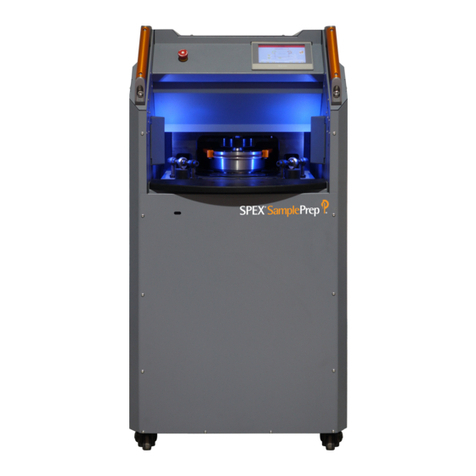
SPEX SamplePrep Genomax 2050 User manual

1300-87072-1A, REV 0 Spex® SamplePrep Page 1 of 26
2050 Genomax®
Automated Tissue and Cell Lyser for Biological Applications
Operations Manual

1300-87072-1A, REV 0 Spex® SamplePrep Page 2 of 26
Copyright 2021 by Spex® SamplePrep LLC
All rights reserved. No part of the work may be reproduced or transmitted in any form or by any
means, electronic or mechanical; including photocopying and recording, except as may be
expressly permitted by the 1976 Copyright Act or in writing from the publisher. Requests for
permission should be addressed in writing to Spex® SamplePrep LLC, 65 Liberty Street,
Metuchen, NJ 08840.

1300-87072-1A, REV 0 Spex® SamplePrep Page 3 of 26
Contents
1.0 INTRODUCTION ........................................................................................................................................ 5
2.0 SPECIFICATIONS...................................................................................................................................... 6
3.0 UNPACKING................................................................................................................................................7
4.0 SETTING UP............................................................................................................................................... 8
4.1 Electrical Connection............................................................................................................................ 8
4.2 Cabinet Set Up...................................................................................................................................... 8
4.3 Installing the #2059 Clamp Base, #2051 Clamp and #2052 Clamp........................................ 8
4.3.1 Installing the #2059 Clamp Base............................................................................................... 9
5.0 TOUCHSCREEN DISPLAY ..................................................................................................................... 10
5.1 Logo Screen .......................................................................................................................................... 10
5.2 User List................................................................................................................................................. 10
5.2.1 Recalling a User ............................................................................................................................ 10
5.2.2 Adding a User................................................................................................................................ 11
5.2.3 Editing a User ................................................................................................................................ 11
5.2.4 Deleting a User.............................................................................................................................. 11
5.3 Control Panel........................................................................................................................................ 12
5.3.1 Starting a Programmed Run ....................................................................................................... 12
5.3.2 Stopping or Pausing a Run ........................................................................................................ 13
5.4 Changing Settings............................................................................................................................... 13
5.5 Saved Protocols................................................................................................................................... 14
5.5.1 Recalling a Protocol ..................................................................................................................... 14
5.5.2 Storing a New Protocol .............................................................................................................. 14
5.5.3 Editing a Protocol......................................................................................................................... 15
5.5.4 Deleting a Protocol...................................................................................................................... 15
5.5.5 Modifying a Recalled Protocol ...................................................................................................... 15
6.0 LOADING THE CLAMP ........................................................................................................................... 15
6.1 Loading the #2051 Multi-Purpose Clamp........................................................................................ 16
6.2 Loading the #2052 Titer Plate Clamp ............................................................................................ 17
6.3 Removing the Sample Vials, Tubes, or Titer Plates..................................................................... 19
7.0 OPERATION .............................................................................................................................................. 19
7.1 Preparing the Titer Plates .................................................................................................................. 20
7.2 Manual Lid Release Latch................................................................................................................. 20

1300-87072-1A, REV 0 Spex® SamplePrep Page 4 of 26
7.3 Running the Genomax ....................................................................................................................... 20
7.4 Safety Recommendations .................................................................................................................. 21
8.0 RUN HISTORY .......................................................................................................................................... 21
8.1 System Settings ................................................................................................................................... 22
8.2 Administrative Lockout Features .................................................................................................... 22
8.2.1 Protocols in Admin Mode........................................................................................................... 22
8.3 Diagnostics........................................................................................................................................... 23
8.3.1 Refresh Data Button .................................................................................................................... 23
8.3.2 View Log Button.......................................................................................................................... 23
8.3.3 Export Button ............................................................................................................................... 23
9.0 ERROR MESSAGES ................................................................................................................................ 24
9.1 Lid Error ................................................................................................................................................. 24
9.2 Rate Error ............................................................................................................................................. 24
10.0 MAINTENANCE ..................................................................................................................................... 24
10.1 Changing the Fuses .......................................................................................................................... 25
11.0 WARRANTY ............................................................................................................................................. 25
11.1 Product Specifications ....................................................................................................................... 26
11.2 To Arrange a Return Shipment ....................................................................................................... 26
12.0 INSTRUMENT DISPOSAL .................................................................................................................... 26
13.0 CONTACT US......................................................................................................................................... 26

1300-87072-1A, REV 0 Spex® SamplePrep Page 5 of 26
PLEASE DO NOT OPERATE THE GENOMAX UNTIL YOU HAVE READ THESE
INSTRUCTIONS AND ARE FAMILIAR WITH ITS CONTROLS AND CLAMP MECHANISM. THE
GENOMAX IS INTENDED FOR USE ONLY BY QUALIFIED AND TRAINED PERSONNEL.
1.0 INTRODUCTION
The 2050 Genomax® is designed to effectively disrupt cellular materials using the Spex
Genomic DNA Isolation Kit for plant or animal tissue by vertically oscillating up to ninety-six
2 mL vials. The unit is supplied with the #2051 Multi-Purpose Clamp for use with vials, tubes,
and jars. The #2052 Titer Plate Clamp is sold separately and is specially designed to hold titer
plates securely to prevent leakage. Genomax features include programmable operating
commands through a series of touchscreen displays, an administrative lockout (passcode)
which allows the lab manager to restrict user access to specific protocols, self-diagnostics,
large observation window, visibility of sample loading area, and clamp orientation to easily
load/unload samples.
Operation is simple. Using the removable #2051 Multi-Purpose Clamp or #2052 Titer Plate
Clamp, vials or titer plates are prepared on the benchtop, secured, then seamlessly loaded in
the Genomax. The controls are checked for the proper running time, stroke rate, number of
cycles, pause time and the RUN button pushed. When the run is complete, the lid is lifted, and
the vials or titer plates can be removed.
The isolation of nucleic acids from intact samples requires mechanically disrupting the samples,
followed by the extraction and subsequent purification of the nucleic acid. Mechanical tissue
disruption is often performed manually with a mortar and pestle, an approach that is not
practical for high-throughput screening since manual grinding of tissues is slow, and re-use of
mortars and pestles may lead to cross-contamination. Alternatively, nucleic acids can be
isolated in a multi-well titer plate, tubes, or vials using balls or beads that mechanically disrupt
the sample. Conventional isolation methodologies can then be used to extract the nucleic acids
from the homogenate.
The DNAmax Isolation Kits (#2401M, #2401MS, #2402P, #2402PT) were optimized with the
motion of the Genomax to prepare sample tissue for extraction of nucleic acid, and other
constituents by agitating the tissue, steel balls or beads, and a lysis agent together in 2 mL
vials.
Sample materials that can be prepared include seeds, stems, roots, leaves, and animal tissue.
Because the unique vertical shaking motion of the Genomax is so strong, many seeds and
other forms of plant tissue can also be pulverized dry in titer plates, jars, tubes, or vials with the
help of one or two grinding balls per well, jar, tube, or vial.

1300-87072-1A, REV 0 Spex® SamplePrep Page 6 of 26
2.0 SPECIFICATIONS
Type of Grinder: Homogenizer, Bead Beater
Display: Touchscreen
Grinding Mechanism: Grinding balls of stainless steel, silica or zirconia ceramic beads.
Dimensions 28 in (71.1 cm) high (40 in, 102 cm with lid open) x 14 in (35.6 cm)
wide x 22.5 in (57.2 cm) deep including handle.
Weight: 100 lb (45.5 kg)
Capacity:
Clamp #2051 – sixteen 50 mL or twenty-four 15 mL centrifuge
tubes, ninety-six 5 mL tubes or ninety-six 2 mL microfuge tubes.
Clamp #2052 – two, four, or six standard 96 deep-well titer
plates.
Dynamic loads > 2 lb can create a rate error.
Clamp Speed: Adjustable range: 500 to 1750 strokes/min.
Clamp Travel: 1.25 in (3.2 cm)
Electrical Specifications: CE approved. 115 V/230 V, 60/50 Hz
Fuse: 3AG 15-amp, 250 V slow-blow fuse for 115 V/60 Hz model.
3AG 10-amp, 250 V slow-blow fuse for 230 V/50 Hz model.
Power Cord:
Do not plug unit into GFCI outlet (Ground Fault Circuit
Interrupter)
115 V/60 Hz model: 3-prong grounded plug supplied.
230 V/50 Hz model: 2-prong European plug supplied.
Safety Features: Lid locks while running. Interlock prevents operation if lid is not
closed. Manual lid release latch on the back of the unit.
Run Timer: Maximum 20 minutes (1 cycle), maximum 10 minutes (2 to 5
cycles).
Motor: 1/2 HP (3-Phase). Maximum speed 3280 rpm.
Maximum power 220 V.
Environment:
For indoor use only at a maximum altitude of 6600 ft (2000 m).
Operate at ambient conditions between 40 °F (5 °C) and 104 °F
(40 °C), with maximum relative humidity 80% below 88 °F (31 °C)
decreasing linearly to 50% at 104 °F (40 °C). Main supply voltage
fluctuations up to 10% of nominal voltage (115- or 230-volts AC
RMS). Pollution degree 1: none or only dry, conductive pollution
occurs.

1300-87072-1A, REV 0 Spex® SamplePrep Page 7 of 26
3.0 UNPACKING
Carefully inspect the exterior of the packing box. Any visible damage should immediately be
reported to the carrier. Remove all packing documents from the exterior of the box and file in
your records. Remove the top of the shipping box, the foam packaging material, and the
Genomax accessories (power cord, titer plates, etc.). Lift the sleeve of the packing box to
remove from the base of the box. Remove the top foam protector with the clamp assembly
inserted. Grasp the Genomax on both sides, using proper lifting techniques, and place it on a
stable bench top (This is a 2-person job). Make sure that there is adequate clearance on the
sides to reach the AC inlet at the rear of the unit and on top when the lid is fully open.
Follow a logical sequence of steps as you inspect the unit (see figures 1 and 2).
1. Inspect the electrical input module for any visible damage.
2. Inspect the cabinet and lid for any visible damage.
3. Ensure that the controller is intact.
4. If the lid is locked, open by pressing and holding the Manual Release Latch on the back
of the unit (at the top left) while lifting the red Lid Handle at the same time.
5. Remove the wooden-plate protector around the shaft inside the unit before attaching
the #2059 Clamp Base (refer to Section 4.3) or turning the unit on.
6. Check the clamp assembly (packed separately). Ensure that it is undamaged.
7. Inspect the accessories and compare with the packing list.
If everything appears to be in proper order, store the packaging materials in case there is a
need to return the unit for service or repair.
Observation
Window
Figure 1 Figure 2
#2059 Clamp Base
Power Button
Lid Handle
Controller
AC Inlet (back of unit)
USB
Manual Lid Release
Latch (back of unit)

1300-87072-1A, REV 0 Spex® SamplePrep Page 8 of 26
4.0 SETTING UP
The 2050 Genomax weighs 100 pounds (45.5 kg). The lid opens from the front with the handle
in the center. The AC Input module, fuse tray, and power cord receptacle are located on the
rear of the Genomax cabinet, toward its bottom. The power (On/Off) button is on the front right,
as shown in Figure 2. The Manual Lid Release Latch is located on the rear of the unit at the top
left. There are gas springs on both sides of the cabinet to control the movement of the lid. The
touchscreen controller is affixed to the front of the unit. Under the front edge of the controller is
an USB port to export run history or upgrade system software (Figure 1).
4.1 Electrical Connection
The detachable power cord should be plugged firmly into its inlet, then into an electrical outlet.
Do not plug unit into a GFCI (Ground Fault Circuit Interrupter) outlet. Make sure that the
electrical outlet is easily accessible in case it becomes necessary to unplug the unit. For 115
V/60 HZ use, a 3-prong outlet fused at 20 amps is recommended. The 230 V/50 HZ power
cord has a standard European 2-prong plug, but modification by the user may be necessary to
meet local electrical codes.
4.2 Cabinet Set Up
To open the cabinet, grasp the red handle and raise the lid to its full upright position. The gas
spring will hold the lid in its open position. To close, grasp the red handle and lower the lid until
it is fully closed.
A safety interlock will engage the Genomax only when the lid is closed. If the RUN button is
touched while the lid is open, the Genomax will not start. The lid stays locked when the unit is
running which prevents the user from opening it during operation. If the locking mechanism
fails and the lid is opened, the motor will immediately stop, and movement of the clamp
assembly will cease.
4.3 Installing the #2059 Clamp Base, #2051 Clamp and #2052 Clamp
The #2051 Multi-Purpose Clamp is used with various vials, tubes, and jars (see Genomax
accessory manual). The #2051 Clamp can also be adapted to hold anything with the same
general dimensions (5 in long x 3 in wide x 2 to 4 in high). This includes racks that hold multiple
individual vials and other possible configurations. The #2052 Titer Plate Clamp can
accommodate a variety of titer plates (up to six). Refer to Section 6.0 Loading the Clamp.
To prevent damage during shipping, the clamp assembly is not installed at the factory. Before
operation, this must be installed by the user. Only use the #2051 Multi-Purpose Clamp or
#2052 Titer Plate Clamp in this unit.

1300-87072-1A, REV 0 Spex® SamplePrep Page 9 of 26
4.3.1 Installing the #2059 Clamp Base
To install the #2059 Clamp Base, first locate the 3/16 in Allen wrench and the two bolts and
lock washers supplied with the Genomax. Open the Genomax lid and place the clamp base on
top of the shaft. Using the lock washers and bolts, secure the clamp base to the shaft with the
Allen wrench (Figure 3).
IMPORTANT: ONLY THE BOLTS AND LOCK WASHERS SUPPLIED WITH THIS CLAMP MUST
BE USED!
Secure clamp base to shaft
using bolts and lock washers
supplied with this clamp
The locking knob
Shaft attached to the
Genomax
Figure 3 – Installing the #2059 Clamp Base

1300-87072-1A, REV 0 Spex® SamplePrep Page 10 of 26
5.0 TOUCHSCREEN DISPLAY
The 2050 Genomax is programmed and operated through a series of touchscreen displays.
Transitioning between screens, and all programming and operating commands, is done by
touching the screen with a fingertip or stylus. Do not use a sharp point as this can damage or
deface the screen.
5.1 Logo Screen
When the power is switched ON at the front of the unit,
“Please wait” appears during start-up as the software
loads. The screen will switch to the Home Screen, as
shown in Figure 4. From the Home Screen the
Username, Control Panel, Saved Protocols, Run History,
and Settings can be accessed by touching the buttons
displayed.
The Home Screen Icon can be found on the Control
Panel positioned at the upper right of the screen.
Touching the Home Icon allows the user to return to the
Home Screen.
5.2 User List
To access the User List screen, touch the Username
button on the Home Screen. An infinite number of users
can be stored. Only 10 user slots are visible at a timeon
the User List screen (Figure 5). To access or make visible
additional users, or vacant spaces, swipe up or down the
touchscreen. This brings up vacant slots on the User List
screen. Touching the Back Arrow button (top left) allows
the user to return to the previous screen.
5.2.1 Recalling a User
In the User List screen, touch the Username to highlight
the name. Then touch the Back Arrow button at the top
left of the screen to send the username to the Control
Panel screen. The username will appear below the Date
and Time at the bottom right of the screen, as shown in
Figure 6.
Figure 4
Figure 5
Figure 6

1300-87072-1A, REV 0 Spex® SamplePrep Page 11 of 26
5.2.2 Adding a User
To add a new user, touch the Add button on the User
List screen (Figure 5) which will bring up the Edit/Add
User screen. Touch inside the box, as shown in Figure 7.
Touching the Back Arrow button (top left) allows the user
to return to the previous screen.
This will bring up the Keyboard screen, a simplified
version of the standard keyboard for a computer. In
addition to number and letter keys, this keyboard has
standard symbol keys (#, %) and four function keys
(SPACE, BACK, DONE, and CLEAR).
The CLEAR key deletes whatever has been entered in the
box. As the letters/numbers are touched, they appear
above the keyboard in the box with a centered cursor. To
access the number and symbol keys touch the 12# button
located bottom left on the Keyboard screen. To switch
back to letter keys, touch the ABC button (same button)
bottom left on the Keyboard screen.
The Up/Down yellow arrow key allows the user to shift back and forth from upper case to lower
case (the default is upper case). Touch the Down arrow to switch to lower case or touch the Up
arrow to revert to upper case.
Touching the SPACE key advances the cursor one space. Touching the BACK key deletes one
space. Touching the DONE key enters the label shown in the box.
Touch the SAVE USER button to save the label shown in the box. The label will appear as the
username in the USER LIST screen (Figure 5). The CANCEL key does not change anything on
the screen, except returns the display to the USER LIST screen.
5.2.3 Editing a User
To edit a saved user, touch the Username to highlight the name on the User List screen (Figure
5). Then touch the EDIT User button. From the Edit/Add User screen change the name by
touching inside the box. This will bring up the KEYBOARD screen, follow the instructions listed
in the Add a User Section 5.2.2. Note: Changes cannot be made to the Guest field.
5.2.4 Deleting a User
To delete a saved user, touch the Username to highlight the name on the User List screen
(Figure 5). Then touch the Delete button. A pop-up window opens confirming to delete this
user. Touch YES to delete name or touch NO to retain the username.
Touch inside the box
Figure 7
Touch inside the box

1300-87072-1A, REV 0 Spex® SamplePrep Page 12 of 26
5.3 Control Panel
The Control Panel displays the programmed run
parameters; Date, Time and Username at the bottom
right of the screen; and Protocol name at the bottom
center of the screen, as shown in Figure 8. Changes to
the run settings are made from this screen.
To recall stored run protocols, touch the Store/Recall
button located at the bottom right of the screen. (See
section 5.5 for more information on Saved Protocols.)
The following sequence of events will occur from the
current settings in Figure 8.
1. Cycle 1 - the unit runs for 2 minutes at a rate of 1000 strokes per minute.
2. Pause - the unit is inactive for 30 seconds allowing the samples to undergo lysis.
3. Cycle 2 - the unit runs for another 2 minutes at a rate of 1000 strokes per minute.
In the CONTROL PANEL, The STATUS BAR (top of screen) counts down the time remaining for
a run (Figure 9).
To change the settings of a selected field, press the arrow buttons on the CONTROL PANEL
screen. The left arrow buttons decrease the number displayed and the right arrow buttons
increase the number displayed.
5.3.1 Starting a Programmed Run
To run the program displayed on the CONTROL PANEL
screen, touch the Run button. The Genomax can be
started, stopped, or paused in the middle of a grinding
program from the button selections to the right of the
screen.
During the RUN TIME stage, the TIME REMAINING
line counts down the time for the programmed run in
1-second increments. To pause the program, touch the
Pause button. To continue the program, touch the
Resume button. To abort the program, touch the Stop
button.
To start a new program, touch the Run button.
The RUN TIME line will display the time remaining in that cycle of the grinding stage. If there
are 2 total grinding periods, the CYCLES line will countdown to “0”. The maximum number of
cycles is 5.
Figure 8
Figure 9

1300-87072-1A, REV 0 Spex® SamplePrep Page 13 of 26
5.3.2 Stopping or Pausing a Run
To stop a program, touch the Stop button on the RUN SCREEN (Figure 9), the button will dim or
turn a muted red and the program will end. If the Run button is touched after the program has
stopped then the entire program will start over.
To pause during a grinding program, touch the Pause button. Note: The TIME REMANING line
will turn yellow which indicates run time is inactive. The run will hold the settings at that
moment (elapsed time, cycle, etc.). At this point the door to the sample area can be opened. To
resume the program, touch the Resume button. This will restart the program at the point at
which it was paused. Alternatively, pressing Stop will end the program.
5.4 Changing Settings
To change parameters (run time, pause time, cycles, and
rate), touch the arrow buttons on the CONTROL PANEL
screen. Touching the plus symbol increases the
parameter, while touching the minus symbol decreases
the parameter. Tap or hold the right or left arrow buttons
until the desired number is reached. The changes will
appear in the blue area between the arrows, as shown
in Figure 10. The maximum run time is 20 minutes for
1 cycle. If running 2 to 5 cycles the maximum run time
per cycles is 10 minutes. The minimum Rest is 15
seconds per cycle for 2 to 5 cycles. To run a program
with the new settings, touch the Run button.
NOTE: If the run parameters are changed to a Protocol
and not saved then (MOD) will appear to the right of
the Protocol name at the bottom center of the screen.
Home Screen Icon
Store and
Recall
Protocols
Figure 10

1300-87072-1A, REV 0 Spex® SamplePrep Page 14 of 26
5.5 Saved Protocols
The SAVED PROTOCOLS screen is shown in Figure 11. In this example, four saved protocols
have been stored and named (2401M Animal, 2401MS Animal Stbl, 2402P Plant, 2402PT Plant
Tough). The four saved protocols have been preprogrammed to be used with the Spex
Genomic DNA isolation kits for animal and plant tissue.
DNAmax Kit Product Number Description
#2401M DNA Isolation Kit for Animal Tissue
#2401MS DNA Isolation Kit with Stabilization Buffer for Animal Tissue
#2402P
DNA Isolation Kit for Soft Plant Tissue
#2402PT
DNA Isolation Kit for Tough Plant Tissue
Up to 500 Protocols can be saved for simple and fast
recall, increasing productivity and reducing operator
error. Only 20 protocols are visible at a time on the
Saved Protocols screen. To view additional protocols or
vacant protocol spaces, swipe up or down on the
touchscreen. This brings up vacant protocol slots on the
SAVED PROTOCOLS Screen.
A saved protocol retains the settings for number of
cycles, run time, pause time between cycles, and rate.
At the top left on the Saved Protocols Screen is the
Back Arrow button. Touching the Back Arrow button
returns the user to the previous screen.
5.5.1 Recalling a Protocol
To recall a stored program, touch the Store/Recall button on the Control Panel screen (Figure
10). In the SAVED PROTOCOLS screen, select the protocol to highlight the box. Then touch
SELECT to send protocol to the CONTROL PANEL screen (Figure 11).
5.5.2 Storing a New Protocol
To store program, touch the Store/Recall button on the
Control Panel screen (Figure 10). In the SAVED
PROTOCOLS screen, touch the Add button, as shown in
Figure 11.
This will bring up the KEYBOARD screen, a simplified
version of the standard keyboard for a computer.
The CLEAR key deletes whatever has been entered in
the Label Box.
Touching the DONE key enters the label shown in the box.
Figure 11
Touch inside the box

1300-87072-1A, REV 0 Spex® SamplePrep Page 15 of 26
Touch the SAVE button to save the label shown in the Box. The label will appear as the name
of the program in the SAVED PROTOCOLS Screen (Figure 11).
The CANCEL key does not change anything on the screen, except returns the display to the
SAVED PROTOCOLS Screen.
To run the newly saved protocol, touch the protocol to highlight the box. Then touch Select to
send the protocol to the CONTROL PANEL screen. Review the parameters and touch the Run
button to initiate the protocol.
5.5.3 Editing a Protocol
To edit a saved protocol, touch the protocol name to
highlight the box on the Saved Protocol screen (Figure
11). Then touch the Edit button. From the Edit Protocol
screen, change the name by touching inside the box.
This will bring up the KEYBOARD screen, follow the
instructions listed in the Storing a Protocol Section 5.5.2.
5.5.4 Deleting a Protocol
To delete a saved protocol, touch the protocol name
to highlight the name on the Saved Protocols screen
(Figure 11). Then touch the Delete button. A pop-up
window opens confirming to delete this protocol. Touch
YES to delete or touch NO to keep the saved protocol.
5.5.5 Modifying a Recalled Protocol
Once a saved protocol is recalled to the CONTROL
PANEL screen, the user can modify the parameters by
using the left and right arrows. If the protocol is
modified, (MOD) will appear next to the protocol name,
e.g. TISSUE (MOD).
6.0 LOADING THE CLAMP
This warning symbol is visible in front of the clamp assembly. It is
essential that samples are securely locked into the sample holder
(clamp assembly) before operation.
The clamp is the most critical component of the Genomax, as it
must be screwed down tightly to hold the titer plates (or vials,
centrifuge tubes, etc.) firmly in place. The up-and-down motion of the clamp is extremely
vigorous. Sample holders (titer plates, vials, centrifuge tubes, etc.) must be held securely in the
clamp during operation to prevent damage and leakage.
Touch inside the Label
Box to change name
Figure 12
Figure 13
Lock Clamp onto
#2059 Clamp Base

1300-87072-1A, REV 0 Spex® SamplePrep Page 16 of 26
6.1 Loading the #2051 Multi-Purpose Clamp
Note: The #2059 Clamp Base must be attached to the Genomax before placing the #2051
Multi-Purpose Clamp in the unit. (Section 4.3.1)
1. Place the sample vials (in the appropriate holder or cryo-block) in the #2051 Clamp. The
sample load must be evenly distributed at all sides of the clamp to avoid excess wear to
the Genomax. In addition, the clamp lid must have a flat surface upon which to rest. If
running less than a full holder of vials, be sure to place vials at the 4 corners to support
the clamp lid.
2. Slide the #2051 Clamp lid onto the vertical threaded rod through the cutout channel and
the upright at the back of the clamp.
3. Turn the locking nut clockwise until finger tight. Check to see whether the vials can be
moved from side to side in the clamp. If not, the clamp is tight and samples are secure.
If the vials can be moved, tighten the locking nut (with the tool) gradually until the vials
are secure.
4. Insert the #2051 Clamp onto the #2059 Clamp Base and lock in place by turning
locking knob clockwise to the ON position. (To remove the clamp, turn the locking knob
counterclockwise to the OFF position and lift from the #2059 Clamp Base.)
Tip: the #2051 Clamp can also be locked into the #2059 Clamp Base prior to placing
sample vials in the #2051 Clamp.
5. Close the Genomax lid and run the unit.
#2059 Clamp Base
Locking Knob
#2051 Clamp Lid
Locked
Unlocked
Figure 14

1300-87072-1A, REV 0 Spex® SamplePrep Page 17 of 26
6.2 Loading the #2052 Titer Plate Clamp
Titer plates are made by many companies and are sealed in various ways. The Genomax is
designed for use with titer plates. Spex #2205-50 Titer Plates and #2206-50 Caps are
reinforced to withstand with rigorous bead beating and have been tested not to leak when
properly sealed in the #2052 Clamp.
1. A minimum of two titer plates must be run as the clamp lid requires a level surface upon
which to rest. If running a set of 2 titer plates, simply place one plate on either side of
the #2052 clamp. The titer plates fit snug in the clamp recess.
2. Titer plates can also be stacked in the clamp to increase throughput. A maximum of
6 deep-well plates can be run in the #2052 clamp, stacked three high on either side of
the clamp.
3. When stacking titer plates, it is necessary to use the #2052T nesting trays. These
provide a rigid surface on the top of the plate to prevent the grinding balls from
perforating a film if used to seal the plate. The nesting trays must also be used if plates
are sealed with cap mats as these hold the cap mats securely in place and prevent
leakage from the plate wells. Note: When stacking 4 or 6 titer plates, do not add more
than five 4 mm steel balls to a single titer plate well.
#2052T Nesting
Tray
#2052T Nesting Trays

1300-87072-1A, REV 0 Spex® SamplePrep Page 18 of 26
4. The #2052T nesting tray set consists of four trays that have a recess on both sides
for the bottom of titer plate and the top of the titer plate (cap mat).
A rubber membrane is placed on top of each titer plate to provide
better sealing.
5. Slide the #2052 clamp lid onto the vertical threaded rod through
the lid cutout channel and the upright at the back of the clamp.
6. Turn the locking nut clockwise until finger tight.
7. Insert the #2051 Clamp onto the #2059 Clamp Base and lock in
place by pushing inwards then turning the locking knob clockwise to the ON position.
8. Then use the clamp tightening tool (#2052R) to further
tighten the locking nut.
9. Close the Genomax lid and run the unit.
NOTE: Never run the Genomax without the #2051 Clamp or #2052 Clamp screw-tightened or
with titer plates held loosely in the clamp. Use the clamp tool to ensure the lid is tight and
secure to prevent leakage. When processing samples in only one titer plate, load an empty titer
plate on the other half of the clamp assembly. Similarly, if less than a full rack of vials is used,
be sure to place an equal number of vials on each side of the clamp to ensure that the load is
balanced and tightly clamped. Empty vials can be used as place holders if an uneven number
of samples are run.
With locking knob in OFF
position, pull outwards
and lower clamp.

1300-87072-1A, REV 0 Spex® SamplePrep Page 19 of 26
6.3 Removing the Sample Vials, Tubes, or Titer Plates
1. When the Genomax comes to a complete stop, open the lid by grasping the red handle
and lift upwards.
2. It is not necessary to remove the clamp mechanism entirely. The #2051 or #2052 Clamp
can remain attached to the #2059 Clamp Base so that only the clamp lid is removed
allowing sample vials and titer plates to be easily accessed.
a. Tip: To remove the #2051 or #2052 Clamp, turn the locking knob
counterclockwise to the OFF position and lift the clamp from the #2059 Clamp
Base.
3. Turn the clamp locking knob counterclockwise until it rotates freely. (If needed, use the
clamp tool to loosen.)
NOTE: To maintain proper functionality of the Genomax, the maximum recommended total
sample load in the clamp assembly is 4 lb (1.8 kg). The total sample load includes sample, vials
(or titer plates), grinding media, holders (or cryo-blocks), and nesting trays. For sample loads
exceeding 2 lb (0.9 kg), the maximum recommended operating rate is 1500 rpm. Sample loads
less than 2 lb can be run at rates up to the maximum of 1750 rpm. Dynamic loads greater than
2 lb can create a rate error. When stacking 4 or 6 titer plates, do not add more than five 4 mm
steel balls to a single titer plate well.
Operating with loads that exceed the recommended maximum rate and weight limits can result
in damage to the Genomax. Therefore, warranty restrictions or invalidation may apply.
7.0 OPERATION
Before operating the Genomax, make sure it is plugged in and turned on. The power cord inlet
is located on the rear of the cabinet. The On/Off button is located on the face of the unit to the
right of the red handle.
The following steps outline a standard operating cycle:
1. Load and seal the titer plates, or load and cap the sample vials.
2. Clamp the titer plates or vials in place, using nesting trays as needed, or vial holders.
3. Close and secure (lock) the lid.
4. Set the timer.
5. Set the number of cycles.
6. Set the pause time.
7. Set the clamp stroke rate.
8. Press the green RUN button to start a run.
9. When the run is complete, lift the lid.
10. Unclamp the titer plates or vials.

1300-87072-1A, REV 0 Spex® SamplePrep Page 20 of 26
7.1 Preparing the Titer Plates
While the precise details are left to the individual user, each well in the titer plate can be
loaded with a seed, plant tissue, or other sample, and an eluent, solvent, etc. If it is necessary
to disrupt the sample, a grinding media is typically added first. The #2100 Grinding Ball
Dispenser available for the Genomax will deposit one 5/32 in (4 mm) steel ball layer in each
well of the titer plate. Dry grinding may require a second ball in each well, possibly sandwiching
the sample between them during grinding. When stacking 4 or 6 titer plates, do not add more
than five 4 mm steel balls to a single titer plate well. Dynamic loads greater than 2 lb can
create a rate error.
To use the #2100 Grinding Ball Dispenser, fill the tray with more than enough steel balls to
cover the bottom, and shake it gently until a steel ball falls into every hole. Then place the
dispenser over an empty titer plate and push in the slide, releasing the balls caught in the slide.
Set the dispenser aside and check that a ball is in each well of the titer plate.
Sealing the loaded titer plate is a matter of choice, which can vary with the brand of titer plate
and the necessity of sealing a fluid in each well. Some manufacturers of titer plates make
sealing systems; many technicians have also developed other methods for plugging the top of
each well. Users must decide for themselves which method is most effective. What matters
most is that the contents of one well do not contaminate the sample in an adjacent well.
NOTE: Because the action of the Genomax is so energetic and efficient, run times are short,
typically 2 minutes or less. When developing a procedure, always start with a short running
time and increase it only if needed.
7.2 Manual Lid Release Latch
To open the cabinet if the power to the Genomax fails, press and hold the metallic button on
the back of the unit (at the top left) while lifting the red Lid Handle at the same time.
7.3 Running the Genomax
Press the green RUN button to initiate a programmed
run. The screen will display a countdown of the time
remaining in a run, as shown in Figure 9. The Genomax
will stop automatically at the end of the run. When the
grinding program has ended, the screen will display
RUN COMPLETE, as shown in Figure 15. Touch the
screen to return to the Control Panel.
To stop the Genomax during a run, press the red STOP
button on the screen. Operation will cease and the timer
will reset.
Figure 15
Table of contents
Other SPEX SamplePrep Laboratory Equipment manuals
Popular Laboratory Equipment manuals by other brands

Metrohm
Metrohm Titrando 851 manual

Beckman Coulter
Beckman Coulter CytoFLEX Series Instructions for use

Panasonic
Panasonic NU-MX100P operating instructions

PBS Biotech
PBS Biotech PBS 0.1 MAG user manual

Waters
Waters Xevo G2 QTof Operator's, overview and maintenance guide

Agilent Technologies
Agilent Technologies ESG series User and Programming Guide