Sportop E80 Operation manual
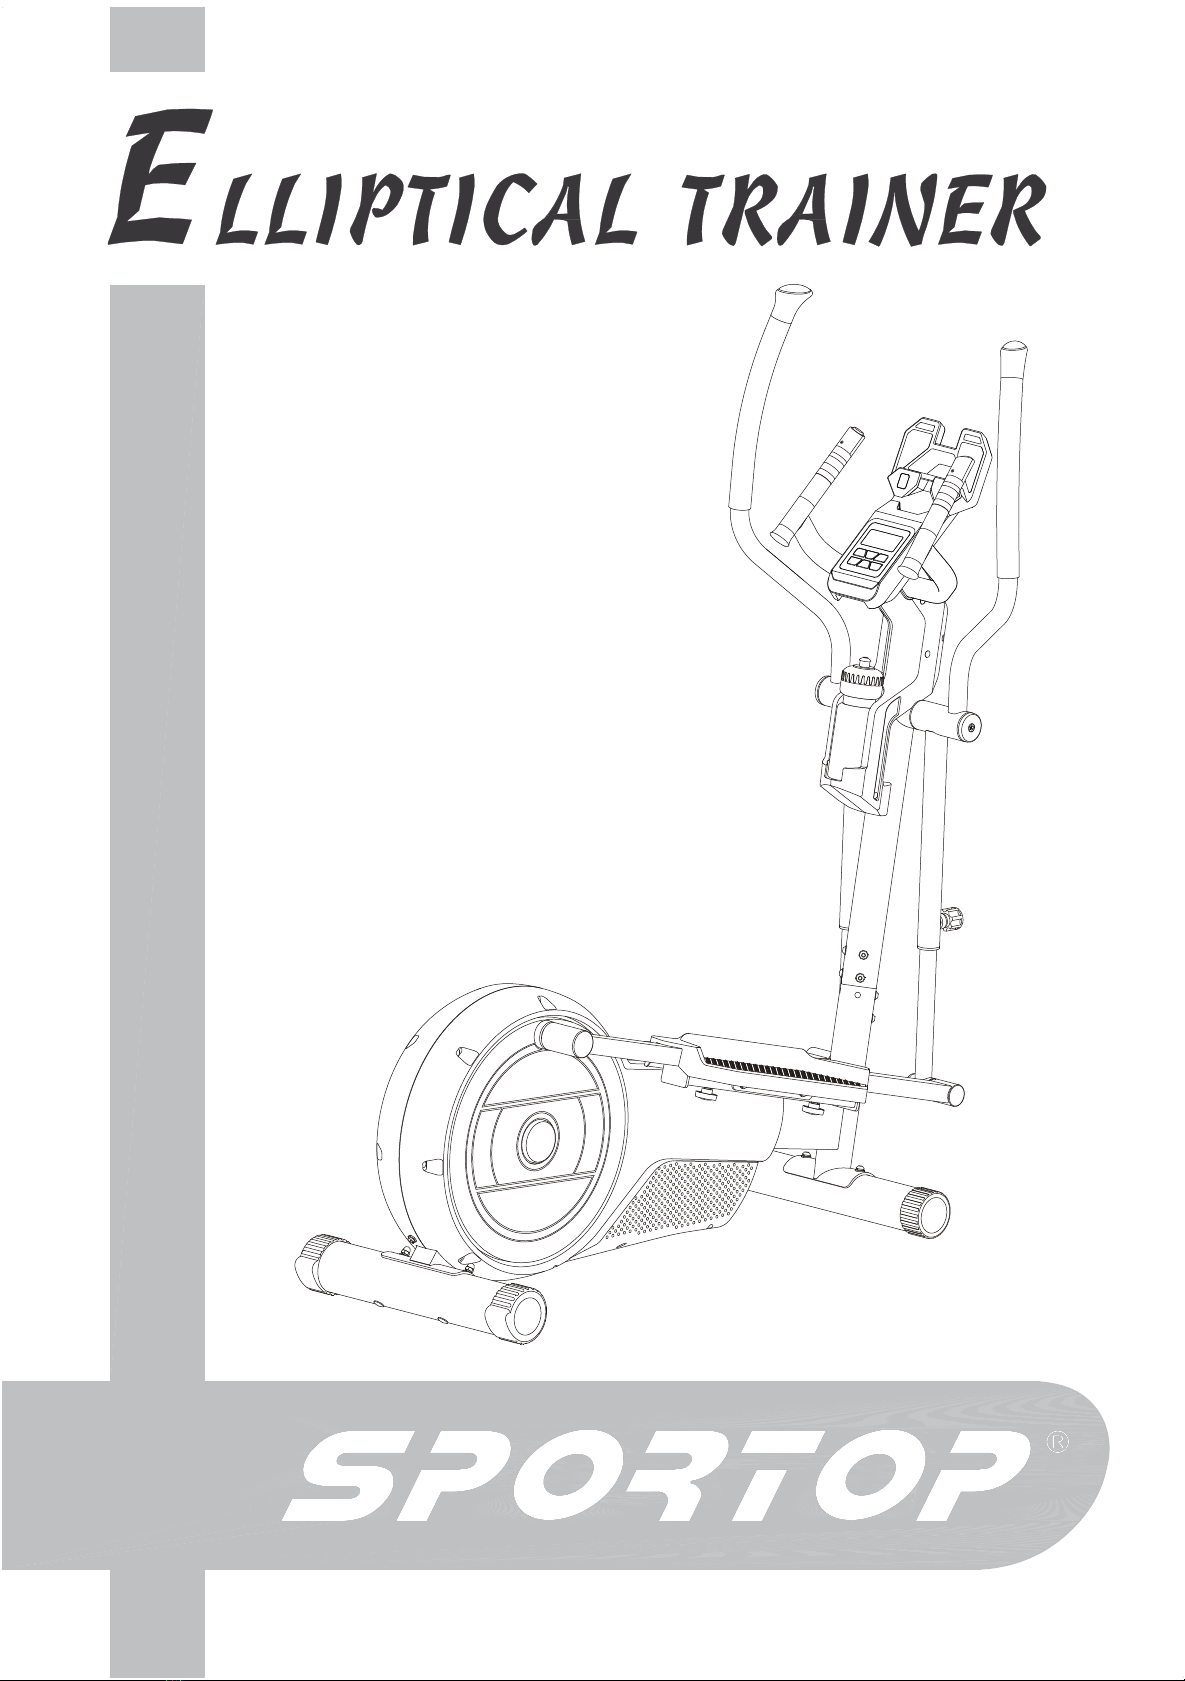
E80
Owner’s Operating Manual ENGLISH
MODEL :
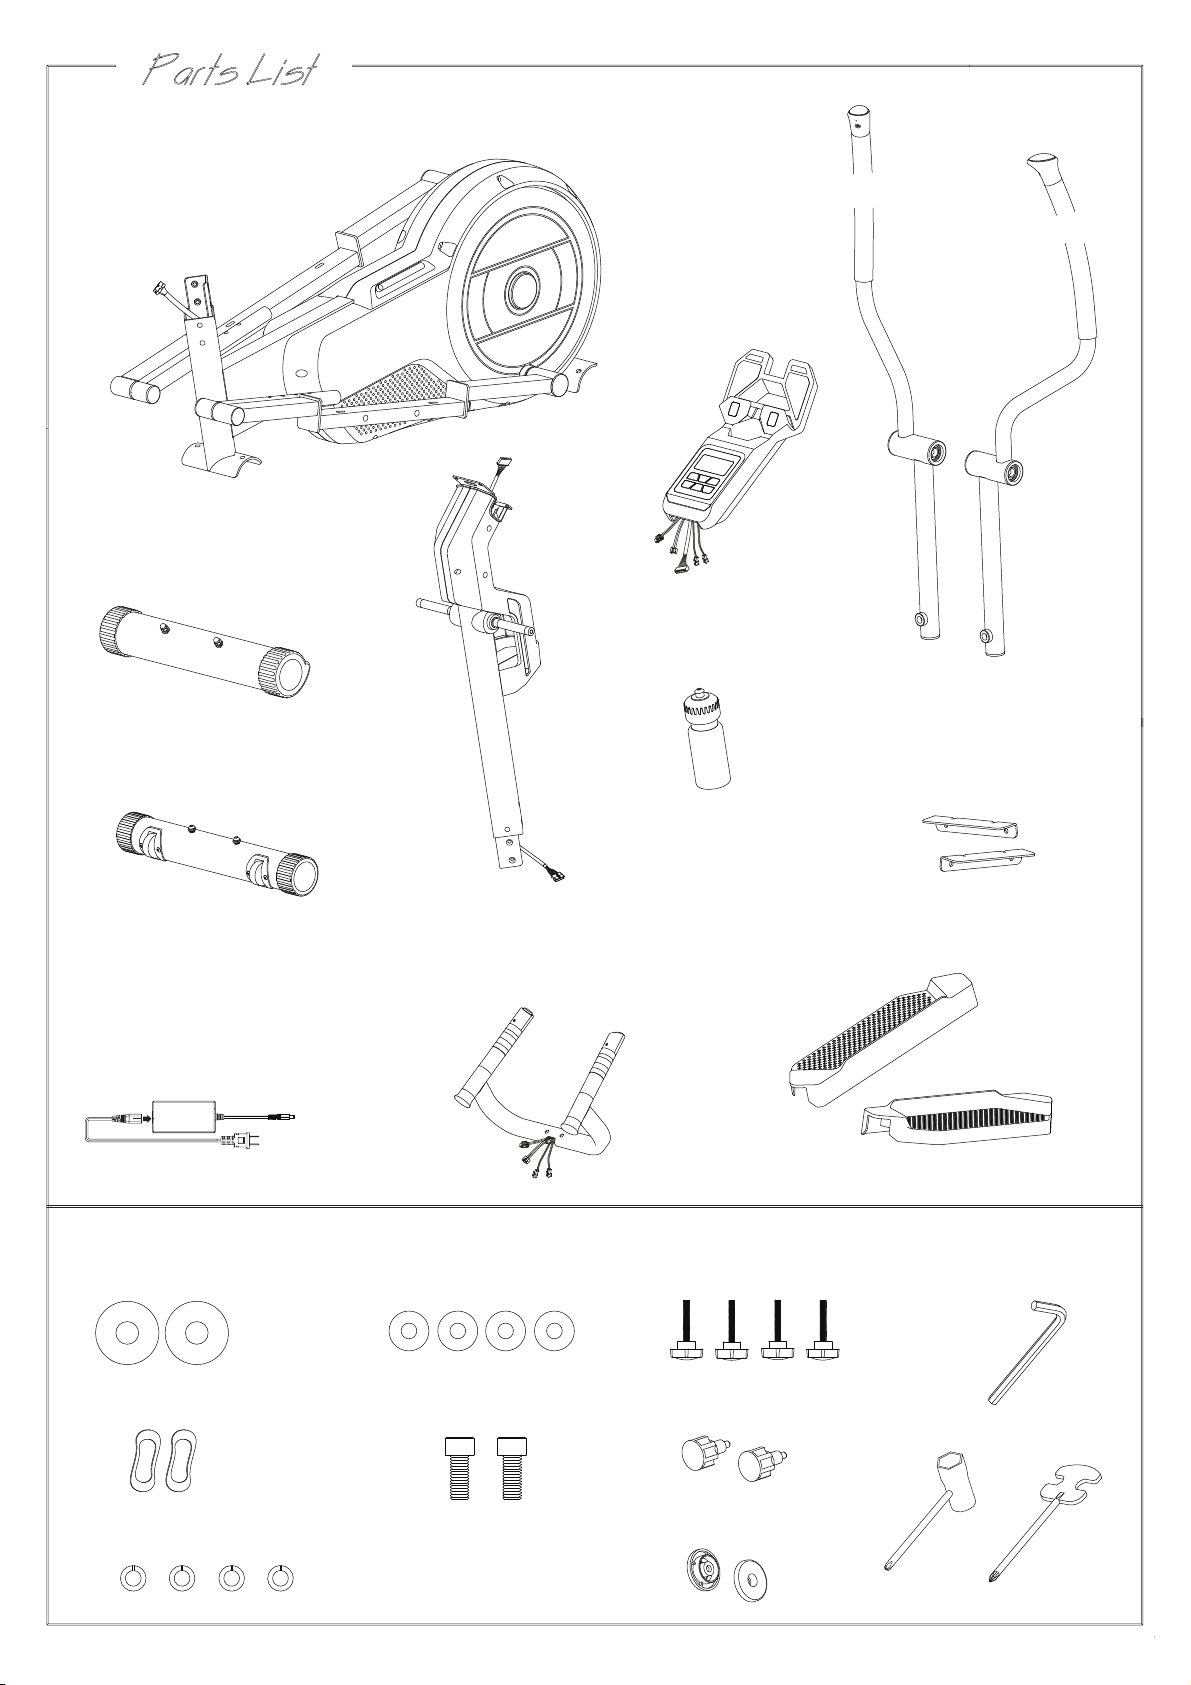
Main frame
A
DFront stabilizer
Rear stabilizer
C
Central supporting
tube
B
E1 Handle bar (L)
E
Console
G
Small handle barF
Adaptor
I
E2 Handle bar (R)
PedalH
)4E( bonK
)1H( bonK
J
Reinforcing plate
(A54)
Tool
(N1) End cap
Water bottleK
(N2) Screw M8x20L
(J7) Washer M8
(J8) Wave washer D17
(J10) Spring washer M6
(J11) Washer M6
1

ASSEMBLY FOR REAR STABILIZER
ASSEMBLY FOR CENTRAL SUPPORTING TUBE
First, remove the nuts(J1), spring washers(J2), washers(J3)and screws(J17)
from the rear stabilizer(C).
Mount the rear stabilizer(C) to attach to the bracket at the back of the main frame(A).
Then, secure it with nuts(J1), spring washers(J2), washers(J3)and screws(J17).
Step1. First, remove the screws(J4), washers(J5) and spring washers(J15)
from the main frame(A).
Step2. Connect the sensor wire(L1) with the sensor wire(L2).Then,assemble
the central supporting tube(B) onto the main frame(A) with the screws(J4),
, washers(J5) and spring washers(J15).
NOTE: When pushing the tubes together make sure not to
pinch the cable!
J17
J3
J2
J1
C
J3
J2
J1 A
A
J4
J5
B
J4
J5
L1
L2
Use tool :
Use tool :
J15
J15
2
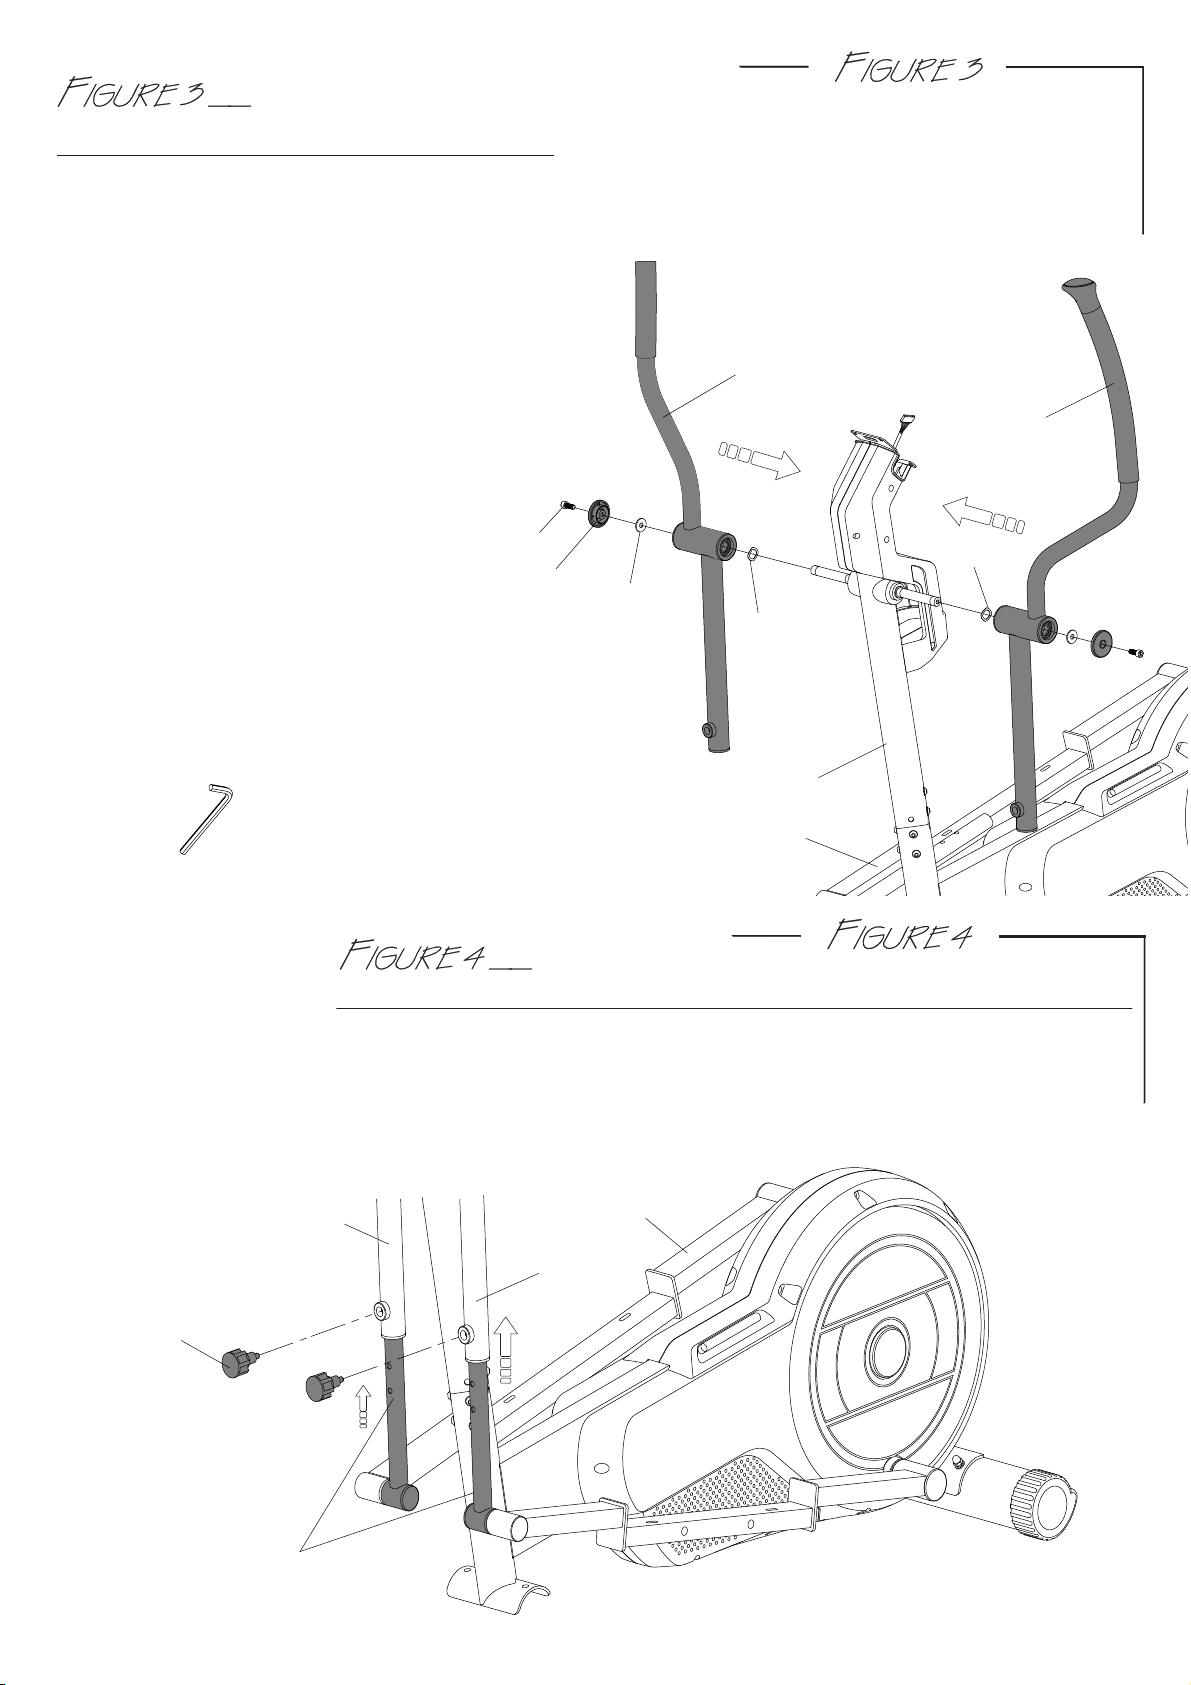
ASSEMBLY FOR SIDE HANDLE BAR
Step1. Put the wave washers(J8) into the axle on the central supporting tube(B) both side first.
Step2. Put the right side handle bar(E2) into the axle and secure it by the washer(J7),
end cap (N1), and screw(N2).
Step3. The left side handle bar(E1) assembly
is the same as the right side.
A
B
E1
E2
J8
J8
J7
CONNECT THE PEDAL TUBE WITH THE SIDE HANDLE BAR
Pull up the pedal connect tube and turn the Knob(E4) into the hole on the side handle
bar(E1&E2). Adjust the suitable position which 4 holes are available when loosing the
pop-pin.
Attention: Please make sure the knob(E4) is turning tightly after choosing the position to
avoid user falling down.
A
E4
Pedal Connect Tube
E1
E2
Use tool :
N1
N2
3
J9
J2
J3
D
A
J9
J2
J3
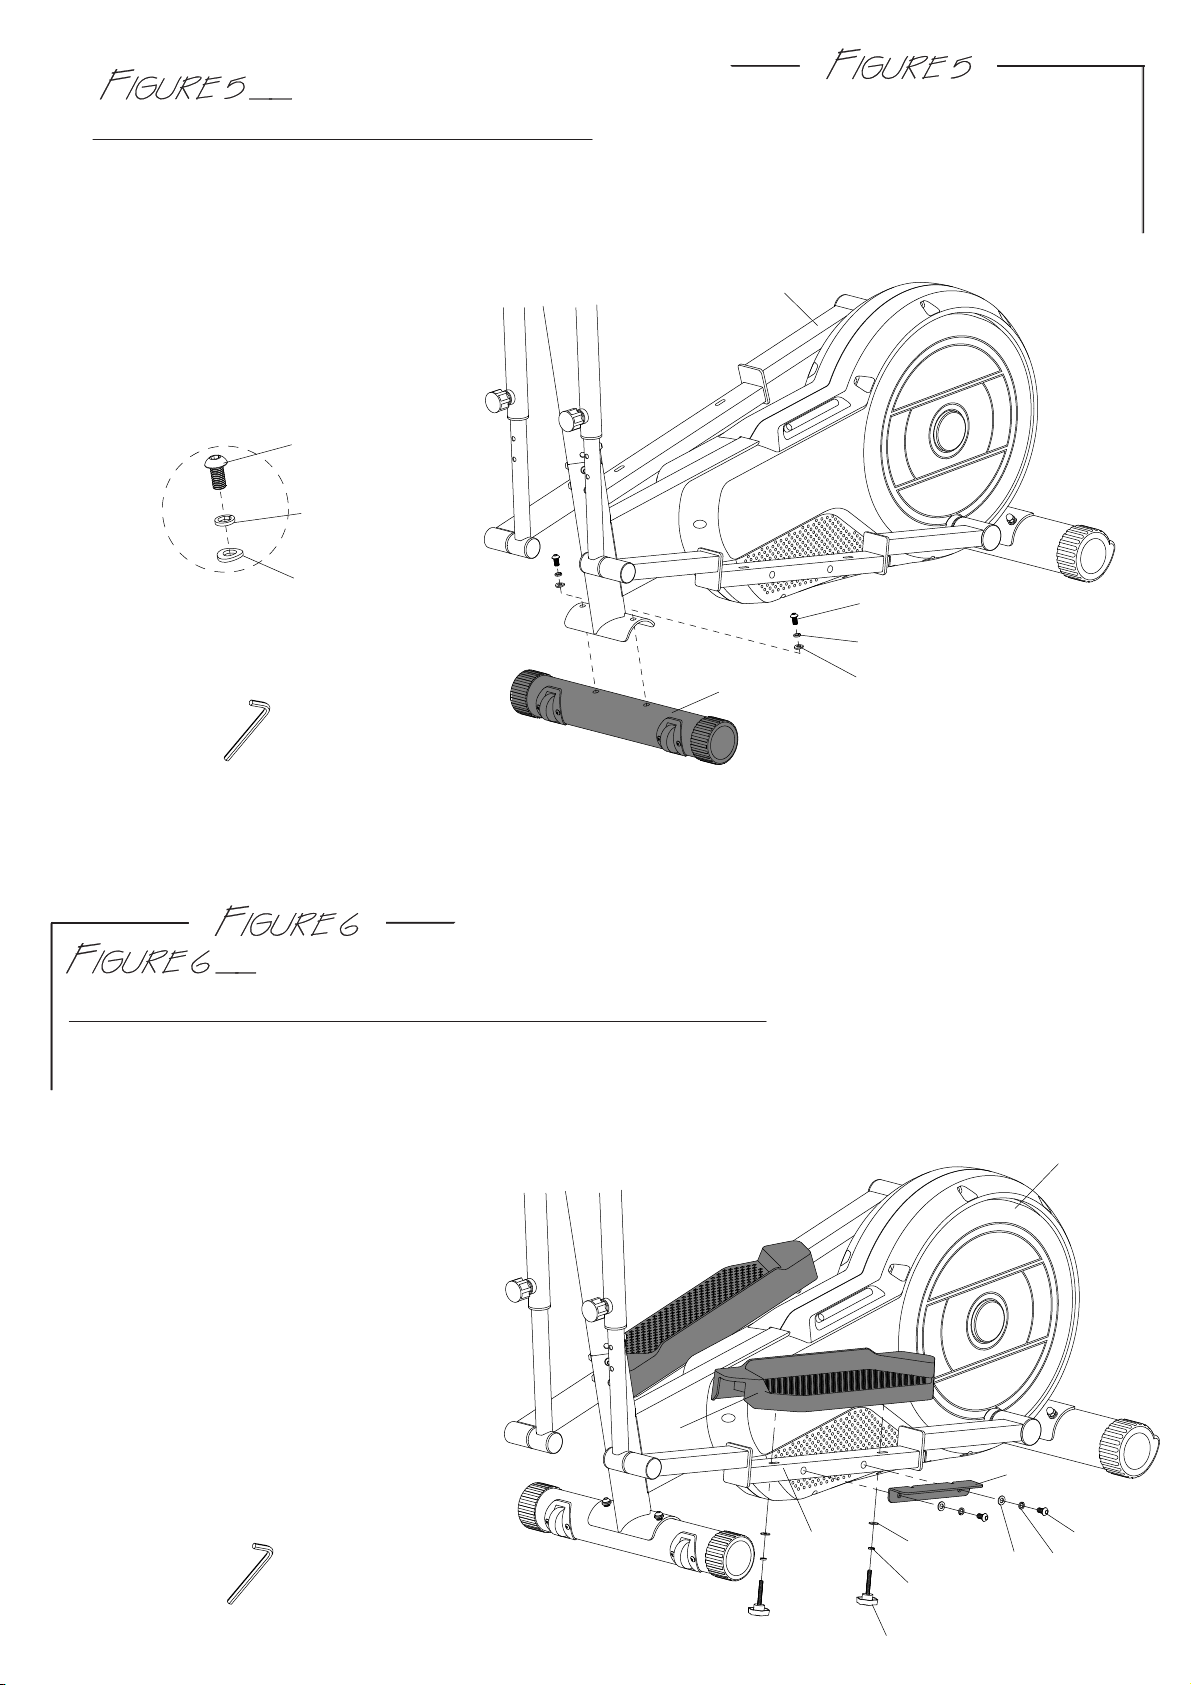
ASSEMBLY FOR FRONT STABILIZER
First, remove the screws(J9), spring washers(J2) and washers(J3) from the front stabilizer(D).
Mount the front stabilizer(D) to attach to the bracket at the front of the main frame(A).
Then, secure it with screws(J9), spring washers(J2) and washers(J3).
Use tool :
ASSEMBLY FOR REINFORCING PLATE AND PEDAL
Step2. Assemble the reinforcing plate(A54) with screws(J9), spring washers(J2), washers(J5).
Step3. Assemble the pedal(H) with knobs(H1), spring washers(J10), washers(J11).
Repeat again to finish other side assemble.
J9
J2
J5
A54
H1
J10
J11
H
A
Step1. First, remove the screws(J9), spring washers(J2), washers(J5) from the pedal tube-L (A49).
A49
Use tool :
4

ASSEMBLY FOR SMALL HANDLE BAR
Note : Do not pinch the sensor wire when assembling
Step1. Remove the preinstalled washers(J13) and nuts(J14) from
the central supporting tube(B).
Step2. Put the small handle bar(F) on the central supporting tube(B),
Step3. Assembly the small handle bar(F) with washers(J13) and
nuts(J14).
B
J13
J14
F
Note!
ASSEMBLY FOR CONSOLE
Step2. Connect the sensor wires(L2, L3, L4, L5) with console wires
and put the console on the fixing plate.
Step3. Assembly the console with screws(G1).
Note: Do not pinch the sensor wire when assembling.
Step1. Remove the preinstalled screws(G1) from the console(G).
NOTE:
if the machine dose not sit level, you
can use the two adjustable end
caps(C2&C3) to compensate for uneven
floors.
G
G1
L2
L3
L4
L5
C2 C3
Use tool :
Use tool :
5

INSTALL THE WATER BOTTLE
HOW TO MOVE THE MACHINE
The front stabilizer has built-in transport wheels.
To move the machine, stand at the front and lift it up until the weight of the machine is
transferred to the transport wheels.
You can now easily move the machine to a new location.
Put the water bottle (K) on the main frame (A).
K
A
6
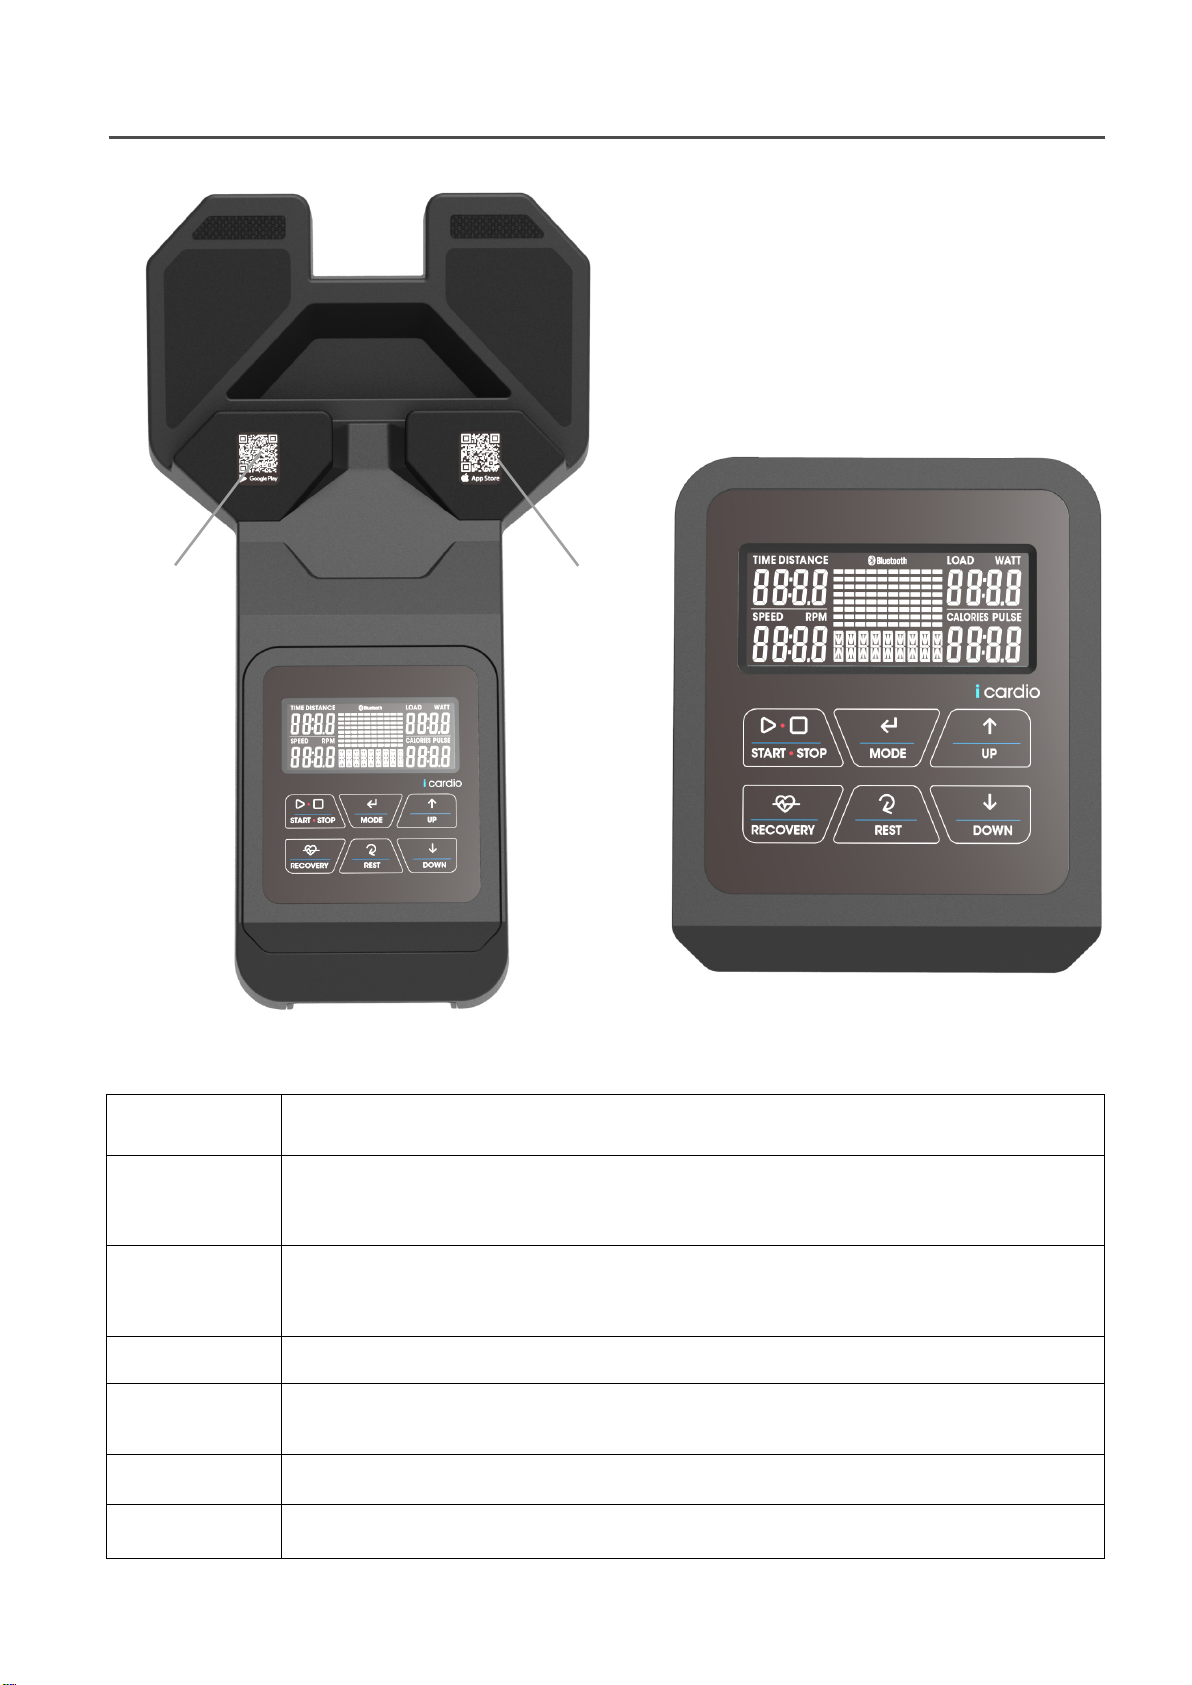
IOS
QR CODE
ANDROID
QR CODE
Console Dlsplay
LCD Display
Button’s function
Function Function description
UP (+)
· Adjust value by increasing the value, e.g.: LOAD/WATT/TIME
· Setting selection
DOWN(-) · Adjust value by decreasing the value, e.g.: LOAD/WATT/TIME
· Setting selection
MODE · Conrm setting or selection.
RESET ·Press and hold for 2 seconds, console will reboot
· Reverse to main menu during pause mode.
START/STOP · Start or Stop workout.
RECOVERY · Test heart rate recovery status.
7

Function
Function description
· SPEED
· RPM
· TIME
· DISTANCE
Display Function
· CALORIES
· WATT
· PULSE
· U1~U4
·
·
· MANUAL
·
· WATTS
·
· H.R.C
·
· USER
·
· PROGRAM
·
· Resistance
Display
range
·
1~16.
·
·
OPERATION PROCEDURE
POWER ON
Plug
1.
2.
in power supply(or press and hold RESET KEY for 2 seconds), console will power on and display
all segments on LCD for 2 seconds (Drawing 1).
Drawing 1 Drawing 2
LCD will display Wheel diameter and Metric (KM or ML) for 1 second (Drawing 2), the resistance
returns to LOAD=1.
·
Display current training speed.
·
Display range 0.0 ~ 99.9.
·
Display the Rotation Per Minute.
·
Display range 0 ~ 999.
·
Display time.
·
Display range 0:00 ~ 99:59
·
Display accumulates total distance
·
Display range 0.0 ~ 99.9
·
Display accumulates calories consumption during training
·
Display range 0 ~ 9999.
·
Display current workout watts.
·
Display range 0~999.
·
Display user’s pulse.
·
Display
range0-30~230.
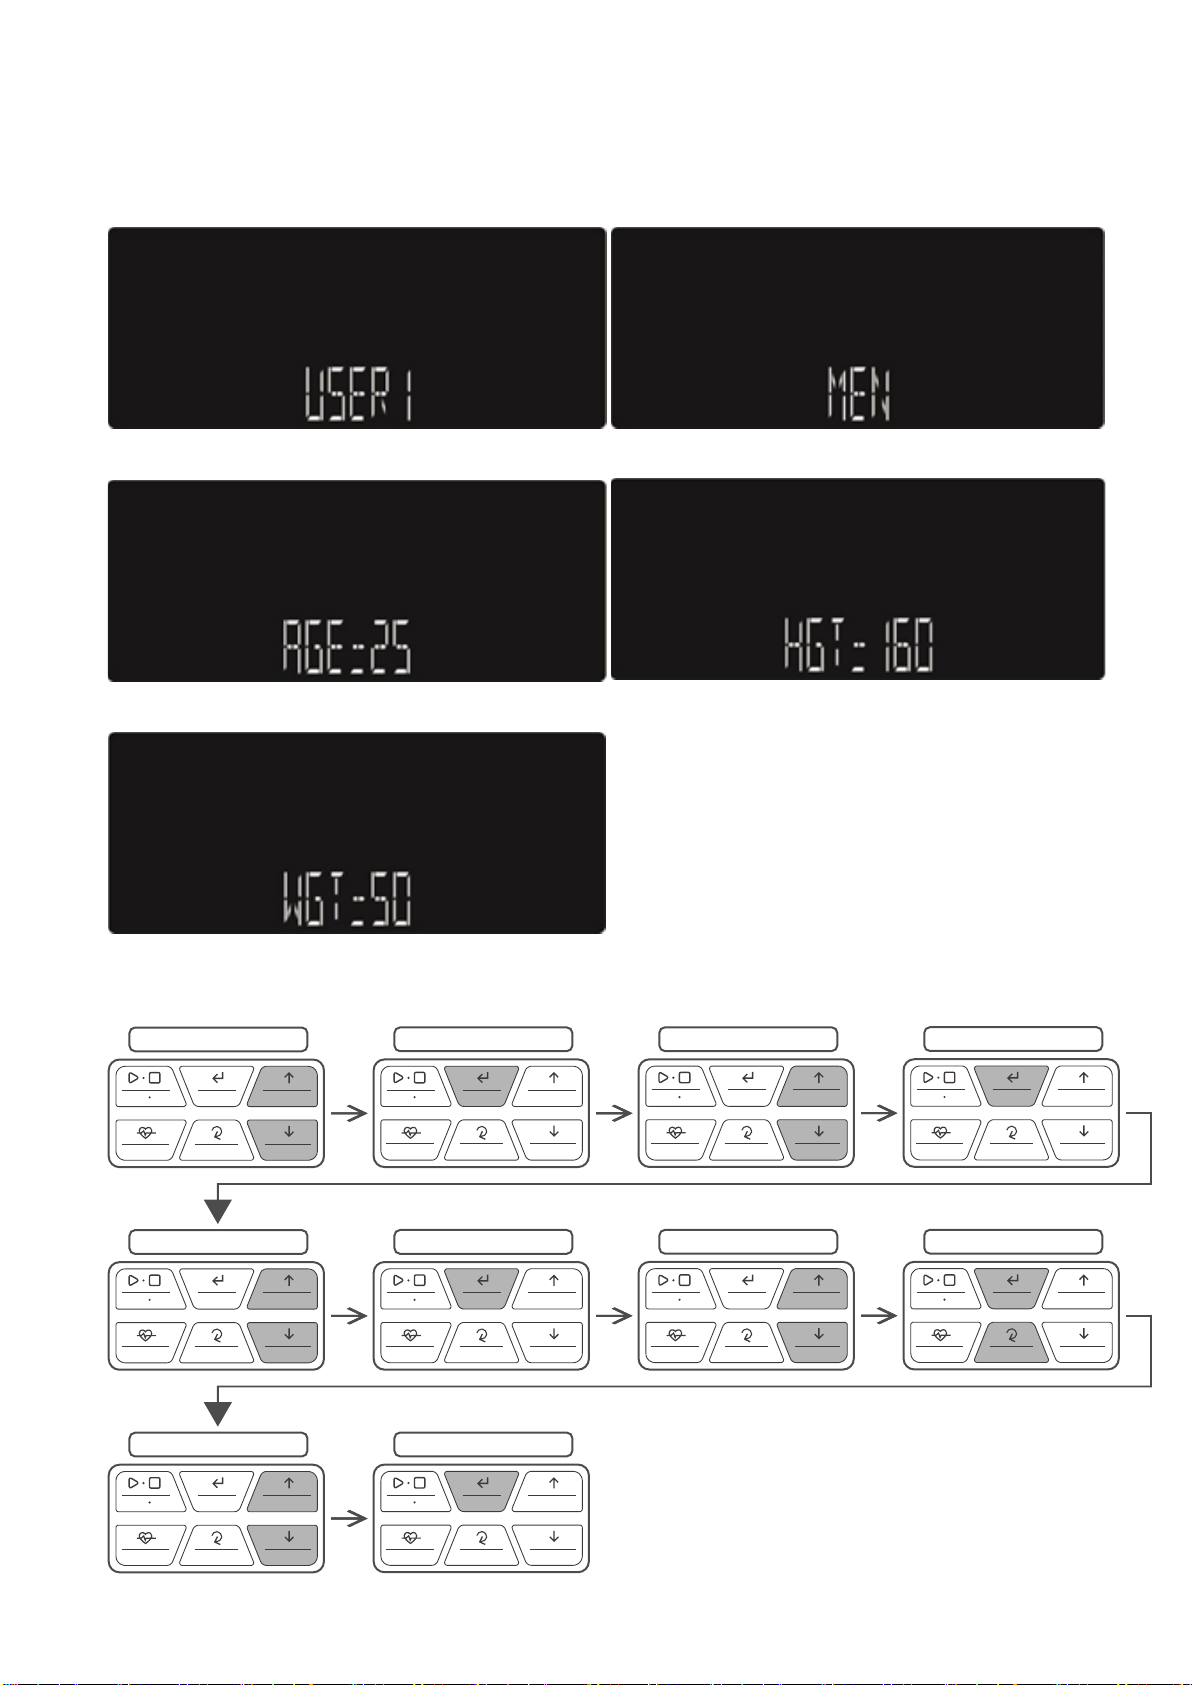
U1~U4 user prole setting:
Gender:male/female
Age(A):1~99 (default value 25)
Height(H) 100~200 (default value 160(cm)
Weight(W):20~150 (default value 50kg)
Manual mode workout.
Watts mode, the resistance will change according to Target Watts/RPM.
Target HR training mode. The resistance will vary according to Target HR.
User creates resistance level prole. Four in total.
12 PROGRAM selection.
Bluetooth Connection
8
Drawing 3 Drawing 4
Drawing 5
Drawing 7
Drawing 6
WORKOUT SELECTION
The console will then enter USER setting, the user can select from U1~U4(drawing 3), then select
SEX,AGE,HEIGHT,WEIGHT(drawing 4~7), then enter WORKOUT SELECTION (drawing 8).
RECOVERY
START STOP
REST
MODE
DOWN
UP
USER SELECT
RECOVERY
START STOP
REST
MODE
DOWN
UP
RECOVERY
START STOP
REST
MODE
DOWN
UP
SEX SELECT
RECOVERY
START STOP
REST
MODE
DOWN
UP
RECOVERY
START STOP
REST
MODE
DOWN
UP
AG SELECT
RECOVERY
START STOP
REST
MODE
DOWN
UP
RECOVERY
START STOP
REST
MODE
DOWN
UP
RECOVERY
START STOP
REST
MODE
DOWN
UP
RECOVERY
START STOP
REST
MODE
DOWN
UP
RECOVERY
START STOP
REST
MODE
DOWN
UP
PRESS MODE PRESS MODE
PRESS MODE
PRESS MODE
PRESS MODEHEIGHT SELECT
WEIGHT SELECT
9
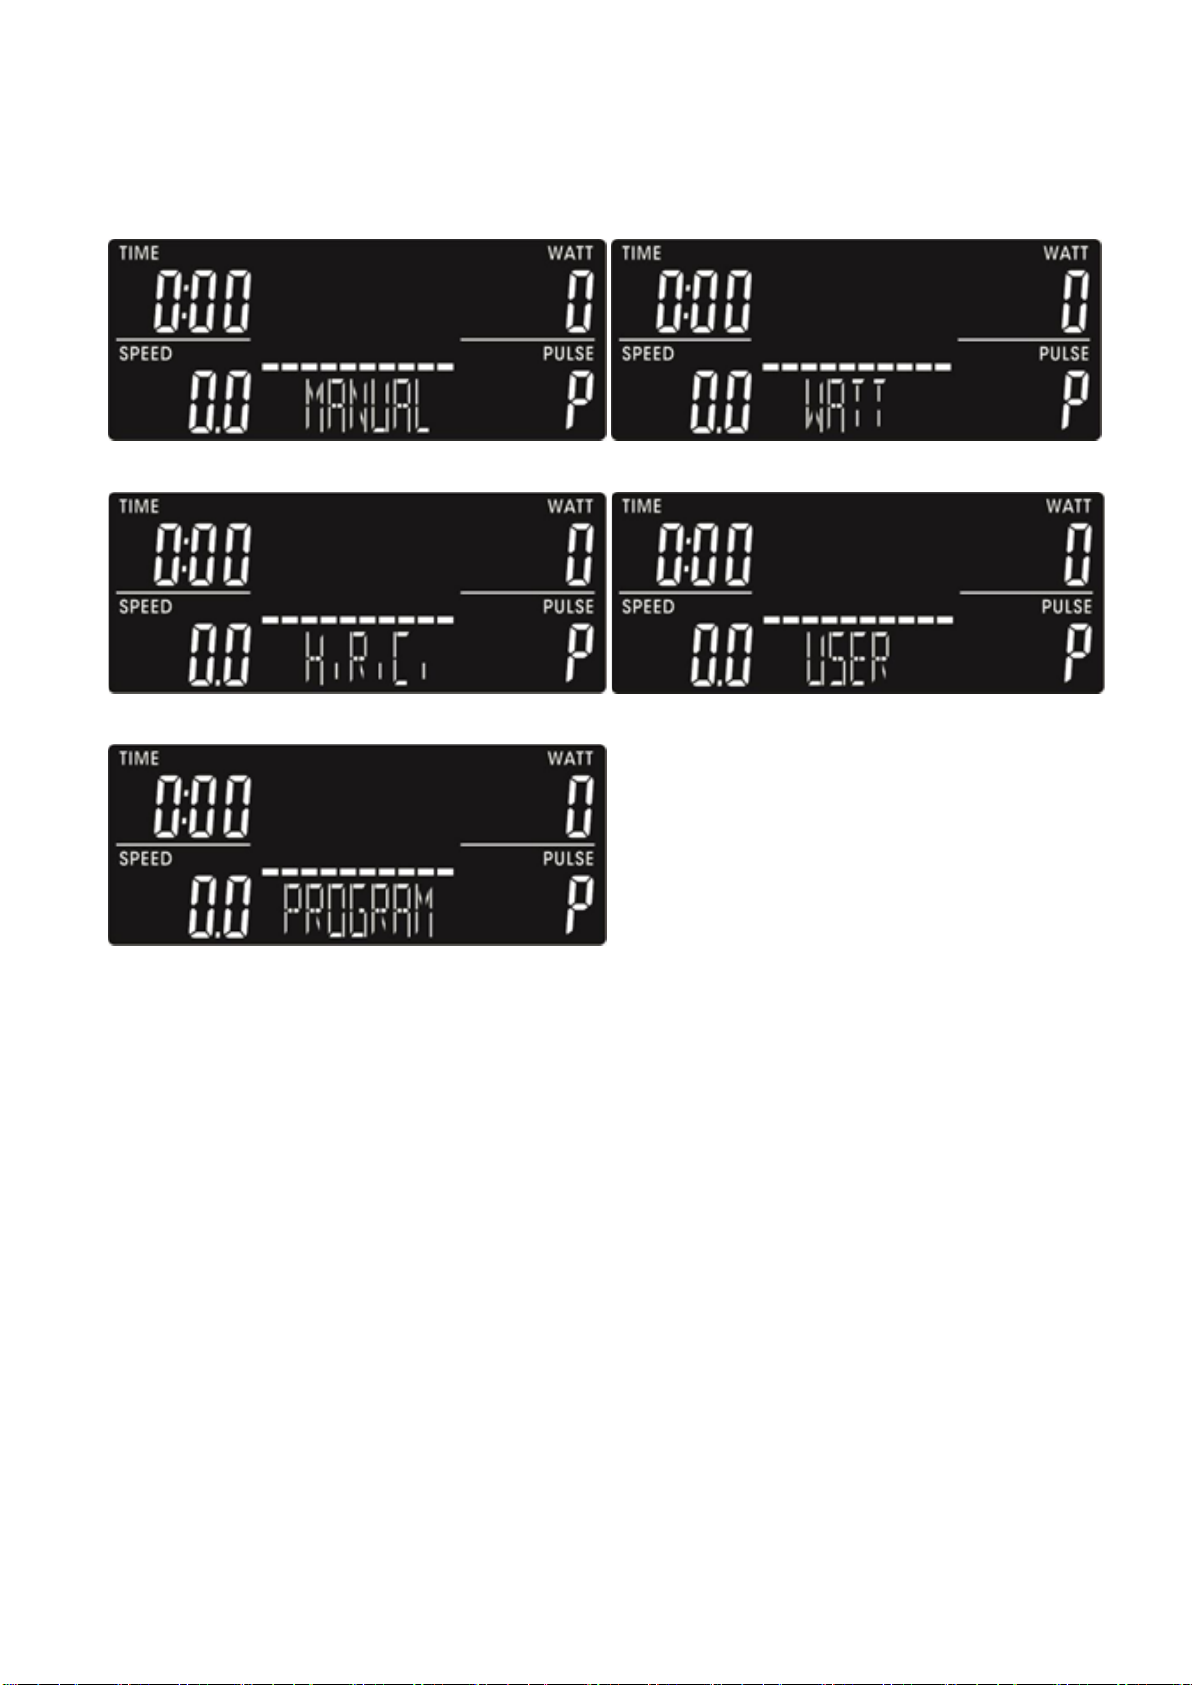
Drawing 8 Drawing 9
Drawing 10
Drawing 12
Drawing 11
LCD displays MANUAL Mode, the user can press UP(+) or DOWN(-). MANUAL(drawing8) →
WATT(drawing9) →H.R.C. (drawing10) →USER(User Program) (drawing11)→PROGRAM(drawing12)
→MANUAL will be displayed according to this order. Press MODE to select the work out program.
Manual Mode
1. Press START/STOP to start workout in manual mode directly
2. Use UP or DOWN to select MANUAL, press MODE / ENTER to enter.
3. PressUP(+) or DOWN(-) to adjust LOAD(drawing13), LCD display the LOAD value. When adjusting
the LOAD, the rotate display function will be turned o, press MODE to conrm
next setting.
and to enter the
4. Adjust value (e.g. TIME、DISTANCE、CALORIES、PULSE etc): When select TIME(drawing14)、
DISTANCE(drawing15)、CALORIES(drawing16) 、PULSE(drawing17) , press UP(+) or DOWN(-) to
adjust value of each function.
5. Press START/STOP KEY to start workout (drawing18 / 6S rotate display value), the user can adjust
LOAD during START mode and LOAD value will be displayed. Press START/STOP KEY during workout
to pause the workout, all the value will be kept on display (PULSE signal stays
RESET KEY to get back to workout mode
unaected), press
selection.
10

Drawing 13 Drawing 14
Drawing 15 Drawing 16
Drawing 17 Drawing 18
RECOVERY
START STOP
REST
MODE
DOWN
UP
RECOVERY
START STOP
REST
MODE
DOWN
UP
RECOVERY
START STOP
REST
MODE
DOWN
UP
LOAD SELECT
RECOVERY
START STOP
REST
MODE
DOWN
UP
RECOVERY
START STOP
REST
MODE
DOWN
UP
TAG TIME SELECT
RECOVERY
START STOP
REST
MODE
DOWN
UP
RECOVERY
START STOP
REST
MODE
DOWN
UP
RECOVERY
START STOP
REST
MODE
DOWN
UP
RECOVERY
START STOP
REST
MODE
DOWN
UP
RECOVERY
START STOP
REST
MODE
DOWN
UP
RECOVERY
START STOP
REST
MODE
DOWN
UP
RECOVERY
START STOP
REST
MODE
DOWN
UP
RECOVERY
START STOP
REST
MODE
DOWN
UP
Press ENTER to continue the previous setting
Press START to get started, do not set up any target value.
MANUAL SELECT
TAG DISTANCE SELECT
TAG CALORIES SELECT
TAG HEART RATE SELECT
PRESS START
PRESS START
PRESS MODE PRESS MODE
PRESS MODE
PRESS MODE
PRESS MODE
11

Watt Mode
1. PressUP(+) or DOWN(-) to select WATT (W), Press MODE to enter (drawing9).
2. WATT value will icker to wait for further setting. (Default value = 120)(drawing19), User can
PressUP(+) or DOWN(-) to adjust WATT value. Press Mode key to conrm and to enter TIME setting.
3. PressUP(+)or DOWN(-) to set TIME, Press START/STOP KEY to start workout after setting.
4. After the workout starts, the program will adjust the WATT value according to user, LOAD will
change according to WATT, the user can also PressUP(+) or DOWN(-) to set WATT;Press
START/STOP KEY during workout to pause the workout, all the value will be kept on display
(PULSE signal stays unaected), press RESET KEY to get back to workout mode selection.
Drawing 19
RECOVERY
START STOP
REST
MODE
DOWN
UP
RECOVERY
START STOP
REST
MODE
DOWN
UP
RECOVERY
START STOP
REST
MODE
DOWN
UP
WATT INSTALLED 120
RECOVERY
START STOP
REST
MODE
DOWN
UP
RECOVERY
START STOP
REST
MODE
DOWN
UP
TAG TIME SELECT
WATT SELECT PRESS MODE PRESS MODE
RECOVERY
START STOP
REST
MODE
DOWN
UP
PRESS START
12

RECOVERY
START STOP
REST
MODE
DOWN
UP
RECOVERY
START STOP
REST
MODE
DOWN
UP
RECOVERY
START STOP
REST
MODE
DOWN
UP
RECOVERY
START STOP
REST
MODE
DOWN
UP
RECOVERY
START STOP
REST
MODE
DOWN
UP
TAG TIME SELECT
H.R.C. SELECT
HRC Mode
1. PressUP(+) or DOWN(-) to select HRC, Press MODE to enter(drawing10).
2. PressUP (+) or DOWN(-) to select 55%、75%、90%、TARGET (drawing20~23) the LCD will icker
during the seclecting, and the display the default value calculated according to age on PULSE window.
3. TARGET MODE can PressUP(+) or DOWN(-), to adjust TARGET value(30~230), the rotate display
function is on.
4. After Target HRC is selected, press MODE KEY to enter TIME setting, PressUP(+) or DOWN(-) to
set TIME.
5. After nishing HRC mode setting, pressSTART/STOP KEY to start workout, LOAD will change
according to HR change. Press START/STOP KEY during workout to pause the workout, all the
value will be kept on display (PULSE signal stays unaected), press RESET KEY to get back to
workout mode selection.
Drawing 20 Drawing 21
Drawing 22 Drawing 23
55% 75% 90% TAG SELECT
RECOVERY
START STOP
REST
MODE
DOWN
UP
PRESS START
PRESS MODE PRESS MODE
13

RECOVERY
START STOP
REST
MODE
DOWN
UP
RECOVERY
START STOP
REST
MODE
DOWN
UP
RECOVERY
START STOP
REST
MODE
DOWN
UP
LOAD SET
RECOVERY
START STOP
REST
MODE
DOWN
UP
RECOVERY
START STOP
REST
MODE
DOWN
UP
LOAD SELECT
USER SELECT
User Program Mode
1.
Press UP(+) or DOWN(-), select User Program (USER, drawing11), Press MODE to enter(drawing24).
2.
User can press UP(+) or DOWN(-) to select PROGRAM drawing. The chosen program drawing will
icker. (drawing25), it will stop ickering after the user Press MODE to conrm and the drawing will
stay light up. There are 10 colums on the timeline to choose from for each PROGRAM drawing.
Press Mode to get back to TIME setting after nishing Program mode setting. If the user doesn’t set
the Program mode setting, then the value will inherent the Program mode setting from your last
workout.
3.
TIME setting : User can press UP(+) or DOWN(-) to set TIME.
4.Press START/STOP KEY after completing setting to start the workout. During START mode the user
can adjust LOAD. The LOAD value will be on displayed. During the workout, press START/STOP KEY
to pause the workout, all the value will be kept on display (PULSE signal stays unaected), press
RESET KEY to get back to workout mode selection.
Drawing 24 Drawing 25
RECOVERY
START STOP
REST
MODE
DOWN
UP
PRESS START
RECOVERY
START STOP
REST
MODE
DOWN
UP
TAG TIME SELECT
RECOVERY
START STOP
REST
MODE
DOWN
UP
PRESS START
PRESS MODE PRESS MODE
14
TAG HEART RATE SELECT
TAG TIME SELECT
RECOVERY
START STOP
REST
MODE
DOWN
UP
RECOVERY
START STOP
REST
MODE
DOWN
UP
RECOVERY
START STOP
REST
MODE
DOWN
UP
RECOVERY
START STOP
REST
MODE
DOWN
UP
PROGRAM SELECT
PROGRAM SELECT P1 TO P12
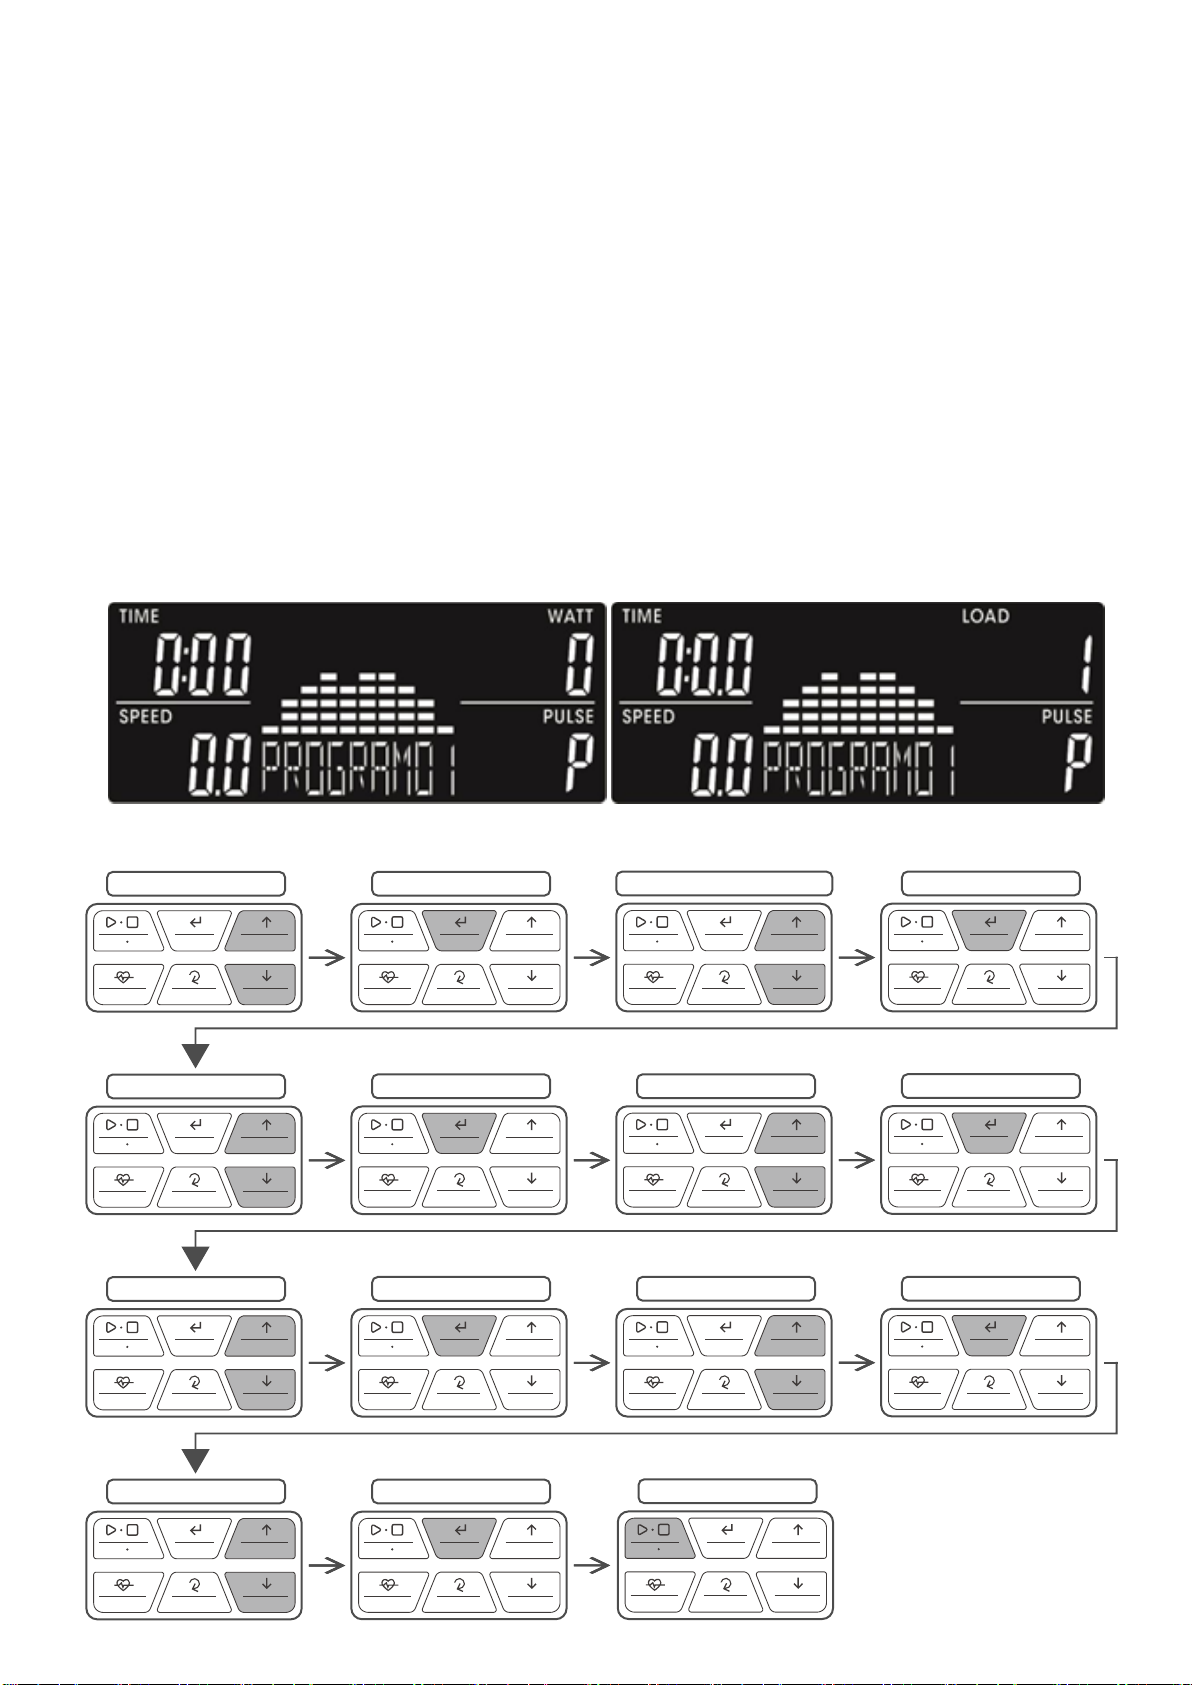
Program Mode
1.
Press UP(+) or DOWN(-) to select PROGRAM (drawing12), Press MODE to enter.
2.
PressUP(+) or DOWN(-) to select P01,P02,P03,P04……,P12 (12 drawings please refer to
Note1.) The chosen program drawing will icker (drawing26).
3.
After selecting PROGRAM drawing, LOAD value will icker until conrmed, the default setting is 1
(drawing27).
4.
PressUP(+) or DOWN(-) to adjust PROGRAM LOAD, LCD will display the drawing accordingly.
Press mode to enter next setting.
5.
Adjust value (e.g. TIME、DISTANCE、CALORIES、PULSE etc).
6.
Press START/STOP KEY after completing setting to start the workout.
7.
During START mode the user can adjust LOAD. The LOAD value will be on displayed. During the
workout, press START/STOP KEY to pause the workout, all the value will be kept on display
(PULSE signal stays unaected), press RESET KEY to get back to workout mode selection.
Drawing 26 Drawing 27
RECOVERY
START STOP
REST
MODE
DOWN
UP
LOAD SELECT
RECOVERY
START STOP
REST
MODE
DOWN
UP
RECOVERY
START STOP
REST
MODE
DOWN
UP
RECOVERY
START STOP
REST
MODE
DOWN
UP
RECOVERY
START STOP
REST
MODE
DOWN
UP
RECOVERY
START STOP
REST
MODE
DOWN
UP
RECOVERY
START STOP
REST
MODE
DOWN
UP
TAG DISTANCE SELECT TAG CALORIES SELECT
RECOVERY
START STOP
REST
MODE
DOWN
UP
RECOVERY
START STOP
REST
MODE
DOWN
UP
RECOVERY
START STOP
REST
MODE
DOWN
UP
PRESS START
PRESS MODE
PRESS MODE
PRESS MODE
PRESS MODE
RECOVERY
START STOP
REST
MODE
DOWN
UP
PRESS MODE
PRESS MODE PRESS MODE
15
Drawing 28 Drawing 29
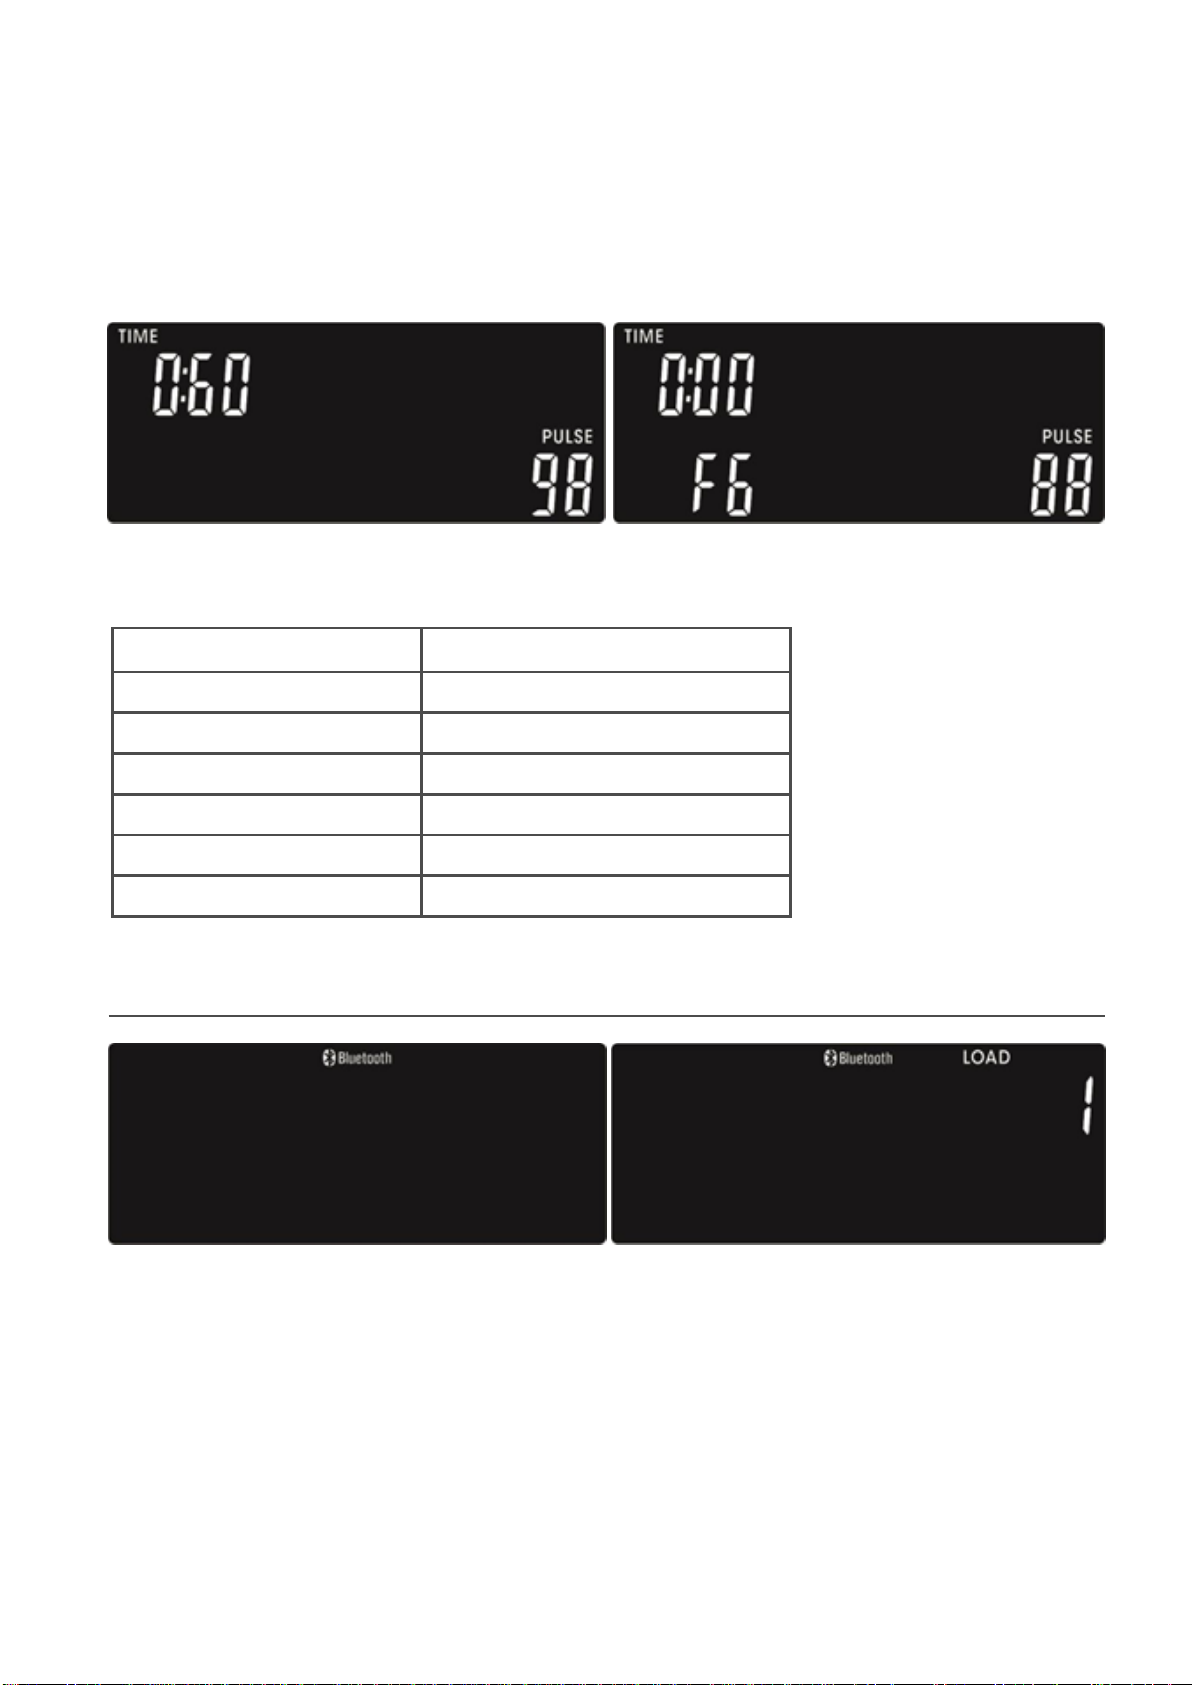
Recovery
After exercising for a period, keep holding on hand grips or wearing chest strap and press RECOVERY
key. All function display will stop except “TIME” starts counting down from 00:60 to 00:00 (drawing28).
Screen will display your heart rate recovery status with the F1, F2…to F6(drawing29). F1 is the best, F6
is the worst. User may keep exercising to improve the heart rate recovery status. (Press the RECOVERY
key again to return the main display.)
RECOBERY Grade comparison table
Result Fitness level
F1 Very good
F2 Good
F3 Average
F4 Satisfactory
F5 Poor
F6 Very poor
Bluetooth Connection
Connection : NOT FTMS(drawing31) Connection : FTMS(drawing32)
16

Others
Without button/pedal/pulse signal input for 4 minutes, the console will enter SLEEP Mode
If the console LCD goes dark, the user can wake the console with pedal or button signal input.
Program drawing
17
Pad Phone
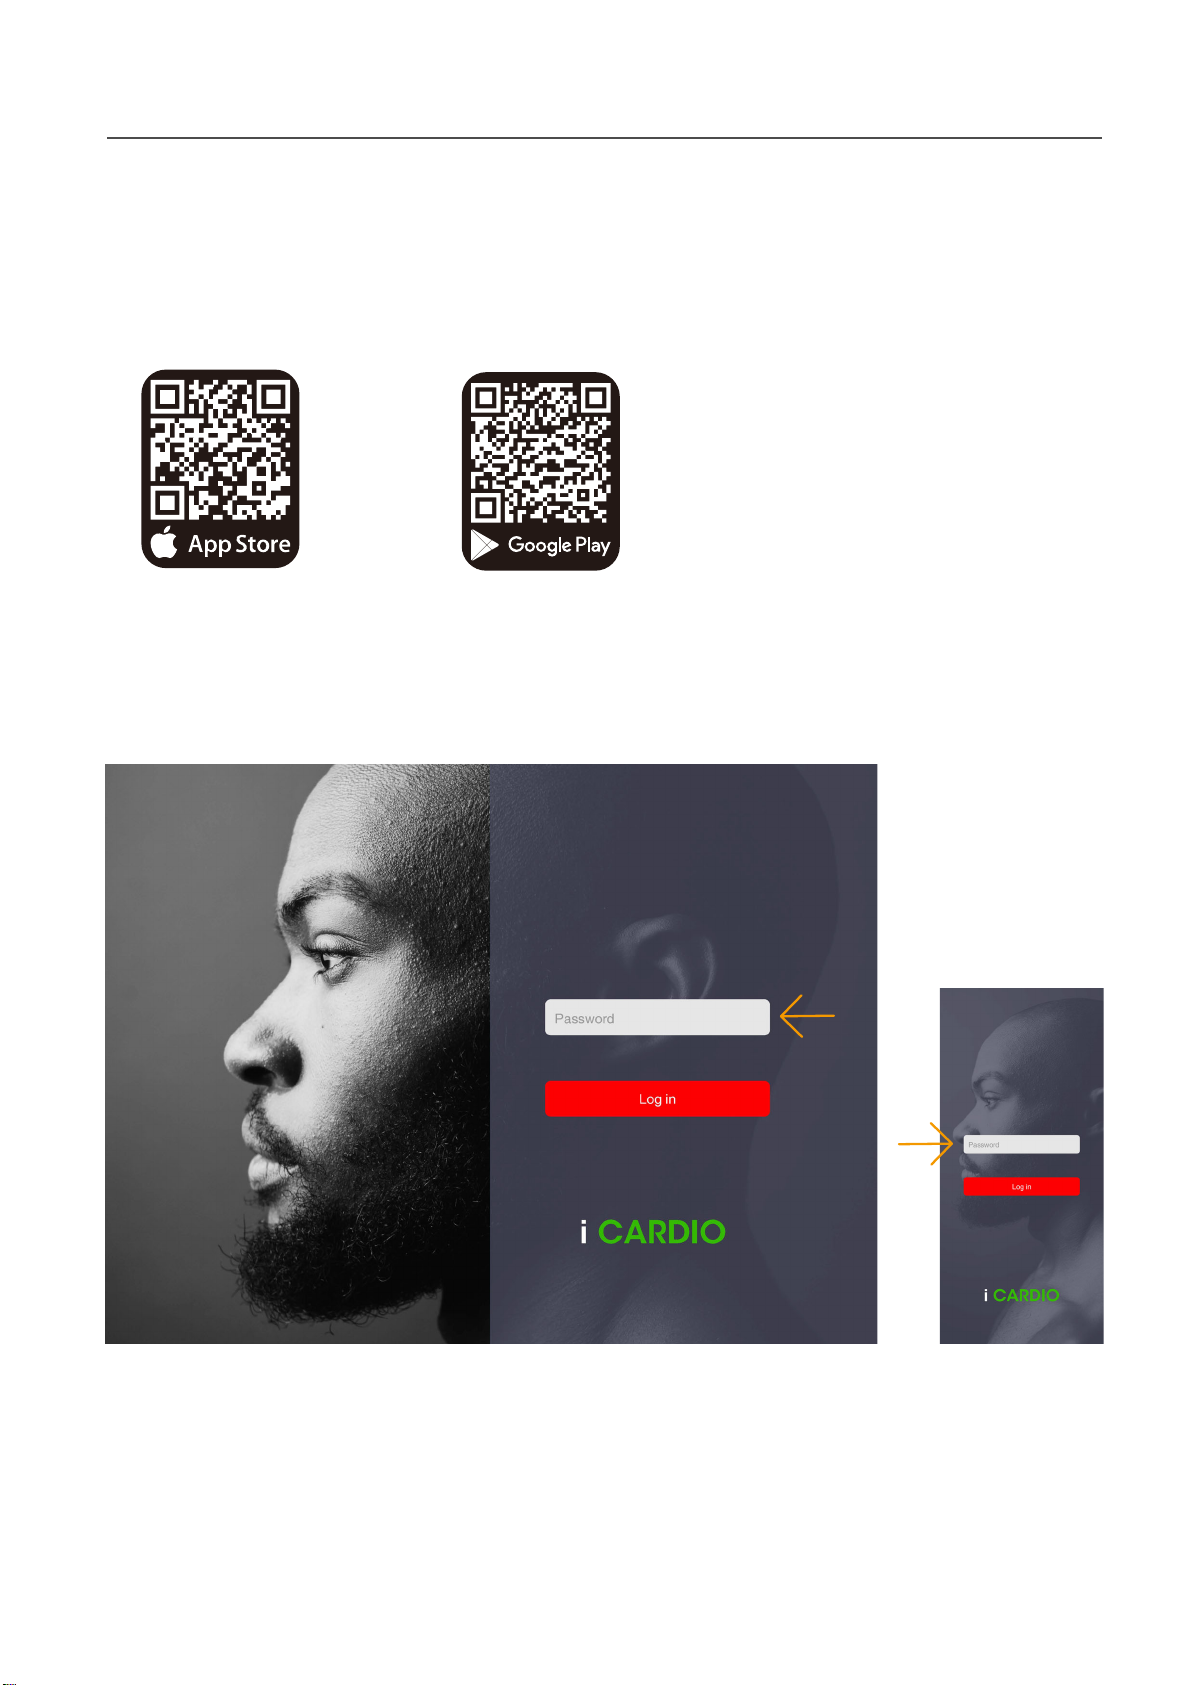
Get Start of the iCardio
IOS
1. Download iCardio in your smart device.
If your smart device is an Apple device, please scan the right QR Code to download the App.
If your smart device is an Android device, please scan the left QR Code to download the App.
Android
** Notice that the iCardio is compatible with the system above Android 9/IOS 13.
2. Please open the Bluetooth of your smart device.
3. Open the App and enter Password iCARDIO to start the iCardio.
The password only has to be entered in the rst time.
18

Pad Phone
Pad Phone
How to setup the Bluetooth connection between iCardio
and the Console?
1. Press the icon at the left-bottom of the home page.
2. Press the Bluetooth icon.
19
Table of contents
Other Sportop Elliptical Trainer manuals

Sportop
Sportop E-860P Operation manual

Sportop
Sportop E7000P PLUS Operation manual

Sportop
Sportop E 7000P Operation manual

Sportop
Sportop VST60 Operation manual

Sportop
Sportop E 8000P Operation manual

Sportop
Sportop RO 700 User manual

Sportop
Sportop E160 Operation manual

Sportop
Sportop E 8000P Operation manual

Sportop
Sportop E770 User manual

Sportop
Sportop E7000P PLUS Operation manual

Popular Elliptical Trainer manuals by other brands


Sears
Sears freespirit C249 30435 0 owner's manual

York Fitness
York Fitness Epic Cross Trainer owner's manual

Cubii
Cubii JR1 owner's manual

Action Sports
Action Sports F000104 Assembly, Installation, Care, Maintenance, and Use Instructions

Fortis
Fortis FXT-380A user guide

Veloteq
Veloteq CF 6000 user manual


