Star Lab Mini Fuge Plus User manual

Mini Fuge Plus · Manual · 1
User Manual · Bedienungsanleitung
Mode d`emploi · Manuale d‘Uso
LIQUID HANDLING TECHNOLOGY
Mini Fuge Plus

EC Declaration of Conformity
STARLAB certifies that
N2631-0017 Mini Fuge Plus
including charging adapter
has been manufactured and inspected in accordance
with the following European directives / standards:
Low Voltage Directive 2014/35/EU
EMC Directive 2014/30/EU
WEEE 2012/19/EU
RoHs 2011/65/EU
Packaging 94/62/EC
As an ISO 9001, ISO 13485 and ISO 14001 certified company,
our working procedures and processes are checked
and audited regularly and the quality
of our products is continuously monitored.
STARLAB International GmbH · Neuer Höltigbaum 38 · 22143 Hamburg
www.starlabgroup.com
© January 2018. All rights reserved, including graphics and images. Every effort has been made to ensure that
the content of this publication is correct. STARLAB can not take responsibility for any errors or omissions.

Mini Fuge Plus · Manual · 3
Product Overview:
The STARLAB Mini Fuge Plus (Cat. No. N2631-0017) provides comprehensive designs for a wide
variety of life science research applications. Smart and stable running can deliver accurate and
reliable experimental results from one experiment to another.
About This Manual:
This manual is designed to assist you in the optimal usage of your STARLAB Mini Fuge Plus.
The manual is also available on the English, German, French and Italian websites at:
www.starlabgroup.com
User Manual ____________________________________________________________________ 3
Bedienungsanleitung ___________________________________________________________ 11
Mode d`emploi _________________________________________________________________ 19
Manuale d‘Uso _________________________________________________________________ 27
1 Specications _______________________________________________________________ 4
1.1 Environmental Conditions__________________________________________________________ 4
2 General Information __________________________________________________________ 4
2.1 Delivery ______________________________________________________________________ 4
3 Safety Precautions ___________________________________________________________ 5
4 Installation __________________________________________________________________ 6
5 Operation ___________________________________________________________________ 6
6 Equipment Maintenance ______________________________________________________ 7
7 Rotors ______________________________________________________________________ 8
8 Cleaning ____________________________________________________________________ 8
9 Service _____________________________________________________________________ 8
10 Appendix ___________________________________________________________________ 8
10.1 Symbols and Conventions _________________________________________________________ 8
10.2 Equipment Disposal - European Regulations ___________________________________________ 9
10.3 Limited Warranty _______________________________________________________________ 9
English
Table of contents
References useful information.

4· Mini Fuge Plus · Manual
1 Specications
Dimensions 5.9 x 5.9 x 4.6 in / 150 x 150 x 116 mm
Weight 2.65 lbs / 1.2 kg
Electrical AC 100 -- 240 V, 50/60 Hz, 0.35 A
Unit Input 24 VDC 1A
Maximum Speed/RCF 6000 rpm / 2000 xg
1.1 Environmental Conditions
› Indoor use only
› Altitude up to 2000m
› Operating temperature 5°C to 40 °C
› Maximum relative humidity 80% for temperature up to 30°C, decreasing linearly to 50%
relative humidity at 40°C
› Pollution degree 2
2 General Information
The STARLAB Mini Fuge Plus is supplied with two rotors, one for micro tubes and one for
0.2ml PCR strip tubes. The 8 place rotor is designed to centrifuge up to eight individual
1.5/2.0ml plastic micro centrifuge tubes. It will also accept 0.5/0.6ml, 0.4/0.25ml and 0.2ml
tubes with the adapters supplied with the unit. The strip tube rotor is designed to centrifuge
four 8 x 0.2ml strip tubes. It will also accept up to 32 individual 0.2ml tubes. Both rotors are
designed for applications requiring relatively low g-forces, such as microfiltration, cell separation
and quick spin downs from the walls of tubes.
Please read this manual thoroughly before attempting to operate the centrifuge.
2.1 Delivery
› 8 place tube rotor
› 4 place PCR strip rotor
› Eight adapters for 0.5 ml tubes
› Eight adapters for 0.2 ml tubes
› Eight adapters for 0.25 ml tubes
› Power Adapter, 24V

Mini Fuge Plus · Manual · 5
English
Specifications/Conditions/General Information/Safety Precautions
3 Safety Precautions
NEVER use the centrifuge in any manner not specified in these instructions.
NEVER operate the centrifuge without a rotor properly attached to the shaft.
NEVER fill tubes while they are in the rotor. Liquid spillage may harm unit.
NEVER put hands in the rotor area unless the rotor is completely stopped.
NEVER move the centrifuge while the rotor is spinning.
NEVER use solvents or flammables near this or other electrical equipment.
NEVER centrifuge flammable, explosive or corrosive materials
NEVER centrifuge hazardous materials outside of a hood or proper containment facility
NEVER try to continue operating the centrifuge if the centrifuge stops working prematurely.
Stop the centrifuge immediately by turning off the main power switch on the back of
the centrifuge. Wait one minute before turning on the main power switch to operate the
centrifuge again.
ALWAYS load the rotor symmetrically. Each tube should be counterbalanced by another tube.
Weight of individual tubes may not exceed of 3.0 g.
ALWAYS locate the centrifuge within easy access to an electrical outlet.
ALWAYS use only micro centrifuge tubes made from plastic and designed to withstand
centrifugal forces of at least 2,000 x g.
Ifthecentrifugeisusedinamannernotspeciedbythemanufacturer,
the protection provided by the centrifuge may be impaired.

6· Mini Fuge Plus · Manual
4 Installation
1. Make sure to always install the centrifuge on stable flat surfaces only
2. Place the centrifuge near the electrical outlet
3. Power adapter instructions
5 Operation
Before operating the centrifuge, be sure that the power switch on the back of the unit is in
the “on” position. To begin a run, simply close the lid of the centrifuge. No other controls are
required.
› Fast stop
Press down and release the tab on the front of the lid. This will release the lid lock, allowing
the lid to open and the rotor to come to a braked stop.
› Gradual stop
Put the power switch in the “off” position, this will cut the power to the motor, and the rotor
to come to a gradual stop.
Caution: Do not attempt to open the lid or remove samples until the unit has come to a com-
plete stop. Once the rotor has come to a full stop, the lid can be manually lifted to the full open
position and samples may be removed from the rotor. Safe operation of the centrifuge requires
that the rotor be loaded in a balanced fashion. Failure to load the rotor properly presents a hazar-
dous condition and may damage the centrifuge. Individual tubes, strip tubes and/or adapters must
always be loaded symmetrically to ensure proper balance. Never run the centrifuge with only one
tube or one strip tube in place.
2 | Mini Centrifuge
4.0 Installation
Adapter body American Australian European British
Push the plug firmly into its position!
5.0 Operation
Before operating the centrifuge, be sure that the power switch on the back of the unit is in the “on” position.
To begin a run, simply close the lid of the centrifuge. No other controls are required.
Fast stop
Press down and release the tab on the front of the lid. This will release the lid lock, allowing the lid
to open and the rotor to come to a braked stop.
Gradually stop
Put the power switch in the “off” position, this will cut the power to the motor, and the
rotor to come to a gradual stop.
Caution: Do not attempt to open the lid or remove samples until the unit has come to a complete stop. Once
the rotor has come to a full stop, the lid can be manually lifted to the full open position and samples may be
removed from the rotor.
Safe operation of the centrifuge requires that the rotor be loaded in a balanced fashion. Failure to load the
rotor properly presents a hazardous condition and may damage the centrifuge. Individual tubes, strip tubes
and/or adapters must always be loaded symmetrically to ensure proper balance. Never run the centrifuge
with only one tube or one strip tube in place.
6.0 Equipment Maintenance
The centrifuge should be cleaned periodically. Ensure that the unit is not plugged in. Use a damp cloth and a
mild, noncorrosive detergent (ph<8). Do not immerse the centrifuge in liquid or pour liquids over it. Excessive
amounts of liquid should be avoided. Liquid should not come into contact with the motor. After cleaning,
ensure all parts are dried thoroughly before attempting to operate the unit.
Should a spill of infectious materials occur within the rotor or rotor chamber, the unit should be disinfected.
This should be performed by qualied personnel with proper protective equipment.
1. Make sure to always install the centrifuge on stable at surfaces only
2. Place the centrifuge near the electrical outlet
3. Power adapter instructions
3.1 Power adapter components

Mini Fuge Plus · Manual · 7
6 Equipment Maintenance
The centrifuge should be cleaned periodically. Ensure that the unit is not plugged in. Use a
damp cloth and a mild, non-corrosive detergent (ph<8). Do not immerse the centrifuge in liquid
or pour liquids over it. Excessive amounts of liquid should be avoided. Liquid should not come
into contact with the motor. After cleaning, ensure all parts are dried thoroughly before attemp-
ting to operate the unit.
Should a spill of infectious materials occur within the rotor or rotor chamber, the unit should be
disinfected. This should be performed by qualified personnel with proper protective equipment.
English
Installation/Operation/Equipment Maintenance
8· Mini Fuge Plus · Manual
7 Rotors
The centrifuge is supplied with two interchangeable quick release rotors. No tools are required
to exchange the rotors or attach them to the motor shaft. The rotors can be easily exchanged
with one hand by way of the quick release system. To remove a rotor, place your thumb on top
of the motor shaft and place two fingers underneath the rotor and lift off the shaft. To replace a
rotor, simply position on the moter shapft and snap in to place.
8 Cleaning
Before using any cleaning or decontamination methods except those recommended by the manu-
facturer, check with the manufacturer that the proposed method will not damage the equipment.
To clean the centrifuge, use a damp cloth and a mild, non-corrosive detergent (ph <8). After clea-
ning, ensure all parts are dried thoroughly before attempting to operate the unit. Do not immerse
the centrifuge in liquid or pour liquids over it.
9 Service
Contact STARLAB at www.starlabgroup.com if you have a question about the centrifuge or if
the unit requires servicing. Please do not send in a unit for service without first obtaining a returns
number and a decontamination form. All units returned must be decontaminated and accom-
panied by a decontamination form. Ensure the unit is properly packed to avoid damage - any
damage resulting from improper packaging will be the responsibility of the user.
10 Appendix
10.1 Symbols and Conventions
Symbols that may be used in this manual or on the product.
CAUTION!
This symbol refers you to important operating and maintenance (servicing) instructions
within the product Instruction Manual. Failure to head this information may present a
risk of damage or injury to persons or equipment
Mini Centrifuge | 3
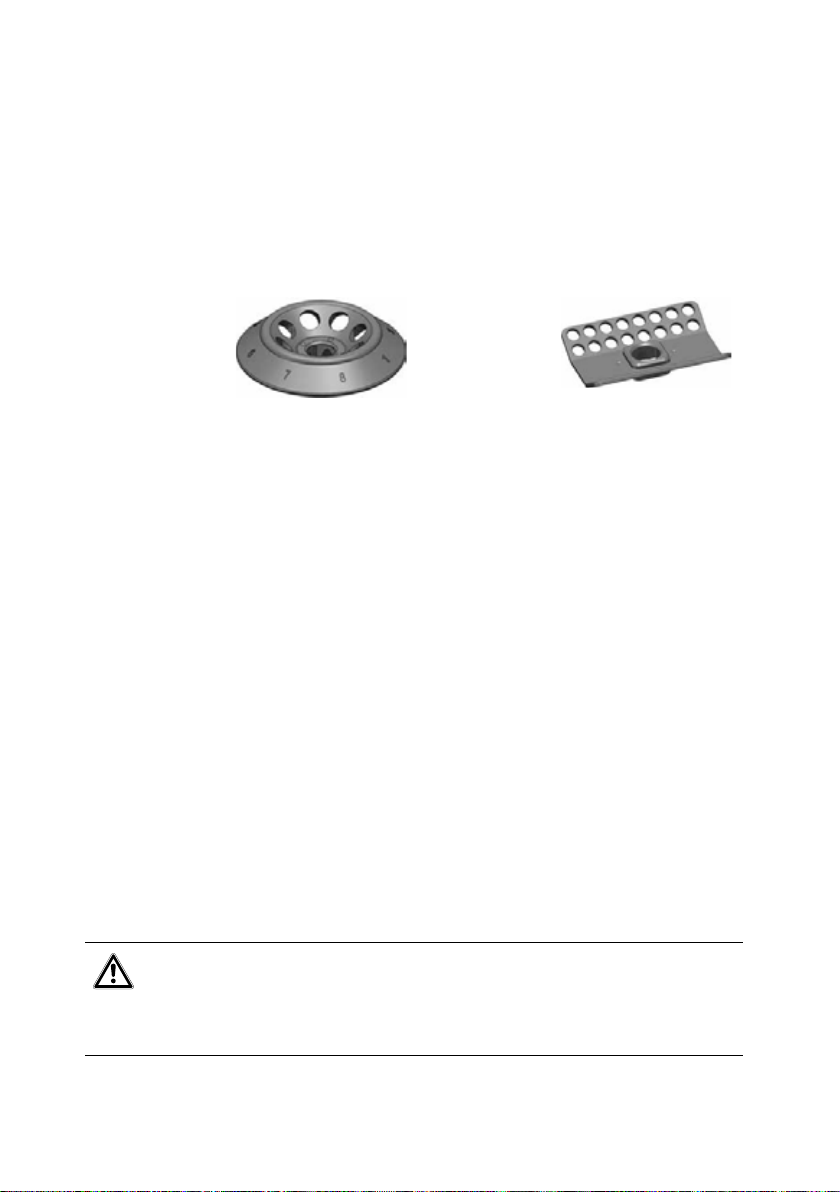
7.0 Rotors
The centrifuge is supplied with two interchangeable quick release rotors. No tools are required to exchange
the rotors or attach them to the motor shaft. The rotors can be easily exchanged with one hand by way of
the quick release system. Removal of the rotors is done by placing your thumb on top of the motor shaft
and lifting up with two ngers under the rotor. Place the other rotor into position on the motor shaft and
snap in.
8 place tube rotor 4 place strip rotor
8.0 Cleaning
Before using any cleaning or decontamination methods except those recommended by the manufacturer, check
with the manufacturer that the proposed method will not damage the equipment. To clean the centrifuge, use
a damp cloth and a mild, noncorrosive detergent (ph <8). After cleaning, ensure all parts are dried thoroughly
before attempting to operate the unit. Do not immerse the centrifuge in liquid or pour liquids over it.
9.0 Service
Should you have a question about the operation of the Mini Centrifuge or if service is required, contact Corning
at: 800-492-1110. Do not send in a unit for service without rst calling to obtain a repair authorization number.
Should the unit require return to Corning for service, it should be properly packed to avoid damage. Any
damage resulting from improper packaging shall be the responsibility of the user.
10.0 Appendix
10.1 Spare Parts
6770-RT 8 place tube rotor for Mini Centrifuge
6770-RTS 4 place PCR strip rotor for Mini Centrifuge
6770-RTA.5 Adapter, 0.5ml tubes
6770-RTA.2 Adapter, 0.2ml tubes
6770-RTA.25 Adapter, 0.25ml tubes
401025 Power Adapter, 24V for Mini Centrifuge
10.2 Symbols and Conventions
The following chart is an illustrated glossary of the symbols that may be used in this manual or on the
product.
CAUTION This symbol refers you to important operating and maintenance (servicing)
instructions within the product Instruction Manual. Failure to head this information may
present a risk of damage or injury to persons or equipment
10.3 Equipment Disposal - European Regulations
According to Directive 2012/19/EU of the European Parliament and of
the Council of 4 July 2012 on waste electrical and electronic equipment
(WEEE), Labnet C1601-B Mini centrifuge is marked with the crossed-out
wheeled bin and must not be disposed of with domestic waste.
Consequently, the buyer shall follow the instructions for reuse and recycling
of waste electronic and electrical equipment (WEEE) provided with the
products and available at the following link: www.corning.com/weee

Mini Fuge Plus · Manual · 9
10.2 Equipment Disposal - European Regulations
According to Directive 2012/19/EU of the European Parliament and of the
Council of 4 July 2012 on waste electrical and electronic equipment (WEEE),
STARLAB Mini Fuge Plus is marked with the crossed-out wheeled bin and
must not be disposed of with domestic waste.
10.3 Limited Warranty
STARLAB INTERNATIONAL warrants that this product will be free from defects in material and
workmanship. Should this product require service contact STARLAB Customer Service at
www.starlabgroup.com to receive a return authorization number and shipping instructions.
Products received without proper authorization will be returned. All items returned for service
should be sent postage prepaid in the original packaging or other suitable carton, and padded to
avoid damage. STARLAB will not be responsible for damage incurred by improper packaging.
This warranty does not cover damage caused by accident, neglect, misuse, improper service,
natural forces, or other causes not arising from defects in original material or workmanship. This
warranty does not cover motor brushes, fuses, light bulbs, batteries, or damage to paint or finish.
Claims for transit damage should be filed with the transportation carrier.
All warranties, including the implied warranty of merchantability and fitness for a particular
purpose, are limited in duration to 24 months from the original date of purchase. STARLAB’s sole
obligation under this warranty is limited to the repair or replacement of a defective product at
STARLAB‘s discretion. STARLAB is not liable for incidental or consequential damage, commercial
loss, or any other damages resulting from the use of this product. No individual may accept for, or
on behalf of STARLAB, any other obligation of liability, or extend the period of this warranty.
For your reference, make note of the model and serial number, date of purchase,
and supplier here:
Cat. No.......................................... Serial No..............................................
Date Purchased..............................
Supplier.........................................
English
Rotors/Cleaning/Service/AppendixWarranty

Table of contents
Other Star Lab Laboratory Equipment manuals

Star Lab
Star Lab N2400-8030 User manual

Star Lab
Star Lab Ergo One User manual

Star Lab
Star Lab Mixer HC Instruction manual

Star Lab
Star Lab ErgoOne E Series User manual

Star Lab
Star Lab ErgoOne FAST User manual

Star Lab
Star Lab N2400-0001 Vortex IR User manual

Star Lab
Star Lab ErgoOne FAST Instruction manual

Star Lab
Star Lab GuardOne User manual

Star Lab
Star Lab Minicentrifuge User manual

Star Lab
Star Lab ErgoOne E User manual


