Staubli CombiTac User manual
1 / 8
MA000 (de_en)
Montageanleitung
MA000 (de_en)
Assembly instructions
MA213-10 (cn_en)
安装说明
MA213-10 (cn_en)
Assembly instructions
CombiTac 轻型外壳 CombiTac light housing
目录
安全须知2
工具准备3
电缆准备3
安装板的钻孔图3
插针和电缆装配4
中央锁紧装配5
电缆夹紧固5
盖板组合6
中央锁紧6
更改编码7
拆卸中央锁紧杆8
CombiTac 插合时移除壳盖8
Content
Safety instructions����������������������������������������������������������������������2
Tools required ����������������������������������������������������������������������������3
Cable preparation ����������������������������������������������������������������������3
Drilling plan mounting plate ������������������������������������������������������3
Pin and cable assembly�������������������������������������������������������������4
Central locking assembly�����������������������������������������������������������5
Cable clamp fastening���������������������������������������������������������������5
Cover assembly �������������������������������������������������������������������������6
Central locking���������������������������������������������������������������������������6
Changing the coding �����������������������������������������������������������������7
Removal of central locking��������������������������������������������������������8
Removal of cover while CombiTac is mated������������������������������8
2 / 82 / 8
符号说明 Explanation of the symbols
危险电压警告 Warning of dangerous voltages
危险区域警告 Warning of a hazard area
产品使用说明或技巧 Useful hint or tip
安全须知 Safety instructions
产品只能由具备相应技能或受过相应培训的专业人员,依照适用
安全法规进行装配或安装。
如您未遵守上述警告,则 Stäubli Electrical Connectors (Stäubli)
不承担任何责任。
The products may be assembled and installed exclusively by
suitably qualied and trained specialists duly observing all ap-
plicable safety regulations�
Stäubli Electrical Connectors (Stäubli) does not accept any li-
ability in the event of failure to observe these warnings�
仅可使用 Stäubli 指定的组件和工具。自行装配时,切勿背离本手
册所述的制备及装配说明,否则 Stäubli 无法保证产品安全性或
产品性能达到官方技术参数。请勿以任何方式修改产品。
Use only the components and tools specied by Stäubli. In
case of self-assembly, do not deviate from the preparation and
assembly instructions as stated herein, otherwise Stäubli can-
not give any guarantee as to safety or conformity with the
technical data� Do not modify the product in any way�
可与 Stäubli 元件插合的非 Stäubli 原厂制造的连接器,在某些情
况下,某些制造商甚至将其描述为“与 Stäubli 兼容”,但该连接器
并不符合长期稳定安全的电连接要求,而且出于安全考虑,不得
与 Stäubli 元件插合在一起。因此,Stäubli 对因此类连接器(即未
经 Stäubli 批准)与 Stäubli 元件插合而造成的任何损失不承担任
何责任。
Connectors not originally manufactured by Stäubli which can
be mated with Stäubli elements and in some cases are even
described as ”Stäubli-compatible” by certain manufacturers
do not conform to the requirements for safe electrical connec-
tion with long-term stability, and for safety reasons must not
be plugged together with Stäubli elements� Stäubli therefore
does not accept any liability for any damages resulting from
mating such connectors (i�e� lacking Stäubli approval) with
Stäubli elements�
此处所述作业不得在带电或负载部件上进行。
The work described here must not be carried out
on live or load-carrying parts.
电击防护必须通过最终产品(即正确组装的插头连接器)及
其用户来确保。
Protection from electric shock must be assured by
the end product (i.e. by the correctly assembled
plug connector) and by its user.
禁止在负载下断开连接。允许带电时进行插拔操作。
The plug connections must not be disconnected
under load. Plugging and unplugging when live is
permitted.
每次使用连接器前,需提前检查外部是否有磨损(尤其是绝
缘层)。如有安全疑虑,必须咨询专业人员或更换连接器。
Each time the connector is used, it should previously
be inspected for external defects (particularly in the
insulation). If there are any doubts as to its safety, a
specialist must be consulted or the connector must
be replaced.
带外壳应用的连接器的防水功能可参考相关产品的IP保护等
级。
The plug connectors in the housing are protected
from water in accordance with the IP protection
class stated for the relevant product.
未插合的连接器必须防潮防尘。被污染的公母连接器不应插
合使用。
Unmated plug connectors must be protected from
moisture and dirt. The male and female parts must
not be plugged together when soiled.
欲了解更多技术参数,请参阅产品目录。 For further technical data please see the product
catalogue.
3 / 83 / 8
1
2
3
4
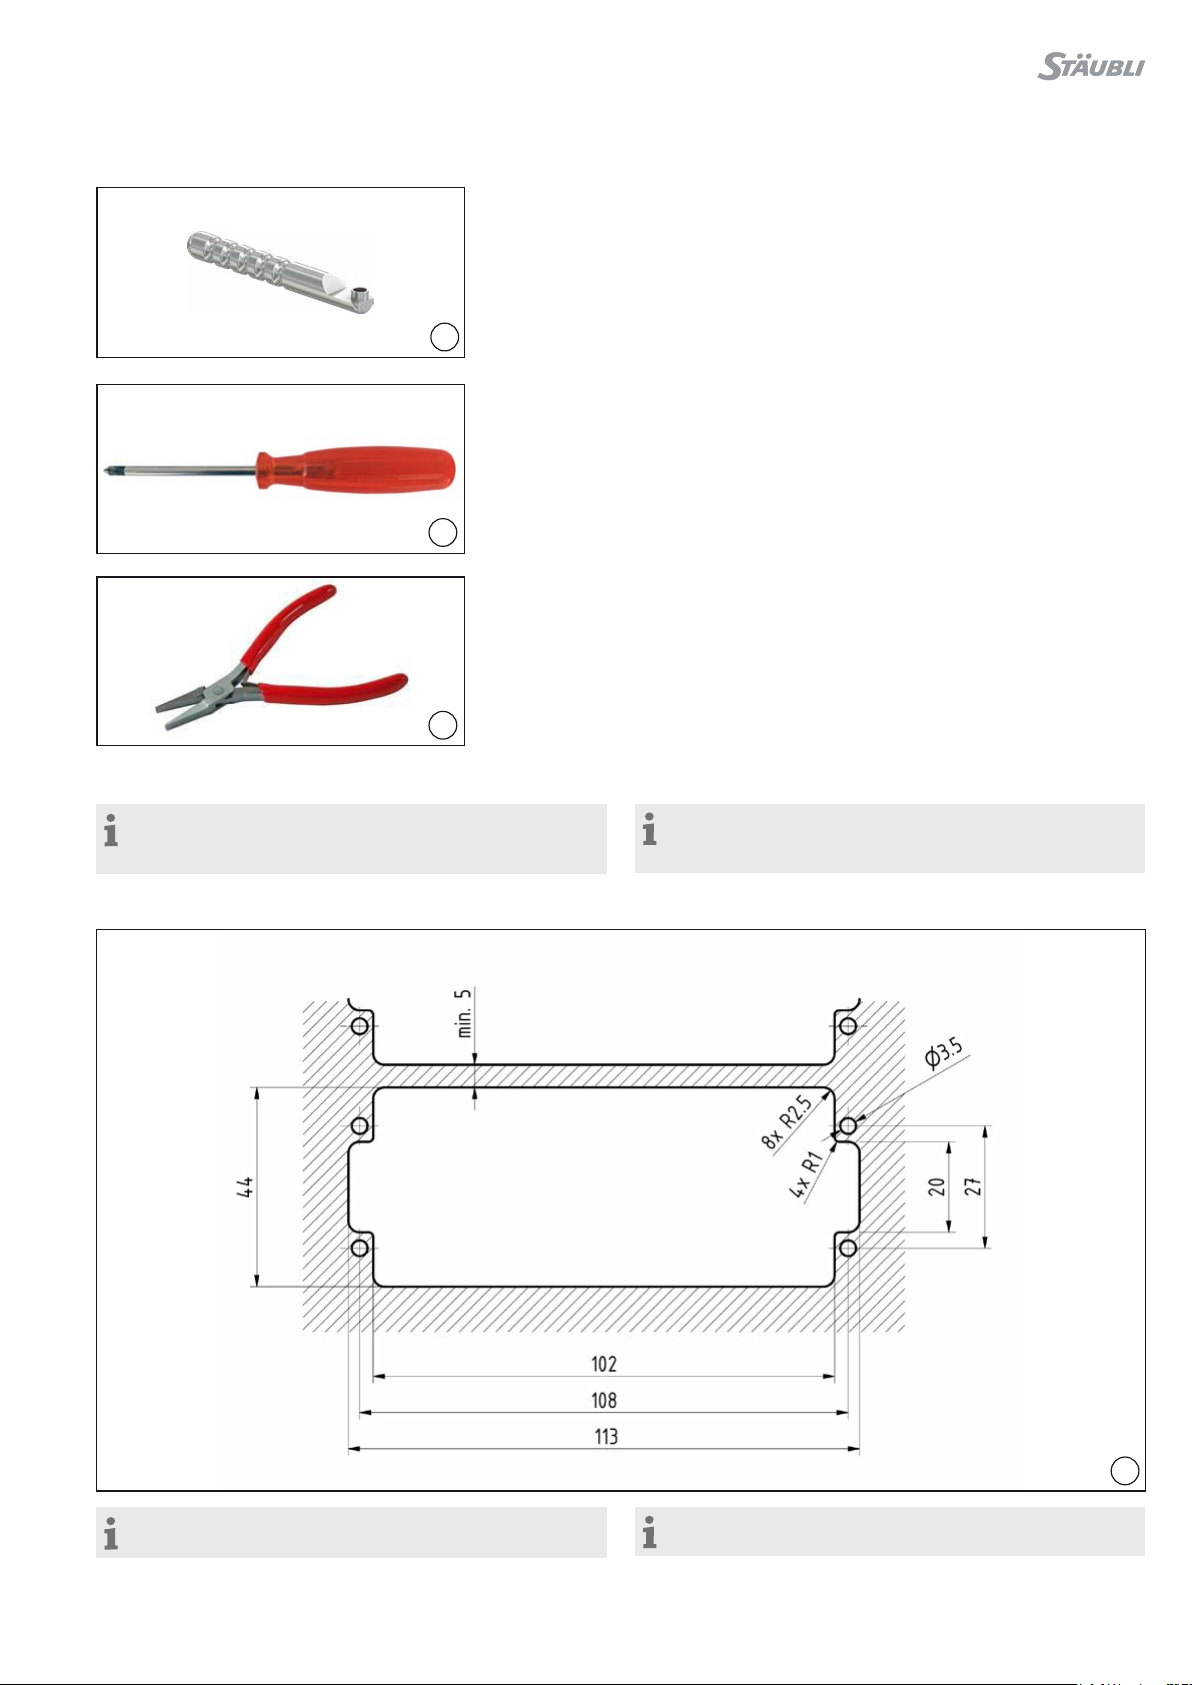
工具准备 Tools required
(ill. 1)
用于拆卸固定夹和更改编码的拔出工
具,订货号 333012
(ill. 1)
Extraction tool for removing holding
clip and change of coding,
Order no� 33�3012
(ill. 2)
PH1 尺寸的十字槽螺丝刀
(ill. 2)
Cross slot screwdriver size PH1
(ill. 3)
尖嘴钳(用于拆卸编码插针)
(ill. 3)
Needle-nose pliers (for coding pins
disassembly)
电缆准备 Cable preparation
注意事项:
根据 MA213-01 准备电缆
wwwstaublicom/electrical
Note:
Cable preparation according to MA213-01
www�staubli�com/electrical
安装板的钻孔图 Drilling plan mounting plate
注意事项:
轻型外壳之间的最小距离 = 5 mm
Note:
Minimum distance between light housings = 5mm
4 / 84 / 8
5
6
7
8
9
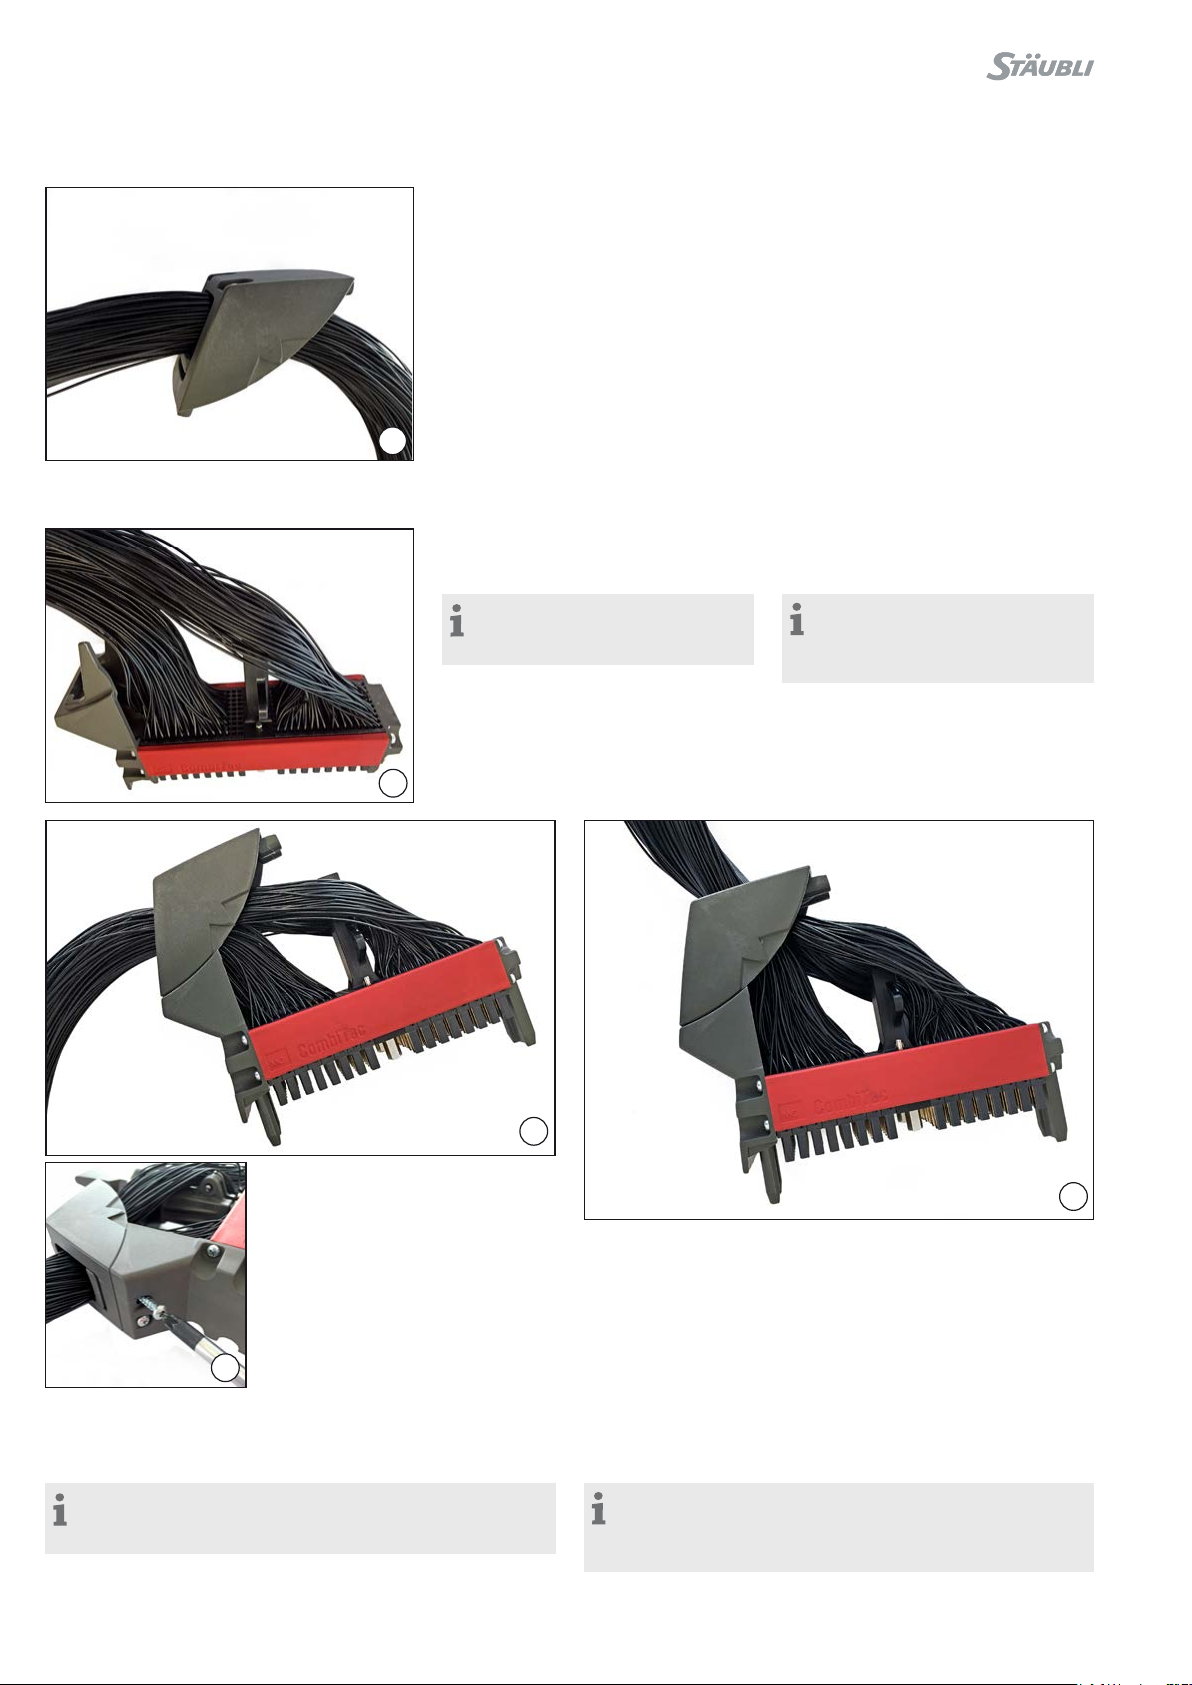
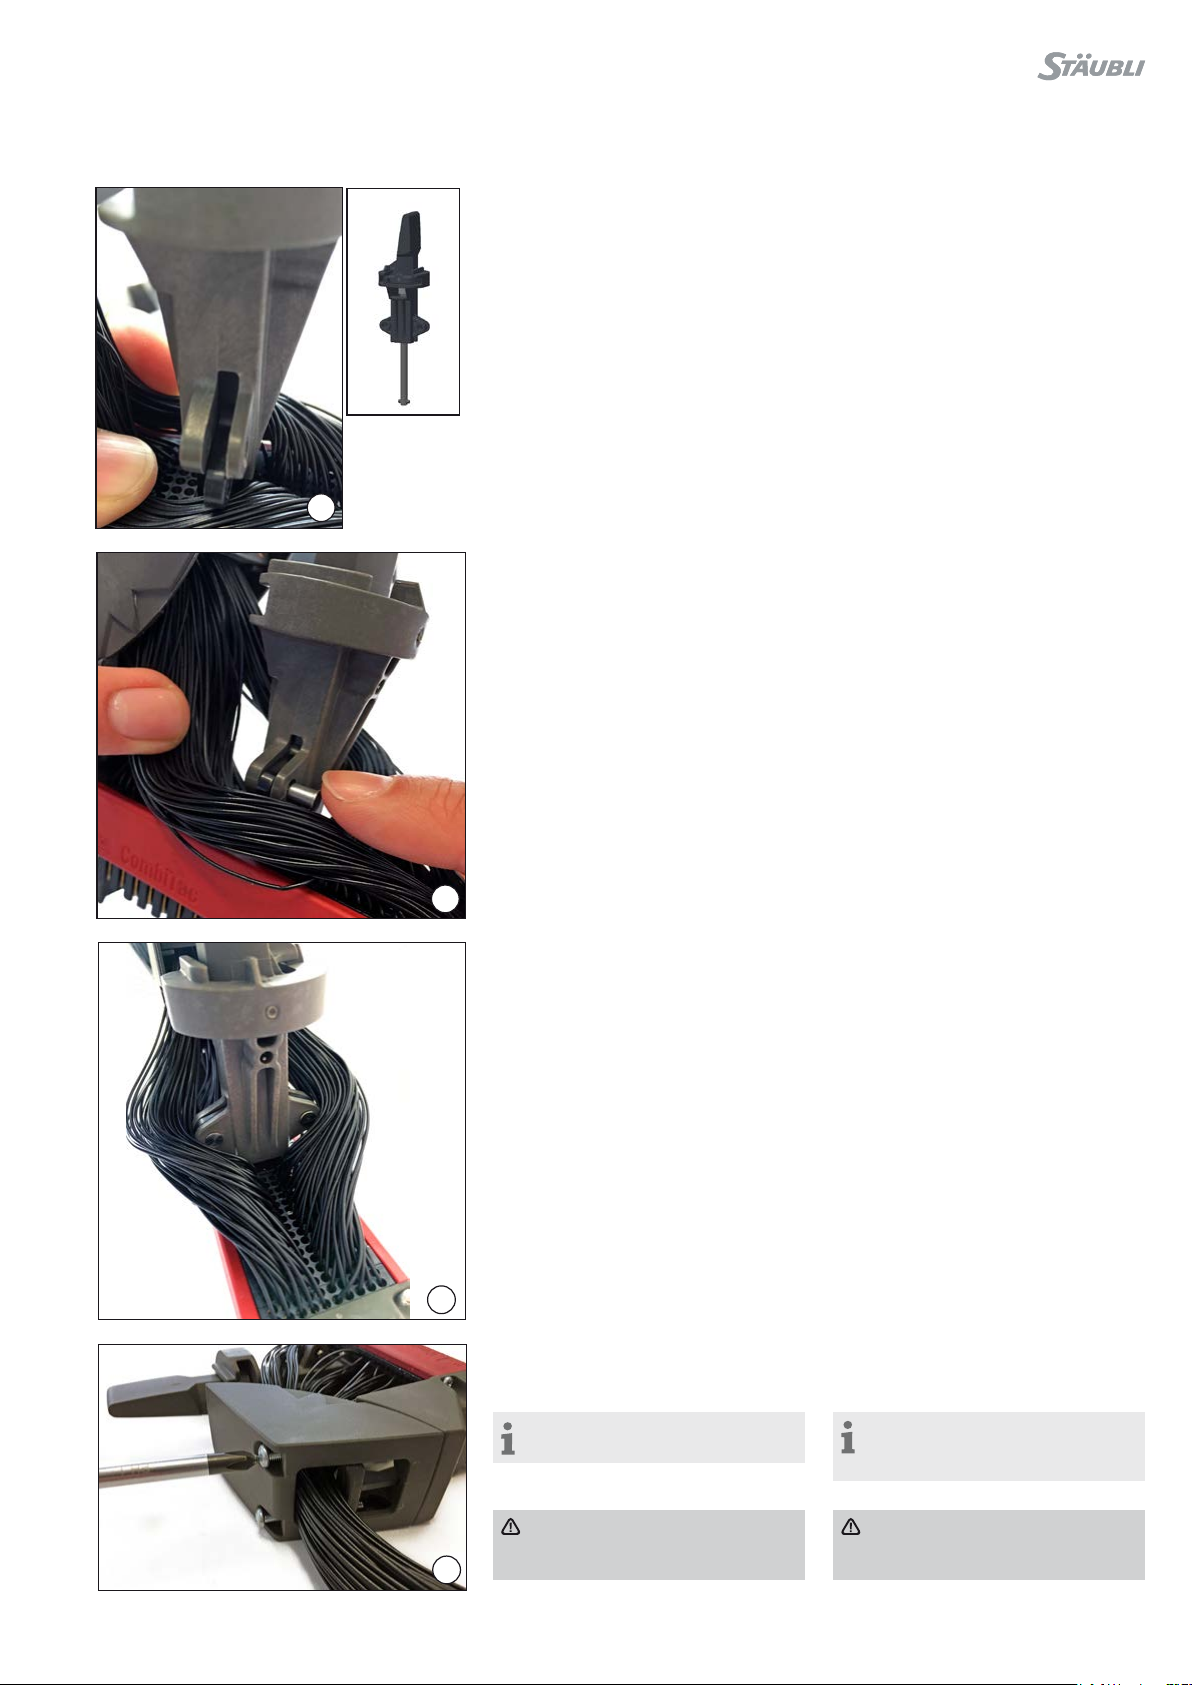
插针和电缆装配 Pin and cable assembly
(ill. 5)
将压接好的电缆穿过出线孔部件。
(ill. 5)
Feed assembled cables through cable
outlet�
(ill. 6)
将压接的插针插入支撑块。
(ill. 6)
Insert crimped pins in the carriers.
注意事项:
建议从更靠近电缆出线一侧的插槽
开始插入。
Note:
It is recommended to carry out the
insertion process starting from the
slots closer to the cable outlet side�
(ill. 7 – 9)
插针完成安装后,通过两个螺丝,将电缆出线口部件与主体锁紧。
(ill. 7 – 9)
Once the pin insertion process is complete, push the cable
outlet into position, insert the two screws and tighten�
注意事项:
根据应用的不同,可以将线缆出线口部件固定在不同位置(15
度直出线和90度侧出线)。
Note:
Depending on the application, the cable outlet can be
placed in two positions (straight cable entry (15˚) and lateral
cable entry (90˚))
5 / 85 / 8
10
11
12
13
中控锁装配 Central locking assembly
(ill. 10)
接入中央锁紧。
(ill. 10)
Insert central locking.
(ill. 11 – 12)
插入两个锁定销,然后将其推动/卡入
到位。
(ill. 11 – 12)
Insert the two locking pins and push/
click into position�
电缆夹紧固 Cable clamp fastening
(ill. 13)
中央锁紧安装到位后,紧固电缆夹螺钉。
(ill. 13)
Once the central locking is in place,
proceed with fastening the cable
clamp screws�
注意事项:
建议平行拧紧螺钉。
Note:
Parallel tightening of screws is
recommended�
注意
将电缆夹拧紧到不会损坏电缆的
程度。
Attention
Tighten cable clamp to a level
that does not damage the cables�
6 / 86 / 8
14 15
16
17
18 19 20
21
90°
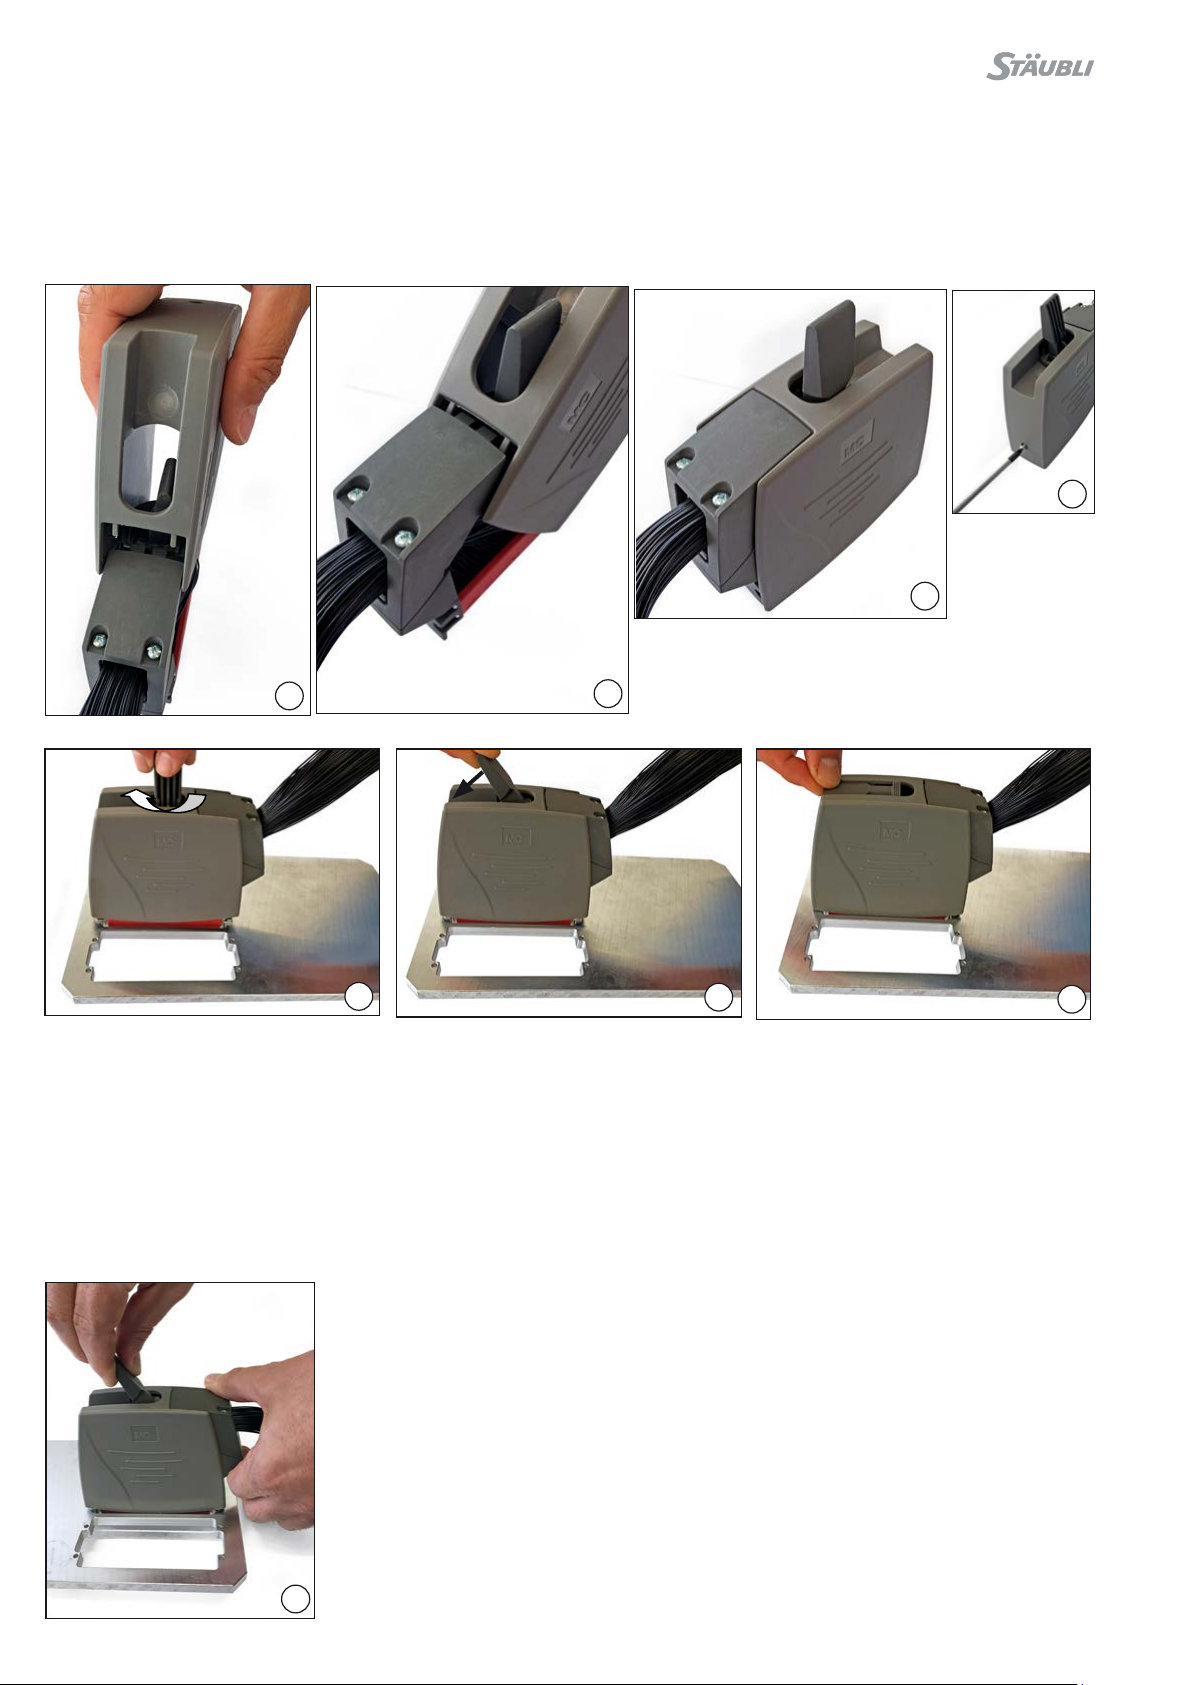
盖板组合 Cover assembly
(ill. 14 – 17)
如图所示插入盖子并拧紧螺钉。
(ill. 14 – 17)
Insert cover as shown and fasten the screw.
中央锁紧 Central locking
(ill. 18-20)
CombiTac 轻型外壳具有中央锁紧机构。
先将CombiTac公头和母头插合到位,然后旋转中央锁杆,再将中
央锁杆推入锁紧位置(如图18-20)。
(ill. 18-20)
The CombiTac light housing features a central locking mecha-
nism�
To lock the CombiTac light housing, push the male and female
CombiTac parts into position, turn lever, and push lever into
locking position as shown�
(ill. 21)
解锁并断开连接:将出线口部件轻轻往
回拉的同时,拉出中央锁杆,中央锁杆
会弹回初始位置(未锁紧状态),即完全
解锁。
(ill. 21)
To unlock the central locking and dis-
connect the light housing, pull out the
locking lever while gently pulling back
on the cable outlet side� The lever will
spring to the default unlock position
as soon as the locking mechanism is
completely released�
7 / 87 / 8
22 23
24
25 26
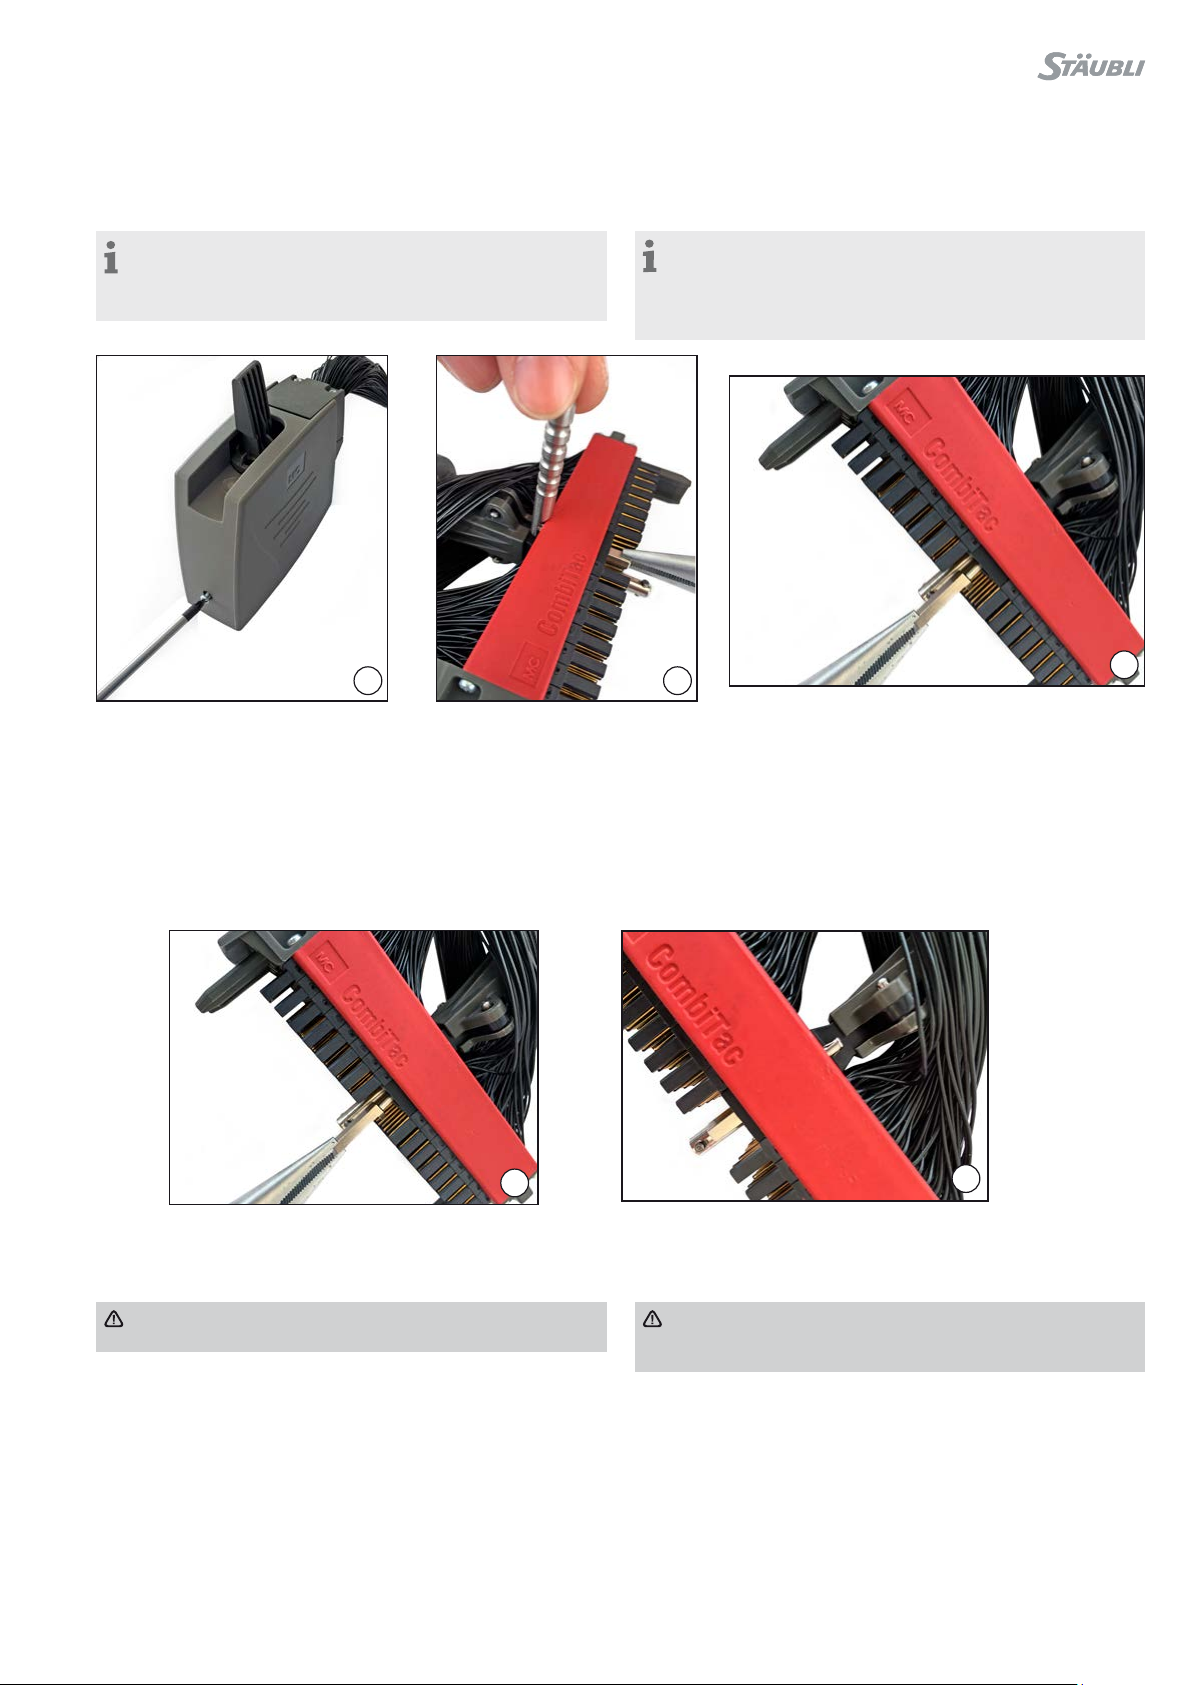
更改编码 Changing the coding
注意事项:
该轻型外壳附有标准预编码。
有 36 种编码可能性。
要手动更改编码,请遵循以下步骤。�
Note:
The light housing is delivered with standard pre-coding�
There are 36 coding possibilities�
To manually change the coding follow the procedure de-
scribed below�
(ill. 22)
拧下螺钉,然后拉开壳盖。
(ill. 22)
Remove screw and pull off the housing cover�
(ill. 23, 24)
如图所示,使用拔出工具(订货号 333012)将编码销推出插槽。
编码销松动后,使用钳子(图3所示)将编码销取出。
(ill. 23, 24)
Use extraction tool (part 33�3012) as shown to push holding
pin out of position�
Once holding pin is released, use the pliers (ill� 3) to remove
coding pin�
(ill. 25)
更改编码位置,将编码销重新装回插槽。
(ill. 25)
Change the coding position and place coding pin back into the
coding pin slot�
注意
编码销重新安装后,请检查是否安装到位,如图 26 所示。
Attention
Once you have inserted the coding pin, check to ensure
correct installation as show in ill� 26�
按照相同的步骤更改CombiTac母头端的编码。
完成编码更改后,请重新插入壳盖。
Follow the same procedure to change coding on the female
CombiTac side�
Once coding change is complete, re-insert the housing cover�

8 / 88 / 8
27 28
29
30
31
生产商/Producer:
Stäubli Electrical Connectors AG
Stockbrunnenrain 8
4123 Allschwil/Switzerland
Tel. +41 61 306 55 55
Fax +41 61 306 55 56
www.staubli.com/electrical
© by Stäubli Electrical Connectors AG, Switzerland – MA213-10 – 03.2017, Index a, Marketing Communications – 随时可能变更 / Subject to alterations
拆卸中央锁紧杆 Removal of central locking
(ill. 27 - 28)
拆卸阀盖。
如图所示,使用拔出工具(零件 333012)在锁紧销上施加压力,以
释放固定弹簧。用钳子将锁紧销拉出。
(ill. 27 - 28)
Remove cover�
Use extraction tool (part 33�3012) as shown to apply pressure
on the locking pins in order to release the holding spring� Use
a pliers to pull the locking pins out�
注意
锁紧销位于中央锁紧杆的两侧。两者都需要拆卸。
Attention
Locking pins are located on both sides of the central lock-
ing� Both need to be removed�
CombiTac 插合时移除壳盖 Removal of cover while CombiTac is mated
出于检修目的,可以在连接(插合)时卸下 CombiTac 轻型外壳。 For service purposes, the CombiTac Light Housing can be
removed while connected (mated)�
(ill. 29)
拧下螺钉,然后拉开壳盖。
(ill. 29)
Remove screw and take off the housing cover�
Other manuals for CombiTac
8
Table of contents
Other Staubli Industrial Equipment manuals


Popular Industrial Equipment manuals by other brands


Siemens
Siemens SIMATIC 505 User & Programmers Manual

Rotex
Rotex 70 Series Maintenance instructions

OHTAKE
OHTAKE BS-C Series Operation manual

LANCIER Monitoring
LANCIER Monitoring RTS 1000 Original operating instructions

Ilco Orion
Ilco Orion ECODRILL 2000 C/E operating manual

Eaton
Eaton XTSE Series Instruction leaflet


