Steren COM-425 User manual


Before using your new TV tuner video capture please read this
instruction manual to prevent any damage. Put it away in a safe
place for future references.
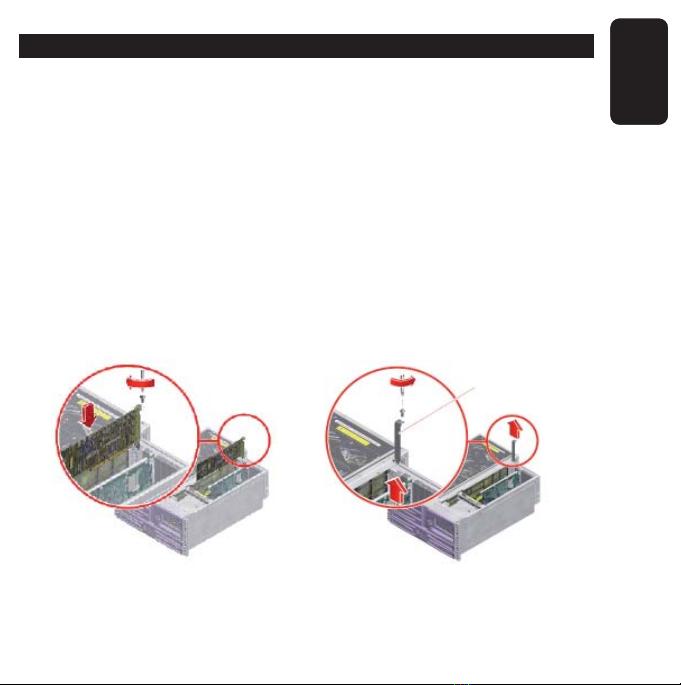
IMPORTANT
To avoid your computer board and other components damaged by
static electricity, make sure you have discharged any static
electricity from your body by touching any metal surface.
PACKAGE CONTENT
1 internal PCI card
3,5mm to 3,5mm audio cable
Remote controller
IR remote control extensor
User’s manual
Installation CD
SYSTEM REQUIREMENTS
1 available PCI slot
Pentium III 800MHz or higher
128MB of system memory or better
VGA graphic card
DirectX 9
16-bit PCI sound card for audio playback and recording
Speaker for audio output
CD-ROM drive
Windows 98, ME, 2000, XP
•
•
•
•
•
•
•
•
•
•
•
•
•
•
•
ENGLISH
ENGLISH-02
Before usin
g
y
our new TV tuner video capture please read this
i
nstruction manual to prevent an
y
dama
g
e. Put it awa
y
in a safe
p
lace for future references
.

1
2
3
4
56
CONTROLS
1.- Video input
Connect the antenna cable to receive TV video signal
2.- Remote control extender input jack
Allows you to connect a Remote Control extender
3.- Composite video input
Connect devices like VCRs, DVDs or VCDs players with RCA connector
ENGLISH
ENGLISH-03

ENGLISH
4.- S-Video input
Connect devices like VCRs, DVDs or VCDs players with S-Video
connector
5.- Audio input
Audio input from video source
6.- Audio output
Use this jack to connect the 3,5mm cable to sound card Line-In jack
ENGLISH-04

ENGLISH
ENGLISH-05
HARDWARE INSTALLATION
You must install the PCI card inside of the computer. Make sure
you have the enough knowledge configuring and installing
computer components, otherwise refers a qualified personnel.
1.- Unplug the power cord from your computer and any other connected
peripheral devices. Follow the precautions for static electricity
discharge.
2. Remove the computer’s cover.
3. Select an available PCI slot for the new board.
4. Remove the selected slot bracket by unscrewing the holding screw,
slide it out and place the PCI card, carefully align the board’s bus
connector with the selected expansion slot on the motherboard. Push
the board down firmly, but gently, until it is well seated.
5. Place the computer’s cover and plug all your peripheral devices.
Slot bracket

ENGLISH
ENGLISH-06
DRIVER INSTALLATION (XP)
1.- After installing the PCI card onto computer, a newly installed card will
be found and Found New Hardware Wizard appears. Press Cancel to
close the wizard.
2.- Place the Driver CD into the CD-ROM drive.
3.- Select Open Folder , you’ll see the files contained in the disk.
4.- Locates and run Setup.exe

ENGLISH
ENGLISH-07
5.- InstallShield wizard begins. Click on Next to continue.
6.- Choose destination location. If you want to use the default location,
click on Next to continue.

7.- Select a country to set the standard for TV tuner. Click on Set to
continue. The installation process begins.
8.- Click on Finish to conclude this part of the process. You must restart
the computer. Choose Yes, I want to restart my computer now and click
on OK to restart.
ENGLISH
ENGLISH-08

ENGLISH
ENGLISH-09
9.- Once the computer restarted, click on Start >>> Control Panel >>>
System >>> Hardware >>> Device Manager >>> Sound, video and
game devices, the new hardware should be found.

ENGLISH
ENGLISH-10
SOFTWARE INSTALLATION
Before install the application CD, make sure you have installed
DirectX 9 or higher in the computer.
1.- Place the Driver CD into the CD-ROM drive.
2.- Select Open Folder , you’ll see the files contained in the disk.
3.- Locates Setup.exe file into AP software folder, and run it.
4.- Select the country where you want to use the equipment, then click
on Set to continue.

ENGLISH
ENGLISH-11
5.- Then, select a language (English) and click on Set to continue.
6.- Choose destination location. If you want to use the default location,
click on Next to continue.

ENGLISH
ENGLISH-12
7.- The installation process begins.
8.- Click on Finish to conclude the process. You must restart the
computer. Choose Yes, I want to restart my computer now and click on
OK to restart.
HOW TO USE THE SOFTWARE
Before start to use the TV tuner you must bridge the COM-425 and the
audio card on the computer. Just plug a 3,5mm from the Audio Output
connector on the COM-425 to Audio In connector on the audio card.
In this way you can hear the TV programs and Video files on your
speakers.
Make sure to connect an antenna with RF connector.
Click ok Scan to search TV signals.
Make sure to check the Line-In option on Windows menu.

ENGLISH
ENGLISH-13
Click Start >>> Programs >>> TV Champ >>> TV Champ to run the
program. You’ll see next screen.
Air / Cable Channels Add fav.
channel Select fav.
channel Pause Record
Volume up
Mute
Volume
adjustment
Volume
down
Continue
Playback
Stop
Playback
Options
Preview
channel
Schedule
Capture
Video source
selector
Audio device
source
Last channel
Snapshot
Scan
Channel
confirmation
Channel input

ENGLISH
ENGLISH-14
Video Window
Click on one of the corners to resize the screen.
Click over the screen (using the right button of the mouse) to
choose one screen size (320x240, 640x480, 7210x480, 720x576 and
full screen). Always on top option allows you to set on top of any
application.
Channel input
Allows you to select a channel, directly. After enter a number, you must
click Enter to confirm the selection.
Scan
Allows you to search TV signals.
Snapshots
If you want to capture still images from TV, click this button. Save them
in BMP or JPG formats. Default saving name is mddhhmmssn, where:
m: Month, dd: Date, hh: hour, mm: minutes, ss: seconds, n:number
Video source select
Choose one of the available video sources: TV tuner, Composite video
and S-Video.
Schedule capture
Program your recordings One Time, Several Days or Every Week.
Never lose a TV program again. Once you have edited the program,
click ADD to insert it in the program list, then click on Save.

ENGLISH
ENGLISH-15
Channel Preview
Choose this option to visualize the available channels in a mosaic. Each
channel will be visualized by 5 seconds and automatically change to
next window. If you want to watch one channel full screen, press the
desired windows twice.
Options
Record
Allows you to select the video recording format: AVI / MPEG1 / MPEG2.
Also, you can select the work directory, where all generated files will be
stored.
Color
This option allows you to adjust: Brightness, Contrast, Hue, Saturation
and Sharpness.
TV Tuner
Use this option to choose one of the video systems: PAL D/K, PAL I,
PAL B/G, NTSC M. Use NTSC M for Mexico.
TV type
Select the video source: Cable or Air TV.
Fine tune
Tune the TV signal, manually. Use this to enhance the signal. We
recommend to use Default option.
Click Accept to confirm and store the changes.

ENGLISH
ENGLISH-16
Add favourite channel
Save the current channel in your favourite channel list.
Favourite channel select
Click on this button to select one of the stored favourite channels. Each
time you use this button, the channel will change.
Recording
Click this button to record a TV program.
Stop
Click on this button to stop the recording / playback.
Pause
Make a pause wile playback.
Playback
Click to start to play a recorded file. When you click this button, a
window will display with all stored files, choose one of them. Playback
automatically.
Continue playback
Resume the playback, when you pressed Pause button.

ENGLISH
ENGLISH-16
REMOTE CONTROL
1.- Source
Select the video source: Composite / TV / S-video
12
3
4
56
7
8
9
10
11 12
13
14 15
8

ENGLISH
ENGLISH-16
2.- Power
Power on / off the equipment
3.- Channels
Select the channels, directly
4.- Last channel
Click to jump to previous channel
5.- Pause
Make a pause while playback
6.- Snapshot
While playback allows you to take a snapshot
7.- Record
Start to record a TV program
8.- Forward / Backward
While playing , allows you to forward or backward
9.- Playback
Start to playback a stored file
10.- Stop
Stops to play / record

ENGLISH
ENGLISH-16
11.- Full screen
Visualize the image full screen
12.- Scan
Search for TV signals
13.- Mute
Disable the sound
14.- Volume
Raise or diminish volume level
15.- Channel selector
Allows you to change the channels, one by one
Some buttons are reserved for future updatings.
Some buttons are reserved for future updatin
g
s
.

ENGLISH
ENGLISH-16
TROUBLESHOOTING
SPECIFICATIONS
Input: 12V
Video system: NTSC / PAL / SECAM
Audio: Stereo audio input / output
Analog video: One S-video input
One composite video input
TV: 75ohms coaxial cable input
Video capture: MPEG 1 / 2
Capture format: AVI
Snapshot format: BMP & JPG
Resolution: 720 x 576 at 25fps (PAL)
720 x 480 at 30fps (NTSC)
Dimensions: 135 x 120 x 20mm
Weight: 231g
Product design and specifications are subject to change, without
notice.
Trouble Solution
Check the audio connections, remember you
must brid
g
e the sound card and COM-425
Make sure you have selected Line-In on
Windows audio menu
(
recordin
g
menu
)
Make sure you have installed DirectX 9.0 or
hi
g
her in
y
our com
p
uter
If you have an older version of DirectX, first
uninstall COM-425 driver, then install DirectX.
After this
,
y
ou can install COM-425 drivers
Can visualiza and record TV programs
but can't playback and can't visualize
preview channel mode
Hear no sound in Preview / Recording
mode
P
roduct desi
g
n and specifications are sub
j
ect to chan
g
e, without
notice
.
Other manuals for COM-425
3
Table of contents
Languages:
Other Steren TV Tuner manuals

Steren
Steren COM-425 User manual

Steren
Steren Mobile Tuner User manual

Steren
Steren INTV-100 User manual

Steren
Steren 208-900 User manual

Steren
Steren COM-252 User manual

Steren
Steren COM-430 User manual

Steren
Steren COM-425 User manual

Steren
Steren 208-700 User manual

Steren
Steren 208-900 User manual

Steren
Steren Smart Tuner User manual