STM ROCKETBOX 2.0 User manual


POWER
Standard 110V
8 Full Load Amps
5-1/2 ft. Cord Length
SOFTWARE &
UPGRADES
HD 7" Responsive Touch Control Panel
with Data Log and Remote Access Capabilities
OPERATION Patent-Pending Pneumatic Leveling System
CYCLE
CUSTOMIZATION
Single Cycle Operation with
Customizable Run Settings
TRAINING Integrated Training Mode with Step-by-Step Tutorials
VOLUME
CAPACITY 453, 143 or 72 Pre-Rolls Every Cycle
MATERIALS
Encased in SAE 304 Stainless Steel
Heavy Duty Caster Wheels (for transport)
Aluminum & Other Food Grade Components
WEIGHT &
DIMENSIONS
Approximately 300 lbs
Machine Dimensions 24" L x 37" H x 27" W
PAPER
COMPATIBILITY Compatible with 84, 98, and 109 mm cones
COMPLIANCE
OSHA Compliant
UL-Listed Components
100% Food-Grade
Emergency Stop System
LIFE CYCLE 10 Years
Sesh Technologies Manufacturing, Inc.
3223 North Market Street, Spokane, WA 99207
Phone: (509) 204-3164 | Web: www.stmcanna.com
USER MANUAL V1.4
ROCKETBOX 2.0 ™

Table of Contents ......................................... 1
Break-In Procedure ...................................... 2
Components ................................................. 3
Lift Plate ........................................................ 5
Adaptor Plate ............................................... 6
Adjustable Top Tray ..................................... 7
Loading & Unloading Cones ....................... 9
Getting Started ........................................... 10
1
TABLE OF CONTENTS
Operation Of Machine ............................... 11
Touch Screen .............................................. 12
Startup Manual .......................................... 13
Input Density Screen ................................. 14
Parameters/Cycle Run ............................... 15
Density Testing ........................................... 16
Cleaning and Maintenance ....................... 19
Terms of Business ...................................... 20

Thank you for being a valuable and loyal client
of STM. Our goal is to bring our customers the
very best in product quality and customer
service. We value your feedback and use it to
evaluate what to improve and/or update in
our existing product line.
The RocketBox™ uses a direct funneling
system to deliver contaminate-free material
into the selected pre-rolls when used properly.
The Top Tray funnels are directly inserted into
the opening of the pre-roll cones. This only
allows what is being fed onto the Top Tray to
enter the desired pre-rolls in the Bottom Tray.
After setting up the RocketBox™, run the machine through
multiple cycles with each of your tray systems - empty and
unloaded. Watch for and remove any debris in-between the
trays and in the bottom of the shaker box. We take great care
to mitigate this during production, however, due to the intense
vibration some debris may appear.
After un-boxing and the initial dry runs are complete, you may
proceed with regular/normal use of the RocketBox™. Until the
machine has been ran for 400 hours, discard all materials
which have dropped inside the bottom of RocketBox™.
*Run time is located on the start screen.
PLEASE ADHERE TO THE RECOMMENDED
GUIDELINES TO BREAK-IN YOUR ROCKETBOX™
After the RocketBox™ has ran for 400 hours you may reuse the
material that has been collected in the bottom of the shaker
box. Only use this product after visual inspection for debris has
been completed.
Visual inspection should always remain part of the
operation for quality control standards.
2
BREAK-IN PROCEDURE
3
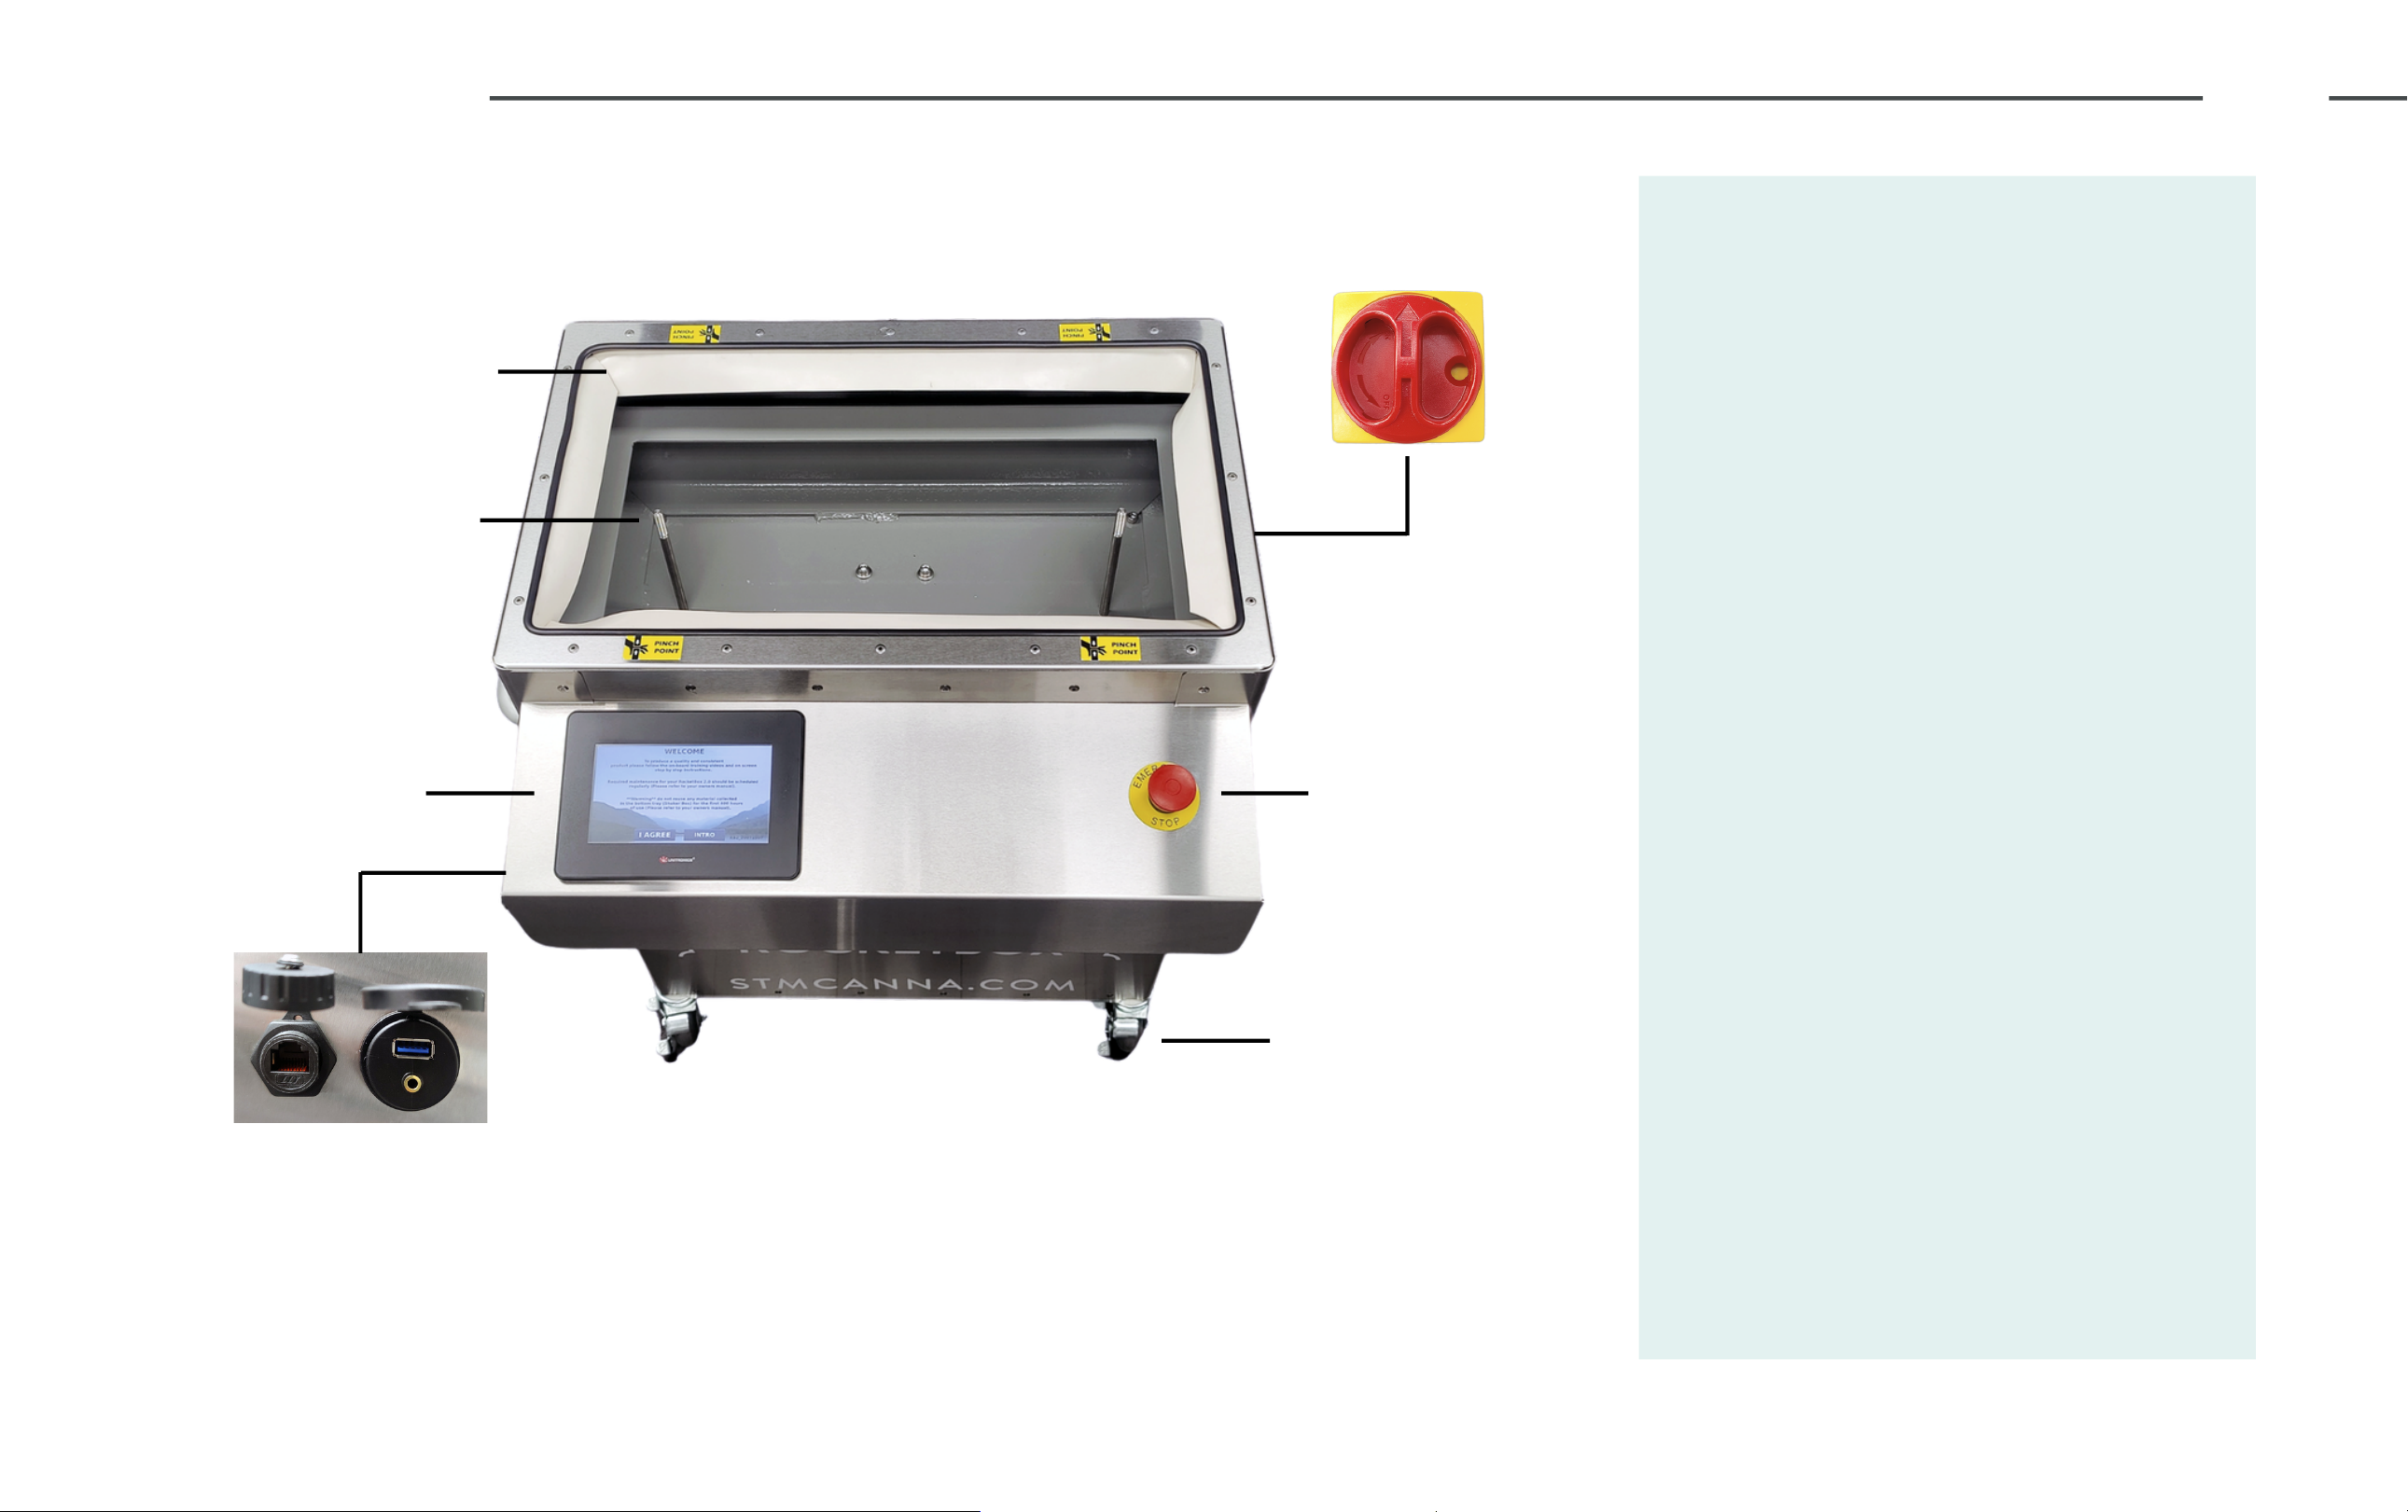
COMPONENTS
6. E-Stop Button3. 7" Touch Screen
1. Rubber Flaps
2. Guide Rod
7. Casters
4. Ports
5. Power Switch 1. Rubber Flaps - Helps
prevent material from falling
into the base of machine.
2. Guide Rods - Threaded rods
to guide and secure the top
and bottom trays into machine.
3. 7" Touch Screen- Used for
the operation of machine.
4. Ports- Ethernet, USB, and
AUX connectivity.
5. Power Switch- Turns the
machine on and off.
6. E-Stop Button- Instantly
turns the machine off in case
of an emergency.
7. Casters - Swiveling caster
wheels for easymobility.
4
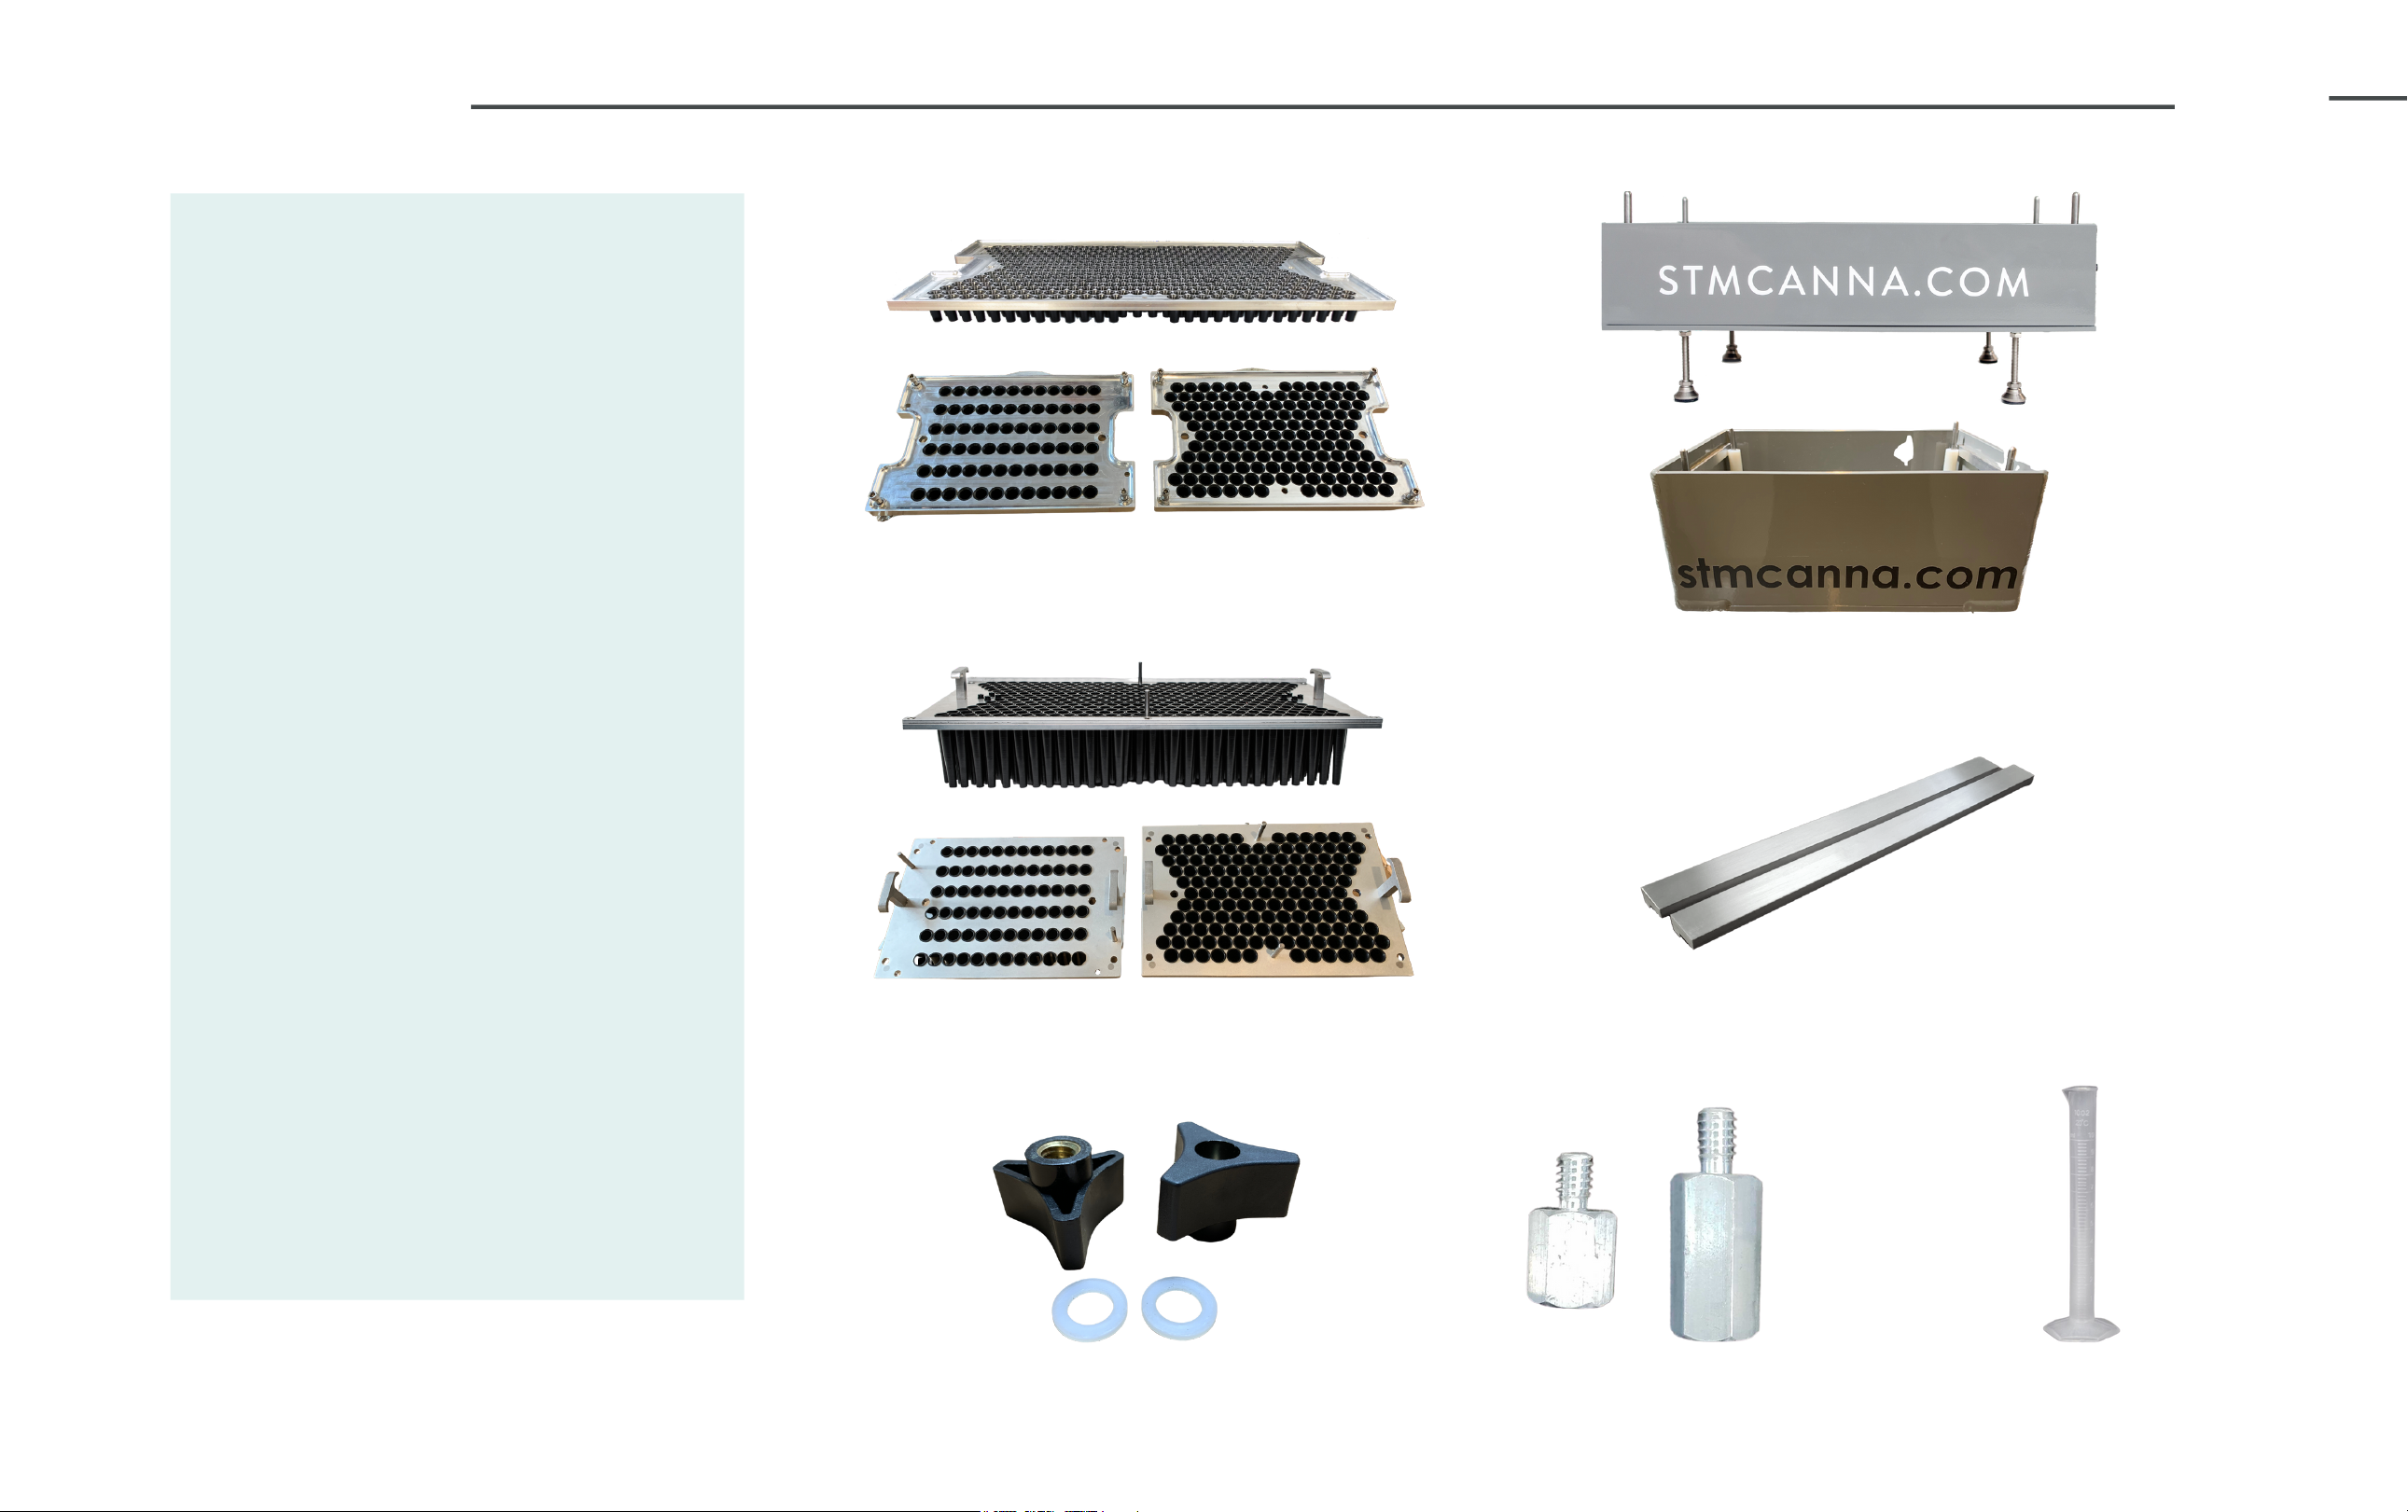
COMPONENTS
11. Loading Box
8. Adjustable Top Tray
9. Bottom Tray
12. Reset Brackets
13. Riser Bolts
14. Density Beaker
11. Loading Box- Holds Top/Bottom
Trays for easy loading and unloading
and also guides the marrying of the
trays.
8. Adjustable Top Tray- Used to funnel
material into bottom tray and control
desired fill level of pre-rolls.
9. Bottom Tray- Cone holding tray (84,
98, or 109 mm cones).
12. (2) Reset Brackets- To reset the
adjustable top tray to the default 1/4"
spacing.
13. Riser Bolts - Adjusts the lift plate for
84mm (1-1/4) and 98mm (98 Special)
cones. (x2 sets of 4)
14. Density Beaker- 10 mL graduated
beaker used during density tests.
10. Wingnuts + Washers- Threads onto
guide rods to secure Top and Bottom
Tray into Rocketbox.
10. Wingnuts + Washers

5
LIFT PLATE
Remove the (4) flathead screws with a 5/32
Allen wrench. Then remove the Lift Plate
completely from the shaker box.
With the lift plate removed, install the
desired Riser Bolts (4) onto the fixed riser
bolts on the bottom of the shaker box.
*See Riser Bolt image to right*
Once Riser Bolts are installed, align and re-
install the Lift Plate. Secure in place with the
four (4) flathead screws using a 5/32 Allen
wrench.
*Riser Bolts should ALWAYS be installed UNDER
the lift plate*
ADJUSTING THE LIFT PLATE
The Lift Plate rests on the four (4) default riser bolts
connected to the bottom of the shaker box.
*Because all papers are rolled by hand, this allows
an even fill line from the bottom up.*
The Lift Plate uses four (4) Riser Bolts to adjust for
98mm (A) and 84mm (B) pre-rolls. The shaker box
always comes with four (4) default riser bolts that
are designed for 109mm King Size pre-rolls.
*DO NOT REMOVE THE DEFAULT SPACERS.*
'A' RISER BOLTS 'B' RISER BOLTS
Used for 98mm pre-rolls Used for 84mm pre-rolls
*Please ensure the correct Riser Bolts are installed prior to use.*
6
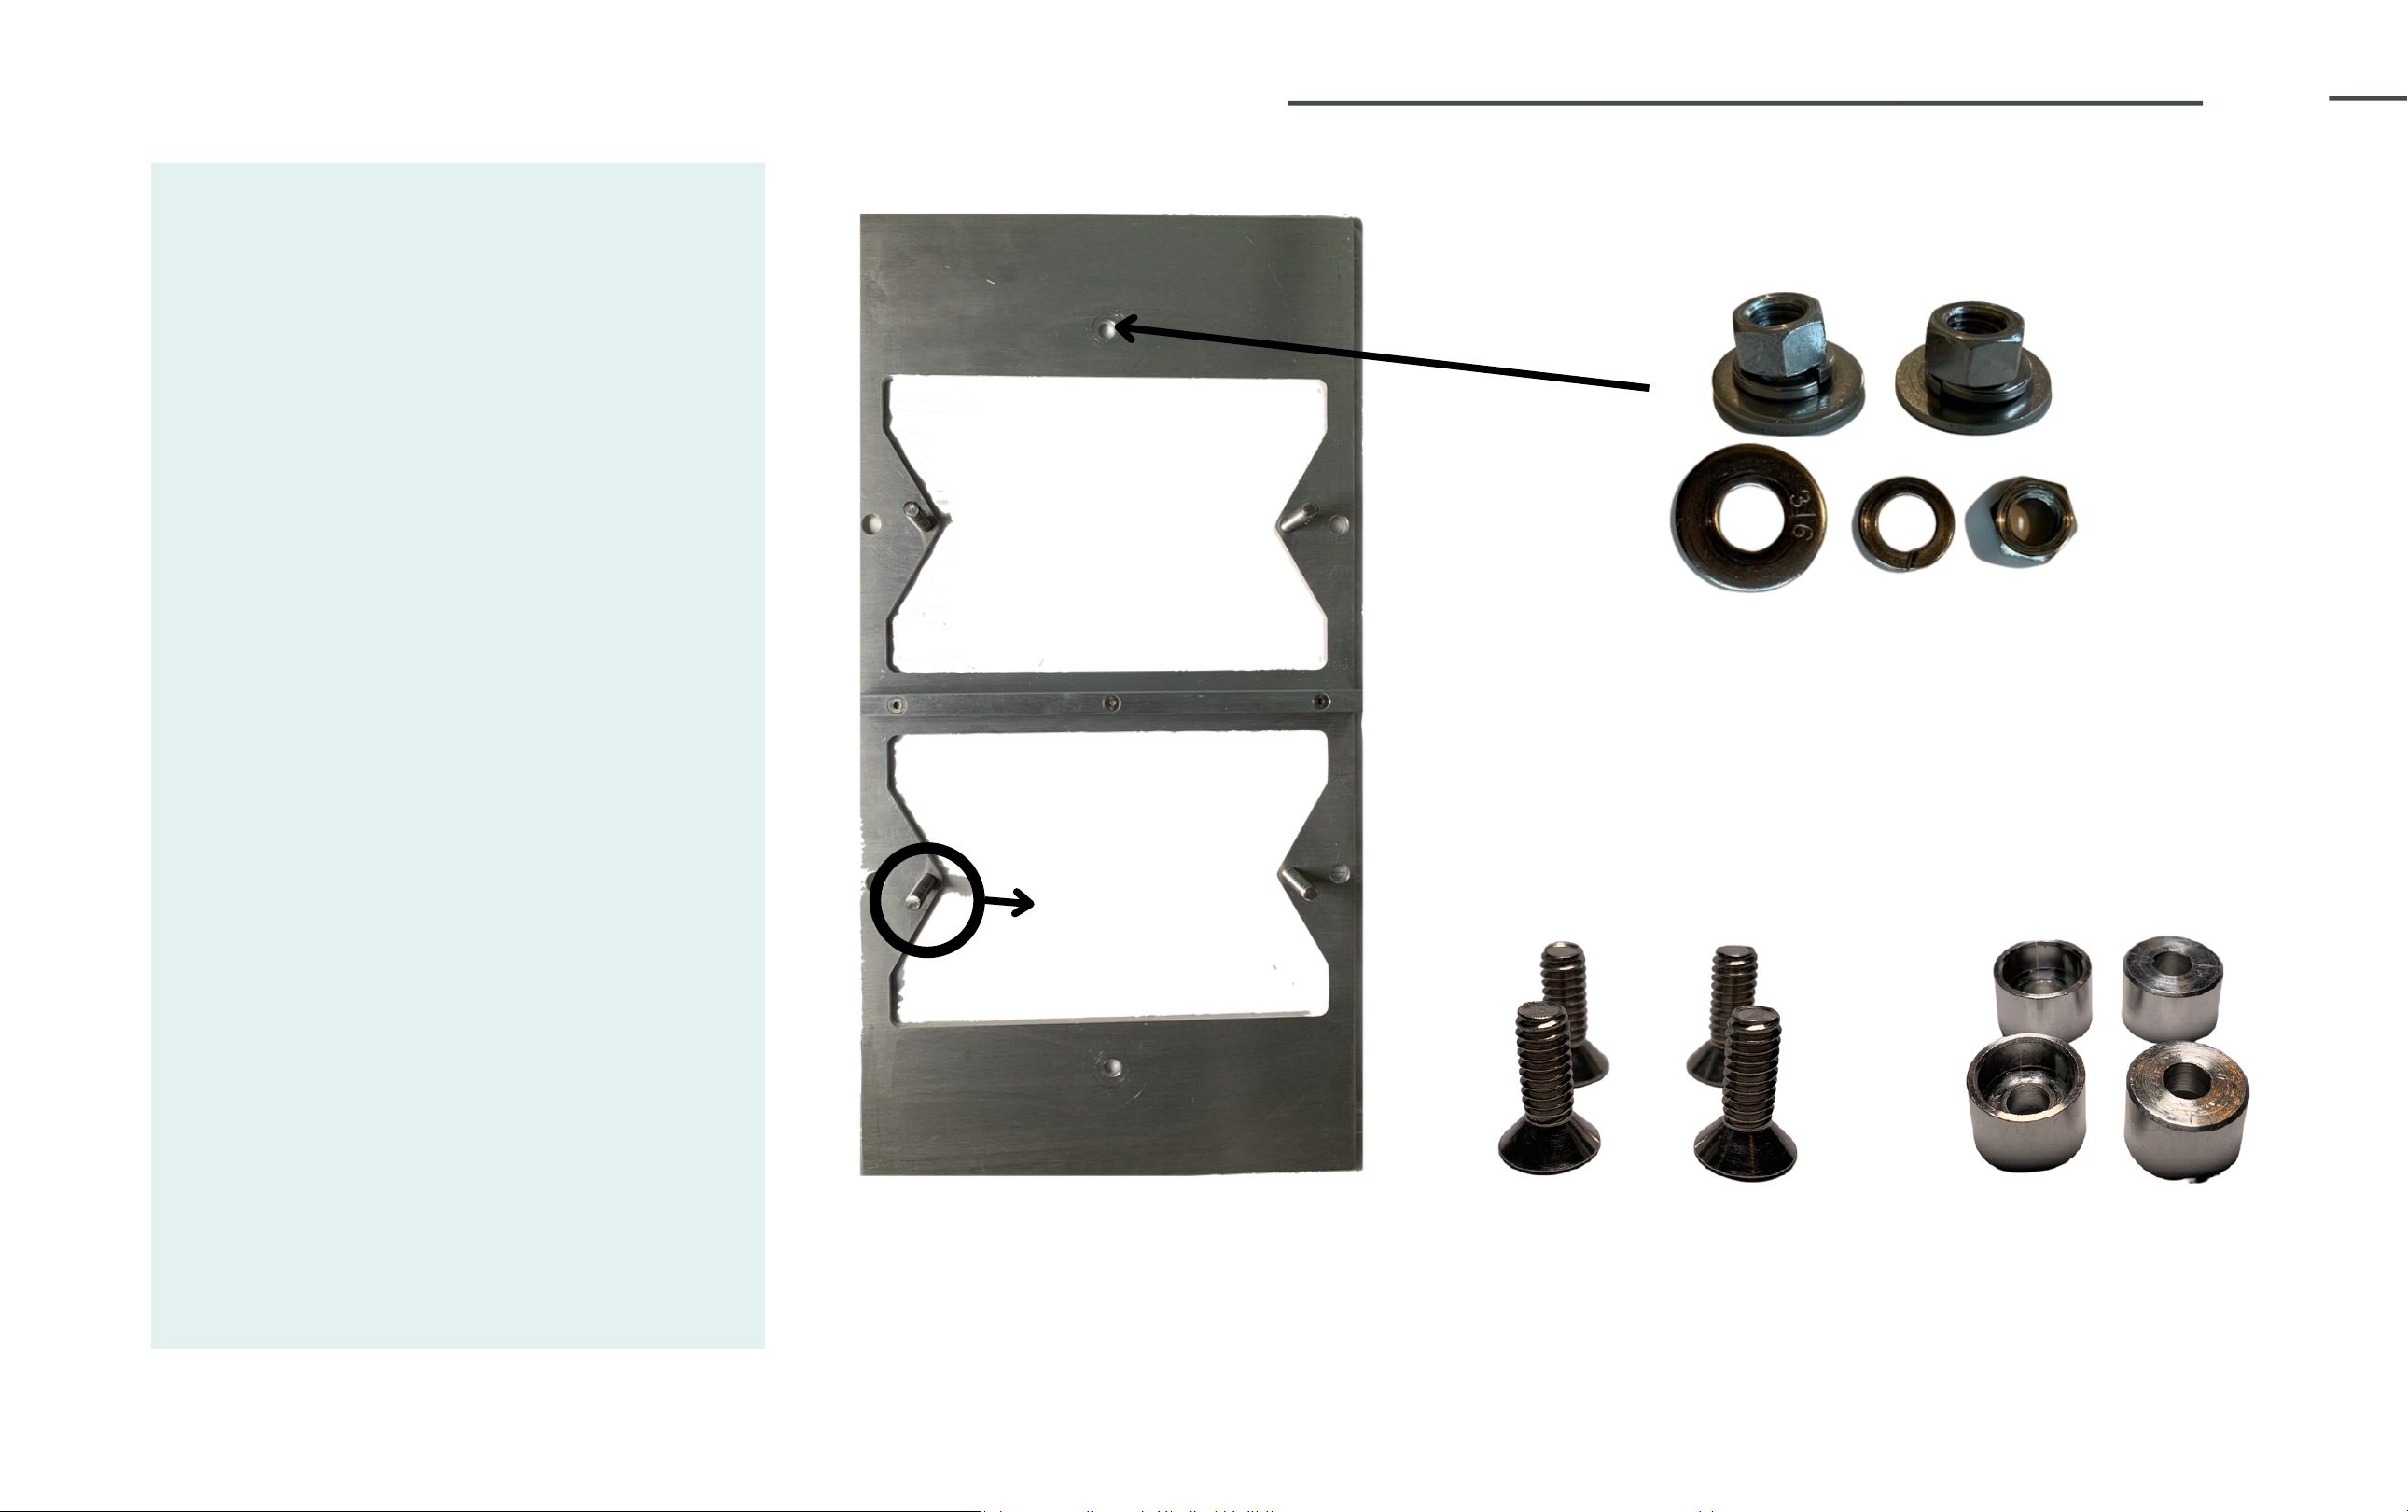
ADAPTOR PLATE COMPONENTS (OPTIONAL)
2. Flat Washer/ Lock Washer / Nut
3. Flat Head Hex Screws
(Long)
4. Hat Spacers
1. Adaptor Plate
5. Top/Bottom
Tray Guide Rods
1. Adaptor Plate- Allows the
Rocketbox 2.0 to run with two (2)
Mini Trays at once - 143ct. or 72ct.
2. Flat Washer / Lock Washer /
Nut- Secures adaptor plate to
Rocketbox 2.0.
3. Flat Head Hex Scews (Long) -
Secures lift plate to bottom of the
shaker box - These are the
LONGER flat head screws. Utilize a
5/32 Allen wrench to
secure/remove.
4. Hat Spacers- Placed ON TOP of
riser bolts. Only used with adaptor
plate install. This compensates for
the added depth from the adaptor
plate.
5. Guide Rods - Threaded rods to
guide and secure the Top and
Bottom trays into Rocketbox.
7
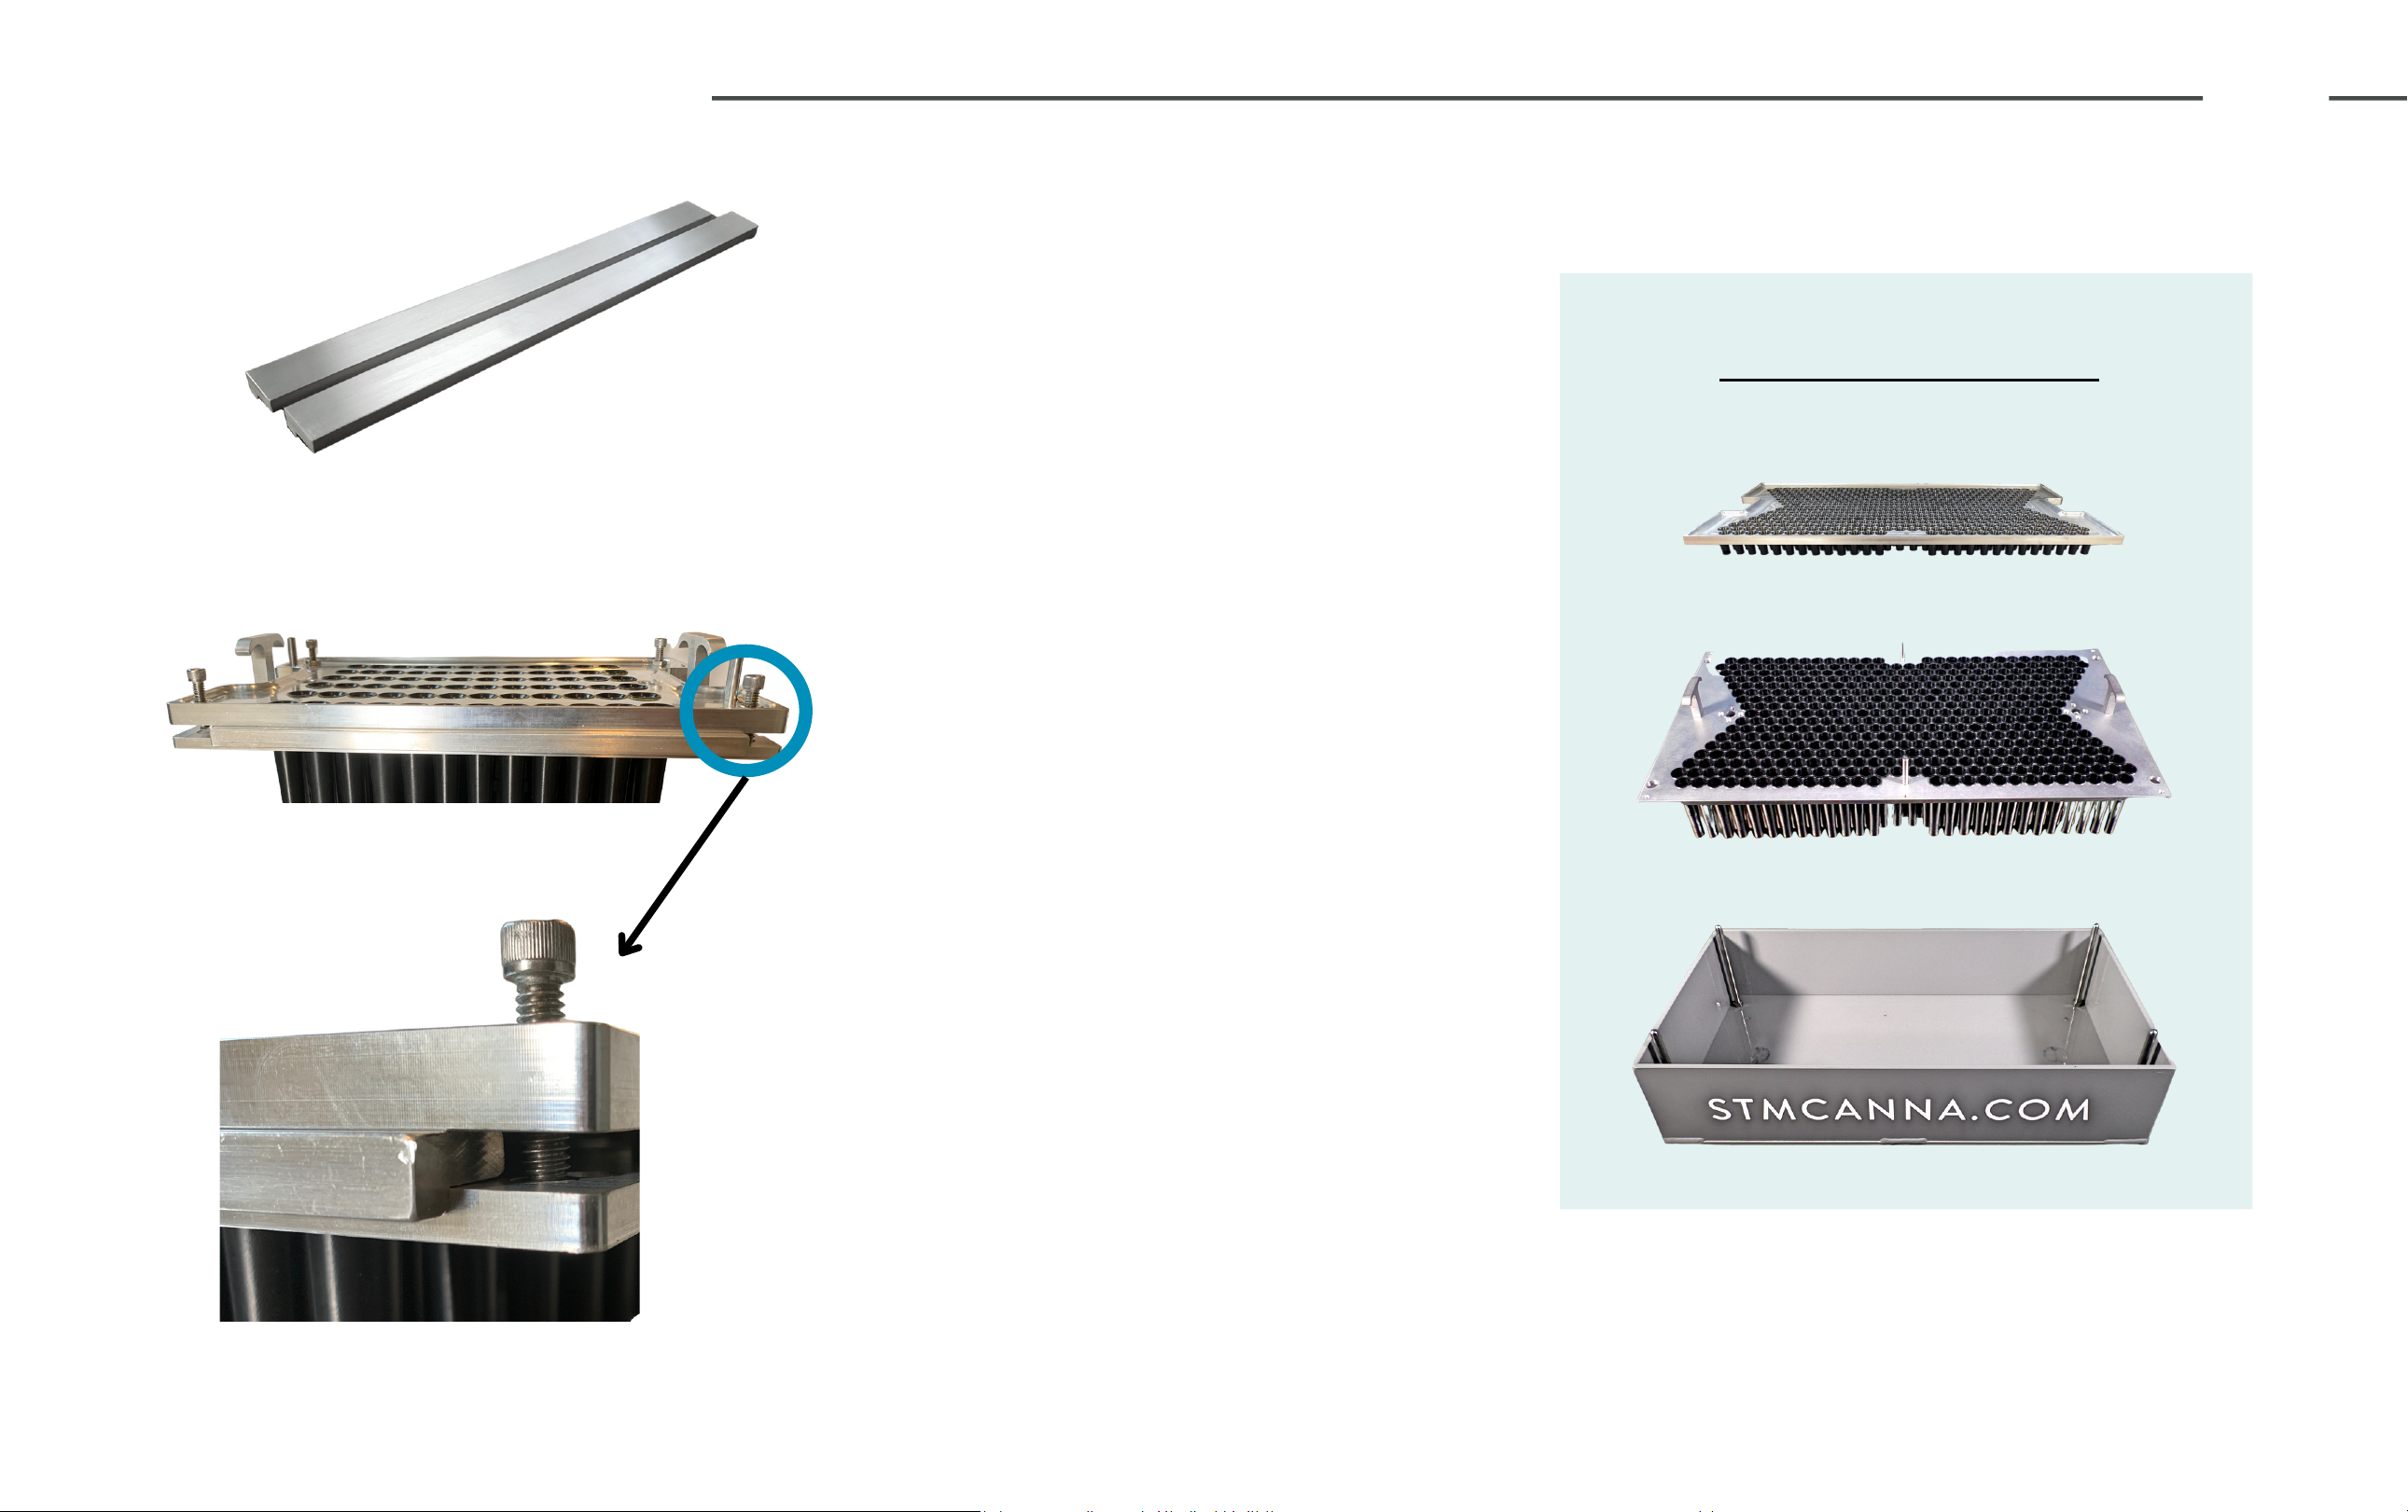
ADJUSTABLE TOP TRAY
Bottom Tray
Top Tray
The Adjustable Bolt touches the Bottom
Tray with the default 1/4" adjustment.
Ensure all (4/6) bolts are adjusted evenly.
Reset Brackets fit in between the Top
and Bottom Tray. Make sure to keep the
Reset Brackets in a convenient location
for future adjustments.
The RocketBox 2.0 includes (2) removable
Reset Brackets to reset the height of the
Top Tray to the default 1/4" setting.
Included Reset Brackets
Placement of Reset Brackets
Placement of Adjustable Bolt
Loading Box
TRAY ASSEMBLY

8
ADJUSTABLE TOP TRAY
Loosenthe bottom nut on the Adjustment Bolt
with a 7/16" closed-end wrench. Repeat with
each of the (4/6) bottom nuts.
Turn the Adjustment Bolt counter-clockwise to
lower the Top Tray, or clockwise to raise the Top
Tray. Repeat for all (4/6) Adjustment Bolts.
Tighten the Adjustment Bolt bottom nut with
7/16" closed-end wrench to secure into place.
Repeat with all (4/6) bottom nuts.
ADJUSTING THE TOP TRAY
RESETTING THE TOP TRAY
Add the (2) Reset Brackets to each side of the
Bottom Tray. Place Adjustable Top Tray on top.
Loosen all hex bolt lock nuts with a 7/16" wrench.
Repeat for all (4/6) bottom nuts.
Turn the Adjustment Bolts until it just touches the
Bottom Tray. Tighten the hex bolt lock nut to lock
into place. Repeat with all (4/6) bolts. This is the
default 1/4" setting. *See Picture*
The Adjustable Top Tray gives the ability to refine and
control the weight of the pre-rolls. This tool allows
the operator to lower and raise the funnels in and out
of the paper pre-rolls. This will increase or decrease
the overall volume and height of fill lines in the pre-
rolls.
The RocketBox 2.0 is pre-installed with an Adjustable
Top Tray. The default adjustment is set at at¼", easily
adjusted with a 7/16" wrench.
(4/6) ¼” Adjustment Bolts *Dependent on Tray Size*
(4/6) ¼” Bottom Nuts *Dependent on Tray Size*
(2) Removable Reset Brackets
ADJUSTABLE TOP TRAY IS EQUIPPED WITH:
9
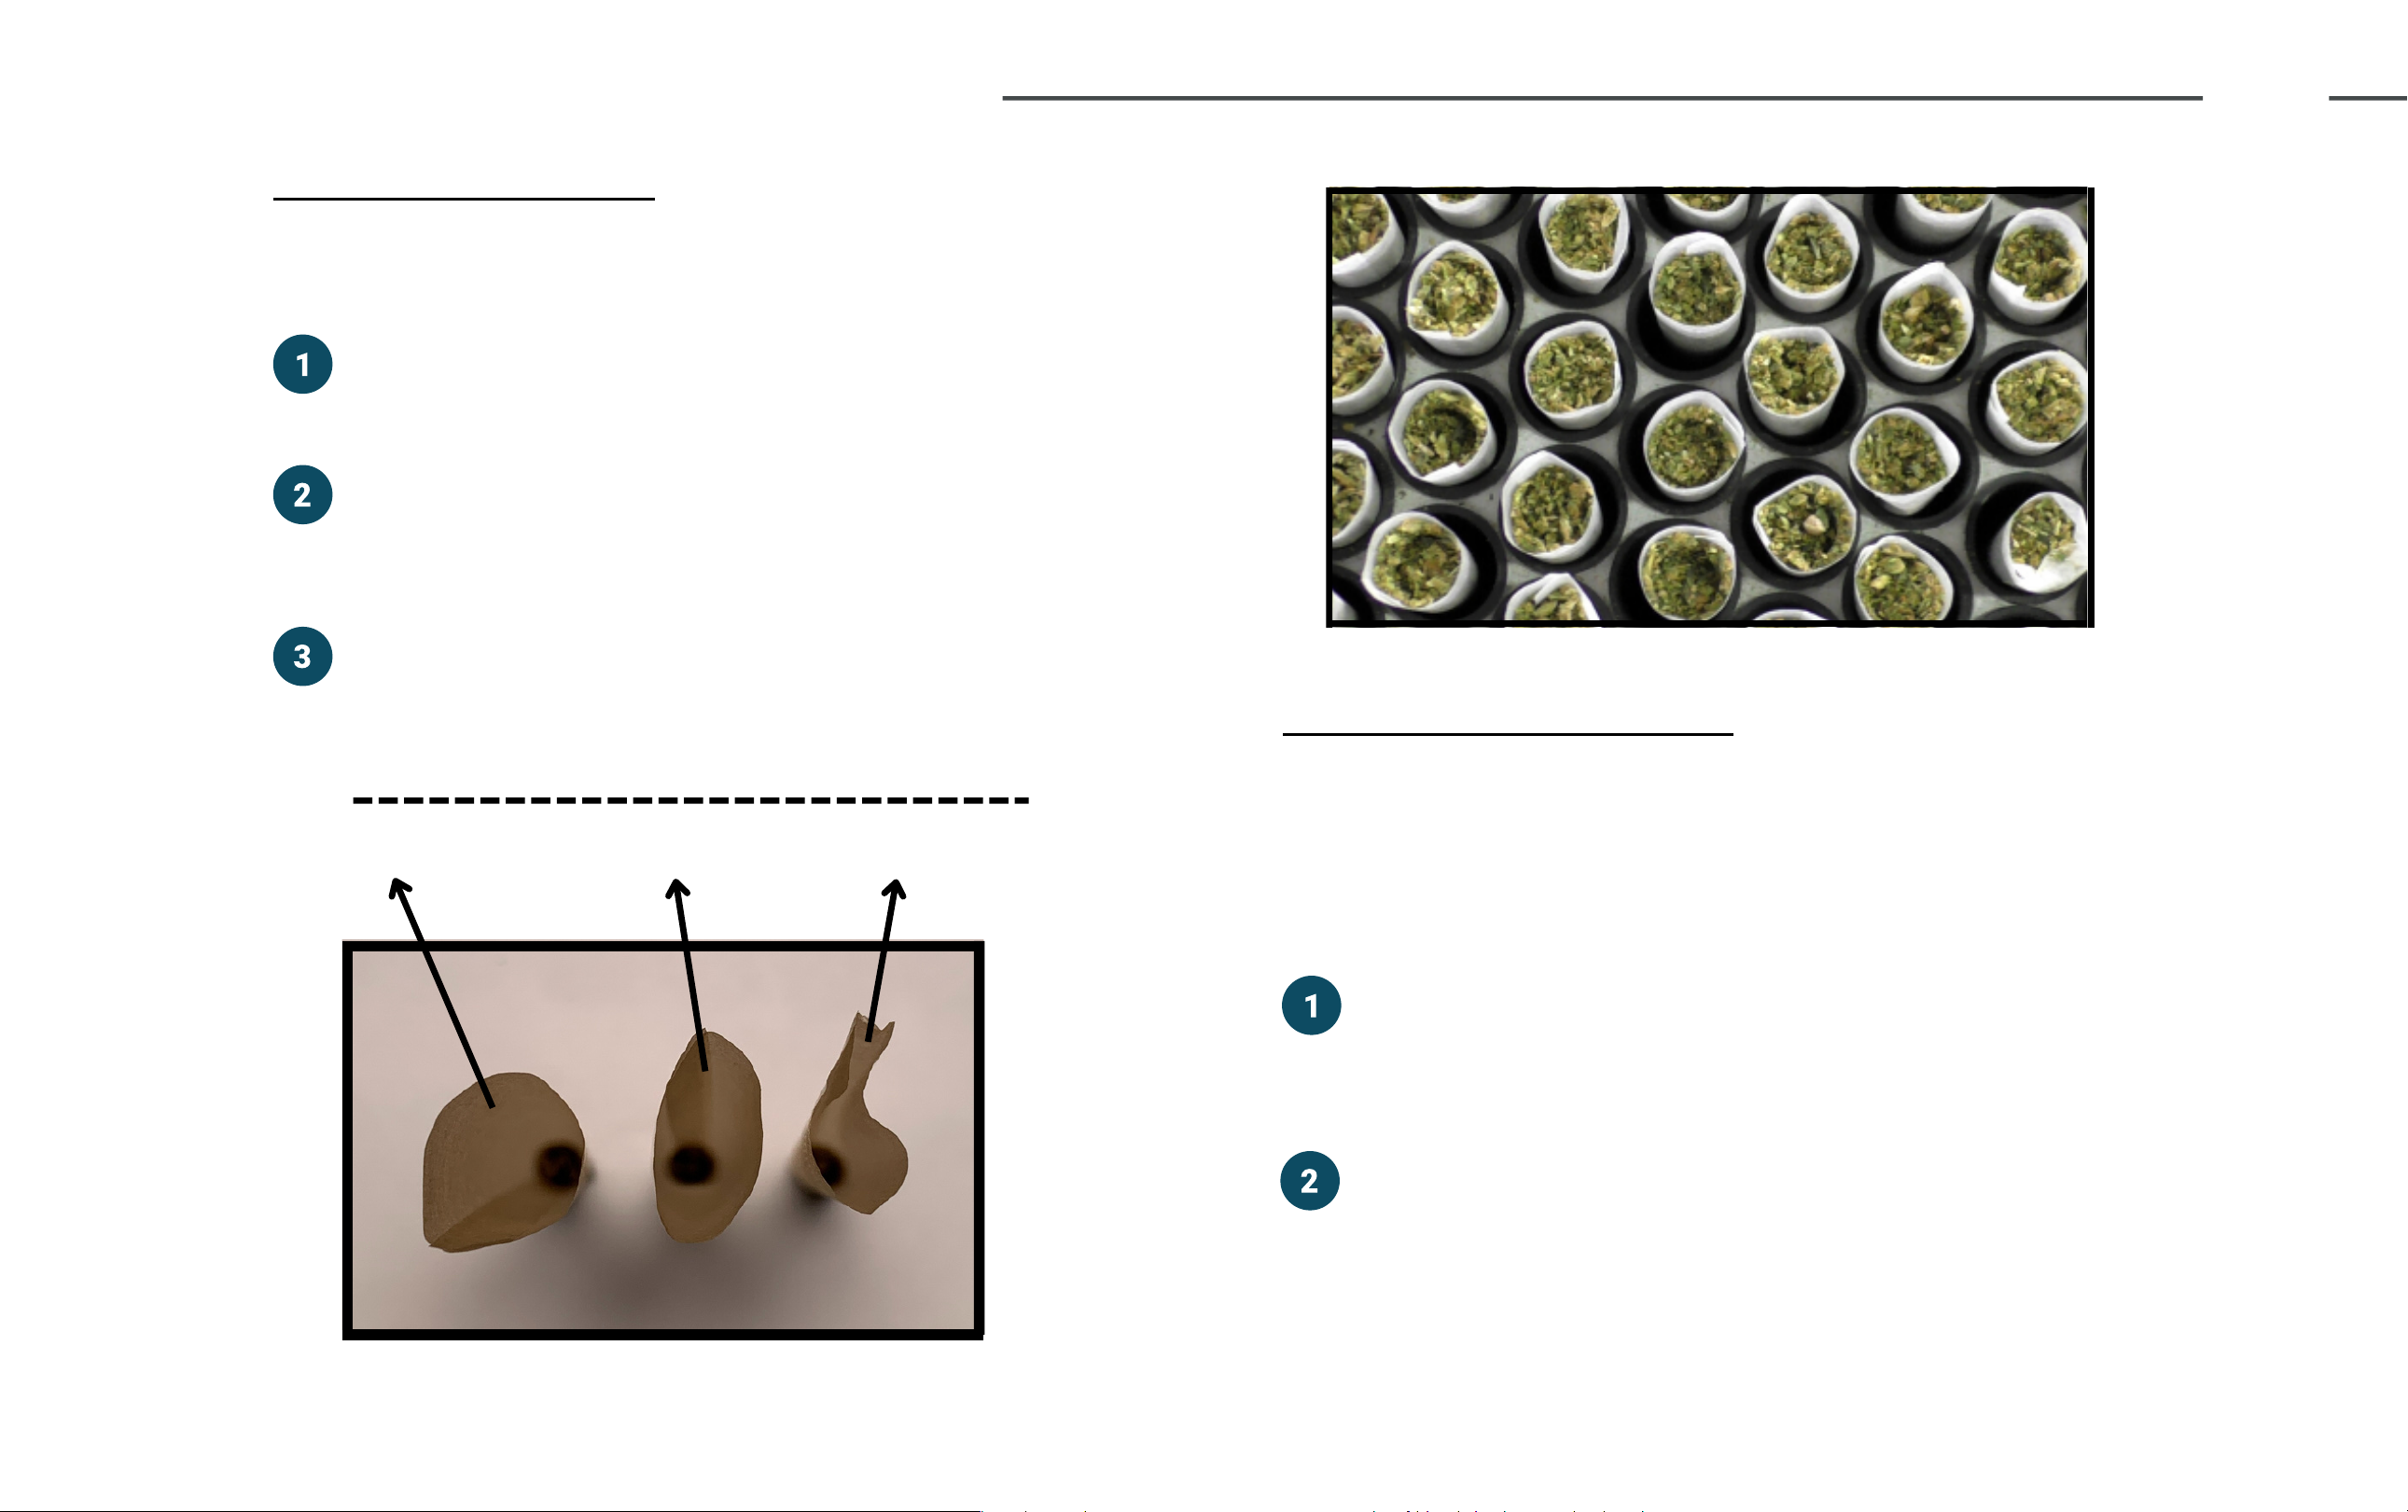
LOADING AND UNLOADING CONES
Place the Bottom Tray into the Loading Box.
Carefully drop cones into the Bottom
Tray. Discard any cones that appear
bent, crushed, or otherwise defective.
Place Top Tray above the Bottom Tray
once loaded with pre-rolls. Marry the
trays together and carefully place into
the RocketBox™.
LOADING CONES
Always use good quality paper cones and discard
all paper cones that appear to be defective.
UNLOADING CONES
Once the cycle in theRocketBox™ is complete and the
PSI is at zero, it is safe to unscrew the wingnuts,
remove the washers, and remove the combined trays.
Remove trays and place into Loading Box.
Set the Top Tray aside. The extra material
on the Top Tray may be reclaimed.
Remove the Bottom Tray from the Loading
Box. Carefully place it onto a solid flat
surface. This will push the cones upwards
and out of the Bottom Tray for easy
examination and removal.
DefectiveAcceptableIdeal

PREPARING WORK AREA
The space required for pre-roll production varies based on
volume needed. See the suggested work areas below:
Grinding Area
Material Prep for
RocketBox™ use
RocketBox Area
For trained person(s) to
operate the RocketBox™
Loading Area
Dedicated to loading
cones into Bottom Trays
Packing Area
Dedicated to closing and
packaging cones
Scoop for Material
Shop Vac
Stainless Steel Chopsticks
Thousandths Scale
70-99% Isopropyl Alcohol
Spray Bottle
Collection Bin
Pipe Cleaners
SUGGESTED TOOLS AND ACCESSORIES
Power OFF Power ON
Power on the RocketBox by plugging it
into a 120v outlet.
Turn the power button clockwise. The
arrow will point upwards.
Once the machine is powered on, the
touch screen will begin powering on.
POWERING ON THE ROCKETBOX
10
GETTING STARTED

11
Helpful Tips
Sift material for better quality pre-rolls.
ALS PSI may display 1 to 2 points lower than settings - this
is normal and to be expected .
Prepare material ahead of time for maximum efficiency.
The key is to have enough material to fill the entire Top Tray
to ensure all cones are optimally filled and packed.
Insert the married Top and Bottom
trays into the RocketBox™. Secure with
washers and wingnuts.
Adjust the settings on the 'Start Up /
Density / Parameters' screens if
necessary. The default settings provide
a good starting point.
Select SYSTEM START to run the cycle.
The airbags will begin to inflate. Once
inflated and the vibratory motor starts,
CYCLE TIME countdown will begin.
Pour material onto Top Tray and
spread evenly to fill all of the cones.
This step may need to be completed at
various speeds, depending on the
material.
After the cycle is complete, an option
to REPEAT RUN (same settings as
previous cycle) or start a NEW RUN
(start from beginning) will appear.
453 Count Tray
72 or 143 Count Tray
OPERATION OF MACHINE
12
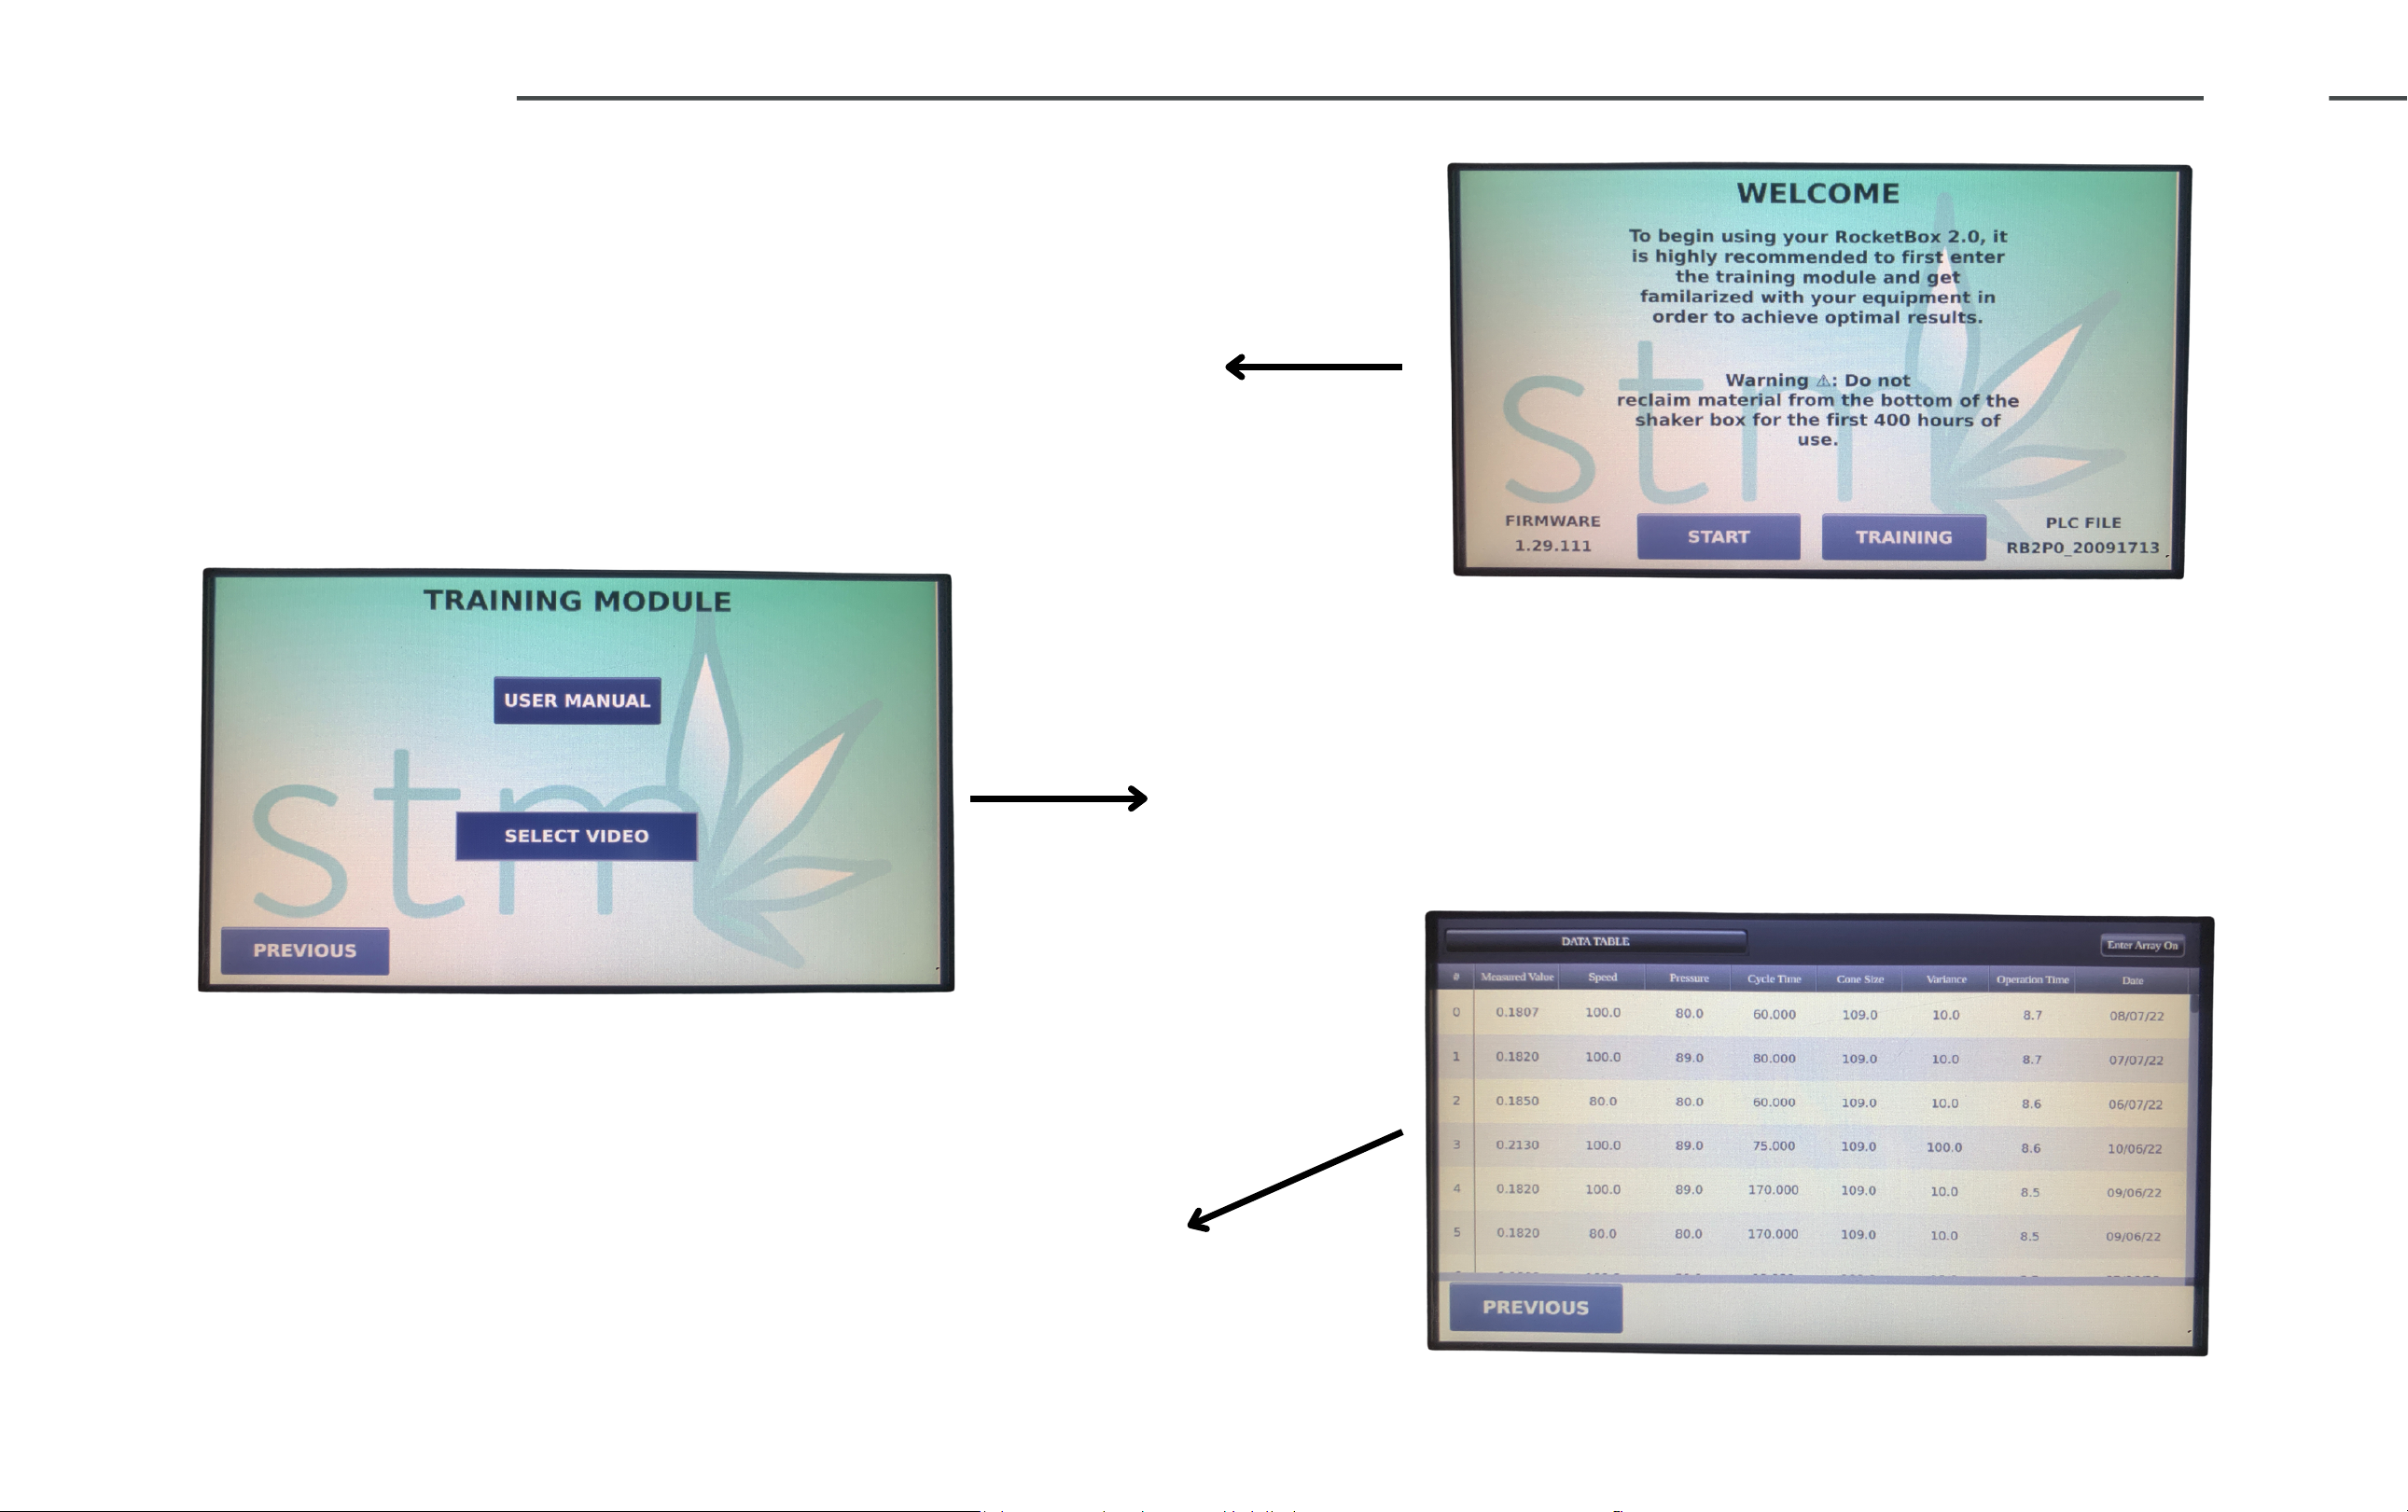
TOUCH SCREEN
WELCOME SCREEN
The welcome screen will appear after powering on the
machine. Select START to begin a new cycle or select
TRAINING to view the training module.
TRAINING MODULE
Select USER MANUAL to view the manual, or select
TRAINING VIDEOS to access the full series of
RocketBox™ training videos.
DATA LOG
Displays data from up too 100 previous cycles, including
density (measured value), speed, pressure, cycle time,
cone size, variance, operation time, and date.

13
STARTUP MENU
STARTUP MENU
The startup menu will appear after selecting START on the
Welcome screen. On this screen, the operator will select the
cone size and weight variance preferred. Additionally, the
operator can view total operation hours of the machine,
training/data logs, target density, and target weight of pre-roll.
Cone Size
Paper and tray size in use.
Weight Variance
Acceptable variance of target weight based on target
density of material.
Operation Hours
Displays the total run time of the machine.
Target Density
Suggested density target to achieve default target weight.
Target Weight
Weight average that should be achieved if product
density equals the suggested target density.
Data Log
Records the settings of the last 100 runs. Additionally,
the data log can be used for troubleshooting purposes.

14
INPUT DENSITY
INPUT DENSITY
The Rocketbox 2.0 utilizes a pre-installed density calculator to
measure the ground product's average mass per ml of material.
*PLEASE NOTE - These inputs do NOT affect the operation of the
Rocketbox 2.0*
Measured Density
The calculated density of your product - Determined by
performing a density test (See pg. 17)
Calculated Weight
The predicted average internal weight of your pre-rolls based
on your measured density.
% of Desired Weight
Based on Measured Density - this displays the predicted
accuracy of the internal weight of pre-rolls.
Run Density Test
Select this button to open the "RUN DENSITY TEST" Screen
(See pg. 16)
Evaluate
Select this button to open a screen that gives additional
information and tips to improve density numbers. (See pg. 16)

15
PARAMETERS / CYCLE RUN
System Start
Starts the system
System Stop
Stops the system
A.L.S Deflate
Air leveling system deflate time
OPERATION PARAMETERS
Shaker Speed
Vibration intensity range of 10-100%
A.L.S. Pressure
Measured air level system PSI range of 60-95 PSI
Cycle Time
Desired time per run
CYCLE RUN
These parameters directly affect the performance of your machine.
Altering these may impact your pre-rolls internal pack and the overall
weight of your pre-roll.
This screen is where you will turn your machine on and off for a
full production run. It will also display the time it takes for your
airbags to deflate.
**THIS SCREEN WILL APPEAR AFTER
"SYSTEM STOP" IS SELECTED

16
To attain the variance goal, performing a density test
is crucial for success.
Run the Shaker Speed / A.L.S. Pressure / Cycle Time
at settings that will be used during full scale pre-roll
production.
Run the density test THREE TIMES to obtain the
average density of the product to be used in full scale
production
See page 17 for additional details and information.
DENSITY TEST MODE
DENSITY TEST MODE
Note: DENSITY TEST MODE screen will lockout
after three density runs. Power the machine
off and back on to run additional density tests.
EVALUATE INFORMATION
This page provides additional information that
can help anyone to improve the target density
numbers of the product used during pre-roll
production.
17
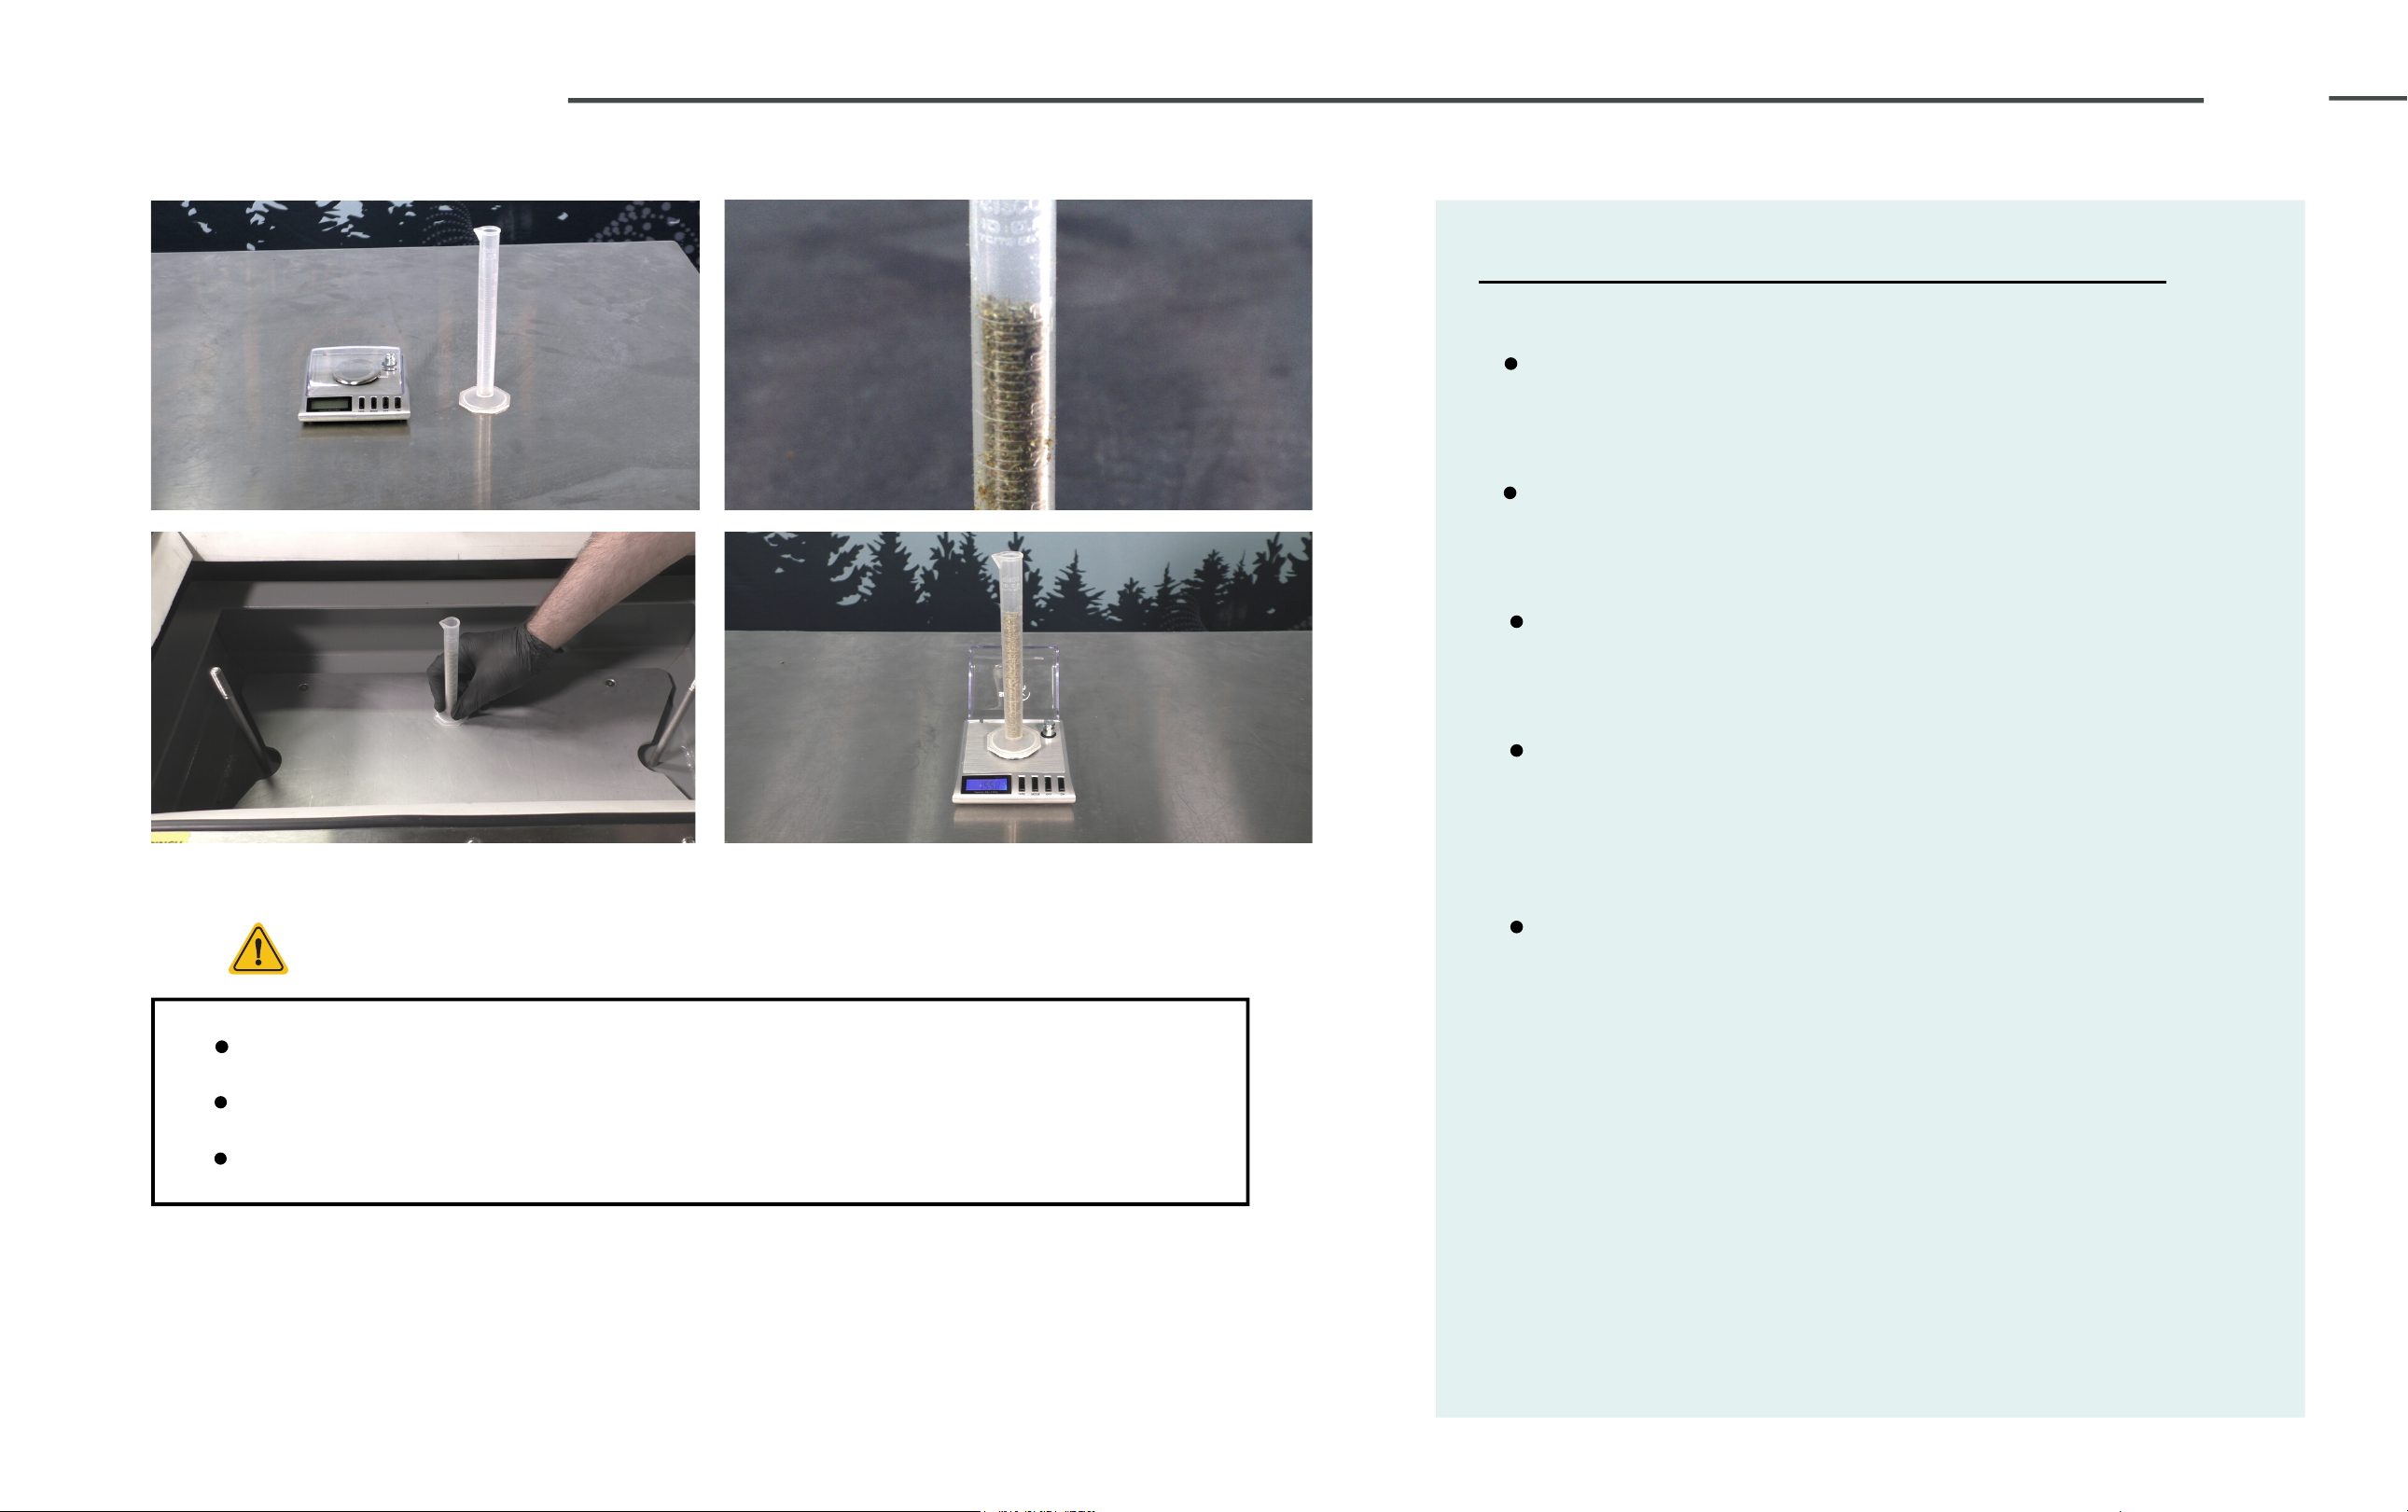
DENSITY TESTING
Repeat density test 3x and average out for optimal results.
Hold beaker in place during density testing.
It is recommended to use a thousandths scale for accuracy.
Helpful Tips
Fill the included beaker just above the 10 mL
line with ground material.
Hold filled beaker firmly onto lift plate and
begin density test - "System Start."
Continue adding material until it settles at
the 10ml fill line while the beaker is vibrating
in the machine.
Remove beaker from machine. Place onto
the tared scale and record weight. Move the
decimal one place to the left - this will be the
calculated density of the tested material.
Utilize this value on the "INPUT DENSITY
SCREEN."
PERFORMING A DENSITY TEST
Tare empty 10 mL beaker on thousandths
scale.
Example: If the scale weight is 1.590, input
0.1590 into the MEASURED DENSITY setting
on the INPUT DENSITY SCREEN.

WHAT IS DENSITY?
Density is a characteristic property of
a substance. The density of a
substance is the relationship between
the mass of the substance and how
much space it takes up (volume).
WHAT IS DENSITY TEST MODE?
Density test mode ensures pre-rolls meet their
target weight. This increases accuracy and
minimizes variance across all 453 pre-rolls.
TheRocketBox™ 2.0's built-in Density Calculator assists
with reaching targeted weight accuracy based on density
of material.
18
DENSITY
Other manuals for ROCKETBOX 2.0
1
Table of contents
Other STM Industrial Equipment manuals

STM
STM RFA Series Instruction Manual

STM
STM NGN-8100 User manual

STM
STM RX Series Instruction Manual

STM
STM MINI-ROCKETBOX CANNA User manual

STM
STM ROCKETBOX User manual

STM
STM ATOMIC CLOSER User manual

STM
STM ROCKETBOX Installation guide

STM
STM REVOLUTION 2.0 User manual

STM
STM MINI-ROCKETBOX PLUS+ User manual
Popular Industrial Equipment manuals by other brands


Brodie
Brodie 9900 Series Installation and operation manual

Chore-Time
Chore-Time Linear Lift 50558 Series manual

PROTA
PROTA ProtaSteel 2021 quick start guide

ABB
ABB HT614283 Operation manual

HOLLISTER-WHITNEY
HOLLISTER-WHITNEY GLV-40S1 Series instruction manual

BVA Hydraulics
BVA Hydraulics CMH6 instruction manual


