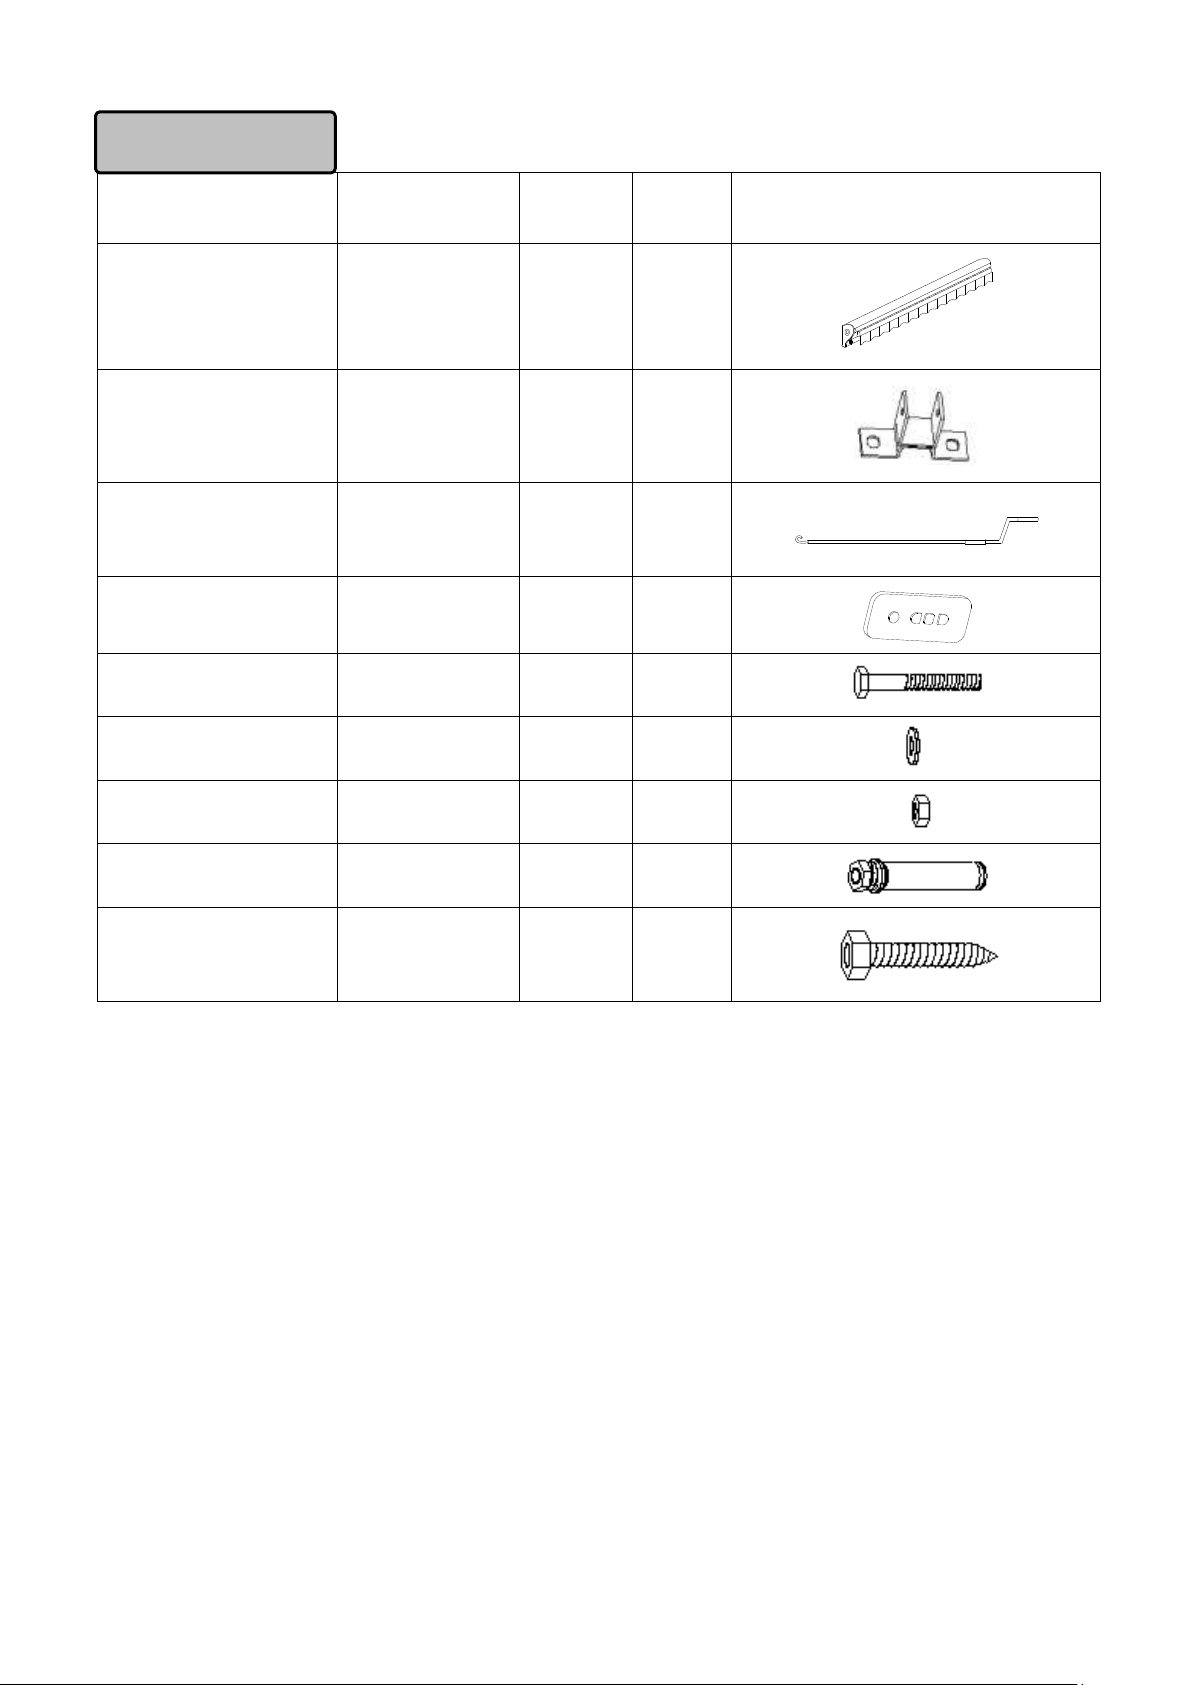
Sunjoy 110108010-G User manual

1/ 8
Thank you for your purchase! We are pleased that you have chosen Sunjoy for your outdoor furniture
purchase.
Our clear, easy to follow, step by step instructions will guide you through the project from start to finish.
Assembly Instructions
Item#:110108010-G
Vendor code:D-AW054PST-G-S

2/ 8
Safety information
•Keep all children and pets away from assembly area. Children and pets should be supervised when they are
in the area of the production construction.
•This package contains small items and plastic bags that should be kept away from children.
•Keep assembly area at least 6 ft. from any obstruction such as a fence, garage, house, overhanging branches,
laundry line or electrical wires.
•Proper placement of your product is essential. Do not place the product underneath electrical lines.
•Keep fingers away from places where they can be pinched or trapped.
•Some parts may contain sharp edges, wear protective gloves if necessary during assembly.
•When assembling and using this product, basic safety precautions should always be followed to reduce the
risk of personal injury and damage to equipment. Please read all instructions before assembly and use.
•Check all screws for tightness before and during usage. Ensure that all connectors and poles are firmly and
fully secured into position. It is important to do so before use so as to avoid a possible collapse or damage to
the item, which could also result in injury.
• This product is intended for outdoor use only.
•Warranty does not cover damage due to extreme weather conditions.
•Please check your state and local regulations prior to purchasing. Some jurisdictions may require permits for,
or otherwise regulate, installation and use.
Warning
•Keep all flame and heat sources away from this awning fabric. This fabric meets the flammability
requirements of CPAI-84. The fabric may burn if left in continuous contact with any flame source. The
application of any foreign substance to the tent fabric may render the flame-resistant properties ineffective.
•The Motor can continue to work for three minutes.
If your motor works longer than three minutes, it will not work. But don’t worry, It will continue to work after 10-15
minutes resting. The total cooling time of motor is 4-5 hours.
Assembly Preparation
• Please read and understand this entire manual before attempting to assemble or install the product. Keep this
manual for future reference.
• Keep the original packaging to store the product.
•Before beginning assembly of product, make sure all parts are present. Do not attempt to assemble the
product if any parts are missing.
•For technical assistance on assembly or replacement parts please call our customer service department at
1-866-578-6569 for help
•This unit is heavy. Do not assemble this item alone. At least two or more people are recommended for safe
assembly.
•Tools required for assembly (NOT included): a screwdriver, wrenches(M8, M10, M12), a hammer, and two
ladders not lower than 2m (6.6 ft).
Important
Please do not return this product to the store. For technical assistance or replacement parts, please call Sunjoy
Group at 1 (866) 578-6569 between 8:00 AM EST and 8:00 PM PST. You may fax your replacement parts form
(which is included in the packaging) to 1 (740) 283-3549 or email to customer.care@sunjoygroup.com

3/ 8
Description
Part#
Label.
Qty
Image
Awning
AW0054XGD01
A
1
Wall Bracket
AW0054XRS02
B
3
Crank Handle
AW0054XRS03
C
1
Remote Control
AW0054XRS04
D
1
M8x65 Hex Bolt
BM08065E
AA
3
M8 Washer
VD08E
BB
3
M8 Hex Nut
LM08E
DD
3
M10x90 Anchor Bolt
PZM10090E
EE
6
M12x60 Hex Sharp Bolt
BAM12060E
FF
6
Parts List

4/ 8
Step 1: Installation of Wall Bracket
FF(EE)
Wall
B
Notice: Please call a professional for assistance on installation for walls other than wood or concrete.
Step.1: Open packaging, remove Wall bracket (B), and anchor Bolt (EE) or Hex Sharp bolt (FF), to install on
wall or ceiling. Place Anchors bolt (EE) or Hex Sharp bolt (FF) into the holes, install the wall bracket and keep
all brackets level, and tightly fasten screws.
Level
Installation of equal wall
1900mm
Level
Installation of equal wall
1900mm

5/ 8
Step 2: Installation of Awning
Step 3:
Awning Operation
Fig.1: Fabric Cover
Correct way Wrong way
B
AA
BB
DD
Remove awning, including all hardware from box. We suggest two people to lift the Awning (A) to the
height of wall bracket, and slide the Awning (A) intoWall bracket (B), fasten with Bolt (AA), Washer (BB)
and Nut (DD). When installing Wall bracket (B), the distance between the wall bracket and shoulder
bracket should not be larger than 50mm (2 inches).
Please insert all screws in each step before fully tightening!

6/ 8
Fig.2: Open and close manual-operated Awning
Method 1: We recommend you to choose Remote Control (E) to Open and Close Awning.
Fig.3 shows the buttons function.
Method 2: Certainly, you also can use handle-way to open and close Awing.
Put the crank handle into gear box loop, Place hands on plastic handle and turn handle
clockwise to open awning.
Close
Stop
Open
LED
Fig. 3
Notice:
1. The cover needs to remain tight when the awning is fully open
2. When turning the crank handle, make sure it keeps in the same straight line with loop
Wrong way
Correct way

7/ 8
Fig.3: Adjust angle of Awning
Notice: Do not turn Bolt (BB) until to unscrewing Bolt (AA). When adjusting angle, please
support the awning arm by hand.

8/ 8
Care & Maintenance
•Before using, clean the product completely with a soft, dry towel. When not in use, wipe free of any dirt or
loose objects, wash with a mild solution of soap and water; rinse thoroughly and dry completely.
•Do not use strong detergent or abrasive cleaners.
•Do not machine wash.
•Bolts can loosen over time. Be sure to check bolts occasionally, tightening as needed.
•Protecting furniture from the elements, when not in use is highly recommended.
•Our iron/steel components for garden accessories and patio items are coated with rust inhibiting paint
that protects it from rusting. However, due to the nature of iron, surface oxidation (rusting) will occur once
these protective coatings are scratched. This is a natural process and is not a defect! To minimize this
condition, we recommend care when assembling & handling the product to prevent scratching the paint.
Should any scratching or damage occur, we recommend immediate touch-up with rust inhibiting paint.
Surface rust can also be easily removed with a very light application of common cooking oil. If surface
oxidation (rusting) occurs and if no measure is taken to prevent this, the oxidation may start dripping on to
deck or patio and cause damaging stains, which may be difficult to remove. This can be prevented if
measure is taken to keep the product from oxidizing.
Limited Warranty
•This limited warranty is extended to the original purchaser and applies to defects in materials and
workmanship of your item provided the item is maintained with care and used only for personal,
residential purposes.
•The item is warranted to be free from defects in material or workmanship for a period of One (1) Year.
If any defect is found, please call our customer service department at 1-866-578-6569 for help. The
manufacturer will not cover transportation or delivery costs, or compensate the individual or any outside
party for assembling or disassembling the product. This warranty gives you specific legal rights, and you
may also have other rights which vary from state to state.
Exclusions
Items used for commercial, contract, or other non-residential purposes, or items damaged due to acts of
nature, vandalism, misuse, or improper assembly are not covered. Corrosion or rusting of hardware is
not covered. Proof of purchase (dated register receipt) is required for warranty claims. Warranty is to
the original purchaser and is non-transferable. Any replacement of warranted items will be in the original
style and color, or a similar style and color if the original is unavailable or has been discontinued. As
some states do not allow exclusions or limitations on an implied warranty, the above exclusions and
limitations may not apply. This warranty gives you specific rights, and you may also have other rights,
which vary from state to state.
Made in China
2017-04
Table of contents
Other Sunjoy Accessories manuals

Sunjoy
Sunjoy D-AW001 User manual

Sunjoy
Sunjoy L-AW001-G User manual

Sunjoy
Sunjoy 105277 User manual

Sunjoy
Sunjoy A106005900 User manual

Sunjoy
Sunjoy 80QT User guide

Sunjoy
Sunjoy A601002201 User manual

Sunjoy
Sunjoy S-AW054PST-B User manual

Sunjoy
Sunjoy S-AW011-G User manual

Sunjoy
Sunjoy L-BC153PST-S User manual

Sunjoy
Sunjoy L-BC109PST-1 User manual
Popular Accessories manuals by other brands

Mitchell Engineering
Mitchell Engineering CAT 13920 instruction manual

Honeywell
Honeywell Farenhyt Series Installation and maintenance instructions

netvox
netvox R718PB13 user manual

Garmin
Garmin GSC 10 instructions

Tronios
Tronios 952.022 instruction manual

Cornelius
Cornelius Maxi series installation instructions