Step 3: Click any of the 4 buttons on the GP switch 4 times continuously, e.g. button
. LED lights connected with the device flicker twice means the light device is
paired to the GP switch successfully.
Note: one light device can be paired with max. 20 GP switches.
Step 1: Do wiring the Zigbee light device according to wiring diagram(please refer
to the instruction of the light device that you would like to pair to)
Step 2: Click the “Prog.” or “Reset” button on the light device 4 times continuously to
set it into pairing to GP switch mode
Prog.
Zigbee Light Device
If there is no indication on the light device for successful pairing, the signal sent by the switch is not on the correct
channel, we need to change the switch’s channel.
To change the switch’s channel, short press the selected button to move from default channel 11 to the next
one. For each such button press, the switch transmits on the next channel.
After each such button press, please wait for approximate 1 second to check whether there is indication on the light
device for successful pairing.
If pairing successfully, please exit learning mode on the switch. If channel 26 has been reached, but there is still no
indication, it might because the switch has not entered learning mode yet since the very start. We have to repeat the step
2 to put it into learning mode.
Delete Pairing to a Paired Zigbee Light Device(Standard Mode):
Step 1: activate delete learning to GP switch mode of the paired light device (generally our light devices will enter
the mode by short pressing “prog.” or “reset” button 3 times, or by resetting power 3 times), please refer to the manual of
corresponding light device.
Step 2: put the GP switch into learning mode.
To enter into learning mode, start by selecting one button on the switch. (Use the same button for the entire sequence,
pressing any other button will exit the learning mode.)
Next, execute the following sequence:
1. Press and hold the selected button for over 10 seconds, and then release it.
2. Short press the button once, and then release it.
3. Press and hold the button again for over 10 seconds, and then release it
The switch has now entered learning mode.
Wait for approximate 1 second to check whether there is indication on the light device to indicate that pairing is deleted,
generally our light device will blink 4 times, which means the pairing is deleted successfully.
Operations
Pairing GP Switch to a Compatible Zigbee Light Device(Easy Mode):
Delete Pairing to a Paired Zigbee Light Device(Easy Mode):
Pairing GP Switch to a Compatible Zigbee Light Device(Standard Mode):
Step 1: activate learning to GP switch mode of the compatible light device (generally our light devices will enter the
mode by short pressing “prog.” or “reset” button 4 times, or by resetting power 4 times), please refer to the manual of
corresponding light device.
Step 2: put the GP switch into learning mode.
To enter into learning mode, start by selecting one button on the switch. (Use the same button for the entire sequence,
pressing any other button will exit the learning mode.)
Next, execute the following sequence:
1. Press and hold the selected button for over 10 seconds, and then release it.
2. Short press the button once, and then release it.
3. Press and hold the button again for over 10 seconds, and then release it
The switch has now entered learning mode.
Wait for approximate 1 second to check whether there is indication on the light device for successful pairing, generally
our light device will blink twice to indicate successful pairing.
Exit learning mode on the switch by pressing any other button on the switch after pairing successfully. Just
ignore step 3.
If there is no indication, please continue executing step 3.
Step 2: Click any of the 4 buttons of the paired switch 4 times continuously, e.g.
button . LED lights connected with the device flicker 4 times means the pairing to
the switch is deleted successfully.
Step 1: Click the “Prog.” or “Reset” button on the light device 3 times continuously to
set it into delete pairing to GP switch mode
Prog.
Zigbee Light Device
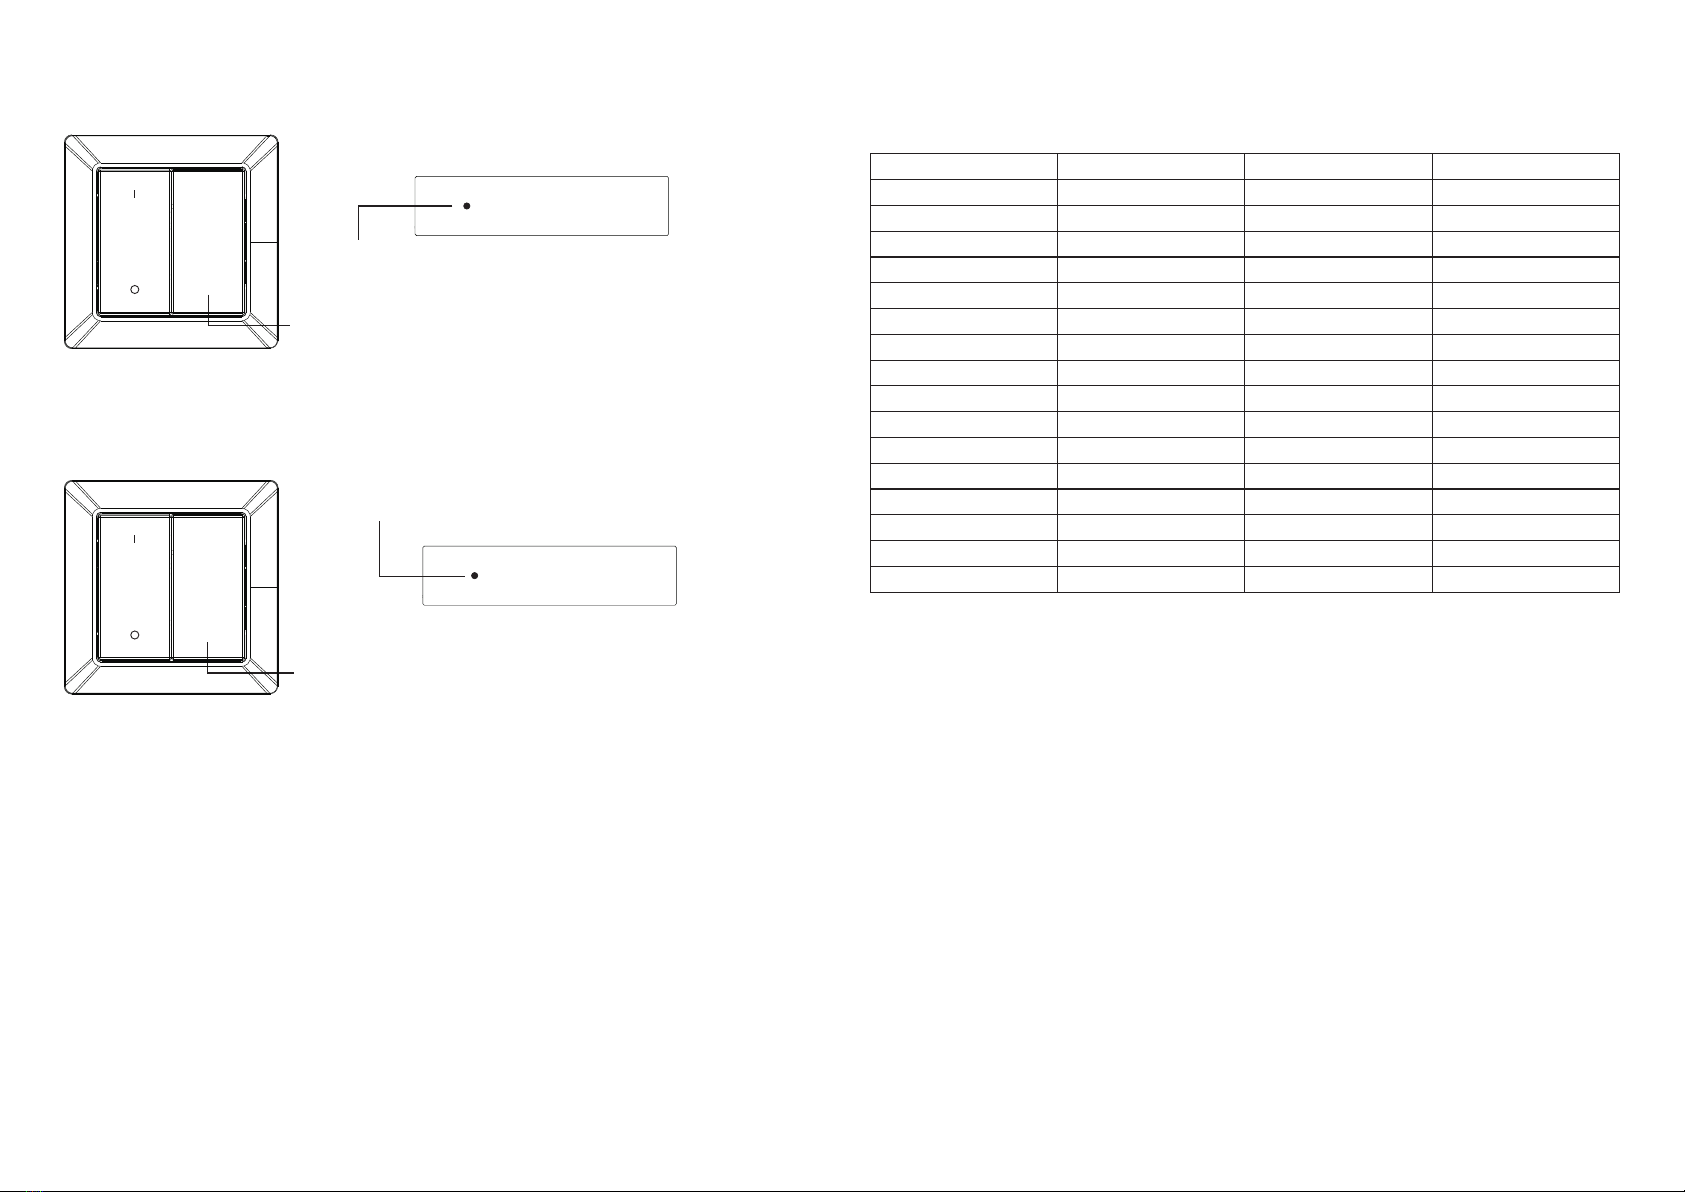
Step 3: Cycle through the sixteen Zigbee channels
A radio signal needs be sent from the switch to the compatible light device on the correct Zigbee channel, the light device
uses one of the sixteen possible channels, automatically set the device. Using the switch, a signal will be sent on each
channel until the channel used by the light device is found.
Upon entering learning mode, the signal will be sent by the switch on default channel 11. Please refer to the following
chart of the Zigbee channels and the corresponding radio frequencies (in MHZ).
Channel ID
11
12
13
14
15
16
17
18
19
20
21
22
23
24
25
26
Lower Frequency
2404
2409
2414
2419
2424
2429
2434
2439
2444
2449
2454
2459
2464
2469
2474
2479
Center Frequency
2405
2410
2415
2420
2425
2430
2435
2440
2445
2450
2455
2460
2465
2470
2475
2480
Upper Frequency
2406
2411
2416
2421
2426
2431
2436
2441
2446
2451
2456
2461
2466
2471
2476
2481
CW
WW
CW
WW
CW
CW


