manuals.online logo
Brands
  1. Home
  2. •
  3. Brands
  4. •
  5. Swegon
  6. •
  7. Fan
  8. •
  9. Swegon PELICAN Ceiling Extract a Guide

Swegon PELICAN Ceiling Extract a Guide

Other Swegon Fan manuals

Swegon ADAPT Parasol EXb User manual

Swegon

Swegon ADAPT Parasol EXb User manual

Swegon CRTc Guide

Swegon

Swegon CRTc Guide

Swegon GOLD RX User manual

Swegon

Swegon GOLD RX User manual

Swegon CASA R9H Smart Guide

Swegon

Swegon CASA R9H Smart Guide

Swegon CASA R85 Series User manual

Swegon

Swegon CASA R85 Series User manual

Swegon GOLD series Quick start guide

Swegon

Swegon GOLD series Quick start guide

Swegon GOLD PX Series Troubleshooting guide

Swegon

Swegon GOLD PX Series Troubleshooting guide

Swegon CASA W3 XS Smart Guide

Swegon

Swegon CASA W3 XS Smart Guide

Swegon ROWb Guide

Swegon

Swegon ROWb Guide

Swegon PELICAN Ceiling User manual

Swegon

Swegon PELICAN Ceiling User manual

Swegon HAWK Ceiling User manual

Swegon

Swegon HAWK Ceiling User manual

Swegon CASA PR085LKA User manual

Swegon

Swegon CASA PR085LKA User manual

Swegon ADAPT Parasol b User manual

Swegon

Swegon ADAPT Parasol b User manual

Swegon ADAPT Parasol b-X User manual

Swegon

Swegon ADAPT Parasol b-X User manual

Swegon PARASOL VAV Series Guide

Swegon

Swegon PARASOL VAV Series Guide

Swegon WISE Colibri Ceiling a User manual

Swegon

Swegon WISE Colibri Ceiling a User manual

Swegon ADAPT Extract Guide

Swegon

Swegon ADAPT Extract Guide

Swegon ADAPT Parasol b 600 Guide

Swegon

Swegon ADAPT Parasol b 600 Guide

Swegon PARAGON d Guide

Swegon

Swegon PARAGON d Guide

Swegon ROE Series Guide

Swegon

Swegon ROE Series Guide

Swegon CASA W4 Smart User manual

Swegon

Swegon CASA W4 Smart User manual

Swegon HAWK Ceiling User manual

Swegon

Swegon HAWK Ceiling User manual

Swegon REACT V SKNXa User manual

Swegon

Swegon REACT V SKNXa User manual

Swegon Adapt Sphere d User manual

Swegon

Swegon Adapt Sphere d User manual

Popular Fan manuals by other brands

Minka Group minkaAire Wave F843 instruction manual

Minka Group

Minka Group minkaAire Wave F843 instruction manual

Airflow Adroit DV50 instruction manual

Airflow

Airflow Adroit DV50 instruction manual

Vornado 270 Series owner's guide

Vornado

Vornado 270 Series owner's guide

comfort air TH-10D instruction manual

comfort air

comfort air TH-10D instruction manual

Livoo DOM386 instruction manual

Livoo

Livoo DOM386 instruction manual

Holmes BLIZZARD HAOF-90 owner's guide

Holmes

Holmes BLIZZARD HAOF-90 owner's guide

Taurus GRECO 16 ELEGANCE manual

Taurus

Taurus GRECO 16 ELEGANCE manual

Quorum PINNACLE installation instructions

Quorum

Quorum PINNACLE installation instructions

Monte Carlo Fan Company 3DIR58RBD-V1 Owner's guide and installation manual

Monte Carlo Fan Company

Monte Carlo Fan Company 3DIR58RBD-V1 Owner's guide and installation manual

Craftmade UH52 installation guide

Craftmade

Craftmade UH52 installation guide

Jocel JVA030658 instruction manual

Jocel

Jocel JVA030658 instruction manual

MIKA MFB1211/GR user manual

MIKA

MIKA MFB1211/GR user manual

Harbor Breeze RLG52NWZ5L manual

Harbor Breeze

Harbor Breeze RLG52NWZ5L manual

Allen + Roth L1405 instruction manual

Allen + Roth

Allen + Roth L1405 instruction manual

ViM KUBAIR F400 ECOWATT Technical manual

ViM

ViM KUBAIR F400 ECOWATT Technical manual

HIDRIA R10R-56LPS-ES50B-04C10 user guide

HIDRIA

HIDRIA R10R-56LPS-ES50B-04C10 user guide

BLAUBERG Ventilatoren CENTRO-M 100 L user manual

BLAUBERG Ventilatoren

BLAUBERG Ventilatoren CENTRO-M 100 L user manual

Triangle Engineering HEAT BUSTER SPL Series owner's manual

Triangle Engineering

Triangle Engineering HEAT BUSTER SPL Series owner's manual

manuals.online logo
manuals.online logoBrands
  • About & Mission
  • Contact us
  • Privacy Policy
  • Terms and Conditions

Copyright 2025 Manuals.Online. All Rights Reserved.

1
Installation – Commissioning – Maintenance 20130806
PELICANTM
Ceiling Extract a
Accessories
Commissioning box:
ALS. The commissioning box is made of galvanized sheet
steel and contains a removable commissioning damper,
fixed measurement tapping and sound absorbing mate-
rial*)with reinforced surface layer.
*)Fire resistance rated to B-s1,d0 in accordance with
EN ISO 11925-2
Frame:
SAR K, for aesthetic installation of a lowered diffuser section.
Adapter:
ADAPTER, for adaptation to various variants and makes of
systemized false ceilings: Ecophon, Gyproc, Dampa, etc.
Used also for adaptation to alternative sizes of systemized
false ceilings, e.g. 625 x 625 or 675 x 675.
Installation
To unfasten the diffuser face, press in the spring retainers
on one side of the diffuser and let the diffuser face hang
on its safety cords. See Figure 2.
The inlet spigot of the air diffuser backing box can be
secured to the connecting duct by means of self-tapping
screws or a blind rivets. For flush-mounting in fixed false
ceiling constructions, secure the terminal by means of
screws into place in the framework through either the
sides or top of the diffuser backing box. The air diffuser
and commissioning box in the version for low installation
height must be centred and jointed together using the
locking strip supplied. Secure the air diffuser in the cor-
rect position with self-tapping screws or pop rivets in the
underside of the commissioning box. See Figure 4.
For mounting in modular false ceilings, it is advisable to
select air diffusers with outer dimensions of 595 x 595
mm. Position these directly down in the T-bar framework,
and then secure them to the duct system or to the com-
missioning box.
If an ALS commissioning box is used, it must be secured
to the building structure by means of hangers or mount-
ing brackets.
The distance between the commissioning box and the
air diffuser can be increased by as much as 500 mm with
an ordinary circular duct without having to lengthen
the measuring tubes and damper adjustment cords. See
Figure 3.
Commissioning
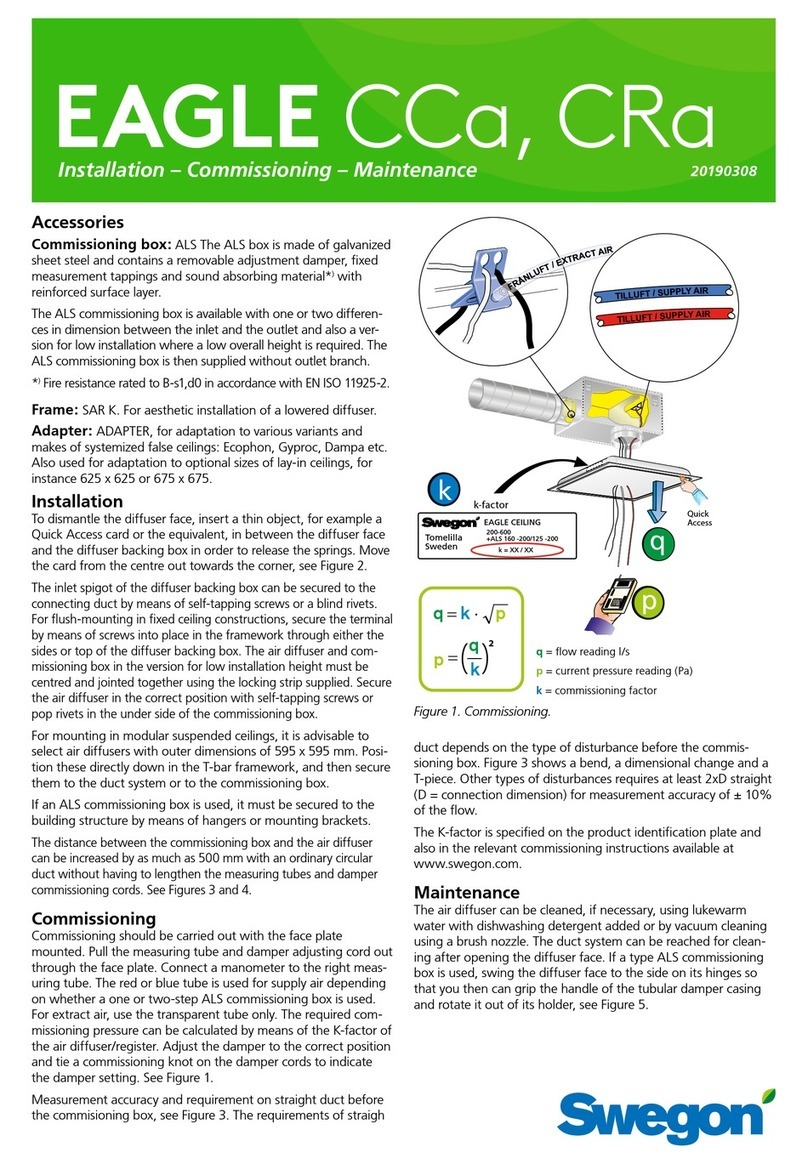
Commissioning should be carried out with the air dif-
fuser face mounted. Pull the measuring tubes and damper
adjustment cords out through the air diffuser face. Then
connect the manometer to the correct measuring tube.
For extract air, always use the transparent tube. The rated
coefficient of performance of the air diffuser can be used
Figure 1. Commissioning
in a calculation to determine the required commission-
ing pressure. Conclude commissioning by adjusting the
damper to the correct blade position, tie a commissioning
knot in the damper cords to indicate the damper position.
See Figure 1.
The rated coefficient of performance (K-factor) is speci-
fied on the identification label of the product and in the
relevant commissioning instructions at www.swegon.com.
Maintenance
The air diffuser can be cleaned, if necessary, using luke-
warm water with dishwashing detergent added or by
vacuum cleaning using a brush nozzle. The duct system
can be reached for cleaning after opening the air diffuser
face. If a type ALS commissioning box is used, swing
the air diffuser face to the side so that you can grip the
damper tube by its handle and rotate it out of its holder.
See Figure 5.
PELICAN CE
Tomelilla
Sweden
200-600
+ALS 160 -200/125 -200
k
k = XX / XX
q
F
R
Å
N
L
U
F
T
/
E
X
T
R
A
C
T
A
I
R
kpq⋅=
k
pq
=
( )2
p
q= flow reading l/s
p= current pressure reading (Pa)
k= commissioning factor
k-factor
2Swegon reserves the right to alter specifications. 20130806 www.swegon.com
PELICAN Ceiling Extract
Figure 2. Quick Access.
Installation
Figure 3. To install the PELICAN CE.
Figure 4. To install an air diffuser and commissioning box with low
installation height.
Figure 5. To dismantle the damper.
3
Swegon reserves the right to alter specifications. 20130806 www.swegon.com
PELICAN Ceiling Extract
Figure 9. Dimensions, SAR K frame.
Figure 6. Dimensions, PELICAN Ceiling.
K-factor (COP)
ALS
Size
PELICAN Ceiling Extract – extract air
Size Standard Low version Tube colour
100-125 125- 400 4.9 4.6 Transparent
125-160 160-400 7.6 7.2 Transparent
160-200 200-600 14.2 12.6 Transparent
200-250 250-600 21.2 20.2 Transparent
250-315 315- 600 27.9 27.7 Transparent
315-400 400-600 41.6 –Transparent
Number of measuring tubes: 1
Q
N
Dimensions, weights and K-factor
Figure 7. Dimensions, PELICAN Ceiling with ALS. Figure 8. Dimensions, PELICAN Ceiling with ALS, low build.
PELICAN Ceiling
Size Dimensions (mm) Weight
(kg)
AØd I M P
125-400 395 124 375 70 35 2.1
160-400 395 159 375 70 35 2.1
200-600 595 199 575 70 35 4.3
250-600 595 244 575 70 35 4.3
315-600 595 314 575 50 34 4.3
400-600 595 399 575 50 34 4.3
Hole cutting dimensions, I x I
CL = Centreline of branch
PELICAN Ceiling with ALS, 1 step
Size Dimensions (mm) Weight
(kg)
ABCØD Ød E1 E2 F1 F2 G1 G2 H K Q
125-400 395 282 217 99 125 255 212 113 70 175 132 270 80 40 3.5
160-400 395 342 252 124 160 279 236 113 70 188 145 315 80 40 4.2
200-600 595 404 288 159 200 314 271 113 70 205 162 375 100 40 7.0
250-600 595 504 332 199 250 354 311 113 70 225 182 465 115 40 8.7
315-600 595 622 388 249 315 395 352 93 50 230 187 575 140 40 11.8
400-600 595 767 488 314 400 455 –93 –262 –712 175 40 15.0
Frame – SAR K
Size Dimensions (mm) Weight (kg)
L N
400 395 75 1.0
500 495 75 1.0
600 595 75 1.0
When installing size 315-600 and 400-600 diffusers, position the
ALS box so that its branch extends 20 mm below the ceiling surface.