Tait orca User manual

11
11
1
Tait Electronics Ltd has made every effort to ensure the
accuracy of the information in this manual. However, Tait
Electronics Ltd reserves the right to update the radio
and/or this manual without notice.
Contents
Safety warningsSafety warnings
Safety warnings ......................................................................................................................................
......................................................................................................................................
................................................................... 44
44
4
Getting starGetting star
Getting startedted
tedted
ted ........................................................................................................................................
........................................................................................................................................
.................................................................... 66
66
6
Installing the antenna ............................................................ 6
Installing and removing the battery pack .............................. 6
Installing and removing the belt clip ..................................... 7
Radio contrRadio contr
Radio controls and indicaols and indica
ols and indicaols and indica
ols and indicatorstors
torstors
tors ........................................................................................
........................................................................................
............................................ 88
88
8
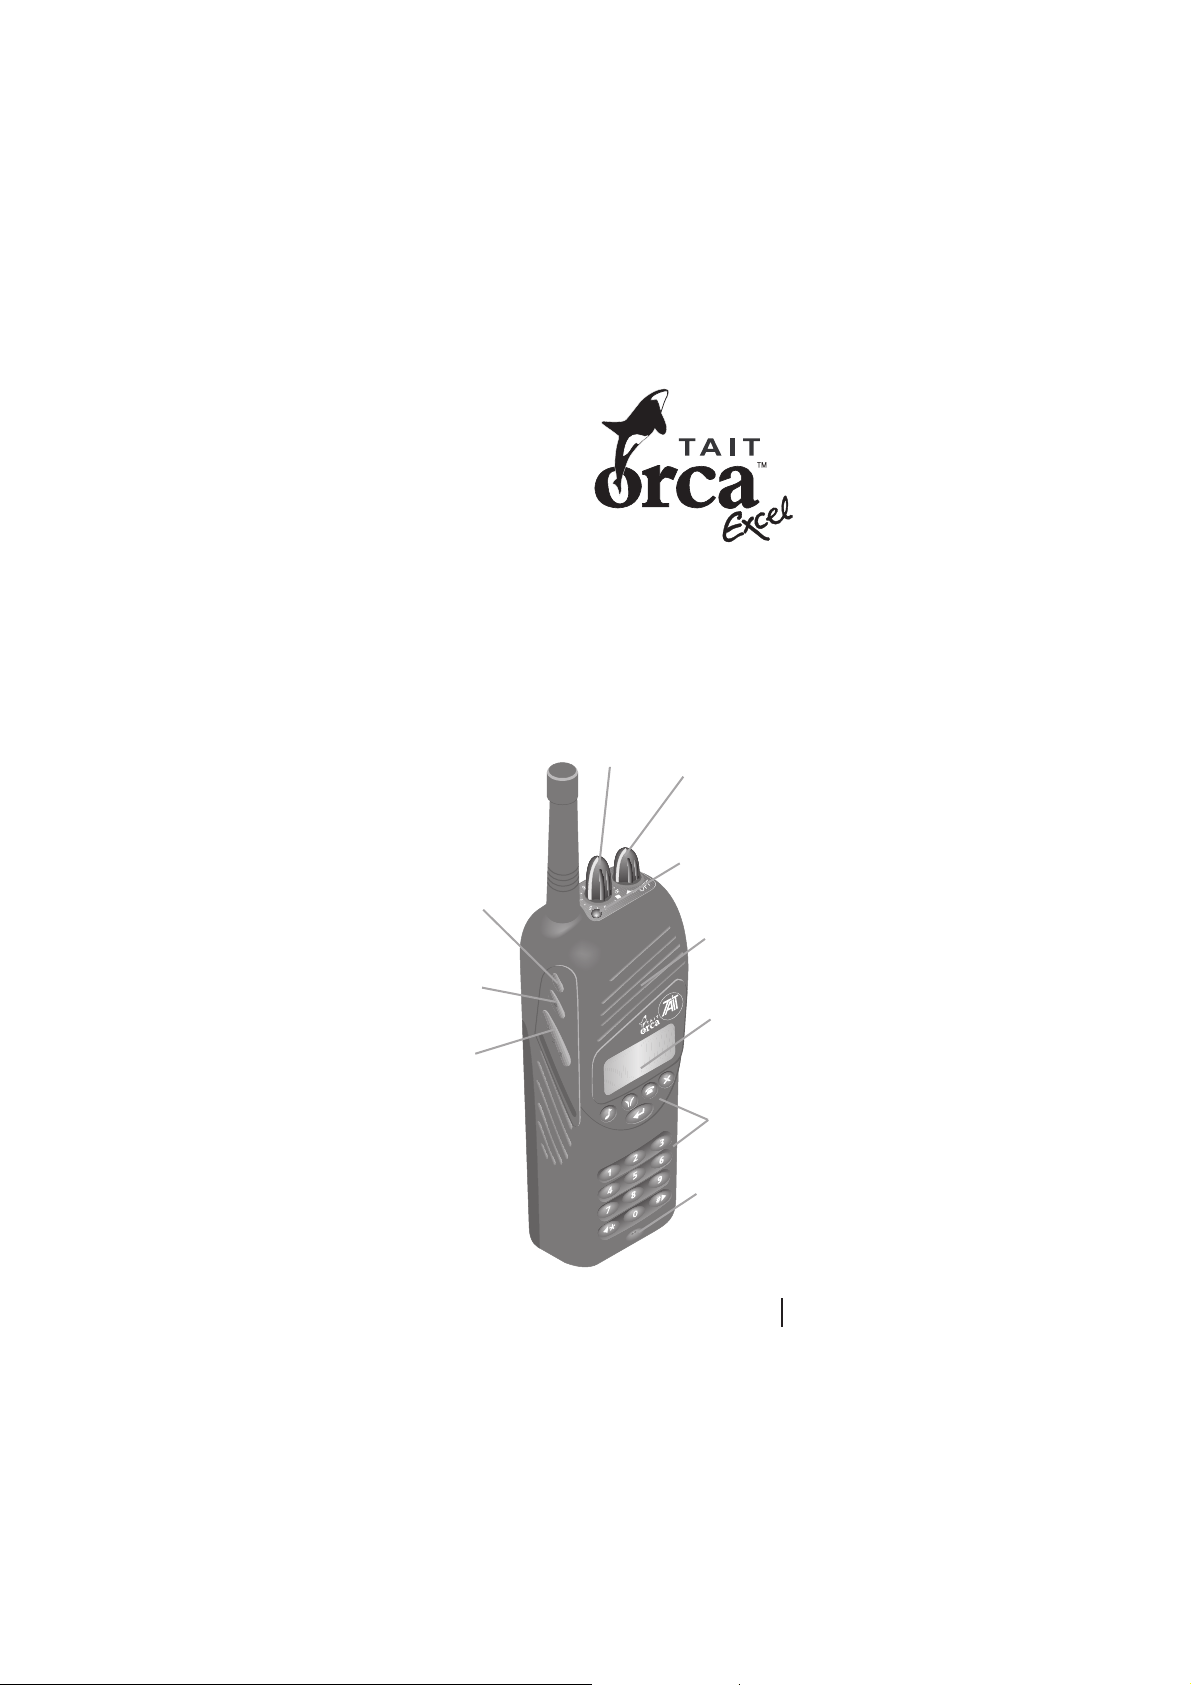
On/off/volume control ......................................................... 8
16-way selector ...................................................................... 8
Side panel keys ..................................................................... 10
Keypad ................................................................................. 10
Radio indicators ................................................................... 10
Confidence tones ................................................................. 12
Programmable function key settings .................................... 13
Keypad functions ................................................................. 14
Summary of radio indicators ................................................ 15
Basic operBasic oper
Basic operaa
aa
ationtion
tiontion
tion ..................................................................................................................................
..................................................................................................................................
................................................................. 11
11
188
88
8
Turning the radio on and off and controlling volume ...........18
Operating modes .................................................................. 18
Battery indicator .................................................................. 19
Transmitting and receiving................................................... 19
Transmit timer ............................................................. 20
TT
TT
Trr
rr
runking operunking oper
unking operunking oper
unking operaa
aa
ationtion
tiontion
tion ....................................................................................................................
....................................................................................................................
.......................................................... 22
22
211
11
1
Types of calls ....................................................................... 22
Trunking call setup .............................................................. 22
Call time limit ...................................................................... 23
Receiving calls ..................................................................... 24
Callers identity display ................................................ 25
Group calls .................................................................. 26

22
22
2
Status calls ................................................................... 26
Making calls ........................................................................ 27
Call setup ..................................................................... 27
Calls not connected ...................................................... 28
Dialling options ................................................................... 29
Radio-to-radio calls ...................................................... 29
Group calls .................................................................. 29
Priority calls ................................................................. 30
Emergency call ............................................................. 30
Preset calls .................................................................... 31
Status calls .................................................................... 31
Despatcher callback requests ....................................... 32
Interfleet (out-of-fleet) calls ......................................... 33
PSTN and PABX calls ................................................... 33
Re-establishing a call ........................................................... 34
Last number redial ...................................................... 34
Callback ....................................................................... 34
Call queuing ................................................................. 34
Selecting another trunking network .................................... 37
Conventional operConventional oper
Conventional operaa
aa
ationtion
tiontion
tion ........................................................................................................
........................................................................................................
.................................................... 3838
3838
38
Subaudible signalling .......................................................... 38
Monitor ............................................................................... 39
Receiving calls ..................................................................... 39
Making calls ........................................................................ 39
Exiting conventional mode .................................................. 40
DTMF oDTMF o
DTMF oDTMF o
DTMF overver
verver
verdiallingdialling
diallingdialling
dialling ......................................................................................................................
......................................................................................................................
........................................................... 44
44
411
11
1
Example: Accessing telebanking .......................................... 42
Example: Calling an automated attendant .......................... 43
Other feaOther fea
Other feaOther fea
Other featurtur
turtur
tureses
eses
es ......................................................................................................................................
......................................................................................................................................
................................................................... 4444
4444
44
Backlighting ........................................................................ 44
Night use ............................................................................. 44
Do not disturb ..................................................................... 44
Dynamic power control ....................................................... 45

33
33
3
Handset operation ............................................................... 45
Volume override .......................................................... 45
Keypad lock ......................................................................... 46
Low power transmit ............................................................ 46
Clear .................................................................................... 46
Charging the baCharging the ba
Charging the battertter
ttertter
tteryy
yy
y..................................................................................................................
..................................................................................................................
......................................................... 4747
4747
47
Charging the battery using the fast charger ......................... 47
Fast charger indicators ........................................................ 48
Charging the battery using the trickle charger .................... 48
Preserving battery life ......................................................... 49
Conditioning the battery with the fast charger .................... 49
Conditioning/analysing the battery with the fast charger ... 50
Disposing of used nickel-cadmium batteries ....................... 50
Basic maintenanceBasic maintenance
Basic maintenance ........................................................................................................................
........................................................................................................................
............................................................ 55
55
511
11
1
General care ......................................................................... 51
Troubleshooting ................................................................... 51
AA
AA
Accessoriesccessories
ccessoriesccessories
ccessories ................................................................................................................................................
................................................................................................................................................
........................................................................ 5252
5252
52
Fitting an accessory ............................................................. 52
SpecificaSpecifica
SpecificaSpecifica
Specificationstions
tionstions
tions ........................................................................................................................................
........................................................................................................................................
.................................................................... 5353
5353
53
SoftwarSoftwar
SoftwarSoftwar
Software Licence Agre Licence Agr
e Licence Agre Licence Agr
e Licence Agreementeement
eementeement
eement ........................................................................................
........................................................................................
............................................ 5454
5454
54

44
44
4
Safety warnings
nDo not hold the radio with its antenna
close to or touching any part of your
body, especially your face and eyes, when
transmitting.
nSwitch the radio off at petrol filling
stations.
nSwitch the radio off in the vicinity of
explosive devices, such as at a quarry that
uses blasting techniques.
nUse of a handheld microphone or radio
while driving is not permitted in some
countries. Check the vehicle regulations
in the area where you are driving.
nUse only Tait Orca battery chargers to
charge your radio battery.
nIf using the radio with an earphone or
headset, avoid using unnecessarily high
volume levels.
nFrequency band 406 to 406.1 MHz is
reserved for use by distress beacons.
Transmissions should not be made within this
frequency band.
nDo not immerse your Tait Orca radio in water.

55
55
5
Congratulations on
your purchase of the
Tait Orca handportable
two-way radio.
Compact, rugged and
reliable, your Tait Orca radio
offers the latest state-of-the-art technology and
is preprogrammed to suit your communication needs. If you
are unsure which of the features described in this manual
are available on your radio, consult your system manager or
the person who programmed your radio.
The custom features programmed for your radio may be
listed on the custom settings page on the inside back cover
of this manual.
PTT (press-to-
talk) key
16-way
selector
On/off/volume
control
Function key 1
Function key 2
LED indicator
Speaker
Display
Keypad
Microphone

66
66
6
WARNING! The battery pack must be fully charged before you
first use the radio, and it is highly recommended that the
battery be put through a condition/analyse cycle before first
use. See pages 47 to 50 for charging instructions.
Getting started
When you receive your Tait Orca handportable radio, make
sure all items you ordered are included. Typically, you
should receive the following:
nTait Orca handportable radio unit
nBattery pack
nAntenna
nBelt clip
nCharger
nPlug pack
nUsers Manual
If any parts are damaged or missing, report this to your
local Tait dealer immediately.
Installing the antenna
Before using the radio, connect the antenna as
illustrated. The antenna screws easily into the
socket at the top of the radio.
Installing and removing the
battery pack
Before the radio is first used, the battery
pack must be fully charged, and putting
the battery through a condition/analyse
cycle to charge it will maximise the
batterys initial capacity.
If using the fast charger or multi-charger
to charge the battery, the battery will charge within two
hours. If using the trickle charger, the battery will charge
within 16 hours. The trickle charger is not recommended
for NiMH battery packs.

77
77
7
For information on charging and conditioning the battery,
see pages 47 to 50.
To fit the battery pack to the radio, insert the bottom edge
of the battery pack into the two slots at the back of the
radio. Push the battery pack towards the radio. It should
snap into place.
To remove the pack, push the battery catch down and from
the sides, pull the battery away from the radio.
Installing and removing the belt clip
Slide the belt clip into the two slots on the top of the
battery. Push down until the clip snaps into place.
The belt clip has been designed to avoid accidental removal.
However, it can be replaced if required.
To remove the belt clip, insert the end of a flat-bladed object
(e.g. a butter knife) under the edge of the release tab
without forcing it. Gently lift the release tab up, then slide
the belt clip away from the battery.
Should the small battery clip come loose while removing the
belt clip, it can easily be refitted by sliding it into the slot at
the top of the battery until it snaps into place.
Battery
Belt clip
Slots
Release
tab
Battery clip

88
88
8
Radio controls and indicators
Your Tait Orca handportable controls and indicators
include the on/off/volume control, the 16-way selector, side
panel keys, keypad, and various radio indicators.
Many of the keys can have functions assigned to both short
and long presses. A short keypress is defined as less than
one second. You may need to experiment to become familiar
with how long short and long keypresses are.
On/off/volume control
Rotating the on/off/volume control clockwise turns on the
radio and increases volume. Rotating the control counter-
clockwise decreases volume and turns off the radio. This
also controls the volume level of indicators and confidence
tones.
To preserve battery life, it is recommended that you turn off
the radio when it is not in use.
16-way selector
Each position on the 16-way selector can be prepro-
grammed for:
nTrunking mode preset calls: Change to the assigned
position and press the PTT to initiate a trunked call.
nConventional channels: Change to the assigned position
to automatically switch the radio into conventional
mode.
nChanging network: Change to the assigned position and
press the PTT to change to a different trunking
network.
What preset calls, networks and conventional channels are
available for your radio may be listed on the custom settings
page on the inside back cover of this manual.
The label displayed for each position on the 16-way selector
can describe what option is available.

99
99
9
Function keys
preprogrammed
functions (see
page 13)
Function
key 1
Function
key 2
LED indicator
(see pages 15 to 17)
Speaker
Display*
(see pages 10
to 12)
Microphone
PTT key
(Press-To-Talk)
press to
transmit,
release to
receive,
press to receive an
incoming trunking
call
Keypad
Despatcher
Queue/Status
DTMF
Clear/Monitor
Enter
/Scroll keys
*Throughout this user’s manual, messages that appear in the display are
shown in ALLCAPS.

1010
1010
10
Side panel keys
The side panel keys include:
nfunction keys 1 and 2 for access to preprogrammed
functions; and
nPTT (press-to-talk) key for making the radio transmit
each time you talk.
The options that can be preprogrammed for the function
keys are described on page 13.
Keypad
Keys 0 to 9 are used for dialling numbers and entering data.
The left arrow/star ( /) and hash/right arrow ( /) keys
can be used for scrolling.
Other key functions are as outlined on page 14.
Radio indicators
In combination, the radios display window, LED indicator
and audible indicators provide you with information on the
state of your radio.
The tables on pages 15 to 17 show the meanings of different
combinations of radio indicators. A summary of these
indicators is also provided on the inside back cover of this
manual.
Throughout this users manual, messages that appear in the
display are shown in ALLCAPS.
A typical display is shown below.

1111
1111
11
The bottom line of the display shows a series of symbols
that give additional information on the state of the radio.
The meaning of these symbols is as follows.
Steady: The battery is low.
Flashing: Recharge the battery.
Steady: The battery is charged.
Steady: The radio is in DTMF dialling mode.
Steady: Monitor or squelch override is active.
Steady: Scrolling is permitted.
Flashing: The radio is transmitting at medium or high power.
Steady: Low power transmit mode is active.
Flashing: The radio is transmitting at low power.
Steady: Handset mode is active.
Steady: The radio currently has access to a trunking network.
Flashing: The radio does not currently have access to a trunking
network. It may be attempting to find a site it is authorised to use, or
it may be out of range of a network signal.
The bars on the display ( ) indicate the received signal
strength (RSSI), which will be displayed whenever the radio
is idle in trunking mode. If signal strength is low, calls you
make may not get through.
The message QUIET ON indicates that the radio is currently
in do not disturb mode, and BARTS is the label of a string
associated with the position on the 16-way selector.

1212
1212
12
If a function such as do not disturb were not active, the
message BARTS would be displayed at double-height, as
shown below.
Confidence tones
There are two sets of confidence tones available for your
radio: the Tait tone set and the MPT tone set. When
describing radio indicators, this manual describes only the
Tait tone set, which is the default.
If your radio has been preprogrammed with confidence
tones, a tone will be sounded each time you press a keypad
key or side panel key. For the Tait tone set, a short medium-
pitched tone indicates that the keypress is valid, and a long,
low-pitched tone indicates that the keypress is invalid. If the
keypress is not valid, you should check to ensure the entry
you are attempting to make is allowed for your radio.

1313
1313
13
When programmed Pressing the assigned function key
for
Audible indicators Turns audible indicators on and off.
Backlighting* Turns backlighting on. Backlighting will turn off
after a preprogrammed time.
Clear* Trunking mode only. Clears the last request to the
trunking system.
Do not disturb* Trunking mode only. Turns the do not disturb
function on and off.
Dynamic power control* Turns dynamic power control on and off.
Handset mode* Turns handset mode on and off.
Keypad lock* Locks the keypad so the keys cannot be activated
accidentally. Pressing the clear/monitor key ( )
turns off keypad lock.
Low power transmit* Changes the transmit power from mid or high to
low. Pressing the key again returns the transmit
power to the preprogrammed level.
Monitor* Conventional mode only. Turns monitor on
and off.
Night use* Turns night operation mode on and off.
Preset calls Sends a trunking preset call, changes to another
trunking network or to a conventional channel. If
the radio is in conventional mode when a trunking
preset call is selected, the call will proceed. Once
the call is complete and has been cleared down,
the radio will return to conventional mode if a
conventional channel is selected on the 16-way
selector.
Volume control* Controls volume in handset mode.
Programmable function key settings
Unless stated otherwise, functions operate in both trunking
and conventional modes. Some functions are not permitted
in some countries.
Functions marked * are described more fully in the Other
features section (pages 44 to 46).

1414
1414
14
Keypad functions
Key Key name Function
despatcher Short press: Send a callback request to your
despatcher (trunking mode only).
queue Short press: Access the call queue (trunked
mode only).
Long press: Display received status call.
DTMF Short press: Enter DTMF overdialling mode*.
clear/monitor Short press: Clear the current entry.
Long press: Turn monitor on and off**
(conventional mode only).
enter End an entry or make a selection.
/left/star Left arrow: Arrow key when scrolling.
Star: For call string and DTMF overdialling.
/hash/right Hash: For terminating and confirming string
entries (in trunking mode) and for DTMF
overdialling.
Right arrow: Arrow key when scrolling.
*If this feature was preprogrammed.
**The radio may be programmed so that monitor cannot be activated.
However, a short press will always turn off monitor, if it is active.

1515
1515
15
Summary of radio indicators
LED:
steady red steady green steady amber
flashing red flashing green flashing amber
Sound:
pitch: high medium low
duration: short long ... sound repeats
Display messages are shown in ALLCAPS, e.g. QUEUED
Trunking mode Basic operation
Display Sound Meaning
+ flashing The radio is transmitting.
+ flashing The radio is transmitting at low power.
medium + Low power transmit is active.
slow + Handset mode is active.
A function has been turned on.
A function has been turned off.
x 3 The transmit timer is about to expire.
In 10 seconds, the radio will stop
transmitting. Release the PTT key
before transmitting again.
The radio has stopped transmitting
1.5 sec because the transmit timer has
expired. Release the PTT key before
transmitting again.
slow + The radio has access to a network and
is ready to make or accept calls.
medium The radio does not currently have
+ flashing access to a network. It is attempting to
find a site it is authorised to use, or is
out of range of a network signal.
x 5 The current operation has been
cancelled at your request.
WAIT The system is setting up an incoming
every call. Give a brief press of the PTT to
1.5 sec accept the call.
(continued on next page)

1616
1616
16
Trunking mode (cont’d)
Display Sound Meaning
+ GO or A traffic channel has been allocated for
a call you have made or received. You
can proceed with the conversation.
+ GO The radio is operating on a traffic
channel.
fast A call has been received but not
+ caller’s ID warble ... answered. You can return the call by
giving a brief press of the PTT.
x 3 Your call time is almost up. In 10
seconds, you will be disconnected and
the network will clear down the call.
ENGAGED ... The system cannot contact the party
you are attempting to call because they
are busy. Try again later. If you are
repeatedly unable to make the call,
contact your fleet manager.
QUEUED The network has queued the call you
are attempting to make. Your call will
be connected as soon as possible.
SYS BUSY The network is busy and is unable to
handle your call request. Try again
later.
NOT HOME The party you are calling has their
radio switched off, in do not disturb
mode or is out of range. Try your call
later.
UNAVAIL Your radio is not permitted to make the
type of call you requested.
UNOBTAIN The call you are attempting to make is
not valid for your radio. Consult your
fleet manager.
ACCEPTED Your status call, despatcher callback
request or network service request has
been accepted.

1717
1717
17
Conventional mode
Warnings
Display Sound Meaning
+ CHAN Your radio is now operating in
conventional mode.
The channel is busy.
You cannot transmit because the
channel is busy. Wait until it is free to
transmit or use a channel that is clear.
medium + Monitor is active.
slow + The battery is low. Recharge or replace
flashing every 5 the battery as soon as possible.
seconds
The battery is too low to operate the
radio. Turn off the radio and recharge
or replace the battery.
The temperature is too high. You
should stop transmitting and allow
the radio to cool down.

1818
1818
18
Basic operation
This section describes the basic operation of your radio,
including turning the radio on and off, adjusting volume,
selecting channels, and transmitting and receiving.
Turning the radio on and off and controlling
volume
Rotating the on/off/volume control clockwise turns on the
radio and increases volume. Rotating the control counter-
clockwise decreases volume and turns off the radio.
To preserve battery life, it is recommended that you turn off
the radio when it is not in use.
When you turn on the radio, you may need to enter a
personal identification number (PIN) before you can use the
radio. If you get the message ENTER CODE, enter your
assigned PIN, which will be up to five characters long, then
press the enter key ( ). If you do not know your PIN,
consult your system manager or the person who pro-
grammed your radio.
The radio will then display the radios identity, then a
message such as TAIT ORCA RADIO. The radio will then
give two short, medium-pitched beeps, which indicate that
the power-up sequence is now complete. How you now use
the radio depends on what operating mode it is in.
Operating modes
There are two main modes of operation available on your
radio: trunked and conventional.
nIn trunking mode, you make calls through the trunking
network. You can call other radios in your fleet and,
depending on how your network is configured, private
automatic branch exchange (PABX) extensions and
public switched telephone network (PSTN) numbers.
See pages 21 to 37 for more information on operating
in trunking mode.

1919
1919
19
nIn conventional mode, your radio communicates
directly with other radios over standard channels or via
a repeater. If your radio is in conventional mode, the
message CHAN will appear in the upper lefthand
corner.
See pages 38 to 40 for more information on operating
in conventional mode.
Battery indicator
The battery indicator in the lower lefthand corner of the
display shows how charged the battery is. When the battery
is low, the low battery symbol ( ) will flash, the radio
will emit a low-pitched beep every five seconds and the LED
indicator will slowly flash red. When the battery gets too
low, the radio will emit a long, low-pitched beep and stop
operating. You should turn off the radio immediately.
See pages 47 to 50 for recharging instructions.
To preserve battery life, it is recommended that you turn off
the radio when it is not in use.
Transmitting and receiving
Making and receiving calls in trunking mode is described on
pages 24 to 36. Making and receiving calls in conventional
mode is described on page 39.
Once a call is established, proceed with the conversation by
pressing the PTT (press-to-talk) key to transmit, and
speaking clearly into the radio. While you are transmitting,
the LED will glow red and the transmitting symbol ( ) will
flash. If you are transmitting at low power, the low power
symbol ( ) will flash.
Release the PTT key to hear the other party.

2020
2020
20
Transmit timer
Your radio is programmed with a transmit timer, which
limits the amount of time you can transmit continuously
using the PTT key.
If the radio gives three short medium-pitched beeps, the
transmit timer is about to expire. Ten seconds later, the
radio will automatically stop transmitting. You will have to
release the PTT key before you can transmit again.
Other manuals for orca
2
Table of contents
Other Tait Radio manuals

Tait
Tait TM9100 User manual

Tait
Tait TM9355 User manual

Tait
Tait Orca 5020 User manual

Tait
Tait TM9155R User manual

Tait
Tait T2000 Series User manual

Tait
Tait TM9400 User manual

Tait
Tait t2040 series ii User manual

Tait
Tait T2000 Series User manual

Tait
Tait TP2210-H5 User manual

Tait
Tait TM8100 mobiles User manual

Tait
Tait TM8100 mobiles Quick start guide

Tait
Tait TM9100 User manual

Tait
Tait TM9356 User manual

Tait
Tait TM8100 mobiles User manual

Tait
Tait TM8260 User manual

Tait
Tait TM9300 DMR User manual

Tait
Tait TM8250 User manual

Tait
Tait TM8100 mobiles User manual

Tait
Tait T2000-300 Quick start guide

Tait
Tait T2000 SERIES II User manual