Team Kalorik TKG SFC 1001 User manual

Copies of the I/B. Please reproduce them without any
changes except under special instruction from Team
International BELGIUM. The pages must be reproduced
and folded in order to obtain a booklet A5 (+/- 148.5 mm
width x 210 mm height). When folding, make sure you
keep the good numbering when you turn the pages of
the I/B. Don’t change the page numbering. Keep the
language integrity.
Fax +32 2 359 95 50
Dampfreiniger
Steam Cleaner
Nettoyeur à vapeur
Stoomreiniger
Limpiador de vapor
Limpar com vapor
Oczyszczacz parowy
Aparat curatat cu aburi
ПАРОЧИСТАЧКА
I/B Version
100525
TKG SFC 1001
230V~ 50Hz 1500W
Ï
Front cover page (first page)
Assembly page 1/76

Copies of the I/B. Please reproduce them without any
changes except under special instruction from Team
International BELGIUM. The pages must be reproduced
and folded in order to obtain a booklet A5 (+/- 148.5 mm
width x 210 mm height). When folding, make sure you
keep the good numbering when you turn the pages of
the I/B. Don’t change the page numbering. Keep the
language integrity.
Fax +32 2 359 95 50
WICHTIGE SICHERHEITSVORSCHRIFTEN
Lesen Sie aufmerksam die Gebrauchsanleitung, bevor Sie Ihr Gerät benutzen, und befolgen Sie
immer die Sicherheitsvorschriften und die Gebrauchsanweisung.
Wichtig: Personen (einschließlich Kinder), die aufgrund ihrer physischen, sensorischen oder
geistigen Fähigkeiten oder ihrer Unerfahrenheit oder Unkenntnis nicht in der Lage sind, das
Gerät sicher zu benutzen, sollten dieses Gerät nicht ohne Aufsicht oder Anweisung durch eine
verantwortliche Person benutzen. Kinder sollten beaufsichtigt werden, um sicherzustellen, dass
sie nicht mit dem Gerät spielen.
Kontrollieren Sie, ob die Netzspannung mit der auf dem Gerät vermerkten Spannung
übereinstimmt, bevor Sie das Gerät benutzen.
Lassen Sie Ihr Gerät niemals beim Gebrauch unbeaufsichtigt.
Schließen Sie das Gerät immer an eine geerdete Steckdose an.
Wenn eine Verlängerungsschnur notwendig ist, muss eine Schnur mit einer Stärke von
mindestens 10 Ampere verwendet werden. Eine Schnur mit niedrigerer Ampere- oder
Watt-Zahl als die Geräte-Daten könnte sich überhitzen. Achten Sie darauf, dass die Schnur
so liegt, dass man nicht darüber stolpern oder fallen kann oder sie herausreißt.
Benutzen Sie das Gerät nur zu Haushaltszwecken, wie in der Bedienungsanleitung
angegeben.
Tauchen Sie das Gerät niemals in Wasser oder andere Flüssigkeiten, weder zum Reinigen,
noch zu einem anderen Zweck.
Benutzen Sie das Gerät nicht in der Nähe einer Wärmequelle.
Überprüfen Sie regelmäßig die Anschlussleitung und das Gerät auf Beschädigungen. Bei
Beschädigungen an Anschlussleitung oder Gerät, darf das Gerät aus Sicherheitsgründen
nicht mehr benutzt werden. Für Reparaturen wenden Sie sich an einen Fachmann(*). Eine
beschädigte Anschlussleitung muss von einem Fachmann(*) ausgewechselt werden.
Das Gleiche gilt, wenn der Wassertank nicht mehr funktioniert oder beschädigt ist.
Demontieren Sie den Wassertank nicht um elektrische Entladung zu vermeiden: Wenden
Sie sich an einen Fachmann. Eine inkorrekte Montage stellt eine Stromschlaggefahr dar,
wenn das Gerät benutzt wird.
Lassen Sie den flexiblen Schlauch niemals mit einer heißen Oberfläche in Berührung
kommen.
Benutzen Sie das Gerät nicht im Freien und bewahren Sie es an einem trockenen Platz auf.
Benutzen Sie nur Zubehör, welches vom Lieferanten empfohlen wurde. Anderes Zubehör
stellt eine Gefahr für den Benutzer dar und das Gerät könnte dadurch beschädigt
werden.
Ziehen Sie niemals an der Anschlussleitung, um das Gerät zu bewegen. Achten Sie darauf,
dass die Anschlussleitung nicht irgendwo hängen bleibt und dies zum Fall des Gerätes
führen könnte. Wickeln Sie die Anschlussleitung nicht um das Gerät oder knicken Sie diese
nicht.
Das Gerät ist kein Spielzeug; unter keiner Bedingung sollte man sich auf das Gerät setzen.
Richten Sie den Dampf niemals auf Geräte mit elektronischen Komponenten (z.B. die
Innenseite eines Backofens).
Rollen Sie die Anschlussleitung und den flexiblen Schlauch völlig aus, bevor Sie das Gerät
anschalten.
ZIEHEN SIE DEN STECKER AUS DER STECKDOSE UND LASSEN SIE DEN WASSERTANK
VOLLSTÄNDIG ABKÜHLEN, BEVOR SIE DEN WASSERTANK ÖFFNEN, FÜLLEN, ENTLEEREN,
BEWEGEN ODER REINIGEN.
Ziehen Sie immer den Stecker aus der Steckdose nach Gebrauch oder wenn das Gerät
nicht benutzt wird.
2 TKG SFC 1001 - 100525
Assembly page 2/76
Copies of the I/B. Please reproduce them without any
changes except under special instruction from Team
International BELGIUM. The pages must be reproduced
and folded in order to obtain a booklet A5 (+/- 148.5 mm
width x 210 mm height). When folding, make sure you
keep the good numbering when you turn the pages of
the I/B. Don’t change the page numbering. Keep the
language integrity.
Fax +32 2 359 95 50
Das Symbol auf dem Gerät bedeutet, dass Sie vorsichtig sein sollten! Passen Sie auf,
denn das Berühren von heißem Wasser, Dampf oder den heißen Teilen des Gerätes
könnte zu ernsthaften Verbrennungen führen.
Füllen Sie den Wassertank niemals mit Essig, Entkalkungsmittel oder anderen chemischen
Produkten.
Achten Sie darauf, dass Sie niemals den flexiblen Schlauch falten, biegen oder quetschen.
Schalten Sie das Gerät nicht an ohne Wasser eingefüllt zu haben.
Stellen Sie sicher, dass Sie das Gerät nicht über 45° kippen während des Gebrauchs. Wenn
das Gerät in Betrieb ist, sollten Sie die Düsen nicht auf Personen, Tiere oder Pflanzen
richten.
ÖFFNEN SIE NIEMALS DEN WASSERTANK, WENN DAS GERÄT IN BETRIEB IST.
BENUTZEN SIE DEN DAMPFREINIGER NICHT, WENN:
)DER FLEXIBLE SCHLAUCH DURCHLÖCHERT IST.
)EINES DER ZUBEHÖRTEILE BESCHÄDIGT IST.
Das Gerät erzeugt heißen Wasserdampf, wie das Symbol ( ) auf der Dampfpistole
angibt. Achten Sie darauf, dass Sie sich bei der Benutzung des Gerätes nicht verbrennen
und richten Sie es niemals auf Sie selbst oder irgendeine andere Person.
Bevor Sie den Wassertankverschluss losdrehen, schalten Sie das Gerät aus und lassen Sie
den Druck ab, indem Sie auf den Dampfknopf drücken bis kein Wasserdampf mehr aus
dem flexiblen Schlauch kommt.
Ziehen Sie vor jeder Reinigung/jedem Unterhalt den Stecker aus der Steckdose und lassen
Sie das Gerät ausreichend abkühlen.
Benutzen Sie immer den Handgriff, wenn Sie das Gerät tragen wollen.
(*) Fachmann: anerkannter Kundendienst des Lieferanten oder des Importeurs, der für derartige
Reparaturen zuständig ist. Für eventuelle Reparaturen wenden Sie sich bitte an diesen
Kundendienst.
BESCHREIBUNG DES GERÄTES
3 TKG SFC 1001 - 100525
Assembly page 3/76

Copies of the I/B. Please reproduce them without any
changes except under special instruction from Team
International BELGIUM. The pages must be reproduced
and folded in order to obtain a booklet A5 (+/- 148.5 mm
width x 210 mm height). When folding, make sure you
keep the good numbering when you turn the pages of
the I/B. Don’t change the page numbering. Keep the
language integrity.
Fax +32 2 359 95 50
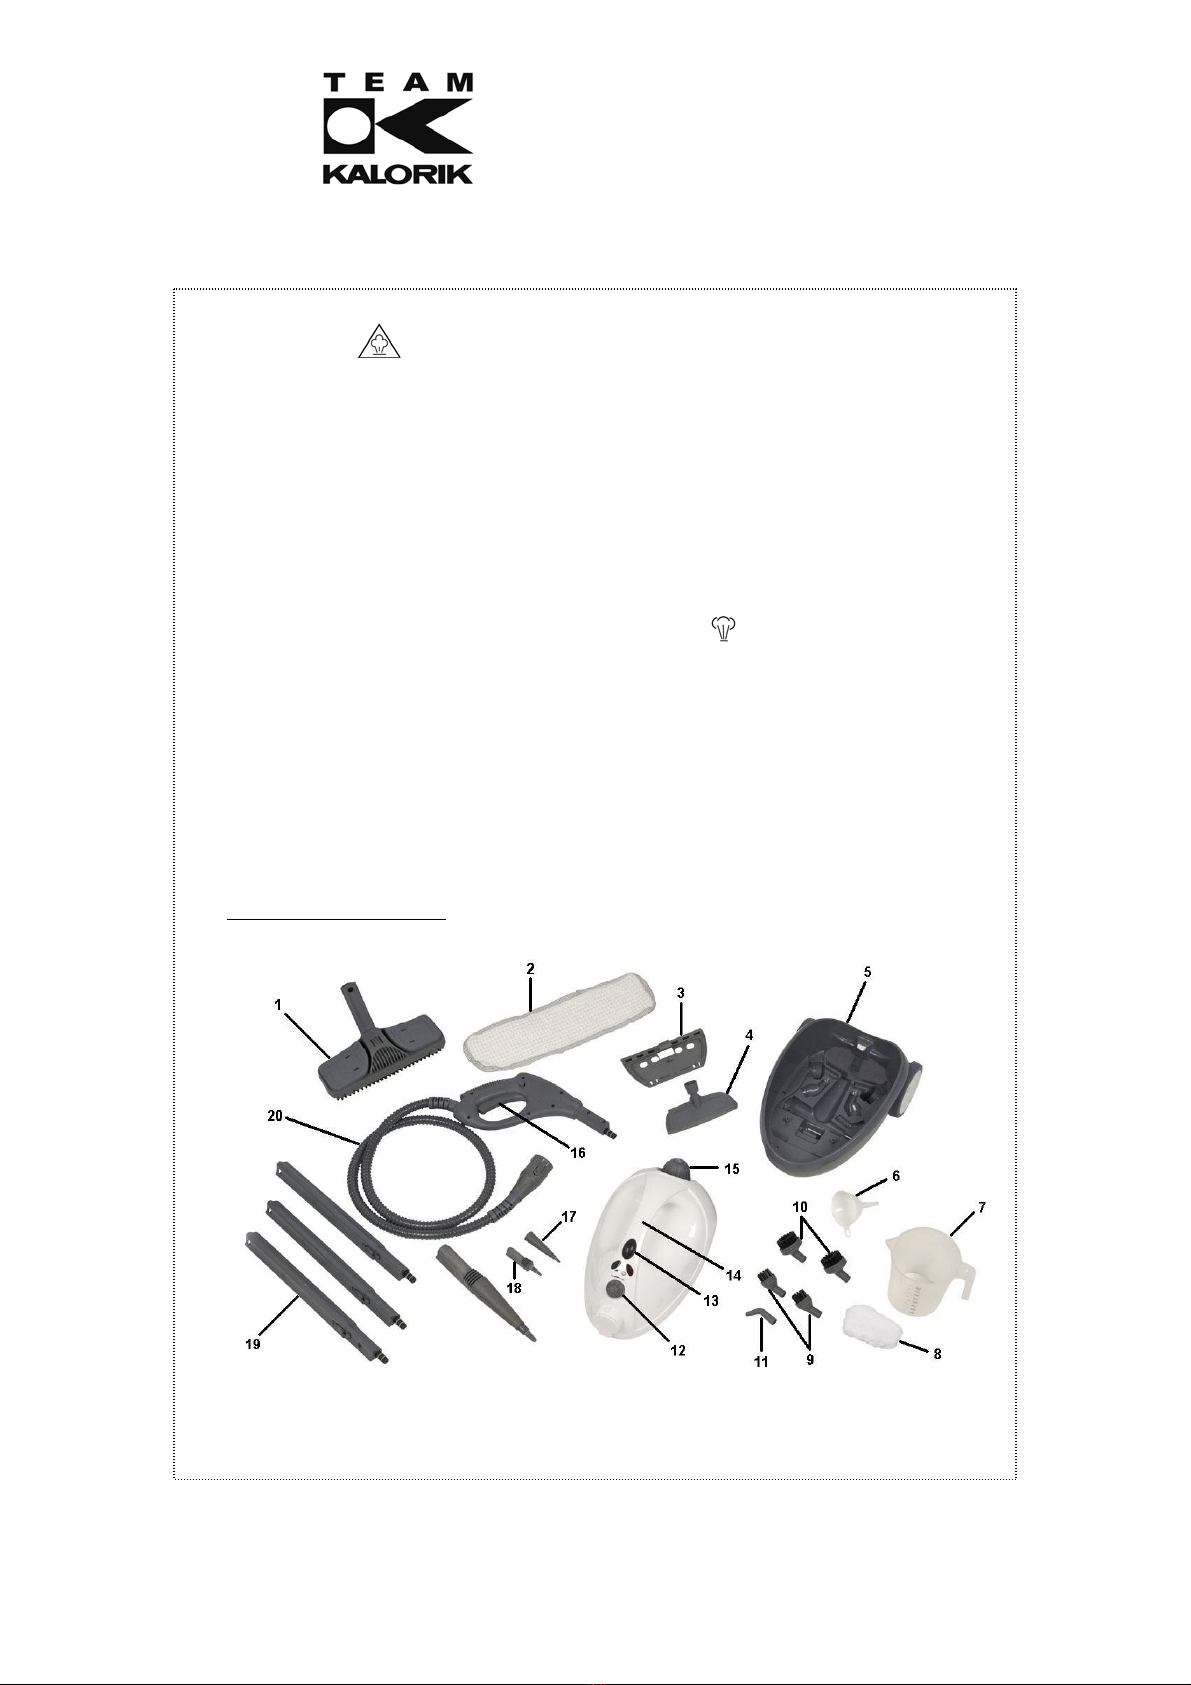
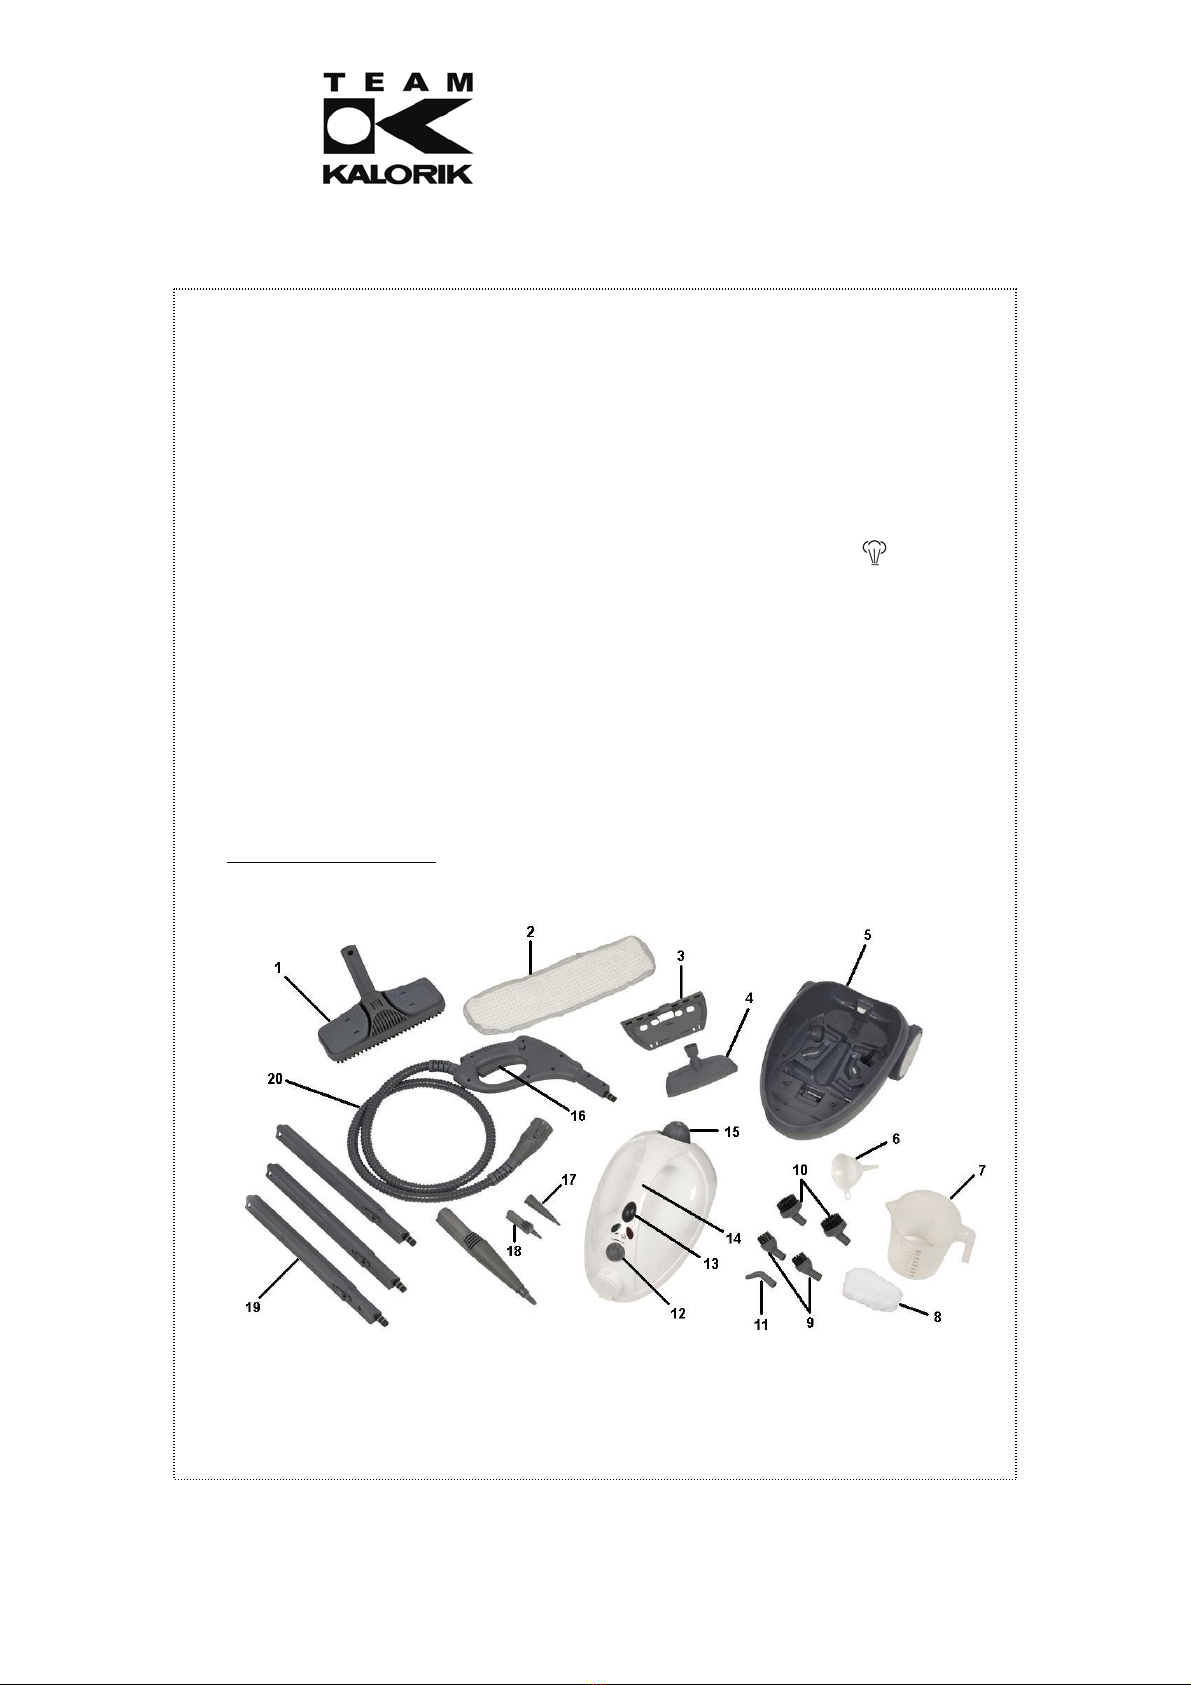
1. Fußbodendüse
2. Tuch für Fußbodendüse
3. Fensterwischer
4. Scheuerbürste
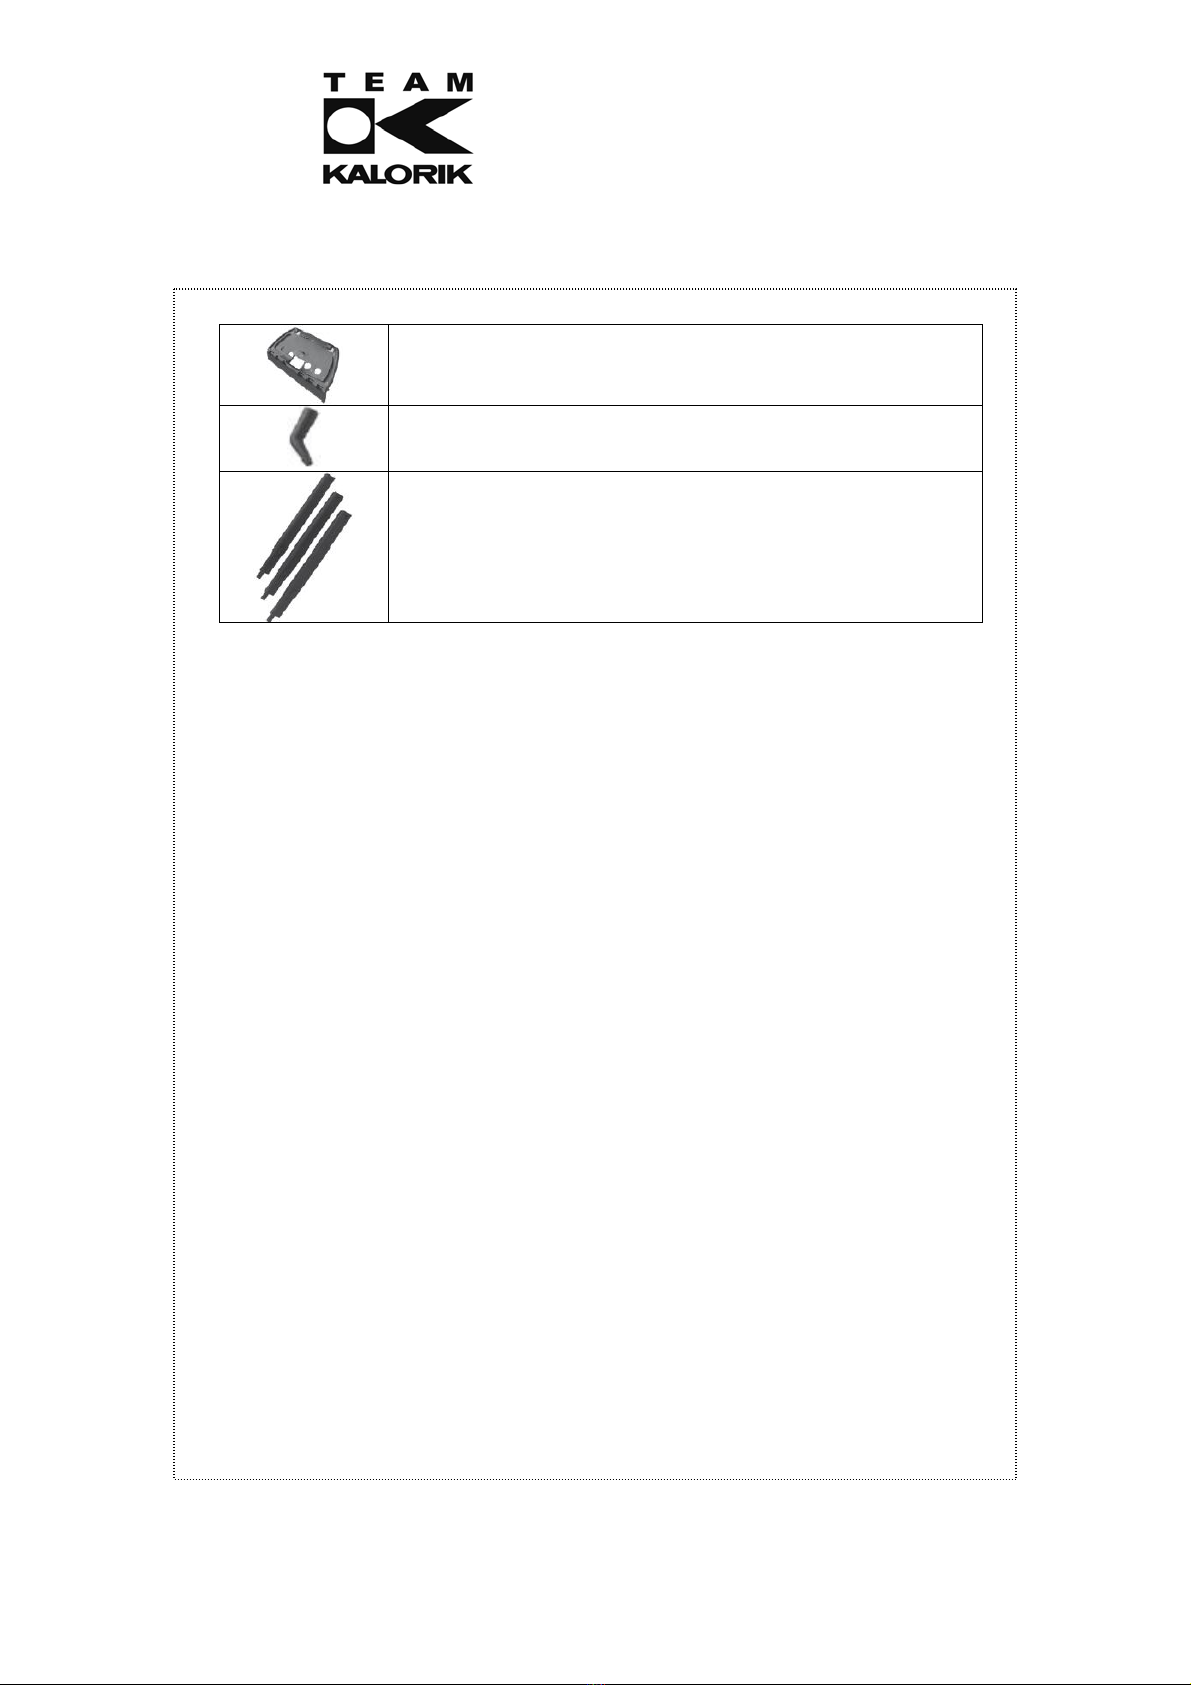
5. Basis
6. Trichter
7. Messbecher
8. Tuch für Scheuerbürste
9. Kleine Bürste
10. Große Bürste
11. Gebogene Düse
12. Dampfregler
13. Ein- und Ausschalter
14. Handgriff
15. Sicherheitsdeckel
16. Dampfknopf
17. Gerade Düse
18. Verbindungsstück für Zubehör
19. Verlängerungsrohr (3 Stück)
20. Flexibler Schlauch
EIGENSCHAFTEN:
Dieses Gerät kann überall benutzt werden und ist sehr einfach zu bedienen. Außerdem
brauchen Sie es nur mit Wasser zu füllen. Es reinigt, entfettet und desinfiziert völlig ohne
chemische Produkte (über 100°C) und eignet sich für verschiedene Materialien und
Oberflächen wie z.B. Fenster, Kleidung, Gartenmöbel, Fahrräder, Wagen, Fliesen usw.
Achtung! Richten Sie dieses Gerät niemals auf Personen oder Tiere.
Dieses Gerät ist also ideal für die Desinfektion von Kühlschränken und Bädern, für die
Entfernung von Gerüchen aus Kleidung und für den Streit gegen Milben und andere Parasiten
in Matratzen, Kissen und Teppichen.
ZUBEHÖR
Fußbodendüse: für waschbare Wandbekleidung und
Bodenbelag. Sie kann mit oder ohne Tuch benutzt
werden. Für empfindliche Oberflächen wie z.B. Holz
oder Linoleum wird es empfohlen, das Tuch zu
benutzen. Stellen Sie die Fußbodendüse auf das Tuch
und befestigen Sie das überhängende Material unter
den Clips an der linken und rechten Seite der
Fußbodendüse. Drücken Sie dazu auf das innere Teil
der Clips zuoberst auf der Fußbodendüse um die Clips
zu öffnen und befestigen Sie das Tuch unterhalb der
Clips.
Verbindungsstück für Zubehör: um die Zubehörteile auf das Gerät zu
montieren.
Gerade Düse: für Fugen, Bretter usw.
Kleine Bürste: um hartnäckigen Schmutz von Rollläden, Heizkörpern,
Ventilen usw. zu entfernen.
Große Bürste: um starke Beschmutzung von weniger empfindlichen
Materialien wie z.B. Edelstahl oder Stein zu entfernen.
Scheuerbürste: für Gardinen und Kleidung usw. Kann zusammen mit Tuch
benutzt werden.
4 TKG SFC 1001 - 100525
Assembly page 4/76
Copies of the I/B. Please reproduce them without any
changes except under special instruction from Team
International BELGIUM. The pages must be reproduced
and folded in order to obtain a booklet A5 (+/- 148.5 mm
width x 210 mm height). When folding, make sure you
keep the good numbering when you turn the pages of
the I/B. Don’t change the page numbering. Keep the
language integrity.
Fax +32 2 359 95 50
Fensterwischer: für Fenster, Spiegel, Glastüren usw.
Achtung! Nicht direkt auf kaltes Glas benutzen.
Gebogene Düse: für Toiletten und Oberflächen, die schwierig zu erreichen
sind.
Verlängerungsrohre: ideal für die Verlängerung der Zubehörteile.
AUFBEWAHRUNG DES ZUBEHÖRS:
In der Basis des Gerätes gibt es ein Fach, in dem Sie das Zubehör aufbewahren können.
Trennen Sie den Wassertank von der Basis, indem Sie auf den Knopf an der Hinterseite des
Gerätes neben dem rechten Rad drücken und zur gleichen Zeit den Wassertank aufheben
anhand des Handgriffes.
Wenn Sie das Zubehör eingesetzt haben oder das gewünschte Zubehörteil herausgenommen
haben, stellen Sie den Wassertank zurück auf die Basis des Gerätes. Drücken Sie den
Wassertank fest nieder, bis er einrastet.
GEBRAUCH:
ACHTUNG! Dieses Gerät darf nicht direkt auf sanfte Kunststoffe, nicht-vorbehandeltes Holz oder
kaltes Glas benutzt werden.
Dampf könnte die Oberfläche von Möbeln beschädigen. Für einen sicheren
Gebrauch sollten Sie daher im Voraus einen Prüflauf ausführen. Achten Sie auf die
Unterhaltsvorschriften des Möbelherstellers.
MONTAGE:
(STECKEN SIE DEN STECKER NICHT IN DIE STECKDOSE, BEVOR SIE EIN ZUBEHÖRTEIL GEWÄHLT UND
MONTIERT HABEN.)
Achtung! Ziehen Sie nach dem Gebrauch den Stecker aus der Steckdose und drücken Sie auf
den Dampfknopf um den Innendruck ausreichend zu verringern. Dann können Sie den
Sicherheitsdeckel entfernen.
1. Nehmen Sie das gewünschte Zubehörteil aus dem Aufbewahrungsfach heraus und stellen
Sie den Wassertank zurück auf die Basis des Gerätes (siehe Abschnitt “AUFBEWAHRUNG
DES ZUBEHÖRS”).
2. Befestigen Sie den flexiblen Schlauch mit der Dampfpistole am Gerät. Klappen Sie dazu
die Kappe auf, die den Schacht bedeckt, und stecken Sie das Schlauchverbindungsstück
in den Schacht, bis es einrastet. Stellen Sie sicher, dass das Stäbchen des
Schlauchverbindungsstücks in den kleinen Schlitz an der Unterseite des Schachts eintritt.
Sie können auf die Entriegelungsknöpfe zu beiden Seiten des Schlauchverbindungsstücks
drücken, um den Eintritt des Schlauchverbindungsstücks zu erleichtern. Um den Schlauch
nach Gebrauch zu entfernen, drücken Sie auf die Entriegelungsknöpfe zu beiden Seiten
des Schlauchverbindungsstücks und ziehen Sie am Schlauchverbindungsstück.
3. Schrauben Sie den Sicherheitsdeckel ab. Drücken Sie dazu auf den Sicherheitsdeckel und
drehen Sie ihn gleichzeitig im Gegenuhrzeigersinn (falls es noch Wasser im Tank gibt und
falls der Sicherheitsdeckel noch festgeschraubt war nach einem vorherigen Gebrauch,
dann tritt ein wenig Entgasung auf. Dies ist normal und nicht gefährlich).
5 TKG SFC 1001 - 100525
Assembly page 5/76
Copies of the I/B. Please reproduce them without any
changes except under special instruction from Team
International BELGIUM. The pages must be reproduced
and folded in order to obtain a booklet A5 (+/- 148.5 mm
width x 210 mm height). When folding, make sure you
keep the good numbering when you turn the pages of
the I/B. Don’t change the page numbering. Keep the
language integrity.
Fax +32 2 359 95 50
4. Füllen Sie den Wassertank mit Wasser. Verwenden Sie bitte den mitgelieferten Messbecher
und den Trichter. Überschreiten Sie niemals den maximalen Füllstand (1,4 Liter). Falls das
Wasser in Ihrer Gegend hart ist, wird es empfohlen destilliertes Wasser zu verwenden oder
in diesem Fall können Sie auch Leitungswasser verwenden, das im Voraus gekocht worden
ist.
5. Zur Beachtung: Füllen Sie den Wassertank niemals mit Entkalkungsmittel, Parfüm oder
Reinigungsmittel um Beschädigung des Gerätes zu vermeiden.
6. Schrauben Sie den Sicherheitsdeckel wieder fest. Drücken Sie dazu auf den
Sicherheitsdeckel und drehen Sie ihn gleichzeitig im Uhrzeigersinn.
7. Montieren Sie die Verlängerungsrohre, falls Sie Fußböden oder Oberflächen, die schwierig
zu erreichen sind, reinigen wollen. Drücken Sie dazu das offene Teil eines Rohrs auf die
Dampfpistole, bis der Entriegelungsknopf der Dampfpistole einrastet. Sie können nur ein,
zwei oder die drei Verlängerungsrohre montieren. Um die Verlängerungsrohre nach dem
Gebrauch wegzunehmen, drücken Sie auf den Entriegelungsknopf zuoberst auf dem
Verlängerungsrohr oder auf der Dampfpistole und ziehen Sie die Rohre auseinander.
8. Machen Sie die Fußbodendüse am Verlängerungsrohr fest, bis der Entriegelungsknopf
einrastet, falls Sie Fußböden reinigen wollen. Falls Sie ein anderes Zubehörteil verwenden
wollen, brauchen Sie erst das Verbindungsstück für Zubehör zu montieren: schieben Sie
das Verbindungsstück für Zubehör auf die Dampfpistole oder auf das Verlängerungsrohr
hinauf, bis der Entriegelungsknopf einrastet. Montieren Sie dann die gerade Düse auf das
Verbindungsstück für Zubehör und drehen Sie die gerade Düse eine Vierteldrehung
entgegen dem Uhrzeigersinn, damit sie einrastet. Um die gerade Düse nach dem
Gebrauch wegzunehmen, drehen Sie sie eine Vierteldrehung im Uhrzeigersinn und ziehen
Sie sie ab. Um die Fußbodendüse oder das Verbindungsstück für Zubehör nach dem
Gebrauch wegzunehmen, drücken Sie auf den entsprechenden Entriegelungsknopf und
ziehen Sie sie/es ab.
9. Die kleine und große Rundbürsten, die Scheuerbürste und die gebogene Düse können auf
die gerade Düse montiert werden.
10. Fensterwischer: Achtung! Benutzen Sie dieses Gerät nicht direkt auf kaltes Glas. Sonst
könnte das Glas zerbrechen. Heizen Sie das Glas vor, indem Sie Dampf sprühen in einem
größeren Bogen aus einer Entfernung von 20-25cm. Verringern Sie langsam den Abstand
bis 10-15cm um das Glas weiter vorzuheizen.
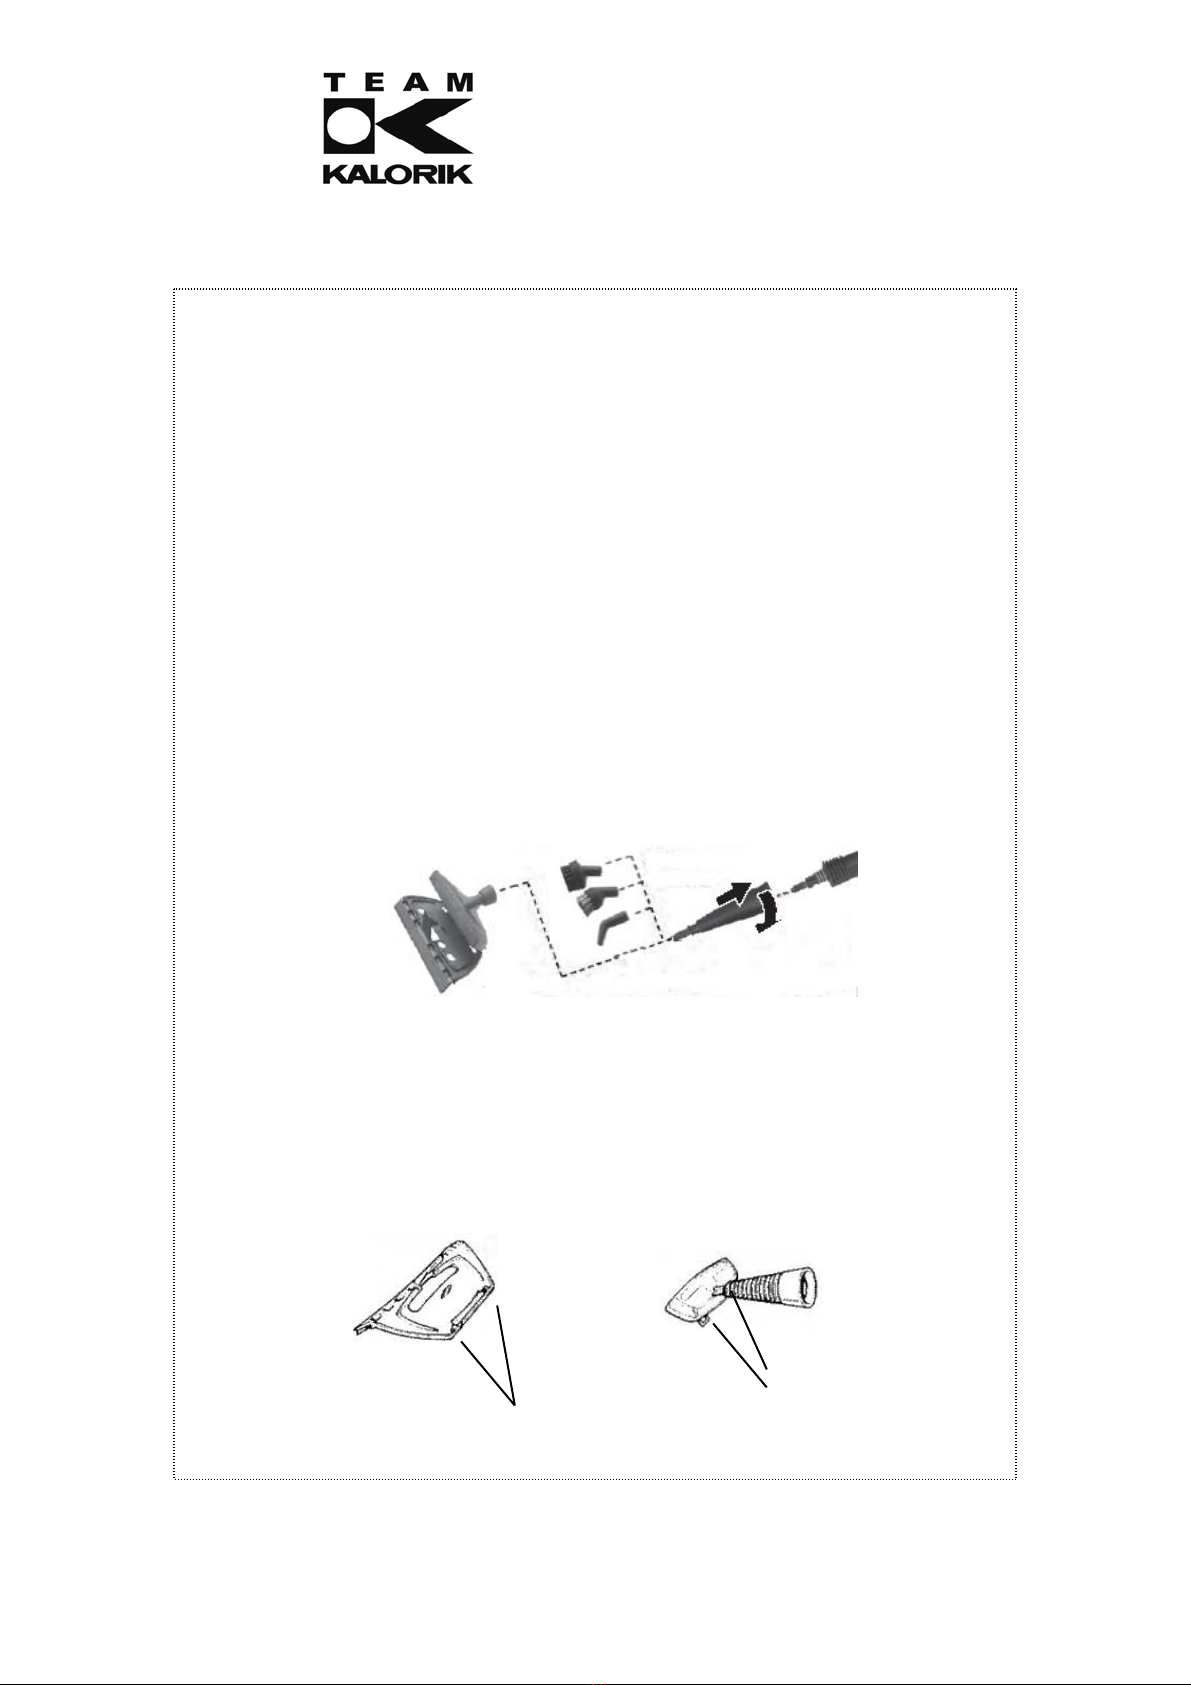
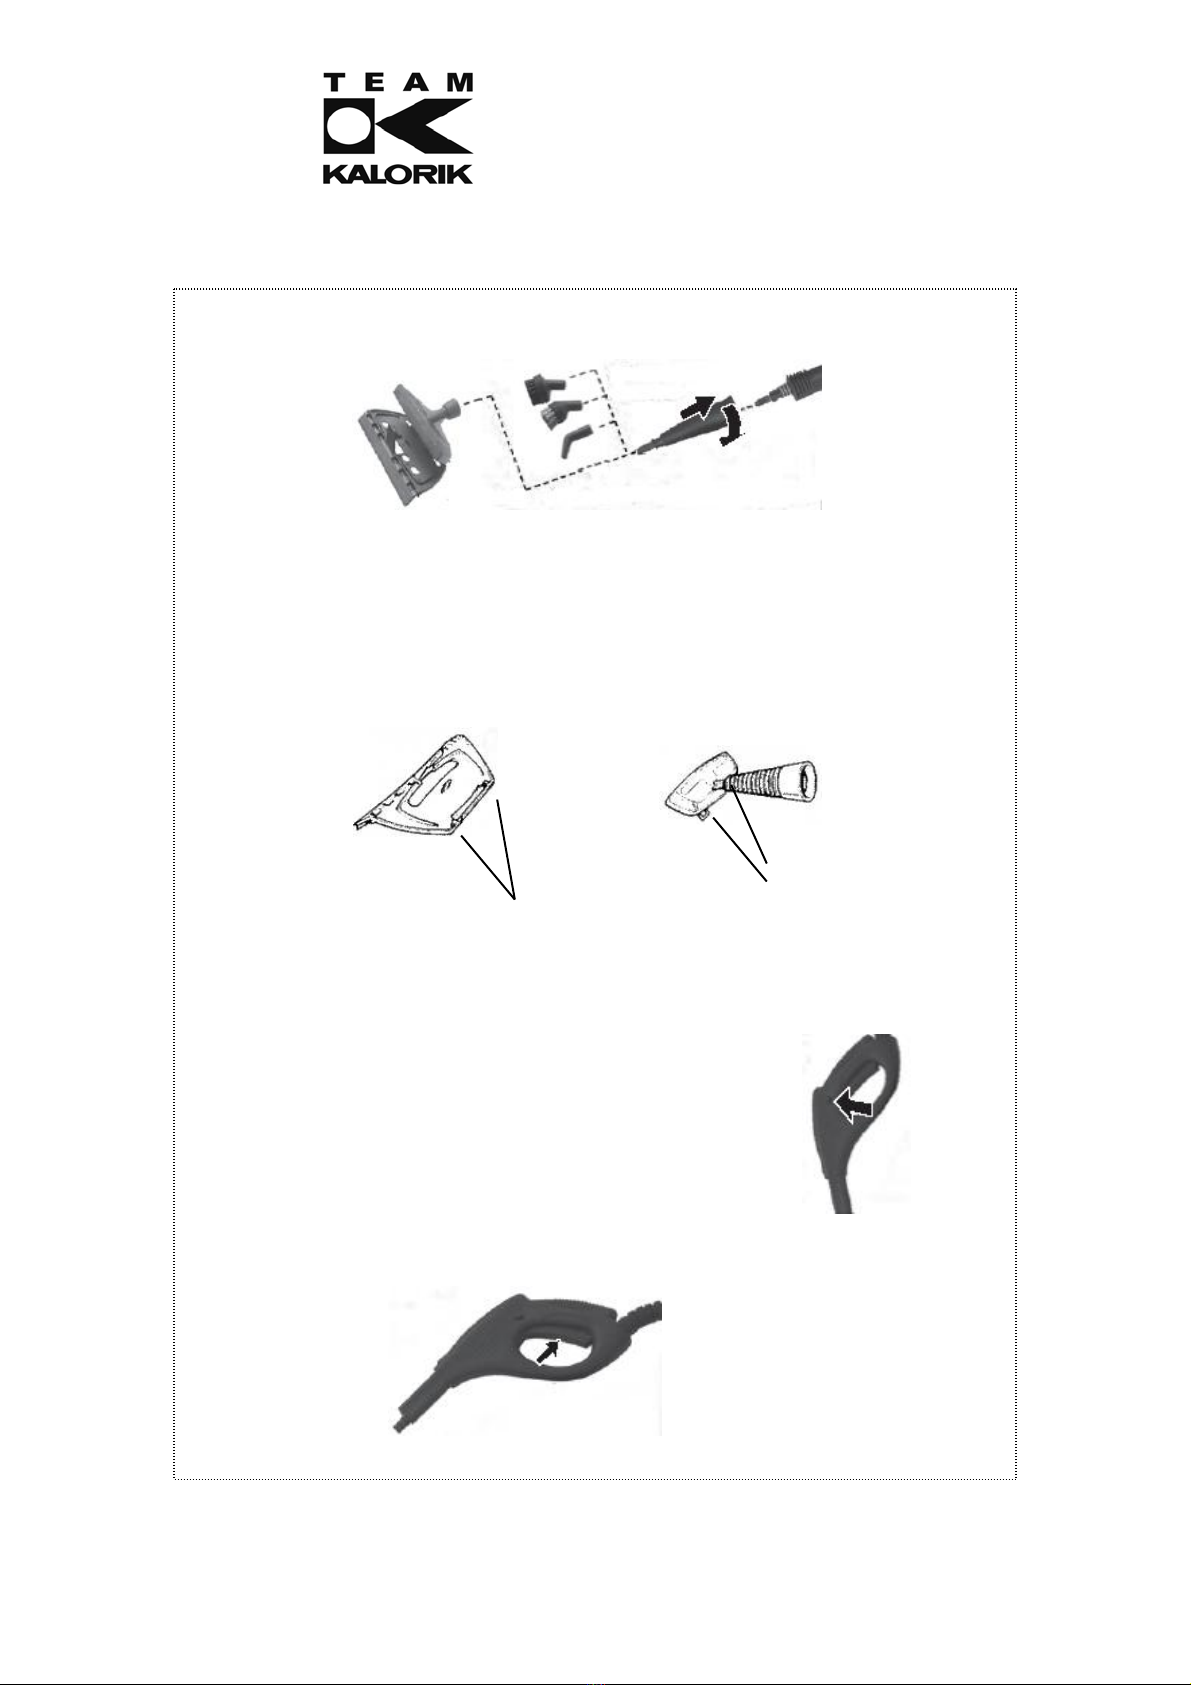
11. Der Fensterwischer muss auf die Scheuerbürste montiert werden. Montieren Sie erst die
Scheuerbürste auf die gerade Düse. Entfernen Sie das Tuch von der Scheuerbürste und
verbinden Sie den Fensterwischer mit der Scheuerbürste anhand der zwei Scharniere. Der
Fensterwischer kann einfach demontiert werden, indem Sie die Scharniere loshaken.
Scheuerbürste
Fensterwischer
Haken Scharnier
6 TKG SFC 1001 - 100525
Assembly page 6/76
Copies of the I/B. Please reproduce them without any
changes except under special instruction from Team
International BELGIUM. The pages must be reproduced
and folded in order to obtain a booklet A5 (+/- 148.5 mm
width x 210 mm height). When folding, make sure you
keep the good numbering when you turn the pages of
the I/B. Don’t change the page numbering. Keep the
language integrity.
Fax +32 2 359 95 50
GEBRAUCH:
1. Stecken Sie den Stecker in die Steckdose und drücken Sie auf den Ein- und Ausschalter um
das Gerät anzuschalten. Die grüne und rote Kontrollleuchten leuchten auf. Sobald die
Vorwärmung beendet ist (nach ungefähr 10 Minuten), erlischt die rote Heizkontrollleuchte.
Das Gerät ist jetzt betriebsbereit.
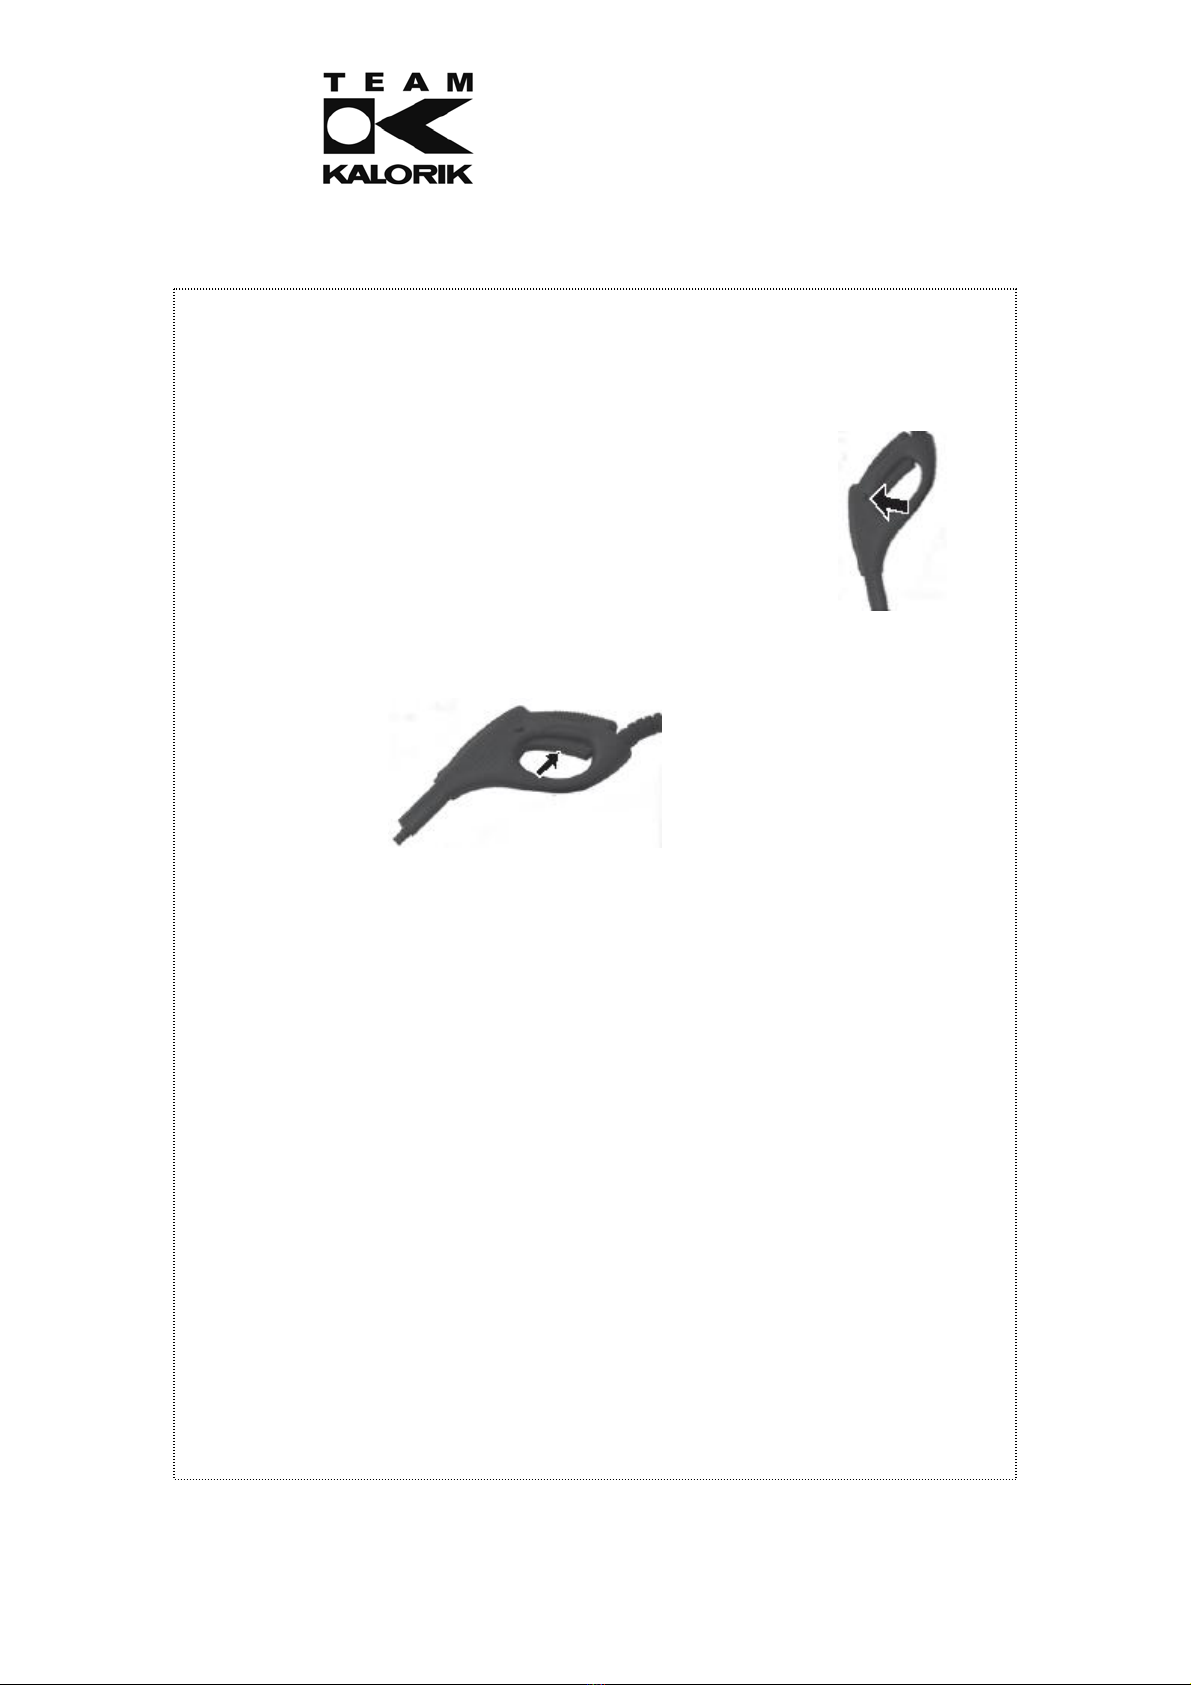
Das Gerät ist ausgestattet mit einer Kindersicherung. Um die
Sicherheitsverriegelung auszuschalten, schieben Sie den dreieckigen
Steckstift auf der rechten Seite der Dampfpistole nach links.
Drücken Sie auf den Dampfknopf und bewegen Sie das Gerät langsam über die
Oberfläche, die gereinigt werden sollte. Es wird vorgeschlagen, dass der Abstand
zwischen der D 3cm ist.
üse und der Oberfläche mindestens 2-
Es ist normal, dass die rote Kontrollleuchte an- und ausgeht während des Betriebes, weil
ERDEN WÄHREND DES
on
n
2. r Dampf
3.
d ziehen Sie den Stecker aus der Steckdose. Drücken Sie auf
bitte den
n
or Sie den Sicherheitsdeckel abschrauben, versichern Sie sich dass der
4. Gerät aus und ziehen Sie den Stecker aus der
.
der Thermostat das Heizelement automatisch regelt.
ACHTUNG! DAS GERÄT DARF NICHT MEHR ALS 45° GEKIPPT W
BETRIEBES. RICHTEN SIE DAS GERÄT NIEMALS AUF PERSONEN, TIERE ODER PFLANZEN.
Das Gerät ist ausgestattet mit einem Überhitzungsschutz. Wenn eine Temperatur v
180°C erreicht wird, schaltet sich das Gerät automatisch ab. Ziehen Sie in diesem Fall de
Stecker aus der Steckdose und warten Sie 30 Minuten, damit das Gerät abkühlt.
Den Dampfausstoß regeln: drehen Sie den Dampfregler im Uhrzeigersinn für minde
oder entgegen dem Uhrzeigersinn für mehr Dampf.
Den Wassertank nachfüllen:
Schalten Sie das Gerät aus un
den Dampfknopf und lassen Sie den Innendruck ganz entweichen. Warten Sie ungefähr 3
Minuten und schrauben Sie den Sicherheitsdeckel langsam ab. ACHTUNG! Heißer Dampf
kann entweichen. Verbrennungsgefahr! Nachdem das Gerät ungefähr bis zur
Umgebungstemperatur abgekühlt ist, füllen Sie den Wassertank. Verwenden Sie
mitgelieferten Trichter und den Messbecher. Überschreiten Sie niemals den maximalen
Füllstand von 1,4 Liter! Schließen Sie den Sicherheitsdeckel und stecken Sie den Stecker
wieder in die Steckdose. Ein voller Tank stimmt ungefähr überein mit einem Gebrauch vo
40 Minuten.
Achtung! Bev
Innendruck ausreichend verringert ist.
Schalten Sie nach dem Gebrauch das
Steckdose, verringern Sie den restlichen Innendruck und entleeren Sie den Wassertank
Warten Sie, bis das Gehäuse und die Zubehörteile abgekühlt sind, bevor Sie das Gerät
berühren. Schließen Sie den Wassertank nicht, bevor dieser völlig ausgetrocknet ist.
7 TKG SFC 1001 - 100525
Assembly page 7/76

Copies of the I/B. Please reproduce them without any
changes except under special instruction from Team
International BELGIUM. The pages must be reproduced
and folded in order to obtain a booklet A5 (+/- 148.5 mm
width x 210 mm height). When folding, make sure you
keep the good numbering when you turn the pages of
the I/B. Don’t change the page numbering. Keep the
language integrity.
Fax +32 2 359 95 50
5. Entkalkung: Um die ausgezeichnete Qualität und Leistungsfähigkeit Ihres Dampfreinigers
zu behalten, empfehlen wir Ihnen das Gerät regelmäßig zu entkalken (alle sechs Monate).
Fügen Sie ein oder zwei Stäbchen für Kalksteinbeseitigung in 1 Liter heißes Wasser (50°C)
ein und füllen Sie den Wassertank mit dieser Lösung auf. Lassen Sie die Lösung etwa 30
Minuten einwirken, und gießen Sie dann die Lösung weg. Spülen Sie den Tank mit klarem
Wasser aus.
Spülung: Wir empfehlen Ihnen, den Tank jede 5 Benutzungen auszuspülen, um den
Kalkstein zu beseitigen, der sich am Boden des Tankes abgesetzt hat. Füllen Sie den
Wassertank nur mit Wasser. Schließen Sie den Sicherheitsdeckel und schütteln Sie den Tank
mit der Hand. Öffnen Sie dann den Sicherheitsdeckel und entleeren Sie den Tank. Lassen
Sie den Tank völlig austrocknen, bevor Sie ihn schließen.
Achtung! Tauchen Sie das Gerät niemals in Wasser. Wischen Sie das Gehäuse nur mit
einem leicht befeuchteten Tuch.
Versuchen Sie nicht, das Gerät zu reparieren. Wenn nötig müssen Reparaturen von elektrischen
Geräten von einem Fachmann gemacht werden.
FEHLERERKENNUNG:
Problem Mögliche Ursache Hinweis
Grüne
Betriebsleuchte
leuchtet nicht auf
•Stecker nicht korrekt in der Steckdose
•Gerät ist nicht eingeschaltet
•Steckdose beschädigt
•Anschlussleitung beschädigt
•Stecken Sie den Stecker
wieder in die Steckdose
•Schalten Sie das Gerät ein
•Kontrollieren Sie die
Steckdose
•Wenden Sie sich an den
Kundendienst
Kein Dampf
•Kindersicherung angeschaltet
•Kein Wasser im Tank
•Schieben Sie den Steckstift
an der rechten Seite der
Dampfpistole nach links
•Füllen Sie den Tank mit
Wasser
Das Gerät braucht
viel Zeit um
aufzuheizen
•Der Wassertank ist verkalkt •Entkalken Sie den
Wassertank
Wasser läuft aus der
Düse heraus
•Zu viel Wasser im Tank
•Gerät zu stark gekippt
•Gerät nicht genügend heiß
•Verringern Sie die
Wassermenge
•Halten Sie das Gerät auf
korrekte Weise fest
•Lassen Sie das Gerät
aufheizen
Wasser kocht
während des
Füllens
•Wassertank noch sehr heiß •Lassen Sie das Gerät
abkühlen
Zubehörteil lockert
sich •Zubehörteil nicht korrekt montiert •Montieren Sie das
Zubehörteil wieder
Andere Probleme •Gerät ist beschädigt •Wenden Sie sich an den
Kundendienst
UMWELTSCHUTZ – RICHTLINIE 2002/96/EG
Zum Schutz unserer Umwelt und unserer Gesundheit sind Elektro- und Elektronik-Altgeräte nach
bestimmten Regeln zu entsorgen. Dies fordert den Einsatz sowohl des Herstellers bzw.
Lieferanten als auch des Verbrauchers.
8 TKG SFC 1001 - 100525
Assembly page 8/76

Copies of the I/B. Please reproduce them without any
changes except under special instruction from Team
International BELGIUM. The pages must be reproduced
and folded in order to obtain a booklet A5 (+/- 148.5 mm
width x 210 mm height). When folding, make sure you
keep the good numbering when you turn the pages of
the I/B. Don’t change the page numbering. Keep the
language integrity.
Fax +32 2 359 95 50
Aus diesem Grund darf dieses Gerät, wie das Symbol auf dem Typenschild bzw. auf der
Verpackung zeigt, nicht in den unsortierten Restmüll gegeben werden. Der Verbraucher hat
das Recht, dieses Gerät über kommunale Sammelstellen zu entsorgen; von dort aus wird die
spezifische Behandlung, Verwertung bzw. das Recycling gem. den Erfordernissen der Richtlinie
sichergestellt.
9 TKG SFC 1001 - 100525
Assembly page 9/76

Copies of the I/B. Please reproduce them without any
changes except under special instruction from Team
International BELGIUM. The pages must be reproduced
and folded in order to obtain a booklet A5 (+/- 148.5 mm
width x 210 mm height). When folding, make sure you
keep the good numbering when you turn the pages of
the I/B. Don’t change the page numbering. Keep the
language integrity.
Fax +32 2 359 95 50
IMPORTANT SAFEGUARDS
Please read these instructions carefully before using the appliance, and always follow the
safety and operating instructions.
Important: People (including children) who are not able to use the appliance in a safe way,
due to their physical, sensorial or mental capacity or their lack of experience or knowledge,
must never use the appliance except if they are supervised by a person responsible for their
safety or if they previously received instructions concerning the safe use of the appliance.
Close supervision is necessary to prevent children from using the appliance as a toy.
Before using the appliance, check that your mains voltage corresponds to that stated on
the appliance.
Never leave the appliance unsupervised when in use.
Connect the plug only to an earthed wall socket.
If an extension cord is absolutely necessary, a 10-ampere or higher cord should be used.
Never use cords rated for less than 10-ampere. Care should be taken to arrange the cord
so that it cannot be pulled or tripped over.
Use the appliance for domestic purposes only and in the way indicated in these
instructions.
Never immerse the appliance in water or any other liquid for any reason whatsoever.
Never use the appliance near hot surfaces.
Check the cord for damages from time to time. Never use the appliance if the cord or
appliance shows any signs of damage. Should the cord be damaged, it must be
replaced by a competent qualified electrician (*). All repairs should be made by a
competent qualified electrician (*).
The same goes if the water tank is not functioning anymore or if it is damaged. To avoid
any electrical discharge, do not disassemble the water tank: take your appliance to a
qualified technician for examination. An incorrect assembly may cause a risk of electric
shocks when the appliance is used.
Do not allow the flexible hose to touch hot surfaces.
Never use the appliance outside and always place it in a dry environment.
Never use accessories which are not recommended by the producer. They could
constitute a danger to the user and risk to damage the appliance.
Never move the appliance by pulling the cord. Make sure the cord cannot get caught in
any way. Do not wind the cord around the appliance and do not bend it.
This appliance is not a toy, it is not supposed to be sat on.
The steam should not be directed towards equipments containing electrical components
such as the interior of ovens.
Unroll the power cord and the flexible hose completely before switching on the
appliance.
UNPLUG THE APPLIANCE AND LET THE WATER TANK COOL DOWN COMPLETELY BEFORE
OPENING, FILLING, EMPTYING, MOVING OR CLEANING THE WATER TANK.
Always unplug the appliance after use and when it is not being used.
The symbol on the appliance means that you need to pay attention! Be careful
because touching the hot water, steam or the hot parts of the appliance might result in
serious burns.
Never fill the water tank with vinegar, descaling agent or any other chemical product.
Do not fold, bend or squash the flexible hose in any way.
Do not operate the appliance without water in the tank.
Make sure that the appliance is not tilted over 45° during the operation. When the
appliance is in operation, the nozzles should not be directed towards humans, animals or
plants.
10 TKG SFC 1001 - 100525
Assembly page 10/76

Copies of the I/B. Please reproduce them without any
changes except under special instruction from Team
International BELGIUM. The pages must be reproduced
and folded in order to obtain a booklet A5 (+/- 148.5 mm
width x 210 mm height). When folding, make sure you
keep the good numbering when you turn the pages of
the I/B. Don’t change the page numbering. Keep the
language integrity.
Fax +32 2 359 95 50
NEVER OPEN THE WATER TANK DURING USE.
DO NOT USE THE STEAM CLEANER IF:
)THE FLEXIBLE HOSE IS PUNCHED.
)ONE OF THE ACCESSORIES IS DAMAGED.
Your appliance produces hot steam as the symbol ( ) located on top of the steam gun
indicates. Do not get burnt during use and never point the steam at yourself or anyone
else.
Before opening the safety cap, switch off the appliance and always bleed the tank by
pressing the steam button until no more steam comes out.
Before each cleaning/maintenance unplug the appliance from the mains supply socket
and let it cool down sufficiently.
Carry the appliance only by its handle.
(*) Competent qualified service: after-sales department of the producer or importer or any
person who is qualified, approved and competent to perform this kind of repairs in order to
avoid all danger. In case of need you should return the appliance to this service.
DESCRIPTION OF THE APPLIANCE
1. Floor brush
2. Cloth for floor brush
3. Window wiper
4. Scrubbing brush
5. Base
6. Funnel
7. Measuring cup
8. Cloth for scrubbing brush
9. Small brush
10. Large brush
11. Curved nozzle
12. Steam regulator
13. On-off switch
14. Handle
15. Safety cap
16. Steam button
17. Straight nozzle
18. Accessory connecting piece
19. Extension tube (3 pieces)
20. Flexible hose
11 TKG SFC 1001 - 100525
Assembly page 11/76

Copies of the I/B. Please reproduce them without any
changes except under special instruction from Team
International BELGIUM. The pages must be reproduced
and folded in order to obtain a booklet A5 (+/- 148.5 mm
width x 210 mm height). When folding, make sure you
keep the good numbering when you turn the pages of
the I/B. Don’t change the page numbering. Keep the
language integrity.
Fax +32 2 359 95 50
CHARACTERISTICS:
This appliance can be used anywhere and is very easy to handle; moreover, you only have to
fill it with water. It cleans, degreases and disinfects completely without chemical products
(over 100°C) and is suitable for different materials and areas, e.g. windows, clothing, garden
furniture, bicycles, cars, tiles etc.
Warning! Never direct this appliance at humans or animals.
This appliance is also ideal for the disinfection of refrigerators and baths, for the removal of
odours from clothing and to fight against mites and other parasites in mattresses, pillows and
carpets.
ACCESSORIES
Floor brush: for washable wall and floor covering. It
may be used with or without its cloth. For sensitive
surfaces such as wood or linoleum it is recommended
to use the cloth. Place the floor brush on the cleaning
cloth and secure the overhanging material under the
clips on the left and right side of the floor brush. To do
so, press on the inner end of the clips on top of the
floor brush to open the clips and secure the cleaning
cloth under the clips.
Accessory connecting piece: to assemble the accessories onto the
appliance.
Straight nozzle: for joints, shelves etc.
Sma
ll brush: to remove stubborn dirt from blinds, radiators, valves etc.
Large brush: to remove heavy staining from less sensitive materials such as
stainless steel or stone.
Scrubbing brush: for curtains and clothing etc. To be used together with
cloth.
Window wiper: for windows, mirrors, glass doors etc.
Caution! Do not use on cold glass directly.
Curved nozzle: for toilets and areas which are difficult to reach.
Extension tubes: ideal for the extension of the accessories.
12 TKG SFC 1001 - 100525
Assembly page 12/76

Copies of the I/B. Please reproduce them without any
changes except under special instruction from Team
International BELGIUM. The pages must be reproduced
and folded in order to obtain a booklet A5 (+/- 148.5 mm
width x 210 mm height). When folding, make sure you
keep the good numbering when you turn the pages of
the I/B. Don’t change the page numbering. Keep the
language integrity.
Fax +32 2 359 95 50
STORAGE OF ACCESSORIES:
In the base of the appliance there is a compartment in which you can store the accessories.
Separate the water tank from the base by pressing the button at the back of the appliance
near the right wheel and lifting the water tank upwards by the handle at the same time.
When you have stored the accessories or taken out the desired accessory, put the water tank
back on the base of the appliance. Press down firmly until it clicks into place.
OPERATION:
CAUTION! This appliance should not be used directly on soft plastics, non-pretreated wood or
cold glass.
Steam could damage the furniture surface. For a safe work please execute a test
run beforehand. Pay attention to the instructions for maintenance of the
manufacturer.
ASSEMBLY:
(DO NOT ATTACH THE APPLIANCE TO THE POWER SUPPLY UNTIL YOU HAVE CHOSEN AND
ATTACHED AN ACCESSORY.)
Warning! After use, unplug the appliance from the mains supply socket and press the steam
button to reduce the internal pressure sufficiently. Then you can release the safety cap.
1. Take the desired accessory from the storage compartment and put the water tank back
on the base of the appliance (see section “STORAGE OF ACCESSORIES”).
2. Attach the flexible hose with the steam gun to the appliance. To do so, flip down the flap
that covers the hose connection inlet and insert the hose connector into the hose
connection inlet until it locks, making sure that the small lug of the hose connector enters
into the small slot at the bottom of the hose connection inlet. You may press the release
buttons on the sides of the hose connector to facilitate the entering of the hose connector
into the hose connection inlet. To remove the hose after use, press the release buttons on
the sides of the hose connector and pull at the hose connector.
3. Unscrew the safety cap. To do so, press the safety cap and at the same time turn it
anticlockwise (if there is still water in the tank and if the safety cap was still screwed in tight
for a previous use, some degassing will occur. This is normal and not dangerous).
4. Fill the water tank with water. Please use the provided measuring cup and the funnel. Do
not exceed the maximum filling level (1.4 litres). If the water in your region is hard, it is
advisable to use distilled water or in that case you can also use tap water that has been
boiled beforehand.
5. Note: never fill descaling agent, perfume or detergent into the water tank, in order to
avoid damages to the appliance.
6. Screw back the safety cap. To do so, press the safety cap and at the same time turn it
clockwise.
7. If you want to clean floors or areas which are difficult to reach, assemble the extension
tubes. To do so, push the open end of a tube onto the steam gun until the release button
of the steam gun clicks into place. You can assemble just one, two or all three extension
tubes. To take the extension tubes off after use, press the release button on top of the
extension tube or steam gun and pull the tubes apart.
8. Put the floor brush on the extension tube until the release button clicks into place if you
want to clean floors. If you want to use another accessory, you first have to assemble the
accessory connecting piece: slide the accessory connecting piece onto the steam gun or
onto the extension tube until the release button clicks into place. Then assemble the
straight nozzle onto the accessory connecting piece and give the straight nozzle a quarter
turn in an anti-clockwise direction to lock it into place. To take the straight nozzle off after
use, give it a quarter turn in a clockwise direction and pull it off. To take the floor brush or
the accessory connecting piece off after use, press the appropriate release button and
pull it off.
13 TKG SFC 1001 - 100525
Assembly page 13/76
Copies of the I/B. Please reproduce them without any
changes except under special instruction from Team
International BELGIUM. The pages must be reproduced
and folded in order to obtain a booklet A5 (+/- 148.5 mm
width x 210 mm height). When folding, make sure you
keep the good numbering when you turn the pages of
the I/B. Don’t change the page numbering. Keep the
language integrity.
Fax +32 2 359 95 50
9. The small and large brushes, the scrubbing brush and the curved nozzle can be
assembled onto the straight nozzle.
10. Window wiper: Caution! Do not operate this appliance directly on cold glass. Otherwise
the glass may crack. Preheat the glass by spraying steam in a wider arc from a distance
of 20-25cm. Slowly reduce the distance to 10-15cm to preheat the glass further.
11. The window wiper must be attached to the scrubbing brush. First assemble the scrubbing
brush onto the straight nozzle. Take off the cloth from the scrubbing brush and connect
the window wiper to the brush by the two hinges. The window wiper can be dismantled
easily by unhooking the hinges again.
Scrubbing brush
Window wiper
OPERATION:
1. Attach the appliance to the mains supply and press the on-off switch to switch the
appliance on. The green and red control lamps light up. As soon as the preheating (about
10 minutes) is terminated, the red heating control lamp goes out. The appliance is now
ready for use.
The appliance is equipped with a child safety device. To release
the locking device, push the triangular pin on the right-hand side o
the steam gun towards the left.
f
urface which is to be
to at least 2-3cm.
Press the steam button and move the appliance slowly over the s
cleaned. It is recommended that the distance between the nozzle and the surface
amounts
Hooks Hinges
14 TKG SFC 1001 - 100525
Assembly page 14/76

Copies of the I/B. Please reproduce them without any
changes except under special instruction from Team
International BELGIUM. The pages must be reproduced
and folded in order to obtain a booklet A5 (+/- 148.5 mm
width x 210 mm height). When folding, make sure you
keep the good numbering when you turn the pages of
the I/B. Don’t change the page numbering. Keep the
language integrity.
Fax +32 2 359 95 50
It is normal that the red control lamp switches on and off during the process, since the
thermostat controls the heating element automatically.
CAUTION! THE APPLIANCE CANNOT BE TILTED OVER 45° DURING THE OPERATION. NEVER
DIRECT THE APPLIANCE TOWARDS HUMANS, ANIMALS OR PLANTS.
The appliance is equipped with an overheating protection. When a temperature of 180°C
is reached, the appliance switches off automatically. In that case, unplug the appliance
and wait 30 minutes for the appliance to cool down.
2. Adjusting the steam rate: turn the steam regulator clockwise for less steam or
anticlockwise for a greater amount of steam.
3. Refilling the water tank:
Switch off and unplug the appliance from the mains supply socket. Press the steam button
and release the internal pressure completely. Wait approx. 3 minutes and release the
safety cap slowly. ATTENTION! Hot steam may escape. Risk of burning! After the appliance
has cooled down to approximately the ambient temperature, fill the water tank. Please
use the provided funnel and the measuring cup. Do not exceed the maximum quantity of
1.4 litres! Close the safety cap and attach the appliance to the mains supply again. One
full tank corresponds to approximately 40 minutes of use.
Warning! Before you release the safety cap, make sure that the internal pressure is
sufficiently reduced.
4. Switch off and unplug the appliance, release the remaining internal pressure and empty
the water tank after use. Wait until the housing and the accessories have cooled down
before touching the appliance. Do not close the water tank until it has dried out
completely.
5. Descaling: in order to maintain the excellent quality and efficiency of your cleaner, we
recommend you to descale the appliance at regular intervals (once every 6 months).
Place one or two limescale removal sticks in 1 litre of warm water (50°C) and fill the water
tank with the solution. Allow the solution to work for about 30 minutes, then pour it away.
Rinse out the tank with clear water.
Rinsing: we recommend rinsing the tank every 5 uses in order to remove limescale that has
been deposited on the bottom of the tank. Fill the water tank only with water. Close the
safety cap and shake the tank by hand. Then open the safety cap and empty the tank.
Allow the tank to dry out completely before closing it.
Warning! Never immerse the appliance in water. Wipe the housing only with a lightly
moistened cloth.
Do not try to repair the appliance. In case of need, repairs of electrical appliances must be
carried out by qualified personnel.
ERROR DETECTION:
Problem Possible cause Advice
Green operating
pilot lamp does not
light up
•Appliance not plugged correctly
•Appliance is not switched on
•Mains supply socket damaged
•Power cord is damaged
•Attach the appliance to
mains supply socket again
•Switch on the appliance
•Check the socket
•Contact the customer
service
No steam
•The child safety device is on
•No water in tank
•Push the pin on the right-
hand side of the steam gun
to the left
•Fill water in tank
15 TKG SFC 1001 - 100525
Assembly page 15/76
Copies of the I/B. Please reproduce them without any
changes except under special instruction from Team
International BELGIUM. The pages must be reproduced
and folded in order to obtain a booklet A5 (+/- 148.5 mm
width x 210 mm height). When folding, make sure you
keep the good numbering when you turn the pages of
the I/B. Don’t change the page numbering. Keep the
language integrity.
Fax +32 2 359 95 50
The appliance
takes a long time to
heat up
•The water tank is furred up •Descale the water tank
Water runs out from
nozzle
•Too much water in the tank
•Appliance too strongly tilted
•Appliance not hot enough
•Reduce water
•Hold the appliance
correctly
•Let the appliance heat up
Water cooks while
filling in •Water tank still very hot •Let the appliance cool
down
Accessory comes
loose •Accessory not correctly attached •Attach the accessory again
Other problems •Appliance is damaged •Contact the customer
service
PROTECTION OF THE ENVIRONMENT – DIRECTIVE 2002/96/EC
In order to preserve our environment and protect human health, the waste electrical and
electronic equipment should be disposed of in accordance with specific rules with the
implication of both suppliers and users. For this reason, as indicated by the symbol on the
rating label or on the packaging, your appliance should not be disposed of as unsorted
municipal waste. The user has the right to bring it to a municipal collection point performing
waste recovery by means of reuse, recycling or use for other applications in accordance with
the directive.
16 TKG SFC 1001 - 100525
Assembly page 16/76

Copies of the I/B. Please reproduce them without any
changes except under special instruction from Team
International BELGIUM. The pages must be reproduced
and folded in order to obtain a booklet A5 (+/- 148.5 mm
width x 210 mm height). When folding, make sure you
keep the good numbering when you turn the pages of
the I/B. Don’t change the page numbering. Keep the
language integrity.
Fax +32 2 359 95 50
POUR VOTRE SECURITE
Lisez attentivement cette notice avant toute utilisation, et respectez bien à la fois les consignes
de sécurité et d'usage.
Important: Votre appareil n’est pas prévu pour être utilisé par des personnes (y compris les
enfants) dont les capacités physiques, sensorielles ou mentales sont réduites, ou des personnes
dénuées d’expérience ou de connaissance, sauf si elles ont pu bénéficier, par l’intermédiaire
d’une personne responsable de leur sécurité, d’une surveillance ou d’instructions préalables
concernant son utilisation en toute sécurité.
Il convient de surveiller les enfants pour s’assurer qu’ils ne jouent pas avec l’appareil.
Avant d'utiliser l'appareil, vérifiez que la tension du réseau correspond bien à celle de
l'appareil.
Ne laissez jamais votre appareil sans surveillance lorsque celui-ci est en fonctionnement ou
sous tension.
Branchez la fiche dans une prise de courant reliée à la terre.
Si une rallonge est absolument nécessaire, utilisez une rallonge d’au moins 10 ampères.
N’utilisez jamais de rallonges de moins de 10 ampères. Assurez-vous que la rallonge ne
puisse être accidentellement accrochée.
Utilisez l'appareil uniquement pour des usages domestiques et de la manière indiquée
dans la notice.
Ne plongez jamais l'appareil dans l'eau ou dans tout autre liquide ni pour son nettoyage ni
pour toute autre raison.
N'utilisez pas l'appareil près de sources de chaleur.
Vérifiez régulièrement l’état de votre appareil et s’il est endommagé de quelque façon
que ce soit, ne l'utilisez pas mais faites-le vérifier et réparer par un service qualifié
compétent(*). Si le cordon d’alimentation est endommagé, il doit être obligatoirement
remplacé par un service qualifié compétent(*).
De même si le réservoir d’eau s’est arrêté de fonctionner ou s’il est endommagé. Pour
éviter toute décharge électrique, ne démontez pas le réservoir d’eau: présentez votre
appareil chez un technicien qualifié afin qu’il examine votre appareil. Un montage
incorrect peut causer un risque de décharges électriques lorsque l'appareil est utilisé.
Assurez-vous que le flexible ne touche pas les surfaces chaudes de l’appareil.
Veillez à ne pas utiliser l'appareil à l'extérieur et entreposez-le dans un endroit sec.
Ne pas utiliser des accessoires non recommandés par le fabricant, cela peut présenter un
danger pour l’utilisateur et risque d’endommager l’appareil.
Ne déplacez jamais l’appareil en tirant sur le câble. Veillez à ce que le cordon
d’alimentation ne puisse être accidentellement accroché et ce, afin d’éviter toute chute
de l’appareil. Évitez d’enrouler le cordon autour de l’appareil et ne le tordez pas.
Cet appareil n’est pas un jouet, veillez à ce que personne ne monte dessus.
La vapeur ne doit pas être dirigée vers des équipements comportant des composants
électriques, tels que l’intérieur des fours.
Déroulez entièrement le cordon électrique et le flexible avant de mettre l’appareil en
marche.
DEBRANCHEZ L’APPAREIL ET LAISSEZ REFROIDIR COMPLETEMENT LE RESERVOIR D’EAU AVANT
DE L’OUVRIR, LE REMPLIR, LE VIDER, LE DEPLACER OU DE NETTOYER CE DERNIER.
Débranchez toujours votre appareil après usage et lorsque vous ne l'utilisez pas.
Attention comme l’indique le symbole présent sur l’appareil! Faites attention car
vous pourriez vous brûler en touchant l’eau chaude, la vapeur ou les parties chaudes du
produit.
17 TKG SFC 1001 - 100525
Assembly page 17/76
Copies of the I/B. Please reproduce them without any
changes except under special instruction from Team
International BELGIUM. The pages must be reproduced
and folded in order to obtain a booklet A5 (+/- 148.5 mm
width x 210 mm height). When folding, make sure you
keep the good numbering when you turn the pages of
the I/B. Don’t change the page numbering. Keep the
language integrity.
Fax +32 2 359 95 50
Ne remplissez jamais le réservoir d’eau avec du vinaigre, détartrant ou autre produit
chimique.
Ne pas plier, courber ou écraser le flexible.
N’utilisez jamais l’appareil sans eau dans le réservoir.
N'inclinez jamais l'appareil à plus de 45° pendant l'utilisation. Lorsque l'appareil est en
fonctionnement, la vapeur ne doit pas être dirigée vers des personnes, des animaux ou
des plantes.
LE RESERVOIR D'EAU NE DOIT JAMAIS ETRE OUVERT PENDANT L'UTILISATION.
N’UTILISEZ PAS LE NETTOYEUR A VAPEUR SI:
)LE FLEXIBLE EST PERFORÉ.
)UN DES ACCESSOIRES EST ENDOMMAGE.
Votre appareil produit de la vapeur chaude comme indiqué par le symbole ( ) situé sur
le pistolet avec interrupteur vapeur. Evitez de vous brûler pendant l’utilisation et ne dirigez
jamais la vapeur vers vous-même ou vers une autre personne.
Avant d’ouvrir le bouchon de sécurité, éteignez l’appareil et libérez toujours la pression
interne du réservoir en appuyant sur le bouton vapeur jusqu’à ce qu’il n’y aie plus de
vapeur qui s’échappe.
Débranchez toujours l'appareil et laissez-le refroidir complètement avant de procéder à
toute opération de nettoyage ou d'entretien.
Portez l’appareil uniquement par sa poignée.
(*) Service qualifié compétent: service après-vente du fabricant ou de l'importateur ou une
personne qualifiée, reconnue et habilitée à faire ce genre de réparation afin d'éviter tout
danger. Dans tous les cas, veuillez retourner l'appareil auprès de ce service.
DESCRIPTION DE L'APPAREIL
18 TKG SFC 1001 - 100525
Assembly page 18/76

Copies of the I/B. Please reproduce them without any
changes except under special instruction from Team
International BELGIUM. The pages must be reproduced
and folded in order to obtain a booklet A5 (+/- 148.5 mm
width x 210 mm height). When folding, make sure you
keep the good numbering when you turn the pages of
the I/B. Don’t change the page numbering. Keep the
language integrity.
Fax +32 2 359 95 50
1. Brosse pour sols
2. Chiffon pour la brosse pour sols
3. Laveur de carreaux
4. Brosse dure
5. Base
6. Entonnoir
7. Gobelet doseur
8. Chiffon pour brosse dure
9. Petite brosse
10. Grande brosse
11. Lance courbée
12. Bouton de réglage du débit de
vapeur
13. Interrupteur marche/arrêt
14. Poignée
15. Bouchon de sécurité
16. Bouton vapeur
17. Lance droite
18. Accessoire de connexion
19. Tube d’extension (3 pièces)
20. Flexible
CARACTERISTIQUES:
Cet appareil peut s’utiliser partout et est très maniable; de plus vous n’avez besoin que de le
remplir d’eau. Cet appareil nettoie, dégraisse et désinfecte complètement sans produit
chimique (plus de 100°C). Il convient également à différents matériaux et différentes
applications tels que le nettoyage des fenêtres, des vêtements, des accessoires de jardin, des
vélos, de la voiture, des carreaux, etc.
Attention! Ne jamais diriger le jet sur des personnes ou des animaux.
Cet appareil est aussi idéal pour désinfecter les réfrigérateurs, les baignoires, enlever les odeurs
des vêtements ainsi que combattre les mites et autres parasites des matelas, oreillers et tapis.
ACCESSOIRES
Brosse pour sols: pour les tapisseries murales et les
revêtements de sol lavables. La brosse peut être
utilisée avec ou sans chiffon. Pour les surfaces
sensibles comme le bois ou le linoléum il est
recommandé d’utiliser le chiffon. Placez la brosse sur
le chiffon et fixez le tissu en surplomb sous les
attaches du côté gauche et droit de la brosse. Pour
cela, appuyez sur le côté intérieur des attaches sur le
dessus de la brosse afin de les ouvrir et fixez le chiffon
sous les attaches.
Accessoire de connexion: pour monter les accessoires sur l’appareil.
Lance droite: pour les joints, les planches.
Petite brosse: pour faire disparaître la saleté persistante de stores,
radiateurs, valves etc.
Grande brosse: pour faire disparaître les taches persistantes de matériels
moins sensibles comme l’acier inoxydable ou la pierre.
Brosse dure: pour rideaux, vêtements, etc. A utiliser avec un tissu.
19 TKG SFC 1001 - 100525
Assembly page 19/76

Copies of the I/B. Please reproduce them without any
changes except under special instruction from Team
International BELGIUM. The pages must be reproduced
and folded in order to obtain a booklet A5 (+/- 148.5 mm
width x 210 mm height). When folding, make sure you
keep the good numbering when you turn the pages of
the I/B. Don’t change the page numbering. Keep the
language integrity.
Fax +32 2 359 95 50
Laveur de carreaux: pour fenêtres, miroir, baie vitrée, etc. Attention, ne
pas utiliser directement sur du verre froid.
Lance courbée: pour les toilettes et les zones difficiles d’accès.
Tubes d’extension: idéal pour l’extension des accessoires.
RANGEMENT DES ACCESSOIRES:
Dans la base de l’appareil se trouve un compartiment dans lequel vous pouvez ranger les
accessoires. Séparez le réservoir d’eau de la base en appuyant sur le bouton à l’arrière de
l’appareil près de la roue droite et en soulevant le réservoir d’eau par la poignée.
Quand vous avez rangé les accessoires ou enlevé l’accessoire désiré, remettez le réservoir
d’eau sur la base de l’appareil. Appuyez fermement sur le réservoir jusqu’à ce qu’il se soit
enclenché avec un déclic.
OPERATION:
ATTENTION! Cet appareil ne doit pas être utilisé vers du plastique, du bois non traité ou du
verre froid.
La vapeur peut endommager la surface des meubles. Pour un emploi plus sûr,
faites d’abord un test et faites attention à respecter les consignes d’entretien du
fabricant.
ASSEMBLAGE:
(NE PAS METTRE SOUS TENSION AVANT D’AVOIR CHOISI ET FIXE UN ACCESSOIRE)
Attention! Après usage, débranchez l’appareil et appuyez sur le bouton de vapeur pour
réduire suffisamment la pression interne.
1. Enlevez l’accessoire désiré du compartiment de rangement et remettez le réservoir d’eau
sur la base de l’appareil (voir paragraphe “RANGEMENT DES ACCESSOIRES”).
2. Fixez le flexible avec le pistolet sur l’appareil. Pour cela, ouvrez le rabat qui couvre l’orifice
de connexion, insérez l’embout du flexible dans l’orifice en vous assurant que le petit
ergot de l’embout s’insère dans la fente en bas de l’orifice et enfoncer l’embout du
flexible jusqu'au déclic vous indiquant le blocage. Afin de faciliter la connexion, vous
pouvez appuyer sur les boutons de déverrouillage situés sur les deux côtés de l’embout du
flexible. Pour enlever le flexible après l’usage, appuyez sur les 2 boutons de déverrouillage
de l’embout du flexible puis tirez.
3. Dévissez le bouchon en appuyant dessus et en tournant simultanément dans le sens
inverse des aiguilles d'une montre (si vous aviez laissé de l’eau dans le réservoir et le
bouchon vissé lors d’un usage ultérieur, un léger dégazage se produira. Ceci est normal et
ne présente aucun danger).
4. En utilisant le doseur et l’entonnoir, remplir le réservoir d’eau. Ne dépassez jamais le
niveau maximum de remplissage (1,4 litre). Si l’eau dans votre région est « dure » (fort
calcaire), nous vous recommandons d’utiliser de l’eau déminéralisée ou alors vous pouvez
aussi utiliser de l’eau du robinet qui a bouilli au préalable.
5. Note: pour éviter de causer des dégâts sur l’appareil, ne jamais remplir le réservoir avec
du détartrant, du parfum ou du détergent.
20 TKG SFC 1001 - 100525
Assembly page 20/76
Table of contents
Languages:
Other Team Kalorik Steam Cleaner manuals


