Technaxx TX-93 User manual

Technaxx®* Gebrauchsanleitung
Video-Armbanduhr mit FullHD-Kamera TX-93
8GB Armbanduhr für Videoaufnahmen mit Ton
Die Konformitätserklärung für dieses Gerät finden Sie unter:
www.technaxx.de/ (untere Leiste “Konformitätserklärung”). Vor dem ersten
Gebrauch des Gerätes lesen Sie bitte die Gebrauchsanleitung sorgfältig
durch.
Dieses Gerät verfügt über einen aufladbaren Akku. Er muss vor dem
ersten Gebrauch vollständig aufgeladen werden. Hinweis: Laden Sie den
Akku des Geräts alle 2 bis 3 Monate, auch wenn es nicht verwendet wird.
Telefonnummer für den technischen Service: 01805 012643 (14 Cent/Minute
aus dem deutschen Festnetz und 42 Cent/Minute aus Mobilfunknetzen).
Kostenfreie E-Mail: support@technaxx.de
Die Gebrauchsanleitung für zukünftige Bezugnahme oder eine Produkt-
weitergabe sorgfältig aufbewahren. Verfahren Sie ebenso mit dem
Originalzubehör dieses Produktes. Im Garantiefall wenden Sie sich bitte an
den Händler oder das Ladengeschäft, wo Sie dieses Produkt gekauft haben.
Garantie 2 Jahre
Besonderheiten
Video Armbanduhr mit integrierter 2MP FullHD Kamera und Mikrofon
Unauffällige Kameralinse im Ziffernblatt
Videoaufzeichnung 1920x1080 mit Ton
Eingebautes Mikrofon für Audioaufzeichnung
Separate Tonaufnahme (WAV)
WEB-Cam Funktion
8GB interner Speicher
4x IR LED für Nachtsicht ~1m
Schutzklasse IP65 (staubdicht & Strahlwasserschutz)
Einfache Übertragung per USB Kabel auf den PC
Plug & Play-Gerät

Technische Spezifikationen
CMOS-Sensor 1/4” CMOS 2 Megapixel
Linse Betrachtungswinkel 60° horizontal, IR Nachtsicht ~1m, 4x IR LED
Videoauflösung 1920 x 1080 (1280 x 720 interpoliert)
Video- / Audioformat AVI-Format, 30fps / WAV
Interner Speicher 8GB für Video- &Audiodateien
Videoaufnahme mit Ton ~35–40 Minuten
Stromverbrauch DC 160mAh/3.7V (nur Video)
DC 100mAh/3.7V (nur IR)
Laden Via 2,5mm Klinke auf USB Kabel* (*enthalten) oder
DC 5V/1A USB-Netzstecker** (**nicht enthalten)
Eingebauter aufladbarer 250mAh Lithium-Ionen Akku: Ladezeit ~3 Std (ohne
gleichzeitiges Aufnehmen); Max. Aufnahmezeit ~1 Std. (voller Akku)
Stromversorgung Uhr / Batterie
DC 1.5V/150mA, AG4-Zell-Batterie 1.5V
(nicht aufladbar, aber austauschbar)
Schutzklasse IP65 (staubdicht & Strahlwasserschutz)
Betriebssysteme Windows 7 / 8 / 8.1 / 10
Arbeitstemperatur –5°C bis 50°C
Gewicht / Maße 83g / Zifferblatt (L) 5,5 x (W) 5,2 x (H) 1,8cm
Verpackungsinhalt
Videoarmbanduhr mit FullHD-Kamera TX-93, USB
Ladekabel mit 2,5mm Klinke, Ersatzknopf für Mikrofon
,
CD, Gebrauchsanleitung

Ladestatus & niedriger Batteriestatus
Die Uhr verfügt über einen eingebauten aufladbaren Lithium-Ionen Akku, der
durch den Anschluss der USB-Schnittstelle der Uhr an die USB-Schnittstelle
des PC oder die eines Adapters** (**nicht enthalten) aufgeladen werden kann.
1. Laden: Den Knopf (7) durch Abdrehen entfernen und die 2,5mm-Buchse
des USB-Ladekabels* (*im Lieferumfang enthalten) in die Uhr stecken. Die
USB-Buchse des Kabels in einen USB-Anschluss eines PCs oder eines USB
5V/500mAh Adapters** einstecken (**nicht im Lieferumfang enthalten). Nach
dem Anschluss leuchtet die BLAUE LED (9) ca. 2 Sekunden auf. Die ROTE
LED blinkt während des gesamten Ladevorgangs. Leuchtet die BLAUE LED
konstant auf, ist die Armbanduhr vollständig aufgeladen. Die Uhr kann
getrennt werden. Die Ladezeit beträgt ca. 3 Stunden.
2. Niedriger Batteriestatus: Während der Aufnahme eines Videos und/oder
von Stimmen blinkt die BLAUE LED schnell auf, wenn der Batterieladestand
niedrig wird. Die Kamera schaltet sich automatisch ab. Bevor sie sich
ausschaltet, werden die Dateien gespeichert.
Überblick
1) EIN/AUS Knopf &
Videoaufnahmeknopf
2) Zeitanpassung
3) Mikrofon
4) 4x IR LED Licht
5) Kamera
6) IR LED Licht EIN/AUS
7) 3.5mm Ladeanschluss
8) Tonaufnahmeknopf
9) LED-Anzeige

Betriebsmodi
1. Kamera einschalten
EIN-/Videotaste (1) zwei Sekunden lang gedrückt halten. Die BLAUE LED
erlischt und leuchtet wieder auf. Die BLAUE LED bleibt dann dauerhaft an
(zeigt Strom ein und Standby-Modus an).
2. Kamera ausschalten
Im Standby/Video-Modus den EIN-/Videoknopf (1) drücken und gedrückt
halten. Die ROTE und die BLAUE LED leuchten gleichzeitig auf. Dann erlischt
die BLAUE LED und die ROTE LED blinkt 3x auf, bevor sie auch erlischt. Wird
die Kamera in den nächsten 3 Minuten nicht verwendet, schaltet sie sich
automatisch aus.
3. Video aufzeichnen
Im Standby/Video-Modus kurz den EIN-/Videoknopf (1) drücken. Die BLAUE
LED blinkt 3x auf, bevor sie sich ausschaltet. Die Videoaufnahme startet. Kurz
den EIN-/Videoknopf (1) erneut drücken, um die Aufnahme zu stoppen. Um
die Videodatei zu speichern, den EIN-/Videoknopf (1) gedrückt halten. Die
ROTE RED LED blinkt 3x schnell. Dann schaltet sich die Kamera aus.
Hinweis: Ist der Speicher der Kamera voll, blinken die ROTE und die BLAUE
LED schnell. Nach 5 Sekunden schaltet sich die Kamera automatisch aus.
4. Separate Tonaufzeichnung
Im Standby-Modus kurz den Tonaufnahmeknopf (8) drücken, um die
Tonaufzeichnung zu starten. Die ROTE LED blinkt 3x auf, bevor sie sich
ausschaltet. Die Aufnahme startet. Den Tonaufnahmeknopf (8) drücken, um
die Aufnahme zu stoppen. Wird der EIN-/Videoknopf (1) lange gedrückt, blinkt
die ROTE LED 3x schnell. Die aufgezeichnete Datei wird dann gespeichert
und die Kamera schaltet sich aus.
5. Infra-Rot-Modus
Im Standby-Modus kurz den IR LED-Licht EIN/AUS-Knopf (6) drücken. Die
BLAUE LED bleibt dauerhaft an, die ROTE LED blinkt 2x und schaltet sich
dann aus. Nun ist das Infrarotlicht aktiviert. Kurz den IR LED-Licht
EIN/AUS-Knopf (6) drücken. Die ROTE LED blinkt 2x und schaltet sich dann
aus. Das Infrarotlicht ist ausgeschaltet.

6. Zurücksetzen (Reset)
Funktioniert die Uhr nicht richtig, den EIN-/Videoknopf (1) und den
Tonaufnahmeknopf (8) gleichzeitig drücken, um sie zurückzusetzen.
Installation des WEB-Kamera-Treibers
1. Falls die WEB-Cam Funktion nicht funktioniert, installieren Sie den Treiber.
Kopieren Sie die Datei auf Ihren Computer. Nur für Windows 7 / 8 / 8.1 / 10.
2. Die CD*** (***enthalten) ins Laufwerk einlegen und die Datei (amcap2a) auf
den Computer kopieren, um die Uhr als WEB-Kamera zu nutzen.
Anschluss an einen Computer
1. Die Uhr mit dem USB-Kabel* (*im Lieferumfang enthalten) an den
USB-Anschluss des PC anschließen. Ein “Wechseldatenträger”-Symbol
erscheint auf dem Computer. Ist die Uhr an den PC angeschlossen, beginnt
sie als Wechseldatenträger zu arbeiten. Video/Übertragen/Kopieren kann
überprüft werden, Daten können leicht angehängt und gelöscht (Video, Audio,
etc.) und musikfreie Dokumente gespeichert werden.
2. PC-Kamera-Funktion
Die Armbanduhr an einen Computer anschließen. Wird es als
Wechseldatenträger angezeigt, kurz den EIN-/Videoaufnahmeknopf (1)
drücken. Nun kann die PC-Kamera verwendet werden.
3. Datumstempel und Zeitstempel einstellen
a. USB-Kabel in Uhr und Computer einstecken.
b. Gehe zu <My Computer> (Mein Computer) oder Computer oder Explorer.
c. Die Kamera wird als Wechseldatenträger erkannt.
d. Die Textdatei mit dem Namen <<time>> durch Doppelklick auf <time.txt>
Datei bearbeiten.
e. Aktuelles Jahr.Monat.Tag. Stunde:Minute:Sekunden eingeben [z.B.:
2016.11.01 23:59:59 Stempelmodus:J] (Durch Änderung von ”J” auf “N” wird
der Zeitstempel nicht mehr anzeigt.)
f. Zur Datei gehen und diese speichern. Anschließend die Datei schließen.
g. Die Uhr aus- und einschalten. Nun erscheinen aktuelle Uhrzeit und Datum.

4. Uhr (USB-Gerät) vom PC trennen
a. Rechter Mausklick auf Windows-Schnittstelle "Safely Remove Hardware“
(Hardware sicher entfernen) (unten rechts, grüner Pfeil).
b."Stopp“ im Dialogfeld "Safely Remove Hardware“ auswählen.
c. Die Armbanduhr, das getrennt werden soll, auswählen und "OK“ drücken.
"Safely Remove Hardware“ zeigt an: “USB Mass Storage Device can now be
safely removed from the system“ (USB Massenspeichergerät kann nun sicher
vom System entfernt werden)” (unten rechts, grüner Pfeil).
d. " Safely Remove Hardware“ schließen.
e. Die Uhr (USB-Uhr) vom Computer trennen.
Hinweis: Die Uhr zeichnet keine Videos oder Stimmen auf, während sie mit
einem Computer verbunden ist.
Wasserdichte Funktion
(die folgenden Anweisungen strikt einhalten)
Hinweis: Die Uhr ist nicht zum Schwimmen oder Tauchen geeignet!
Genau diese beiden verschiedenen Knopfarten unterscheiden
1. MIC-Knopf mit Schallloch
2. Tonübertragungssloch
3. Wasserdichter MIC-Knopf
4. Wasserdichter Dichtungspad
MIC-Knopf & USB-Knopf
können NICHT untereinander
ausgetauscht werden dies
würde zu Schäden am Gerät
führen. Es wäre dann weder
wasser- noch staubdicht.

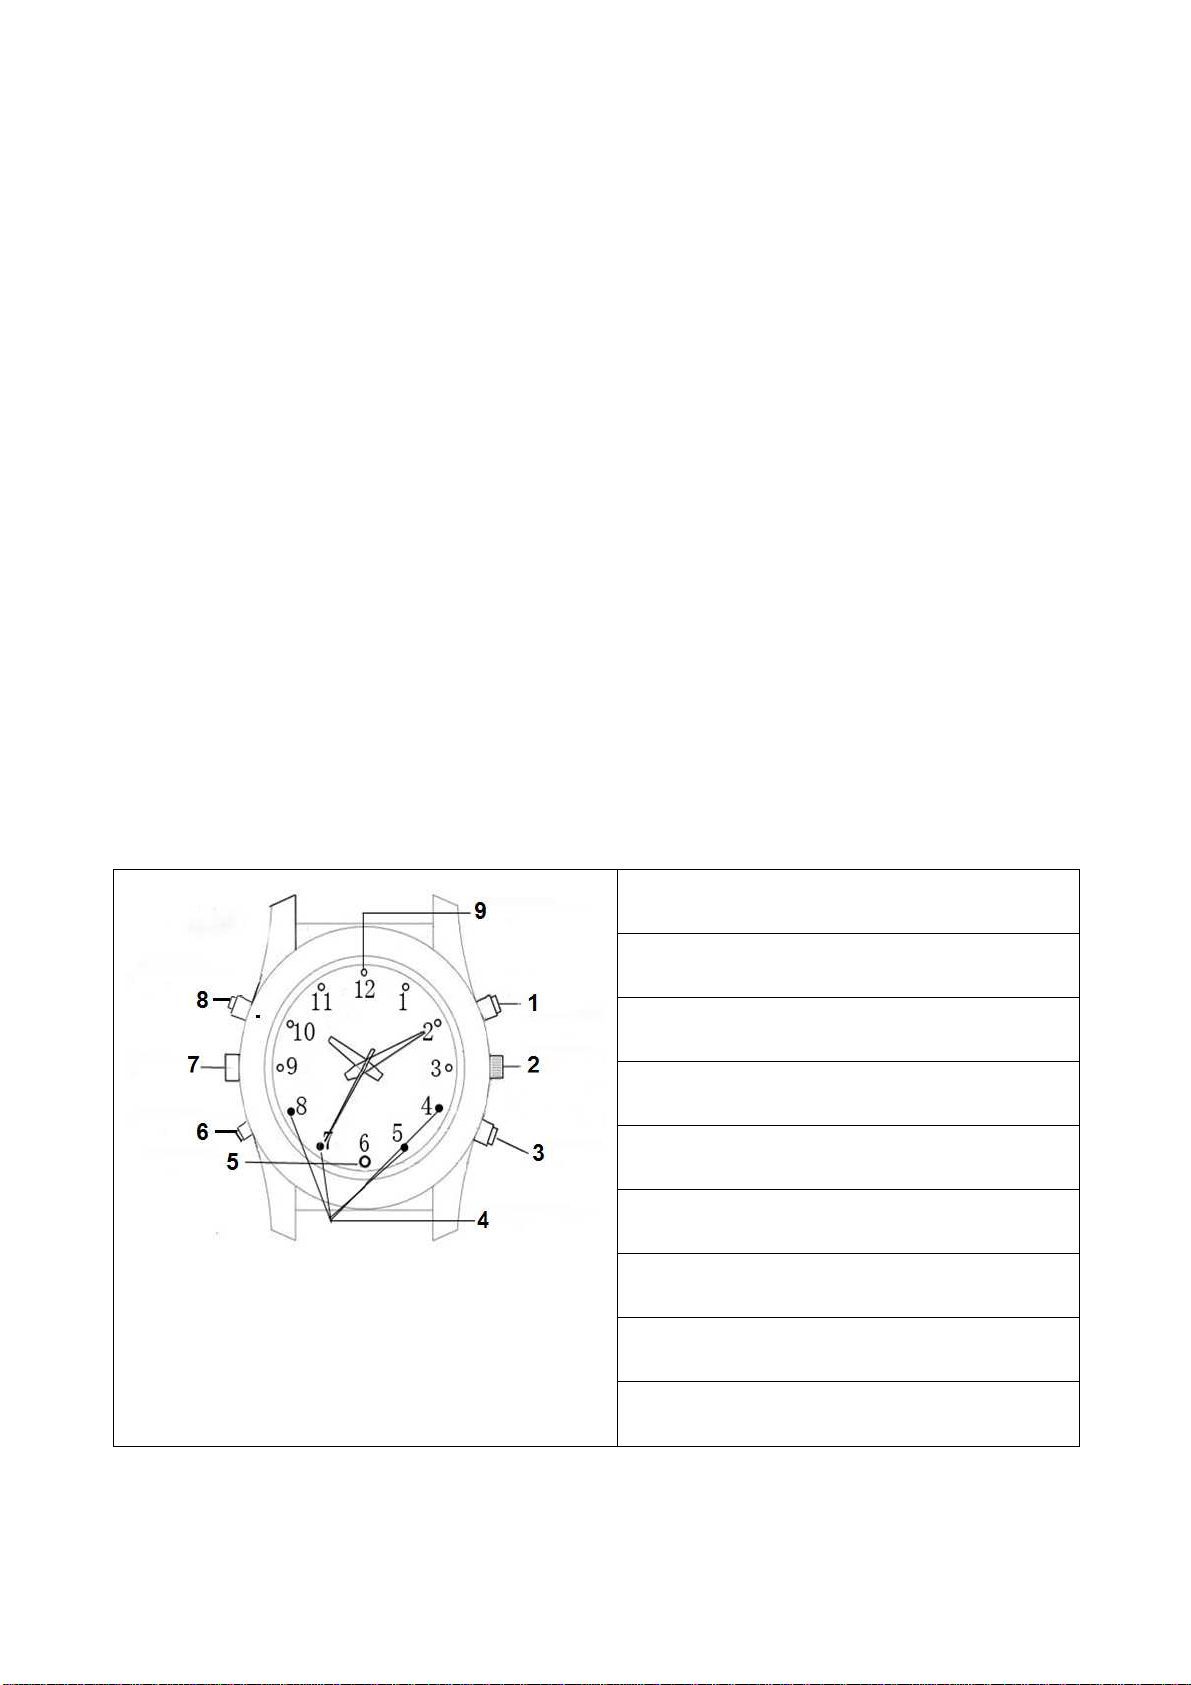
MIC1 und MIC2 sind MIC-Knöpfe. MIC1 ist mit einem Schallloch in der
Mitte ausgestattet. Unter gewöhnlichen Bedingungen diesen Knopf
verwenden. Er kann Stimmen synchron zu Videos aufzeichnen. MIC2
verfügt über ein Dichtungspad und hat kein Schallloch. Unter schlechten
Bedingungen diesen Knopf verwenden, der Wasser- und staubdicht ist. Bei
Verwendung dieses Knopfes können keine Stimmen aufgezeichnet werden.
Hinweis:
Der USB-Knopf ist ebenfalls mit einem Dichtungspad versehen und hat
kein Schallloch. Diesen immer festdrehen, da sonst der USB-Anschluss oder
elektronische Bauteile beschädigt werden können. Alle wasserdichten
Knöpfe bei ihrem Einsatz festdrehen. Die Dichtungspads immer
überprüfen. Sind sie lose, die Sicherungsknöpfe verwenden.
FAQ: Die Armbanduhr kann nicht eingeschaltet werden Prüfen, ob der
Batteriestand niedrig ist: Die Batterie aufladen. Kein normaler Up- oder
Download von Dateien möglich (a) USB-Kabel zwischen Gerät und PC auf
Schäden und korrekten Anschluss prüfen. (b) Korrekte Installation des
Treibers überprüfen. (c) Prüfen, ob ausreichend Speicherplatz vorhanden ist.
Warnhinweise
Die Uhr nicht demontieren. Dies kann zu Kurzschlüssen oder schweren
Schäden führen. Die Uhr nicht schütteln oder fallen lassen. Dies kann zu
internen mechanischen Schäden führen. Die Uhr nur bei normalen
Temperaturen und normaler Luftfeuchtigkeit verwenden. Die Uhr nicht in
grelles Licht halten, um Schäden am optischen Gerät zu vermeiden. Die
Uhr nicht bei hoher Staubdichte verwenden, da dies die Linse und andere
Bauteile einfärben und somit die Kameraqualität beeinträchtigen könnte. Die
Uhr keinen starken Stößen, Vibrationen und hohen magnetischen Feldern
aussetzen. DieUhr von kleinen Kindern fernhalten.
Hinweise zum Umweltschutz: Verpackungen sind
recycelbares Rohmaterial. Alte Geräte nicht im Hausmüll
entsorgen. Reinigung: Gerät vor Verschmutzung
schützen (mit sauberem Tuch reinigen). Keine rauen,
groben Materialien oder Lösungsmittel oder andere
aggressive Reinigungs- mittel verwenden. Gereinigtes
Gerät gründlich abwischen. Inverkehrbringer: Technaxx
Deutschland GmbH & Co.KG, Kruppstr. 105, 60388
Frankfurt a.M., Deutschland

Technaxx® * User Manual
Video Watch with FullHD Camera TX-93
8GB Watch for video recordings with sound
The Declaration of Conformity for this device is under the Internet link:
www.technaxx.de/ (in bottom bar “Konformitätserklärung”). Before using the
device the first time, please read the user manual carefully.
This device has a rechargeable battery. It must be fully charged before
first use. NOTE: Charge the battery of the device every 2–3 month if it is
not used!
Service phone No. for technical support: 01805 012643 (14 cent/minute from
German fixed-line and 42 cent/minute from mobile networks).
Keep this user manual for future reference or product sharing carefully. Do the
same with the original accessories for this product. In case of warranty, please
contact the dealer or the store where you bought this product.
Warranty 2 years
Features
Video watch with integrated 2MP FullHD camera and microphone
Inconspicuous camera lens in the dial
Video resolution 1920x1080 with sound
Separate sound recording (WAV)
WEB cam function
8GB flash memory
4x IR LED for night vision ~1m
Protection class IP65 (dust proof & water jet proof)
Easy transfer via USB cable to a PC
Plug & Play device

Technical specifications
CMOS sensor 1/4” CMOS 2 Mega Pixels
Lens Viewing angle 60° horizontal, IR night vision ~1m, 4x IR LED
Video resolution 1920 x 1080 (1280 x 720 interpolated)
Video / Audio format AVI , 30fps / WAV
Internal memory 8GB for video & audio files
Video recording time with sound ~35–40 minutes
Power consumption DC 160mAh/3.7V (only video)
DC 100mAh73.7V (only IR)
Charging Via 2.5mm jack to USB cable* (*included) or
DC 5V/1A USB power adapter** (**not included)
Built-in rechargeable 250mAh Lithium ion battery:
Charging time ~3 hours (without simultaneous recording)
Maximal recording time ~1 hour (fully charged battery)
Watch power supply / Battery
DC 1.5V/150mA / AG4 cell battery 1.5V
(not rechargeable, but replaceable)
Protection Class IP65 (dust proof & water jet proof)
Operation systems Windows 7 / 8 / 8.1 / 10
Working temperature –5°C up to 50°C
Weight / Dimensions 83g / Dial (L) 5.5 x (W) 5.2 x (H) 1.8cm
Package
contents
Video Watch with FullHD Camera TX-93,
USB charging cable with
2.5mm jack, Replacement knob for microphone, CD, User Manual

Charging Status & Low Battery Status
This watch has a built-in rechargeable (but not replaceable) Lithium ion
battery which can be charged by connecting the USB interface of the watch
with computer USB interface or an adapter** (**not included).
1. Charging: remove the knob (7) by screwing it apart and then insert the
2.5mm jack of the USB charging cable* (*included) to the watch. Insert the
USB jack of the cable to an USB port of a PC or to an USB 5V/500mAh
adapter** (**not included). After connection, the BLUE LED (9) lights up for
about 2 seconds. The RED LED flashes during the charging process. When
the BLUE LED constantly is ON (constantly shines) the watch is fully charged,
and you can disconnect the watch. Charging time is approx. 3 hours.
2. Low Battery Status: while recording a video and/or voices, the BLUE LED
flashes quickly when the battery becomes a low status. The camera turns OFF
automatically. Before the camera turns OFF, the files are saved.
Overview
1) Power ON/OFF
Video Record Button
2) Time adjust
3) Microphone
4) 4x IR LED light
5) Camera
6) IR LED light ON/OFF
7) 3.5mm jack charging slot
8) Sound Recording Button
9) Indicator LED

Operation Modes
1. Turning camera ON
Press and hold the Power/Video button (1) for two seconds. The BLUE LED
lights up turns OFF and turns ON again. The BLUE LED is steady ON now (it
indicates power on and standby time mode).
2. Turning camera OFF
In the standby/video mode, press and hold the Power/Video button (1). The
RED and BLUE LEDs turn on at the same time. Then the BLUE LED turns off,
and the RED LED flashes for 3x and turns off, too. When the camera is not
used for 3 minutes after powered on, it will power off automatically.
3. Recording a video
In the standby/video mode press shortly the Power/Video button (1). The
BLUE LED flashes for 3x and then turns off. Video recording starts. Press
shortly press the Power/Video button (1) again to stop the recording. To save
the video file, hold the Power/Video button (1). The RED LED flashes 3x
quickly. Then the camera turns off.
Note: When storage of the camera is full, the RED and BLUE LEDs flash
quickly. After 5 seconds the camera turns off automatically.
4. Separate Sound recording
In the standby mode press shortly the Sound recording button (8) to start
sound recording. The RED LED flashes 3x and turns off. Then recording
starts. Press the Sound recording button (8) to stop the recording. If the
Power/Video button (1) is press long, the RED LED flashes 3x quickly. Then
the recorded file will be saved, and the camera turns off.
5. Infra Red Mode
Under standby mode, press shortly the IR LED light ON/OFF button (6). The
BLUE LED is steady on, the RED LED flashes 2x and turns off now infrared
light is enabled. Press shortly the IR LED light ON/OFF button 86). The RED
LED flashes 2x and turns off then infrared light is closed.

6. Reset
If the watch is not operating properly, press the Power/Video button (1) and
the Voice record button (8) at the same time to reset it.
Installation of the WEB camera driver
1. If the WEB cam functions does not work, install the driver. Copy the file onto
your computer. For Windows 7 / 8 / 8.1 / 10 only.
2. Put the CD*** (***included) to the CD-ROM drive to copy the file (amcap2a)
to the computer for using the watch as WEB camera.
Connect to a computer
1. Use the USB cable* (*included) to connect the watch to a PC USB port.
Then a “removable disk” icon occurs on the computer. If the watch is
connected to a PC, it starts to work as a removable disk. Video/Transmit/Copy
can be checked, data can be easily attached and deleted (video, audio, etc.)
and non-music documents can be saved.
2. PC camera function
Connect the watch to a computer. When it shows a removable disk, press
shortly the Power/Video record button (1). Then the PC camera can be used.
3. Set Date stamp and Time stamp
a. Plug in the USB cable to the watch and to a computer.
b. Go to <My Computer> or Computer or Explorer.
c. The camera will be recognized as removable Disk Drive.
d. Edit the text file named <<time>> by double left click on the <time.txt> file.
e. Fill in the current Year.Month.Day. hour:minute:seconds [eg: 2016.11.01
23:59:59 Stamp Mode:Y] (Change ”Y” to “N”, the time stamp will not show up.)
f. Go to the file and save it, then close the file.
g. Power off the watch and restart it. Now it has the current date and time.

4. Disconnect the watch (USB watch) from the PC
a. Right mouse click on the Windows interface "Safely Remove Hardware"
icon (lower right corner on green arrow).
b. Select "Stop" in "Safely Remove Hardware" dialog box.
c. Choose the watch you want to disconnect, click "OK", watch quit safely.
"Safely Remove Hardware" dialog box shows “USB Mass Storage Watch can
now be safely removed from the system”(lower right corner, green arrow).
d. Close "Safely Remove Hardware" dialog box.
e. Disconnect the watch (USB watch) from the computer.
Note: The watch is not recording video or voice while connected with a
computer.
Waterproof function
(comply strictly with following operations)
NOTE: The watch is NOT suitable for swimming or diving!
Distinguish strictly between the two different types of knobs
1. MIC knob with sound hole
2. Sound transmission hole
3. Waterproof MIC knob
4. Waterproof sealing pad
MIC knob & USB knob
they are NOT inter-
changeable. otherwise the
product will be damaged. May
not longer be waterproof or
dustproof.

MIC1 and MIC2 are both MIC knobs.
MIC1 is with a sound hole at the center. Under usual conditions, use this
knob. It can record the voice synchronously when recording video.
MIC2 is with a sealing pad and no sound hole. Under bad conditions, use
this knob for waterproof and dustproof. The voice cannot be recorded when
using this knob.
Note: USB knob also is with sealing pad and no hole. Screw it tightly no
matter what environment, otherwise the USB port or electronic components
will be damaged. Tighten all waterproof knobs when using. Check if the
sealing pads are off, if off, use back-up knobs.
FAQ:
Cannot turn on Check if the watchs power is low: charge the battery.
Cannot upload/download files normally (a) Check the USB cable
between the watchs USB and the PC, maybe is damaged or not/correct
connected. (b) Check if the driver is installed properly. (c) Check if there is
enough storage space to save the file.
Warnings
Do not attempt to disassemble the watch, it may result in shortly-circuit or
even damage. Do not drop or shake the watch. It may cause internal
mechanical damage. Use it under normal temperature and normal humidity.
Do not use it directly against strong light, to avoid damage optical watch.
Do not use under high dust density environment, to avoid the lens and other
components stain dust and effect the camera quality. Do not make its strong
shock, vibration, do not use under high magnetic field. Keep the watch away
from little children.
Hints for Environment Protection: Packages materials
are raw materials and can be recycled. Do not disposal old
devices or batteries into the domestic waste. Cleaning:
Protect the device from contamination and pollution (use a
clean drapery). Avoid using rough, coarse-grained
materials or solvents/aggressive cleaner. Wipe the
cleaned device accurately. Distributor: Technaxx
Deutschland GmbH & Co.KG, Kruppstr. 105, 60388
Frankfurt a.M., Germany

Technaxx® * Manuel d’utilisation
Montre vidéo avec caméra FullHD TX-93
8Go Montre pour l’enregistrement vidéo avec son
Déclaration de Conformité est disponible sur: www.technaxx.de/ (sur la barre
inférieure “Konformitätserklärung”). Avant la première utilisation, lisez
attentivement le manuel d’utilisation s’il vous plaît.
Cette montre est muni d’une batterie rechargeable. Il doit être
complètement chargé avant la première utilisation. NB: Rechargez la
batterie de la montre tous les 2 ou 3 mois s'il n'est pas utilisé!
No. de téléphone pour le support technique: 01805 012643 (14
centimes/minute d’une ligne fixe Allemagne et 42 centimes/minute des
Conservez soigneusement ce manual d’utilisation pour références ultérieure
ou pour le partage du produit. Faites de même avec les accessoires d’origine
pour ce produit. En case de garantie, veuillez contacter le revendeur ou le
magasin où vous avez achéte ce produit. Garantie 2 ans
Caractéristiques
Montre vidéo avec caméra FullHD 2MP intégrée
Lentille de la caméra discrète dans le cadran
Résolution vidéo 1920x1080 avec son
Enregistrement audio séparé (WAV)
Fonction caméra WEB
Mémoire flash interne 8GB
4x LED IR pour vision nocturne jusqu'à ~1m
Classe de protection IP65 (protection étanche à la poussière & au jet d’eau)
Simple transfert via un câble USB à l'ordinateur
Montre prêt à l’emploi (Plug & Play)

Caractéristiques techniques
Capteur CMOS 1/4” CMOS 2 mégapixels
Lentille Angle de vue horizontal 60°, vision nocturne IR ~1m, 4x LED IR
Résolution vidéo 1920 x 1080 (1280 x 720 interpolée)
Format vidéo/audio AVI, 30ips / WAV
Mémoire interne 8Go pour les fichiers vidéo & audio
Temps de enregistrement vidéo avec son ~35–40 min.
Consommation
électrique
CC 160mAh/3,7V (uniquement vidéo)
CC 100mAh/3,7V (uniquement IR)
Charge Via jack 2,5mm pour câble USB* (*inclus) ou
CC 5V/1A adaptateur électrique USB** (**non inclus)
Batterie lithium-ion 250mAh rechargeable intégrée:
Temps de charge ~3 heures (sans enregistrement simultané)
Temps d'enregistrement max. ~1 heure (batterie complètement chargée)
Alimentation de la
montre / Batterie
CC 1,5V/150mA, pile AG4 1,5V
(la batterie n'est pas rechargeable, mais remplaçable)
Systèmes d’exploitation Windows 7 / 8 / 8.1 / 10
Température de fonctionnement –5°C jusqu’à 50°C
Poids / Dimensions 83g / Cadran (Lo) 5,5 x (La) 5,2 x (H) 1,8cm
Contenu de la
livraison
Montre vidéo avec caméra FullHD TX-93,
Câble de
charge USB avec prise 2,5mm, Bouton
de rechange
pour microphone, CD, Manuel d’utilisation

Mise en charge & état de batterie faible
Cette montre dispose d’une batterie au lithium-ion rechargeable intégrée
(mais non remplaçable) qui peut être chargée en connectant l'interface USB
de la montre à l'interface USB d’un ordinateur ou adaptateur** (**non inclus).
1. Mise en charge: enlevez le bouton (7) en le dévissant, puis insérez le
connecteur 2,5mm du câble de charge USB* (*inclus) à la montre. Insérez le
connecteur USB du câble à un port USB d'un PC ou à un adaptateur USB
5V/500mAh** (**non inclus). Une fois la connexion effectuée, le LED BLEU (9)
s'allume pendant environ 2 secondes. Le LED ROUGE clignote pendant la
mise en charge. Lorsque le LED BLEU est toujours ALLUMÉ (brille toujours),
la montre est complètement chargé, et vous pouvez déconnecter la montre.
Le temps de mise en charge dure environ 3 heures.
2. État de batterie faible: tout en enregistrant une vidéo et/ou des voix, le
LED BLEU clignote rapidement lorsque l’état de la batterie devient faible. La
caméra S’ÉTEINT. Avant que la caméra ne S’ÉTEIGNE, les fichiers sont
enregistrés.
Aperçu
1) Bouton MARCHE/ARRÊT &
Bouton d’enregistrement vidéo
2) Réglage du temps
3) Microphone
4) 4x LED IR
5) Caméra
6) LED IR MARCHE/ARRÊT
7) 3.5mm connecteur mise en
charge
8) Bouton d’enregistrement
sonore
9) Indicateur LED

Modes de fonctionnement
1. ALLUMER la caméra
Maintenez le bouton Vidéo/Alimentation (1) enfoncé pendant deux secondes.
Le LED BLEU s’éteint et se rallume. Le LED BLEU est toujours allumé
maintenant (il indique la mise en service et le temps de veille).
2. ÉTEINDRE la caméra
En mode vidéo/veille, maintenez le bouton Vidéo/Alimentation (1) enfoncé.
Les LEDS ROUGE et BLEU s'allument en même temps. Puis, le LED BLEU
s’éteint et le LED ROUGE clignote 3x puis s'éteint aussi. Si vous n’utilisez pas
la caméra ~3 minutes après l’avoir allumée, elle s’éteindra automatiquement.
3. Enregistrer une vidéo
En mode vidéo/veille, appuyez brièvement sur le bouton Vidéo/Alimentation
(1). Le LED BLEU clignote 3x, puis s'éteint. L’enregistrement vidéo commence.
Appuyez à nouveau brièvement sur le bouton Vidéo/Alimentation (1) pour
arrêter l'enregistrement. Pour enregistrer le fichier vidéo, maintenez le bouton
Vidéo/Alimentation (1) enfoncé. Le LED ROUGE clignote 3x rapidement. Puis,
la caméra s’éteint. Remarque: Lorsque l’espace de stockage de la caméra est
plein, les LEDS ROUGE et BLEU clignotent rapidement. Après environ 5
secondes, la caméra s’éteint automatiquement.
4. Enregistrement sonore séparé
En mode veille, appuyez brièvement sur le bouton Enregistrement sonore (8)
pour commencer l'enregistrement sonore. Le LED ROUGE clignote 3x et
s'éteint. Puis, l’enregistrement commence. Appuyez sur le bouton
Enregistrement sonore (8) pour arrêter l'enregistrement. Si le bouton Vidéo/
Alimentation (1) est maintenu enfoncé, le LED ROUGE clignote 3x rapidement.
Puis, le fichier enregistré sera enregistré, et la caméra s’éteint.
5. Mode infrarouge
En mode veille, appuyez brièvement sur le bouton MARCHE/ARRÊT du LED
IR (6). Le LED BLEU reste allumé, le LED ROUGE clignote 2x et s'éteint la
lumière infrarouge est maintenant activée. Appuyez brièvement sur le bouton
MARCHE/ARRÊT du LED IR (6). Le LED ROUGE clignote 2x et s'éteint
puis, la lumière infrarouge est désactivée.

6. RÉINITALISER
Si la montre ne fonctionne pas correctement, appuyez sur le bouton
Vidéo/Alimentation (1) et le bouton Enregistrement sonore (8) en même temps
pour la réinitialiser.
Installation du pilote de caméra WEB
1. Si les fonctions de caméra WEB ne fonctionnent pas, installez le pilote.
Copiez le fichier sur votre ordinateur. Pour Windows 7 / 8 / 8.1 / 10 seulement.
2. Placez le CD*** (***inclus) sur le lecteur CD-ROM pour copier le fichier
(amcap2a) sur l’ordinateur afin d’utiliser la montre comme caméra WEB.
Connecter à un ordinateur
1. Utilisez le câble USB* (*inclus) pour connecter la montre au port USB du
PC. Puis, une icône «disque amovible» s’affiche sur l’écran. Si la montre est
connectée à un PC, elle commence à fonctionner comme disque amovible.
Les fonctions Vidéo/Transfert/Copier peuvent être consultées, les données
peuvent être facilement exportées et supprimées (vidéo, audio, etc.) et les
documents non musicaux peuvent être enregistrés.
2. Fonction caméra PC
Connectez la montre à un ordinateur. Lorsqu’un disque amovible s’affiche,
appuyez brièvement sur le bouton Vidéo/Alimentation (1). Puis, la caméra du
PC peut être utilisée.
3. Régler la date et l’heure
a. Connectez le câble USB à la montre et à un ordinateur.
b. Allez à <My Computer> (Mon ordinateur) ou Ordinateur ou Explorer.
c. La caméra sera reconnue comme Lecteur de disque amovible.
d. Modifiez le fichier texte nommé <<temps>> en double-cliquant avec le
bouton gauche sur le fichier <time.txt>.
e. Complétez Année.Mois.Jour et heure:minute:secondes en cours [p.ex.:
2016.11.01 23:59:59 Mode d’estampille:Y] (Remplacez «Y» par «N»,
l’estampille temporelle ne s’affichera pas.)
f. Accédez au fichier et enregistrez-le, puis fermez-le.
g. Éteignez et redémarrez la montre. Elle affiche l’heure et la date en cours.

4. Déconnecter la montre (périphérique USB) du PC
a. Faites un clic droit sur l’icône «Safely Remove Hardware» (Enlever le
périphérique en toute sécurité) de l’interface Windows (en bas à droite sur la
flèche verte).
b. Sélectionnez «Stop» (Arrêter) dans la boîte de dialogue «Safely Remove
Hardware».
c. Sélectionnez la montre à déconnecter, cliquez sur «OK» et la montre se
déconnecte en toute sécurité. La boîte de dialogue «Safely Remove
Hardware»affiche «USB Mass Storage Device can now be safely removed
from the system» (Le périphérique stockage de masse USB peut maintenant
être enlevé du système en toute sécurité) (en bas à droite, flèche verte).
d. Fermez la boîte de dialogue «Safely Remove Hardware».
e. Déconnectez la montre (périphérique USB) de l’ordinateur.
Remarque: La montre ne peut pas enregistrer une vidéo ou une voix
lorsqu’elle est connectée à un ordinateur.
Fonction étanche
(se conformer strictement aux opérations)
REMARQUE: La montre NE convient PAS à la natation ou à la plongéel!
Bien différencier les deux types de boutons
1. Bouton MIC avec orifice audio
2. Orifice de transmission audio
3. Bouton MIC étanche
4. Èlément de fermeture étanche
Bouton MIC et bouton USB
Ils NE sont PAS
interchangeables. sinon, le
produit sera endommagé et
perdra son étanchéité à l’eau ou
à la poussière.
Other manuals for TX-93
2
Table of contents
Languages:
Other Technaxx Watch manuals

Technaxx
Technaxx TX-SW6HR User manual

Technaxx
Technaxx TX-SW5HR User manual

Technaxx
Technaxx TrendGeek TG-SW1 User manual

Technaxx
Technaxx TX-81 User manual

Technaxx
Technaxx 4G Kids-Watch User manual

Technaxx
Technaxx TXX3233 User manual

Technaxx
Technaxx TX-SW7HR User manual

Technaxx
Technaxx TrendGeek TG-SW2HR User manual

Technaxx
Technaxx TX-93 User manual

Technaxx
Technaxx TX-SW3HR User manual