Teleco TVPLI868A01 User manual

IT - CENTRALE 24VDC CON RICEVITORE RADIO PER IL COMANDO DI 1 MOTORE A 24VDC PER COPERTURA
PISCINA
EN 24VDC CONTROL UNIT WITH RADIO RECEIVER TO CONTROL ONE 24VDC MOTOR FOR MOTORISED POOL
ENCLOSURE
IT - Codice prodotto EN - Product code
TVPLI868A01
M
24Vdc /M
24Vdc
M
24Vdc
M
24Vdc
M
24Vdc
24Vdc
M
230Vac
230
Vac M
230Vac
M
230Vac
M
230Vac
230
Vac
24Vdc
24Vdc
M
230Vac /
230
Vac
M
230Vac
M
230Vac
DOC.: T1006.01
TVPLI868A01 DATE: 21/11/22
Thermoplastic ABS
Not suitable for direct UV exposure
Product fastening holes
IT - DIMENSIONI EN DIMENSIONS
This document is the property of Teleco Automation Srl, which reserves all reproduction and copyrights
TELECO AUTOMATION SRL
Via dell’Artigianato, 16 - 31014 Colle Umberto (TV) ITALY
TELEPHONE: +39.0438.388511 - www.telecoautomation.com
185 mm
18 mm
70 mm
56 mm
56 mm
151 mm
M
24Vdc /M
24Vdc
M
24Vdc
M
24Vdc
M
24Vdc
24Vdc
M
230Vac
230
Vac M
230Vac
M
230Vac
M
230Vac
230
Vac
24Vdc
24Vdc
M
230Vac /
230
Vac
M
230Vac
M
230Vac

2
IT - Il prodotto in oggetto deve essere installato, messo in servizio e controllato periodicamente solo da personale tecnico
qualicato nel rispetto delle normative vigenti riguardanti le coperture automatiche. Il sistema è alimentato a 24Vdc. Prima di collegare
l’alimentazione assicurarsi che i sensori e i motori siano collegati correttamente. Un errato collegamento (polarità discordi) potrebbe
danneggiare i motori oltre che gli elementi meccanici ad essi collegati. L’alimentatore deve fornire la tensione e la corrente richiesta
dal dispositivo e dai motori collegati. L’alimentatore deve essere conforme alla norma IEC60950-1 e protetto contro corto-circuiti
e sovratensioni.Si consiglia l’uso di un cavo 2x1.5mm per collegare i motori al dispositivo per una lunghezza no a 6m, mentre è
opportuno un cavo 2x2.5mm per tratte superiori. SMALTIMENTO DEL PRODOTTO: alla ne dalla vita utile, l’apparecchio non deve
essere smaltito come riuto domestico, ma conferito in un centro di raccolta riuti elettrici ed elettronici. Per evitare inltrazioni d’acqua
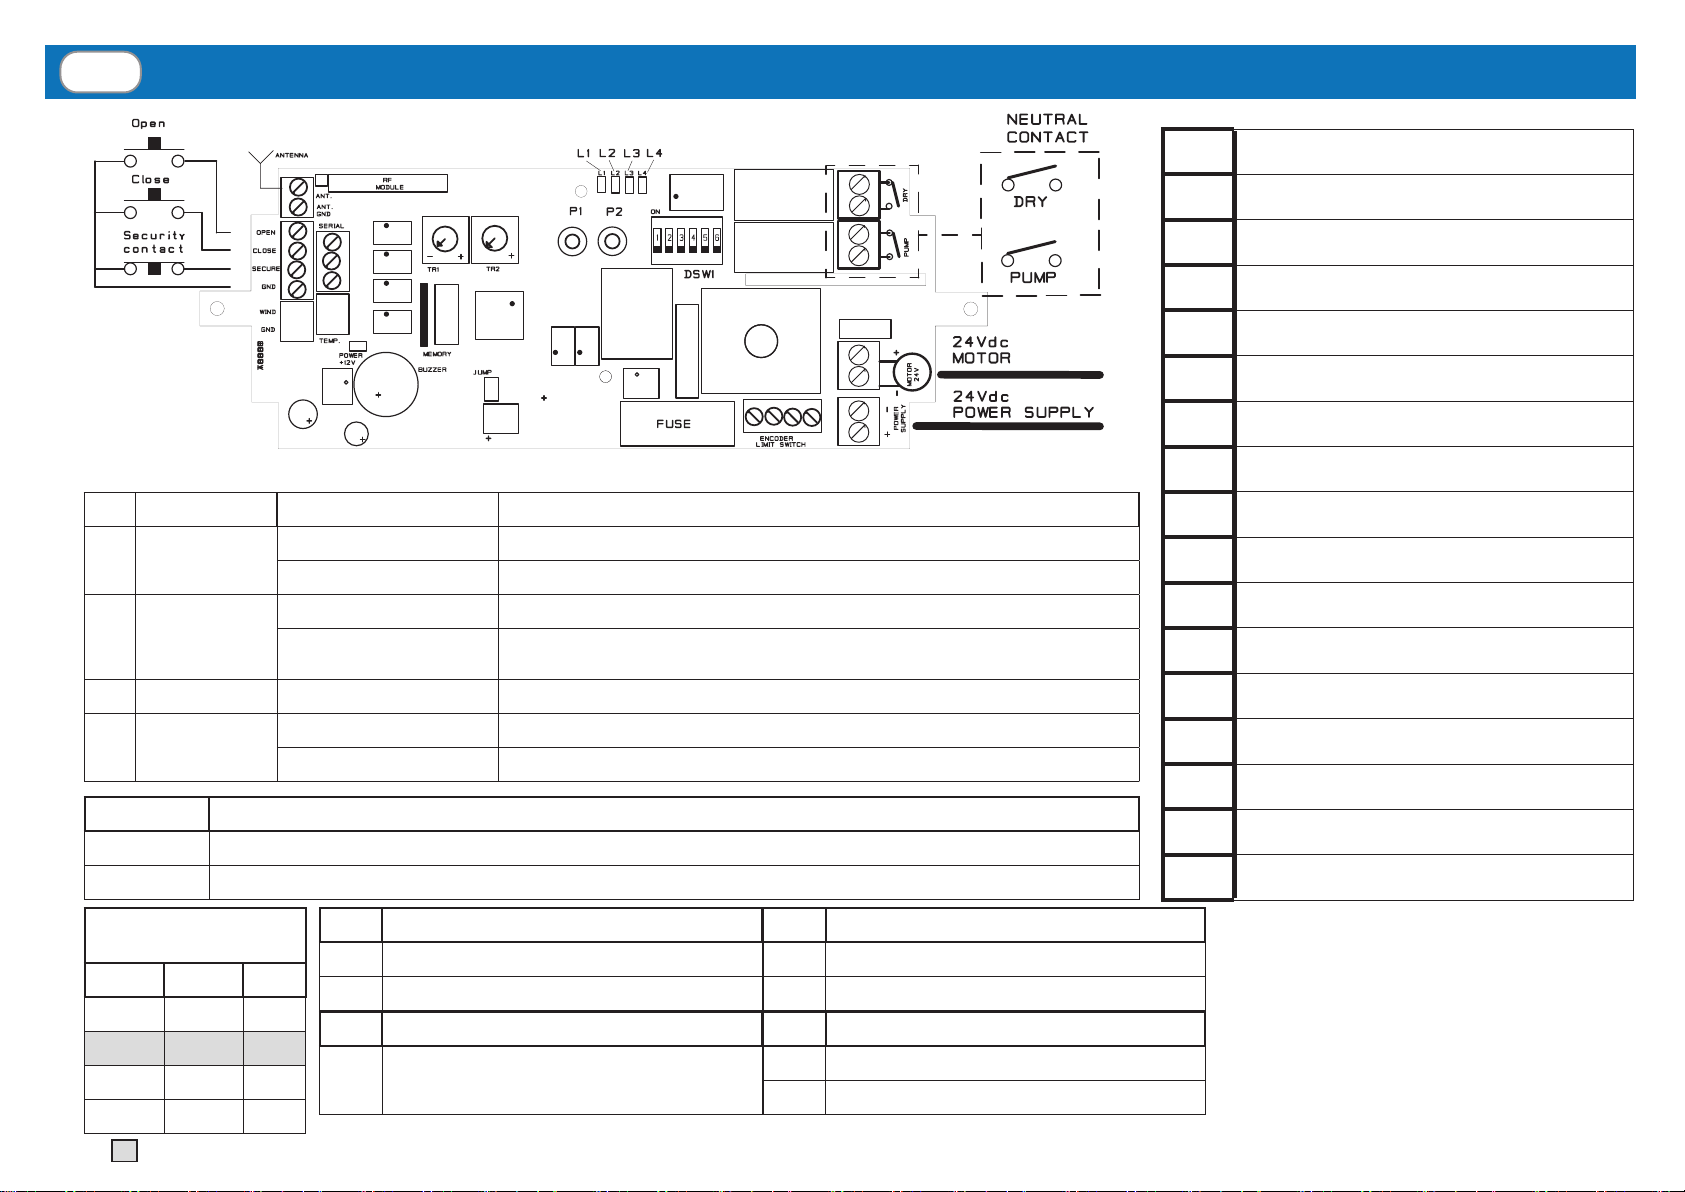
si consiglia di cablare il prodotto come segue:
Il fabbricante, Teleco Automation s.r.l , dichiara che il tipo di Apparecchiatura radio è conforme alla direttiva 2014/53/UE. Il testo
completo della dichiarazione di conformità UE è disponibile al seguente indirizzo Internet: www.telecoautomation.com/ce. Nell’ottica
di un continuo sviluppo dei propri prodotti, il produttore si riserva il diritto di apportare modiche a dati tecnici e prestazioni senza
preavviso.
EN - The product at issue must be installed, commissioned and maintained only by licensed and authorised people, respecting the
laws concerning the automatic covers. The system is powered by 24Vdc. Before the connection to the power supply make sure
that the sensors and motors are correctly connected. A faulty connection of the motors (polarity inversion) could damage them
together with the connected mechanical elements. The power supply must supply the required voltage and current according to the
characteristics of the system. The power supply must be compliant with IEC60950-1 and must be protected against the short-circuit
and over-voltage. Use a 2x1.5mm cable to connect the motors and the control unit for length up to 6m, or 2x2.5mm cable for longer
segments. PRODUCT DISPOSAL: at the end of this product’s useful life, it must not be disposed of as domestic waste, but must be
taken to a collection centre for waste electrical and electronic equipment. To prevent inltration of water, wire the product as follows:
The manufacturer, Teleco Automation s.r.l, declares that the type of radio equipment is compliant with Directive 2014/53 / EU. The
full text of the EU compliance declaration is available at the following Internet address: www.telecoautomation.com/ceIn the view of
a constant development of their products, the manufacturer reserves the right for changing technical data and features without prior
notice.
IT - AVVERTENZE EN WARNINGS

3
IT - INDICE
1. Collegamenti e Tarature pag. 4
2. Trasmettitori pag. 5 - 8
2.1 Trasmettitore per controllo motore
2.2 Trasmettitore per controllo POMPA/AUX
2.3 Memorizzazione codici radio
2.4 Cancellazione codici radio
2.5 Memorizzazione remota ulteriori cidici radio
2.6 Cancellazione remota di un codice radio
2.7 Cancellazione remota di tutti i codici radio
3. Selezione modalità di funzionamneto pag. 9 - 13
3.1 Motore con necorsa meccanico (DIP3=OFF)
3.1.1 Verica del verso di rotazione e necorsa meccanici
3.2 Motore con encoder (DIP3 = ON)
3.2.1 Verica del verso di rotazione ed encoder
3.3 Congurazione encoder
3.4 Programmazione punti di rallentamento per motore con necorsa meccanico
3.5 Programmazione punti di rallentamento per motore con encoder
4. Stato della memoria pag. 14
5. Speciche Tecniche pag. 14
1. Connections and adjustments pag. 4
2. Transmitters pag. 5 - 8
2.1 Transmitter for motor controll
2.2 Transmitter for PUMP/AUX controll
2.3 Radio code memorization
2.4 Radio code delation
2.5 Remote memorization of further radio codes
2.6 Remote delation of a radio code
2.7 Remote delation of all the radio codes
3. Functioning Mode Selection pag. 9 - 13
3.1 Motor with mechanical limit switch (DIP3=OFF)
3.1.1 Checking the rotationdirection and mechanical limit switches
3.2 Motor with encoder (DIP3 = ON)
3.2.1 Checking the rotation direction and encoder
3.3 Encoder conguration
3.4 Programming slowdown points for motor with mechanical limit switch
3.5 Programming slowdown points for motor with encoder
4. Memory status pag. 14
5. Technical Specications pag. 14
EN INDEX

4
1IT - COLLEGAMENTI E TARATURE EN CONNECTIONS AND ADJUSTMENTS
LED Colore - Color Stato - State Signicato - Meaning
L1 ROSSO - RED
ON Si spegne ad ogni pressione di P1/P2 - It turn o each press of P1/P2
Lampeggio - Flashing Apprendimento limiti o punto rallentamento - Limit switches learning or slowing point
L2 BLU - BLUE
ON Finecorsa meccanici - Mechanical limit switch
Un lampeggio ogni secondo
One ash every second Finecorsa con encoder - Encoder limit switch
L3 ROSSO - RED ON Fase rallentamento - Slowingdown phase
L4 ROSSO - RED
ON Superamento soglia corrente - Exceeding the current threshold
Lampeggio - Flashing Identica movimento encoder - Encoder moviment detected
IT - Settaggio Corrente
EN - Current Setting
DIP1 DIP2 (A)
OFF OFF 2
OFF ON 4
ON OFF 6
ON ON 9
DIP3 Modalità di funzionamento - Settin mode
ON Encoder
OFF Finecorsa - Limit switched
DIP5 Modalità di funzionamento - Settin mode
ON Apertura automatica - Automatic opening
OFF Apertura manuale - Hold-to-run opening
DIP6 Modalità di funzionamento - Settin mode
ON Chiusura automatica - Automatic closing
OFF Chiusura manuale - Hold-to-run closing
DIP4 Modalità di funzionamento - Settin mode
ON Regolazione dei limiti con encoder (par 3.3)
Encoder setting limit switches (par 3.3)
Default
Trimmer Regolazione velocità dopo punto di rallentamento - Speed settings after deceleration point
TR1 Velocità motore in apertura (60% - 90%) - Motor opening speed (60% - 90%)
TR2 Velocità motore in chiusura (60% - 90%) - Motor closing speed (60% - 90%)
2
1
15 16 17 18
12
11
10
9
4
3
6
5
8
7
14
13
1
Alimentazione +24Vdc
Input +24Vdc Power Supply
2
GND
Power Supply GND
3
Motore – (Apertura)
Motor – (Open)
4
Motore + (Chiusura)
Motor + (Close)
5-6
Relè Pompa
Pump Relè
7-8
Relè Aux
Aux Relè
9
Comune Ingresso lare (GND)
Wired Input Common (GND)
10
Contatto Sicurezza (N.C.)
Security Contact (N.C.)
11
Pulsante di Chiusura
Close Button
12
Pulsante di Apertura
Open Button
13
Antenna GND
Aerial GND
14
Antenna RF
Aerial RF
15
Alimentazione Encoder
Encoder Power Supply
16
Finecorsa Apertura / Encoder D1 / Encoder 1 Filo
Open Limit Switch / Encoder D1 / 1 Wire Encoder
17
Finecorsa Chiusura / Encoder D2
Close Limit Switch / Encoder D2
18
GND
Power Supply GND
P1-P2
Tasti di Programmazione
Programming Buttons

5
2.1
IT - DIP 5 e DIP 6 in OFF apertura e chiusura con comando a uomo presente. DIP 5 e DIP 6 in ON apertura e chiusura con comando Automatico.
Si può utilizzare anche la combinazione tra DIP5 e DIP6 per avere un comado Automatico e uno a uomo presente.
EN - DIP 5 and DIP 6 in OFF Hold-to-Run Opening and Closing. DIP 5 and DIP 6 in ON Automatic Opening and Closing.
The combination of DIP5 and DIP6 can also be used to have an automatic and hold to run control
DIP5 IT - Comando EN - Command DIP6 IT - Comando EN - Command
OFF IT - Apertura a uomo presente
EN - Hold-to-Run Opening OFF IT - Chiusura a uomo presente
EN - Hold-to-Run Closing
ON IT - Apertura in automatico
EN - Automatic Opening ON IT - Chiusura in automatico
EN - Automatic Closing
IT - COMANDI AUTOMATICI
EN - AUTOMATIC COMMANDS
Trasmettitore 2 canali
2 channel transmitter
IT - TRASMETTITORE PER IL MOTORE
EN TRANSMITTER FOR THE MOTOR
Apre / STOP
Open / STOP
Chiude / STOP
Closes / STOP
T
R
A
S
M
I
T
T
E
R
S
1 2 3 4 5 6
IT - COMANDI MANUALI
EN - MANUAL COMMANDS
Apre
(uomo presente)
Open
(hold-to-run)
Chiude
(uomo presente)
Closes
(hold-to-run)
IT - COMANDI AUTOMATICI
EN - AUTOMATIC COMMANDS
Apre / STOP
Open / STOP
Chiude / STOP
Closes / STOP
Chiude / STOP
Closes / STOP
Apre / STOP
Open / STOP
IT - COMANDI MANUALI
EN - MANUAL COMMANDS
Apre
(uomo presente)
Open
(hold-to-run)
Chiude
(uomo presente)
Closes
(hold-to-run)
Apre
(uomo presente)
Open
(hold-to-run)
Chiude
(uomo presente)
Closes
(hold-to-run)
TVTXP868x02xPO
Trasmettitore 2 canali
2 channel transmitter TVTXP868x02xPO
Trasmettitore 4 canali
4 channel transmitter TVTXP868x04xPO
Trasmettitore 4 canali
4 channel transmitter TVTXP868x04xPO
2.2 IT - TRASMETTITORE PER I CONTATTI NEUTRALI (POMPA & AUX)
EN TRANSMITTER FOR THE NEUTRAL CONTACTS POMP & AUX
IT - TASTO SINGOLO
EN - SINGLE KEY
Trasmettitore 2 canali
2 channel transmitter
ON / OFF
ON / OFF
TVTXP868x02xPO
IT - COPPIE
EN - PAIRS
Trasmettitore 2 canali
2 channel transmitter
ON
OFF
TVTXP868x02xPO
IT - TASTO SINGOLO
EN - SINGLE KEY
Trasmettitore 4 canali
4 channel transmitter TVTXP868x04xPO
IT - COPPIE
EN - PAIRS
Trasmettitore 4 canali
4 channel transmitter TVTXP868x04xPO
ON / OFF
ON / OFF
ON / OFF
ON / OFF ON
OFF
OFF
ON
T
R
A
S
M
I
T
T
E
R
S

6
IT - TIPO DI MEMORIZZAZIONE
EN - TYPE OF MEMORIZATION P1
IT - Comandi Automatici/Manuali (coppie)(Motore)
EN - Automatic/Manual Commands (pairs)(Motor)
*
1x
IT - Premere il tasto del trasmettitore
relativo al codice da memorizzare.
EN - Press the button of the transmitter
relative to the code to be memorized.
IT - Tasto singolo (Relé Pompa)
EN - Single key (Pump Relé)
*
2x
IT - Tasto singolo (Relé Ausiliario)
EN - Single key (Pump Aux)
*
3x
IT - Coppie (Relé Pompa)
EN - Pairs (Pump Relé)
*
4x
IT - Coppie (Relé Ausiliario)
EN - Pairs (Pump Aux)
*
5x
IT - Premere il pulsante P1 tante volte quanto richiesto dal tipo di memorizzazione e tenere premuto. Il buzzer emette un suono continuo. Premere il pulsante del trasmettitore relativo al codice da
memorizzare. La memorizzazione è indicata da un suono intermittente del buzzer.
EN - Press the button P1 as many times as requested by the type of memorization and keep it pressed. The buzzer emits a continuous sound. Press the button of the transmitter relative to the code
to memorize. The memorization is indicated by an intermittent sound of the buzzer.
...
2.3
P1
suono intermittente
intermittent sound
*IT - Il buzzer emette un bit ad ogni pressione. Fra la pressione di un tasto e quella succesiva non deve passare più di un secondo.
EN - The buzzer will make a beep each time the button is pressed. No more than a second should pass between one press to another one.
IT - MEMORIZZAZIONE CODICI RADIO
EN RADIO CODE MEMORIZATION
tenere premuto
keep it pressed
suono continuo
continuos sound

7
** IT - Il buzzer emette un bip ad ogni pressione. Fra la pressione di un tasto e quella succesiva non deve passare più di un secondo.
EN - The buzzer will make a beep each time the button is pressed. No more than a second should pass between one press to another one.
2.4
IT - TIPO DI CANCELLAZIONE
EN - TYPE OF DELETION P2
IT - Singolo codice radio
EN - Single radio code
**
1x
IT - Premere il tasto del trasmettitore relativo
al codice da cancellare.
EN - Press the button of the transmitter
relative to the code to delete.
IT - Premere 1 volta il tasto P2 e tenere premuto. Il buzzer emette un suono intermittente. Premere un tasto del trasmettitore relativo al codice da cancellare entro 10 secondi. All’avvenuta cancellazione
il buzzer emette un suono continuo. EN - Press P2 1 time and hold. The buzzer emits an intermittent sound. Press the button of the transmitter relative to the code to be deleted within 10 seconds.
Successful deletion is indicated by a continuous sound of the buzzer.
IT - Tutti i codici radio
EN - All the radio codes
**
2x
IT - Premere 2 volte il tasto P2 e tenere premuto per 10 secondi. Il buzzer emette un suono intermittente veloce. Rilasciare quando il suono diventa costante.
EN - Press P2 2 times and the sixth time hold for 10 seconds. The buzzer emits a fast intermittent sound. Release when the sound becomes continuous.
...
(10 s)
...
P2
suono intermittente
intermittent sound
suono intermittente
intermittent sound
suono continuo
continuos sound
suono continuo
continuos sound
IT - CANCELLAZIONE CODICI RADIO
EN RADIO CODE DELETION
tenere premuto
keep it pressed
2.5 IT - MEMORIZZAZIONE REMOTA TRASMETTITORE DA UN TRASMETTITORE GIÀ MEMORIZZATO
EN REMOTE NEW TRASMITTER MEMORIZATION BASED ON TRAMITTER MEMORIZED
5 SECONDI DI TIMEOUT - TIMEOUT 5 SECONDS 5 SECONDI DI TIMEOUT - TIMEOUT 5 SECONDS
IT - Premere il tasto P3 del trasmettitore
memorizzato e tenere premuto.
EN - Press the P3 key of a memorized
transmitter and hold it.
IT - Premere il tasto relativo al codice da copiare del
trasmettitore memorizzato.
EN - Press the key relative to the code to copy of the
memorized trasmitter.
IT - Premere il tasto relativo al codice da memorizzare
del nuovo trasmettitore.
EN - Press the key relative to the code to memorize of
the new trasmitter.
memorizzato
memorized
Suono intermittente
Intermittent sound
Suono continuo
Continuos sound
Memorizzato
Memorized
P3 *
1 s
Suono continuo
Continuos sound
Nuovo
New
* IT - Il tasto P3 si trova sul retro del trasmettitore. Ad ogni pressione di P3 il buzzer emette un bip. EN - P3 button is located on the rear of the transmitter. Every time P3 is pressed the buzzer emits a beep.
...
5 s 5 s

8
2.7
* IT - Il tasto P3 si trova sul retro del trasmettitore. Ad ogni pressione di P3 il buzzer emette un bip. EN - P3 button is located on the rear of the transmitter. Every time P3 is pressed the buzzer emits a beep.
IT - CANCELLAZIONE REMOTA DI TUTTI I CODICI RADIO
EN REMOTE DELETION OF ALL THE RADIO CODES
2.6 IT - CANCELLAZIONE REMOTA DI UN CODICE RADIO
EN REMOTE DELETION OF A RADIO CODE
5 SECONDI DI TIMEOUT - TIMEOUT 5 SECONDS
IT - Premere il tasto P3 3 volte del
trasmettitore memorizzato
EN - Press button P3 3 times of a
memorized transmitter.
IT - Premere il tasto relativo al codice da cancellare.
All’avvenuta cancellazione il buzzer emetterà un suono continuo.
EN - Press the button relative to the code to delete.
The buzzer will emit a continuos sound.
memorizzato
memorized
( x3)
... Suono intermittente
Intermittent sound
Suono continuo
Continuos sound
Da cancellare
To delete
x10
IT - Entro 10 s dall’accensione...
EN - Within 10 s from power ON...
IT - Premere 10 volte il tasto P3 del trasmettitore e tenere premuto per 5 s.
EN - Press 10 times the button P3 of the transmitter and keep it pressed 5 s.
Suono intermittente
Intermittent sound
...
IT - Procedura possibile con qualsiasi trasmettitore (memorizzato o nuovo). Se presenti più ricevitori, alimentarne uno solo per volta.
EN - The procedure is possible using any transmitter (memorized or new). If more receivers are present, supply just one at a time.
tenere premuto
keep it pressed
( 5 s)
...
ON
< 10 s
Suono continuo
Continuos sound
P3 *
P3 *

9
1
IT - NOTA: Se la direzione non risultasse corretta, invertire i li di alimentazione del motore.
EN - NOTE: If the direction is wrong, invert the motor wires.
2
3IT - Eseguire la procedura di settaggio dei punti di rallentamento (par.3.4)
EN - Perform the procedure for setting the slowdown points (par.3.4)
3.1
WIRING CONNECTIONS
IT - Mettere DIP3 in OFF
EN - Move DIP3 to OFF.
3
DIP3 SETTINGS
ON ENCODER
OFF LIMIT SWITCHES
IT - Fare riferimento alla seguente tabella per impostare la congurazione desiderata
(ad ogni ulteriore selezione del DIP3 il sistema necessita di una nuova impostazione dei limiti):
EN - Refer to the follow table in order to set the desired conguration (with each further selection
of DIP3, the system needs a new limit setting):
IT - SELEZIONE MODALITÀ DI FUNZIONAMENTO
EN FUNCTION MODE SELECTION
IT - MOTORE CON FINECORSA MECCANICO (DIP3 OFF)
EN MOTOR WITH MECHANICAL LIMIT SWITCH DIP3 OFF
16 17 18
16 IT - Finecorsa Apertura EN - Opening Limit switch
17 IT - Finecorsa Chiusura EN - Closing Limit switch
18 IT - Comune EN - Common
3.1.1 IT - VERIFICA DEL VERSO DI ROTAZIONE E FINECORSA MECCANICI (DIP3 OFF)
EN CHECKING THE ROTATION DIRECTION AND MECHANICAL LIMIT SWITCHES DIP3 OFF
apertura totale
total opening
Apre /
Open
L2
IT - Controllare che il movimento
si fermi a necorsa raggiunto,
accendendo L2.
EN - Check that movement stops
when the limit switch is reached
(L2 ON).
Chiude /
Closes chiusura totale
total closure
1 2 3 4 5 6

10
3.2
IT - Mettere DIP3 in ON
EN - Move DIP3 to ON.
IT - Collegamenti per ENCODER a 2 segnali
EN - Connections for 2 signal ENCODER
15 IT - Alimentazione Encoder EN - Encoder Powe Supply
16 IT - Segnale encoder D1 EN - Encoder signal D1
17 IT - Segnale encoder D2 EN - Encoder signal D2
18 IT - GND Encoder EN - Encoder GND
IT - MOTORE CON ENCODER (DIP3 ON)
EN MOTOR WITH ENCODER DIP 3 ON
15 16 17 18
IT - Collegamenti per ENCODER a singolo segnale
EN - Connections for single signal ENCODER
15 IT - Alimentazione Encoder EN - Encoder Powe Supply
16 IT - Segnale encoder EN - Encoder signal
17 IT - NC EN - NC
18 IT - GND Encoder EN - Encoder GND
1
IT - NOTA: Se la direzione non risultasse corretta, invertire i li di alimentazione del motore. L4 lampeggia durante l’attivita dell’encoder.
EN - NOTE: If the direction is wrong, invert the motor wires. L4 ashes during encoder activity.
2IT - Eseguire la procedura di settaggio dei punti di rallentamento (par.3.5)
EN - Perform the procedure for setting the slowdown points (par.3.5)
3.2.1 IT - VERIFICA DEL VERSO DI ROTAZIONE ED ENCODER (DIP3 ON)
EN CHECKING THE ROTATION DIRECTION AND ENCODER DIP3 ON
Apre /
Open
Chiude /
Closes
apertura
opening
chiusura
closure
1 2 3 4 5 6

11
IT - NOTA: per ogni modica del tipo di ENCODER il sistema necessita di una nuova impostazione dei limiti
EN - NOTE: for each change of ENCODER type, the system requires a new limit setting
IT - TIPO DI ENCODER
EN - TYPE OF ENCODER P1
IT - 1 Filo
EN - 1 Wire
*
7x
IT - 2 Fili (DEFAULT )
EN - 2 Wires (DEFAULT )
*
8x
IT - Premere il pulsante P1 tante volte quanto richiesto dal tipo di encoder e tenere premuto 3s. Il buzzer emette 3 o 4 bip a seconda del tipo di encoder scelto.
EN - Press the button P1 as many times as requested by the type of encoder and keep it pressed for 3s. The buzzer emits 3 or 4 beeps depending on the chosen encoder type.
3.3 IT - CONFIGURAZIONE ENCODER
EN ENCODER CONFIGURATION
P1
tenere premuto
keep it pressed
( 3 s)
....
.... (3 bip)
(3 beeps)
(4 bip)
(4 beeps)
IT - NOTA: per ogni modica della frequenza dell’ ENCODER il sistema necessita di una nuova impostazione dei limiti
EN - NOTE: for each change of ENCODER frequency, the system requires a new limit setting
IT - FREQUENZA ENCODER
EN - ENCODER FREQUENCY P1 IT - COMPATIBILE
EN - COMPATIBLE
IT - LENTO (DEFAULT )
EN - SLOW (DEFAULT )
*
9x
UNICUM
PL1210
Motor
IT - VELOCE
EN - FAST
*
10x
ASUTEC
Motenro
Motor
IT - Premere il pulsante P1 tante volte quanto richiesto dal tipo di encoder e tenere premuto 3s. Il buzzer emette 3 o 4 bip a seconda del tipo di encoder scelto.
EN - Press the button P1 as many times as requested by the type of encoder and keep it pressed for 3s. The buzzer emits 3 or 4 beeps depending on the chosen encoder type.
tenere premuto
keep it pressed
( 3 s)
....
.... (3 bip)
(3 beeps)
(4 bip)
(4 beeps)
*IT - Il buzzer emette un bip ad ogni pressione. Fra la pressione di un tasto e quella succesiva non deve passare più di un secondo.
EN - The buzzer will make a beep each time the button is pressed. No more than a second should pass between one press to another one.

12
0
IT - Mettere il DIP3 in OFF.
EN - Move DIP3 to OFF.
Settaggio rallentamento - Slowdown setting
1
IT - Entro 30 secondi dall’accensione, premere il pulsante P2 5 volte e tenere premuto per 5 secondi. Al rilascio il
buzzer emetterà 3 beeps.
EN - Within 30 seconds from power ON, press the “P2” button 5 times and hold it for 5 seconds.
At the button release the buzzer emits 3 beeps.
2IT - Premere il pulsante di “CHIUSURA”. Agire in chiusura no al raggiungimento della chiusura totale.
EN - Press the “CLOSE” button. Keep closing until full closure is reached.
3
IT - Premere il pulsante di “APERTURA” no al punto dove si desidera iniziare il rallentamento in apertura.
Premere “P2” per confermare con un suono lungo del buzzer.
EN - Press the “OPEN” button until the point you desire to start of the opening slowdown.
Press “P2” to conrm by earing a long sound of the buzzer.
4
IT - Premere il pulsante di “APERTURA” no al raggiungimento del necorsa della totale apertura.
(la velocità è ridotta al valore del trimmer).
EN - Press the “OPEN” button of the transmitter until the total opening limit switch is reached.
(the speed is reduced as the trimmer setting).
5
IT - Premere il pulsante di “CHIUSURA” no al punto dove si desidera iniziare il rallentamento in chiusura. Premere
“P2” per confermare con un suono lungo del buzzer.
EN - Press the “CLOSE” button until the point you desire to start of the opening slowdown. Press “P2” to conrm
by earing a long sound of the buzzer.
6
IT - Premere il pulsante di “CHIUSURA” no al raggiungimento del necorsa della chiusura totale.
Il buzzer emette un suono lungo di conferma.
EN - Press the “CLOSE” button of the transmitter until the total closing limit switch is reached.
As a confermation the buzzer emit a long sound.
<30 s
/
3.4
( 5 s)
P2
( x 5)
...
( x 3)
tenere premuto
keep it pressed
P2
suono lungo
long beep
suono lungo
long beep
chiusura totale
total closure
rallentamento
slowdown
rallentamento
slowdown
apertura totale
total opening
P2
suono lungo
long beep
chiusura totale
total closure
1 2 3 4 5 6
IT - PROGRAMMAZIONE PUNTI DI RALLENTAMENTO PER MOTORE CON FINECORSA MECCANICO
EN PROGRAMMING SLOWDOWN POINTS FOR MOTOR WITH MECHANICAL LIMIT SWITCH

13
0IT - Mettere il DIP3 in ON (congurazione ENCODER par.3.3).
EN - Move DIP3 to ON (ENCODER conguration par.3.3).
Settaggio rallentamento - Slowdown setting
1IT - Entro 30 secondi dall’accensione, mettere il DIP4 in ON
EN - Within 30 seconds from power ON, move DIP4 to ON.
2
IT - Premere il pulsante di “CHIUSURA”. Agire in chiusura no al raggiungimento della chiusura totale
desiderata.
EN - Press the “CLOSE” button. Close until the desired total closure is reached.
3IT - Premere il pulsante “P1” 2 volte il buzzer emetterà 1 bip.
EN - Press the “P1” button 2 times the buzzer emits 1 beep.
4IT - Premere il pulsante di “APERTURA” no al punto dove si desidera iniziare il rallentamento in chiusura.
EN - Press the “OPEN” button until the point you desire to start of the closing slowdown.
5IT - Premere il pulsante “P1” due volte e il buzzer emetterà 2 bip.
EN - Press the “P2” button one time and the buzzer emits 2 beeps.
6IT - Premere il pulsante di “APERTURA” no al punto dove si desidera iniziare il rallentamento in apertura.
EN - Press the “OPEN” button until the point you desire to start the opening slowdown.
7IT - Premere il pulsante “P1” 2 volte il buzzer emetterà 3 bip.
EN - Press the “P1” button 2 times the buzzer emits 3 beeps.
8
IT - Premere il pulsante di “APERTURA” no alla posizione desiderata per l’apertura completa.
(la velocità è ridotta al valore del trimmer).
EN - Press the “OPEN” button until the desired position of total opening is reached.
(the speed is reduced as the trimmer setting).
9IT - Premere il pulsante “P1” 2 volte il buzzer emetterà 4 bip.
EN - Press the “P1” button 2 times the buzzer emits 4 beeps.
10 IT - Mettere il DIP4 in OFF
EN - Move DIP4 to OFF.
3.5
P1
( x 2) ( x 1)
IT - PROGRAMMAZIONE PUNTI DI RALLENTAMENTO PER MOTORE CON ENCODER
EN PROGRAMMING SLOWDOWN POINTS FOR MOTOR WITH ENCODERS
/
P1
( x 2) ( x 3)
P1
( x 2) ( x 4)
< 30s
P1
( x 2) ( x 2)
chiusura totale
total closure
rallentamento
slowdown
rallentamento
slowdown
apertura totale
total opening
1 2 3 4 5 6
1 2 3 4 5 6
1 2 3 4 5 6

14
IT - SPECIFICHE TECNICHE
EN TECHNICAL SPECIFICATIONS
5
IT - STATO DELLA MEMORIA
EN MEMORY STATUS
IT - Se nella memoria del ricevitore è stato salvato almeno un trasmettitore, al
riavvio il buzzer emette 1 bip.
EN - If at least one transmitter has been saved in the receiver memory, upon restart
buzzer beeps 3 times.
IT - Se la memoria del ricevitore è vuota, al riavvio il buzzer emette 3 bip.
EN - If the receiver memory is empty, upon restart buzzer beeps 3 times.
ON
4
IT - Se la memoria del ricevitore è piena, nella fase di memorizzazione fallita, il buzzer emette 3 bip lenti.
EN - If the receiver memory is full, in the failed storage phase, the buzzer beeps slowly 3 times.
IT - Alimentazione
EN - Power supply 24Vdc
IT - Potenza massima motore
EN - Max. motor power 200W
IT - Temperatura di funzionamento
EN - Operating temperature range -20° - +50°C
IT - Tempo lavoro
EN - Working time 180 s
IT - Grado di protezione
EN - Protection rating IP54
IT - Frequenza ricezione
EN - Reception frequency 868.3 MHz
IT - Frequenza massima encoder
EN - Max encoder frequency 100 Hz
IT - Capacità memoria radio (trasmettitori)
EN - Radio memory capability (transmitters) 16

15

TELECO AUTOMATION OCEANIA PTY LTD
AUSTRALIA
Tel. +61.(07)5502.7801
info@telecoautomation.com.au
TELECO AUTOMATION BENELUX SPRL
BELGIUM
Tel. +32.67561967
info@telecoautomation.be
This document is the property of Teleco Automation Srl, which reserves all reproduction and copyrights
TELECO AUTOMATION S.R.L.
ITALY
Tel. +39.0438.388511
info@telecoautomation.com
TELECO AUTOMATION FRANCE
FRANCE
Tel. +33.(0)472.145080
info@telecofrance.com
TELECO AUTOMATION GMBH
GERMANY
Tel. +49.(0)8122.9563024
info.[email protected]
TELECO AUTOMATION IBÉRICA S.L.
SPAIN
Tel. +34.966.16.82.24
jv.lopez@telecoautomation.com
Table of contents
Other Teleco Control Unit manuals

Teleco
Teleco TVPLS868TT3 User manual

Teleco
Teleco TVPLR868AC2 User manual

Teleco
Teleco TVPLA868CC2EN User manual

Teleco
Teleco TVPLA868CC2 User manual

Teleco
Teleco TVPLA868AC2 User manual

Teleco
Teleco TVPLD868C80TS User manual

Teleco
Teleco TVPLS868CS User manual

Teleco
Teleco TVPLD868C150TT User manual

Teleco
Teleco TVPLA868AC2 User manual
Popular Control Unit manuals by other brands

AXELPROD
AXELPROD GTM 1660 RAPSODY manual

SMART Embedded Computing
SMART Embedded Computing RTM-ATCA-747x-10G Series Installation and use

FAS
FAS FNI MPL-508-105-M user manual

Remotec
Remotec ZFM-80US/DA065 user manual

Honeywell
Honeywell Gamewell FCI Velociti Series Installation and maintenance instructions

Exhausto
Exhausto OJ GreenZone instructions