Telstra TSH-D Assembly instructions

Getting to know your
Telstra TSH-D
Desktop Phone

2
Getting to know your phone
Overview of your phone
Softkey right
3
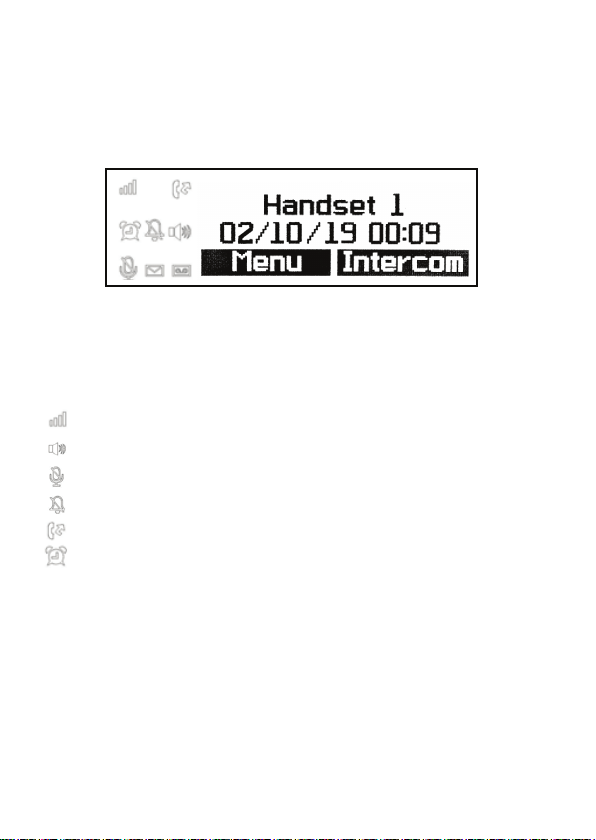
Phone display
Display icons
Signal icon
Displays when in hands-free mode
Mute is activated
Ringer is switched off
Indicates a missed call
Alarm is set
Unregistered
Menu Register

4
What’s inside
2Getting to know your phone
2Overview of your phone
3Phone display
3Display icons
7Safety precautions
8Getting started
8Location
8Phone range
8Signal strength
8Compatible modems
9Contents of the package
9Setting up
Connecting the power adapter
Power up the phone
10 Select a language
10 Registering the phone
On the modem
On the phone
10 Date and time
11 Navigating the menus
Scrolling through menus
12 Menu map
13 Making and receiving calls
13 Switch the phone on/off
13 Calls
Preparatory dialling
Make a call using speed dial keys
Receive a call
Adjust the earpiece or hands-free volume
Adjust the ringer volume
Mute
Hold
14 Intercom, second calls, transferring calls and conference calls
Making an internal call
Receiving an internal call
Making a second call
Second internal call
Second external call
Conference calls
Transferring calls
Receiving a second call (call waiting)

5
17 Phonebook
17 Store a name and number
18 View the details or dial an entry
18 Edit a name and number
18 Delete an entry
19 Delete all entries
19 Predial an entry
19 Check the memory status (Local contacts only)
20 Caller ID and caller list
20 New calls alert
20 Dial a number in the Call List
20 Copy a Call List number to the phonebook
21 View the details of an entry
21 Delete an entry
21 Delete the entire Call List
22 Predial an entry in the Call List
22 Clock and alarm
22 Set the date and time
23 Set the alarm
23 Call features
23 Add a speed dial number
23 Edit / Delete a speed dial number
24 Phone settings
24 Sound
Ringer volume
Ringer melody
Key beep
25 Display
Display contrast
Display backlight
25 Language
25 Registration
On the modem
On the phone
26 De-registering a phone
Phone name
Restore to default settings
Phone version
27 Upgrade phone software
Manually
Base or phone notication

6
27 Advanced settings
27 DECT settings
Change PIN
Clock Master
ECO plus
Base version
29 Restore to default settings
29 Internal names
29 Line settings
Line name
Line ID
30 Phone line settings
Multi call mode
Intrusion call
31 Line selection
31 Default settings
31 Help
31 No dial tone
31 No display
32 No caller display
32 Cannot register a phone to the modem
32 Phone does not ring
Noise interference on my phone or on other electrical
equipment nearby
32 Appendix
32 Care
32 Warranty conditions

7
Your new phone is intended for use within Australia for
connection to a Telstra Smart Modem. Please read the safety precautions and user
guide carefully before installing the phone. The user guide is a part of the product
package and must be passed on to a new owner.
Caution: Warning/danger statement, follow safety precautions!
• The ambient temperature must be between 0 °C and 40 °C.
• Please note that the ringer for incoming calls as well as signal tones are
emitted on the phone loudspeaker. Do not therefore hold the phone
close to your ear while one of these functions is on, otherwise your hearing
may be affected.
• This product requires an electrical supply of 100 - 240 volts AC.
• The mains power plug must always be easily accessible.
• To disconnect the device from mains, separate the plug from the wall socket
rst.
Please Note:
• Before using the phone, wearers of hearing aids should note that radio
signals can be picked up by the hearing aid and cause an unpleasant buzzing
noise.
• Do not use your phone in environments at risk from explosion (e.g.
paintworks, petrol stations etc.)
• Do not position the phone in bathrooms or showers.
• The radio signals may inuence the working of medical equipment.
• In the event of a power cut or if the batteries are discharged, your phone
will not function!
• The phone must not be charged up without batteries or the battery cover in
place.
• Do not touch exposed metal contacts.
Small Metal Objects
Small metal objects may stick to the phone due to the presence of magnetic
elds on the phone.
Exercise caution when used where metal objects can be picked up.
Safety precautions
27 Advanced settings
27 DECT settings
Change PIN
Clock Master
ECO plus
Base version
29 Restore to default settings
29 Internal names
29 Line settings
Line name
Line ID
30 Phone line settings
Multi call mode
Intrusion call
31 Line selection
31 Default settings
31 Help
31 No dial tone
31 No display
32 No caller display
32 Cannot register a phone to the modem
32 Phone does not ring
Noise interference on my phone or on other electrical
equipment nearby
32 Appendix
32 Care
32 Warranty conditions

8
Environmental impact
At the end of the product’s life cycle, the telephone must not be disposed of
in normal domestic waste. Please take it to a collection point for processing
electrical and electronic equipment.
Some materials used in this product can be recycled if you take it to a recycling
depot.
By recycling parts or raw materials from used products you will be making an
important contribution to environmental protection. Please contact your local
authority if you require information about collection points in your neighbourhood.
Getting Started
IMPORTANT
Do not place your in the bathroom or other humid areas.
Location
You need to place your charger within 2 metres of the mains power
socket so that the cable will reach. The socket-outlet should be installed near
the equipment and should be easily accessible.
Make sure that it is at least 1 metre away from other electrical appliances to
avoid interference. Your phone works by sending radio signals between the
phone and gateway.
Phone range
The unit has a range of up to 300 metres outdoors when there is a clear line of
Compatible modems
The TSH-D is compatible with Telstra Smart modems Gen 1 and Gen 2.
It supports the DECT GAP standard and may work on other modems but not all
functions may be supported.
sight between the gateway and phone. Any obstruction between the gateway
and phone will reduce the range signicantly. With the gateway indoors and the
phone either indoors or outdoors, the range will normally be up to 50 metres.
Thick concrete and stone walls can severely affect the range.
Signal strength
The icon on your phone indicates that you are within range of the modem
When out of range of the modem, the icon will show.
9
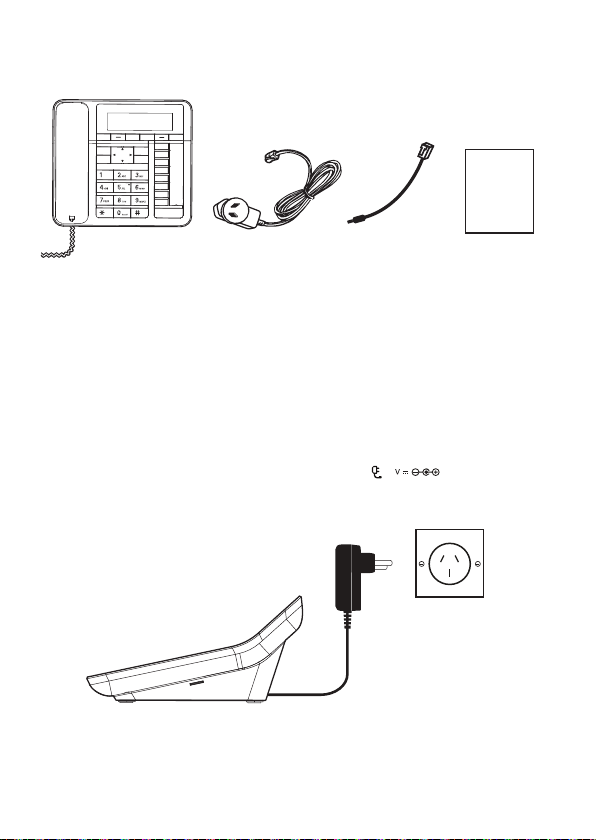
Setting up
Contents of the package
IMPORTANT
Use only the power adaptor supplied with the product.
TSH-D Desktop Phone
with Handset Cord
Power adaptor Headset cord Quick Start Guide
Connecting the power adaptor
Power up the phone
1. Plug the power adaptor into the socket marked on the rear of
the phone and plug the other end into the mains power wall socket. Switch
on the mains power.
6.0

10
When the phone is rst set up it will list the different languages, use to
scroll to the required language and press
Select
.
1.
step 2 below.
2. If the phone is not registered to a modem, press
Register
. The screen
displays
Registering
and once successful
Registered
will be displayed.
3. If the phone is already registered to another modem, press
Menu
, scroll
to
Phone
Settings
and press
Select
.
4. Scroll to
Registration
and press
Select
.
5.
Register
is highlighted, press
Select
.
6. The screen displays
Registering
and once successful
Registered
will be
displayed.
Note
A beep will be heard if the registration is successful. The phone is automatically
assigned an available phone number. Use this number when making internal
calls.
If registration is not successful the rst time, please repeat the process again in
case the modem registration period ran out of time.
If you still cannot register a phone to the modem please check how many
phones are already registered. The total number of phones that can be
registered to a modem is dependent on the modem.
Date and time
Note
The phone can be set so that the modem or phone can be the clock master,
once set this will sync across all phones.
If Clock Master is set to Base, the date and time is set automatically when
registered to the modem. See page 26.
If Clock Master is set to phone, you can also set the date and time manually.
See page 26.
Pair
On the modem
On the phone
Registering the phone
Select a language
Table of contents
Other Telstra Telephone manuals

Telstra
Telstra VVX500 User manual

Telstra
Telstra VVX300 User manual

Telstra
Telstra VVX500 Specification sheet

Telstra
Telstra Cisco 7861 MPP User manual

Telstra
Telstra SP817BB User manual

Telstra
Telstra T1000C SMS User manual

Telstra
Telstra A60 User manual

Telstra
Telstra 8950 User manual

Telstra
Telstra T310 User manual

Telstra
Telstra Commander E105 Manual

Telstra
Telstra T700 User manual

Telstra
Telstra VVX410 User manual

Telstra
Telstra T1000S User manual

Telstra
Telstra T800 User manual

Telstra
Telstra Access 200 User manual

Telstra
Telstra T310 User manual

Telstra
Telstra T110 User manual

Telstra
Telstra T310 User manual

Telstra
Telstra T1000S User manual

Telstra
Telstra Priority Assist Phone User manual


