Tendercare Mobility Nursery Snugseat Spring User manual

Tendercare Ltd
The Snugseat Spring User Manual
Document No 034-01v4 Snugseat Spring
User Manual.doc
Authority. Quality Controller
Authorised. J Adams Page 1 Dec 05
USER MANUAL
Mobility Nursery Snugseat Spring
Mobility Junior Snugseat Spring
Mobility Senior Snugseat Spring
IMPORTANT
Please read these instructions carefully
Before using your Snugseat

Tendercare Ltd
The Snugseat Spring User Manual
Document No 034-01v4 Snugseat Spring
User Manual.doc
Authority. Quality Controller
Authorised. J Adams Page 2 Dec 05
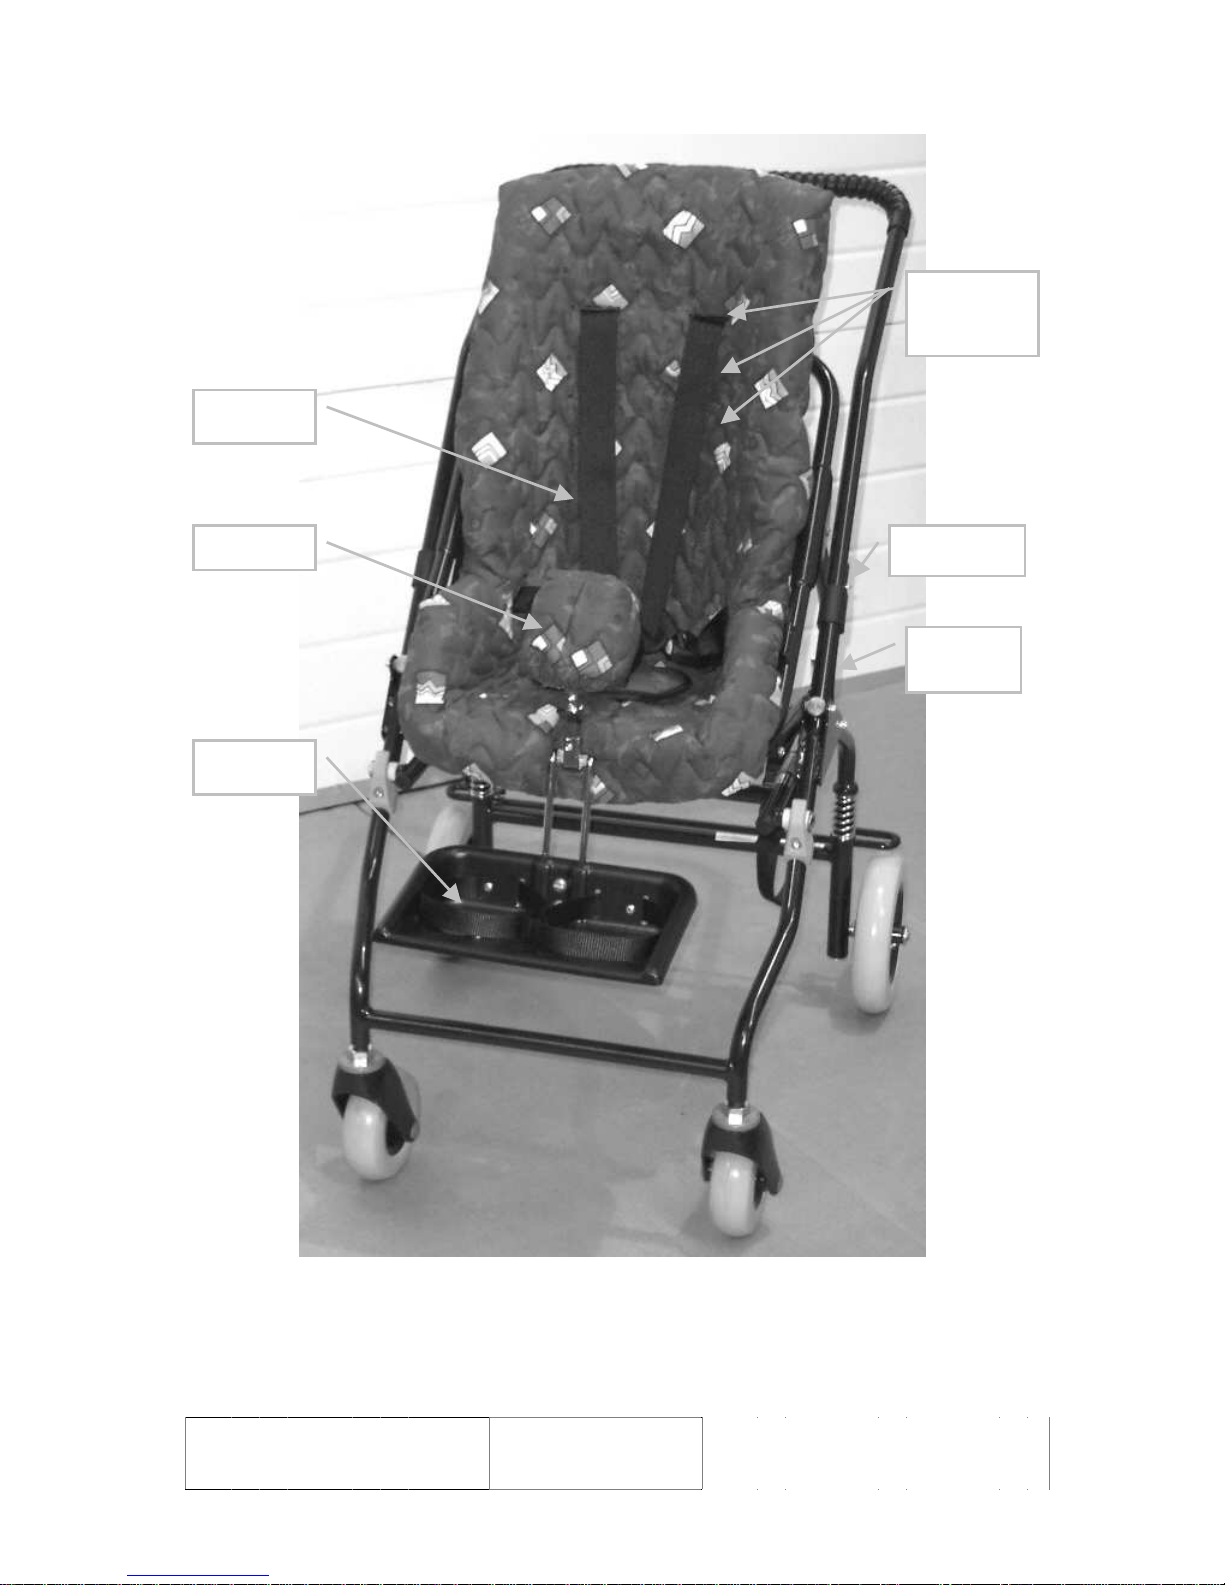
SNUGSEAT AND SNUGSEAT SPRING BUGGY
Frame Lock
Footrest
Seat Tilt
Lock
Harness
Mounting
Slots
Pommel
Harness

Tendercare Ltd
The Snugseat Spring User Manual
Document No 034-01v4 Snugseat Spring
User Manual.doc
Authority. Quality Controller
Authorised. J Adams Page 3 Dec 05
SNUGSEAT SPRING BUGGY
BRAKE
PEDAL
FRAME
LOCK
SEAT FRAME
SUPPORT
SEAT FRAME
LOCK

Tendercare Ltd
The Snugseat Spring User Manual
Document No 034-01v4 Snugseat Spring
User Manual.doc
Authority. Quality Controller
Authorised. J Adams Page 4 Dec 05
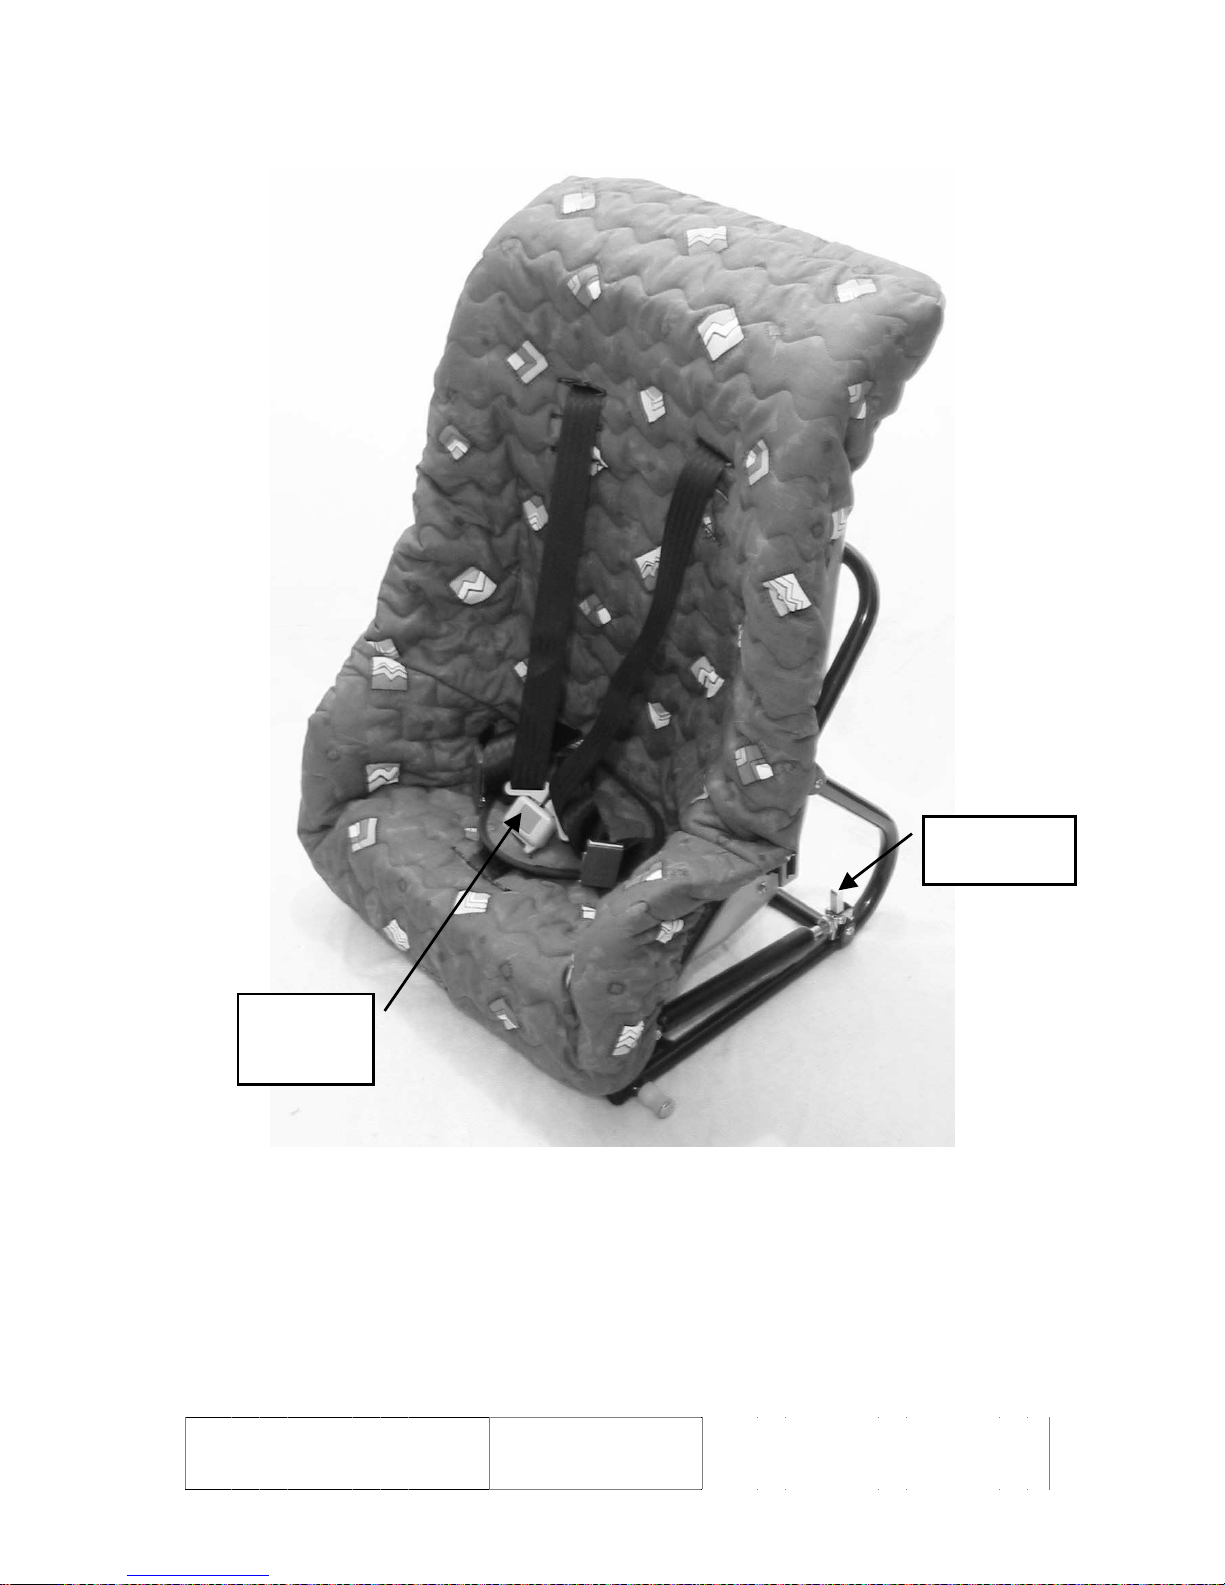
SNUGSEAT SEAT UNIT
GAS STRUT
CATCH
HARNESS
RELEASE
CATCH

Tendercare Ltd
The Snugseat Spring User Manual
Document No 034-01v4 Snugseat Spring
User Manual.doc
Authority. Quality Controller
Authorised. J Adams Page 5 Dec 05
Item Description Page
1Who to contact if you have difficulty…………………………………………….. 6
2Intended user………………………………………………………………………. 6
3Unpacking………………………………………………………………………….. 7
4Preparing for use…………………………………………………………………... 8
4.1 Unfolding the frame and assembling the buggy…..……….…………………… 8
4.2 Brakes………………………...………………………….……………………… ..9
4.3 Fitting seat to buggy...…………………………………….…………………….. ..9
4.4 Fitting footrests to seat.…………………………………….…………………… 10
4.5 Fitting pommel to seat…………………………………….…………………….. 11
4.6 Tilt in Space……………………………………………….……………………. 11
5Setting up the seat unit………………………………………………………..…… 12
5.1 Fitting support pads…………………………………….………………….…… 13
5.2 Setting up the patterned cover………………………….………………………. 16
5.3 Adjusting the harness…………………………………………………………… 17
5.4 To lock and release the harness………………………………………………… 17
5.5 Final checks……………………………………………………………………... 17
6User instructions 18
6.1 Getting into the Snugseat…..…………………………………………………… 18
6.2 Getting out of the Snugseat….………………………………………………….. 18
7Attendant pushing...……………………………………………………………….. 18
7.1 Pushing………………………………………………………………………….. 18
7.2 Brakes…………………………………………………………………………… 19
7.3 Comfort…………………………………………………………………………. 19
7.4 Lifting and general safety………………………………………………………. 20
8Cleaning…………………………………………………………………………….. 20
8.1 Buggy and seat shell..…………………………………………………………… 20
8.2 Patterned covers and tummy pad.….…………………………………………… 20
8.3 Modular foam pads……….…………………………………………………….. 20
8.4 5-Point harness………………………………………………………………….. 20
9Maintenance………………………………………………………………………... 20
9.1 Routine maintenance…………………………………………………………… 21
9.2 Six monthly maintenance….……………………………………………………. 21
10 Oxygen cylinder……………………………………………………………………. 22
11 Warranty…………………………………………………………………………… 22
12 Transporting the Snugseat……………………………………………………….. 22
12.1 Preparing Snugseat for transport……………………………………………… 23
12.2 Attaching Snugseat to vehicle…………………………………………………. 23
12.3 Car fixing kit…………………………………………………………………... 26
13 Repairs………………………………………………………………………………
28

Tendercare Ltd
The Snugseat Spring User Manual
Document No 034-01v4 Snugseat Spring
User Manual.doc
Authority. Quality Controller
Authorised. J Adams Page 6 Dec 05
1. Who to contact in difficulty
Tendercare Ltd
PO Box 3091, Littlehampton, BN16 2WF
Tel (01903) 726161 Fax (01903) 734083
Email: info@tendercareltd.com
www.tendercareltd.com
2. Intended user
The Snugseat postural control seating system is designed to enhance the sitting of disabled
children who have postural instability with minimal skeletal deformities.
The buggy is of lightweight but rugged construction and this makes them suitable for daily
use. The buggy has two fixed wheels at the rear mounted on spring suspension and two castor
wheels at the front for easy steering. The buggy comes in two sizes Nursery/Junior and Senior
and these will accommodate all sizes of snug seat.
The seat unit is available in three sizes, Nursery, Junior and Senior. The seat is supplied with
an attractive cover and modular pad inserts to meet the needs of a wide range users. The seat
has tilt in space seating, five-point harness, pommel and footrest. The seat can be quickly
fitted and removed from the buggy, which can be folded for transport. The complete system
has passed impact tests and has been designed for use as a vehicle seat when restrained in
accordance with this manual (see section 12).
The following accessories for use with the Snugseat are available from Tendercare Ltd.
Aluminium carrying tray, Shopping basket, Rain-hood, Sun canopy, Snug-toes, Headrest and
Car fixing kit.
These instructions apply to all sizes.
SEAT SIZE– mm
MODEL MAX OCCUPANT
WEIGHT WIDTH DEPTH HEIGHT
Nursery 50 kg 300 250 550
Junior 50 kg 340 320 610
Senior 50 kg 390 380 660
Important: - The maximum occupant weight includes the occupant and all accessories.
OVERALL SIZE
DIMENSION
mm Nursery Junior Senior
Dim A 845 845 915
Dim B 615 615 650
Dim C 1020 1090 1170

Tendercare Ltd
The Snugseat Spring User Manual
Document No 034-01v4 Snugseat Spring
User Manual.doc
Authority. Quality Controller
Authorised. J Adams Page 7 Dec 05
C
All sizes and weights are given as a guide. Tendercare Ltd reserves the right to amend
specifications at any time as part of their product development programme.
3. Unpacking
The Snugseat spring buggy is delivered in a cardboard carton of approximate weight 15kg and
size 600 mm wide x 470 mm deep x 1050 mm high. The Snugseat seat unit, upholstery and
modular padding are delivered in a cardboard carton of approximate weight 13kg and size 480
mm wide x 530 mm deep x 800 mm high.
Warning: - The transit carton is quite bulky so moving and unpacking must be done with
care. Observe all lifting and handling regulations.
Stand the Carton upright making sure it is supported and cannot fall over. Open the carton
carefully and remove any packages or packing, which could obstruct the removal of the buggy
or seat. Carefully remove the buggy or seat and any other packages, which are still in the
carton.
Check that you have the following items: -
Item Component Number Yes No
1. Buggy 1
2. Seat Unit 1
3. 5 point harness fitted to seat unit 1
4. Footrest 1
5. Pommel 1
6. Bag containing seat cover, tummy pad and pommel covers 1
7. Bag containing modular pads and wedges 1
8. User Manual 1
If any items are damaged or missing please contact Tendercare,
Preferably by fax 01903-734083 within 36 hours of delivery.
A B

Tendercare Ltd
The Snugseat Spring User Manual
Document No 034-01v4 Snugseat Spring
User Manual.doc
Authority. Quality Controller
Authorised. J Adams Page 8 Dec 05
Remove the upholstery and modular pads from their plastic bags and any protective packaging
from the frame. After unpacking and checking you have all components and that they are in
good condition dispose of the packaging at your local recycling centre.
4. Preparing the buggy for use
Warning. When opening or folding the buggy, ensure that you hold the frame so that you
avoid any danger of catching your fingers in moving parts.
4.1 Unfolding and assembling the buggy
4.1.1 Unfolding the frame.
Standing at the side of the buggy: -
Unfasten the strap holding the buggy in the folded position by
squeezing the plastic prongs together and pulling the catch apart.
(See picture opposite).
1) Carefully spread the wheels apart and lift up the push handle making
sure the two plastic clips are near the top of the push handle tubes
and the pegs on the push handle fit into the holes in the rear frame.
(See picture opposite).
Lock the frame open using the two safety catches, which
are on each side of the frame near the top hinges. (See
picture opposite).
Press in the silver coloured push button and slide the
plastic locking clip down the tube and over the button.
Do this on both sides of the Snugseat.
The frame is now locked.
Warning: - If the locking clips are not in the correct position or the push buttons do not
protrude so allowing the locking clips to move back up the frame, then the
frame may collapse in use.
SQUEEZE
HERE

Tendercare Ltd
The Snugseat Spring User Manual
Document No 034-01v4 Snugseat Spring
User Manual.doc
Authority. Quality Controller
Authorised. J Adams Page 9 Dec 05
4.1.2 Folding the frame
To unlock the frame and fold the buggy reverse the above.
4.2 Brakes
1. The brake-operating pedal is on the right hand side at the rear of
the pushchair. (See picture opposite).
2. To put the brakes on press the pedal down and backwards with the
sole of your foot until it locks into place.
3. To release the brake, place your toe under the pedal and lift up.
Warning: - The brake lever will come up quickly be careful it does not catch your ankle.
4.3 Fitting seat to buggy
Open the chrome plated locking bar at the rear of the buggy
by pulling bar “A” backwards. Then undo the safety strap
“B” which is to the right of the locking bar by squeezing the
catch pins and pulling the catch apart. (See picture opposite)
Carefully place the seat unit between the buggy frames so that
the white front rollers are behind the grey retaining brackets
on the front of the buggy. (See picture opposite).
A
B
ON
OFF

Tendercare Ltd
The Snugseat Spring User Manual
Document No 034-01v4 Snugseat Spring
User Manual.doc
Authority. Quality Controller
Authorised. J Adams Page 10 Dec 05
Lower the rear of the seat unit into the chrome
plated lock and push the lock lever forwards
as far as it will go. Finally fit the safety strap
over the seat frame cross bar and lock by
pressing the two halves of the catch together.
(See picture opposite).
4.4 Fitting footrests to seat
Pass the two chrome bars of the footrest through the slit
in the front of the seat cover and insert them into the
corresponding holes in the seat frame. (See picture
opposite)
Lock footrest in place by tightening (turn clockwise) the
two thumbscrews under the seat frame.
NOTE: - The seat cover is not shown for clarity.
To adjust the height of the footrest, loosen the two
screws in the centre of the footrest. (See picture
opposite). Turn the screws anticlockwise using a flat
bladed screwdriver whilst holding the nut at the back
of the footrest with a 10mm spanner.
Move the footrest to the desired height and retighten
both screws (turn clockwise).
The foot straps are held with Velcro. To fit and
adjust simply pull them apart place around the feet
and push together. Foot Strap Velcro Fixing

Tendercare Ltd
The Snugseat Spring User Manual
Document No 034-01v4 Snugseat Spring
User Manual.doc
Authority. Quality Controller
Authorised. J Adams Page 11 Dec 05
4.5 Fitting pommel to seat
The pommel is mounted on an adjustable steel frame so that the height and depth can be
adjusted using thumbscrews. (See picture below).
To fit the pommel, pass the chrome bar with a slot in it through the slit in the front of the seat
cover. Then looking under the front of the seat, remove the thumbscrew shown in the picture
opposite. Insert the slotted bar of the pommel into the mounting slot then insert and tighten
the thumbscrew. (See picture above).
NOTE: - The seat cover is not shown for clarity.
To adjust the depth, loosen the thumbscrew under the seat and move the pommel in or out
until it is in the desired position then retighten the screw.
To adjust height, loosen the thumbscrew on the front of the pommel support tube. Move the
pommel to the desired height then retighten the screw making sure that the screw fits into one
of the indentations in the pommel support bar.
4.6 Tilt-in-Space
The angle of the seat and backrest (Tilt in Space) can be infinitely adjusted throughout its
range. Adjust the seat angle as follows: -
On the Nursery and Junior sizes there is a single gas spring. The gas
spring release lever, a small chrome lever, is located at the rear of
the seat. To operate place one hand in the middle at the front of the
seat just above the footrest location, and with the other hand gently
press the gas spring release lever backwards (see picture opposite).
Allow the seat to recline slowly, when the required position is
reached release the lever to lock the seat in position.
Pommel attachment thumbscrew
Height adjustment thumbscrew

Tendercare Ltd
The Snugseat Spring User Manual
Document No 034-01v4 Snugseat Spring
User Manual.doc
Authority. Quality Controller
Authorised. J Adams Page 12 Dec 05
The senior size has two gas springs one either side of the seat.
The gas spring release lever, a chrome bar, is located under the
front of the seat. To operate place one hand on the middle front
of the seat just above the footrest location, and with the other
hand gently lift the gas spring release lever upwards (see picture
opposite). Allow the seat to recline slowly, when the required
position is reached release the lever to lock the seat in position.
Important: - Always ensure the 5-point harness is used and correctly adjusted before
reclining or returning the seat to a more upright position.
Warning: - Always support the front of the seat when reclining, as the gas springs are very
quick in operation. If the front of the seat is not supported, the seat may
move swiftly and could cause the occupant distress.
To return the seat to a more upright position, place one hand on the middle front of the seat,
just above the footrest location and use your body weight to push down. If extra leverage is
required place one hand on the footrest instead of the seat. At the same time use the other
hand to operate the gas spring release lever. When the required position is reached release the
lever.
5.0 Setting up the seat unit
When setting up the seat unit always ensure the following is done: -
Always consult your Therapist or Rehabilitation Engineer for advice.
Ensure that the child is relaxed and happy and if possible in an environment in which
they are familiar.
If possible, sit the child on a flat box of the correct height that has a conforming
surface.
Assess level of sitting ability.
Take the measurements listed below.
Measurement Symbol Millimetres Inches
Pelvic Width P.W.
Seat Depth S.D.
Set Seat Depth S.D. – 25mm (1”) -25mm= -1” =
Footrest Height F.H.

Tendercare Ltd
The Snugseat Spring User Manual
Document No 034-01v4 Snugseat Spring
User Manual.doc
Authority. Quality Controller
Authorised. J Adams Page 13 Dec 05
Example: -
Seat depth measured on the child is 279mm (11")
Set seat depth (SSD) is 279mm - 25mm =254mm, (11"-1" = 10")
S.S.D. = 254mm or 10"
This is the measurement from the front of the seat to the back pad.
5.1 Fitting support pads
For details of the correct position of the pads see picture on page 14.
Select the correct seat cushion and Velcro it into the seat shell, so that the front of the cushion
is flush with the front edge of the shell. The flat cushion gives a neutral hip angle and the
ramped cushion will achieve a flexed hip angle.
Select the combination of back pads required to give the required set seat depth (S.S.D.) and
Velcro in position.
Using the lateral pelvic support pads, position in the shell as shown in the picture on page 14
until the distance between the pads is equal to the pelvic width (P.W.).
Adjust footplate to the required height (F.H.) See section 4.4.
Position the child in the seat and fit the 5-point harness (See section 5.3)
Check the following: -
The pelvis is in the mid line position and not anteriorly rotated (i.e. not sacral seating)
The pelvic lateral supports provide enough support without being over tight.
The hips are about the mid line
The footrest is adjusted to the correct height
The abduction is satisfactory. If more abduction is required fit a pommel. (See section
4.5).
IMPORTANT: - DO NOT use the pommel as a stop to prevent the child sliding forwards.

Tendercare Ltd
The Snugseat Spring User Manual
Document No 034-01v4 Snugseat Spring
User Manual.doc
Authority. Quality Controller
Authorised. J Adams Page 14 Dec 05
SNUG SEAT PADS
AND
SUPPORT ELEMENTS
SEAT
CUSHION
HEAD
SUPPORT
LATERAL
PELVIC
SUPPORT
BACKREST
CUSHION
LUMBER
SUPPORT
LATERAL
TRUNK
SUPPORT
POMMEL
FOOT
SUPPORT

Tendercare Ltd
The Snugseat Spring User Manual
Document No 034-01v4 Snugseat Spring
User Manual.doc
Authority. Quality Controller
Authorised. J Adams Page 15 Dec 05
With the child in the seat measure the correct positions of the following supports: -
(See page 14 for position of supports)
Remove the child from the seat.
At the required Lumber Support (L.S.) position on the backrest pad, Velcro two wedge shaped
pads with the narrow edge towards the middle of the seat. Ensure that the lumber pad has
promoted a symmetrical lumber curve and not simply displaced the pelvis forward.
At the required Lateral Trunk Support (L.T.S.) positions, Velcro the lateral trunk supports to
retain the trunk in a symmetrical and upright position. Ensure that the supports are positioned
as far back as possible so that they do not interfere with arm movement.
At the required Head Support (H.S.) positions, Velcro the head supports to the back pad to
help maintain head stability. The small flat pads are used for lateral support and the wedge
pads for posterior support. The thickness and position of the pads will determine the support
of the head and stability in a forward direction.
If required, attach the pommel to seat and adjust for correct position.
Note: -Always remove pommel before placing child in the seat.
Position the child in the seat and assess the child's posture. If the posture is correct remove the
child.
Take a photograph or draw a sketch of the pad positions. The child’s carers should retain one
copy for their reference and a further copy should be placed in the child’s file.
The child's posture in the seat will need to be reassessed on a regular basis, consult your
paediatric therapist with regard to how often this should be.
Measurement Symbol Millimetres Inches
Lumber Support L.S.
Lateral Trunk Supports L.T.S
Head Support H.S.

Tendercare Ltd
The Snugseat Spring User Manual
Document No 034-01v4 Snugseat Spring
User Manual.doc
Authority. Quality Controller
Authorised. J Adams Page 16 Dec 05
5.2 Setting up the Patterned cover
The 5-point harness is fitted to the seat cover before the seat cover is fitted to the Snugseat.
Tip. The harness length adjuster always goes over the user’s thighs, NEVER the
shoulders.
Fit the harness to the seat cover by inserting all straps from the
patterned side of the cover. When passing the buckle through
the slots in the harness always twist the buckle so that the
smallest side passes through the slot first. (See picture
opposite).
Insert both shoulder straps and black buckles through the
nearest slot that is above the child’s shoulder height.
Insert the pelvic straps and buckles through the slots in the
seat section, which are at the rear and side of the seat. Always
make sure that the harness adjustment mechanism remains on the patterned side of the cover.
To insert the groin strap first remove the buckle. Note how the webbing is threaded through
the buckle. (See picture on page 17). Thread the groin strap through the slots in the Tummy
pad, Patterned cover, Seat cushion then through the slot in the seat shell so that the strap
comes out the front of the casting between the holes that the footplate rods fit into. Thread the
strap through the buckle as shown below. Finally adjust the strap to the desired length and
then push the buckle into the slot in the casting.
Shoulder Strap
Pelvic Strap
Harness
Length
Adjuster
Quick Release
Catch
Groin Strap
5 Point Harness

Tendercare Ltd
The Snugseat Spring User Manual
Document No 034-01v4 Snugseat Spring
User Manual.doc
Authority. Quality Controller
Authorised. J Adams Page 17 Dec 05
Insert the shoulder and pelvic strap buckles through
the slots in the seat shell. Pull on the straps so that the
buckles are flat against the seat shell. (See picture
opposite).
Fit the patterned cover over the seat shell, make sure
that the cover is correctly fitted and not twisted.
Always make sure that the harness adjustment
mechanism remains on the patterned side of the cover.
To remove the cover and harness do the above in reverse order.
5.3 Adjusting the harness
Adjustments are made using the harness adjustment mechanism, which is on the pelvic straps.
To make the harness longer press in the brass strip in the top of the harness adjustment
mechanism and pull the shoulder strap until the desired length is obtained. Alternatively, turn
the adjustment mechanism on its side to lengthen the straps.
To make the harness shorter, pull the short length of strap protruding through the harness
adjustment mechanism until the desired length is obtained.
5.4 To lock and release the harness
To lock the harness pass the long straps over the child’s shoulders and press the short chrome
strips into the quick release buckle on the groin strap.
To release the harness, press the red button on the buckle and pull the shoulder straps off the
child’s shoulders.
5.5 Final checks
1. Check that the 5-point harness is secure and adjusted correctly.
2. Check that the cover is correctly positioned.
3. Check that the pads are in the correct position.
GROIN STRAP
BUCKLE
GROIN
STRAP

Tendercare Ltd
The Snugseat Spring User Manual
Document No 034-01v4 Snugseat Spring
User Manual.doc
Authority. Quality Controller
Authorised. J Adams Page 18 Dec 05
4. Check that the Mobility Seat is located and locked correctly in the Mobility Chassis.
5. Check that the safety strap is over seat frame cross bar and is locked.
6. Position the child correctly in the seat, and assess the child's posture if the child's
posture appears to have changed remove the child and compare the pad set up with
that recorded at the assessment and if necessary adjust the pads and try again.
7. Check footplate position and adjust if necessary.
6. User Instructions
6.1 Getting into the Snugseat
1) Put the brakes on.
2) Place the child into the seat so that their feet are on the footplate.
3) Fit the safety harness to the child and lock the harness.
4) Fit the foot straps.
6.2 Getting out of the Snugseat
1) Put the brakes on.
2) Undo the safety harness and foot straps.
3) Lift child from the Snugseat.
7. Attendant pushing
7.1 Pushing
Important: - At the start of every journey make sure that the two white plastic rollers on
the seat are correctly located into the grey retaining brackets on the front
of the buggy and that the seat is fully locked into the chrome catch at the
back of the buggy. Also check that the safety strap beside the chrome lever
is locked in place.
Do not allow children to play with the gas spring release lever.
1) The Snugseat is easy to push over hard, even surfaces but may be more difficult over
rough, uneven surfaces and the wheels can sink into soft ground. Never force the
Snugseat if it becomes stuck, this may cause the rear wheels to lift and the Snugseat
to be tipped forwards. If the Snugseat gets jammed on a stone or cracked pavement,
tip the Snugseat backwards to raise the front wheel over the obstacle and then proceed.
On soft ground it may be easier to pull the Snugseat backwards.
2) The buggy has castor wheels and is easily steered simply by turning the Snugseat in
the desired direction.

Tendercare Ltd
The Snugseat Spring User Manual
Document No 034-01v4 Snugseat Spring
User Manual.doc
Authority. Quality Controller
Authorised. J Adams Page 19 Dec 05
3) Whenever possible avoid steep and uneven surfaces because there is a danger that the
Snugseat may tip over. If you cannot avoid difficult surfaces you must take extra care
when travelling across them.
4) Do not use the Snugseat in sandy conditions.
5) Always use two hands for pushing the Snugseat.
6) For the comfort of the occupant always avoid pushing too fast or making sudden fast
turns, jerking, jolting and bumping. Many occupants are liable to be affected by rough
handling, which can cause loss of confidence, discomfort or pain.
7) Avoid kerbs. Wherever possible use ramped kerbs or slopes. This will make pushing
the chair easier and safer and will be more comfortable for the occupant.
8) Avoid steep kerbs and flights of steps because of the danger of losing your grip on the
chair or of the occupant being tipped out. Always use a ramp or lift if available.
9) To tip the Snugseat backwards when climbing kerbs stand behind and holding onto the
push handle with both hands, press down and pull backwards. The front of the chair
will lift.
IMPORTANT: - Take great care when doing this to avoid the combined weight of the
Snugseat and occupant overcoming your strength and tipping back onto
you. Never try to tip the Snugseat if the occupant is much heavier than
you are.
10) Always look well ahead so that you have plenty of time to avoid hazards.
11) Be considerate to other people and watch out for pedestrians who may stop or
suddenly change direction.
7.2 Brakes
1) Always put the brakes on when placing the child in or taking them out of the seat and when
leaving the Snugseat unattended.
7.3 Comfort
1) Always be considerate to the occupant.
2) Before setting out on a journey make sure the occupant is comfortably and correctly
seated and that the safety harness is correctly fitted and adjusted. Always ensure that
both feet are on the footrest and that clothing is tucked in and cannot catch on
doorways or other obstructions.
3) Remember the occupant is in front of you. They will want to be part of your
conversations and interests. Also their view will be different to yours when it comes
to looking into shop windows, etc. it can be extremely frustrating to hear something
exciting being discussed when it is situated somewhere behind the occupant’s eyes,
and thus, out of sight.

Tendercare Ltd
The Snugseat Spring User Manual
Document No 034-01v4 Snugseat Spring
User Manual.doc
Authority. Quality Controller
Authorised. J Adams Page 20 Dec 05
7.4 Lifting and general safety
1) The Snugseat is designed to carry one person only. Never allow children to play on, or
stand on the footrest or frame. Never hang anything such as bags on the push handle. If
you do, there is a danger of the Snugseat tipping backwards.
2) If it is necessary to lift the Snug Seat whilst it is occupied always use two people, one
either side of the Snugseat.
3) For your own safety and good practice never lift the empty Snugseat until it has been
properly folded. Always use good lifting practice.
4) Do not allow children to play with the gas spring release lever.
8. Cleaning
8.1 Buggy and seat shell.
1) To clean the buggy or seat shell, wipe with a damp cloth and dry thoroughly.
2) For more stubborn stains wipe with a damp cloth and warm water in which a little mild
soap has been dissolved. Dry thoroughly
3) Never use furniture polish or any spirit to clean the frame.
8.2 Patterned covers & tummy pad.
1) Remove the cover from the Snugseat. Remove the harness from the cover. Wash as per
instructions on the cover (40°C Synthetic Wash).
2) Dry cover thoroughly before re-assembly. Do not tumble dry.
8.3 Modular foam pads
1) Make a sketch or take a photograph of the position of foam pads.
2) Remove foam pads that need cleaning.
3) Wipe with a damp cloth and dry thoroughly.
4) Using the sketch or photo, refit the pads in exactly the same position.
8.4 Five point harness
1) Remove harness from the seat.
2) Wipe with a damp cloth and dry very thoroughly. Do not tumble dry.
3) Do Not immerse in water or wash in a machine.
9. Maintenance
Should a problem be found when carrying out the regular checks, it should be immediately
reported to the issuing authority or Tendercare Ltd.
This manual suits for next models
2
Table of contents
Other Tendercare Wheelchair manuals

Tendercare
Tendercare Mini Tilt Wheelchair Instruction manual

Tendercare
Tendercare Extra Small Fold-a-Way Spring Instruction manual

Tendercare
Tendercare Gas Strut Model v4 User manual

Tendercare
Tendercare MINI TILT Instruction manual

Tendercare
Tendercare Mini Tilt Wheelchair User manual

Tendercare
Tendercare Snappi User manual

Tendercare
Tendercare Extra Small Fold-a-Way Spring User manual

Tendercare
Tendercare GAS STRUT TILT and FOLD Wheelchair Instruction manual

Tendercare
Tendercare New Aluminium Mini Tilt Wheelchair User manual

Tendercare
Tendercare TILT and FOLD Instruction manual