Tenovis Integral T3 Classic User manual
Integral T3
Classic
connected to
Communication Server Integral 55
Operating instructions

Familiarise yourself with your telephone
2
Important information
Contents of this operating manual
Only frequently used functions are described in this manual.
You can find a complete description of all the possible functions on the CD ROM
supplied.
Which systems can you connect your telephone to?
This telephone is only intended for connection to telecommunications systems from
Tenovis. It may not be directly connected to a public telephone network.
Declaration of Conformity
We, Tenovis GmbH & Co. KG, declare that the T3--Classic telephone complies with
the basic requirements and other relevant rules in accordance with EU directive
1999/5/EU (radio and telecommunication terminal equipment, R&TTE).
This telephone is intended for connection to digital interfaces of Tenovis
telecommunications systems and meets the fundamental requirements in
accordance with the EU directive 1999/5/EU (Radio and Telecommunication
Terminal Equipment, R&TTE).
The design of this telephone makes it unsuitable for direct operation on interfaces of
public telephone networks.
Use with Link and DSS modules:
This Link/DSS module is intended for connection to T3 telephones and meets the
fundamental requirements in accordance with the EU directive 1999/5/EU (Radio
and Telecommunication Terminal Equipment, R&TTE).
The design of this Link/DSS module makes it suitable for use with T3 telephones
only.
If any problems should occur during operation, please initially contact your specialist
dealer or Tenovis Service department.
The Declaration of Conformity can be requested from the following Internet address:
www.tenovis.com/deutsch/verzeichnis/conformance.htm or search for the keyword
“Conformity” in the index.
Which system is your telephone connected to?
You can identify which Tenovis telephone system your telephone is connected to as
follows:
With the handset cradled press the +key:
If your telephone is connected to the Tenovis I5 telephone system, the first menu
item Contrast appears. If your telephone is connected to the Tenovis I33/I55
telephone system, Handset appears as the first menu item.

Familiarise yourself with your telephone
3
Continued
Important information
Tips for choosing the installation location
Place the telephone on a non--slip surface, especially if the furniture is new or has
recently been cleaned with cleaning agents. Enamels or cleaning agents may
contain substances which soften the base parts of your telephone, and the softened
bases can leave undesirable marks on the furniture. Tenovis cannot assume liability
for damages of this kind.
Repairs
The equipment may only be opened or repaired by a qualified technician. Do not
open the telephone yourself. Doing so could damage the unit and cause it to
malfunction.
Notes on description of the operating steps
The procedures described in this operating manual assume a standard assignment
of the function keys.
If you re-assign function keys, please bear in mind that this may change the
operating procedures.
Additional functions
Functions marked with -are not supplied as standard with your telephone.
Other functions may be locked or, depending on the system software, unavailable.
Please consult your Tenovis Service if you want to use one of these functions.
Operating manual in other languages
Do you want to see this operating manual in another language? You can reach our
document database from the Tenovis homepage www.tenovis.com. This will tell you
whether your desired language version is available for download.

4
Contents
Familiarise yourself with your telephone
Important information 2..................................................
Your T3 Classic at a glance 6.............................................
All the keys at a glance 7................................................
Get to know your telephone
The display helps you 8..................................................
Basic rules of operation 9................................................
...telephoning made comfortable 14........................................
Initial operation of your telephone 15........................................
Telephoning as usual
Makingacall 16.........................................................
Answering calls 19.......................................................
Telephoning with no handset 22............................................
Making several connections 25............................................
Diverting calls 30.........................................................
Telephoning in comfort
Editing the redial list 32...................................................
Editing the call list 35.....................................................
Editing the journal 38.....................................................
Using the phonebook 41..................................................
Listening to messages-44...............................................
Locking the telephone 46.................................................

5
Continued
Contents
Telephoning with partners
Telephoning with partners-49............................................
Individually setting up your telephone
Assigning functions/phone numbers to keys 57...............................
Audio, contrast and language settings 65....................................
Links
Links-69..............................................................
Refer to if necessary
Overview of telephone- functions 70........................................
Information in the idle display 73...........................................
Ringing- and handset tones 77.............................................
Menu overview 78........................................................
Troubleshooting 82.......................................................
Key words 84............................................................

Familiarise yourself with your telephone
6
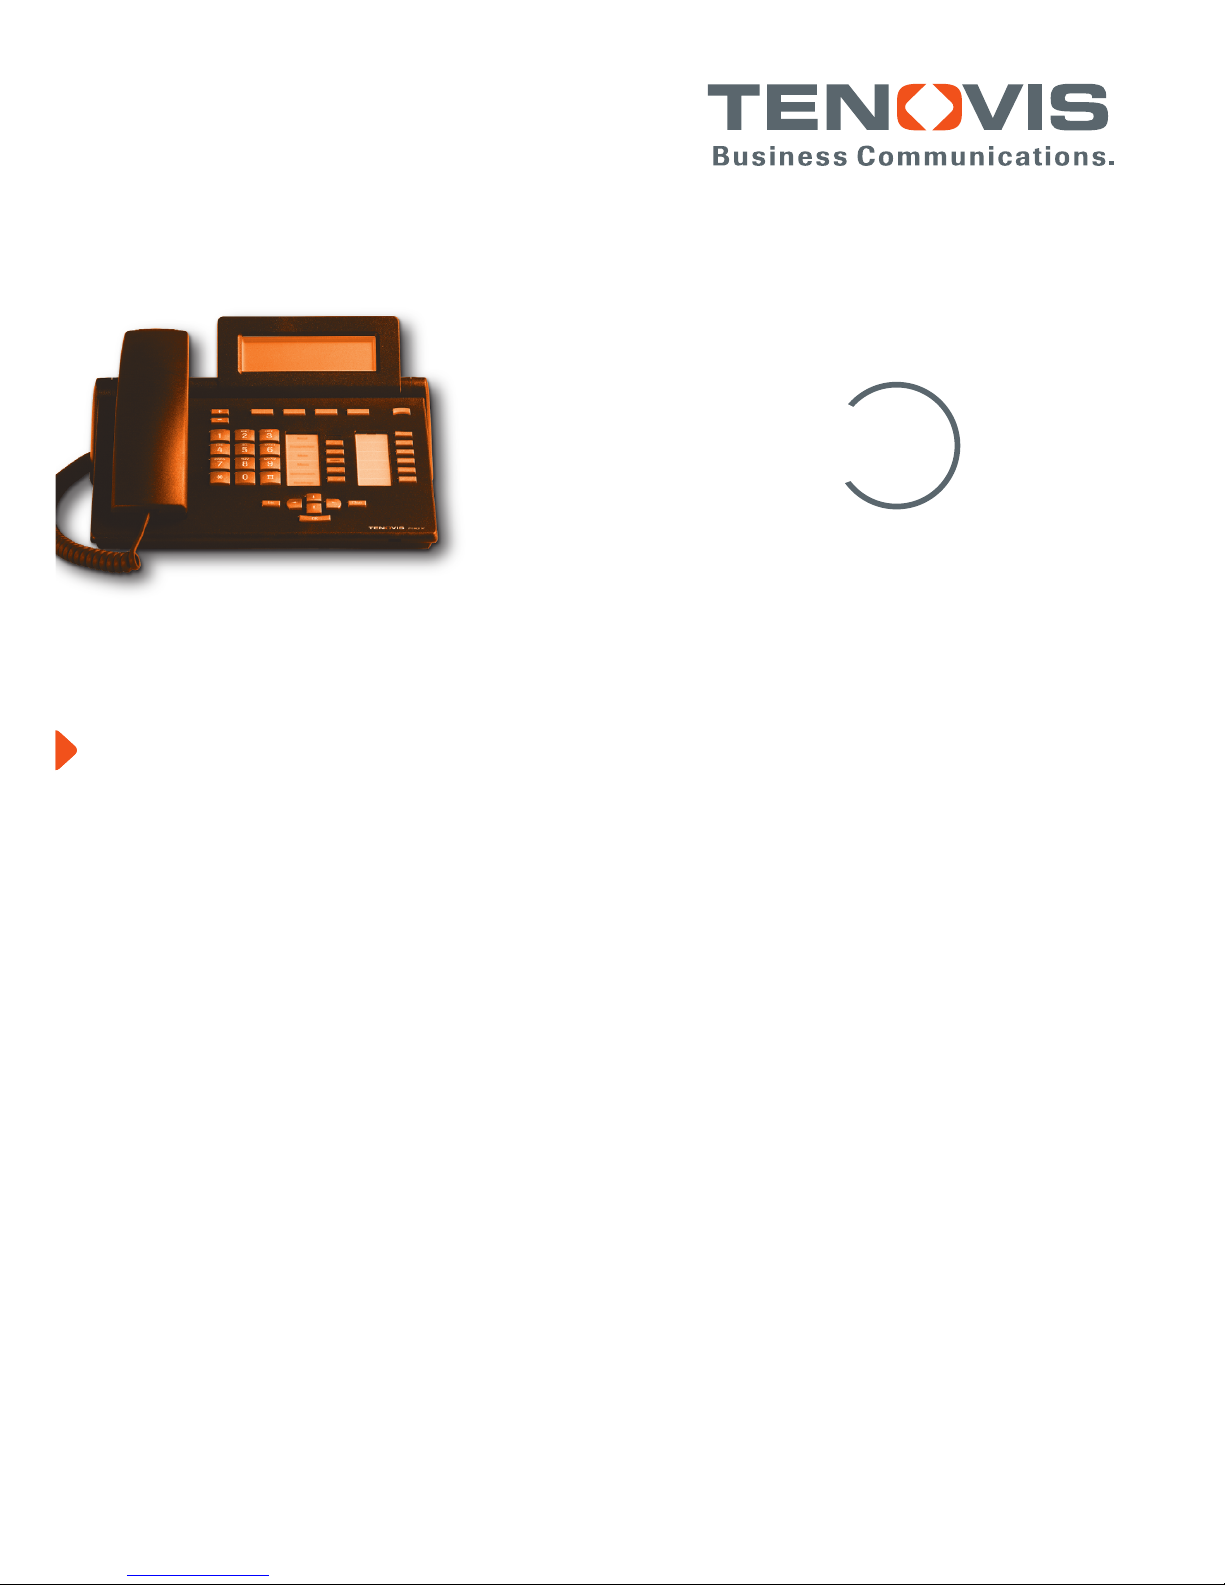
Your T3 Classic at a glance
Display Level switch for
display keys
Display keys for
destinations, functions,
partners and lines
Call display
Function keys,
partly with
illuminated
display
Escape
key
Clear
key
Arrow keys for
navigating the display
OK key
Number keys
with letters
Volume/
Contrast keys

Familiarise yourself with your telephone
7
All the keys at a glance
Number keys with letters:
To dial phone numbers and vanity numbers.
Star and hash:
For special functions
Escape:
Ends the current connection during a call. Otherwise an input is aborted (the
next higher menu level is then shown in the display).
Clear:
Deletes the character above the mark. If the mark is after the last character,
the last character is deleted. If the Clear key is held down for longer, the
characters entered last are cleared in order (as with a PC). This key can also
be used to delete entries in a list (e.g. in the call list or phonebook). This
functions in the following manner: First, select the entry and then press the
“Clear” key. The selected entry then begins to flash. If “OK” is pressed or
“Clear” is pressed again during this flashing phase, the entry is deleted.
Arrow up/down:
Moves the cursor up or down in the display.
+/--:
Increases or reduces the volume or the contrast.
Arrow left/right:
Moves the cursor to the left or right in the display.
Enter:
Opens a selected menu item or confirms an input.
Switch level:
Activates the next level for the display keys. If the key is pressed for a longer
period the display keys return to level 1.
Function keys:
4 display keys below the display.
8 freely-programmable function keys next to the number keypad, all with
LEDs.
3 permanently programmed function keys Menu, Repeat dial and Refer back.

Get to know your telephone
8
The display helps you
The displays guide you through operation step by step. The display gives you a lot
of information, e.g. about your current call.
The phone number of every external ISDN caller appears in the display providing he
has not switched off his phone number display. This allows you to see who is calling
If the name and phone number of the caller is saved in your phonebook, the name
is displayed when they call.
The 4 display keys can have different functions. You can read the current function of
each key in the display.

Get to know your telephone
9
Basic rules of operation
The following pages provide a short description of the basic operating rules
for your telephone:
Contents
Selecting functions in the menu 10.........................................
Cancelling or exiting an action 10..........................................
What does the idle display show? 10.......................................
Display keys 11..........................................................
Display keys on five levels 11..............................................
Entering text 12..........................................................
Appointment activated
Brown HagueWagner Howard
6745 No... Fr 08.06.01 08:26
Get to know your telephone
10
Continued
Basic rules of operation
Selecting functions in the menu
Press the “Menu” function key.
or Scroll to the desired menu item.
Confirm your selection. The selected function is displayed. A sub-menu
also appears in many cases. You can scroll in the sub-menu just as you can in the
menu. The relevant LED is lit for as long as you are in the menu.
Cancelling or exiting an action
If you have made an input or setting error:
Press (several times if necessary) to cancel the action. You then move up one
menu level or go to the idle display.
What does the idle display show?
The idle display shows:
-- Date and time
-- Your phone number and your name
(if set up)
-- additional information on the status of
your telephone, e. g. “Appointment
activated”.
Display keys
i
•Menu items or list entries that cannot be completely shown in the display due to
the length of the text, are abbreviated using “...”. However, you can scroll through
the whole text using the left arrow key and right arrow key.

Brown Hague
Wagner Howard
6745 No... Fr 08.06.01 08:26
Appointment activated
Get to know your telephone
11
Continued
Basic rules of operation
The display keys can have different
functions. You can read the current
function of each key in the display.
Example: “Brown”: The marked display key
canbeusedtocall“Brown”.
Display keys on five levels:
In each case, the display shows one level with 4 key assignments. However, you
can assign each key several times. You can assign destinations (levels 1 to 5),
functions (levels 1 to 5), partners (for partner functions, levels 1 to 3) and lines (for
Multiline, levels 1 to 3) to the display keys on the five levels.
If there is no entry in the right-hand display field, this tells you the level you are in
(e.g. “--3--” for level 3).
Press the Change level key to display the individual levels If the Switch level
key is held down, level 1 is activated again.

Get to know your telephone
12
Continued
Basic rules of operation
Entering text
You enter the desired text using the number keys with letters.
Using the following table, you can see how many times you have to press the
relevant key to get the desired character:
Key 12345678910 11
1? ! . , 1 ; : ¨ ’ ¿ ¡
2A
aB
bC
c2 Ä
äÁ
áÂ
âÀ
àÅ
åÇ
ç
3D
dE
eF
f3 É
éÊ
êÈ
èË
ë
4G
gH
hI
i4 Í
íÎ
îÌ
ìÏ
ï
5J
jK
kL
l5
6M
mN
nO
o6 Ñ
ñÖ
öÓ
óÔ
ôÒ
ò
7P
pQ
qR
rS
s7 ß
8T
tU
uV
v8 Ü
üÚ
úÛ
ûÙ
ù
9W
wX
xY
yZ
z9Ý
ý
0Spac
e
0 @ & % $ § _
** + -- = ( ) / \ < > #
#cap/
lc
Example: You want to enter the name “Bowyer” :
Press number key “2” twice: B
Press number key “6” six times: ö
Press number key “4” four times: h
Press number key “6” once: m

Get to know your telephone
13
Continued
Basic rules of operation
General key controls
-- Delete characters with the Clear key:
If the cursor is to the right of the text entered, the Clear key has a backspace
function (the characters entered are deleted from right to left).
If the cursor is within the text entered, pressing the Clear key deletes the marked
character and the character to the right moves back towards the left in its placed.
-- A “space” is entered using the “0” key (see table).
-- Switch between capitals/lower case with the # key:
The first letter and the letter after a space are automatically written as capitals.
The hash key # is used to switch permanently to capitals and is pressed again to
switch back to lower case (toggling).
-- If the whole of a text cannot be shown in the display, this is represented by “...”.
You can use the arrow keys and to scroll through the text.

Get to know your telephone
14
... telephoning made comfortable
You can make the following settings immediately or during your first telephone calls:
-- Adjust the ring and handset volume and the handsfree settings to your
surroundings.
-- Adjust the contrast of the display to the lighting conditions where you are
(see p. 67).
-- Save frequently used phone numbers in a personal phonebook You can change
the entries in your personal phonebook yourself (see p. 41).

Get to know your telephone
15
Initial operation of your telephone
Selecting the language for display and Minimail
When you use your telephone for the first time, you only have to select the
language for the display and Minimail texts.
Scroll to status message D/GB/F/I .
Confirm your selection.
Select desired language for display texts, e.g. Deutsch .
Confirm your selection.
Select desired language for Minimail texts, e.g. Deutsch .
Confirm your selection.
i
•You can change the language at any time later. You can find more details in the
Chapter “Audio, contrast and language settings”.

Telephoning as usual
16
Making a call
You can use the telephone as usual within and outside of your telephone system.
Internal: Dial the desired extension number directly.
External: Depending on the system, first dial the external line code, e.g. “0”.
You can call the last ten phone numbers dialled again (redial) and select frequently
used phone numbers using the destination keys.
You can have calls returned automatically in your telephone system when a busy
line is free again.
Contents
Calling within your telephone system 17.....................................
Calling outside your telephone system 17...................................
Making a call with a destination key 17......................................
In case of a busy signal (Automatic callback) 18..............................
Clear automatic callback 18...............................................
Repeatedly dialling a phone number 18.....................................

Telephoning as usual
17
Continued
Making a call
Calling within your telephone system
Enter phone number.
Lift the handset.
Calling outside your telephone system
Enter external line code, e.g. 0.
Enter phone number.
Lift the handset.
Making a call with a destination key
Press the destination key for the desired subscriber.
Lift the handset.
i
•Of course you can lift the handset first and then dial the number. However, in this
case you cannot correct an input error.
•If you do not want the other party to hear what you are saying, you can press the
“Mute” function key. If you press the relevant key again, they can hear you again.
•Instructions for assigning a phone number to a destination key can be found in
the Chapter “Assigning functions/phone numbers to keys”.

Telephoning as usual
18
Continued
Making a call
In case of a busy signal (Automatic callback)
The internal connection dialled is busy.
Press the “Callback” function key.
Replace the handset. Your telephone rings as soon as the other line is free.
Lift the handset. The other line is called automatically by the telephone
system.
Clear automatic callback
Press the “Callback” function key.
Scroll to the Delete callback menu item.
Confirm your selection.
Repeatedly dialling a phone number
The connection dialled is busy.
Scroll to the Automatic redial menu item.
Confirm your selection.
Replace the handset. Dialling is repeated up to nine times at intervals of
30 seconds. If you press any key or lift the handset, automatic redial will stop.

Telephoning as usual
19
Answering calls
You can lift the handset and speak with the caller as usual.
It is also possible to answer calls using the Handsfree key and then to telephone
with the handset cradled.
If another subscriber in your system receives a call, you can divert the call to your
phone (pick-up).
It is also possible not to answer calls immediately but to put them on hold. You can
then finish an operating procedure (e.g. editing a phonebook entry).
Contents
When you are called 20...................................................
When another telephone receives a call (Pick-up call) 20......................
Placing a call on hold 21..................................................

Telephoning as usual
20
Continued
Answering calls
When you are called
Your telephone rings. The call is shown in the display.
Lift the handset.
When another telephone receives a call (Pick-up call)
Another telephone rings.
Enter the number of the ringing telephone with the handset on the
cradle.
Scroll to the Pick-up call menu item.
Confirm your selection and wait until the call is signalled on your telephone.
Lift the handset.
i
•Telephoning without the handset: Press the “Monit./Handsfree” function key.
•Internal and external calls can be differentiated by the different ringing tones.
•If you do not want the other party to hear what you are saying, you can press the
“Mute” function key. If you press the relevant key again, they can hear you again.
•If your telephone system is set accordingly, you have another option for picking
up a call. All you have to do is enter a code. After lifting the handset, enter “*6”
for example for the “Pick-up call” function and then dial the number of the ringing
phone. You will then hear a special dial tone for approx. 1 second. The call is
then directly transferred.
Please contact your Tenovis service if your have any questions.
Table of contents
Other Tenovis Telephone manuals

Tenovis
Tenovis Integral T3 Compact User manual

Tenovis
Tenovis OS33 User manual

Tenovis
Tenovis TS 13 User manual

Tenovis
Tenovis Economy Integral TE 13 User manual

Tenovis
Tenovis Integral T3 Compact User manual

Tenovis
Tenovis Integral TH 13 User manual

Tenovis
Tenovis Integral TB 13 User manual

Tenovis
Tenovis Integral T3 User manual

Tenovis
Tenovis Integral T3 Compact User manual

Tenovis
Tenovis Integral TB 13 User manual


