COMPONENTS
2 3 4
HBS07 Blender Kit User Guide HBS07 Blender Kit User Guide HBS07 Blender Kit User Guide
thevessel to avoidsplashing the contents.
SAFETY GUIDE - PLEASE READ
$After each operation, allow the blender to cool for 3
CAREFULLY
minutesbefore using itagain.
Please follow all the safety precautions listed below for safety
$The blade on this blender is sharp. Treat it with care at all
andto reduce therisk of injuryor electrical shock. times and never allow fingers, hair, or clothing to come
$Read all the instructions carefully before using your intocontact with theblade.
blenderand keepthem for futurereference.
$If you wish to scrape the contents of the bowl with a spatula,
$Unplug the appliance from the mains supply when not in remove the blenderfirst.
use, when removing or attaching accessories, or before
$Do not process food containing hard objects which cannot
cleaningany part ofthe appliance. be safelybroken upby the blade.
$Thisappliance is foroccasional household useonly.
$Donot use theblender with hotliquids.
$Donot use outdoorsor in dampconditions.
$Do not yank or pull the cord as this may damage it and
$Do not immerse the motor unit or the electrical cord or plug eventually cause arisk ofelectricshock.
inliquids.
$To protect against fire, do not operate the unit in the
$Donot use neara source ofheat or onan unstable surface. presenceof explosiveand/orflammable fumes.
$Neverletchildren operate thisappliance. Close supervision
$Keeptheblender outofthe reachofchildren.
isnecessary when thisappliance is usednear children.
Additional instructions for using the whisk
$Ensure that the power cord does not touch any hot surface
andthatitdoesnotoverhangtheedgeofyourworksurface. $Treat the whisk with care. The wire hoops are fragile - do
$When unplugging the power cord, hold the plug top, not not bendordistortthem.
thepower cord. $If the wire hoops are bent or the whisk becomes
$Do not operate any appliance with a damaged cord or plug unbalanced, stop using the product. An unbalanced whisk is
or after the appliance malfunctions, or is dropped or potentiallydangerousandcoulddamagethe motor.
damaged in any manner. Return appliance to the nearest $Only use the whisk with liquids, creams, egg whites, etc. If
authorized service facility for examination, repair or you want to cream using butter or solid fats, make sure they
electricalor mechanical adjustment. areverysoft beforestarting,or usethe blenderattachment.
$Do not use attachments or accessories which are not $Do notadd solidingredientsintoa mixture whenwhisking.
recommended by the manufacturer. They may cause $Supportthejugorbowl.
malfunctionor injury. Additional instructions for using the chopper
$Do not attempt to replace the power cord on this appliance.
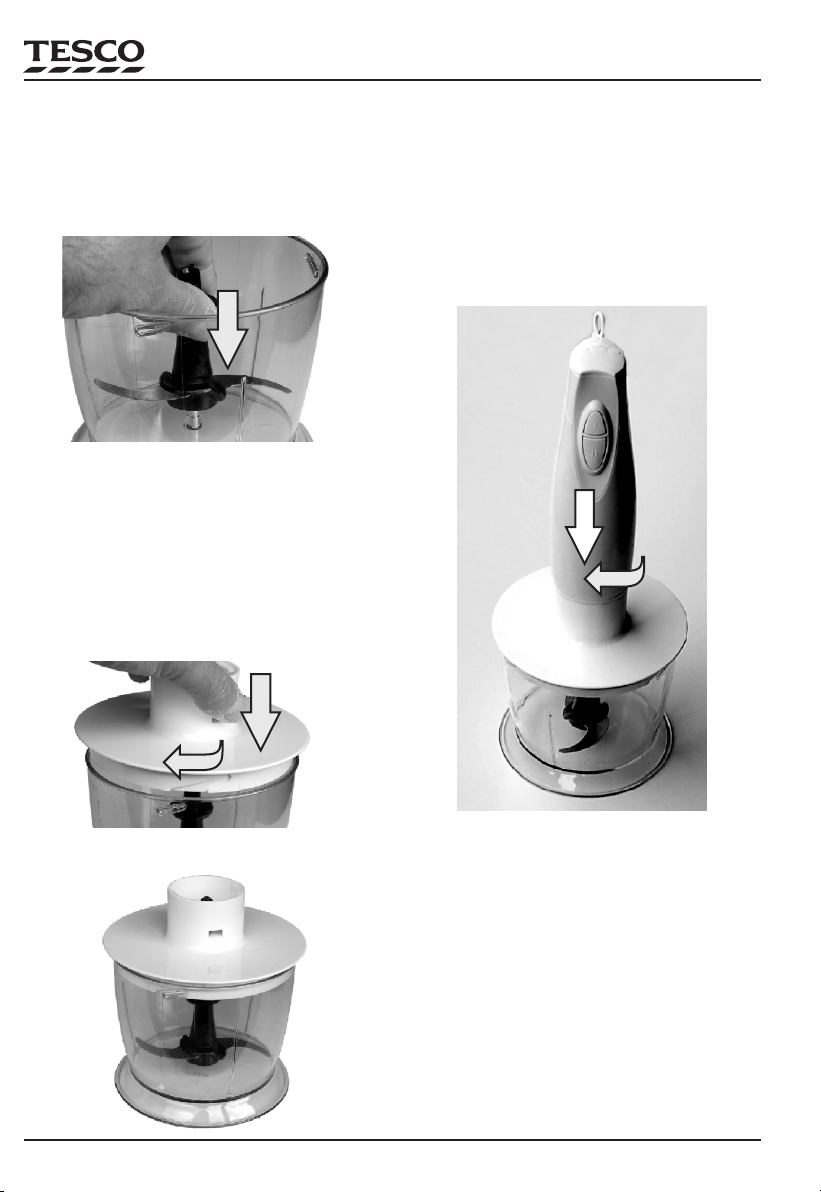
$Exercisecarewhen handling theblade assembly.The sharp
This should only be carried out by authorised service
edge may cause injury. When inserting or removing the
personnelwith specialist tools.
blade,hold the assemblyby the shaft.
$Store the processor away from direct sunlight and out of
$Ensure the lid is securely locked in place before operating
thereach of children.
theappliance.
$There are no user serviceable parts in your appliance
$When filling or emptying the processor bowl, switch off the
Unauthorised dismantling or servicing will void the blender and detach it from the lid before opening the lid to
productwarranty. addor removeingredients.
$Do not use the appliance for any purpose not expressly
$Donot chop meatwith bones orfruits with hard stones.
specifiedin this manual.
$If the chopper gets clogged, switch off, unplug from the
When operating your blender and attachments: mains and detach the motor from the lid before clearing
Using the blender: theobstruction.
$Make sure the appliance is on a sturdy work surface. Use
$When the blender is not in use make sure that it is safely
bothhands to holdthe appliance.
unpluggedfrom the mainssupply.
$To reduce the risk of injury, never place the cutting blade on
basewithout first puttingthebowl properlyinplace.
$When using the blender ensure there is adequate room in
NOTE: Never process very hot liquids. This is dangerous.
DANGEROF SCALDING!
PRELIMINARIES yourmainsvoltage:
$Please read all the instructions in this User Guide with
Unpacking particularreferencetothesafetynotes.
Unpackyourblendercarefully.Inthecartonyoushouldfind:
$Clean the blender. Refer to the cleaning notes pn Page 6
$HandBlenderMotor forinstructions.
$BlenderWand Important Note:
$Whisk
$The maximum time you can run the unit with no load is 15
$WhiskJug seconds.
$Chopper:ThisconsistsoftheBowl,Lid,Bladeassembly.
$The blender is a two speed unit: When using the
$Onewallbracketfor housing the assembled blender. blender at high speed the maximum time you can run the
If any items are missing or damaged return the item to your unit is 1 minute. After each minute of continuous use,
nearest Tesco store for replacement. Please have your receipt switch off and let the motor rest for a further three minutes
withyouwhenyoucall. beforecontinuing.
Retainthepackaging. If you dispose of the packaging do so with $Blades are very sharp, handle them with care.
regardtoanyrecyclingregulationsinyourarea.
$Ensure that the blender motor is unplugged from the
Before using your blender for the first time: power outlet before assembling or removing
$Check that the voltage marked on the rating plate matches attachments.
ASSEMBLY AND USE
BLENDER AND WHISK
The blender and the whisk are both hand
held appliances.
To attach the motor:
$Makesurethemotor isunplugged.
$Hold the motor in one hand and the attachment in the
other.
$Push the attachment against the motor and rotate the
motorclockwisetolockthemotorandtheattachment.
$Make sure the attachment is firmly locked to the motor
beforeuse.
$Now plug in the whisk or hand blender and switch
the power on at the mains socket to use the
appliance.
To detach the motor:
$Unplugtheappliance.
$Hold the motor in one hand and the attachment in the
other. Rotate the motor anti-clockwise to separate the
motorandtheattachment.
Using the hand blender
Introducetheblenderintothefoodbeforeswitchingitontoavoidsplashing.
Press and hold down the appropriate button to switch the blender on. Release the button to switch the unit off.
Use the slow speed where possible especially when you commence blending or if you are smoothing out lumps
or reducing food to a puree. The high speed can be used as a finishing touch or when a particularly fine mix is
needed.
NEVER use the blender in a vessel while it is being heated on the stove. NEVER let the base of the blade
housingcomeintoprolongedcontactwiththebodyofavesselwhileblending.
Using the whisk
Youmay use thesupplied measuring jug to whisk ingredients such as egg white, light batters, creametc. If you
arewhiskingeggwhite,thejugwillaccommodatetwoeggwhites-usealargebowlforextraamounts.
Press and hold down the appropriate button to switch on. Introduce the whisk into the food before switching it
on to avoid splashing. Use the slow speed where possible -the high speed can be used as a finishing touch.
Releasethebuttontoswitchtheunitoff.
NEVERletthewiresofthewhiskcomeintoprolongedcontactwiththebodyofavesselwhileblending.
Theblenderisidealformakingpurees,coldsauces,mayonnaise,orevenformixingdrinks.
Blender Motor
Whisk
Blender
Wand
Jug
Chopper
Bracket
WHISK
LOOSEN
TIGHTEN
BLENDER
STEM
MOTOR
Low Speed
High Speed