TFA 60.2505 User manual

Kat. Nr. 60.2505
Bedienungsanleitung
Operating Instructions
Mode d’emploi
Istruzioni
Instrucciones para el manejo
Gebruiksaanwijzing
TFA_No. 60.2505 Anleitung_11_19 12.11.2019 14:48 Uhr Seite 1

32
Fig. 1
A
C
B
D
E
F G
H I J K
Fig. 2
TFA_No. 60.2505 Anleitung_11_19 12.11.2019 14:48 Uhr Seite 2

Funkwecker
54
Vielen Dank, dass Sie sich für dieses Gerät aus dem Hause TFA entschieden haben.
1. Bevor Sie mit dem Gerät arbeiten
•Lesen Sie sich bitte die Bedienungsanleitung genau durch.
So werden Sie mit Ihrem neuen Gerät vertraut, lernen alle Funktionen und Bestandteile
kennen, erfahren wichtige Details für die Inbetriebnahme und den Umgang mit dem
Gerät und erhalten Tipps für den Störungsfall.
•Durch die Beachtung der Bedienungsanleitung vermeiden Sie auch Beschädigungen
des Gerätes und die Gefährdung Ihrer gesetzlichen Mängelrechte durch Fehlge-
brauch. Für Schäden, die aus Nichtbeachtung dieser Bedienungsanleitung verur-
sacht werden, übernehmen wir keine Haftung.
•Beachten Sie besonders die Sicherheitshinweise!
•Bewahren Sie diese Anleitung gut auf!
2. Lieferumfang
• Wecker • Batterien 3 x 1,5 V AAA
• Netzteil • Bedienungsanleitung
3. Einsatzbereich und alle Vorteile Ihres neuen Gerätes auf einen Blick
• Funkuhr mit höchster Genauigkeit
• Große, rote LED-Leuchtziffern
• Zeitzone und manuelle Einstellmöglichkeit
• Kalenderanzeige (Monat, Tag)
• Weckalarm mit Schlummerfunktion
Fig. 3
M
L N
TFA_No. 60.2505 Anleitung_11_19 12.11.2019 14:48 Uhr Seite 3

Funkwecker
Funkwecker
76
• Verlegen Sie das Netzkabel so, dass es nicht mit scharfkantigen oder heißen Gegen-
ständen in Berührung kommt.
Vorsicht!
Verletzungsgefahr!
• Bewahren Sie das Gerät und die Batterien außerhalb der Reichweite von Kindern auf.
• Batterien enthalten gesundheitsschädliche Säuren und können bei Verschlucken
lebensgefährlich sein. Wurde eine Batterie verschluckt, kann dies innerhalb von 2
Stunden zu schweren inneren Verätzungen und zum Tode führen. Wenn Sie vermuten,
eine Batterie könnte verschluckt oder anderweitig in den Körper gelangt sein, nehmen
Sie sofort medizinische Hilfe in Anspruch.
• Batterien nicht ins Feuer werfen, kurzschließen, auseinander nehmen oder aufladen.
Explosionsgefahr!
• Um ein Auslaufen der Batterien zu vermeiden, sollten schwache Batterien möglichst
schnell ausgetauscht werden. Verwenden Sie nie gleichzeitig alte und neue Batterien
oder Batterien unterschiedlichen Typs.
• Beim Hantieren mit ausgelaufenen Batterien chemikalienbeständige Schutzhandschuhe
und Schutzbrille tragen!
Wichtige Hinweise zur Produktsicherheit!
• Stellen Sie keine Gegenstände auf das Gerät.
• Setzen Sie das Gerät keinen extremen Temperaturen, Vibrationen und Erschütterungen
aus.
4. Zu Ihrer Sicherheit
• Das Produkt ist ausschließlich für den oben beschriebenen Einsatzbereich geeignet.
Verwenden Sie das Produkt nicht anders, als in dieser Anleitung beschrieben wird.
• Das eigenmächtige Reparieren, Umbauen oder Verändern des Gerätes ist nicht gestat-
tet.
Vorsicht!
Lebensgefahr durch Stromschlag!
• Schließen Sie das Basisgerät nur an eine vorschriftsmäßig installierte Steckdose mit
einer Netzspannung von 230V an!
• Die Steckdose muss nahe der Einrichtung angebracht und leicht zugänglich sein.
• Das Basisgerät und das Netzteil dürfen nicht mit Wasser oder Feuchtigkeit in Kontakt
kommen. Nur für den Betrieb in trockenen Innenräumen geeignet.
• Benutzen Sie das Gerät nicht, wenn Gehäuse oder Netzteil beschädigt sind.
• Bewahren Sie das Gerät außerhalb der Reichweite von Personen (auch Kindern) auf,
die mögliche Gefahren im Umgang mit elektrischen Geräten nicht richtig einschätzen
können.
• Ziehen Sie sofort den Stecker aus der Steckdose, wenn eine Störung auftritt oder das
Gerät für längere Zeit nicht benutzt wird.
• Verwenden Sie ausschließlich das mitgelieferte Netzteil.
• Ziehen Sie den Netzstecker nicht am Kabel aus der Steckdose.
TFA_No. 60.2505 Anleitung_11_19 12.11.2019 14:48 Uhr Seite 4

Funkwecker
Funkwecker
98
• Der Empfang wird zwischen 1.00 bis 5.00 Uhr erneut aktiviert.
Achtung: Während des Empfangs des DCF-Signals ist die Anzeige vorübergehend aus-
geschaltet.
• Sie können die Initialisierung auch manuell starten. Halten Sie den WAVE Knopf im
Batteriefach gedrückt (ca. 3 Sek.). Die Funkuhr versucht nun das DCF Signal zu emp-
fangen.
• Falls die Funkuhr kein DCF-Signal empfangen kann (z.B. wegen Störungen, Übertra-
gungsdistanz, etc.), kann die Zeit manuell eingestellt werden. Die Uhr arbeitet dann wie
eine normale Quarz-Uhr (siehe 7.1 Manuelle Einstellung von Uhrzeit, Zeitzone und
Kalender).
6.1 Empfang der Funkzeit
Die Zeitübertragung erfolgt von einer Cäsium Atom-Funkuhr, die von der Physikalisch
Technischen Bundesanstalt in Braunschweig betrieben wird. Die Abweichung beträgt
weniger als 1 Sekunde in einer Million Jahren. Die Zeit ist kodiert und wird von Mainflin-
gen in der Nähe von Frankfurt am Main durch ein DCF-77 (77.5 kHz) Frequenzsignal über-
tragen mit einer Reichweite von ca. 1.500 km. Ihr Funkwecker empfängt das Signal, wan-
delt es um und zeigt immer die exakte Zeit an. Auch die Umstellung von Sommer- und
Winterzeit erfolgt automatisch. Der Empfang hängt hauptsächlich von der geographi-
schen Lage ab. Im Normalfall sollten innerhalb des Radius von 1.500 km ausgehend von
Frankfurt bei der Übertragung keine Probleme auftauchen.
Bitte beachten Sie folgende Hinweise:
• Es wird empfohlen, einen Abstand von mindestens 1,5 – 2 Metern zu eventuell stören-
den Geräten wie Computerbildschirmen und Fernsehgeräten einzuhalten.
5. Bestandteile
LCD-Anzeige (Fig. 1)
A: Uhrzeit / Datum B: Alarmsymbol
C: PM (bei 12-Stundenanzeige) D: DST (Sommerzeit / Daylight Saving Time)
E: Funksignal F: DATE (bei Datumsanzeige)
Tasten (Fig. 2+3)
G: SNOOZE/BRIGHTNESS Taste H: ALARM Taste
I: SET Taste J: UP Taste
K: DOWN Taste L: WAVE Knopf
Gehäuse (Fig. 2+3)
M: Batteriefach N: Netzstecker
6. Inbetriebnahme
• Ziehen Sie die Schutzfolie vom Display.
• Legen Sie die drei Batterien (3 x 1,5 V AAA) polrichtig ein. Stecken Sie den Stecker in
eine Steckdose. Ein kurzer Signalton ertönt und alle Segmente werden für ca. 2 Sekun-
den angezeigt. Die Batterien fungieren im Falle eines Stromausfalls als Back-up-Batte-
rien.
•Wichtig! Stellen Sie sicher, dass Ihre Netzspannung nicht mehr als 230 V beträgt!
Andere Netzspannungen können zur Beschädigung des Instrumentes führen.
• Das DCF-Empfangszeichen leuchtet auf und die Uhr versucht nun, das Funksignal zu
empfangen. Wenn der Zeitcode nach 3-10 Minuten empfangen wurde, wird die funkge-
steuerte Zeit angezeigt und das DCF-Empfangszeichen bleibt ständig im LCD stehen.
TFA_No. 60.2505 Anleitung_11_19 12.11.2019 14:48 Uhr Seite 5

Funkwecker
Funkwecker
1110
• Bei erfolgreichem Empfang des DCF-Signals wird die manuell eingestellte Zeit über-
schrieben.
• Mit der SET Taste können Sie zwischen Uhrzeit und Datum (DATE erscheint im Display)
wechseln.
7.2 12- und 24 Stunden-Anzeige
• Mit der DOWN Taste können Sie im Normalmodus das 12- oder 24-Stunden-Zeitsy-
stem auswählen.
• Im 12-h-System erscheint auf dem Display PM (nach 12 Uhr).
7.3 Einstellung des Weckalarms
• Halten Sie die ALARM Taste gedrückt.
• Auf dem Display blinkt .
• Die Stundenanzeige fängt an zu blinken und Sie können mit der UP oder DOWN Taste
die Stunden einstellen.
• Drücken Sie noch einmal die ALARM Taste und Sie können nun die Minuten mit der UP
oder DOWN Taste einstellen.
• Bestätigen Sie mit der ALARM Taste.
• Auf dem Display erscheint die aktuelle Uhrzeit.
• Drücken Sie die ALARM Taste noch einmal und die Alarm-Funktion ist aktiviert.
• erscheint auf dem Display.
• Wenn der Wecker klingelt (3 verschiedene Alarmstufen), beenden Sie den Alarm mit
einer beliebigen Taste.
• Die Snooze-Funktion lösen Sie mit der SNOOZE/BRIGHTNESS Taste an der Oberseite
aus.
• In Stahlbetonbauten (Kellern, Aufbauten) ist das empfangene Signal natürlicherweise
schwächer. In Extremfällen wird empfohlen, das Gerät in Fensternähe zu platzieren
und/oder durch Drehen das Funksignal besser zu empfangen.
• Nachts sind die atmosphärischen Störungen meist geringer und ein Empfang ist in den
meisten Fällen möglich. Ein einziger Empfang pro Tag genügt, um die Genauigkeit zu
gewährleisten und Abweichungen unter 1 Sekunde zu halten.
• Sobald der Wecker das Funksignal empfangen hat, können Sie die Weckzeit einstellen
(siehe 7.3 Einstellung des Weckalarms).
7. Bedienung
•Wichtig: Während des Empfangs des Funksignals ist eine Bedienung der Tasten nicht
möglich.
• Das Gerät verlässt automatisch den Einstellmodus, wenn länger als 20 Sekunden keine
Taste gedrückt wird.
• Halten Sie die UP oder DOWN Taste im Einstellmodus gedrückt, gelangen Sie in den
Schnelllauf.
7.1 Manuelle Einstellung von Uhrzeit, Zeitzone und Kalender
• Halten Sie die SET Taste im Normalmodus gedrückt. 00 fängt an zu blinken und Sie
können mit der UP oder DOWN Taste die Zeitzone (+12/-12) einstellen.
• Die Zeitzoneneinstellung wird benötigt, wenn das DCF Signal empfangen werden kann,
die Zeitzone sich aber von der DCF-Zeit unterscheidet.
• Drücken Sie die SET Taste und Sie können nun nacheinander die Stunden, die Minuten,
das Jahr, den Monat und den Tag ansteuern und mit der UP oder DOWN Taste einstellen.
• Bestätigen Sie mit der SET Taste.
TFA_No. 60.2505 Anleitung_11_19 12.11.2019 14:48 Uhr Seite 6

Funkwecker
Funkwecker
1312
Wenn Ihr Gerät trotz dieser Maßnahmen immer noch nicht funktioniert, wenden Sie sich
an den Händler, bei dem Sie das Produkt gekauft haben.
10. Entsorgung
Dieses Produkt wurde unter Verwendung hochwertiger Materialien und Bestandteile her-
gestellt, die recycelt und wiederverwendet werden können.
Batterien und Akkus dürfen keinesfalls in den Hausmüll!
Als Verbraucher sind Sie gesetzlich verpflichtet, gebrauchte Batterien und
Akkus zur umweltgerechten Entsorgung beim Handel oder entsprechenden
Sammelstellen gemäß nationaler oder lokaler Bestimmungen abzugeben.
Die Bezeichnungen für enthaltene Schwermetalle sind:
Cd=Cadmium, Hg=Quecksilber, Pb=Blei
Dieses Gerät ist entsprechend der EU-Richtlinie über die Entsorgung von
Elektro- und Elektronik-Altgeräten (WEEE) gekennzeichnet.
Dieses Produkt darf nicht mit dem Hausmüll entsorgt werden. Der Nutzer ist
verpflichtet, das Altgerät zur umweltgerechten Entsorgung bei einer ausge-
wiesenen Annahmestelle für die Entsorgung von Elektro- und Elektronikge-
räten abzugeben.
11. Technische Daten
Spannungsversorgung: Batterien 3 x 1,5 V AAA, Netzstecker DC 4,5 V
• blinkt und der Alarmton wird für 4 Minuten unterbrochen.
• Um die Alarm-Funktion zu deaktivieren, drücken Sie noch einmal die ALARM Taste.
7.4 Beleuchtung
• Mit der SNOOZE/BRIGHTNESS Taste können Sie die Helligkeit der Displaybeleuchtung
in zwei Stufen verändern.
8. Pflege und Wartung
• Reinigen Sie das Gerät mit einem weichen, leicht feuchten Tuch. Keine Scheuer- oder
Lösungsmittel verwenden! Vor Feuchtigkeit schützen.
• Entfernen Sie die Batterien, wenn Sie das Gerät längere Zeit nicht verwenden.
• Bewahren Sie Ihr Gerät an einem trockenen Platz auf.
9. Fehlerbeseitigung
Problem Fehlerbeseitigung
Keine Anzeige ➜ Gerät mit Netzadapter anschließen
Kein DCF Empfang ➜WAVE Knopf im Batteriefach gedrückt halten
(ca. 3 Sek.)
➜Uhrzeit manuell einstellen
➜Empfangsversuch in der Nacht abwarten
Unkorrekte Anzeige ➜Neuinbetriebnahme
TFA_No. 60.2505 Anleitung_11_19 12.11.2019 14:48 Uhr Seite 7

Radio-controlled clock
Funkwecker
1514
Thank you for choosing this instrument from TFA.
1. Before you use this product
•Please make sure you read the instruction manual carefully.
This information will help you to familiarise yourself with your new device, learn all of
its functions and parts, find out important details about its first use and how to operate
it, and get advice in the event of faults.
•Following the instruction manual for use will prevent damage to the device and loss
of your statutory rights arising from defects due to incorrect use. We shall not be
liable for any damage occurring as a result of not following these instructions.
•Please take particular note of the safety advice!
•Please keep this instruction manual safe for future reference.
2. Delivery contents
• Alarm clock
• Batteries 3 x 1,5 V AAA
• AC/DC power adaptor
• Instruction manual
3. Field of operation and all of the benefits of your new instrument at a glance
• Highest precision radio-controlled clock
• Large, red LED digits
• With time zone and manual setting option
• Calendar (date, month)
• Alarm with snooze function
Gehäusemaße: 78 x 170 x 110 mm
Gewicht: 375 g (mit Batterien und Netzteil)
Diese Anleitung oder Auszüge daraus dürfen nur mit Zustimmung von TFA Dostmann veröffentlicht
werden. Die technischen Daten entsprechen dem Stand bei Drucklegung und können ohne vorherige
Benachrichtigung geändert werden.
Die neuesten technischen Daten und Informationen zu Ihrem Produkt finden Sie auf unserer Homepa-
ge unter Eingabe der Artikel-Nummer in das Suchfeld.
EU-KONFORMITÄTSERKLÄRUNG
Hiermit erklärt TFA Dostmann, dass der Funkanlagentyp 60.2505 der Richtlinie 2014/53/EU entspricht.
Der vollständige Text der EU-Konformitätserklärung ist unter der folgenden Internetadresse verfügbar:
www.tfa-dostmann.de/service/downloads/ce
www.tfa-dostmann.de
E-Mail: [email protected]
TFA Dostmann GmbH & Co.KG, Zum Ottersberg 12, D-97877 Wertheim, Deutschland 11/19
TFA_No. 60.2505 Anleitung_11_19 12.11.2019 14:48 Uhr Seite 8

Radio-controlled clock
1716
Caution!
Risk of injury!
• Keep this instrument and the batteries out of the reach of children.
• Batteries contain harmful acids and may be hazardous if swallowed. If a battery is
swallowed, this can lead to serious internal burns and death within two hours. If you
suspect a battery could have been swallowed or otherwise caught in the body, seek
medical help immediately.
• Batteries must not be thrown into a fire, short-circuited, taken apart or recharged. Risk
of explosion!
• Low batteries should be changed as soon as possible to prevent damage caused by
leaking.
• Wear chemical-resistant protective gloves and safety glasses when handling leaking
batteries.
Important information on product safety!
• Do not place any objects on the device.
• Do not place the unit near extreme temperatures, vibrations or shocks.
5. Elements
LCD (Fig. 1)
A: Clock / Date B: Alarm symbol
C: PM (for 12-HR-system) D: DST (Daylight Saving Time)
E: DCF signal F: DATE (for date display)
4. For your safety
• This product is exclusively intended for the field of application described above. It
should only be used as described within these instructions.
• Unauthorised repairs, modifications or changes to the product are prohibited.
Caution!
Risk of electrocution!
• Plug the device only into a socket installed in regulation manner and with a mains vol-
tage of 230V!
• The mains socket must be installed near the equipment and it must be easily accessi-
ble.
• The device and the mains adapter must not come into contact with water or moisture.
Only suitable for operation in dry interiors.
• Do not use the unit if the housing or the main adapter is damaged.
• Keep the unit out of reach of persons (including children) who cannot fully appreciate
the potential risks of handling electrical equipment.
• Pull the plug out of the socket immediately if any fault occurs or if the unit is not used
for a lengthy period.
• Only use the supplied mains adapter.
• Do not pull the plug out of the socket by its lead.
• Route the mains lead so that it does not come into contact with sharp-edged or hot
objects.
TFA_No. 60.2505 Anleitung_11_19 12.11.2019 14:48 Uhr Seite 9

Radio-controlled clock
1918
• If the clock cannot detect the DCF-signal (for example due to disturbances, transmit-
ting distance, etc.), the time can be set manually. The clock will then work as a normal
quartz clock. (see 7.1 Manual setting of clock, time zone and calendar).
6.1 Radio-controlled time reception
The time base for the radio-controlled time is a caesium atomic clock operated by the
Physikalisch Technische Bundesanstalt Braunschweig. It has a time deviation of less than
one second in one million years. The time is coded and transmitted from Mainflingen
near Frankfurt via frequency signal DCF-77 (77.5 kHz) and has a transmitting range of
approximately 1,500 km. Changeover from summer time or winter time are automatic.
The quality of the reception depends mainly on the geographic location. Normally there
should be no reception problems within a 1,500 km radius around Frankfurt.
Please take note of the following:
• The recommended distance to any interfering sources like computer monitors or TV
sets is at least 1.5 - 2 metres.
• Inside ferro-concrete rooms (basements, superstructures), the received signal is natu-
rally weakened. In extreme cases, please place the unit close to a window to improve
the reception.
• During nighttime, the atmospheric interference is usually less severe and reception is
possible in most cases. A single daily reception is adequate to keep the accuracy devi-
ation below 1 second.
• After the reception of the radio-controlled time you can set the alarm time (see 7.3
Setting of alarm clock).
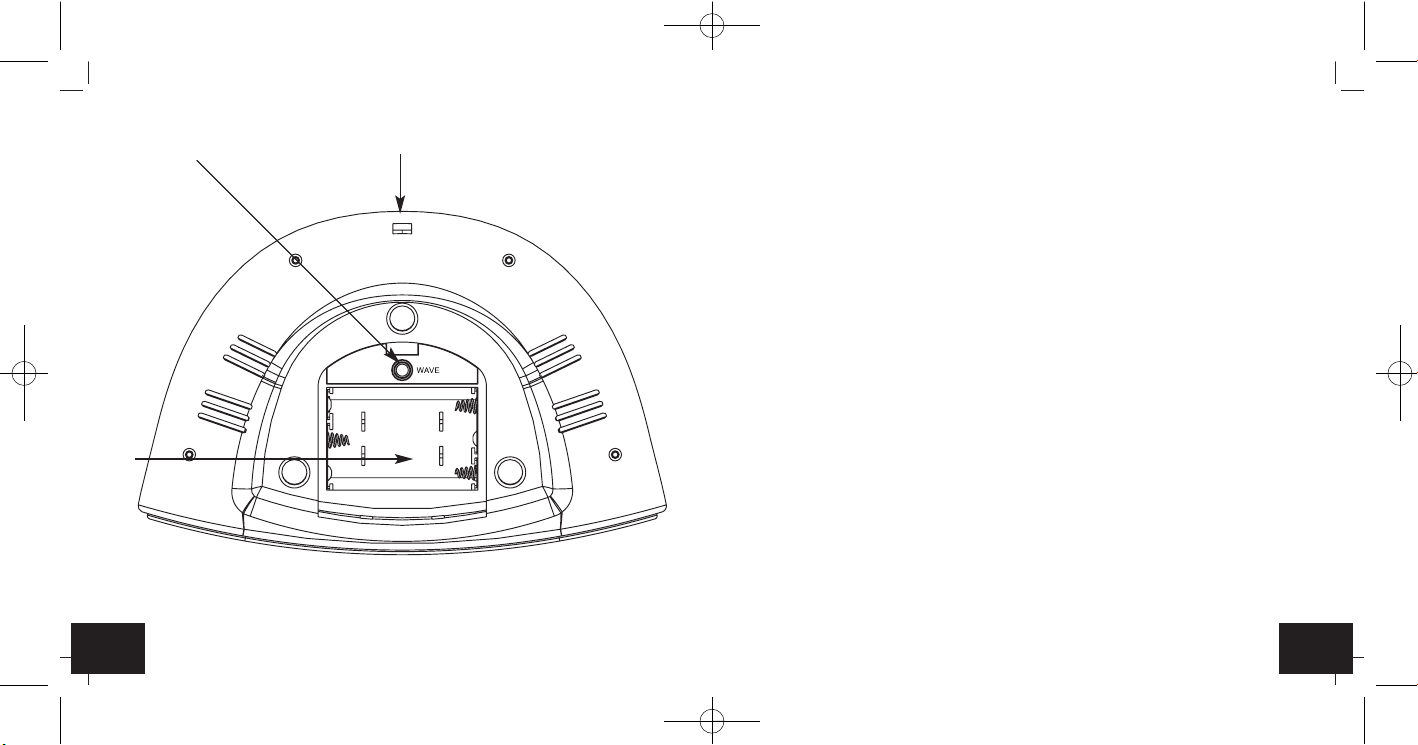
Buttons (Fig. 2+3)
G: SNOOZE/BRIGHTNESS button H: ALARM button
I. SET button J: UP button
K: DOWN button L: WAVE button
Housing (Fig. 2+3)
M: Battery compartment N: Power adapter
6. Getting started
• Pull off the protection foil on the display.
• Insert the three batteries (3 x 1,5 V AAA). Ensure batteries polarity are correct. Connect
the power adapter to a wall socket. A brief beep tone will sound and all LCD segments
will light up for about 2 seconds. The batteries will operate as a backup power source
in case of power failure.
•Important! Make sure that your household voltage is 230V! Otherwise your clock may
be damaged.
• The clock will now scan the DCF frequency signal and the DCF symbol flashes on the
LCD. When the time code is received successfully after 3-10 minutes, the radio-con-
trolled time is displayed and the date and the DCF symbol are displayed steadily in the
LCD.
• If the reception fails, scanning stops and will be repeated between 1.00 and 5.00 am.
Important: The display will be switched off while scanning the DCF signal.
• Manual initialization can be helpful. Press and hold WAVE button for 3 seconds. The
clock will scan the DCF frequency signal.
TFA_No. 60.2505 Anleitung_11_19 12.11.2019 14:48 Uhr Seite 10

Radio-controlled clock
2120
• The hour digit is flashing. Press UP or DOWN button to adjust the hours.
• Press ALARM button again and you can adjust the minutes with the UP or DOWN but-
ton.
• Confirm with ALARM button.
• The display shows the current time.
• Press ALARM button again and the alarm function is activated.
• appears on the display.
• Once the alarm starts to ring (3 different sounds), you can stop the alarm by pressing
any button.
• You can activate the snooze function by pressing the SNOOZE/BRIGHTNESS button on
the top.
• flashes and the alarm will be interrupted for 4 minutes.
• To turn off the alarm function, press again the ALARM button.
7.4 Backlight
• To activate the brightness of the backlight (2 levels), press SNOOZE/BRIGHTNESS
button.
8. Care and maintenance
• Clean it with a soft damp cloth. Do not use solvents or scouring agents. Protect from
moisture.
• Remove the batteries if the device will not be used for an extended period of time.
• Keep the instrument in a dry place.
7. Operation
•Important: Buttons will not function while scanning DCF signal.
• The instrument will automatically quit the setting mode if no button is pressed within
20 seconds.
• Press and hold UP or DOWN button in the setting mode for fast running.
7.1 Manual setting of clock, time zone and calendar
• Press and hold SET button in normal mode. 00 is flashing. Press UP or DOWN
buttons the time zone (+12/-12).
• The time zone setting is needed for countries where the DCF signal can be received but
the time zone is different from the German time.
• Press SET button to make the settings in the following sequence: Hours, minutes, year,
month and day. Press UP or DOWN button to adjust it.
• Confirm with SET button.
• The manually set time will be overwritten by the DCF time when the signal is received
successfully
• Press SET button to change between time and date (DATE appears on the display).
7.2 12 and 24 hours system indication
• Press DOWN button in normal mode to choose 12 HR or 24 HR system.
• In 12 HR system PM (after 12 o'clock) appears on the display.
7.3 Setting of alarm clock
• Press and hold ALARM button.
• flashes on the LCD of the display.
TFA_No. 60.2505 Anleitung_11_19 12.11.2019 14:48 Uhr Seite 11

Radio-controlled clock
2322
This instrument is labelled in accordance with the EU Waste Electrical and
Electronic Equipment Directive (WEEE).
Please do not dispose of this instrument in household waste. The user is
obligated to take end-of-life devices to a designated collection point for the
disposal of electrical and electronic equipment, in order to ensure environ-
mentally-compatible disposal.
11. Specifications
Power consumption: Batteries 3 x 1.5 V AAA, power adapter DC 4.5 V
Housing dimension: 78 x 170 x 110 mm
Weight: 375 g (with batteries and adapter)
No part of this manual may be reproduced without written consent of TFA Dostmann. The technical
data are correct at the time of going to print and may change without prior notice. The latest technical
data and information about this product can be found in our homepage by simply entering the product
number in the search box.
EU declaration of conformity
Hereby, TFA Dostmann declares that the radio equipment type 60.2505 is in compliance with Directive
2014/53/EU. The full text of the EU declaration of conformity is available at the following Internet
address: www.tfa-dostmann.de/service/downloads/ce
www.tfa-dostmann.de
E-Mail: [email protected]
TFA Dostmann GmbH & Co.KG, Zum Ottersberg 12, D-97877 Wertheim, Germany 11/19
9. Troubleshooting
Problems Solution
No indication ➜ Connect unit to main adapter
No DCF reception ➜Press WAVE button for 3 seconds
➜Manual time setting
➜Wait for attempted reception during the night
Incorrect indication ➜Reset the instrument
If your device fails to work despite these measures contact the supplier from whom you
purchased it.
10. Waste disposal
This product has been manufactured using high-grade materials and components which
can be recycled and reused.
Never dispose of empty batteries and rechargeable batteries in household
waste.
As a consumer, you are legally required to take them to your retail store or
to appropriate collection sites depending on national or local regulations in
order to protect the environment.
The symbols for the heavy metals contained are:
Cd=cadmium, Hg=mercury, Pb=lead
TFA_No. 60.2505 Anleitung_11_19 12.11.2019 14:48 Uhr Seite 12

Réveil radio piloté
Réveil radio piloté
2524
4. Pour votre sécurité
• L'appareil est uniquement destiné à l'utilisation décrite ci-dessus. Ne l'utilisez jamais à
d'autres fins que celles décrites dans le présent mode d'emploi.
• Vous ne devez en aucun cas démonter ou modifier l'appareil par vous-même.
Attention !
Danger de choc électrique !
• Connectez l’appareil uniquement à une prise électrique conforme avec une tension de
230V !
• La prise de courant doit être installée à côté de l'équipement et doit être facilement
accessible.
• L’appareil et l'adaptateur secteur ne doivent pas entrer en contact avec de l'eau ou de
l'humidité. L’appareil doit être utilisé uniquement en intérieur dans un environnement
sec.
• Ne pas utiliser l'appareil si le boitier ou l'adaptateur secteur sont endommagés.
• Conservez le produit hors de portée des personnes (enfants compris) inaptes à évaluer
les risques possibles liés au maniement d'appareils électriques.
• Retirez immédiatement la fiche de la prise en cas de défaut ou si l'appareil n'est pas
utilisé pendant une longue période.
• Utilisez uniquement l'adaptateur secteur fourni.
• Pour débrancher, tirez sur la fiche et non sur le cordon de la prise.
• Placez le cordon d'alimentation de sorte qu'il n'entre pas en contact avec des objets
tranchants ou chauds.
Nous vous remercions d'avoir choisi l'appareil de la Société TFA.
1. Avant d'utiliser l'appareil.
•Lisez attentivement le mode d'emploi.
Pour vous familiariser avec votre nouvel appareil, découvrez les fonctions et tous les
composants, notez les détails importants relatifs à la mise en service et lisez quelques
conseils en cas de disfonctionnement.
•En respectant ce mode d'emploi, vous éviterez d'endommager l'appareil et de per-
dre vos droits résultant d'un défaut pour cause d'utilisation non conforme. Nous
n'assumons aucune responsabilité pour des dommages qui auraient été causés par
le non-respect du présent mode d'emploi.
•Suivez bien toutes les consignes de sécurité !
•Conservez soigneusement le mode d'emploi !
2. Contenu de la livraison
• Réveil
• Piles 3 x 1,5 V AAA
• Adaptateur secteur
• Mode d'emploi
3. Aperçu du domaine d'utilisation et de tous les avantages de votre nouvel appareil
• Horloge radio-pilotée à très grande précision
• Grands chiffres lumineux rouges à LED
• Fuseau horaire et option de réglage manuel
• Calendrier (date et mois)
• Alarme avec fonction snooze
TFA_No. 60.2505 Anleitung_11_19 12.11.2019 14:48 Uhr Seite 13

Réveil radio piloté
Réveil radio piloté
2726
D : DST (Heure d’été / Daylight Saving Time)
E : Symbole de réception DCF F : DATE (pour affichage de date)
Touches (Fig. 2+3)
G :Touche SNOOZE/BRIGHTNESS H : Touche ALARM
I : Touche SET J : Touche UP
K : Touche DOWN L : Bouton de réglage WAVE
Boîtier (Fig. 2+3)
M : Logement batterie N : Adaptateur secteur
6. Mise en service
• Tirez la feuille de protection de l´affichage.
• Insérez les trois piles (3 x 1,5 V AAA), polarité +/- selon l'illustration. Connectez l'adap-
tateur AC/DC à une prise murale. Un signal sonore se fait entendre et tous les seg-
ments LCD s'allument pendant 2 secondes. La pile sert de source de soutien en cas de
panne d'électricité.
•Important ! S'assurer que le voltage de secteur est 230V ! Dans le cas contraire, le
réveil pourrait être endommagé.
• L’horloge cherche le signal radio et le symbole de réception DCF clignote. En cas de
réception correcte, (3-10 minutes) l’heure radio s’affiche et le symbole en continu.
• La réception sera de nouveau activée entre 1.00 et 5.00 heures du matin.
Important ! Pendant la réception du signal radio DCF, l'affichage est désactivé.
• Vous pouvez activer manuellement la réception de l’heure radio. Appuyez sur la touche
WAVE (ca. 3 sec.) dans le compartiment à piles. L’horloge cherche le signal radio.
Attention !
Danger de blessure !
• Gardez votre appareil et les piles hors de la portée des enfants.
• Les piles contiennent des acides nocifs pour la santé et peuvent être mortelles dans le
cas d’une ingestion. Si une pile a été avalée, elle peut entraîner des brûlures internes
graves ainsi que la mort dans l’espace de 2 heures. Si vous craignez qu’une pile ait pu
être avalée ou ingérée d’une autre manière, quelle qu’elle soit, contactez immédiate-
ment un médecin d’urgence.
• Ne jetez jamais de piles dans le feu, ne les court-circuitez pas, ne les démontez pas et
ne les rechargez pas. Risque d'explosion !
• Une pile faible doit être remplacée le plus rapidement possible afin d'éviter toute fuite.
• Pour manipuler des piles qui ont coulé, utilisez des gants de protection chimique spé-
cialement adaptés et portez des lunettes de protection !
Conseils importants de sécurité du produit !
• Ne placer aucun objet sur l’appareil.
• Évitez d’exposer l’appareil à des températures extrêmes, à des vibrations ou à des
chocs.
5. Composants
Affichage à CL (Fig. 1)
A : Horloge / Date B : Symbole alarme
C : PM (pour système de temps à 12 heures)
TFA_No. 60.2505 Anleitung_11_19 12.11.2019 14:48 Uhr Seite 14

Réveil radio piloté
Réveil radio piloté
2928
• La nuit, les perturbations s’affaiblissent en règle générale et la réception est possible
dans la plupart des cas. Un seul signal par jour suffit pour garantir la précision de l’af-
fichage de l’heure, et pour maintenir d’éventuels écarts en dessous d' 1 seconde.
• Le paramétrage de l'heure de réveil est possible dès réception du signal radio (voir
point : 7.3 : Réglage de l’alarme de réveil).
7. Utilisation
•Important : Pendant la réception du signal radio, il n'est pas possible d'utiliser les tou-
ches.
• L'appareil quitte automatiquement le mode de paramétrage si aucune entrée n'a été
effectuée pendant 20 secondes.
• Pour accéder au mode de réglage rapide, maintenez la touche UP ou DOWN appuyée
en continu.
7.1 Réglage manuel de l'heure, du fuseau horaire et du calendrier
• Appuyez sur la touche SET en mode normal. 00 commence à clignoter. Réglez le
fuseau horaire (+12/-12) avec la touche UP ou DOWN.
• Pour paramétrer un fuseau horaire, autre que celui de l’heure DCF, procédez comme
suit.
• Appuyez sur la touche SET on peut sélectionner successivement les heures, les minu-
tes, l'année, le mois et la date. Réglez les valeurs à l'aide de la touche UP ou DOWN.
• Confirmez avec la touche SET.
• L’heure ajustée manuellement sera transcrite si la réception DCF de l’heure réussit.
• En appuyant sur la touche SET en mode normal, ou peut sélectionner l'affichage de
l'horloge ou de la date (DATE apparaît sur l'affichage).
• Si votre réveil radio piloté ne peut pas recevoir le signal DCF (par exemple en raison de
la présence de perturbations, d’une distance de transmission excessive etc.), vous
pouvez procéder à un paramétrage manuel. Dans ce cas, l’horloge fonctionne comme
une horloge à quartz normale (voir point : 7.1 Réglage manuel de l'heure, du fuseau
horaire et du calendrier).
6.1 Réception de l'heure radio
La transmission de l’heure radio s’effectue via une horloge atomique au césium, exploitée
par la Physikalisch Technische Bundesanstalt de Braunschweig (Institut Fédéral Physico-
Technique de Braunschweig). L’écart de précision de cette horloge est d' 1 seconde pour
un million d’années. L’heure est diffusée à partir de Mainfingen, près de Francfort sur le
Main, par un signal DCF-77 (77,5 kHz), avec une portée d’environ 1500 km. Votre horloge
radio pilotée reçoit ce signal, le convertit et affiche ainsi toujours l’heure exacte. Le pas-
sage de l’heure d’hiver à l’heure d’été et vice-versa s’effectue également en mode auto-
matique. La réception est essentiellement en fonction de votre position géographique. En
règle générale, dans un rayon de 1500 km autour de Francfort, aucun problème de trans-
mission ne devrait apparaître.
Nous vous prions de respecter les consignes suivantes :
• Nous vous recommandons de respecter une distance de 1,5 - 2 m entre l'appareil et
d’éventuelles sources de signaux parasites, comme les écrans d'ordinateur et les pos-
tes de télévision.
• Dans les bâtiments en béton armé (caves, greniers aménagés), le signal reçu est affai-
bli. Dans les cas extrêmes, nous vous conseillons de placer l’appareil près d’une fenê-
tre de manière à améliorer la réception du signal radio.
TFA_No. 60.2505 Anleitung_11_19 12.11.2019 14:48 Uhr Seite 15

Réveil radio piloté
Réveil radio piloté
3130
8. Entretien et maintenance
• Pour le nettoyage de l'appareil, utilisez un chiffon doux et humide. N’utilisez aucun dis-
solvant ou agent abrasif ! Protégez contre l'humidité
• Enlevez les piles, si vous ne les utilisez pas pendant une durée prolongée.
• Conservez votre appareil dans un endroit sec.
9. Dépannage
Problème Résolution
Affichage manquant ➜ Connectez l'appareil avec l'adaptateur secteur
Aucune réception de DCF ➜Appuyez sur la touche WAVE (ca. 3 sec.)
dans le compartiment à piles
➜Procéder à un paramétrage manuel
➜Attendre la réception du signal de nuit
Indication incorrecte ➜Procédez à une nouvelle mise en service
Si votre appareil ne fonctionne toujours pas malgré ces mesures, adressez-vous à votre
vendeur.
10. Traitement des déchets
Ce produit a été fabriqué avec des matériaux et des composants de haute qualité qui peu-
vent être recyclés et réutilisés.
7.2 Affichage 12 heures ou 24 heures
• Vous pouvez ajuster le système de temps à 12 heures ou à 24 heures à l'aide de la tou-
che DOWN en mode normal.
• En système de temps à 12 heures PM (après-midi) apparaît sur le visuel.
7.3 Réglage de l’alarme de réveil
• Appuyez sur la touche ALARM.
• clignote sur le visuel.
• L’indicateur de l’heure commence à clignoter. Réglez l’heure à l'aide de la touche UP
ou DOWN.
• Appuyez encore une fois sur la touche ALARM et vous pouvez ajuster les minutes.
Réglez les minutes à l'aide de la touche UP ou DOWN.
• Validez via la touche ALARM.
• L'heure actuelle s’affiche à l’écran.
• Pour activez la fonction d'alarme appuyez encore une fois sur la touche ALARM.
• apparaît sur l'affichage.
• Lorsque le réveil sonne (3 signaux auditifs différents). Appuyez sur une touche quel-
conque pour arrêter l’alarme.
• Activez la fonction snooze via la touche SNOOZE/BRIGHTNESS sur le dessus de l'appa-
reil.
• clignote et le son de l'alarme sera interrompu pour 4 minutes.
• Pour activez la fonction d'alarme appuyez encore la touche ALARM.
7.4 Éclairage de fond
• Vous pouvez modifier la luminosité de l'écran sur trois niveaux à l'aide de la touche
SNOOZE/BRIGHTNESS.
TFA_No. 60.2505 Anleitung_11_19 12.11.2019 14:48 Uhr Seite 16

Réveil radio piloté
Réveil radio piloté
3332
La reproduction, même partielle du présent mode d'emploi est strictement interdite sans l'accord
explicite de TFA Dostmann. Les spécifications techniques de ce produit ont été actualisées au moment
de l'impression et peuvent être modifiées, sans avis préalable.
Les dernières données techniques et des informations concernant votre produit peuvent être trouvées
en entrant le numéro de l'article sur notre site.
Déclaration UE de conformité
Le soussigné, TFA Dostmann, déclare que l'équipement radioélectrique du type 60.2505 est conforme
à la directive 2014/53/UE. Le texte complet de la déclaration UE de conformité est disponible à l'adres-
se Internet suivante : www.tfa-dostmann.de/service/downloads/ce
www.tfa-dostmann.de
TFA Dostmann GmbH & Co.KG, Zum Ottersberg 12, D-97877 Wertheim, Allemagne 11/19
Les piles et accus usagés ne peuvent en aucun cas être jetés dans les ordu-
res ménagères !
En tant qu'utilisateur, vous avez l'obligation légale de rapporter les piles et
accus usagés à votre revendeur ou de les déposer dans une déchetterie pro-
che de votre domicile conformément à la réglementation nationale et locale.
Les métaux lourds sont désignés comme suit :
Cd=cadmium, Hg=mercure, Pb=plomb
Cet appareil est conforme aux normes de l'UE relatives au traitement des
déchets électriques et électroniques (WEEE).
L'appareil usagé ne doit pas être jeté dans les ordures ménagères. L’utilisa-
teur s’engage, pour le respect de l’environnement, à déposer l’appareil
usagé dans un centre de traitement agréé pour les déchets électriques et
électroniques.
11. Caractéristiques techniques
Alimentation : Piles 3 x 1,5 V AAA, adaptateur secteur DC 4,5 V
Mesure de boîtier : 78 x 170 x 110 mm
Poids : 370 g (avec piles et adaptateur secteur)
TFA_No. 60.2505 Anleitung_11_19 12.11.2019 14:48 Uhr Seite 17

Orologio sveglia radiocontrollato
3534
4. Per la vostra sicurezza
• Il prodotto è adatto esclusivamente agli utilizzi di cui sopra. Non utilizzate il prodotto in
maniera diversa da quanto descritto in queste istruzioni.
• Non sono consentite riparazioni, alterazioni o modifiche del dispositivo non autorizzate.
Attenzione!
Pericolo di morte per scossa elettrica!
• Collegate il dispositivo esclusivamente a una presa di corrente a norma che fornisca
corrente a una tensione di 230V!
• La presa dell’alimentazione dovrebbe essere situata vicino al dispositivo e dovrebbe
essere facilmente accessibile.
• Il dispositivo e l’alimentatore non devono venire a contatto con acqua o umidità. Il
dispositivo è adatto esclusivamente all’utilizzo interno in ambienti asciutti.
• Non utilizzate il dispositivo qualora la cassa o l’alimentatore risultino danneggiati.
• Conservate il dispositivo fuori dalla portata di persone (per esempio i bambini) che
potrebbero non riconoscere adeguatamente il rischio derivante dall’uso di apparecchi
elettrici.
• Estraete immediatamente la spina dalla presa di corrente qualora rileviate un guasto o
nel caso in cui non utilizziate il dispositivo per un periodo prolungato.
• Utilizzate esclusivamente l’alimentatore in dotazione.
• Quando estraete la spina dalla presa di corrente, non tiratela per il cavo.
• Posizionate il cavo in modo che non entri in contatto con oggetti dotati di spigoli vivi o
con superfici calde.
Vi ringraziamo per aver scelto l'apparecchio della TFA.
1. Prima di utilizzare l'apparecchio
•Leggete attentamente le istruzioni per l'uso. Avrete così modo di familiarizzare con il
vostro nuovo apparecchio, di scoprirne tutte le funzioni e le componenti, di apprendere
importanti dettagli sulla sua messa in funzione, di acquisire dimestichezza nel suo uti-
lizzo e di usufruire di alcuni validi consigli da seguire in caso di guasti.
•Seguendo le istruzioni per l'uso, eviterete anche di danneggiare il dispositivo e di
pregiudicare a causa di un utilizzo scorretto, i diritti del consumatore che vi spetta-
no per legge. Decliniamo ogni responsabilità per i danni derivanti dal mancato
rispetto delle presenti istruzioni per l'uso.
•Prestate particolare attenzione alle misure di sicurezza!
•Conservate con cura queste istruzioni per l'uso!
2. La consegna include
• Orologio sveglia
• 3 Batterie AAA da 1,5 V
• Alimentatore
• Istruzioni per l'uso
3. Tutte le applicazioni e tutti i vantaggi del vostro nuovo apparecchio
• Orologio radio controllato della massima precisione
• Grandi cifre color rosso a LED
• Fuso orario e possibilità di impostare l'ora in modo manuale
• Datario (Data, mese, giorno)
• Sveglia con funzione snooze
TFA_No. 60.2505 Anleitung_11_19 12.11.2019 14:48 Uhr Seite 18

Orologio sveglia radiocontrollato
3736
Tasti (Fig. 2+3)
G: Tasto SNOOZE/BRIGHTNESS H: Tasto ALARM
I: Tasto SET J: Tasto UP
K: Tasto DOWN L: Tasto WAVE
Contenitore (Fig. 2+3)
M: Vano batteria N: Alimentatore
6. Messa in funzione
• Rimuovere il foglio protettivo dal display.
• Inserire le 3 batterie (3 x AAA da 1,5 V), con la giusta polarità. Collegare l'adattatore ad
una presa a terra. Tutti i segmenti LCD appaiono e viene emesso un breve segnale acu-
stico. Le batterie agiscono quindi come alimentazione di supporto nel caso in cui man-
chi la corrente.
•Avvertenza importante! Controllare che il voltaggio della vostra abitazione sia 230V,
perché altrimenti il dispositivo potrebbe essere danneggiato.
• L'orologio inizia a ricevere il segnale radio e il simbolo della ricezione del segnale DCF
lampeggia. Se entro 3-10 minuti l'orologio riceve il time-code, sul display vengono
visualizzati l'ora radiocontrollata e il simbolo della ricezione del segnale DCF.
• La ricezione viene attivata di nuovo tra le ore 1.00 e 6.00 ogni giorno.
Importante: Durante la ricezione del segnale DCF la luce non funziona.
• È possibile avviare l'inizializzazione anche in modo manuale. Tenere premuto il tasto
WAVE situato nel vano batteria per 3 secondi. L'orologio inizia a ricevere il segnale
radio per l'orologio.
Attenzione!
Pericolo di lesioni!
• Tenete il dispositivo e le batterie lontano dalla portata dei bambini.
• Le batterie contengono acidi nocivi per la salute. Se ingerite, le batterie possono essere
mortali. Se una batteria venisse ingerita, potrebbe causare gravi ustioni e portare alla
morte nel giro di due ore. Se si sospetta che una batteria sia stata ingerita o inserita
nel corpo in altra maniera, consultare immediatamente un medico.
• Non gettare le batterie nel fuoco, non polarizzarle in maniera scorretta, non smontarle
e non cercare di ricaricarle. Pericolo di esplosione!
• Sostituite quanto prima le batterie quasi scariche, in modo da evitare che si scarichino
completamente.
• Quando si maneggiano batterie esaurite indossare sempre guanti resistenti alle sostan-
ze chimiche e occhiali di protezione.
Avvertenze sulla sicurezza del prodotto!
• Non appoggiare alcun oggetto sopra l’unità.
• Non esporre l'apparecchio a temperature estreme, vibrazioni e urti.
2. Componenti
Display LCD (Fig. 1)
A: Orologio / Data B: Simbolo della sveglia
C: PM (con sistema orario di 12 ore) D: DST (Ora solare / Daylight Saving Time)
E: Simbolo di ricezione DCF F: DATE (indicazione data)
TFA_No. 60.2505 Anleitung_11_19 12.11.2019 14:48 Uhr Seite 19

Orologio sveglia radiocontrollato
3938
• Non appena l'apparecchio riceve il segnale radio è possibile impostare dell'orario della
sveglia (ved.: 7.3 Impostazione della sveglia).
7. Uso
•Importante: Durante la ricezione del segnale radio del trasmettitore non è possibile uti-
lizzare i tasti.
• L’apparecchio esce automaticamente dal modo di programmazione, se non si preme
alcun tasto per più di 20 secondi.
• Tenere premuto il tasto UP o DOWN in modalità impostazione per procedere veloce-
mente.
7.1 Impostazione manuale dell'ora, del fuso orario e della data
• Tenere premuto il tasto SET in modalità normale. 00 lampeggia ed impostare con il
tasto UP o DOWN il fuso orario (+12/-12).
• L'impostazione del fuso orario è necessaria quando è possibile ricevere il segnale DCF,
ma il fuso orario è diverso dall'ora DCF.
• Premedo il tasto SET è possibile impostare ore, minuti, anno, mese e giorno usando il
tasto UP o DOWN.
• Confermate con il tasto SET.
• Se il segnale DCF è attivato, in caso di corretta ricezione del segnale DCF, l'ora impo-
stata in modo manuale viene sostituita.
• Tramite il tasto SET è possibile visualizzare la data oppure l’ora (sul display compare
DATE).
• Nel caso in cui l’orologio non riesca a ricevere il segnale DCF (a causa di guasti, della
distanza di trasmissione, ecc.), l'ora può essere impostata manualmente. In questo
caso il simbolo della ricezione del segnale DCF scompare e l'orologio funziona come
un normale orologio al quarzo (vedi: 7.1 Impostazione manuale dell'ora, del fuso orario
e della data).
6.1 Informazioni dell'ora radiocontrollata DCF
Il segnale orario è fornito dall'orologio atomico al cesio dell'istituto di metrologia "Physi-
kalisch Technische Bundesanstalt" di Braunschweig (Germania), che presenta una devia-
zione di meno di un secondo in un milione di anni. L'ora è codificata e viene trasmessa da
Mainflingen vicino a Francoforte con un segnale a frequenza DCF-77 (77,5 Khz), ed ha un
raggio di trasmissione di circa 1.500 km. Anche il cambio tra ora solare e ora legale
avviene automaticamente. La qualità della ricezione dipende molto dalla posizione geo-
grafica. In condizioni normali non dovrebbero esserci problemi di ricezione entro un rag-
gio di trasmissione di 1.500 km da Francoforte.
Siete pregati di osservare le indicazioni elencate qui di seguito:
• La distanza raccomandata da qualsiasi fonte di interferenza come monitor di computer
o televisori è di almeno 1.5 - 2m.
• All'interno di strutture in cemento armato (seminterrati, sovrastrutture) la ricezione del
segnale è naturalmente più debole. In casi estremi si consiglia di sistemare l'unità vici-
no ad una finestra per ottenere una migliore ricezione del segnale.
• Durante le ore notturne, le interferenze dovute ad agenti atmosferici sono normalmente
meno influenti, e la ricezione è possibile nella maggior parte dei casi. Una singola rice-
zione giornaliera è sufficiente a garantire la precisione e a mantenere la deviazione al di
sotto di un secondo.
TFA_No. 60.2505 Anleitung_11_19 12.11.2019 14:48 Uhr Seite 20
Other manuals for 60.2505
1
Table of contents
Languages:
Other TFA Clock Radio manuals