The Distillery Network EZ KIT User manual

TDN
BooKitLet

Introduction
Are you up for a challenge?
The EZ KIT you just purchased comes with a challenge; this is not a kit for
amateurs, but for the “DIY” kind of guy or girl.
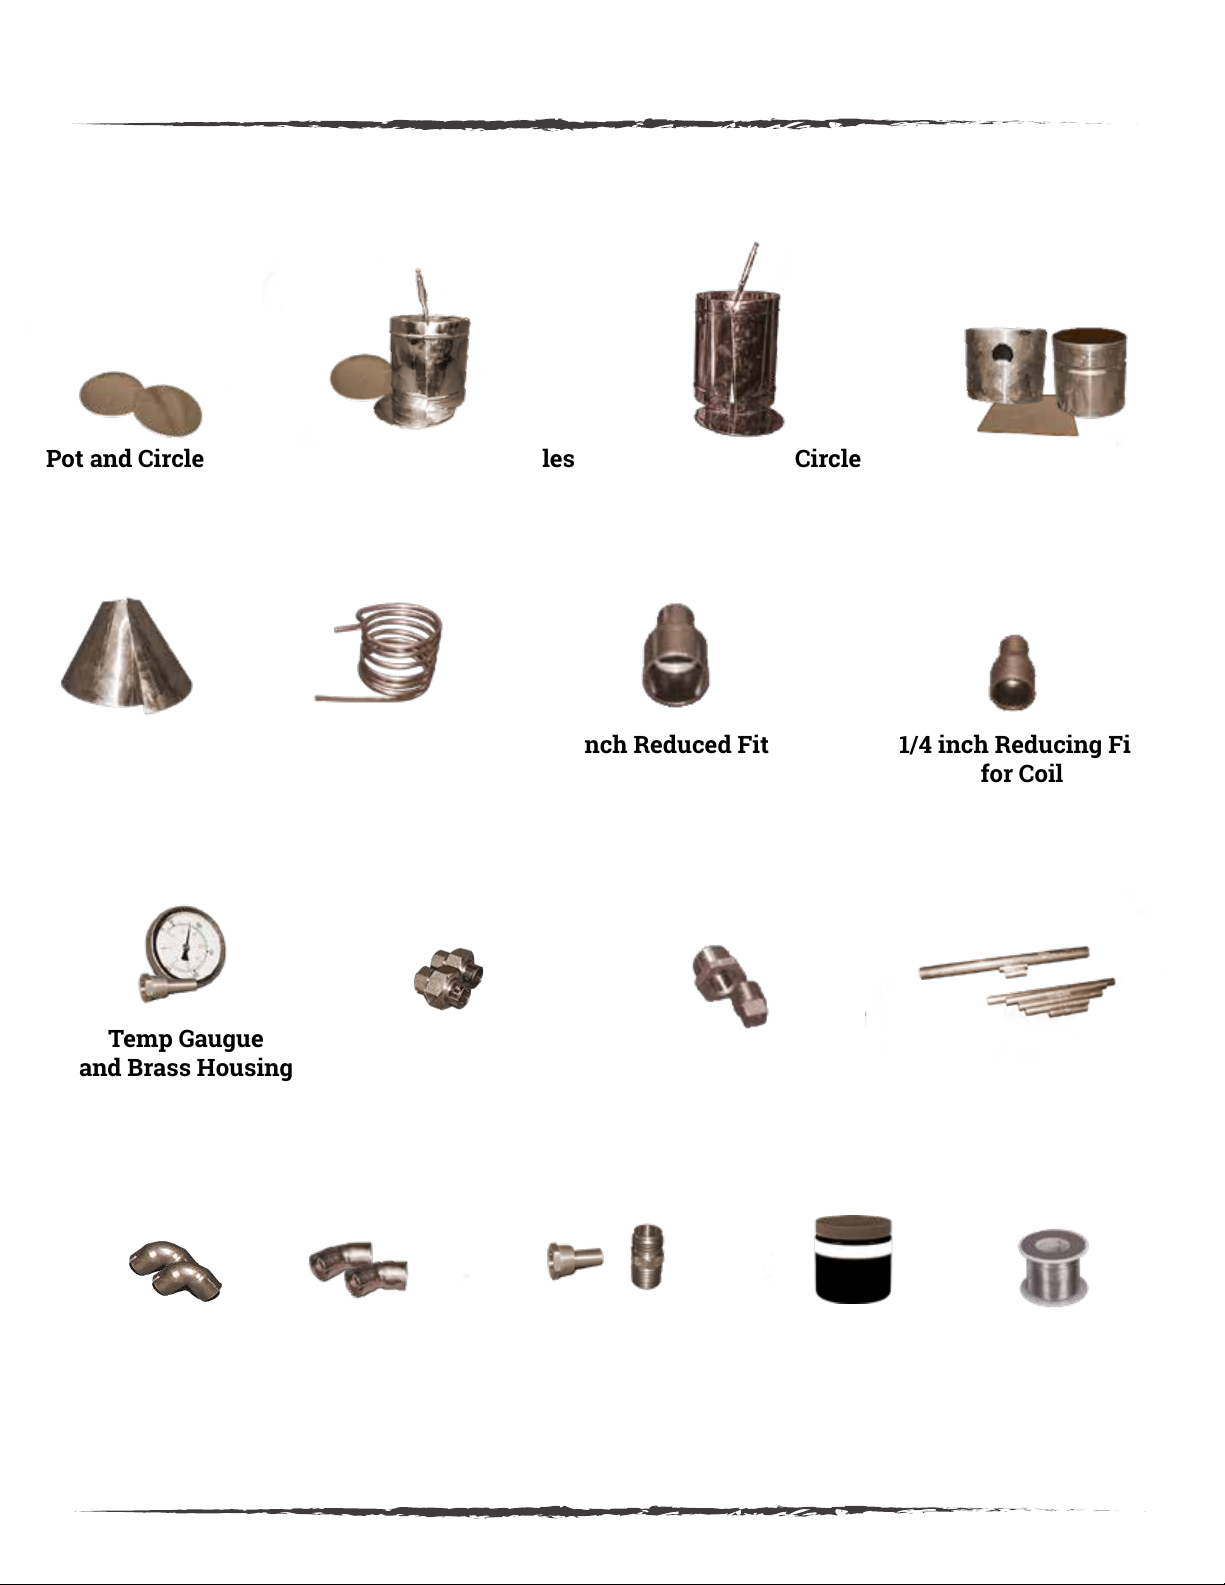
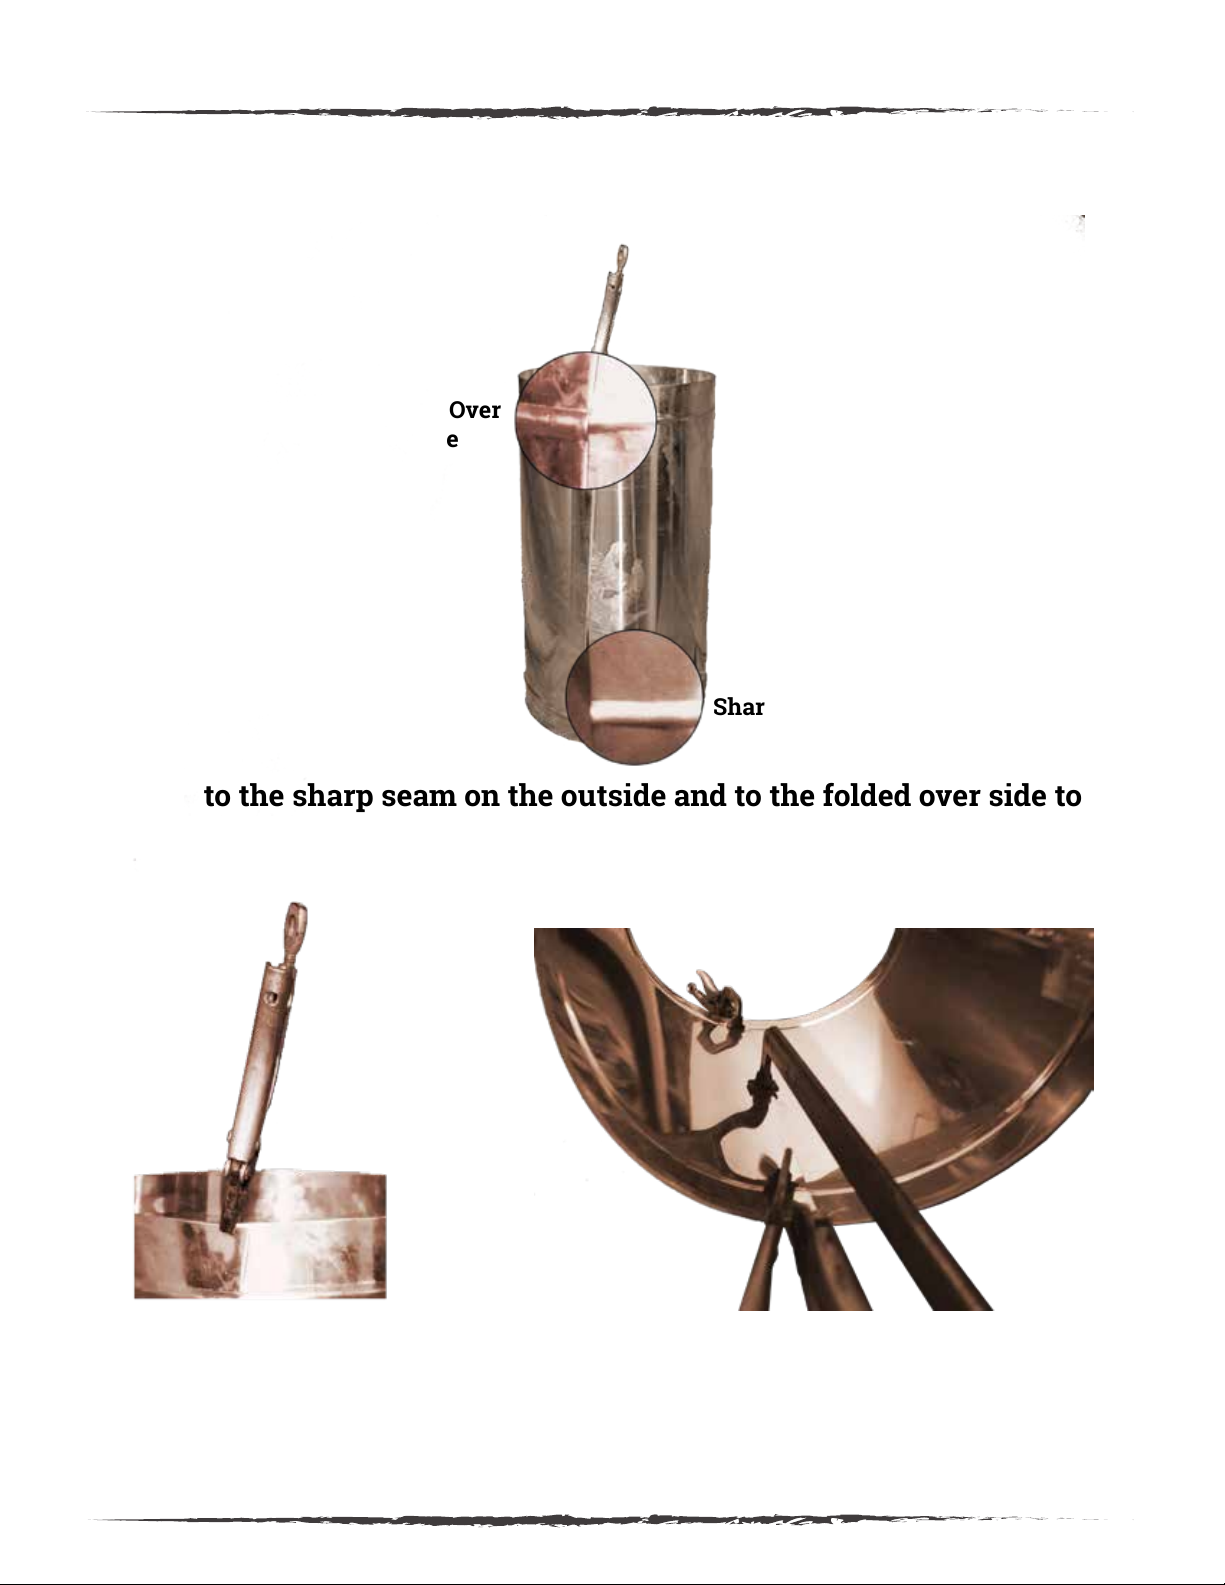
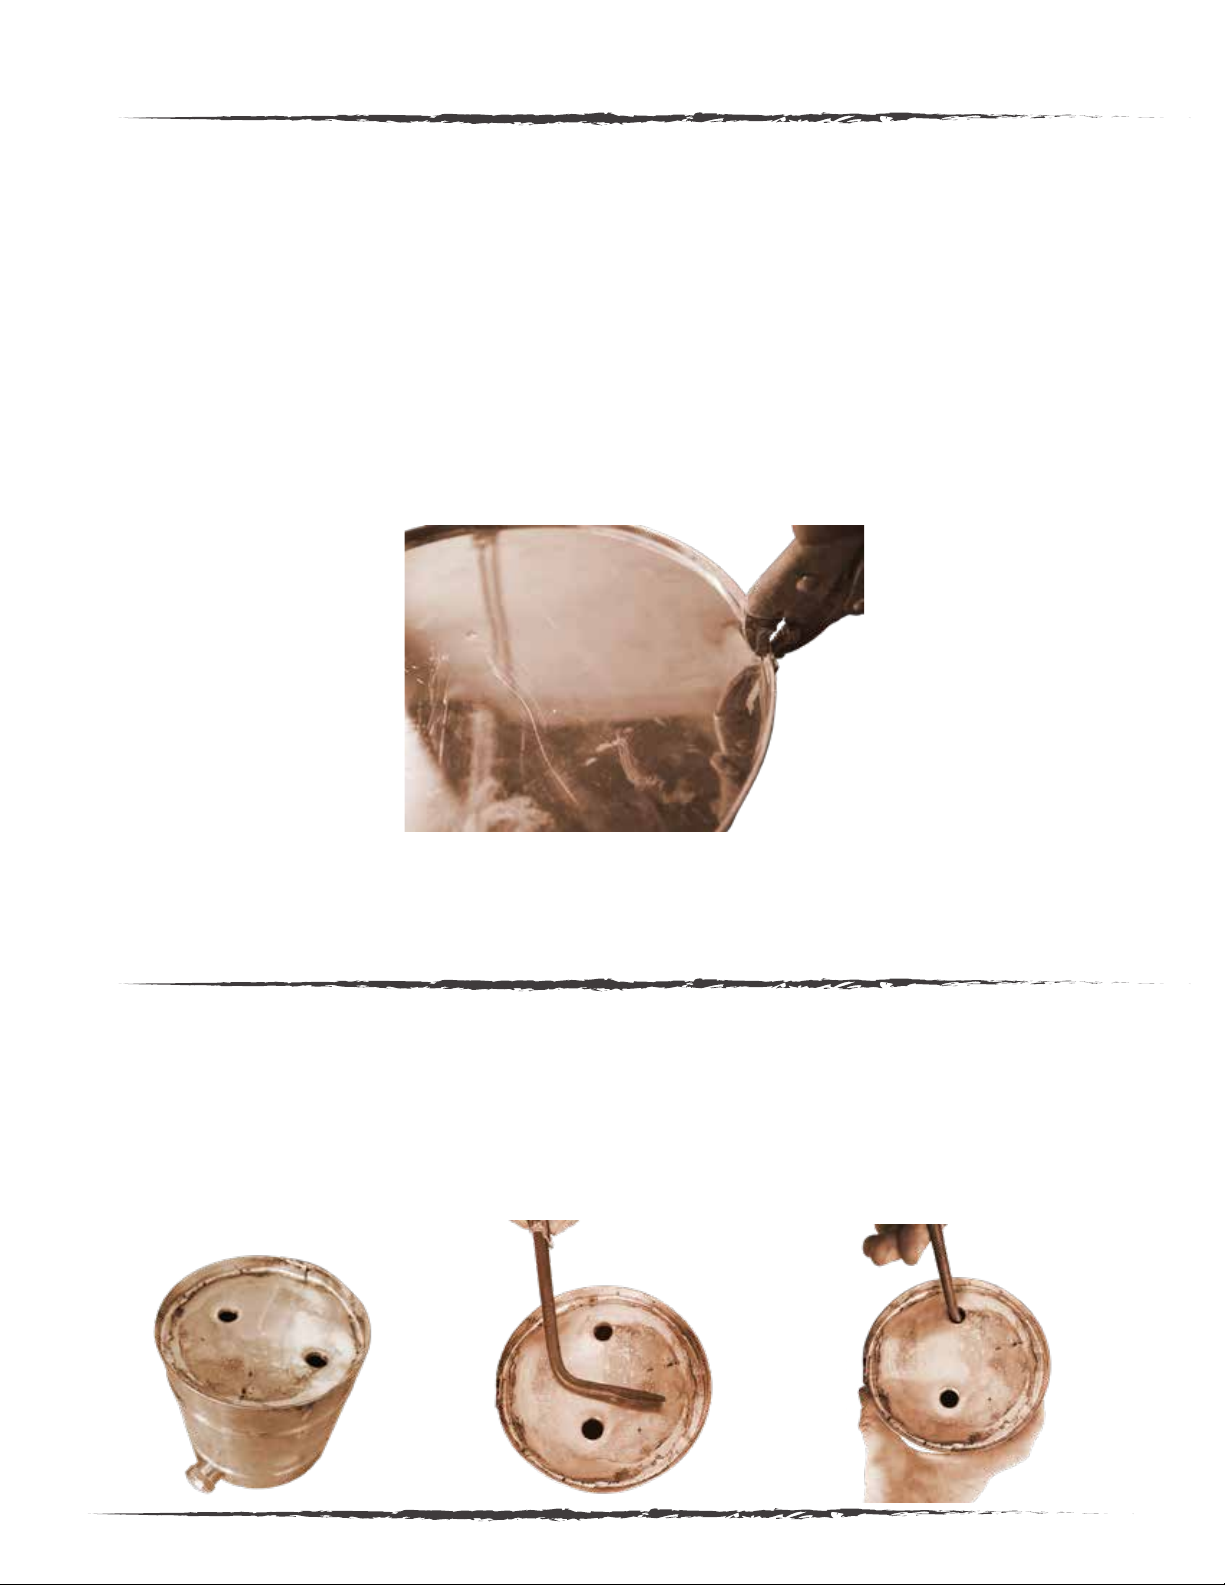
Assembling the EZ KIT is not easy; you have to attach, clamp and solder
each piece yourself. We have already cut, bent, rolled and embossed the
copper for you to get you started.
Now it’s up to you to rise up to the challenge.
How rewarding would it be to be able to BRAG to all your friends and family
that you actually built a Copper Moonshine Still yourself! Or better yet,
build it with the help of a friend or family member as a quality time project.
We included this BooKitLet (yeah, that’s what we called this awesome thing)
with very detailed instructions on how to get your Still ready to rock. How-
ever you decide to tackle this, we promise you that you will not be alone
along the way, we are just a phone call away if you have questions!
1-(603) 997-6786
We also have an instruction video on our website for you to follow along.
Go to www.moonshinekits.com to watch.
So, turn to the page with a list of Tools Needed and get ready to build your
own Copper Moonshine Still!
Good Luck Moonshine Kit Rockstar.
INTRODUCTION

Page 1
KIT INSTRUCTIONS
PARTS INCLUDED:
Pot and Circle
(Bottom)
Thumper and Two Circles
(Top and Bottom)
Worm and One Circle
(Bottom)
Cap Kit
(Bottom, Top, Tip Top)
Cone Coil for
Worm
Temp Gaugue
and Brass Housing
1x1/2 inch Reduced Fitting
for Lyne Arm
1/2x1/4 inch Reducing Fitting
for Coil
Brass Plug and Bushing
for Thumper
Spin Unions
(Connectors)
90Degree
Fittings
45 Degree
Fittings
Copper Pipe
Pieces
Flux Solder
¾ Garden Hose
Hookups

* Gloves and eye googles
* Metal Snips for Custom Cuts
* Small Ball Hammer
* Metal File for Sharp Edges
* Propane Torch Head
* Propane tank (small, disposable)
* Fire Extinguisher and other safety supplies
* Long Flat Head Screwdriver
* Step Drill Bit
* Deburring Tool (if needed)
* Anything made of metal to hold up the bottom of the pot from the
inside Or a 5 Gallon bucket lined with tin foil
(to hold circle bottom piece into place when fitting it)
* Clamps to hold the seams together when soldering
(Have different length sizes on hand)
* Tin Foil
Page 2
Tools Needed:

Page 3
Pot Body Assembly
The Pot has two sides of the seam: a sharp side and a tucked seam side.
The Sharp side goes on the inside of the pot, it tucks under the folded over side.
Apply flux to the sharp seam on the outside and to the folded over side to the
inside (the flux sides will touch when you fold them over). Clamp the seams
together on the folded over seam.
Our mission here is to clamp the pot to the correct size of the bottom circle.
Clamp the pot so the circle fits snug, you want it on the tighter side rather than
loose. This is important, please remember copper is soft and you will want it
tight, so the solder makes a connection.
Folded Over
Side
Sharp Side

Page 4
Start soldering inside the pot seams. Use the heat and folow with the
solder, you’ll heat up the copper to melt the solder.
Go slow, making sure the solder drips into the gaps of the seam. Your first
run of soldering is to fill the gaps, you will do a second run along the seam
to make it look good.
Insert the pot circle and use something to push the circle up from the
inside, as to keep it in place while you solder the circle. Same as with the
pot seams solder slowly; making sure there are no gaps, circle has to be
snug.
Let it Cool and take the clamps off.
Thumper Assembly
Thumper comes with two copper circles.
One of these circles has two drilled holes; this one is the top circle.
Same as the pot, insert bottom circle and solder.
Turn over and insert the top, use a tool to pull up the edges to solder
nice and flat.
Continued
Pot Body Assembly

Page 5
Cap Bottom
Beveled Line
Cap Top
Cap TipTop
Clamp and solder the open cylinder (cap bottom) just as you did with
the pot body.
The bottom piece of the Cap has two lines, a beveled line and an em-
bossed line. Embossed line is under beveled line.
Flux the seams of Cap Top and Bottom; Insert the Cap top on Bottom
with beveled line on top, match the seams as these interlock. Get the
tightest fit you can, flux seams again and start soldering as you did
with the pot.
Make Two runs of solder inside the cap pieces (you can always do a
small solder line on the outside for added security).
Included is a flat square of copper, this is your Cap Tip Top; you can cut
this into a circle to fit the cap top.
Using the top piece of the cap as a guide, draw a circle with marker on
the inside to make a stencil of the right size.
Cut the circle shape, leaving about a 1/8” extra when you cut, this will
help make sure the circle you cut is not too small for the cap. Fit the
circle into the top of Cap Kit, use something inside to drive the circle up
and keep it in place while you solder (any metal cylinder would work).
Flux the seams along circle and solder.
Cap Kit Assembly

Page 6
As we saw with the pot body, the Cone also has two sides: a sharp side and a
folded over side. The folded over side is always on the outside, covering the
sharp edge side.
Flux the sharp side of the seam on the side facing towards you, flux the
seam of the folded over side as well, just as we did with the pot.
Match the bottom of cone seams first and when you fold the seams over each
other, leave about 2” overhang on the bottom and about ¼” on top to be able
to fit the clamps (Don’t clamp the seam, you will be soldering the seam).
Clamp the top and bottom and use a longer handle clamp to clamp the
middle of the cone, we do not want any gaps. Close the gap well so the
copper sides are touching each other.
Flux and solder from the inside, make sure to fill the gaps well with the
solder. Solder in two runs: the first run is to fill the gaps well; the second run
is to make it look nice and even.
Wait for the solder to cool, remove clamps.
Folded Over
Side
Sharp Side
Cone Assembly

Page 7
For this step, you will need an object such as a metal stand, metal object or a 5
gallon bucket lined with tin foil (to prevent melting), this will help you hold the
cone into place while you insert the pot body and solder.
Flip cone upside down on the bucket (holder) and fit the pot into the cone and
match up the seams.
Apply pressure to the top of the pot before soldering, to make gaps tighter.
(you may want to have another person pushing down to make sure gaps are
tight, or you can use a weight as well).
Flux along the seam of Cone and Pot and solder, go slow, in 3” stretches.
Assembly Pot to Cone
(cone to body connection)

Page 8
Assembly Cap to Cone
Just as we did with the Pot to Cone assembly, attach Cap to small end of
cone making sure the seams match (these should interlock).
Have someone help you keeping into place, or have something holding
the Cap in place (make sure whatever you use keeps the two pieces
steady!)
flux and solder leaving no gaps. Use low heat, do not overheat and do
not force the solder into the seams. Make it so the solder flows
naturally and the flame and the flux do all the work.

Same process as with the Pot’s Body.
Fit bottom circle onto the worm’s body, flux and solder.
The top circle of worm will have two holes, use a tool to get the top circle up so
you can solder in place.
Worm Assembly
Page 9

Page 10
Plugs and Bushings
You’ll need to drill the holes (unless they are already drilled).
It is best to use a step drill bit; make sure you do not over drill the hole,
you want the piece to fit snug. Try to use the threads of the piece you
are installing to make it fit tight.
When you heat up these pieces, it is different that heating the copper up
and soldering! You need to heat up the piece slightly longer before ap-
plying the solder. If you apply the solder before the brass piece is hot
enough to take the solder, you will end up with solder drips on the
copper.
All these pieces will be in the box. The plug and bushing go on the
thumper or anywhere you would like to install.

Page 11
Plumbing the Unit
Once all of your pieces are ready to get installed, you need to line
everything up on the table and get it nice and straight before you solder
everything up. We call this “Plumbing the Unit”.
Making sure everything lines up before soldering the pipes is important to
ensure that your unit looks proper.
Make sure you apply enough flux to all joints before soldering. Hold the
flame on the fitting and heat it up until solder takes. Do not wait too long
or the solder won’t take. If this happens, use sand paper or wire brush to
clean up and reflux, let it cool down before you try to solder again.
The seam is on the back side, the drain plug is on the front. Once you de-
termine which side is the front and back, you then need to make sure the
correct tubing gets installed. The long tubing goes almost all the way
down on the left side. The tubing that does not go down much at all goes
on the right side.
Thumper Pipe Instructions

Page 12
The coil for the worm needs to be installed in a manner where the coil
spirals downwards.
The coil cannot be spiraling from low to high or down too flat.
Make sure when installing the coil, the flow of the spiral goes downwards
to ensure the correct flow needed.
Worm Calibration

Page 13
* Clamping the copper is important when building a copper moonshine still; the
tighter you clamp the copper, the less solder you will have to use and a much
stronger bond will be created.
* When clamping, make sure you use the clamps with flat ends which pivot this
way you won’t be left with marks on your moonshine still.
* Flux pieces before clamping and before soldering. The flux cleans and prepares
the area for maximum adhering capabilities.
Soldering
* Flux the pieces generously to ensure proper solder bondings; the solder should
“Mend” into the copper.
* Use flux to cool certain spots down if needed.
* Go slow when soldering, do not overheat the flux or copper and let the solder
mend naturally with the copper sheet.
* Make sure you fill all seams with solder. We like to go until it drips out the other
end and use gravity to your advantage!
* Always start from the bottom (side close to you) and run the solder up the
seams. Put the flame first and follow with the solder, let the copper melt the
solder instead of the flame.
* Solder in Two Runs. First run is meant for the solder go into the seams. Second
run is to make it look nice and finished.
Flux in between runs, but let it cool off first!
*Before you do a “Second Run”, hold the flame on left hand side of seam and
you’ll see the solder bubble. If there is space for the solder to move, it will move.
*Wrap your clamps with tin foil to avoid solder drippings on your clamps.
Tips and Tricks
Clamping

Contact Us!
Call us with questions at:
1(603) 997-6786
Visit our website for video instructions:
www.moonshinekits.com
Follow us:
www.facebook.com/TheDistilleryNetwork
Twitter: @DistilleryNet
Purchase more awesome stuff and Accessories:
www.shop.buyamoonshinestill.com
www.thedistillerynetwork.com
This manual suits for next models
1
Table of contents