manuals.online logo
Brands
  1. Home
  2. •
  3. Brands
  4. •
  5. Thermo King
  6. •
  7. Automobile Accessories
  8. •
  9. Thermo King T- series User manual

Thermo King T- series User manual

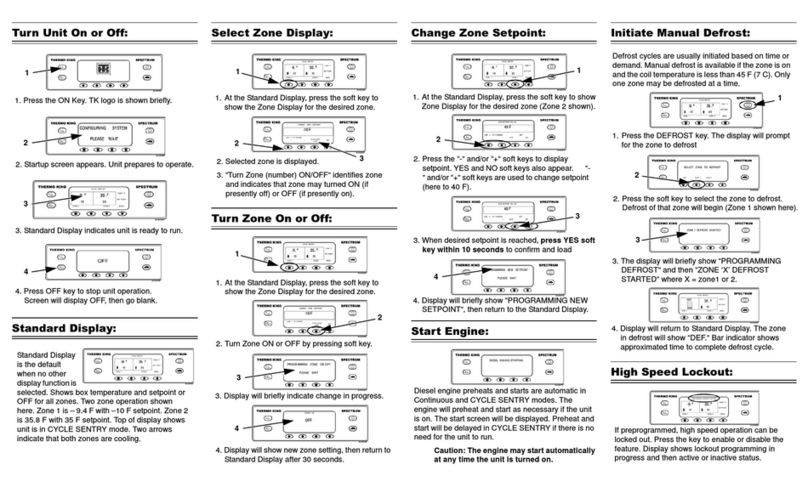
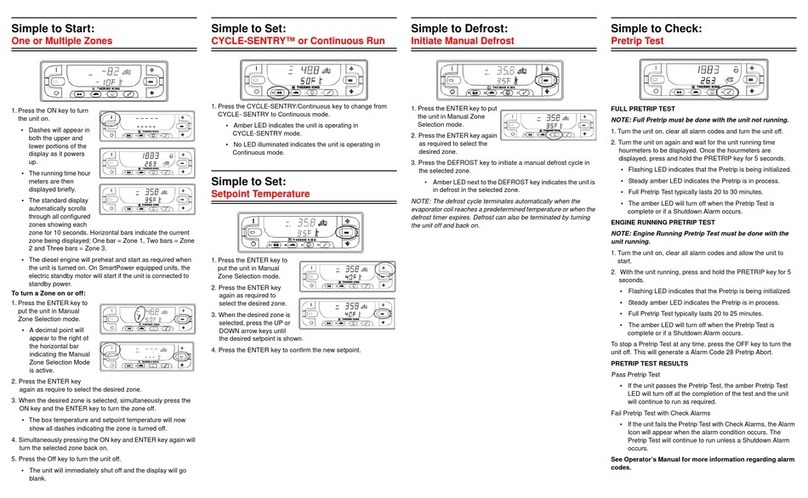
Simple to Start:
One or Multiple Zones
1.Press the ON key to turn
the unit on.
• The Thermo King
Logo will briefly be
displayed as the
system initializes.
•CONFIGURING
SYSTEM PLEASE
WAIT briefly appears
while communications
are established and
the unit prepares for
operation.
• The Standard Display
showing box
temperatures and setpoints briefly appears next.
• DIESEL ENGINE STARTING appears as the engine
preheats and starts. On SmartPower equipped units,
ELECTRIC MOTOR STARTING will appear if the unit is
connected to standby power.
• The Standard Display showing box temperatures and
setpoints appears while the unit is running.
2. Press the OFF key to turn the unit off. The unit will immediately
shut off and SYSTEM IS POWERING DOWN will appear
briefly.
To turn a Zone on or off:
Zone 1 will always be displayed any time the unit is turned on.
Zone 2 and Zone 3 (if present) can be turned on and off as
desired.
1.Return to the Standard Display (press any key to return to the
Standard Display).
2. Press the ZONE key under the desired zone.
• The setpoint display appears. If the zone is turned on, the
third key will be labeled Turn Zone Off. If the zone is turned
off, the third key will be labeled Turn Zone On.
3. Press the TURN ZONE OFF key to turn the zone off.
• The display briefly shows PROGRAMMING ZONE ON/OFF -
PLEASE WAIT.
• The display will confirm the new Zone setting for several
seconds.
• The display will return to the Standard Display showing the
Zone is off. The setpoint for the Zone has been replaced
with OFF to indicate that the zone is now off.
Simple to Set:
CYCLE-SENTRY™ or Continuous Run
1.From the Standard
Display, press the MENU
key to display the MODE
menu.
2. When the MODE Menu is
shown press the
SELECT key.
• TURN OFF CYCLE
SENTRYorTURN ON
CYCLE SENTRY will
appear.
3. Press the SELECT key to
change the mode.
• The new mode is
confirmed for 10
seconds followed by
NEW SYSTEM
MODE IS (Cycle Sentry or Continuous).
4. Once the display returns to Mode Menu, press EXIT key to
return to the Standard Display.
5. Press the SELECT key again to change the unit back to the
previous mode.
Simple to Set:
Setpoint Temperature
1.From the Standard Display, press the ZONE key for the desired
zone (example: Zone 2 is shown).
• The setpoint display will appear for the selected Zone.
2. Press the + or - keys to change the setpoint reading.
3. Press the YES or NO key accordingly.
• PROGRAMMING NEW SETPOINT - PLEASE WAIT will
appear.
• NEW SETPOINT WILL BE XX appears briefly.
• The Standard Display appears with Zone setpoint changed
to the new setpoint.
Simple to Check:
Gauges
1.From the Standard Display, press the MENU key.
2. Press the NEXT key until the Gauges Menu appears.
3. Press the SELECT key to enter the Gauges Menu.
4. Pressthe BACK or NEXT
keys to scroll through the
available gauges.
5. Press the LOCK key to
display any gauge
screen for an indefinite period.
6. Press the LOCK key again to unlock the screen.
7. Press the EXIT key to return to the Standard Display.
Simple to Defrost:
Initiate Manual Defrost
1.From the Standard Display, press the DEFROST key.
• DEFROST will briefly be displayed followed by SELECT
ZONE TO DEFROST.
2. Press the SELECT key for desired zone (example: Zone 1 is
shown).
• The display will
briefly show
DEFROST, followed
byPROGRAMMING
DEFROST -
PLEASE WAIT and
then DEFROST
STARTED.
• The bar indicator
shows approximate
percentage of time
remaining to
complete defrost
cycle.
NOTE: The defrost cycle
terminates automatically
when the evaporator coil reaches a predetermined temperature or
when the defrost timer expires. Defrost can also be terminated by
turning the unit off and back on.
Simple to Check:
Sensors
1.From the Standard Display, press the MENU key.
2. Press the NEXT key until the Sensors Menu appears.
3. Press the SELECT key to
enter the Sensors Menu.
4. Press the NEXT or BACK
keys to scroll through the
sensors.
5. Press the LOCK key to display any sensor screen for an
indefinite period.
6. Press the LOCK key again to unlock the screen.
7. Press the EXIT key to return to the Standard Display.
Simple to Check:
Pretrip Test
1.Clear all alarm codes.
2. From the Standard Display,
press the MENU key.
3. Press the NEXT key until
the PRETRIP Menu
appears.
4. Press the SELECT key.
• FULL PRETRIP will be
initiated if the unit is not
running.
• RUNNING PRETRIP
will be initiated if the unit
is running on either
diesel or electric standby.
When all tests are complete, the results are reported as PASS,
CHECK or FAIL. If the results are CHECK or FAIL, the
accompanying alarm codes will direct the technician to the cause
of the problem.
Simple to View and Determine:
Cause of Alarm and Clear Alarm Codes
If an unit alarm condition
occurs the large Alarm Icon
will appear.
If a zone-specific alarm
occurs, a small alarm Icon will
appear within the affected
zone as well (example: Zone
2 shown).
1.From the Standard Display,
press the MENU key.
2. Press the NEXT key until
the Alarm Menu appears.
3. Press the SELECT key.
• The Alarm Display will appear.
• If no alarms are present, NO ALARMS is shown.
• If alarms are present, the quantity of alarms (if more than
one) and the most recent alarm code number will be
shown.
4. After the alarm situation is resolved press the CLEAR key to
clear the alarm.
5. To display the next alarm, press the NEXT key.

• If an alarm will not clear, it may still exist. If the alarm is not
corrected, it will not clear. All alarms must be viewed before
any of the alarms can be cleared.
• If an alarm cannot be cleared from the Main menu, the Clear
key will not appear. These alarms must be cleared from
Guarded Access Menus.
6. Press the EXIT key to return to the Standard Display.
See Operator’s Manual for more information regarding alarm
codes.
Simple to Select:
High Speed Lockout Feature
1.From the Standard
Display, press the High
Speed Lockout key.
• PROGRAMMING
HIGH SPEED
LOCKOUT-
PLEASE WAIT will
briefly be displayed.
• The change will be
confirmed by
displaying HIGH
SPEED LOCOUT
ACTIVE or HIGH
SPEED LOCKOUT
INACTIVE.
• The display will then return to the Standard Display. If High
Speed Lockout is turned on, the message HIGH SPEED
LOCKOUT ACTIVE will be shown at the top of the
standard display.
2. Pressing the High Speed Lockout key again will turn the feature
off.
Simple to Check:
Hourmeters
1.From the Standard
Display, press the MENU
key.
2. Press the NEXT key until
the Hourmeters Menu
appears.
3. Press the SELECT key to enter the Hourmeters Menu.
4. Press the NEXT and BACK keys to view the hourmeter
displays.
5. Press the EXIT key to return to the Standard Display.
Simple to Operate:
SmartPower™ Electric Standby (OPTION)
1.Connect the proper
voltage power supply to
the unit’s power
receptacle.
2. Press the ON key to turn
the unit on.
• The Thermo King
Logo will briefly be
displayed as the
system initializes.
• CONFIGURING
SYSTEM PLEASE
WAIT briefly
appears while communications are established and the
unit prepares for operation.
• The Standard Display showing box temperatures and
setpoints briefly appears next.
• ELECTRIC MOTOR STARTING will appear.
• The Standard Display showing box temperatures and
setpoints appears while the unit is running.
3. Press the OFF key to turn the unit off. The unit will immediately
shut off and SYSTEM IS POWERING DOWN will appear
briefly.
T-Series
Multi-Temperature
Truck Unit
with
Premium HMI
Driver’s Guide to
Simple Operation
2
TK 54735-1-PC (Rev. 1, 07/10) ©Thermo King Corporation

Other manuals for T- series

2

Other Thermo King Automobile Accessories manuals

Thermo King Precedent C-600M User manual

Thermo King

Thermo King Precedent C-600M User manual

Thermo King V-520 Series User manual

Thermo King

Thermo King V-520 Series User manual

Thermo King T- series User manual

Thermo King

Thermo King T- series User manual

Thermo King Smart Reefer 3 Installation and operation manual

Thermo King

Thermo King Smart Reefer 3 Installation and operation manual

Thermo King B Series User manual

Thermo King

Thermo King B Series User manual

Thermo King Precedent S-750i User manual

Thermo King

Thermo King Precedent S-750i User manual

Thermo King TriPac EVOLUTION User manual

Thermo King

Thermo King TriPac EVOLUTION User manual

Thermo King T-1000R User manual

Thermo King

Thermo King T-1000R User manual

Thermo King V-520 RT Series User manual

Thermo King

Thermo King V-520 RT Series User manual

Thermo King E-200 User manual

Thermo King

Thermo King E-200 User manual

Thermo King Whisper User manual

Thermo King

Thermo King Whisper User manual

Thermo King 42-2499 Reference guide

Thermo King

Thermo King 42-2499 Reference guide

Thermo King Spectrum TS User manual

Thermo King

Thermo King Spectrum TS User manual

Thermo King SLXi-100 User manual

Thermo King

Thermo King SLXi-100 User manual

Thermo King UT-800 User manual

Thermo King

Thermo King UT-800 User manual

Thermo King V Series User manual

Thermo King

Thermo King V Series User manual

Thermo King V220 Series User manual

Thermo King

Thermo King V220 Series User manual

Thermo King B-100 User manual

Thermo King

Thermo King B-100 User manual

Thermo King VCP2 User manual

Thermo King

Thermo King VCP2 User manual

Thermo King V220 Series User manual

Thermo King

Thermo King V220 Series User manual

Popular Automobile Accessories manuals by other brands

Demco 6175 Operator's manual

Demco

Demco 6175 Operator's manual

SSV Works TXF-OSP65 installation instructions

SSV Works

SSV Works TXF-OSP65 installation instructions

Front Runner BGTH002 quick start guide

Front Runner

Front Runner BGTH002 quick start guide

Curt Group ARIES S224046 installation manual

Curt Group

Curt Group ARIES S224046 installation manual

TOP VEHICLE TECH KWAUDI5 installation manual

TOP VEHICLE TECH

TOP VEHICLE TECH KWAUDI5 installation manual

Cruz Evo Rack Alu A21-140 Assembly instructions

Cruz

Cruz Evo Rack Alu A21-140 Assembly instructions

luceco BG SyncEV EVS7GGR Installation and user guide

luceco

luceco BG SyncEV EVS7GGR Installation and user guide

Cruz Race Assembly instructions

Cruz

Cruz Race Assembly instructions

Vintage Air 561191 instruction manual

Vintage Air

Vintage Air 561191 instruction manual

Broadfeet DCNI-533-32 installation instructions

Broadfeet

Broadfeet DCNI-533-32 installation instructions

Prorack K045 Fitting instructions

Prorack

Prorack K045 Fitting instructions

Menabo WHITE BEAR 4 Fitting instructions

Menabo

Menabo WHITE BEAR 4 Fitting instructions

Saris Freedom 4414B Assembly instructions

Saris

Saris Freedom 4414B Assembly instructions

Edelbrock 1584 installation instructions

Edelbrock

Edelbrock 1584 installation instructions

Philips SJM3123 Specification sheet

Philips

Philips SJM3123 Specification sheet

travall TDG 1654 Fitting instructions

travall

travall TDG 1654 Fitting instructions

Tomei 194017 installation manual

Tomei

Tomei 194017 installation manual

Parksafe Automotive CAMINTER15 manual

Parksafe Automotive

Parksafe Automotive CAMINTER15 manual

manuals.online logo
manuals.online logoBrands
  • About & Mission
  • Contact us
  • Privacy Policy
  • Terms and Conditions

Copyright 2025 Manuals.Online. All Rights Reserved.