THIEYE Carbox 6 User manual

Dash Cam Carbox 6
User Manual
Carbox 6 How-to Video

USER MANUAL
Deutsche Anleitung
取り扱い説明書
Guide de démarrage rapide
Guida di Operazione Rapida
Manual de usuario
Руководство пользователя
.................................................................
...........................................................
..................................................................
............................................
..........................................
.............................................................
...........................................
01
17
34
50
67
83
100
EN 1
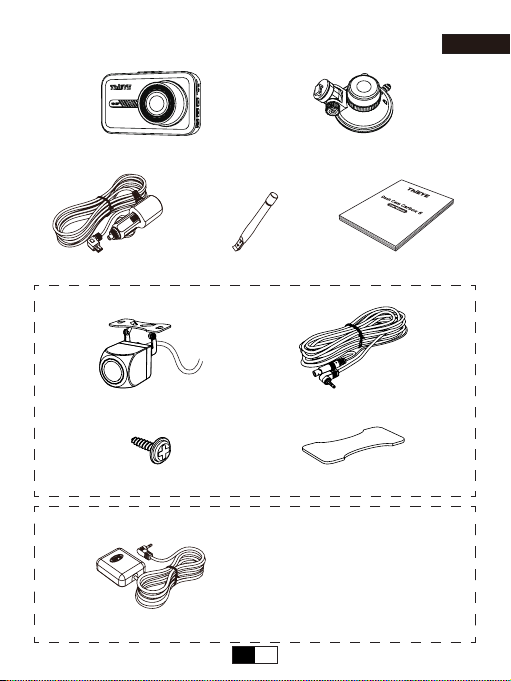
Packing List
Dash Cam Carbox 6 Suction Cup Mount
3.5M Car Charger User Manual
Optional 1
Rear Camera 6M Rear Camera Cable
Rear Camera Screw x 2 3M Glue for Rear Camera
Optional 2
GPS Antenna
English
Plastic Crowbar
EN 2
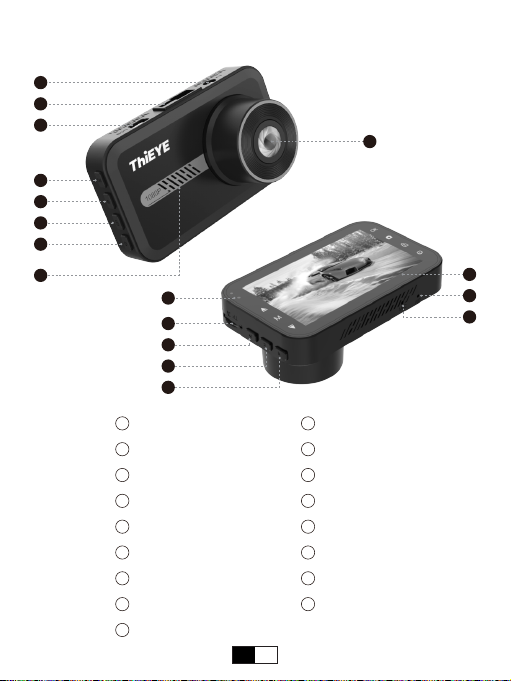
Layout
1AV Output Port
Chimeric Insert
Mini USB Port
OK Button
Mode Button
Lock Button
Power Button
Speaker
Indicator
2
3
4
5
6
7
8
10 TF Card Slot
Up Button
Menu Button
Down Button
Lens
Screen
Reset
Microphone
11
12
13
14
15
16
1
2
3
4
5
6
7
9
10
11
12
13
8
16
17
14
15
9
17
EN 3
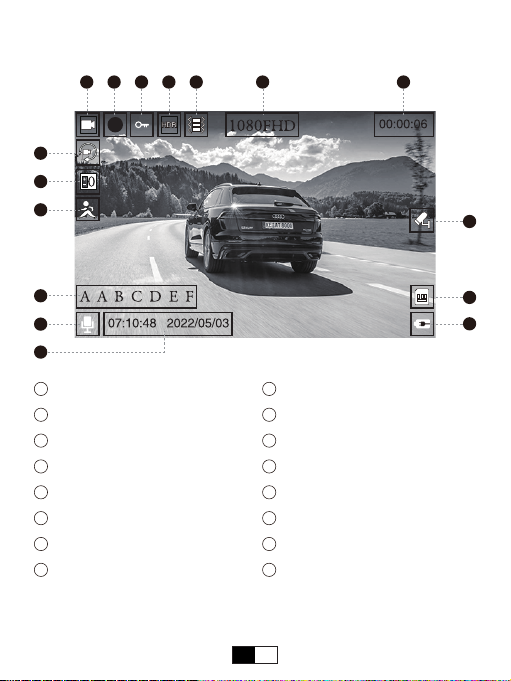
Screen Display
1 3 4 5 6
8
9
10
12
14
15
16
13
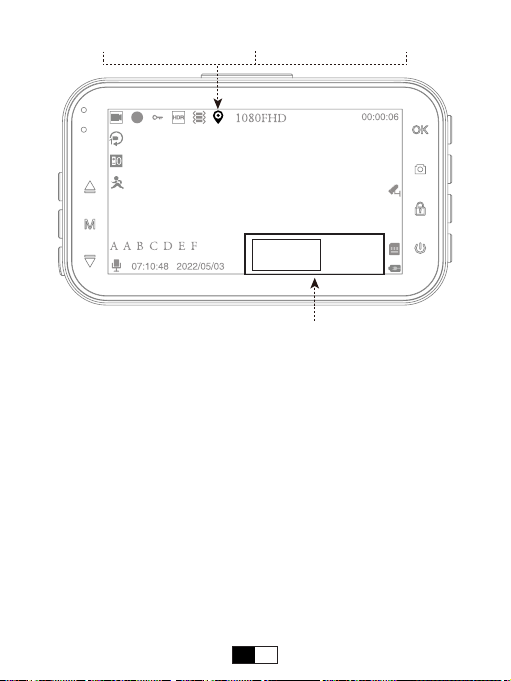
1Video Mode
Red Dot (It means recording)
Lock
HDR
G-sensor
Video Resolution
Recording Time
Loop Recording
2
3
4
5
6
7
8
9Exposure Compensation
Motion Detection
License Plate Number
Microphone
Time & Date
Parking Monitor
TF Card
Battery Status
10
11
12
13
14
15
7
11
16
2
* When some icons appear on the screen, it means the function is enabled.

EN 4
LED Indicators
Indicators Status Instructions
Red Indicator Is On Charging
Blue Indicator Flashes Recording
Specications
Screen Size 3.0 inch
Image Sensor 2 MegaPixel
Lens View Angle 170°
Video 1920*1080 / 30FPS (MOV)
Photo 4032*3040 (JPG)
TF Card Support up to 64GB
Storage Compression MJEPG
Storage Temperature -30℃~80℃
Working Temperature -20℃~70℃
Voltage DC 5V
Size 89mm*52.7mm*35.22mm
Installation Instructions
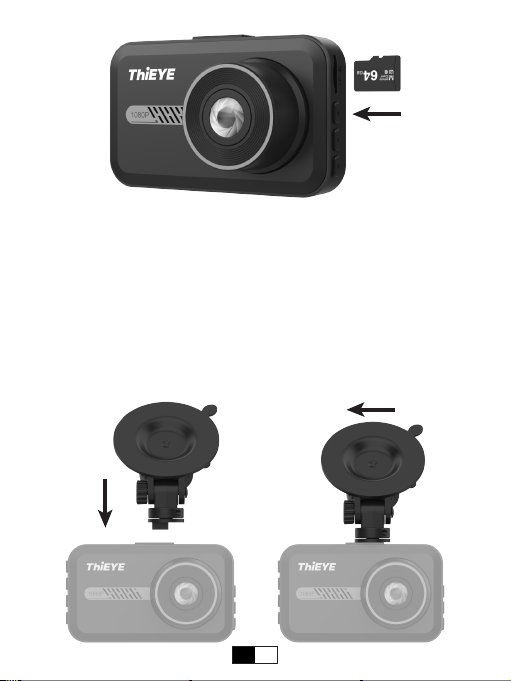
1.Insert a Micro SD Card (Not included)
Please format the TF card in the camera before rst use.
EN 5
Note:
* Please use a Micro SD card of at least 32GB. (Over Class 10)
* To keep your Micro SD Card in good condition, please format it regularly. As
reformatting erases all of your contents, be sure to back up your photos and
videos rst.
* Please remove the SD card in the power-o state to avoid damage to the
memory card.
* To prevent the loss of important data, please pay attention to backup.
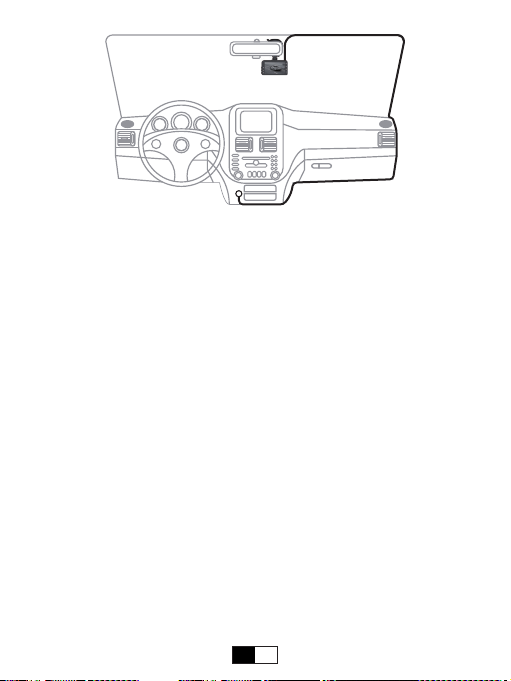
2.Install the Dash Cam to the Car
(1) Connect the dash cam to the suction cup mount.

EN 6
(3) Adjust the angle.
(2) Install the suction cup on the windshield.
(4) When the car is turned o, connect the dash cam to the car outlet with the car
charging cable.
(5) Hide the power cable in the gap of the car.
(6) Start the engine and Carbox 6 will automatically turn on.
EN 7
Basic Instruction
1.Power On / O
(1) Auto power on / o with ignition
When powered by the car charger, the dash camera will automatically turn on
recording when you start your car engine. When turning o your car, the camera
will automatically turn o after approximately 5 seconds.
(2) Manual power on / o
Press and hold the power button to manually turn on / o the camera.
* In the power-on state, press the power button to turn on / o the display.
2.Mode Switching
Press the mode button to switch the modes (Video, Photo, Playback).
* If your camera is recording, please stop recording rst by pressing the OK button.
3.Front And Rear Camera Switching
After installing the rear camera, the dual camera views (Picture-In-Picture Mode)
will be displayed at the same time.
(1) In video mode, press the up button to switch between PIP mode, dual camera
mode, front single camera mode, and rear single camera mode.
(2) In photo mode, press the up button to switch between the front and rear camera
to take pictures.
EN 8
(3) In playback mode, press and hold the up button to switch folders of the front
and rear camera.
4.Video Mode
In video mode, press the OK button to start / stop manual recording. When in
recording, red dot and blue indicator will ash.
·Press the lock button to lock the recording in progress. It can prevent the
important recording from overwriting due to loop recording.
·Press the down button to turn on / o the audio recording.
·Press and hold the down button to turn on / o the parking monitor.
5.Photo Mode
Press the mode button to get into the photo mode. (Camera icon will be on the
upper left corner of the screen)
Press the OK button to take a picture.
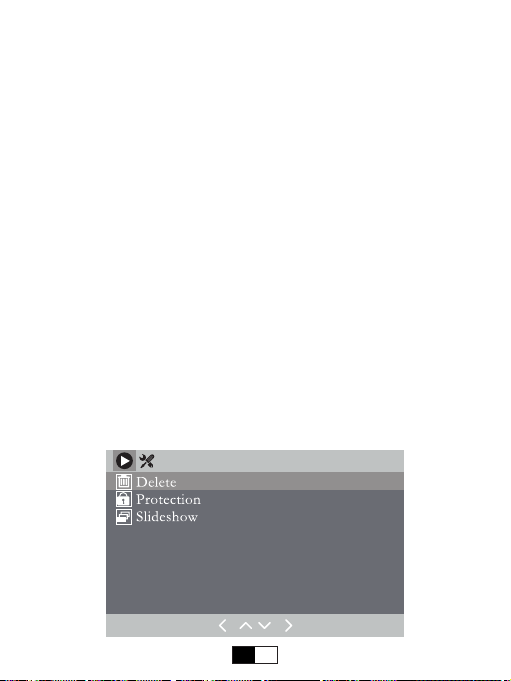
6.Playback Mode
In playback mode, you can use the up and down buttons to select the recorded
video, and press the OK button to view the playback.
Press the menu button to open the playback menu, you can delete, lock, and
unlock les.
Press the menu button again to exit the interface.
EN 9
Menu Settings Instruction
Press the menu button to get into the menu settings. During the setting, press the
up and down buttons to select, and press the OK button to conrm. After the setting
is completed, press the menu button to exit the setting.
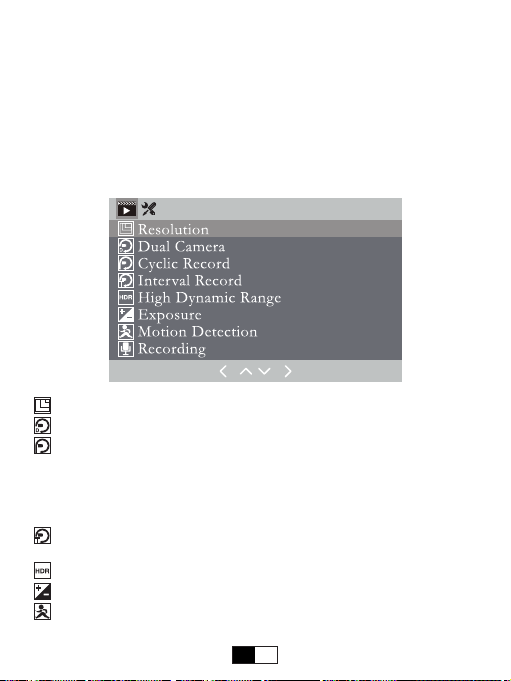
1.Video Menu Settings
In video mode, when not recording, press the menu button to enter the video menu
settings. If the dash cam is recording, please exit the recording rst.
Video Resolution
Dual Camera
Cyclic Record
In the case of recording and saving at interval of 1 / 3 / 5 minutes, the dash cam will
automatically over write the earliest le in the TF card once the card is full.
If you turn o the cyclic record, the dash cam will record every 5min segment of
video and stop recording when the card is full.
Interval Record
The interval time between each recording.
High Dynamic Range
Exposure Compensation
Motion Detection
In the power-on state, the dash cam will automatically record any movement that is
EN 10
detected by dash cam. It will stop recording when motion disappears.
* Motion detection will result in variable recording duration. If you need record
continuously, please turn o the motion detection.
Audio record
Date Stamps
Gravity Sensing
After turning on G-sensor, it will lock the recording when detecting a collision during
the recording. The G-sensor sensitivity can be selected in the menu.
Parking Guard
After parking, the dash cam will auto-start and record when it detects a collision. It
will turn o after continuously recording 30 seconds.
License Plate Number
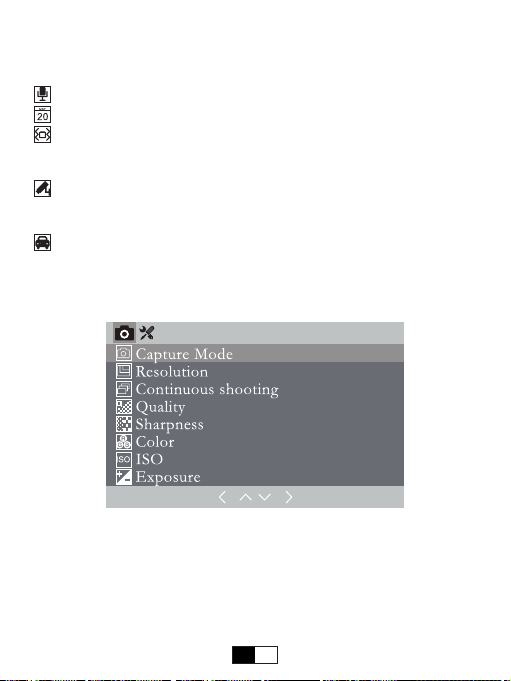
2.Photo Menu Settings
In photo mode, press the menu button to get into photo menu settings.

EN 11
Basic Settings
Press the menu button twice to get into the basic settings interface.
Screen Saver
The screen display will be turned o after a period of inactivity.
The camera is still recording when the screen display turns o.
Press the power button to activate the screen.
Auto shut down
Light Source Frequency
Button Sound
Language
Date / Time
Press up / down button to change the number. Press the OK button to conrm the
number and switch the setting.
Format
All les will be deleted in format mode.
Default
In default setting, all user information set before will be cleared.
Version
EN 12
Accessories Installation & Instruction
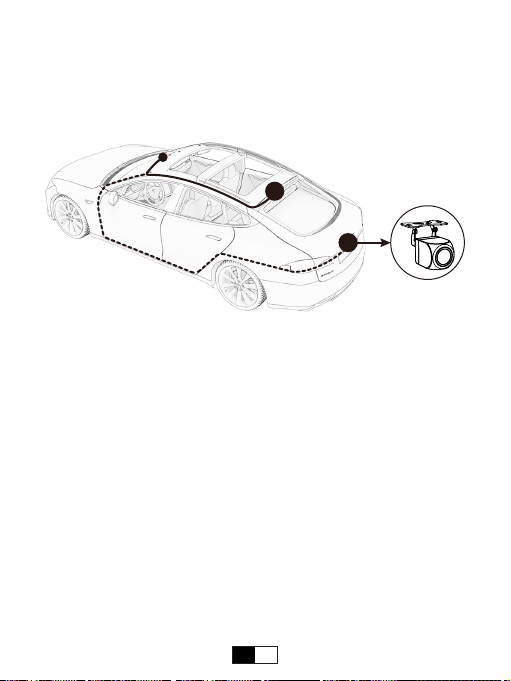
1.Install the Rear Camera (Need to be purchased)
The installation location of rear camera is actually quite exible, so there some
recommended locations with dierent angles of visions.
A
B
A: Install on the rear windshield.
B: Install above the license plate.
Connect the red wire to the reverse light
Please identify the wire that feeding the reverse light from rear light cluster, although
its placement may vary, make sure to refer to your car’s manual. Once spotted, use
a pair of pliers or wire strippers to peel the rubber to expose the live wire.For safety,
make sure you do this while the car is turned o. Tie the red trigger wire with the
positive terminal of the correct wire and then wrap it with electrical tape.
* Do not connect the red trigger wire to brake light of tail light.
* When on reverse gear, it will make the dash camera’s screen automatically change
to the rear view in order to view the reversing situation.

EN 13
Mounting Bracket
Rear Camera
6 Meters Rear Camera Cable
Trigger Wire for Reverse Light (Red)
AV Out Connect to Dash Cam
Note: The installation illustrations are for your reference only. The placement of the
devices and cables may vary depending on the car model. If you encounter any
problems during installation, contact a skilled installer (such as the service personnel
of the car) for assistance.
2.Install the GPS Antenna (Need to be purchased)
(1) Install the external GPS antenna at the corner of the center console.
Best Mounting Location
(2) Connect the GPS Antenna to the GPS slot of the dash cam.
Power on dash cam. A yellow " " will appear in the upper left corner of the screen
while the GPS module is establishing satellite and location. This will be replaced by
a green " " when the satellite and location are established. Then the GPS module
will automatically embed your GPS coordinates and speed in all video recordings.
EN 14
000 KM/H
Red: not conncted Yellow: In preparation Green: Operates normally
Speed Display
The icon turns “Red” to indicate that no satellite and location has been found, and
“Green” indicates that the search for satellite is completed and the positioning is
accurate. “Yellow” indicates that the satellite is being searched.
GPS Instruction
1.Setting
Once connect the GPS antenna to the AV Output port of the dash cam, you can
press the menu button to set these functions.
(1) Time Zone: UTC-12:00 to UTC+12:00
(2) Speed Unit: KM/H and MPH.
2.Open GPS Video File on PC
(1) Import video les from TF card to computer.

EN 15
(2) Download the dedicate GPS player via link, click here:
http://www.thieye.com/download/gpsplayer
Note: With TF card inserted, when the GPS Module connects to the dash cam, an
installation le of the GPS player will be generated in the root directory of the TF
card. Click on this le (gpsplayer.exe) to install the GPS player to Windows computer.
(For the Mac OS X computer, please download the le from website)
SettingsMap
Settings
Change language English, Chinese, Japanese, German, French, etc. And change
your unit of speed measurement from MPH to KMH.
Map
Record and display your location information in real time.
Factors that GPS Cannot Locate:
* The signal strength of the position is not strong enough or under the shelter. For
example, the position is near dense high-rise building, or in the valleys, canyons,
tunnels, underground parking garages. Please subject to electrical electromagnetic

EN 16
interference or metal composition shelter, etc.
* Weather Factors: Sunspots; severe weather (such as typhoon, etc.)
* Other Factors: Human interference (such as SA policy, Microwave transmitter);
GPS satellite orbit; Electromanetic interference noise around GPS equipment;
Surrounding transmitting stations or mobile base station, etc.
Troubleshooting
If the machine freezes, reboots repeatedly and fails to boot, please try the following
methods:
1. Replace the power cable.
2. Pull out the TF card and turn on the machine again. If it works, it means there is
a problem with the TF card, please format the TF card or replace the TF card.
3. Pull out the TF card, press and hold the reset button to turn on.
Table of contents
Other THIEYE Dashcam manuals


