THIEYE CarView 4 User manual

USER MANUAL
Dual Lens Mirror Dash Cam
CarView 4

USER MANUAL
Guide de démarrage rapide
Deutsche Anleitung
Guida di Operazione Rapida
取り扱い説明書Manual de usuario
Руководство пользователя
01
20
39
58
77
96
115
...........................................
.........................
......................................
........................
............................................
........................................
.........................

What’s Included English
Mirror Dash Cam Rear Camera
With 0.5M Cable
Rear Camera
Screw × 2
7.5M Rear
Camera Cable
GPS Module
Pry Tool 3M Glue For
Rear Camera
Mounting Strap × 4
User Manual
Car Charger
With Additional USB
EN 01

Layout
Reset
Front Lens
Power Button
Speaker
Rear Lens
1
2
3
4
5
Touch Screen
Back Clip Fixed Hook
Mini USB Port
Rear Camera Port
TF Card Slot
GPS Port
6
7
8
9
10
11
2
3 4
1
5
9 10 1186 7
EN 02
Installation Instructions
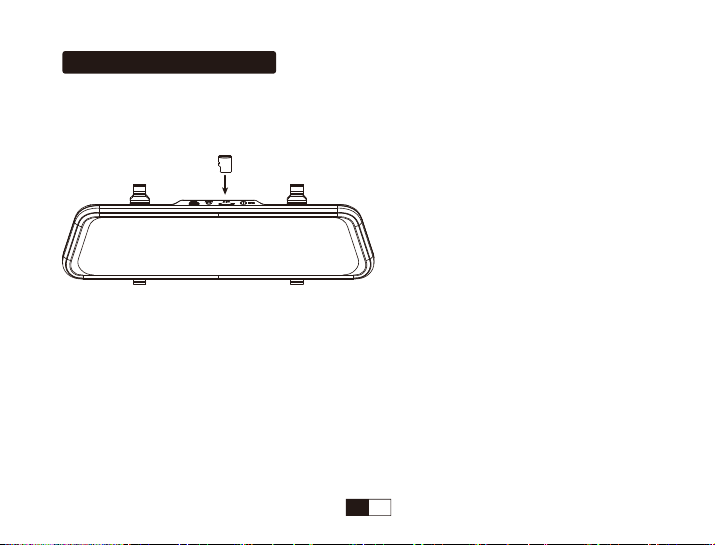
1.Insert A TF Card (Not included)
Supports up to 128GB (Over U1).
Please format the TF Card in the camera before first use.
Note:1.To keep your TF card in good condition, please format it regularly. As reformatting erases all of your
contents, be sure to back up your photos and videos first.
2.Please remove the TF card in the power-off state to avoid damage to the memory card.
3.To prevent the loss of important data, please pay attention to backup.
EN 03

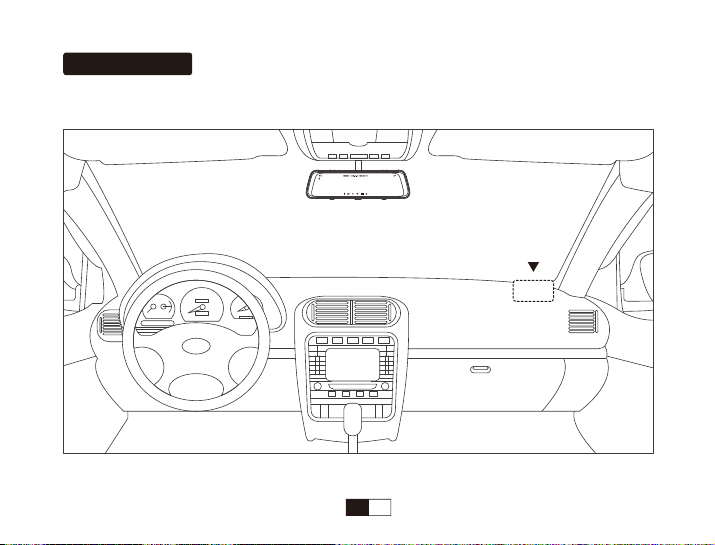
2.Install the Mirror Dash Cam to the Car
3.Front Camera Installation Wiring Diagram
Or
EN 04

A
C
B
4.Install the Rear Camera
The installation location of rear camera is actually quite flexible, so there are some recommended locations with
different angles of visions.
A:Installed on the front windshield for in-car recording
B:Installed on the rear windshield for recording outside the car
C:Installed near the license plate for recording the rear areas of the car
Mount the rear camera properly
as shown in the picture
A
C
B
EN 05

Connecting the Red Wire with the Reversing Light
Please identify the wire that feeding the Reverse Light from the rear light cluster, although its placement may vary,
so be sure to refer to your car’s manual. Once spotted, use a pair of pliers or wire strippers to peel the rubber to
expose the live wire.
For safety, make sure you do this while the car is turned off. Tie the Red Trigger Wire with the positive terminal of
the correct wire and then wrap it with electrical tape.
Note:
1.DO NOT connect the Red Trigger Wire with Brake Light or Tail Light.
2.While on reverse gear, it will make the dash camera's screen automatically changes to the rearview in order to
view the reversing situation.
Note:
* The installation illustrations are for your reference only. The placement of the devices and cables may vary
depending on the car model. If you encounter any problems during installation, contact a skilled installer (such as
the service personnel of the car) for assistance.
Trigger Wire for Reverse Light (Red)
7.5 Meters Rear Camera Cable
AV Out
Connect to Dash Cam
Rear Camera
Mounting Bracket
EN 06

5.Connect to Power
Front Camera
Rear Camera
Rear Camera Cable (24ft)
The Red Wire
Car Charger
AV-IN Port
Mini USB Port
EN 07
Get Started
1.Power On / Off
①Auto Power On / Off with Ignition
When powered by the car charger, the dash cam will automatically turn on when you start your car engine.
When turning off your car, the camera will automatically turn off after approximately 5 seconds.
②Manual Power On / Off
To manually turn the camera On / Off, press and hold the power button at least 3 seconds.
Note: In low power status, the dash cam will automatically shut down after it displays low battery.
2.Screen On / Off
Simply press the Power Button once to switch the screen off when the Mirror Dash Camera is ON, press it again
or tap the touchscreen to wake the camera up.
Note: When recording, switch the screen off, the dash cam will also keep recording.
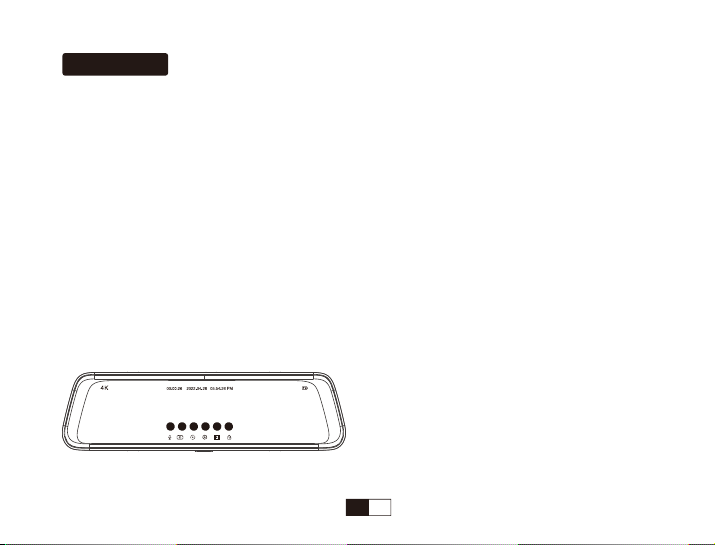
3.Touch Screen Overview
A D E FB C
EN 08

4.Asr (Automatic Speech Recognition)
The below operations can be controlled by voice. Only available in specific English or Japanese sentences.
More Gestures Operation:
* Swipe upward and downward on the left part of the touch screen to fine tuning the angle of the front and rear
camera.
* Swipe upward and downward on the right part of the touch screen to adjust the display brightness.
* Swipe the touch screen from right to left to switch among the view from the rear cameras, the View from the
front camera, and the view from both cameras.
* Swipe the touch screen from left to right to enter into playback mode.
Operation Function
A Tap the Audio On / Off Icon Open / Close Audio Recording
B Tap the Photo Taking Icon Take a photo
C Tap the video recording icon Start / stop video recording
D Tap the menu icon Enter into the setting menu
E Tap the playback icon Enter into the playback mode
F Tap the emergency lock icon Manually lock / unlock the file
Operation Voice Control
Switch the screen on / off Turn on / off screen
Stop / start audio recording Turn on / off audio
Take a photo Take photo
Switch the camera display mode Show front camera / Show rear camera / Show both cameras
Lock the emergency video Lock the video
EN 09

5.Video Mode
In the main interface, tap the video recording icon to start recording, the screen will appear a red dot and flash slowly,
indicating the video is recording.
Tap the lock icon to lock the recording, the screen will appear a yellow dot and flash slowly,indicating the video is locked.
Tap the photo taking icon to take a photo.
6.Playback Mode
Swipe the touch screen from left to right or tap the playback icon to enter playback mode.
Note:
When entering the playback mode, recording stops. Start recording again when returns.
View videos and photos by category, tap the folder name to switch.
Front ordinary video
Front ordinary video
00:00/00:30
Front photo
Front urgent video
Rear ordinary video
Rear photo
Rear urgent video
EN 10
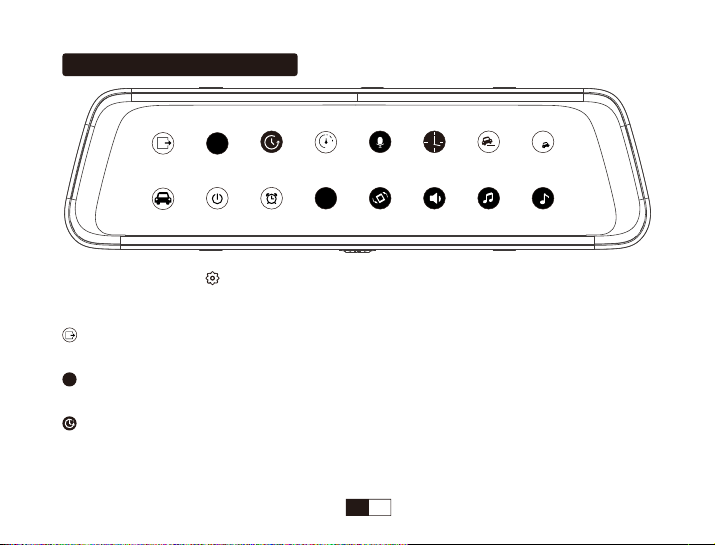
Menu Settings Instruction
*When in video mode, tap “ ” to enter into video setting menu and the recording stops. Start recording again
when returns.
Back
Return back the main interface.
Loop Recording
In the case of recording and saving at interval of 1 / 3 / 5 minutes, the dash cam will automatically overwrite the
earliest file in the memory card once the card is full.
Resolutions
4K / 2K / 1080P
4k
P
1
4k50Hz
zzz
BackResolutionLoop RecordTime-LapseRecord AudioG-SensorDatestampParking GuardLicenseAuto Power OffScreen SaverPower FrequencyBack MirrorSpeakerBoot SoundKey Sound0
EN 11
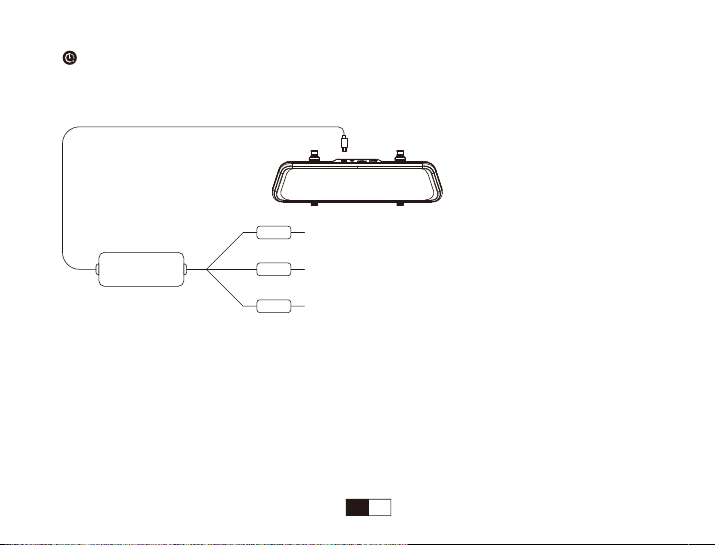
Time-Lapse
Note: An extra hardwire kit (also called the step-down line or buck line, sold separately) is required for using the
Time-lapse function (Off / 1s / 2s / 3s).
* When using the hardwire kit to supply power for the dash cam, and when the car engine turns off:
If you set time-lapse at off, the dash cam will power off automatically. If you set time-lapse at 1s, the camera will
capture 1 frame per 1s and merge them into a video. Selecting 2s indicates that the camera will capture 1 frame
per 2s, and selecting 3s indicates that will capture 1 frame per 3s.
* When using the hardwire kit to supply power for the dash cam, and when the car engine turns on: The dash
cam will exit the time-lapse function, and start recording normally.
Mini USB Port: Connect to the dash cam
GND Wire (Black ): Connect to any metal in the car
GND
Hardwire Kit BAT
ACC ACC Wire (Red): Connect to ACC
(Connect to on/off ignition switched fuse)
Battery Wire(Yellow): Connect to always powered constant fuse
EN 12

Note:
If you connect both the Battery Wire and ACC Wire to always powered constant fuse, and when the car
engine turns off, you will realize 24-hour recording. (But the Time-Lapse doesn’t work)
Audio record
Date Stamp
G-sensor
After turning on G-sensor, it will lock the recording when detecting a collision during the recording. The G-sensor
sensitivity can be selected Off / Low / Middle / High in the menu.
Parking Guard
After parking, the dash cam will auto-start and record when it detects a collision. It will turn off after continuously
recording 30 seconds.
License
Auto Power Off
When your camera is not recording, CarView 4 will automatically power off after 1 / 3 / 5 minutes.
Screen Saver
Off / 1 / 3 / 5 min
Back Mirror
Turn on to view the mirror image of the rear camera.
Power Frequency
50HA
zzz
EN 13

Speaker
Boot Sound
Key Sound
Language
Date/Time
ENVersion
Default
In default setting, all user information set before will be cleared.
Format
All files will be deleted in format mode.
Asr (Automatic speech recognition)
Off by default, turn on Asr to control specific operations by speaking specific English or Japanese sentences.
Troubleshooting
If the machine freezes, reboots repeatedly and fails to boot, please try the following methods:
1.Replace the power cable.
2.Pull out the TF card and turn on the machine again. If it works, it means there is a problem with the TF card,
please format the TF card or replace the TF card.
3.Pull out the TF card, press and hold the reset button to turn on.
AI
EN 14
1.Getting Started
1.Install the external GPS antenna at the corner of the center console.
66mp/h
Best mounting location
GPS Antenna
EN 15

2.Connect the external GPS antenna to the GPS slot of the dash cam
Power on dash cam. A yellow “ ” will appear in the upper left corner of the screen while the GPS module is
establishing satellite and location. This will be replaced by a green “ ” when the satellite and location are
established. Then the GPS module will automatically embed your GPS coordinates and speed in all video
recordings.
The icon turns “Red” to indicate that no satellite and location has been found, and “Green” indicates that the
search for the satellite is completed and the positioning is accurate. “Yellow” indicates that the satellite is being
searched.
66mp/h
Red: Not connected
Yellow: In preparation
Green: Operates normally
EN 16

3.Setting
Once connect the GPS antenna to the GPS slot of the dash cam, 3 new GPS setting options will appear in the
setting mode. Tap the “ ” button to enter the setting mode and set GPS options.
1. GPS Test
Check the GPS information, including GPS status, GPS satellites in view, Accuracy(feet), Azimuth(degrees),
Coordinate(Lon/Lat), Speed and UTC Time.
2. Time Zone
Set the real-time time zone in your living area from UTC -12:00 to UTC +12:00. After setting the Time Zone, the
time of dash cam will synchronize with the Time Zone.
3. Speed Unit
Set the speed unit to be displayed in the dash cam, including KM/H and MP/H.
EN 17

4.Open GPS Video File on PC
1.Import video files from TF card to computer.
2.Download the dedicate GPS player via link, click here: http://www.thieye.com/download/gpsplayer
Note:
With TF card inserted, when the GPS Module connects to the dash cam, an installation file of the GPS
player will be generated in the root directory of the TF card. Clink on this file (gpsplayer.exe) to install the GPS
player to a Windows computer. (For the Mac OS X computer, please download the file from website)
①②EN 18
Table of contents
Other THIEYE Dashcam manuals


