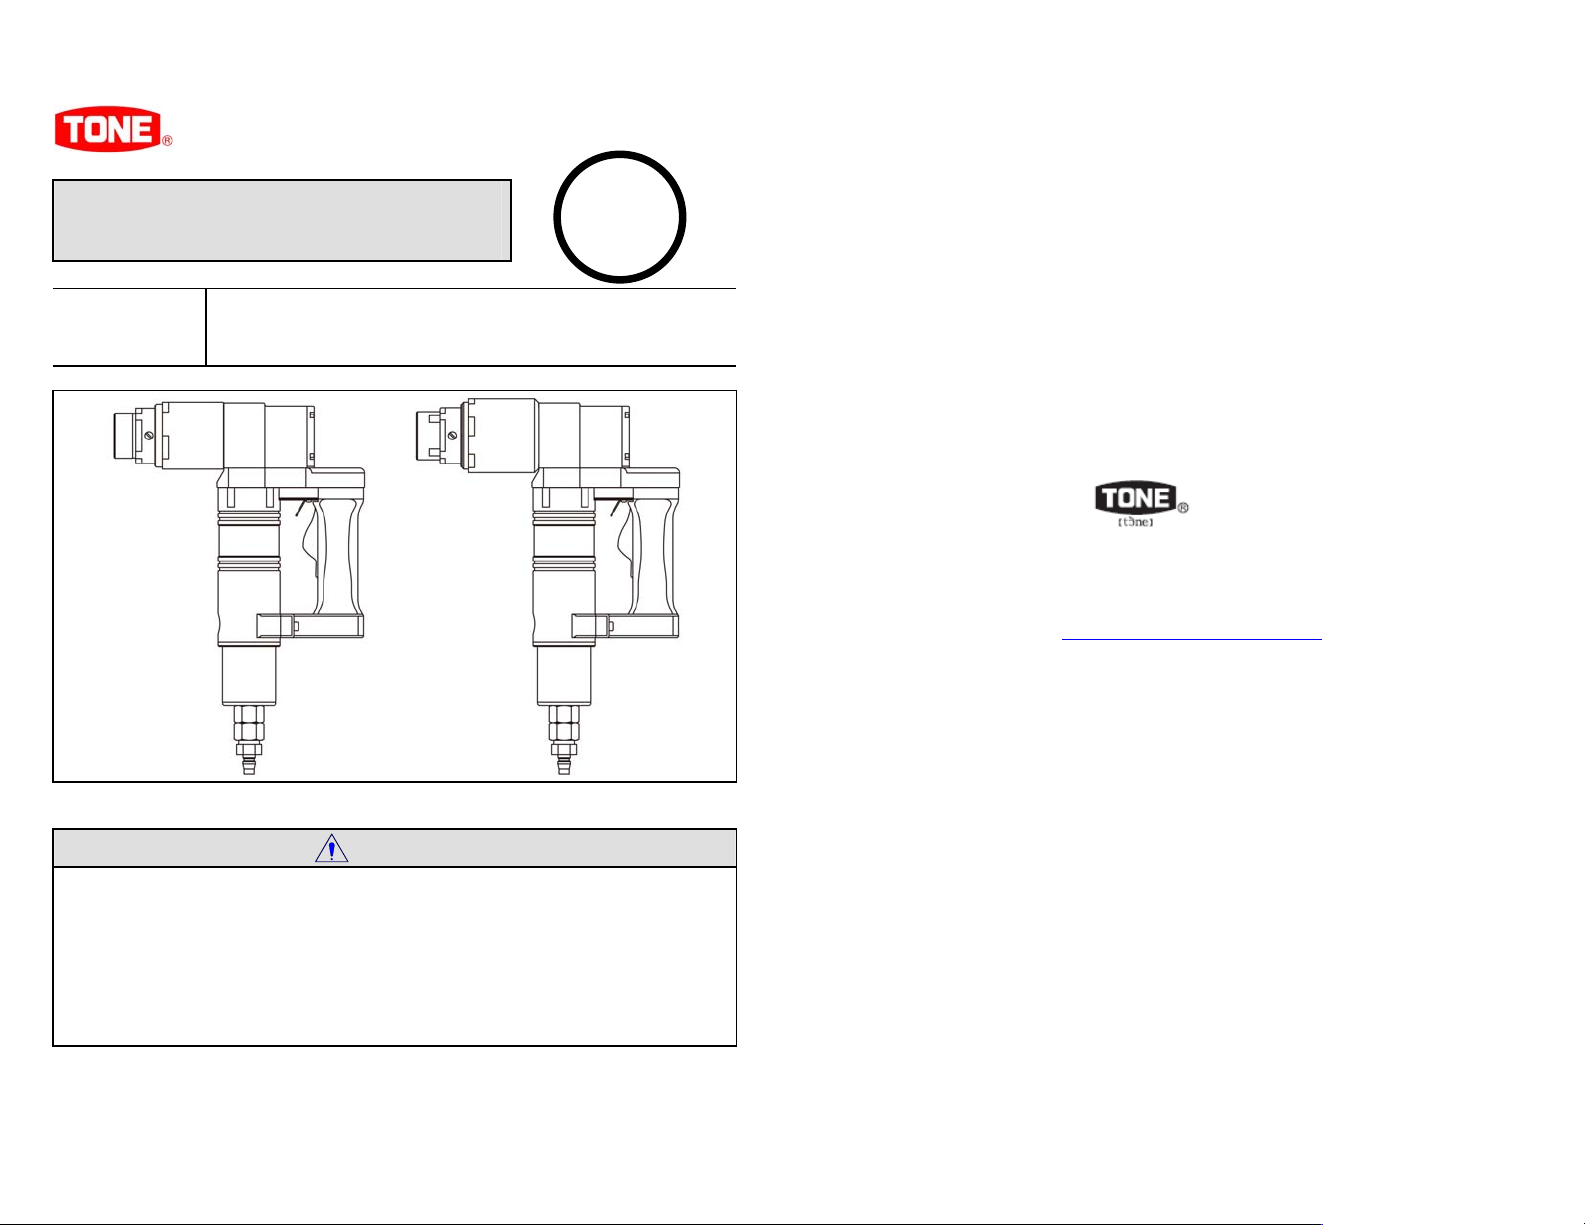
Tone PW200 User manual

INSTRUCTION MANUAL
No. 0901
MODEL PW200
PW220
CAUTION
Read and fully understand all the instructions before use.
Keep this manual in designated place for easy and quick
reference.
The model mentioned on this manual is designed for use outside
o Japan.
Warranty shall be void if above mentioned model is used in
Japan.
LeJeune Bolt Company
PNEUMATIC SHEAR WRENCH
TO BE
PRESERVED
MAEDA METAL INDUSTRIES, LTD.
No.14-3, Fukae-kita 3-chome,
Higashinari-ku, Osaka, Japan, Post code 537-0001
Web site : http://www.tonetool.co.jp
●Specifications and the design are subject to change without
notice. ●

1
INTRODUCTION
Thank you for purchasing the LeJeune PNEUMATIC SHEAR WRENCH
■Upon receipt, check and confirm the following:
- Check any transport damages.
- Check for any loose or lost screws and bolts.
- Check the model as per order.
- Check all the accessories are contained. (see page 20)
If any problems are found, contact your LeJeune Bolt Company
■Read this instruction manual carefully before use.
Full understanding of manual is essential to prevent
personal injury or malfunction.
■Keep this manual in a bag attached to the back of metal
case lid for easy and quick reference.
■If manual or warning label is lost or becomes illegible,
or if additional manual is required, contact LeJeune Bolt
Company.
If you have any questions about the products or the
contents of this instruction manual, contact LeJeune Bolt
Company.
■This manual is only applicable to outside of Japan.
SAFETY INSTRUCTIONS
2
This manual specifies three (3) basic safety
instructions:
DANGER WARNING CAUTION
■Instructions are classified by degree of risk and
described as follows:
DANGER
Danger is used to indicate threatening
dangerous or unsafe practices which could
imminently result in severe personal
injury or death in the worst case.
WARNING
Warning is used to indicate hazardous or
unsafe practices which could result in
severe personal injury or death in the
worst occasion.
CAUTION
Caution is used to indicate hazardous or
unsafe practices which could result in
personal injury or product or property
damage.
Even if the risk is classified as CAUTION , risk could
become more serious result depending on conditions. Make
sure to follow all instructions when using..
TABLE OF CONTENTS
1.

3
APPLICATION 4
2. PRECAUTIONS FOR USE 4
3. BEFORE USE
11
4. PART NAME
13
5. OPERATING PROCEDURE 13
6. CHANGING SOCKETS
15
7. INSPECTION & MAINTENANCE
18
8. FEATURES
19
9.
SPECIFICATIONS
19
10. ACCESSORIES
20
11.AFTER SALES SERVICE 20
4
1. APPLICATION
■TONE PNEUMATIC SHEAR WRENCH is a pneumatic tool for
tightening Tension Control Bolts/Nuts.
2. PRECAUTIONS FOR USE
■To prevent accident, personal injury and etc, read and
follow all instructions listed below.
DANGER
●Never use power source other than air compressor.
Failure to follow this instruction such as use of high
pressure gas invites explosion.
WARNING
●Use rated air pressure.
Failure to follow this instruction may result in accident
and personal injury.
●Air hose must be regularly inspected.
Stop using the wrench if there is a problem with the air
hose.
Failure to follow this instruction may result in
accident, personal injury or deficiency in wrench
performance.

5
WARNING
●Use adequate air hose.
○Use adequate air hose listed on page 19.
○Use oil and abrasion resistant air hose.
○Never use deteriorated or overlong air hose.
Failure to follow these instructions may result in
malfunction or deficiency in wrench performance.
●Ensure air inlet fitting is securely connected.
○There is a high risk of whipping air hose when hose is
accidentally comes off the pneumatic wrench.
○Air inlet fitting must be securely connected to the air
hose and the pneumatic wrench.
○Use adequate air inlet fitting listed on page 19.
Failure to follow these instructions may result in serious
accident and injury.
●Beware of fall down accident when working at a high
place.
○Wear safely belt.
○Provide safety net or canvas as safeguarding against
falling items.
○Confirm that no one is underneath the working site before
operation.
○Stop operation when physically or mentally tired.
Failure to follow these instructions may result in fall
down accident.
6
WARNING
●Avoid overloading.
○Use pneumatic wrench and its accessories within the rated
specification.
Overloading of the wrench and its accessories may result
in damage of the wrench or its accessories; or accident
or personal injury.
●Properly install the socket as described in this
manual.
Incomplete installation may result in accident and
personal injury.
See “CHANGING SOCKETS” on page 15 - 17
●Avoid accidental starting.
○Ensure the switch is in the off-position before
connecting air hose.
○Never carrying the wrench with your finger on the switch
when air compressor is powered on.
Failure to follow these instructions may result in
accidental starting and personal injury.
●Disconnect the air hose when:
○not in use.
○changing accessories.
○inspection and maintenance.
○or other danger is foreseen.
Failure to follow these instructions may result in
accidental starting and personal injury.

7
WARNING
●Never connect pneumatic wrench to electric power
source.
○Pneumatic wrench is not an insulated tool.
Failure to follow this instruction may result in serious
accident and injury.
●Do not disassemble or modify pneumatic wrench.
Disassembly or modification made by unauthorized personnel
may result in malfunction or personal injury.
Disassembly & Re-assembly work is permitted for following
expendables:
Inner Socket, Outer Socket, Set Screws, Inner Socket
Spring, Ejector Pin and Ejector Spring.
●Store pneumatic wrench in the metal case and keep
it in the designated place when not in use.
○Store the wrench in lockable dry location to keep any
unauthorized personnel away.
Failure to follow this instruction may result in
malfunction or accident.
●Immediately stop using and disconnect air hose
from pneumatic wrench when unusual sound,
vibration or smell is detected.
○Contact your distributor immediately.
Failure to follow this instruction may result in serious
injury.
8
WARNING
●Contact your distributor for repair service.
Repair work should only be done by a qualified serviceman.
Repair work done by an inexperienced person may cause
accident, injury or malfunction.
●Check the following items before operation.
○Check for any deformation, crack or damage on wrench
body, air hose, air inlet fitting and etc.
Do not use wrench if any problem is found on items listed
above.
○Make sure that socket assembly is correctly installed
on the wrench.
○Make sure that set screws are securely fastened.
Loose installation may result in accident and personal
injury.
●Immediately check the wrench when it is dropped
down or banged.
○Check for deformation, crack, damage and other
abnormality. Stop using the wrench if any abnormality
is found.
Continued use of faulty wrench may result in accident and
personal injury.

9
CAUTION
●Keep work area clean.
Cluttered areas and benches invite accidents.
●Keep children away.
Do not let children touch pneumatic wrench and air hose.
All visitors should be kept away from work area.
●Secure work area.
Keep body stance balanced and firm.
Never wrap the air hose.
Keep work area well lit.
●Use suitable model for each application.
Do not use pneumatic wrench beyond its capacity.
Do not use pneumatic wrench for purposes not intended.
●Dress properly.
Always wear gloves and non-slip safety shoes when
operating outdoor.
Always wear safety helmet.
●Use genuine accessories or attachments
manufactured by Maeda Metal Industries, Ltd.
●Do not abuse air hose.
Never carrying the pneumatic wrench by air hose.
Keep air hose away from heat, oil, sharp edges or moving
parts.
10
CAUTION
●Keep air motor well ventilate.
Do not block exhaust vent.
●Never put any items into exhaust vent.
Water, mud or other substances entering an exhaust vent
may result in malfunction of the wrench.
●Maintain pneumatic wrench.
Keep the wrench handle clean, dry and free of oil or
grease.
●Use quality Filter/Regulator/Lubricator Unit.
Place F/R/L Unit as close as possible to the operating
pneumatic wrench.
Failure to follow this instruction may result in
accident, malfunction or deficiency in wrench
performance.
●Beware emission of an air-oil mixture.
Do not directly expose eyes, ears and nose to emission
of an air-oil mixture.
Failure to follow this instruction may result in
accident, injury or illness.
●Observe local laws and rules concerning noise
level.

11
3. BEFORE USE
1. Inspection
WARNING
●Ensure the air hose is not connected to the wrench
before inspection.
Accidental starting invites personal injury.
○Check for any deformation, crack or damage on wrench
body, air hose, air inlet fitting and etc.
Do not use wrench if any problem is found on items listed
above.
○Make sure that socket assembly is correctly installed on
the wrench.
○Make sure that set screws are securely fastened.
Loose installation may result in accident and personal
injury.
See “CHANGING SOCKETS” on page 15 - 17
2. Equipments
Air Compressor
Use sufficient air compressor. 7.5kW per wrench is
required.
Air Hose
Use 1/2” bore air hose with a maximum length of 5m.
Oil and abrasion resistant air hose must be used.
Air Inlet Fitting
Use Nitto Kohki part 40SH or 200-40SH or equivalent.
Filter/ Regulator/Lubricator Unit
F/R/L Unit must be placed as close as possible to operating
pneumatic wrench.
Use a quality F/R/L Unit that meets airflow requirements.
12
CAUTION
●Supply dry air below 10 (50).
Air supply over 10 (50) may result in malfunction or
deficient in wrench performance.
●Use a quality Filter to remove dirt.
Not using filter may result in accident, malfunction or
deficiency in wrench performance.
●Use a quality Regulator for proper air pressure
setting.
Air pressure must be at 0.6 Mpa (90psi).
Improper pressure setting may result in accident,
malfunction or deficiency in performance.
●Use a quality Lubricator to feed air motor oil into
pneumatic wrench.
Use additive-free turbine oil ISO VG32 or equivalent.
Feed 5 drops per minute.
Insufficient lubrication will invite air motor seizing,
accident, malfunction or deficient in wrench
performance.
■Basic System Setup ■
Figure 1

13
4. PART NAME
Figure 2
5. OPERATING PROCEDURE
WARNING
●Keep others a safe distance from work area.
○Do not throw pintail away. Collect pintail in designate
bag during operation.
Failure to follow this instruction may result in accident
and personal injury.
CAUTION
●Beware emission of an air-oil mixture.
Do not directly expose eyes, ears and nose to emission
14
CAUTION
of an air-oil mixture.
Failure to follow this instruction may result in
accident, injury or illness.
●Snug tight by using snug tightening wrench like
TONE SNUG MASTER is required before using pneumatic
wrench.
Figure 3
(1) Slide Inner Socket over
the bolt pintail.
(2) Slide Outer Socket over
the nut.
(3) Squeeze trigger switch
to start tightening.
(4) Rotating speed gradually
shows down as the tightening
proceeds, then bolt pintail
shears off when designated
torque is reached.
(5) When tightening is
completed, remove pneumatic
wrench from bolt/nut
assembly. Sheared-off bolt
pintail remains in Inner
Socket.
(6) Pull Ejector Lever to
eject bolt pintail. Keep
pintail in designated bag.

15
6. CHANGING SOCKETS
WARNING
●Release ejector pin by pulling ejector lever
before changing sockets.
Accidental ejector pin release invites blindness or
injury.
(1) Remove inner & outer socket assembly from pneumatic
wrench by unscrewing set screws (Figure 4). Do not remove
set screws completely from outer socket holder.
Figure 4
(2) Remove inner socket from outer socket by pushing
projecting pin using screwdriver or TC bolt (Figure 5).
Figure 5
●Projecting pin is a doughnut-shaped pin in the inner
socket.
16
(3) Select adequate inner & outer socket assembly of the
bolts being tightened.
i.e. Use TONE genuine 5/8”inner & outer socket assembly
for tightening
5/8”TC bolt/nut assembly
(4) Place the inner socket vertically then slide the outer
socket over the inner socket. Push projecting pin down
using screwdriver or pintail of the TC bolt and inner &
outer socket will properly assembled (Figure 6).
Figure 6
(5) Set inner & outer socket assembly to pneumatic wrench
body and completely remove the gap between socket assembly
and wrench body.
The gap can be removed by turning & pushing down
screwdriver or TC bolt into the inner socket.
Fasten the set screws only after gap is completely removed.

17
WARNING
●There should be no gap between the socket assembly
and the pneumatic wrench.
The gap invites accident or breakage of the sockets or
the wrench body.
Figure 7
18
7. INSPECTION & MAINTENANCE
WARNING
●Disconnect air hose from pneumatic wrench before
inspection and maintenance.
Accidental starting invites serious injury.
(1) Clean dust and debris from the sockets periodically.
(2) Use only a damp cloth to clean your wrench and sockets
since certain cleaning agents and solvents are harmful to
those parts. Some of these include: benzene, thinner,
gasoline and etc.
(3) Never put solvents into the exhaust vent.
(4) Store pneumatic wrench in the metal case after operation
and keep it dry.
(5) Ejector pin must be regularly inspected and replaced
when it wears down. Sheared bolt pintail will not be
ejected from inner socket with worn ejector pin (Figure
4).
WARNING
●Replace the inner socket when sheared bolt pintail
is came off the inner socket
w
ithout pulling the
ejector lever.
○There is a risk of unexpected bolt pintail ejection when
inner drive of the inner socket is worn down. The inner
socket must be immediately replaced.
Failure to follow this instruction may result in serious
accident and injury.
(7) Overhaul must be carried out every 6 months or 30,000
tightening, whichever comes first.

19
Contact your distributor for overhaul.
8. FEATURES
Explosion protection
TONE style grip
Bolt/Nut Anti-Defacement mechanism
Silencer
9. SPECIFICATIONS
MODEL PW200 PW220
Max Air Pressure 0.6MPa [90psi]
Max Air
Consumption 1.2m(normal)/min [42CFM]
Rated Max Torque 375Nm [277 lbf
ft]
610Nm [450 lbf
ft]
No-load Speed 75min[rpm] 50min[rpm]
Sound Pressure Level
85dB(A)
Tension Control Bolt S10T
M16 M16,M20
Tension Control Bolt A325
Adaptable Bolt
Diameter
1/2”,5/8”,3/4” 1/2”,5/8”,3/4”,
7/8”
External
Dimensions
Outer Dia: 68mm
Length: 255mm
Height: 358mm
Outer Dia: 75mm
Length: 268mm
Height: 362mm
Wrench Weight 5.8kg [12.8 lbs] 6.3kg [13.9 lbs]
Air Compressor 7.5kW per wrench is required
Air Temperature below 1050°F
Air Hose
1/2” bore with a maximum length of 5m
oil and abrasion resistant air hose must
be used
Air Inlet
Fitting
Nitto Kohki part 40SH or 200-40SH or
equivalent
20
Additive-free turbine oil ISO VG32 or
equivalent
Air Motor Oil
Feed 5 drops per minute
●Wrench weight excludes sockets and air hose
10. ACCESSORIES
MODEL ACCESSORIES
Q’TY
PW200
PW220
○Ejector Pin
○Ejector Spring
○Inner Socket Spring
○Screwdriver (-)
○Instruction Manual
○Metal Case
1
1
1
1
1
1
●Sockets sell separately
11. AFTER SALES SERVICE
■Please contact your distributor for details of available
services.
■Please provide model, serial number, date of purchase and
details of failure when contacting your distributor.
CAUTION
●Do not use pneumatic wrench when malfunction,
deficiency in wrench performance, personal
injury or property loss is foreseen.

21
MEMO
MEMO
22
This manual suits for next models
1
Table of contents
Other Tone Power Tools manuals

Tone
Tone CNR Series User manual

Tone
Tone T2MN6-QL User manual

Tone
Tone TNC-24EZA-1 User manual

Tone
Tone P150A User manual

Tone
Tone Power Digitorqon PDX-302N User manual

Tone
Tone GMC221EZ User manual

Tone
Tone T2MP6 User manual

Tone
Tone GX361ZA User manual

Tone
Tone GX361ZA-UC User manual

Tone
Tone GNR31E-UC User manual