Tone P150A User manual
取扱説明書
INSTRUCTION MANUAL No.1708
製品番号
MODEL
P150A
P300A
P600A
/
/
/
P150AT
P300AT
P600AT
CAUTION
●製品をご使用される前に、取扱説明書をお読みいただき、理解していただいた上で
ご使用ください。
●取扱説明書は、いつでも読めるように所定の場所に大切に保管してください
Read and fully understand all the instructions before use.
Keep this manual in designated place for easy and quick reference.

- 28 -
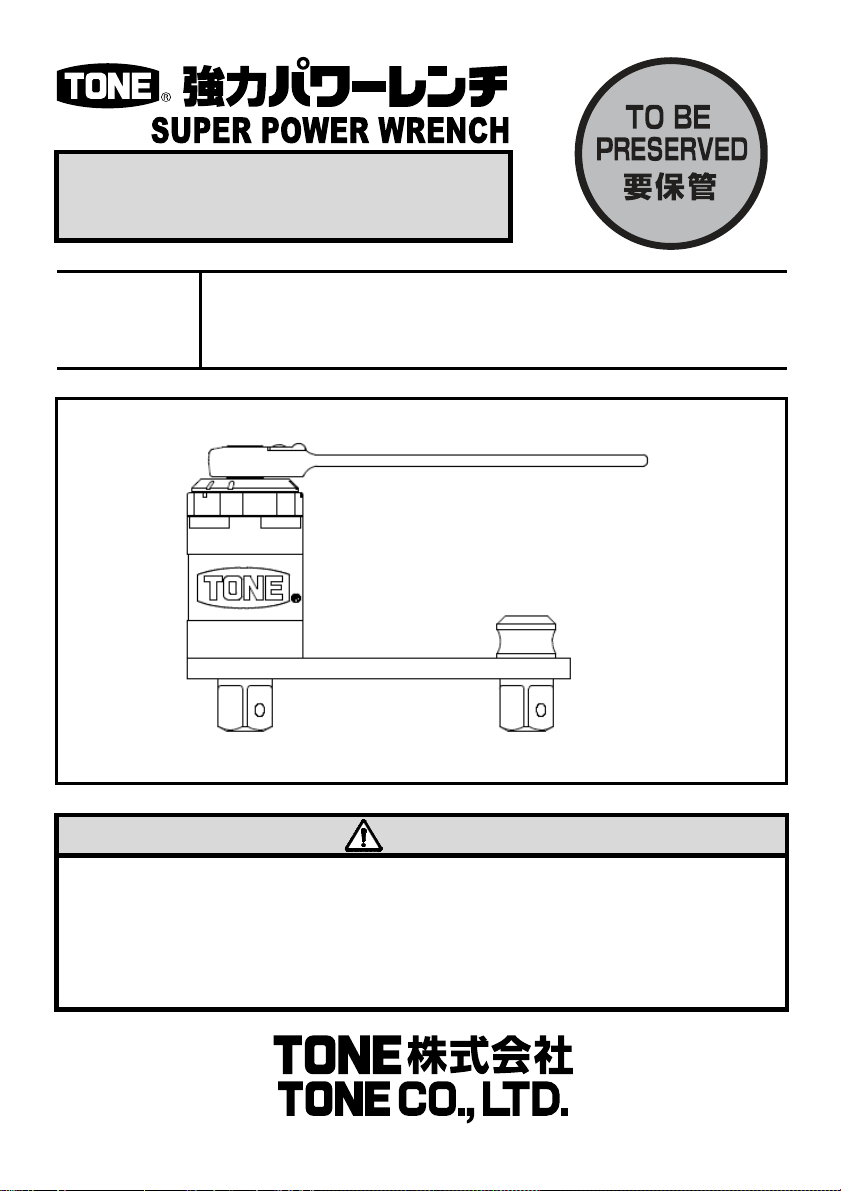
■PREFACE
Thank you for purchasing the Super Power Wrench
■Upon receipt, check and confirm the following:
- Check for any damage.
- Check for any loose or missing screws and bolts.
- Check the model as per order.
- Check all the accessories are contained (➭P.32).
If any problems are found, contact your distributor.
■Read this instruction manual carefully before use.
Full understanding of this manual is essential
to prevent personal injury or malfunction.
■Keep this manual in the case for reference.
■If the manual or warning label is lost or becomes illegible,
or if an additional manual is required, contact your distributor.
If you have any questions about the products or the contents of this
instruction manual, contact your distributor.

■SAFTY INSTRUCTION
This manual specifies three (3) basic safety instructions:
■Instructions are classified by degree of risk and described as follows:
Danger is used to indicate threatening
dangerous or unsafe practices which could
immediately result in severe personal injury
or death in the worst case.
Warning is used to indicate hazardous or
unsafe practices which could result in severe
personal injury or death in the worst case.
Caution is used to indicate hazardous or
unsafe practices which could result in
personal injury, product or property damage.
Even if the risk is classified as , the risk could become more serious
depending on the conditions. Make sure to follow all instructions when operating
these tools.

- 30 -
13. Application
■Manual power wrench is for tightening and loosening large bolt/nut.
14. Precautions for Use
■To prevent accidents or personal injury read and follow all instructions
listed below.
DANGER
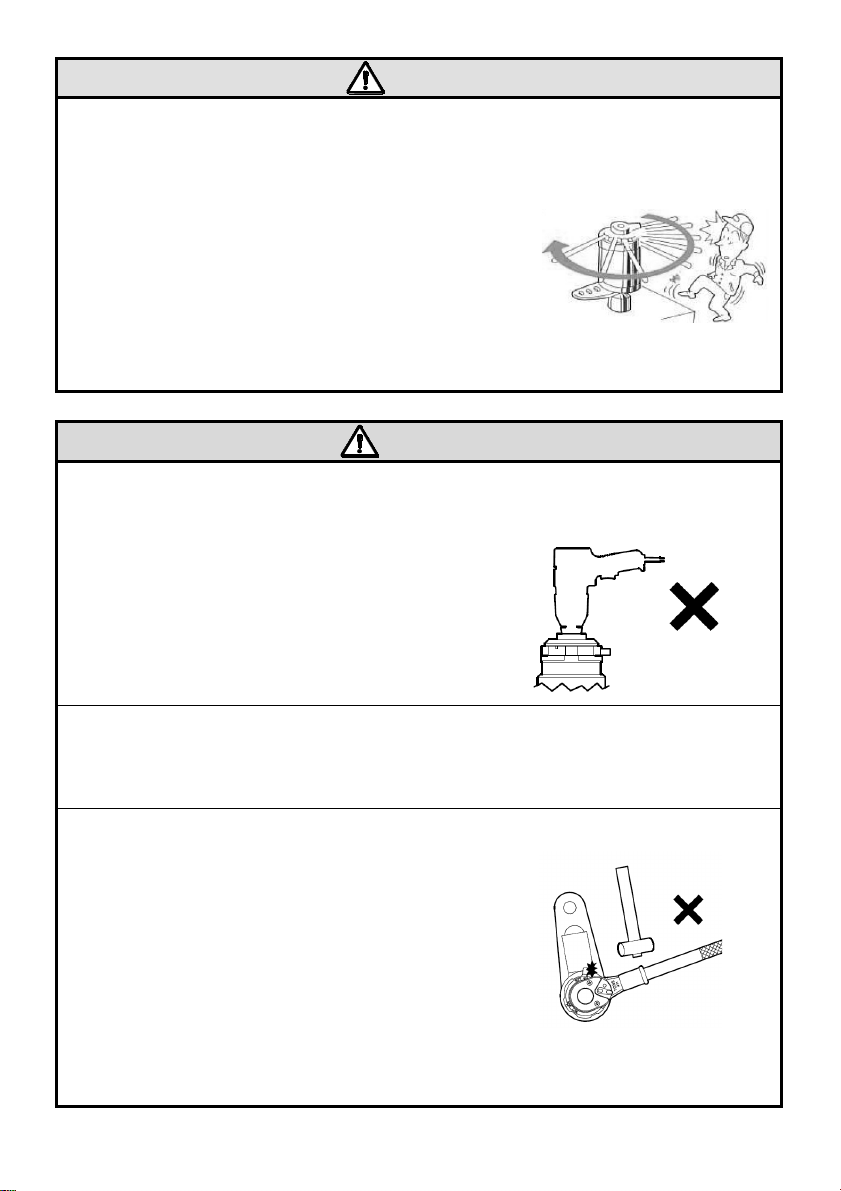
●Beware of falling accidents when working at elevated heights.
○ Dangerous situation can arise due to damage to the wrench from
excessive input or inappropriate handling of reaction force, or if the
reaction arm comes loose.
○Provide safety net or canvas as safe guarding against falling items.
○Confirm that no one is underneath the working site before operation.
Failure to follow these instructions may result in accidents.
●During operations, do not approach the reaction arm with your
hands, fingers, legs, or feet, etc.
○Note that the reaction arm rotates in the opposite direction of the output
angle adjustor.
○Be sure that hands, fingers, legs, feet, etc. are not in the path of the
reaction arm before commencing operations.
Hands, fingers, legs, and feet may get caught
between the equipment, which can result in
severed finger or limbs.
- 31 -
DANGER
●Avoid the ratchet handle rotation radius.
○ When changing the dial on the clutch
following input, the ratchet handle may
rotate. For safety reasons, do not suddenly
take your hand away from the handle.
○Check that no one is in the work area before
commencing operations.
The presence of others in the work area may
lead to injury.
WARNING
●Do not use power tools for input. Power tools such as impact
wrenches.
○This unit is designed for manual input. Do
not use power tools including impact
wrenches and electronic wrenches.
Failure to follow these instructions may
result in malfunction and injury.
●Do not set a pipe on ratchet and use it.
Use the ratchet with pipe can result in malfunction and injury.
●Do not hit with a hammer when changing the dial on the clutch.
○Following input, the clutch dial may lock,
making difficult to change to another setting,
or there may be so much weight on it that it
not move at all. See page for instructions on
changing the clutch dial settings.
Failure to follow these instructions may
result in malfunction and injury.

- 32 -
WARNING
●Do not use attachments.
○Do not place attachments between the square drive and the socket
(including extension bars, joints, adapters, etc.).
If the Super Power Wrench falls over during operations, or if any attachments
break, it may affect torque precision, and may cause injury.
●Place the reaction arm on a hard surface
(one that will not bend or break).
○Because the surface where the reaction arm is placed receives roughly
the same stress level as the output torque, select a hard surface that will
not bend or break under pressure.
Failure to follow these instructions may result in malfunction, accidents or
inaccuracy.
●Place the reaction arm on a stabilized reaction member.
○Since the reaction member receives the same force as output force,
choose a rigid object as reaction member.
○If not possible, cover a soft place with an iron to buffer. Attach a shock
absorber firmly.
Failure to follow these instructions may result in accidents or injury.
●Beware of falling accidents when working at elevated heights.
○Wear safety belt.
○Provide safety net or canvas as safe guarding against falling items.
○Confirm that no one is underneath the working site before operation.
○Stop operation when physically or mentally tired.
Failure to follow these instructions may result in accidents.

- 33 -
WARNING
●Immediately check the wrench when it is dropped down or banged.
○Check for deformation, crack, damage and other abnormality. Stop
using the wrench if any abnormality is found.
Failure to follow these instructions may result in injury.
●Do not exceed unit capacity.
○Use the wrench only within its capacity.
Failure to observe capacity limits may result in damage to the unit or injury
to the user.
●Properly install the sockets as described in this manual.
○Incomplete installation may result in accident and personal injury.
See “Changing parts” (➭P.43).
●Do not disassemble or modify the wrench.
○Disassembly or modification made by unauthorized personnel may result
in malfunction or personal injury.
○Disassembly and Re-assembly is permitted for the following
consumable parts: Reaction arm and Sockets.
●Store the wrench in the metal case and place it in protected
storage when not in use.
○Store the wrench in a secure, dry location to keep any unauthorized
personnel away.
Failure to follow these instructions may result in malfunction or accidents.
●Contact your distributor for repair service.
○Repair work should only be carried out by a qualified technician.
○Repair work done by an inexperienced person may cause accidents,
injury or malfunction.

- 34 -
WARNING
●Check the following items before operation.
○Check for any deformation, crack or damage on the Super Power
Wrench body, reaction arm, socket, Hexagonal L Wrench and other
accessories.
Failure to follow this instruction may result in accidents or injury.
○Make sure that a socket and a reaction arm are correctly installed on
the wrench.
○Make sure that set screws are securely fastened.
Failure to follow these instructions may result in accidents and personal
injury.
CAUTION
●Keep work area clean.
■Cluttered areas and benches invite accidents.
●Keep children away.
■Do not let children touch wrenches.
■All visitors should be kept away from work area.
●Secure work area.
■Keep body stance balanced and firm.
■Keep the work area well lit.
●Use suitable model for each application.
■Do not use the wrench beyond its rated specifications.
■Do not use the wrench for purpose not intended.
●Dress properly.
■Always wear gloves and non-skid shoes when operating.
■Always wear safety helmet.

- 35 -
CAUTION
●Use genuine accessories and attachments manufactured
by TONE CO., Ltd.
■Use the genuine accessories mentioned in this instruction manual
or TONE’s general catalog.
●Maintain the wrench
■Keep the wrench handle clean, dry and free of oil or grease.
15. Part Name・Accessories・External Dimensions
Parts Name
Input Drive HSH Bolt(Cap Bolt)
※HSH Bolt Size
P150A:5mm
P300A・P600A:6mm
Name Label
Slide-type Reaction Arm
Square Shaft Bush
Moveable Square Drive
HSH Bolt(Cap Bolt)
Output Drive
Clutch
(Clutch Dial)
●P150A~P600A
Eye Bolt
(ONLY P300A・P600A)
- 36 -
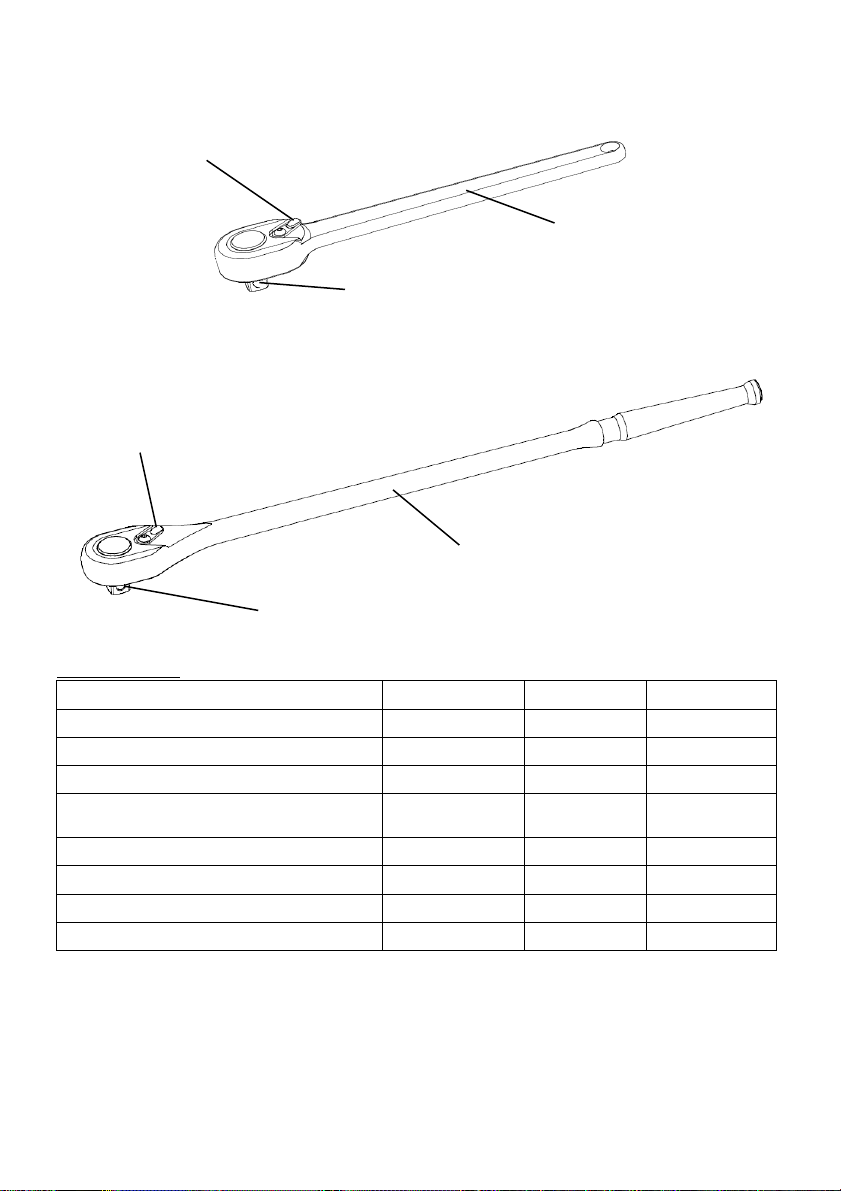
Accessories
Model P150A P300A P600A
Ratchet Handle 371 371L 371L
Slide-type Reaction Arm * 150PNHS 300PNHS 600PNHS
Hexagon Socket Head Cap Screw *
M6×15 (6) M8×20 (4)
M8×20 (6)
Hexagonal L Wrench ○(5・8mm) ○(6・8mm)
○(6・10mm)
Eye Bolt × ○(2) ○(2)
Metal Case ○ ○ ○
Inspection Certificate ○ ○ ○
User Manual ○ ○ ○
●Slide-type reaction arm and Hexagon socket head cap screw is attached on the
Super Power Wrench.
●Contact your distributor for the accessories above and other optional
accessories as well.
Switch Lever
Square Drive
Handle
●Ratchet handle 371L(P300A・P600A)
●Ratchet handle 371(P150A)
Switch Lever
Square Drive
Handle

- 37 -
External Dimensions
●Super Power Wrench
Model D H A B ℓ L H1 L1
P150A
71 122
12.7
25.4
248
235
142
200
P150AT 369 139
P300A
84 138
12.7
25.4
450
242
158
200
P300AT 693 158
P600A
96 172
12.7
38.1
450
348
192
300
P600AT 693 192
(mm)
●Slide-type Reaction Arm
Model ℓ ℓ1 L T R D d A
150PNHS
172
69 235
12 35 55 39 25.4
300PNHS
172
84 242
16 42 64 44 25.4
600PNHS
267
95 348
16 48 75 55 38.1
(mm)

- 38 -
16.Before use
■Check followings before using the Super Power Wrench.
16-1. Selecting Suitable Model
Check the instructions on nut and bolt torque before tightening.
When the torque is NOT noted, check with the manufacturer or decide on the
torque referring to the instructions that come with the screws.
Reference T=K・D・N
T:Torque (N・m) K:Torque coefficient
D:Bolt shaft diameter (mm)
N:Axial tension (kN)
Caution for Loosening
It is often the case that more than double of tightening torque is needed for
loosening, due to gathered rust or deteriorated threads.
When tightening torque is about the same as the max, output torque of the
wrench, it may not be able to loosen bolt/nut. In that case, it is better to use
models with a bigger torque range.
In case the rust is heavy, apply penetrating type lubricant, below on threads
and wait approximately 10 minutes before loosening.
Do not forget to wipe out lubricant completely before re-tightening to prevent
bolt from being come loose.
16-2. Inspection
Check that there is no obvious deformation of the wrench, reaction arm,
socket, and other accessories.
Do not use the product if there are any abnormalities.
Make sure that the reaction arm is properly fastened with hexagon socket
head cap screws.
If not, tighten the screws with the attached hexagonal L wrench.
For more information, see “Changing parts” (➭P.42).
16-3. Selecting a Socket
To prevent the unit from falling over, attach the socket compatible with
the nuts and bolts you are using.

- 39 -
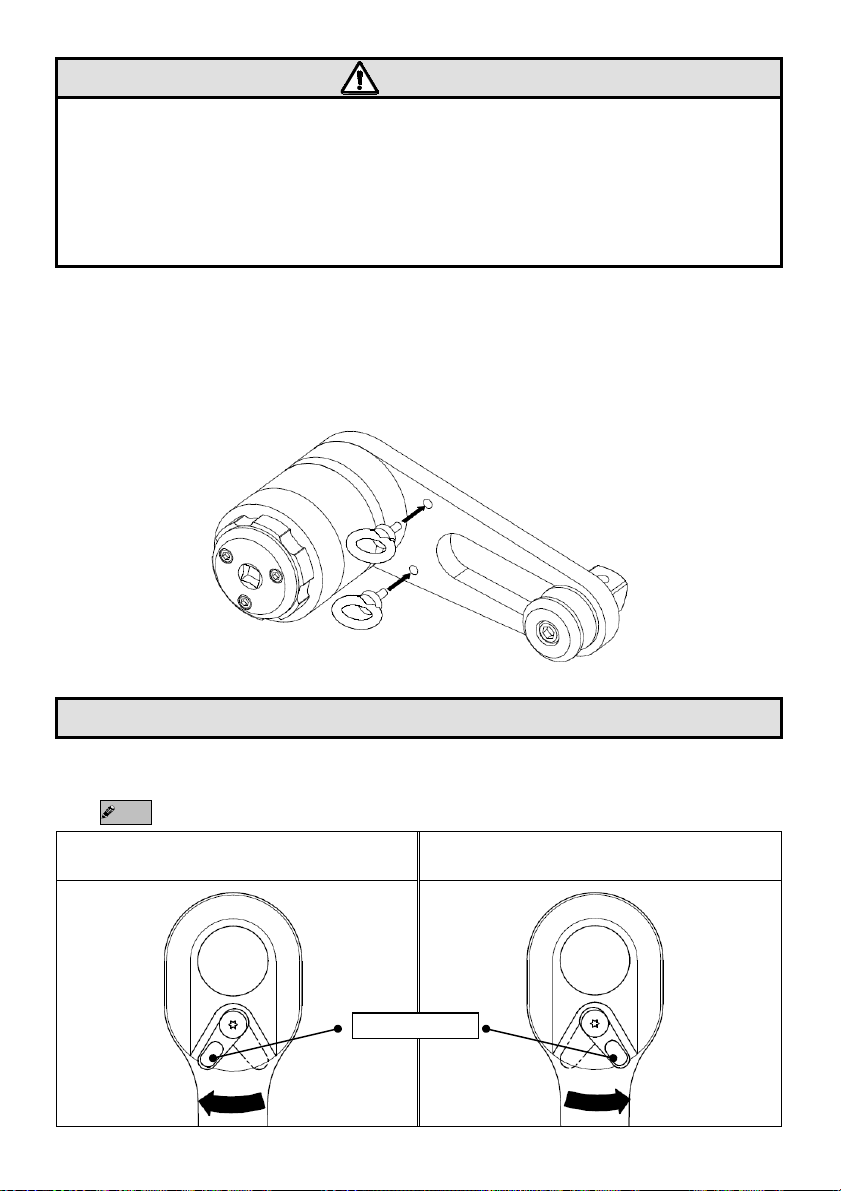
16-4.Attaching Reaction Arm (➭P.42)
Check that the reaction arm is properly attached, and also make sure that the
reaction arm does not come loose from the main unit.
16-5.Attaching Socket (➭P. 43 )
Check that the sockets are properly attached, and also make sure that the
socket does not come loose from the main unit.
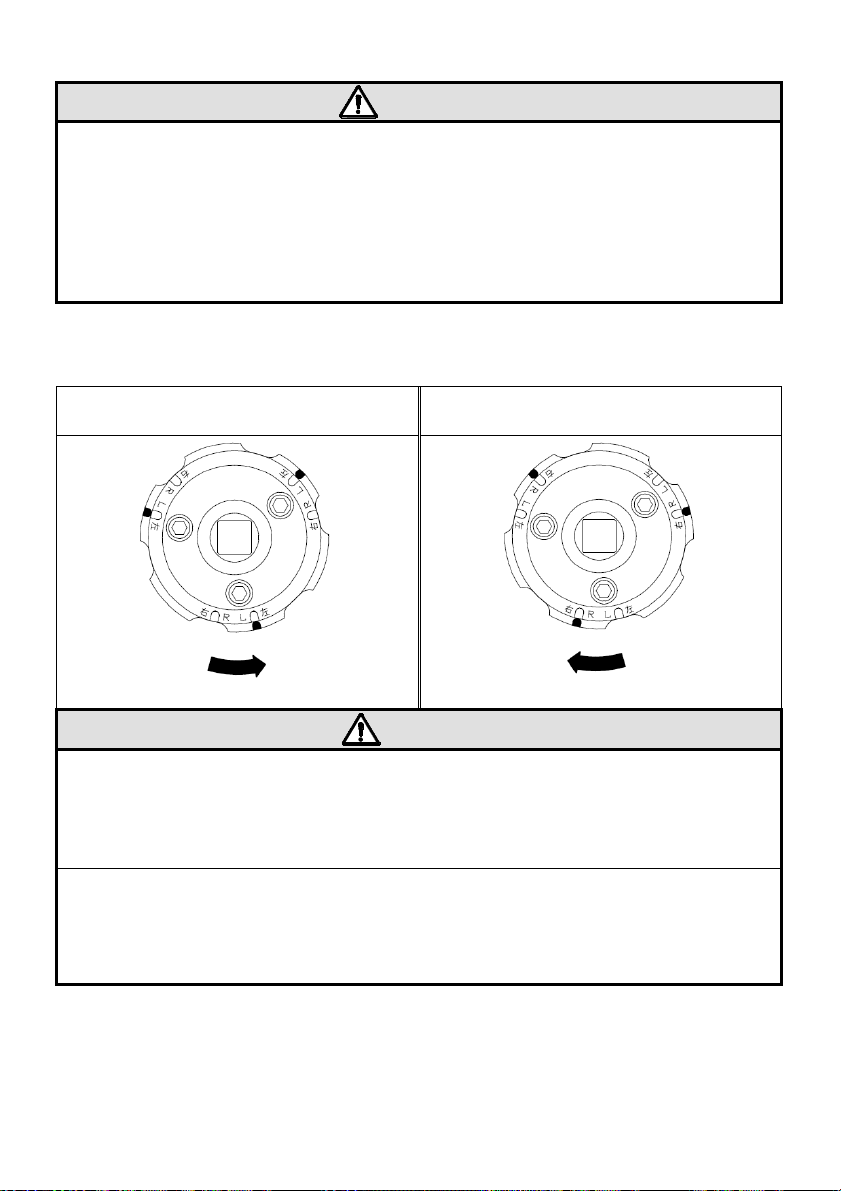
16-6. Clutch
Purpose of the Clutch
When using ratchet handle, a significant portion of the input may be absorbed
by gear backlash (gap between the gears) or elastic deformation of the
materials, resulting in input loss. The clutch is intended to prevent input loss
and improve efficiency of operations.
Part name and operations
When rotate clockwise, adjust the
baseline to Right (R).
When rotate counter-clockwise,
adjust the baseline to Left (L).
Clutch Dial
Baseline
- 40 -
CAUTION
●Before starting the unit, check that the output square drive rotation
direction and the clutch direction conform.
Failure to operate the clutch dial properly may lead to damage to or
breakdown of the unit, or injury to the user.
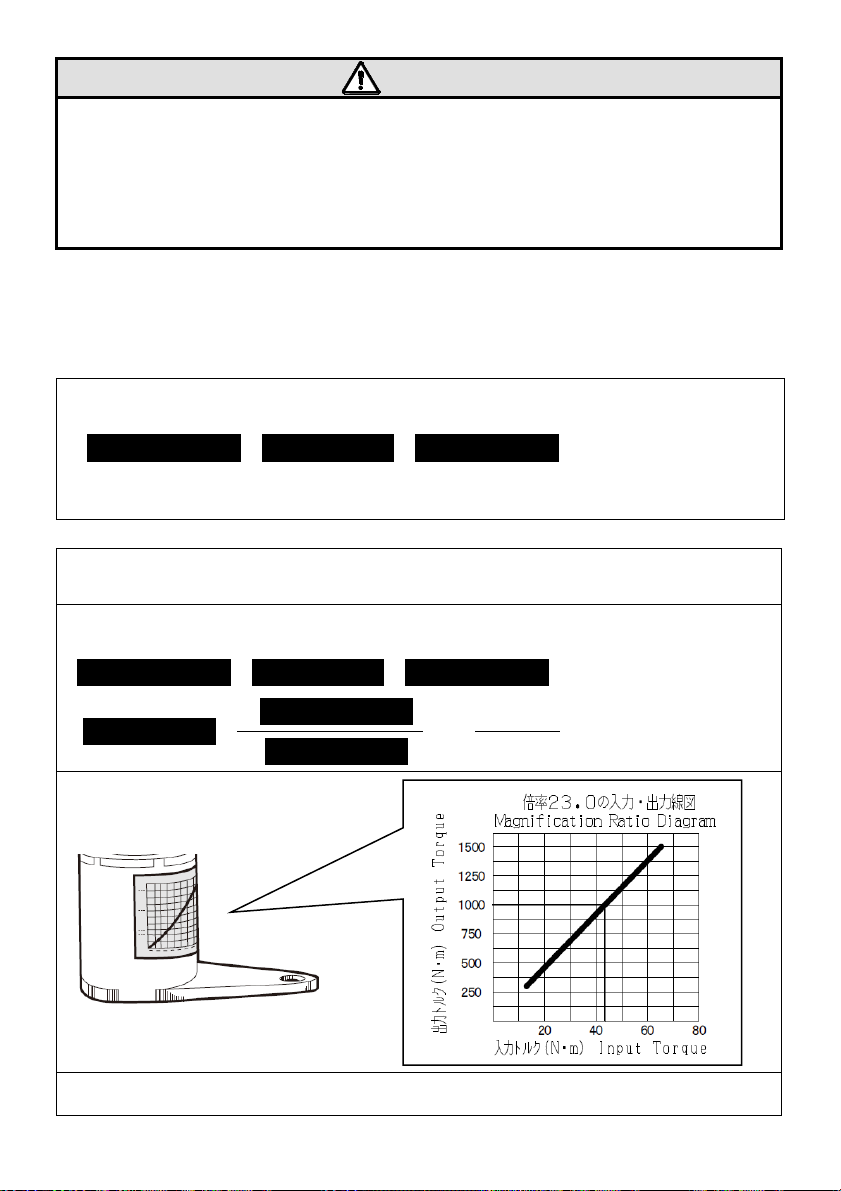
16-7.Calculation of Input Torque
Target input torque of ratchet handle or torque wrench can be calculated by
method below.
【 How to calculate input torque 】
①Calculate from formula
Output torque = Input torque × Magnification
②
Calculate from magnification diagram (on P ) or rating plate
《 Example 》
Super Power Wrench:P150A Target torque: 1000 N・m
①In the case, Magnification for 1000N・m is 23.0 on the Inspection Certificate.
Output torque = Input torque × Magnification
Input torque =
Output torque
=
1000 ≒ 43.5 N・m
Magnification
23.0
②
Thus,
43.5 N・m
is required for input torque to obtain 1000N・m

- 41 -
●When use a ratchet wrench, calculate from following formula.
Input torque = Newton (N) × Length (m)
Newton(N) =
Input torque =
43.5 = 174N
Length (m) 0.25
※“Length” means the distance
from the center of wrench to
load point. “Length” is depended
on the load point.
Thus,
174N
is required for load point to obtain 43.5N・m by ratchet wrench
(371)
16-8.Warm up the Super Power Wrench before uses it.
CAUTION
●Try to use several time as a warming up before use the Super Power
Wrench.
■Without warming up, the wrench is not able to output torque stably.
Load Point
248mm(≒0.25m)

- 42 -
17.Changing parts
17-1.Attach/Remove Reaction Arm
○Attach Reaction Arm
①Attach reaction arm to the Super Power Wrench and Tighten HSH bolt (black)
by using hexagonal L wrench securely.
Remove Reaction Arm
①Loosening HSH bolt (black) and remove the reaction arm.
Do not remove the bolts
Slide-type Reaction Arm
HSH Bolt (Black)
Drive Square

- 43 -
17-2.Attach/Remove Socket
①To prevent the unit from falling over,
attach a socket compatible with the
nuts and bolts you are using.
②Remove the O ring from the grooves of
the socket, and remove the pin.
③Line up the through hole of the output
drive and the socket pinhole, and attach
the socket.
④Attach the pin to the socket pin hole
so that the pin does not come out,
set the O ring in the groove.
⑤Check that the O ring is properly attached, and also make sure that the
socket does not come loose from the main unit.
○Remove socket.
①Detach the O ring from the grooves of the socket, and remove the pin.
②Remove the socket from the output drive.
WARNING
●Check that there are no cracks, chips, wear or deformation of the
socket.
A damaged socket may lead to injury to the user.
●Check that there is no deformation of the O ring, and that
the pin is not bent, broken, or cracked.
The pin and the O-ring are replaceable supplies. Replace them if there are any
problems. Injury may result if the socket falls down or the pin flies out.
【Picture for Attaching Pin/O-ring】
O ring
Output Squire Drive
Hole
Pin
- 44 -
WARNING
●After attaching the socket, pull on it to make sure that it is
properly attached.
If it is not properly attached, the socket may come loose during use, creating
a dangerous situation. A loose socket may also result in hindered unit
durability, unit breakdown, or injury to the user.
17-3.Set Eyebolt
(ONLY P300A/P300AT・P600A/P600AT)
①Set the Eyebolt following the picture.
Adjust the direction of Eyebolt by setting washer.
18. Unit Operations
①Set the switch lever according to the intended direction of the output angle
adjustor as shown below.
Note Set the target torque before use torque wrench following the instruction manual
When rotate the output angle adjustor to the
left, set the switch lever to the Left.
When rotate the output angle adjustor to the
right, set the switch lever to the Right
Switch Lever
- 45 -
WARMING
●The torque wrench in the set, use in clockwise direction only.
Use ratchet wrench in the set for loosening.
○The torque wrench is only for tightening. Never use the torque wrench for
loosening operation.
Failure to following this instruction may result in malfunction and injury.
②Set the clutch according to the intended direction of the output drive as shown
below.
When rotate the output angle adjustor to the
left, set the clutch dial to the Left (L).
When rotate the output angle adjustor to the
right, set the clutch dial to the Right (R)
CAUTION
●Before starting the unit, check that the output angle adjustor
rotation direction and the clutch direction conform.
Incorrect use of the clutch may result in damage to the unit.
●Try to use several time as a warming up before use the
Super Power Wrench.
Without warming up, the wrench is not able to output torque stably.

- 46 -
③Set the Super Power Wrench to bolt/nut.
Reaction arm must be placed securely against a solid member and set the
socket for loosening and tightening without gap between the socket and bolt
or nut.
Slide-type reaction arm receives large force almost equivalent to output
torque by set the socket and place to the adjacent bolt or nut to be
tightened or loosened. This is how to do it.
⑴.Select right size of socket for the bolt to receive output torque and set the
socket to moveable square drive.
⑵.Loosening the HSH bolt and set the socket to the bolt/nut by sliding the
moveable square drive.
⑶.Tighten the HSH bolt, which is loosened in the step (2), for fixing moveable
square drive. Receive output torque by the socket set on moveable squire
drive
Note Reaction arm must be placed squarely against a solid member or surface adjacent to
the bolt/nut to be tightened, as such member or surface receives large force almost
equivalent to output torque.
Rotation for Reaction Arm
Adjacent Bolt/Nut
Rotation for Drive Square
(Socket)
Member
HSH Bolt
Moveable Squire Drive
Socket
●Receive output torque
by reaction arm plate
●Receive output torque by the socket
set on moveable squire drive
This manual suits for next models
5
Table of contents
Other Tone Power Tools manuals

Tone
Tone T2MN6-QL User manual

Tone
Tone T2M6 User manual

Tone
Tone PW200 User manual

Tone
Tone SIMPLE TORQON XT-STC7TE User manual

Tone
Tone S-61EZ User manual

Tone
Tone T2MP6 User manual

Tone
Tone GM161EZ User manual

Tone
Tone GNBC81E-UC User manual

Tone
Tone Power Digitorqon PDX-302N User manual

Tone
Tone GPTN241E-UC User manual


