Toro Reelmaster 5010- H User manual

FormNo.3395-552RevA
Verticutter
Reelmaster®5010-HSeriesCuttingUnitwith
5–inchor7–inchReel
ModelNo.03618—SerialNo.315000001andUp
ModelNo.03619—SerialNo.315000001andUp
Registeratwww.Toro.com.
OriginalInstructions(EN)*3395-552*A

WARNING
CALIFORNIA
Proposition65Warning
Thisproductcontainsachemicalorchemicals
knowntotheStateofCaliforniatocausecancer,
birthdefects,orreproductiveharm.
ThisproductcomplieswithallrelevantEuropeandirectives.
Fordetails,pleaseseetheDeclarationofIncorporation(DOI)
atthebackofthispublication.
Introduction
ThisproductcomplieswithallrelevantEuropeandirectives,
fordetailspleaseseetheseparateproductspecicDeclaration
ofConformity(DOC)sheet.
Theverticutterkitsaremountedonaride-onmachineand
areintendedtobeusedbyprofessional,hiredoperators
incommercialapplications.Itisprimarilydesignedfor
verticuttinggrassonwell-maintainedlawnsinparks,sports
elds,andoncommercialgrounds.
Readthisinformationcarefullytolearnhowtooperateand
maintainyourproductproperlyandtoavoidinjuryand
productdamage.Youareresponsibleforoperatingthe
productproperlyandsafely.
YoumaycontactTorodirectlyatwww .Toro.comforproduct
andaccessoryinformation,helpndingadealer,ortoregister
yourproduct.
Wheneveryouneedservice,genuineToroparts,oradditional
information,contactanAuthorizedServiceDealerorToro
CustomerServiceandhavethemodelandserialnumbersof
yourproductready.Writethenumbersinthespaceprovided.
ModelNo.
SerialNo.
Thismanualidentiespotentialhazardsandhassafety
messagesidentiedbythesafetyalertsymbol(Figure1),
whichsignalsahazardthatmaycauseseriousinjuryordeath
ifyoudonotfollowtherecommendedprecautions.
Figure1
1.Safetyalertsymbol
Thismanualuses2wordstohighlightinformation.
Importantcallsattentiontospecialmechanicalinformation
andNoteemphasizesgeneralinformationworthyofspecial
attention.
©2015—TheToro®Company
8111LyndaleAvenueSouth
Bloomington,MN554202
Contactusatwww.Toro.com.
PrintedintheUSA
AllRightsReserved

Contents
Safety...........................................................................3
SafetyandInstructionalDecals.................................4
Setup............................................................................5
1InspectingtheVerticutter.......................................6
2InstallingtheTransportRollers...............................6
3InstallingtheO-ringandtheGrease
Fitting................................................................6
4InstallingtheShoulderBolt(RM5010–Hybrid
only)..................................................................7
5InstallingtheEnd-WeightKit(Model03618
only)..................................................................7
6AdjustingtheBladeDepth.....................................8
7AdjustingtheRearGrassShield..............................8
8AdjustingtheRollerScrapers..................................9
9AdjustingtheTransportRollers...............................9
10MountingtheVerticutterReel..............................10
ProductOverview.........................................................10
Specications........................................................10
Operation....................................................................11
TrainingPeriod......................................................11
OperatingTips.......................................................11
Maintenance.................................................................12
LubricatingtheVerticutter.......................................12
RemovingtheVerticutterBladesfromthe
Shaft.................................................................12
InstallingtheVerticutterBlades................................13
OptionalBladeSpacing...........................................14
ServicingtheRoller.................................................15
Safety
ThismachinehasbeendesignedinaccordancewithENISO
5395:2013.
Hazardcontrolandaccidentpreventionaredependent
upontheawareness,concern,andpropertraining
ofthepersonnelinvolvedintheoperation,transport,
maintenance,andstorageofthemachine.Improper
useormaintenanceofthemachinecanresultininjury
ordeath.Toreducethepotentialforinjuryordeath,
complywiththefollowingsafetyinstructions.
•Read,understand,andfollowallinstructionsinthe
tractionunitoperatorsmanualbeforeoperatingthe
verticutters.
•Read,understand,andfollowallinstructionsinthis
operatorsmanualbeforeoperatingtheverticutters.
•Neverallowchildrentooperatethetractionunitor
verticutters.Donotallowadultstooperatetractionunit
orverticutterswithoutproperinstruction.Onlytrained
operatorswhohavereadthismanualshouldoperatethe
verticutters.
•Neveroperatetheverticutterswhenundertheinuence
ofdrugsoralcohol.
•Lightningcancausesevereinjuryordeath.Iflightning
isseenorthunderisheardinthearea,donotoperate
themachine;seekshelter.
•Keepallshieldsandsafetydevicesinplace.Ifashield,
safetydeviceordecalisillegibleordamaged,repairor
replaceitbeforeoperationiscommenced.Alsotighten
anyloosenuts,bolts,andscrewstoensureverticutteris
insafeoperatingcondition.
•Donotoperateverticutterswhilewearingsandals,tennis
shoes,sneakers,orshorts.Also,donotwearloose
ttingclothingwhichcouldgetcaughtinmovingparts.
Alwayswearlongpantsandsubstantial,slip-resistant
shoes.Wearingsafetyglasses,safetyshoes,andahelmet
isadvisableandrequiredbysomelocalordinancesand
insuranceregulations.
•Removealldebrisorotherobjectsthatmightbepicked
upandthrownbytheverticutterreelblades.Keepall
bystandersawayfromtheworkingarea.
•Ifthecuttingbladesstrikeasolidobjectortheunit
vibratesabnormally,stopandshuttheengineoff.Check
verticutterfordamagedparts.Repairanydamagebefore
restartingandoperatingtheverticutter.
•Lowertheverticutterstothegroundandremovekey
fromignitionswitchwhenevermachineisleftunattended.
•Besureverticuttersareinsafeoperatingconditionby
keepingnuts,boltsandscrewstight.
•Removekeyfromignitionswitchtopreventaccidental
startingoftheenginewhenservicing,adjustingorstoring
themachine.
3

•Performonlythosemaintenanceproceduresdescribedin
thismanual.Ifmajorrepairsareeverneededorassistance
isdesired,contactanAuthorizedToroDistributor.
•Tobestprotectyourinvestmentandmaintainoptimal
performanceofyourToroequipment,countonToro
genuineparts.Whenitcomestoreliability,Torodelivers
replacementpartsdesignedtotheexactengineering
specicationsofourequipment.Forpeaceofmind,insist
onTorogenuineparts.
SafetyandInstructionalDecals
Safetydecalsandinstructionsareeasilyvisibletotheoperatorandarelocatednearanyareaofpotential
danger.Replaceanydecalthatisdamagedorlost.
93-6688
1.Warning—readthe
instructionsbefore
servicingorperforming
maintenance.
2.Cuttinghazardofhandor
foot—stoptheengineand
waitformovingpartsto
stop.
4

Installation
LooseParts
Usethechartbelowtoverifythatallpartshavebeenshipped.
ProcedureDescriptionQty.Use
1Verticutter1Inspecttheverticutter.
Transportrollerassembly2
2Cotterpin2Installthetransportrollers.
O-ring1
3Straightgreasetting1InstalltheO-ringandthegreasetting.
4Shoulderbolt5Installtheshoulderbolt
(RM5010–Hybridonly)
5End-weightkit(soldseparately)1Installtheend-weightkit(Model03618
only).
6Nopartsrequired–Adjustthebladedepth.
7Nopartsrequired–Adjustthereargrassshield.
8Nopartsrequired–Adjusttherollerscrapers.
9Nopartsrequired–Adjustthetransportrollers.
10Nopartsrequired–Mounttheverticutterreel.
MediaandAdditionalParts
DescriptionQty.Use
PartsCatalog1
Operator'sManual1Reviewthematerialandsaveitinanappropriateplace.
5
Note:Determinetheleftandrightsidesofthemachine
fromthenormaloperatingposition.
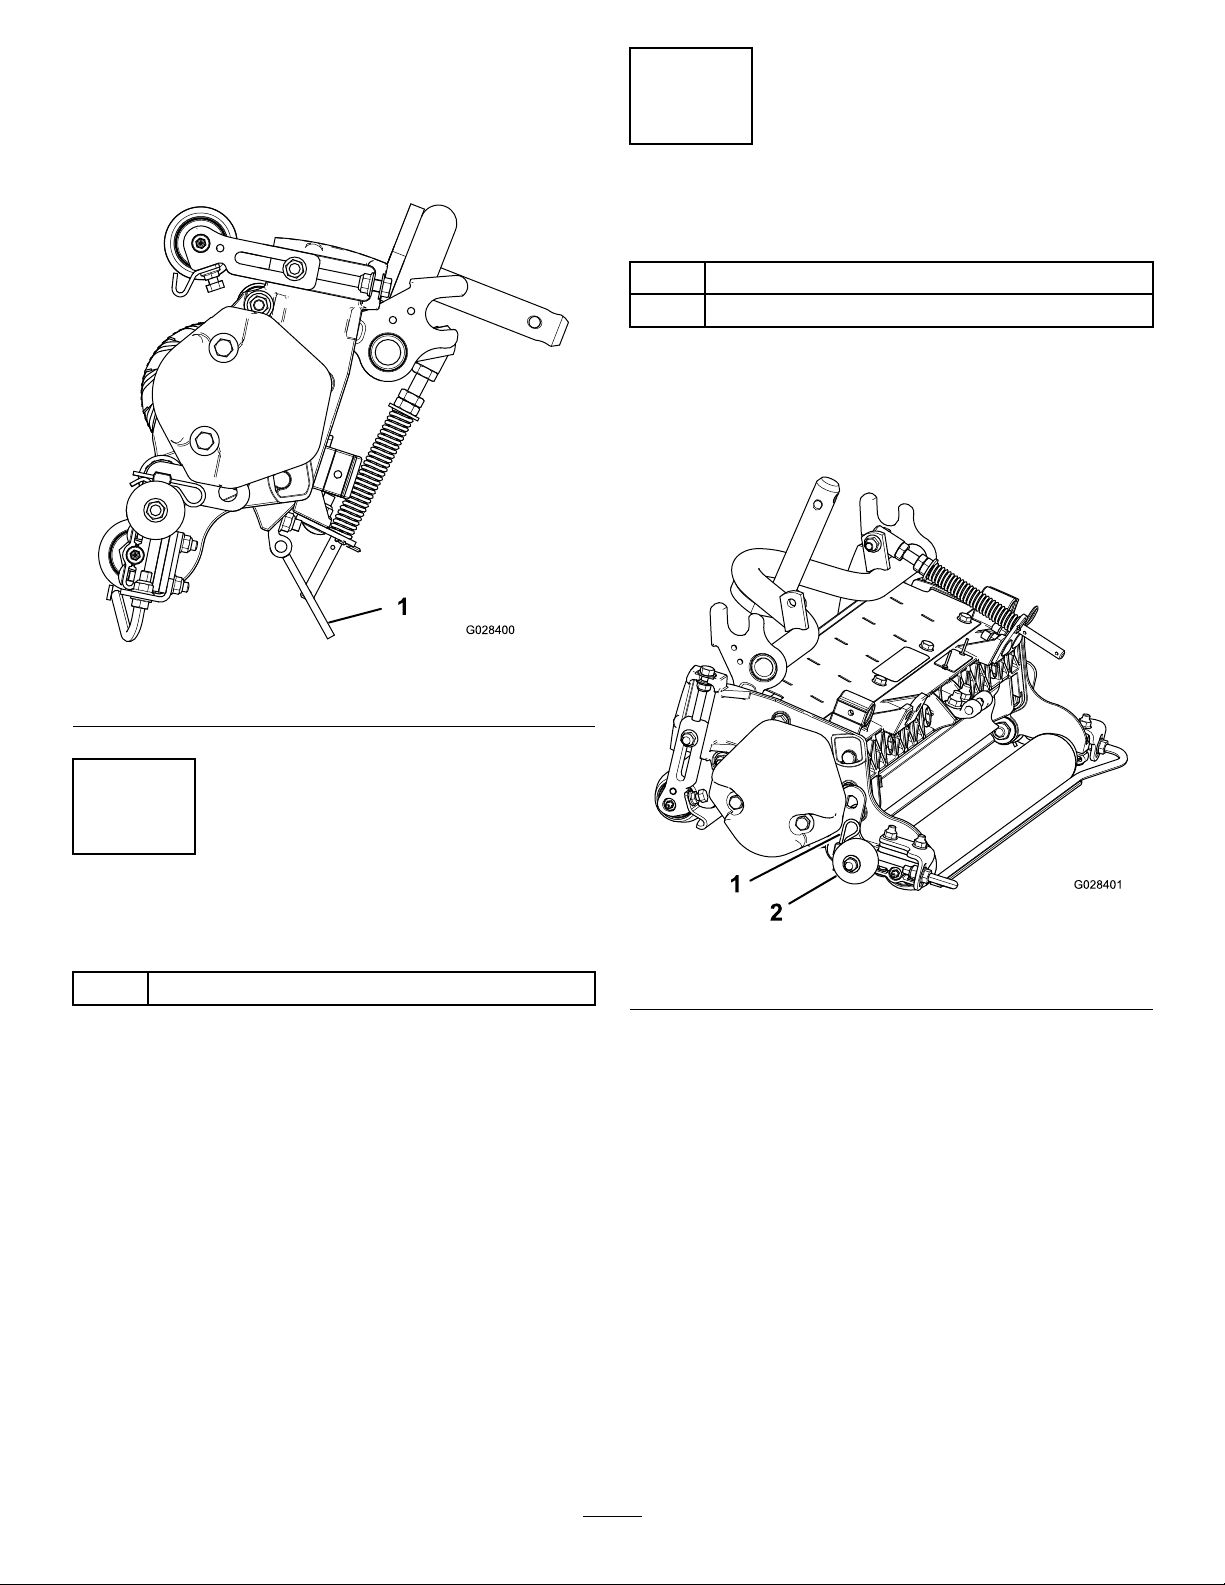
Note:Whenevertheverticutterhastobetippedtoexpose
theverticutterblades,usethekickstand(suppliedwith
tractionunit);refertoFigure2.
Figure2
1.Kickstand
1
InspectingtheVerticutter
Partsneededforthisprocedure:
1Verticutter
Procedure
Aftertheverticutterisremovedfromthebox,inspectthe
following:
1.Checkeachendofthereelforgrease.Greaseshouldbe
visiblyevidentintheinternalsplinesofthereelshaft.
2.Ensurethatallnutsandboltsaresecurelytightened.
3.Makesurethatthecarrierframesuspensionoperates
freelyanddoesnotbindwhenmovedbackandforth.
2
InstallingtheTransportRollers
Partsneededforthisprocedure:
2Transportrollerassembly
2Cotterpin
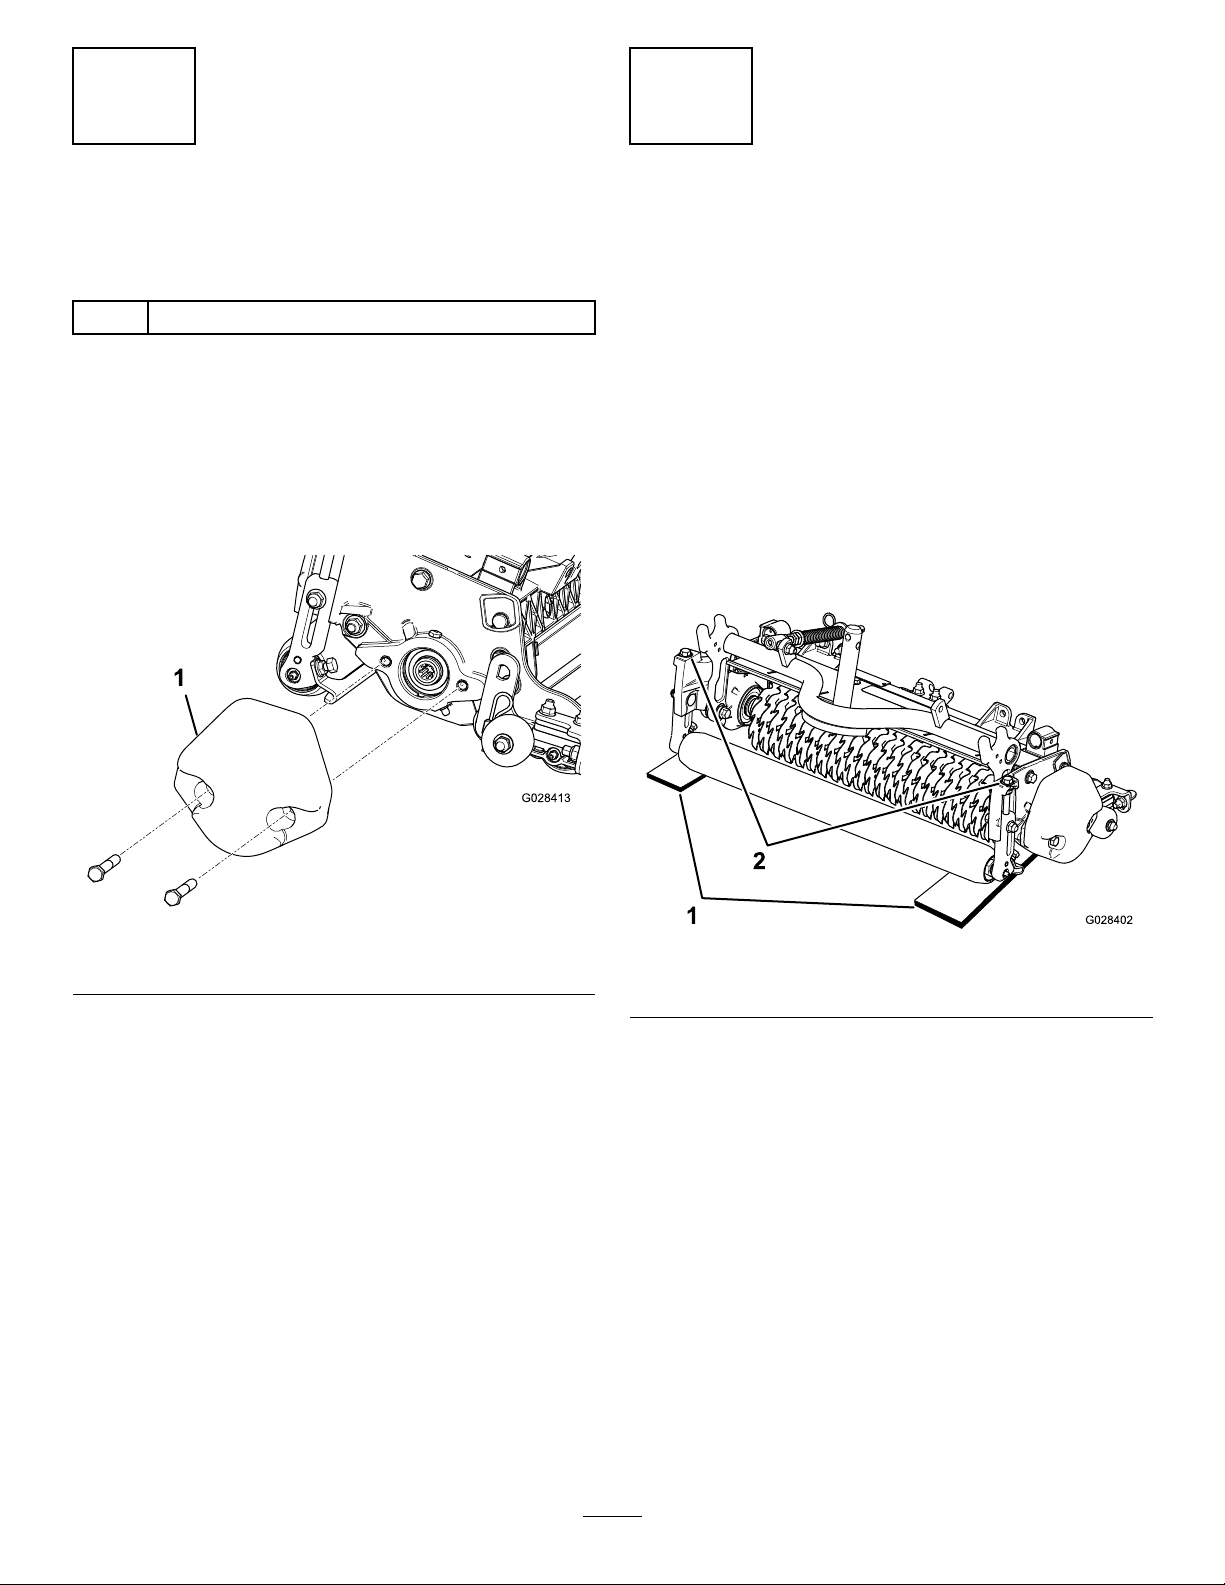
Procedure
Secureatransportrollerbrackettoeachsideplatepinwith
acotterpin(Figure3).
Figure3
1.Cotterpin2.Transportrollerassembly
Note:Therollershouldbepositionedtotherearofthe
verticutter.
6

3
InstallingtheO-ringandthe
GreaseFitting
Partsneededforthisprocedure:
1O-ring
1Straightgreasetting
Procedure
Thegreasettingmustbeinstalledonthereelmotorsideof
theverticutter.Usethefollowingdiagramtodeterminethe
positionofeachreelmotor(Figure4).
Figure4
1.Removeanddiscardthesetscrewonthereel-motor
side-plate(Figure5).
32
G028407
1
Figure5
1.Capscrews3.Setscrew(removeand
discard)
2.Straightgreasetting
(install)
2.Installthestraightgreasetting(Figure5).
3.Iftherearenoboltsonthereel-motorside-plate,install
them(Figure5).
4.InstalltheO-ringonthereelmotor(Figure6).
Note:Theelectricmotorisshown;thisstepalso
appliestothehydraulicmotor.
Figure6
1.O-ring
4
InstallingtheShoulderBolt
(RM5010–Hybridonly)
Partsneededforthisprocedure:
5Shoulderbolt
Procedure
ForverticuttersbeingmountedonaReelmaster5010–H,
locatedonthereel-motorside-plate(Figure7),mustbe
replacedwiththenewshoulderboltortheelectricreelwill
contacttheexistingbolt.
Figure7
1.Oldbolt2.Newshoulderbolt
7
5
InstallingtheEnd-WeightKit
(Model03618only)
Partsneededforthisprocedure:
1End-weightkit(soldseparately)
Procedure
Buyandinstalltheendweightkitappropriateforthe
congurationofyourmachine(Figure8).
•WeightKitModel03411forelectricreelmotors
•WeightKitModel03412forhydraulicreelmotors
Figure8
1.Endweight(largeweightshown)
Theverticutterscanbeinstalledatanyofthe5locationson
thetractionunit.Figure4showstheorientationofthedrive
motorforeachofthelocations.Foranyofthelocations
requiringthemotortobemountedontherightendofthe
verticutter,installacounterweightontheleftendofthe
verticutter.Forthelocationsrequiringthemotortobe
mountedontheleftend,installacounterweightontheright
endoftheverticutter.
Note:ForModel03619,counterweightsareshipped
installedtotherightendoftheverticutters.Theboltsonthe
leftendaretobeusedforsecuringthemotor.
6
AdjustingtheBladeDepth
NoPartsRequired
Procedure
Note:Themaximumrecommendedbladepenetration
depthsareasfollows:
•Model03618is3mm(1/8inch).
•Model03619is6mm(1/4inch).
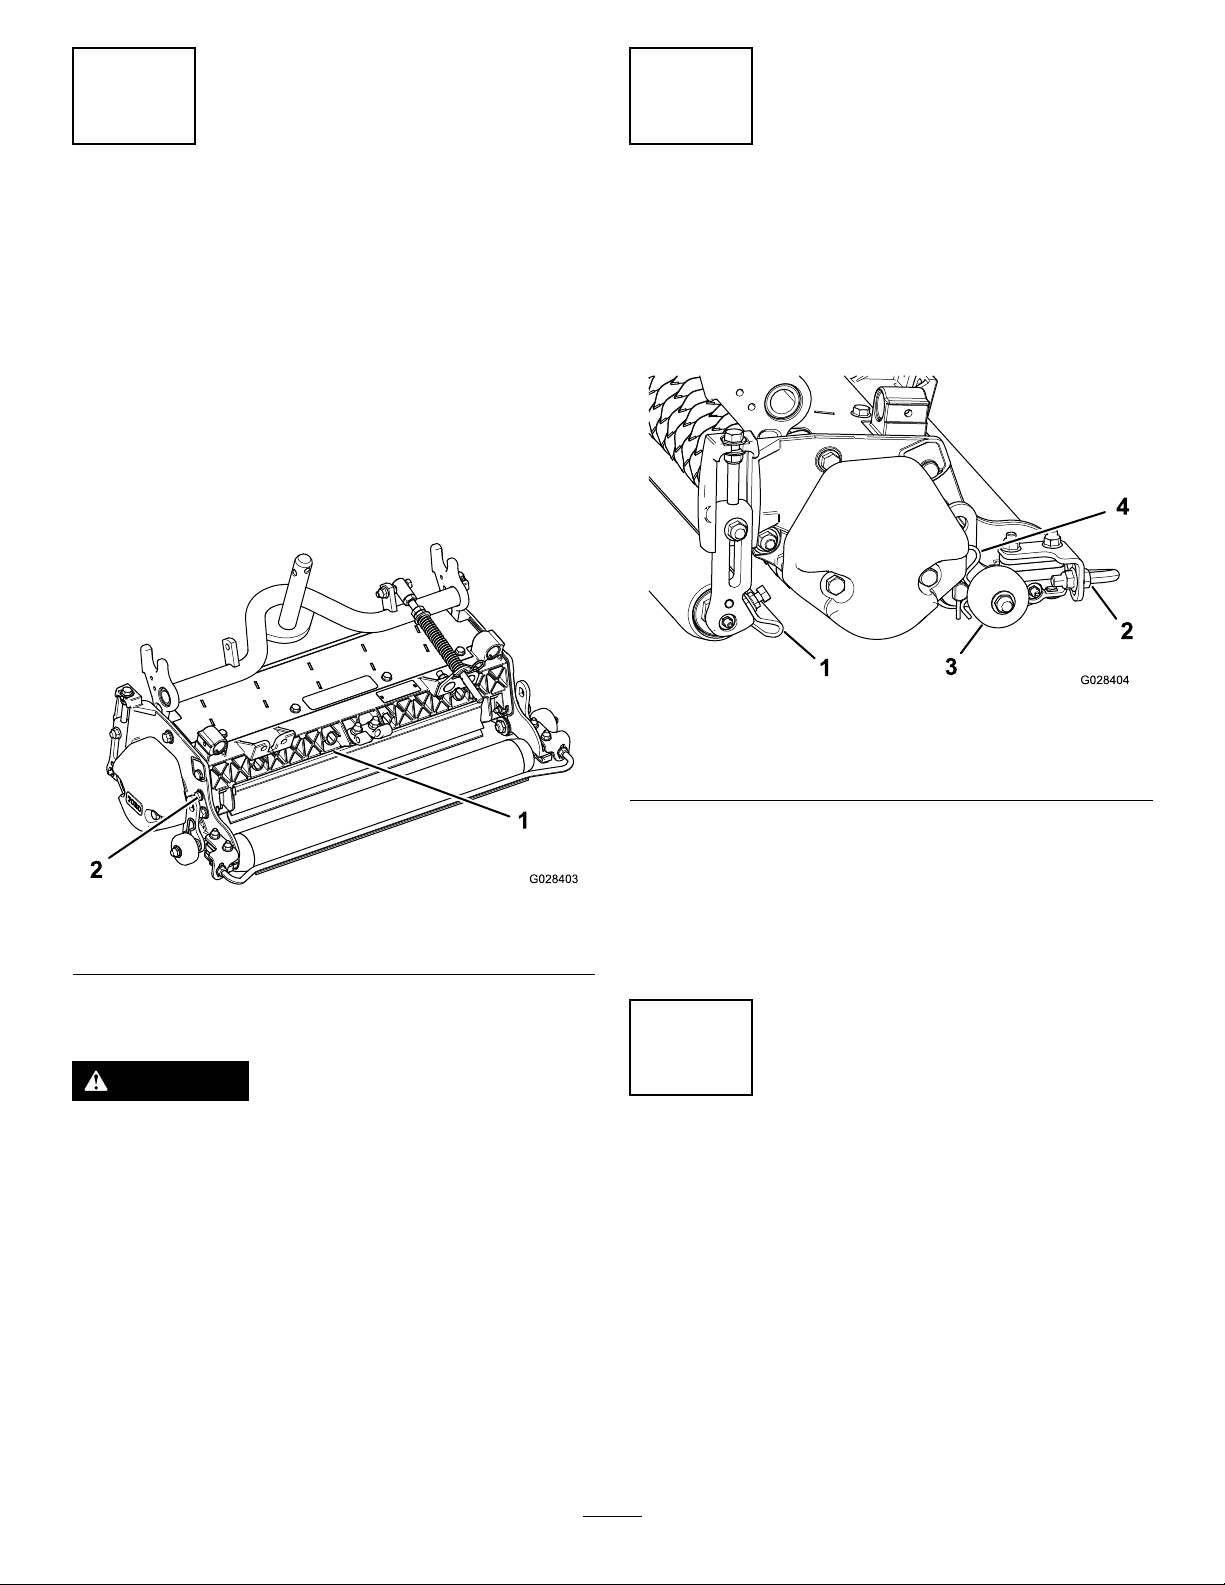
1.Placetheverticutterreelonalevelsurface.
2.Place2gaugebars,whichhavethedesireddepthof
bladepenetrationbelowtheground,underthefront
andrearrollersoftheverticutterreeloneachendof
thereel(Figure9).
Figure9
1.Gaugebars2.Adjustingbolts
Note:Theverticutterbladesmustnottouchthe
gaugebars.
3.Turntheadjustingboltoneachheight-of-cutbracket
(Figure9)sothatthereelbladescomeincontactwith
thelevelsurfaceonbothends.
Note:Astheverticutterbladeswear,thediameterof
thereelwilldecreaseandthedepthsettingwillchange.
Checkthedepthsettingperiodicallytoensurethatthe
desiredsettingisachieved.
8
7
AdjustingtheRearGrass
Shield
NoPartsRequired
Procedure
Note:Whenoperatinginturfconditionswheremuchdebris
orunusuallyheavythatchisencountered,opentherear
dischargeshieldtohelpallowthedebristodischargefrom
thereel.
1.Loosentheboltsonthepivotofthegrassshield
(Figure10).
Figure10
1.Reargrassshield2.Pivotbolt
2.Rotatethegrassshieldtothedesiredsetting,and
tightenthebolts(Figure10).
CAUTION
Donotopentherearshieldsothatitishigherthan
leveltoground.
Throwndebriscouldcausepersonalinjury.
8
AdjustingtheRollerScrapers
NoPartsRequired
Procedure
1.Loosentheangenutsthatsecuretherollerscrapers
(Figure11).
Figure11
1.Frontrollerscraper3.Transportroller
2.Rearrollerscraper4.Cotterpin
2.Movethescraperrodsinorouttoattain0.0to0.75
mm(0.0to0.03inch)clearancebetweenthescraper
androller.
3.Ensurethatthescraperrodisparalleltotherollerand
tothelevelsurface.
4.Tightentheangenutstolocktheadjustment.
9
AdjustingtheTransport
Rollers
NoPartsRequired
Procedure
Beforetheverticuttersareloweredtotheshopooror
removedfromthetractionunit,lowerthetransportrollers
(Figure11)toprotectthebladesfromhardsurfacecontact.
1.Removethecotterpinthatsecuresthetransportroller
brackettothesideplatepin.
2.Positionthetransportrollerasfollows:
9

•Lowertherollerbracketbeforetheverticutteris
loweredtotheshopoor.
•Raisetherollerbracketaftertheverticutterisraised
totheoperatingposition.
3.Securethetransportrollerbrackettothesideplatepin
withthecotterpin.
4.Repeattheprocedureontheoppositeendofthe
verticutter.
10
MountingtheVerticutterReel
NoPartsRequired
Procedure
Verticutterreelsaremountedtotractionunitthesameway
cuttingunitsare.RefertoTractionUnitOperator'sManualfor
mountinginstructions.
Installthereelmotorandgreasethesideplateuntilexcess
greaseoozesoutofthereliefvalve(Figure12).
ProductOverview
Specications
ModelNetweight
Withnoendweight:
49.4kg(109lb)
Withsmallendweight
(hydraulicmotor):
52.6kg(116lb)
03618
Withlargeendweight
(electricmotor):
55.8kg(123lb)
0361959.9kg(132lb)
10

Operation
Note:Determinetheleftandrightsidesofthemachine
fromthenormaloperatingposition.
TrainingPeriod
Beforeoperatingtheverticutterreels,evaluatethe
performanceofthereelatthedesiredsetting.Operateina
clear,unusedareatodetermineifthedesiredresultswillbe
achieved.Adjustasdesired.
OperatingTips
1.Operatethetractionunitatfullthrottle,fullreelspeed
(setting9)andatthedesiredtractionspeed.
2.Themaximumrecommendedbladepenetrationdepths
areasfollows:
•Model03618is3mm(1/8inch).
•Model03619is6mm(1/4inch).
3.Powerrequirementstooperatetheverticutterreelswill
varywithturfandsoilconditions.Travelspeedmay
needtobereducedinsomeconditions.
4.Whenoperatinginturfconditionswheremuchdebris
isencountered,orunusuallyheavythatch,openthe
frontandreardischargeshieldstohelpallowthedebris
todischargefromthereel.
CAUTION
Throwndebriscouldcausepersonalinjury.
Donotopentherearshieldsothatitishigher
thanleveltotheground.
11

Maintenance
LubricatingtheVerticutter
Eachverticutterhas5greasettings(Figure12)thatmustbe
lubricatedweeklywith#2general-purpose,lithium-based
grease.
Thelubricationpointsarethefrontroller(2),therearroller
(2),andthereelmotorsplines(1).
Important:Lubricatingthecuttingunitsimmediately
afterwashinghelpspurgewateroutofthebearingsand
increasesbearinglife.
1.Wipeeachgreasettingwithacleanrag.
2.Applygreaseuntilyouseecleangreasecomingoutof
therollersealsandthebearingreliefvalve(Figure12).
Figure12
1.Reliefvalve
3.Wipeanyexcessgreaseaway.
RemovingtheVerticutter
BladesfromtheShaft
1.Securetheendoftheverticuttershaft,whichhasonly
onewasherandnut,inavise.
2.Onotherendofshaft,rotatethenutcounter-clockwise
andremovethenut.
CAUTION
Thebladesareextremelysharpandmayhave
burrsthatwillcutyourhands.
Usecautionwhenremovingthebladesfrom
theshaft.
3.Removethesmallspacer,thewasher,theblades,and
thelargespacers.Cleanandlubricatethesquareshaft
withalightcoatingofgreasetosimplifytheassembly
(Figure13).
Figure13
1.Shaft4.Smallspacer
2.Nut5.Blade(25formodel03618;
16formodel03619)
3.Washer6.Largespacer(24for
model03618;15formodel
03619)
Important:Donotinverttheverticutterreel
blades.Theorderofdisassemblyisextremely
important.Donotinverttheverticutterreelblades
whendisassemblingorreversetheorderwhen
assemblingthem.Notetheindexholeineach
verticutterblade.Theindexholeisprovidedfor
assemblyinordertoobtaintheproperhelixfor
theverticutterreel.
12

InstallingtheVerticutter
Blades
1.Assembleablade(Figure14).
2.Assemblealargespacer.
3.Donotinvertthereelbladeswhenassemblingthem
onthereelshaft.
Note:Ifthebladesareinverted,thebladesthatare
inuse,(rounded)willbemixedwiththesharpends
ofthebladeswhichwerenotinuse.Thiswillcause
unsatisfactoryperformanceintheverticutterreelunit.
Attentionshouldalwaysbetakenwhendisassembling
theverticutterbladesfromreel.
4.Installthenextbladeclockwisesothattheindex
referencehole(Figure14)isnotalignedwiththerst
bladeholebyoneatoftheshaft.
G017524
Figure14
1.Indexreferencehole
5.Continuetoinstallspacersandbladesinthismanner
untilthefullcomplementofbladeshavebeeninstalled.
Note:Whenproperlyassembled,thebladeswillbe
staggeredinsuchamannerastoappearlikeahelix.
6.Installthesmallspacertotheshaft.
7.ApplyBlueLoctite242tothenut.Installthenutonto
theshaft(machinedsideofthenuttowardthespacer),
andtightenitto109to135N-m(80to100ft-lb).
13
OptionalBladeSpacing
0.50-InchBladeSpacingforModel03618
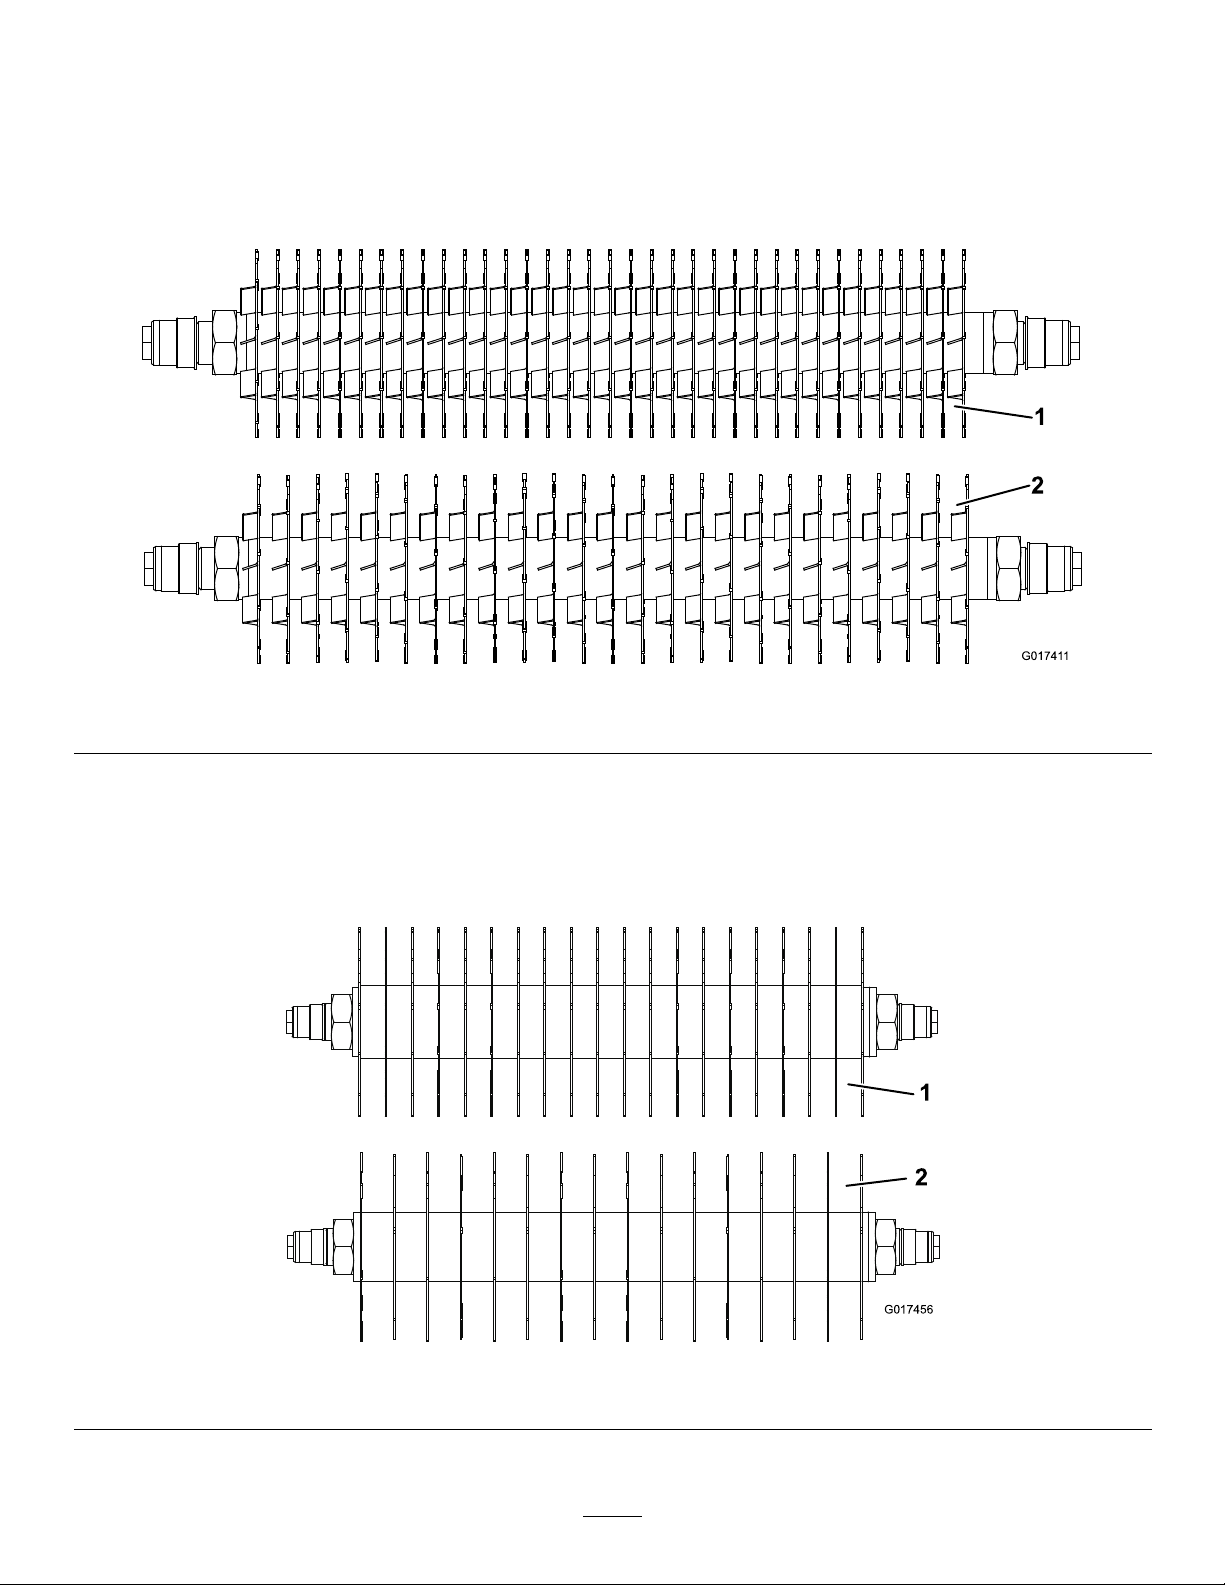
Tochangethecongurationoftheverticutterfromthestandard0.75-inchspacingtothe0.50-inchspacingrequiresan
additional34spacers,partno.17-1580andanadditional10carbideblades,partno.106-6355,oranadditional10regularblades
andpartno.17-1590(Figure15).
1
2
Figure15
1.0.50-inchspacing2.0.75-inchspacing
1.00-InchBladeSpacingforModel03619
Tochangethecongurationoftheverticutterfromthestandard1.25-inchspacingtothe1.00-inchspacingrequires19new
spacers,partno.93-3092andanadditional4carbideblades,partno.106-8625,oranadditional4regularbladesandpart
no.93-3038-03(Figure16).
G017456
1
2
Figure16
1.1.00-inchspacing2.1.25-inchspacing
14

ServicingtheRoller
ARollerRebuildKit,PartNo.114–5430andaRollerRebuild
ToolKit,PartNo.115–0803(Figure17)areavailablefor
servicingtheroller.TheRollerRebuildKitincludesallthe
bearings,bearingnuts,innersealsandoutersealstorebuilda
roller.TheRollerRebuildToolKitincludesallthetoolsand
theinstallationinstructionsrequiredtorebuildarollerwith
therollerrebuildkit.Refertoyourpartscatalogorcontact
yourAuthorizedToroDistributorforassistance.
Figure17
1.Rebuildkit(PartNo.114–5430)6.Bearingnut
2.Rebuildtoolkit(PartNo.115–0803)7.Innersealtool
3.Innerseal8.Washer
4.Bearing9.Bearing/outersealtool
5.Outerseal
15

Notes:
16

Notes:
17

DeclarationofIncorporation
ModelNo.SerialNo.ProductDescriptionInvoiceDescriptionGeneralDescriptionDirective
03618315000001andUpVerticutter22IN5INVERTICUTTER
[5010HYBRID]Verticutter2006/42/EC
03619315000001andUpVerticutter22IN7INVERTICUTTER
[5010HYBRID]Verticutter2006/42/EC
RelevanttechnicaldocumentationhasbeencompiledasrequiredperPartBofAnnexVIIof2006/42/EC.
Wewillundertaketotransmit,inresponsetorequestsbynationalauthorities,relevantinformationonthispartly
completedmachinery.Themethodoftransmissionshallbeelectronictransmittal.
ThismachineryshallnotbeputintoserviceuntilincorporatedintoapprovedT oromodelsasindicatedonthe
associatedDeclarationofConformityandinaccordancewithallinstructions,wherebyitcanbedeclaredin
conformitywithallrelevantDirectives.
Certied:EUT echnicalContact:
PeterTetteroo
ToroEuropeNV
B-2260Oevel-Westerloo
Belgium
DavidKlisTel.003214562960
Sr.EngineeringManagerFax003214581911
8111LyndaleAve.South
Bloomington,MN55420,USA
December11,2014
18

InternationalDistributorList
Distributor:Country:PhoneNumber:Distributor:Country:Phone
Number:
AgrolancKftHungary3627539640MaquiverS.A.Colombia5712364079
BalamaPrimaEngineeringEquip.HongKong85221552163MaruyamaMfg.Co.Inc.Japan81332522285
B-RayCorporationKorea82325512076Mountelda.s.CzechRepublic420255704
220
CascoSalesCompanyPuertoRico7877888383Mountelda.s.Slovakia420255704
220
CeresS.A.CostaRica5062391138MunditolS.A.Argentina54114821
9999
CSSCTurfEquipment(pvt)Ltd.SriLanka94112746100NormaGardenRussia74954116120
CyrilJohnston&Co.NorthernIreland442890813121OslingerTurfEquipmentSAEcuador59342396970
CyrilJohnston&Co.RepublicofIreland442890813121OyHakoGroundandGarden
Ab
Finland35898700733
EquiverMexico525553995444ParklandProductsLtd.NewZealand6433493760
FemcoS.A.Guatemala5024423277PerfettoPoland48618208416
ForGarderOUEstonia3723846060PratoverdeSRL.Italy390499128
128
G.Y .K.CompanyLtd.Japan81726325861Prochaska&CieAustria4312785100
GeomechanikiofAthensGreece30109350054RTCohen2004Ltd.Israel97298617979
GolfinternationalTurizmTurkey902163365993RiversaSpain34952837500
GuandongGoldenStarChina862087651338LelyTurfcareDenmark4566109200
HakoGroundandGardenSweden4635100000SolvertS.A.S.France331308177
00
HakoGroundandGardenNorway4722907760SpyprosStavrinidesLimitedCyprus35722434131
HayterLimited(U.K.)UnitedKingdom441279723444SurgeSystemsIndiaLimitedIndia911292299901
HydroturfInt.CoDubaiUnitedArabEmirates97143479479T-MarktLogisticsLtd.Hungary3626525500
HydroturfEgyptLLCEgypt2025194308ToroAustraliaAustralia61395807355
IrrimacPortugal351212388260ToroEuropeNVBelgium3214562960
IrrigationProductsInt'lPvtLtd.India0091442449
4387
ValtechMorocco21253766
3636
JeanHeybroekb.v.Netherlands31306394611VictusEmakPoland48618238369
EuropeanPrivacyNotice
TheInformationToroCollects
ToroWarrantyCompany(Toro)respectsyourprivacy.Inordertoprocessyourwarrantyclaimandcontactyouintheeventofaproductrecall,weaskyou
tosharecertainpersonalinformationwithus,eitherdirectlyorthroughyourlocalTorocompanyordealer.
TheT orowarrantysystemishostedonserverslocatedwithintheUnitedStateswhereprivacylawmaynotprovidethesameprotectionasapplies
inyourcountry.
BYSHARINGYOURPERSONALINFORMATIONWITHUS,YOUARECONSENTINGTOTHEPROCESSINGOFYOURPERSONALINFORMATION
ASDESCRIBEDINTHISPRIVACYNOTICE.
TheWayToroUsesInformation
Toromayuseyourpersonalinformationtoprocesswarrantyclaims,tocontactyouintheeventofaproductrecallandforanyotherpurposewhichwetell
youabout.T oromayshareyourinformationwithToro'safliates,dealersorotherbusinesspartnersinconnectionwithanyoftheseactivities.Wewillnot
sellyourpersonalinformationtoanyothercompany.Wereservetherighttodisclosepersonalinformationinordertocomplywithapplicablelawsand
withrequestsbytheappropriateauthorities,tooperateoursystemsproperlyorforourownprotectionorthatofotherusers.
RetentionofyourPersonalInformation
Wewillkeepyourpersonalinformationaslongasweneeditforthepurposesforwhichitwasoriginallycollectedorforotherlegitimatepurposes
(suchasregulatorycompliance),orasrequiredbyapplicablelaw.
Toro'sCommitmenttoSecurityofYourPersonalInformation
Wetakereasonableprecautionsinordertoprotectthesecurityofyourpersonalinformation.Wealsotakestepstomaintaintheaccuracyandcurrent
statusofpersonalinformation.
AccessandCorrectionofyourPersonalInformation
Ifyouwouldliketorevieworcorrectyourpersonalinformation,pleasecontactusbyemailat[email protected].
AustralianConsumerLaw
AustraliancustomerswillnddetailsrelatingtotheAustralianConsumerLaweitherinsidetheboxoratyourlocalToroDealer.
374-0269RevH

ToroGeneralCommercialProductWarranty
ATwo-YearLimitedWarranty
ConditionsandProductsCovered
TheToroCompanyanditsafliate,T oroWarrantyCompany,pursuant
toanagreementbetweenthem,jointlywarrantyourT oroCommercial
product(“Product”)tobefreefromdefectsinmaterialsorworkmanship
fortwoyearsor1500operationalhours*,whicheveroccursrst.This
warrantyisapplicabletoallproductswiththeexceptionofAerators
(refertoseparatewarrantystatementsfortheseproducts).Wherea
warrantableconditionexists,wewillrepairtheProductatnocosttoyou
includingdiagnostics,labor,parts,andtransportation.Thiswarranty
beginsonthedatetheProductisdeliveredtotheoriginalretailpurchaser.
*Productequippedwithanhourmeter.
InstructionsforObtainingWarrantyService
YouareresponsiblefornotifyingtheCommercialProductsDistributoror
AuthorizedCommercialProductsDealerfromwhomyoupurchasedthe
Productassoonasyoubelieveawarrantableconditionexists.Ifyouneed
helplocatingaCommercialProductsDistributororAuthorizedDealer,or
ifyouhavequestionsregardingyourwarrantyrightsorresponsibilities,
youmaycontactusat:
ToroCommercialProductsServiceDepartment
ToroWarrantyCompany
8111LyndaleAvenueSouth
Bloomington,MN55420-1196
952–888–8801or800–952–2740
E-mail:[email protected]
OwnerResponsibilities
AstheProductowner,youareresponsibleforrequiredmaintenanceand
adjustmentsstatedinyourOperator'sManual.Failuretoperformrequired
maintenanceandadjustmentscanbegroundsfordisallowingawarranty
claim.
ItemsandConditionsNotCovered
Notallproductfailuresormalfunctionsthatoccurduringthewarranty
periodaredefectsinmaterialsorworkmanship.Thiswarrantydoesnot
coverthefollowing:
•Productfailureswhichresultfromtheuseofnon-T ororeplacement
parts,orfrominstallationanduseofadd-on,ormodiednon-Toro
brandedaccessoriesandproducts.Aseparatewarrantymaybe
providedbythemanufactureroftheseitems.
•Productfailureswhichresultfromfailuretoperformrecommended
maintenanceand/oradjustments.Failuretoproperlymaintainyour
ToroproductpertheRecommendedMaintenancelistedinthe
Operator’sManualcanresultinclaimsforwarrantybeingdenied.
•ProductfailureswhichresultfromoperatingtheProductinanabusive,
negligent,orrecklessmanner.
•Partssubjecttoconsumptionthroughuseunlessfoundtobedefective.
Examplesofpartswhichareconsumed,orusedup,duringnormal
Productoperationinclude,butarenotlimitedto,brakepadsand
linings,clutchlinings,blades,reels,rollersandbearings(sealedor
greasable),bedknives,sparkplugs,castorwheelsandbearings,tires,
lters,belts,andcertainsprayercomponentssuchasdiaphragms,
nozzles,andcheckvalves,etc.
•Failurescausedbyoutsideinuence.Conditionsconsideredtobe
outsideinuenceinclude,butarenotlimitedto,weather,storage
practices,contamination,useofunapprovedfuels,coolants,lubricants,
additives,fertilizers,water,orchemicals,etc.
•Failureorperformanceissuesduetotheuseoffuels(e.g.gasoline,
diesel,orbiodiesel)thatdonotconformtotheirrespectiveindustry
standards.
•Normalnoise,vibration,wearandtear,anddeterioration.
•Normal“wearandtear”includes,butisnotlimitedto,damagetoseats
duetowearorabrasion,wornpaintedsurfaces,scratcheddecalsor
windows,etc.
Parts
Partsscheduledforreplacementasrequiredmaintenancearewarranted
fortheperiodoftimeuptothescheduledreplacementtimeforthatpart.
Partsreplacedunderthiswarrantyarecoveredforthedurationofthe
originalproductwarrantyandbecomethepropertyofToro.Torowillmake
thenaldecisionwhethertorepairanyexistingpartorassemblyorreplace
it.Toromayuseremanufacturedpartsforwarrantyrepairs.
DeepCycleandLithium-IonBatteryWarranty:
DeepcycleandLithium-Ionbatterieshaveaspeciedtotalnumberof
kilowatt-hourstheycandeliverduringtheirlifetime.Operating,recharging,
andmaintenancetechniquescanextendorreducetotalbatterylife.Asthe
batteriesinthisproductareconsumed,theamountofusefulworkbetween
chargingintervalswillslowlydecreaseuntilthebatteryiscompletelyworn
out.Replacementofwornoutbatteries,duetonormalconsumption,
istheresponsibilityoftheproductowner.Batteryreplacementmaybe
requiredduringthenormalproductwarrantyperiodatowner’sexpense.
Note:(Lithium-Ionbatteryonly):ALithium-Ionbatteryhasapartonly
proratedwarrantybeginningyear3throughyear5basedonthetime
inserviceandkilowatthoursused.RefertotheOperator'sManualfor
additionalinformation.
MaintenanceisatOwner’sExpense
Enginetune-up,lubrication,cleaningandpolishing,replacementoflters,
coolant,andcompletingrecommendedmaintenancearesomeofthe
normalservicesToroproductsrequirethatareattheowner’sexpense.
GeneralConditions
RepairbyanAuthorizedToroDistributororDealerisyoursoleremedy
underthiswarranty.
NeitherTheToroCompanynorToroWarrantyCompanyisliablefor
indirect,incidentalorconsequentialdamagesinconnectionwiththe
useoftheToroProductscoveredbythiswarranty,includingany
costorexpenseofprovidingsubstituteequipmentorserviceduring
reasonableperiodsofmalfunctionornon-usependingcompletion
ofrepairsunderthiswarranty.ExceptfortheEmissionswarranty
referencedbelow,ifapplicable,thereisnootherexpresswarranty.All
impliedwarrantiesofmerchantabilityandtnessforusearelimitedto
thedurationofthisexpresswarranty.
Somestatesdonotallowexclusionsofincidentalorconsequential
damages,orlimitationsonhowlonganimpliedwarrantylasts,sotheabove
exclusionsandlimitationsmaynotapplytoyou.Thiswarrantygivesyou
speciclegalrights,andyoumayalsohaveotherrightswhichvaryfrom
statetostate.
Noteregardingenginewarranty:
TheEmissionsControlSystemonyourProductmaybecoveredby
aseparatewarrantymeetingrequirementsestablishedbytheU.S.
EnvironmentalProtectionAgency(EPA)and/ortheCaliforniaAirResources
Board(CARB).Thehourlimitationssetforthabovedonotapplytothe
EmissionsControlSystemWarranty.RefertotheEngineEmissionControl
WarrantyStatementsuppliedwithyourproductorcontainedintheengine
manufacturer’sdocumentationfordetails
CountriesOtherthantheUnitedStatesorCanada
CustomerswhohavepurchasedT oroproductsexportedfromtheUnitedStatesorCanadashouldcontacttheirT oroDistributor(Dealer)toobtain
guaranteepoliciesforyourcountry,province,orstate.IfforanyreasonyouaredissatisedwithyourDistributor'sserviceorhavedifcultyobtaining
guaranteeinformation,contacttheToroimporter.374-0253RevC
Other manuals for Reelmaster 5010- H
8
This manual suits for next models
2
Table of contents
Other Toro Cutter manuals


Popular Cutter manuals by other brands


Habasit
Habasit AF-61/6 30 Series operating instructions

CellPath
CellPath TruSlice Digital CBA-0200-00A Instructions for use

SignWarehouse.com
SignWarehouse.com Vinyl Express Cougar 24" owner's manual

Makita
Makita 180 mm 4157KB instruction manual

KINZO
KINZO 29605 manual

ORSI
ORSI Acrobat 4.4 Translation of the original instructions