manuals.online logo
Brands
  1. Home
  2. •
  3. Brands
  4. •
  5. Toro
  6. •
  7. Lawn Mower Accessories
  8. •
  9. Toro Groundsmaster 300 Series User manual

Toro Groundsmaster 300 Series User manual

Other manuals for Groundsmaster 300 Series

4

Other Toro Lawn Mower Accessories manuals

Toro HoverPro 450 User manual

Toro

Toro HoverPro 450 User manual

Toro 31321 User manual

Toro

Toro 31321 User manual

Toro Reelmaster 03657 User manual

Toro

Toro Reelmaster 03657 User manual

Toro RT1200 User manual

Toro

Toro RT1200 User manual

Toro 111-8083 User manual

Toro

Toro 111-8083 User manual

Toro 02710 Manual

Toro

Toro 02710 Manual

Toro 31984 User manual

Toro

Toro 31984 User manual

Toro 30667 User manual

Toro

Toro 30667 User manual

Toro 30669 User manual

Toro

Toro 30669 User manual

Toro 08755 User manual

Toro

Toro 08755 User manual

Toro 120-3171 User manual

Toro

Toro 120-3171 User manual

Toro 161-4520 User manual

Toro

Toro 161-4520 User manual

Toro 112-5803 User manual

Toro

Toro 112-5803 User manual

Toro TURBO FORCE User manual

Toro

Toro TURBO FORCE User manual

Toro 30447 User manual

Toro

Toro 30447 User manual

Toro Recycler 126-8701 User manual

Toro

Toro Recycler 126-8701 User manual

Toro 125-8121 User manual

Toro

Toro 125-8121 User manual

Toro 08838 User manual

Toro

Toro 08838 User manual

Toro 136-9046 User manual

Toro

Toro 136-9046 User manual

Toro 145-3530 User manual

Toro

Toro 145-3530 User manual

Toro 78496 User manual

Toro

Toro 78496 User manual

Toro 106-2643 User manual

Toro

Toro 106-2643 User manual

Toro Sand Pro 5040 User manual

Toro

Toro Sand Pro 5040 User manual

Toro Super Recycler 115-8416 User manual

Toro

Toro Super Recycler 115-8416 User manual

Popular Lawn Mower Accessories manuals by other brands

Ariens 891008 Operator's manual

Ariens

Ariens 891008 Operator's manual

Rover 108 - 109 owner's manual

Rover

Rover 108 - 109 owner's manual

Snapper 1690047 Operator's manual

Snapper

Snapper 1690047 Operator's manual

RHINO 800 Operator's manual

RHINO

RHINO 800 Operator's manual

Exmark Quest 126-7506 Operator's manual

Exmark

Exmark Quest 126-7506 Operator's manual

Snapper 1685167 installation instructions

Snapper

Snapper 1685167 installation instructions

Cub Cadet 19B70029100 installation manual

Cub Cadet

Cub Cadet 19B70029100 installation manual

Stihl AMK 043.1 instruction manual

Stihl

Stihl AMK 043.1 instruction manual

MTD 753-0873 Service kit manual

MTD

MTD 753-0873 Service kit manual

Bush Hog RG60 Operator's manual

Bush Hog

Bush Hog RG60 Operator's manual

Scag Power Equipment GC-F4 Operator's manual

Scag Power Equipment

Scag Power Equipment GC-F4 Operator's manual

Land Pride RCF2760 Operator's manual

Land Pride

Land Pride RCF2760 Operator's manual

Peco SPARTAN RZ Series Operator's manual

Peco

Peco SPARTAN RZ Series Operator's manual

Peco 28621206 Operator's manual

Peco

Peco 28621206 Operator's manual

Simplicity 367 Operator's manual

Simplicity

Simplicity 367 Operator's manual

Simplicity 211 Operator's manual

Simplicity

Simplicity 211 Operator's manual

Iseki SSM72 Operators & service manual

Iseki

Iseki SSM72 Operators & service manual

Simplicity 1690043 Operator's manual

Simplicity

Simplicity 1690043 Operator's manual

manuals.online logo
manuals.online logoBrands
  • About & Mission
  • Contact us
  • Privacy Policy
  • Terms and Conditions

Copyright 2025 Manuals.Online. All Rights Reserved.

FORM NO. 3316-806 Rev. A
The TORO Company - 1994, Rev. 1997
INSTALLATION
INSTRUCTIONS
PART NO. 93-3149
TRACTION PEDAL KIT
Groundsmaster 300 Series
CAUTION
Before servicing or making adjustments to the
machine, stop engine and remove key from
switch.
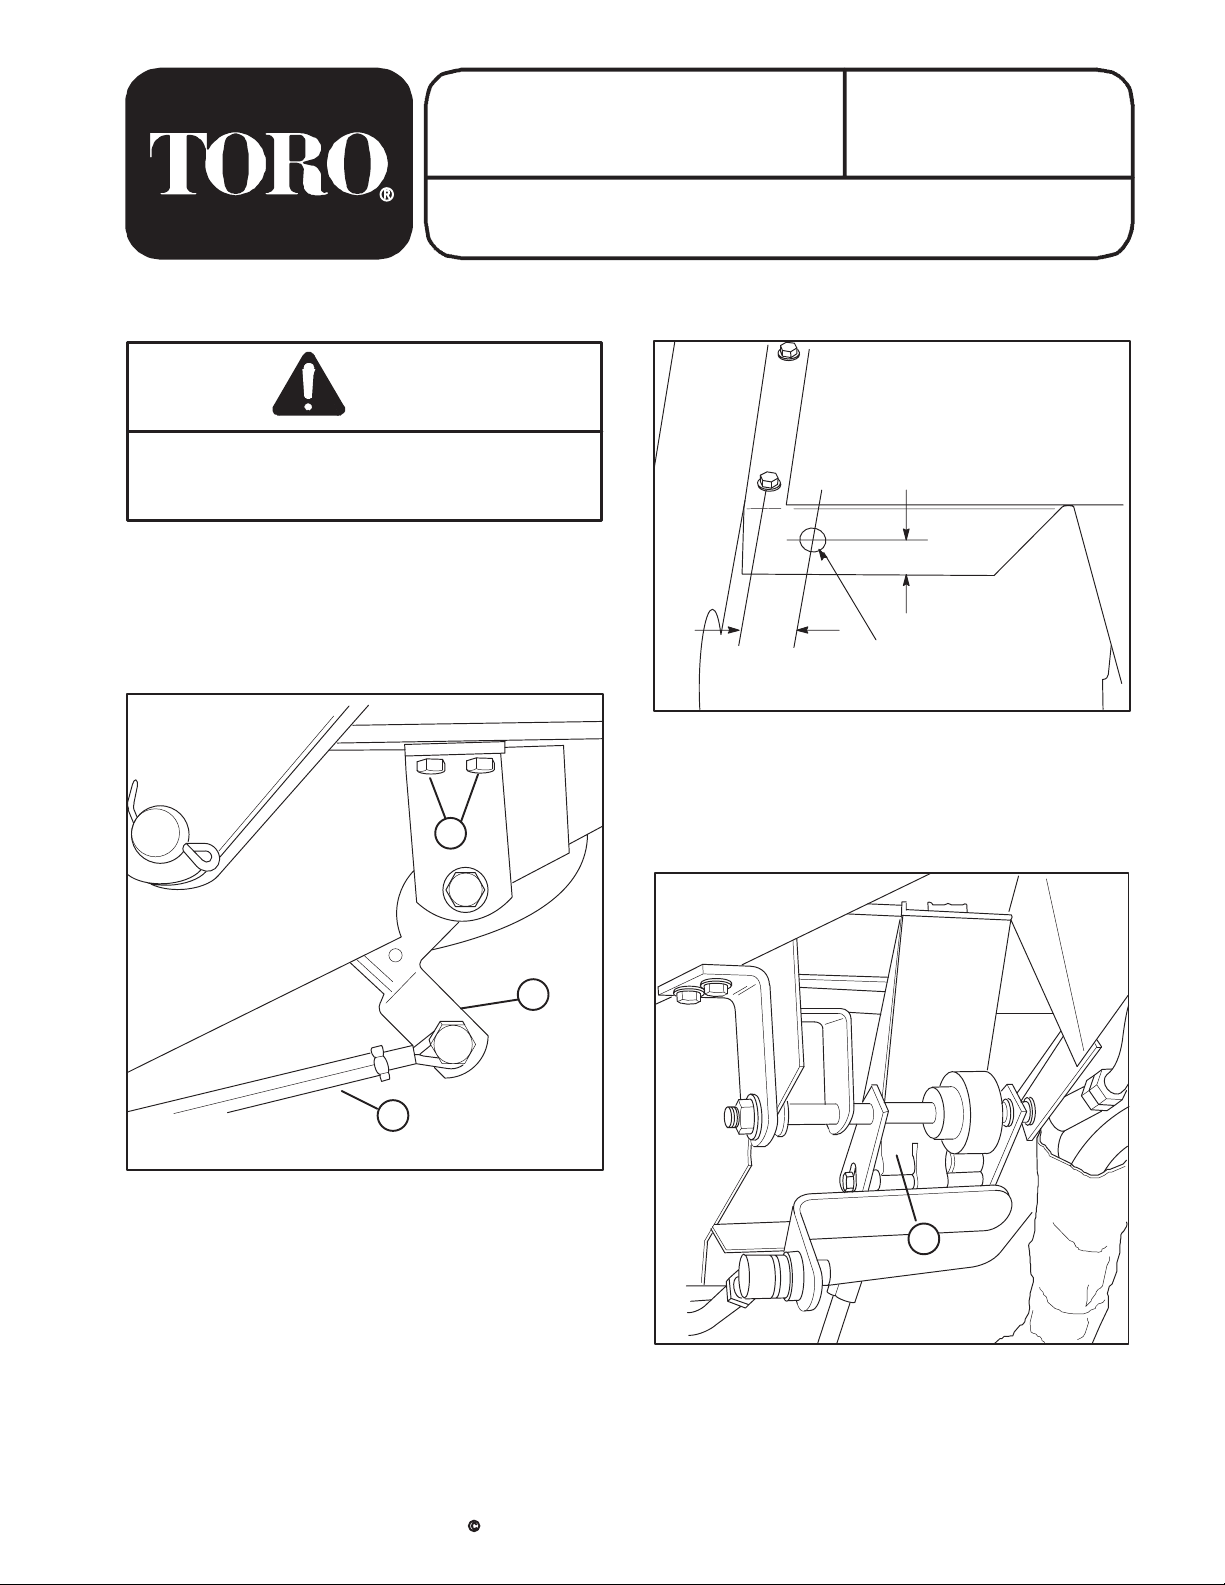
1. Remove nut securing front end of pump control
rod to traction pedal pivot bracket (Fig. 1).
Figure 1
1. Pump control rod
2. Traction pedal pivot bracket
3. Self tapping screws
1
3
2
2. Remove (2) self tapping screws securing top of
traction pedal pivot bracket to frame (Fig. 1). Remove
traction pedal assembly.
3. Using dimensions shown in figure 2, locate, mark
and drill 11/32" dia. hole in floor plate.
Figure 2
.69"
1.00" 11/32" dia.
4. Place new traction pedal assembly into position
and secure traction pedal pivot bracket to frame with
(2) new self tapping screws (Fig. 3).
Figure 3
1. Traction pedal assembly
1
5. Connect pump control rod to traction pedal pivot
bracket with nut previously removed (Fig. 3).
2
6. Press down on front of traction pedal and check
travel. There should be approximately 3.50" clearance
between end of pedal and floor plate when pedal in
fully depressed (Fig. 4). Adjust pump control rod to
attain dimension.
Figure 4
12
1. End of pedal
2. Floor plate
3.50"
7. Mount footrest to footrest bracket and floor plate
with (2) carriage bolts and locknuts (Fig. 5).
Figure 5
1. Foot rest
2. Foot rest pad
1
2
8. Affix foot rest pad to top of foot rest (Fig. 5).