Toro LT-F3000 User manual

FormNo.3403-967RevA
RoadLightKitincludingBrakeLights
LT-F3000SeriesTractionUnit
ModelNo.02918—SerialNo.316000001andUp
InstallationInstructions
ThisproductcomplieswithallrelevantEuropeandirectives.Fordetails,pleaseseetheDeclarationofIncorporation(DOI)at
thebackofthispublication.
Installation
LooseParts
Usethechartbelowtoverifythatallpartshavebeenshipped.
ProcedureDescriptionQty.Use
1Nopartsrequired–Preparethemachine.
Bolt(M16x110mm)2
Locknut(M16)2
Leftlightbracketassembly1
Rightlightbracketassembly1
Number-platebracket1
Numberplatelight1
Washer(M6)6
Locknut(M6)4
Hex-headscrew(M6x20mm)2
Setscrew(M3x16mm)2
Washer(M3)2
Locknut(M3)2
Pressureswitch1
Rear-lightconnector2
Flasherrelay1
Fuse(10amp)1
Fuse(15amp)1
Dowtyseal1
Pressure-switchconnector1
2
Setscrew(M6x30mm)1
Installtherearlights.
©2016—TheToro®Company
8111LyndaleAvenueSouth
Bloomington,MN55420
Registeratwww.Toro.com.OriginalInstructions(EN)
PrintedintheUK
AllRightsReserved*3403-967*A

ProcedureDescriptionQty.Use
Leftbracket1
Rightbracket1
Lightframeassembly1
Headlamp2
Headlampcable2
Washer(M8)4
Washer(5/16inch)4
Locknut(M8)4
Hex-headscrew(M8x25mm)4
Frontlightconnector2
Washer(M12)8
Locknut(M12)4
3
Hex-headscrew(M12)4
Installthefrontlights
Lightswitch1
Hazardswitch1
Direction-indicatorswitch1
4Connectorlead1
Installtheswitches.
Adhesivereector2
Cabletie20
5Seriallabel1
Completetheinstallation.
1
PreparingtheMachine
NoPartsRequired
Procedure
1.Parkthemachineonalevelsurface,lowerthecutting
unit,stoptheengine,engagetheparkingbrakeand
removethekeyfromtheignitionswitch.
2.Disconnectthenegative(–)batterycablefromthe
battery.
WARNING
Gasesfromthebatterycanbeexplosive.
Wearsafetygogglesandrubbergloveswhen
workingwiththebattery.Keepopenames
andelectricalsparksawayfromthebattery.
Donotsmoke.
2

2
InstallingtheRearLights
Partsneededforthisprocedure:
2Bolt(M16x110mm)
2Locknut(M16)
1Leftlightbracketassembly
1Rightlightbracketassembly
1Number-platebracket
1Numberplatelight
6Washer(M6)
4Locknut(M6)
2Hex-headscrew(M6x20mm)
2Setscrew(M3x16mm)
2Washer(M3)
2Locknut(M3)
1Pressureswitch
2Rear-lightconnector
1Flasherrelay
1Fuse(10amp)
1Fuse(15amp)
1Dowtyseal
1Pressure-switchconnector
1Setscrew(M6x30mm)
MountingtheLights
WARNING
Usingadrillwithoutpropereyeprotectionmay
allowdebristoentertheeye,causinginjury.
Whendrillingorcarryingoutotheroperation,
alwaysweareyeprotection.
1.Opentheenginecover.
2.Lifttheplatform.
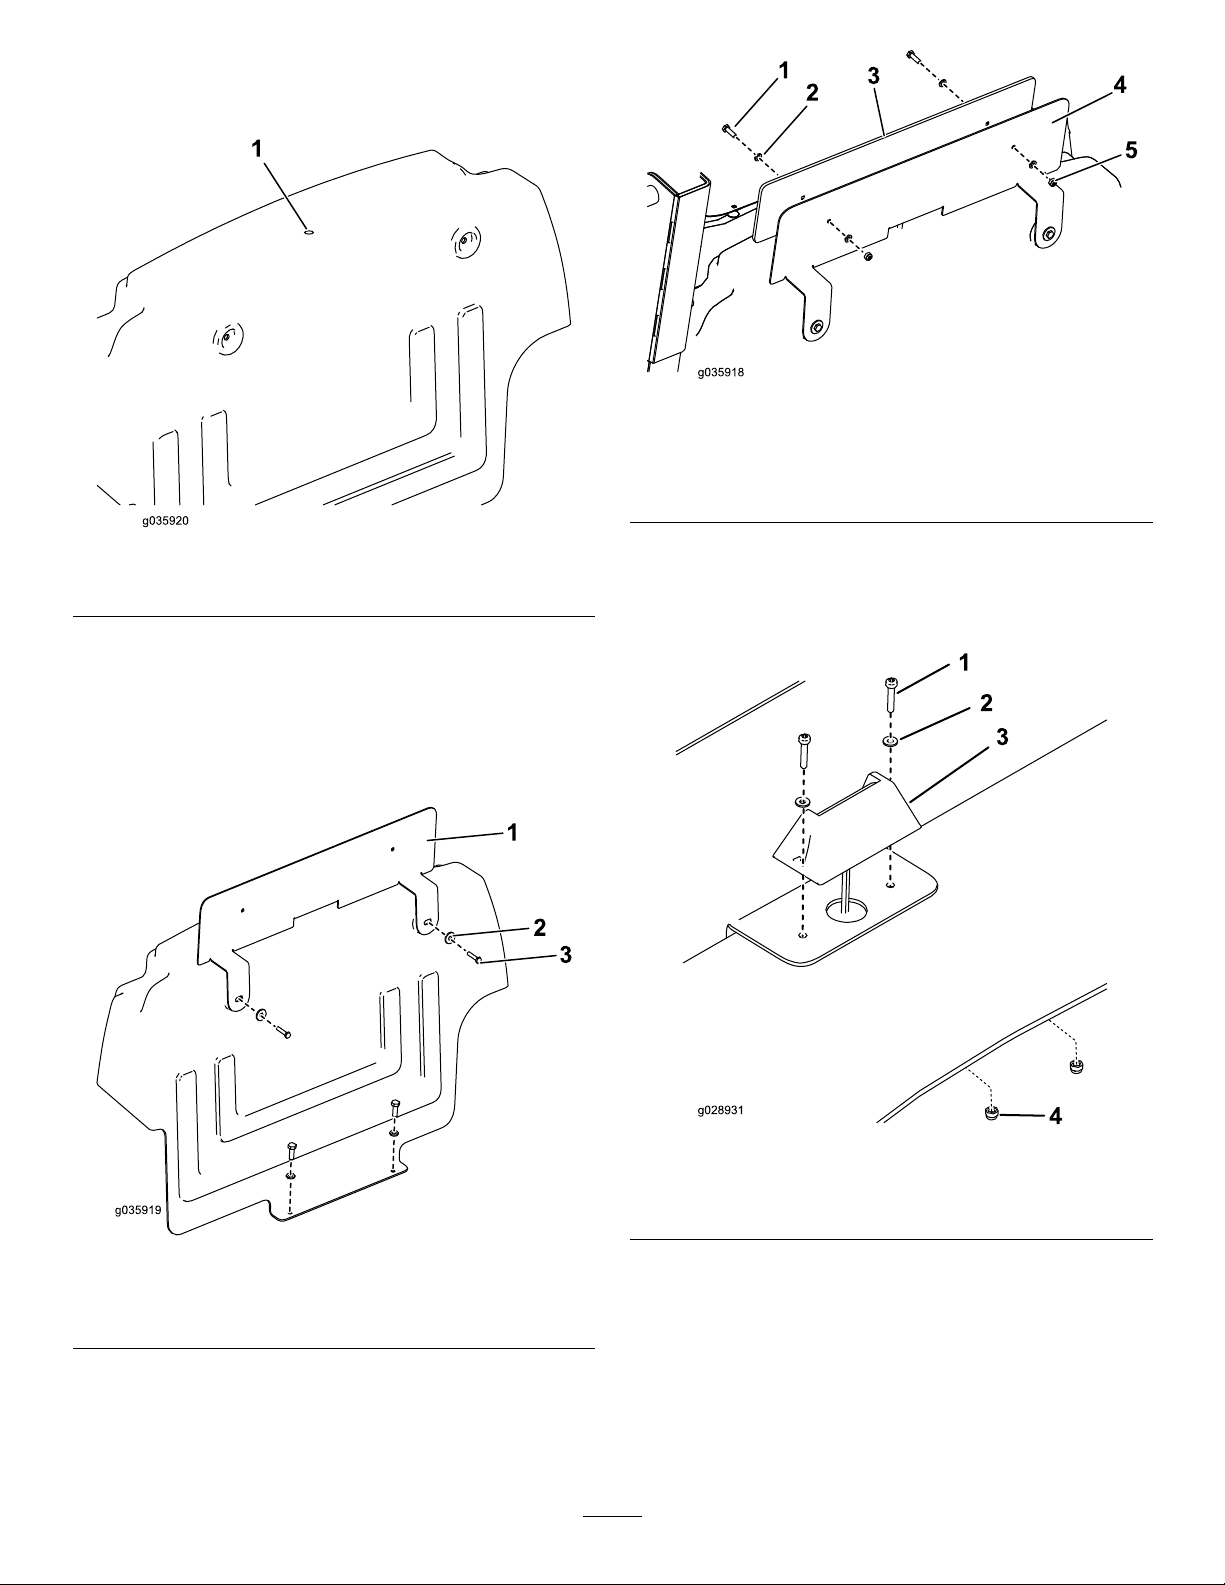
3.Removethebulkheadbehindtheoperator’sseatby
unscrewingthe4boltsand4washers(Figure1).Retain
thewashersand2bolts.
Note:Thisisenablesaccesstothemainwiringloom.
Figure1
4.Disconnectthenegativecablefromthebattery.
5.EnsurethattheROPSpivotboltsandclampboltsare
inplaceandtight.
6.RemovetheROPSpivotboltandlocknutontheleft
sideofthemachine.
7.Aligntheholeintheleftlightbracketassemblywith
thisholeandinsertthenewbolt(Figure2).
8.Installthelocknut(M16)ontheboltusingtheexisting
washers,andtightenittoatorqueof15N∙m(11ft-lb).
Note:Donotovertightenthelocknut,asthismakes
theROPSdifculttofold.
Figure2
1.Bolt3.Locknut
2.Leftlightbracketassembly
3

Note:Ifabeaconkitisttedtothemachine,youmay
stillusethepivotboltlocation.
9.FeedallelectricalcablesdownthefrontoftheROPS
frameandontotheelectricalmountpanel.
10.Connecttheconnectorleadtothemainwiringloom
ofthemachine(Figure3).
11.Connect1blackandgreenconnectortotherear
indicatorlightconnectorandtheblack,red,andorange
connectortothestop/taillightconnector(Figure3).
Figure3
Viewoncableentry
1.Connectorlead5.Numberplateconnector
2.Blackandredconnector6.Indicatorlightconnector
3.Blackandgreenconnector7.Stop/taillightconnector
4.Black,red,andorange
connector
12.Repeatthisprocedurefortherightsideofthemachine.
InstallingtheFusesandtheNumber
Plate
WARNING
Whendrillingorcarryingoutotheroperations,
alwaysweareyeprotection.
1.Installthefuses(10and15A)beneaththehornas
showninFigure4.
Figure4
1.Fuse(10amp)2.Fuse(15amp)
4
2.Drillan8mm(5/16inch)diameterholeonthecenter
ofthebulkhead,15mm(5/8inch)fromthecenterline
ofthebulkhead(Figure5).
Figure5
1.Hole—6mm(5/16inch)
3.Usetheboltsretainedinstep3ofMountingtheLights
(page3)tomountthebottomtabofthebulkheadto
themachine(Figure6).
4.Mountthenumberplatebracketusing2M6x30mm
boltsandthewashersretainedin3ofMountingthe
Lights(page3)asshowninFigure6.
Figure6
1.Number-platebracket3.Bolt
2.Washer
5.Installthenumberplatetothenumberplatebracket
using2hex-headscrews(M6),4washers(M6),and2
locknuts(M6)asshowninFigure7.
Figure7
1.Hex-headscrew(M6)4.Number-platebracket
2.Washer(M6)5.Locknut(M6)
3.Numberplate
6.Feedthenumberplatelightcablethroughthe8mm
(5/16inch)holeinthebulkheadandinstallthelight
tothebracketusing2setscrews(M3x16),2washers
(M3),and2locknuts(M3;)asshowninFigure8.
Figure8
1.Setscrew3.Numberplatelight
2.Washer4.Nylocnut
7.Pushthecableterminalsintotheplasticconnector
(Figure9).
5

Figure9
1.Blackwire2.Redwire
8.Connectthenumberplatelighttotheconnectorleads.
RefertoFigure3.
9.Connecttheotherendoftheconnectorleadtothe
mainloomconnectorlocatedontheelectricalmount
panel.
10.Plugtheasherrelayintothevacantrelaysocket
locatedontherightsideoftheelectricalmountpanel.
InstallingthePressureSwitch
Note:Thepressureswitchcontrolsthebrakelights.
1.Locatetherearfaceofthetransmissionmanifold.
Thereisaport,marked“PS”,ttedwithablanking
plug(Figure10).
Figure10
1.Transmissionmanifold4.Pressureswitch
2.“PS”port5.Pressure-switchconnector
3.Dowtyseal6.Blankingplug
2.Removetheblankingplug(Figure10).
3.Attachthepressureswitchtotheblockusingadowty
sealandtorqueto34N∙m(25ft-lb).
4.Attachthepressure-switchconnectortothemain
wiringloom.
5.Installthepressure-switchconnectortothepressure
switch(Figure10).
3
InstallingtheFrontLights
Partsneededforthisprocedure:
1Leftbracket
1Rightbracket
1Lightframeassembly
2Headlamp
2Headlampcable
4Washer(M8)
4Washer(5/16inch)
4Locknut(M8)
4Hex-headscrew(M8x25mm)
2Frontlightconnector
8Washer(M12)
4Locknut(M12)
4Hex-headscrew(M12)
InstallingtheBracketsandtheLights
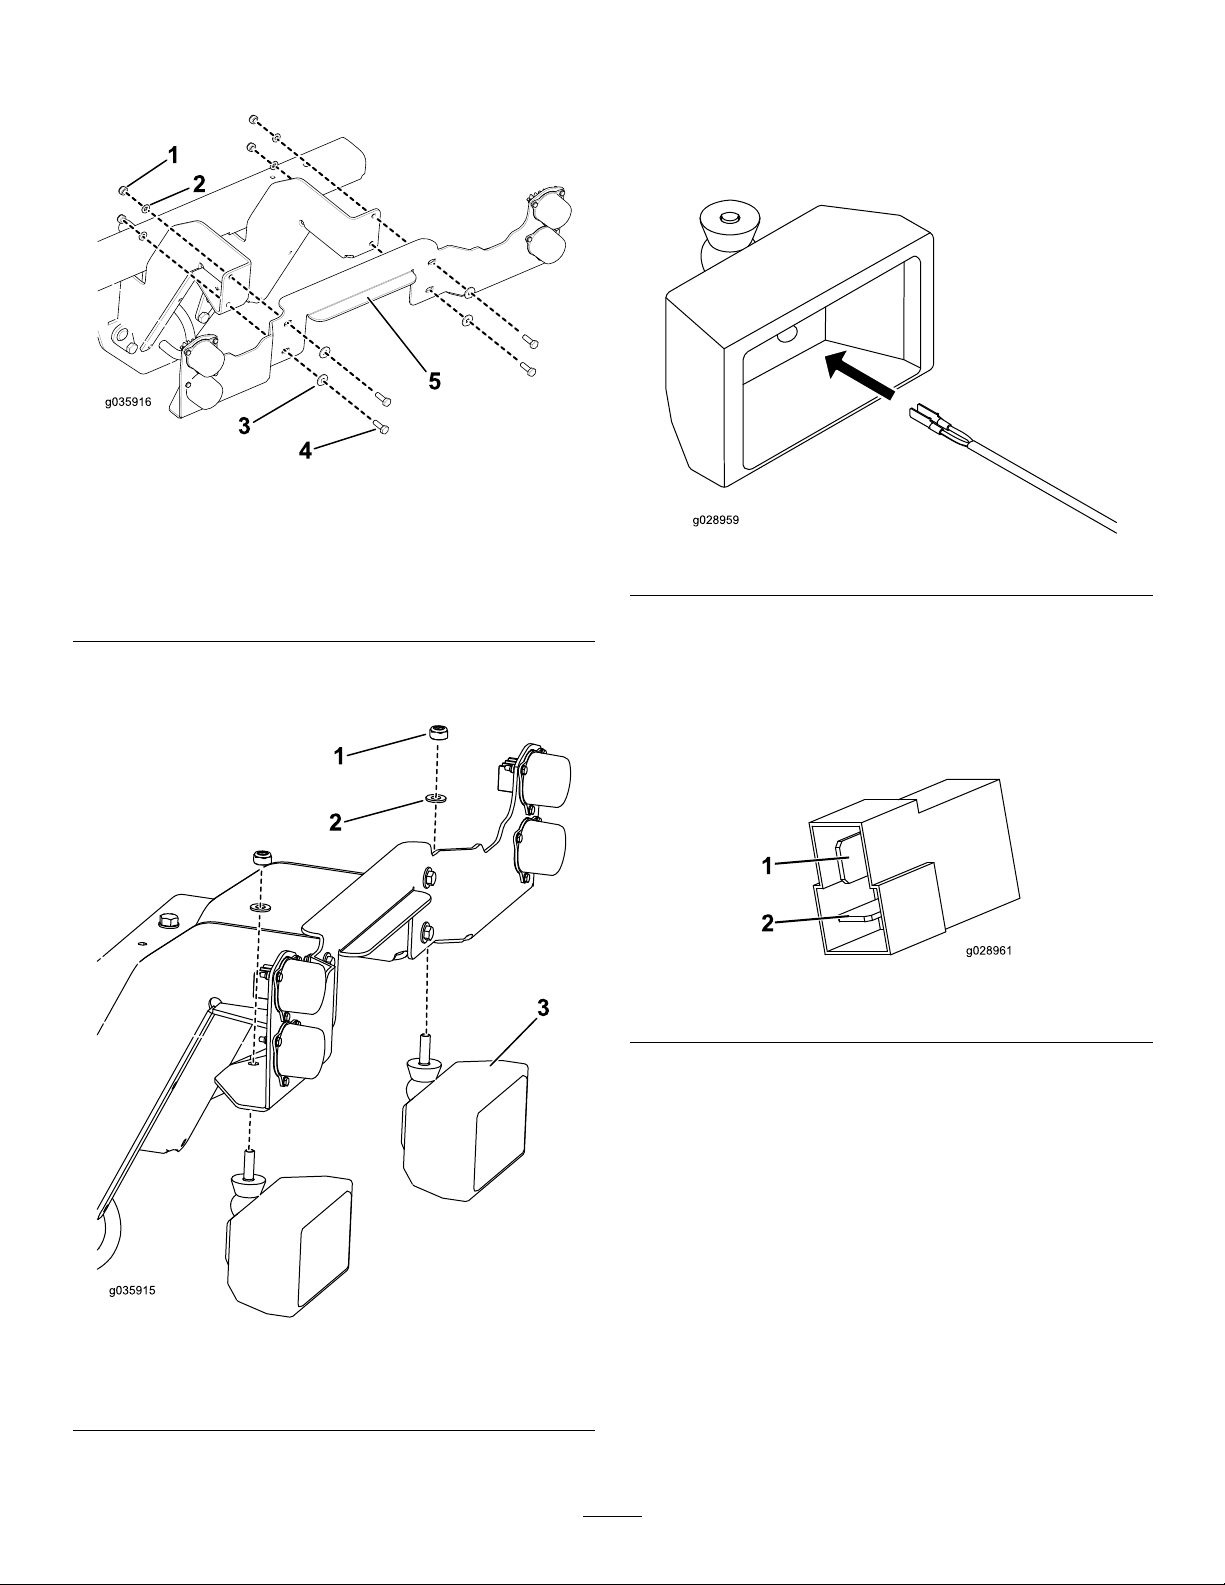
1.Installtheleftandrightlightsupportstothefrontof
themachineusing8washers(M12),4locknuts(M12),
and4hex-headscrews(M12)asshowninFigure11.
Figure11
1.Locknut(M12)4.Leftlightsupport
2.Washer(M12)5.Hex-headscrew(M12)
3.Rightlightsupport
2.Installthefrontlightbracketassemblytothese
supportsusing4washers(M8),4washers(7/8inch),4
6
locknuts(M8),and4hex-headscrews(M8x25mm)as
showninFigure12.
Figure12
1.Locknut(M8)4.Hex-headscrew(M8x25
mm)
2.Washer(M8)5.Frontlightbracket
assembly
3.Washer(5/16inch)
3.Removethehexnutandwasherfromeachlightand
usethemtoinstallthelights(Figure13).
Figure13
1.Hexnut3.Light
2.Washer
ConnectingtheWires
1.Connectaheadlampcabletotheleftheadlampby
passingtheendwithjustthepinsthroughthehole
intheheadlampbodyfromtheinsidesothatthe
connectorisinsidethelamp(Figure14).
Figure14
2.Connecttheconnectortotheheadlamp.
3.Fitthelooseconnectortothepinsontheotherendof
thisconnector.
Note:Pushtheconnectorsintotheplugasshown
inFigure15.
Figure15
1.Blackwire2.Redwire
4.Passtheconnectorleadthroughtheholeinfrontof
thechassistowardsthecuttermanifoldandlocatethe2
connectorsonthemainwiringloom.
5.Feedthethreeconnectorsthroughtheplastic
protectivesheathandplugthefrontmarkerlight,
frontindicatorlight,andheadlampcablesintothe
connectors,matchingthewirecolortothelocation
showninFigure16andFigure17.
Note:Cuttheplasticsheathinhalftoprotectboth
theleftandtherightconnectors.
Important:Makesurethattheconnectionsare
correct.
7

Figure16
Viewoncableentry
1.Black3.Green
2.Red/white4.Blue
Figure17
1.Frontmarkerlight—black
wire(top),red/whitewire
(bottom)
3.Headlamp—blackwire
(top),bluewire(bottom)
2.Frontindicatorlight—
blackwire(top),green
wire(bottom)
6.Pulltheplasticprotectivesheathovertheconnectors
andcableateitherend.
7.Repeattheprocedurefortherightheadlamp.
4
InstallingtheSwitches
Partsneededforthisprocedure:
1Lightswitch
1Hazardswitch
1Direction-indicatorswitch
1Connectorlead
Procedure
1.Removethe6screwssecuringthecontrolpaneltothe
controlpod(Figure18).
Figure18
1.Screw3.Controlpod
2.Controlpanel
2.Carefullyliftoffthepanel,ensuringthattheconnectors
totheexistingswitchesarenotdisturbed.
3.Feedthelongestendoftheconnectorleaddownthe
controlarm(Figure19).
Figure19
1.Lightswitch5.Controlarm
2.Hazardswitch6.Controlpod
3.Connectorlead7.Direction-indicatorswitch
4.Plugintomainharness
4.Connecttothemulti-pinplugonthemainharnessat
thebaseofthecontrolarm.
8
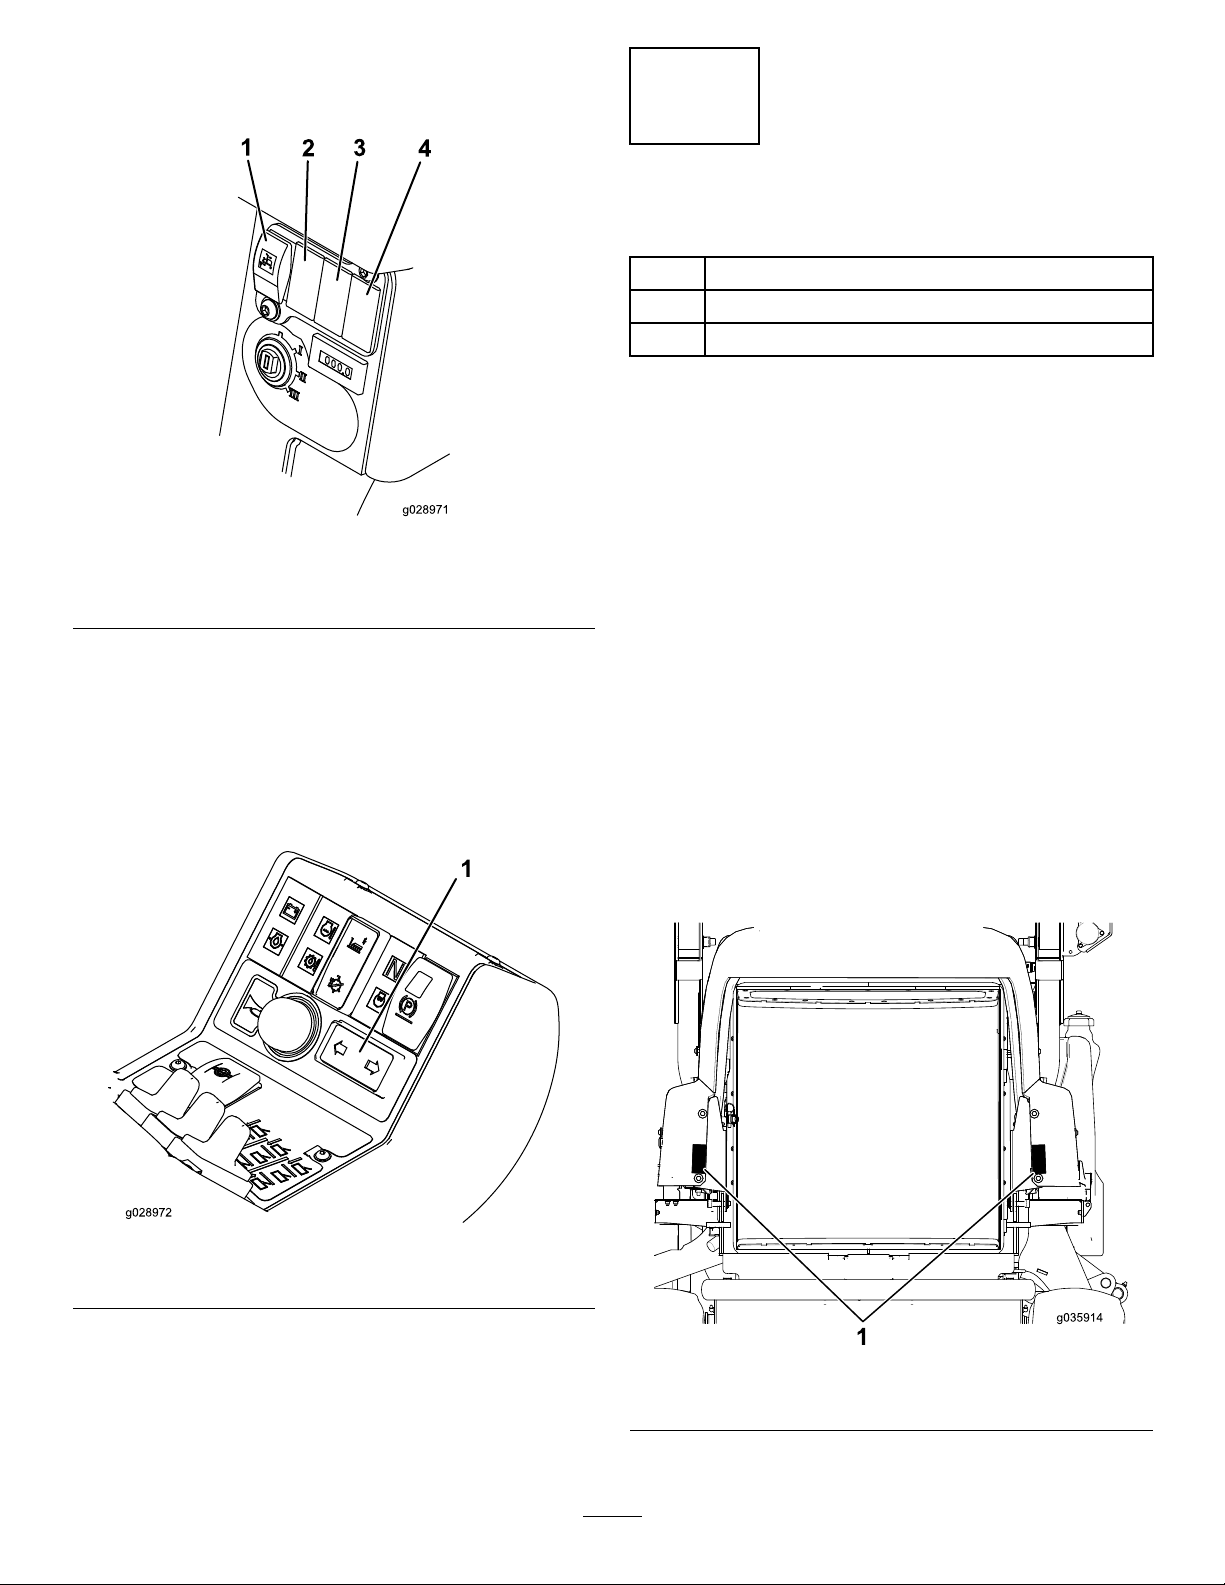
5.Ontherearfaceofthecontrolpod,abovethekey
switch,removetheswitchblankpanelsbetweenthe
autolimitedliftandbeaconswitches(Figure20).
Figure20
1.Autolimitedliftswitch3.Hazardswitch
2.Lightsswitch4.Beaconswitch
6.Pushtheconnectorsandwiresthroughtheswitch
holes.
7.Connectthelightswitchandhazardswitchreferringto
thelabelsontheconnectorsidentifyingthem(Figure
20).
8.Inthecontrolpanel,pushouttheblankingplatenext
tothehornandinsertthedirection-indicatorswitch.
Figure21
1.Direction-indicatorswitch
9.Connecttotheconnectorlead.
5
CompletingtheInstallation
Partsneededforthisprocedure:
2Adhesivereector
20Cabletie
1Seriallabel
Procedure
1.Cabletieallcablesforthefrontlights,rearlightsand
thepressureswitchsothattheyaresecureandto
preventthemfrombecomingtrappedorchafed.
2.Connectthepositivebatterycable.
3.Testtheswitchesonthecontrolpanelandensurethat
theindicatorswitchisorientedcorrectlysothatthe
directionoftheswitchmatchesthedirectiononthe
indicators.
4.Retthecontrolpanel,ensuringthatnoconnectors
havebecomedetachedandthatnocablesarenipped
(seeFigure18).
5.Lowerandlatchtheenginecover.
6.Applytheadhesivereectorstotheenginecover,
aligningreector’slongestedgewiththeinsideedgeof
theenginecover(Figure22).
Note:Thereectorsshouldbetted6–7cmfromthe
bottomedgeoftheenginecover.
Figure22
1.Reectors
7.Lowerandlatchtheoperatorplatform.
9

8.Applytheseriallabeladjacenttothemachineserial
label.
Operation
Positionthemarkerlights(frontandrear).Pressthetopof
theswitch—theswitchwillilluminateandthered(rear)and
white(front)markerlightswillturnon.
AdjustingtheHeadlights
Adjusttheheadlightssothatthehorizontalpartofthecut-off
ofthebeamistilteddownwardat2.0%.
1.Loosenthenutthatsecurestheheadlightstothe
bracket.
2.Adjusttheheadlightsintopositionbyhand.
3.Tightenthenuttoholdthelightinthecorrectposition.
OperatingtheLights
LightsSymbols
Thelightscontrolsaremarkedwiththesymbolsshownin
Figure23.
Figure23
1.Hazardwarning3.Lights—On/Off
2.Directionindicators
Headlights
Theseoperateasthepositionmarkerlights,exceptthat
theignitionswitchmustbeinposition2toilluminatethe
headlights.
HazardLights
Pressthetopofthehazardlightswitchtoashall4indicator
lamps.Theignitionswitchdoesnotneedtobeonforthese
tooperate.
DirectionIndicators
Withtheignitionswitchatposition2,presstherelevantside
ofthedirectionindicatorswitchtoashthe2indicatorlamps
onthatsideofthemachine.
BrakeLights
Thebrakelightsautomaticallyturnonwhenthemachineis
decelerating(whenthecontrolpedalisreturningtoneutral,
whentravellinginaforwarddirectiononly).
Maintenance
ReplaceallwornordamagedpartswithgenuineToroparts.
Checkthatalllightsareworkingonaregularbasis.Ensure
thattheheadlightsareadjustedcorrectly.Cleanthelights
daily—avoidusingsolvent-basedproducts.
ChangingaBulb
Note:EachheadlightusesanH4halogenbulb.
1.Removethelenscover.
2.Removethebulb.
3.Installanewbulb.
4.Installthelenscover.
5.Adjustthelights;refertoAdjustingtheHeadlights
(page10).
10

Notes:
11

Notes:
12

Notes:
13

DeclarationofIncorporation
ModelNo.SerialNo.ProductDescriptionInvoiceDescriptionGeneralDescriptionDirective
0291831600001andUpRoadLightKitincluding
BrakeLights
KIT-ROADLIGHTSW/
BRAKELIGHTSLightKit2004/108/EC
RelevanttechnicaldocumentationhasbeencompiledasrequiredperPartBofAnnexVIIof2006/42/EC.
Wewillundertaketotransmit,inresponsetorequestsbynationalauthorities,relevantinformationonthispartly
completedmachinery.Themethodoftransmissionshallbeelectronictransmittal.
ThismachineryshallnotbeputintoserviceuntilincorporatedintoapprovedToromodelsasindicatedonthe
associatedDeclarationofConformityandinaccordancewithallinstructions,wherebyitcanbedeclaredin
conformitywithallrelevantDirectives.
Certied:EUTechnicalContact:
MarcVermeiren
ToroEuropeNV
B-2260Oevel-Westerloo
Belgium
DavidKlisTel.003214562960
Sr.EngineeringManagerFax003214581911
8111LyndaleAve.South
Bloomington,MN55420,USA
April5,2016
14

InternationalDistributorList
Distributor:Country:PhoneNumber:Distributor:Country:PhoneNumber:
AgrolancKftHungary3627539640MaquiverS.A.Colombia5712364079
AsianAmericanIndustrial(AAI)HongKong85224977804MaruyamaMfg.Co.Inc.Japan81332522285
B-RayCorporationKorea82325512076Mountelda.s.CzechRepublic420255704220
BrisaGoodsLLCMexico12104952417Mountelda.s.Slovakia420255704220
CascoSalesCompanyPuertoRico7877888383MunditolS.A.Argentina541148219999
CeresS.A.CostaRica5062391138NormaGardenRussia74954116120
CSSCTurfEquipment(pvt)Ltd.SriLanka94112746100OslingerTurfEquipmentSAEcuador59342396970
CyrilJohnston&Co.NorthernIreland442890813121OyHakoGroundandGardenAbFinland35898700733
CyrilJohnston&Co.RepublicofIreland442890813121ParklandProductsLtd.NewZealand6433493760
FatDragonChina8861080841322PerfettoPoland48618208416
FemcoS.A.Guatemala5024423277PratoverdeSRL.Italy390499128128
FIVEMANSNew-T echCo.,LtdChina86-10-63816136Prochaska&CieAustria4312785100
ForGarderOUEstonia3723846060RTCohen2004Ltd.Israel97298617979
G.Y .K.CompanyLtd.Japan81726325861RiversaSpain34952837500
GeomechanikiofAthensGreece30109350054LelyTurfcareDenmark4566109200
GolfinternationalTurizmTurkey902163365993Lely(U.K.)LimitedUnitedKingdom441480226800
HakoGroundandGardenSweden4635100000SolvertS.A.S.France33130817700
HakoGroundandGardenNorway4722907760SpyprosStavrinidesLimitedCyprus35722434131
HayterLimited(U.K.)UnitedKingdom441279723444SurgeSystemsIndiaLimitedIndia911292299901
HydroturfInt.CoDubaiUnitedArabEmirates97143479479T-MarktLogisticsLtd.Hungary3626525500
HydroturfEgyptLLCEgypt2025194308ToroAustraliaAustralia61395807355
IrrimacPortugal351212388260ToroEuropeNVBelgium3214562960
IrrigationProductsInt'lPvtLtd.India00914424494387ValtechMorocco212537663636
JeanHeybroekb.v.Netherlands31306394611VictusEmakPoland48618238369
EuropeanPrivacyNotice
TheInformationToroCollects
ToroWarrantyCompany(T oro)respectsyourprivacy.Inordertoprocessyourwarrantyclaimandcontactyouintheeventofaproductrecall,weaskyou
tosharecertainpersonalinformationwithus,eitherdirectlyorthroughyourlocalTorocompanyordealer.
TheTorowarrantysystemishostedonserverslocatedwithintheUnitedStateswhereprivacylawmaynotprovidethesameprotectionasapplies
inyourcountry.
BYSHARINGYOURPERSONALINFORMATIONWITHUS,YOUARECONSENTINGTOTHEPROCESSINGOFYOURPERSONALINFORMATION
ASDESCRIBEDINTHISPRIVACYNOTICE.
TheWayToroUsesInformation
Toromayuseyourpersonalinformationtoprocesswarrantyclaims,tocontactyouintheeventofaproductrecallandforanyotherpurposewhichwetell
youabout.T oromayshareyourinformationwithT oro'safliates,dealersorotherbusinesspartnersinconnectionwithanyoftheseactivities.Wewillnot
sellyourpersonalinformationtoanyothercompany.Wereservetherighttodisclosepersonalinformationinordertocomplywithapplicablelawsand
withrequestsbytheappropriateauthorities,tooperateoursystemsproperlyorforourownprotectionorthatofotherusers.
RetentionofyourPersonalInformation
Wewillkeepyourpersonalinformationaslongasweneeditforthepurposesforwhichitwasoriginallycollectedorforotherlegitimatepurposes
(suchasregulatorycompliance),orasrequiredbyapplicablelaw.
Toro'sCommitmenttoSecurityofY ourPersonalInformation
Wetakereasonableprecautionsinordertoprotectthesecurityofyourpersonalinformation.Wealsotakestepstomaintaintheaccuracyandcurrent
statusofpersonalinformation.
AccessandCorrectionofyourPersonalInformation
Ifyouwouldliketorevieworcorrectyourpersonalinformation,pleasecontactusbyemailat[email protected].
AustralianConsumerLaw
AustraliancustomerswillnddetailsrelatingtotheAustralianConsumerLaweitherinsidetheboxoratyourlocalT oroDealer.
374-0269RevK

TheToroWarranty
ALimitedWarranty
ConditionsandProductsCovered
TheToro®Companyanditsafliate,ToroWarrantyCompany,pursuant
toanagreementbetweenthem,jointlywarrantyourToroCommercial
product(“Product”)tobefreefromdefectsinmaterialsorworkmanship
fortwoyearsor1500operationalhours*,whicheveroccursrst.This
warrantyisapplicabletoallproductswiththeexceptionofAerators
(refertoseparatewarrantystatementsfortheseproducts).Wherea
warrantableconditionexists,wewillrepairtheProductatnocosttoyou
includingdiagnostics,labor,parts,andtransportation.Thiswarranty
beginsonthedatetheProductisdeliveredtotheoriginalretailpurchaser.
*Productequippedwithanhourmeter.
InstructionsforObtainingWarrantyService
YouareresponsiblefornotifyingtheCommercialProductsDistributoror
AuthorizedCommercialProductsDealerfromwhomyoupurchasedthe
Productassoonasyoubelieveawarrantableconditionexists.Ifyouneed
helplocatingaCommercialProductsDistributororAuthorizedDealer,or
ifyouhavequestionsregardingyourwarrantyrightsorresponsibilities,
youmaycontactusat:
CommercialProductsServiceDepartment
ToroWarrantyCompany
8111LyndaleAvenueSouth
Bloomington,MN55420-1196
E-mail:[email protected]
OwnerResponsibilities
AstheProductowner,youareresponsibleforrequiredmaintenanceand
adjustmentsstatedinyourOperator’sManual.Failuretoperformrequired
maintenanceandadjustmentscanbegroundsfordisallowingawarranty
claim.
ItemsandConditionsNotCovered
Notallproductfailuresormalfunctionsthatoccurduringthewarranty
periodaredefectsinmaterialsorworkmanship.Thiswarrantydoesnot
coverthefollowing:
•Productfailureswhichresultfromtheuseofnon-T ororeplacement
parts,orfrominstallationanduseofadd-on,ormodiednon-Toro
brandedaccessoriesandproducts.Aseparatewarrantymaybe
providedbythemanufactureroftheseitems.
•Productfailureswhichresultfromfailuretoperformrecommended
maintenanceand/oradjustments.Failuretoproperlymaintainyour
ToroproductpertheRecommendedMaintenancelistedinthe
Operator’sManualcanresultinclaimsforwarrantybeingdenied.
•ProductfailureswhichresultfromoperatingtheProductinanabusive,
negligentorrecklessmanner.
•Partssubjecttoconsumptionthroughuseunlessfoundtobedefective.
Examplesofpartswhichareconsumed,orusedup,duringnormal
Productoperationinclude,butarenotlimitedto,brakespadsand
linings,clutchlinings,blades,reels,bedknives,tines,sparkplugs,
castorwheels,tires,lters,belts,andcertainsprayercomponents
suchasdiaphragms,nozzles,andcheckvalves,etc.
•Failurescausedbyoutsideinuence.Itemsconsideredtobeoutside
inuenceinclude,butarenotlimitedto,weather,storagepractices,
contamination,useofunapprovedcoolants,lubricants,additives,
fertilizers,water,orchemicals,etc.
•Normalnoise,vibration,wearandtear,anddeterioration.
•Normal“wearandtear”includes,butisnotlimitedto,damagetoseats
duetowearorabrasion,wornpaintedsurfaces,scratcheddecalsor
windows,etc.
Parts
Partsscheduledforreplacementasrequiredmaintenancearewarranted
fortheperiodoftimeuptothescheduledreplacementtimeforthatpart.
Partsreplacedunderthiswarrantyarecoveredforthedurationofthe
originalproductwarrantyandbecomethepropertyofT oro.T orowillmake
thenaldecisionwhethertorepairanyexistingpartorassemblyorreplace
it.T oromayuseremanufacturedpartsforwarrantyrepairs.
NoteRegardingDeepCycleBatteryWarranty:
Deepcyclebatterieshaveaspeciedtotalnumberofkilowatt-hoursthey
candeliverduringtheirlifetime.Operating,recharging,andmaintenance
techniquescanextendorreducetotalbatterylife.Asthebatteriesin
thisproductareconsumed,theamountofusefulworkbetweencharging
intervalswillslowlydecreaseuntilthebatteryiscompletelywornout.
Replacementofwornoutbatteries,duetonormalconsumption,isthe
responsibilityoftheproductowner.Batteryreplacementmayberequired
duringthenormalproductwarrantyperiodatowner’sexpense.
MaintenanceisatOwner’sExpense
Enginetune-up,lubricationcleaningandpolishing,replacementofItems
andConditionsNotCoveredlters,coolant,andcompletingRecommended
MaintenancearesomeofthenormalservicesT oroproductsrequirethat
areattheowner’sexpense.
GeneralConditions
RepairbyanAuthorizedT oroDistributororDealerisyoursoleremedy
underthiswarranty.
NeitherTheToroCompanynorToroWarrantyCompanyisliablefor
indirect,incidentalorconsequentialdamagesinconnectionwiththe
useoftheToroProductscoveredbythiswarranty,includingany
costorexpenseofprovidingsubstituteequipmentorserviceduring
reasonableperiodsofmalfunctionornon-usependingcompletion
ofrepairsunderthiswarranty.ExceptfortheEmissionswarranty
referencedbelow,ifapplicable,thereisnootherexpresswarranty.
Allimpliedwarrantiesofmerchantabilityandtnessforusearelimitedtothe
durationofthisexpresswarranty.Somestatesdonotallowexclusionsof
incidentalorconsequentialdamages,orlimitationsonhowlonganimplied
warrantylasts,sotheaboveexclusionsandlimitationsmaynotapplytoyou.
Thiswarrantygivesyouspeciclegalrights,andyoumayalsohaveother
rightswhichvaryfromstatetostate.
CountriesOtherthantheUnitedStatesorCanada
CustomersshouldcontacttheirToroDistributor(Dealer)toobtainguaranteepoliciesforyourcountry,province,orstate.Ifforanyreasonyouare
dissatisedwithyourDistributor'sserviceorhavedifcultyobtainingguaranteeinformation,contacttheT oroimporter.Ifallotherremediesfail,you
maycontactusatT oroWarrantyCompany.
374-0277RevB
Other manuals for LT-F3000
5
This manual suits for next models
1
Table of contents
Other Toro Lighting Equipment manuals


Popular Lighting Equipment manuals by other brands

ENERGY FOCUS
ENERGY FOCUS LEDFLT8-82765 5EDCTF Series Product instructions

ADEO Services
ADEO Services 3276007484540 instruction manual

PXM
PXM PX385 user manual

BoomToneDJ
BoomToneDJ Starlight-LZR user manual

Classic Exhibits
Classic Exhibits VISIONARY DESIGNS VK-2985 Setup instructions

Gemmy
Gemmy 11955 instructions


