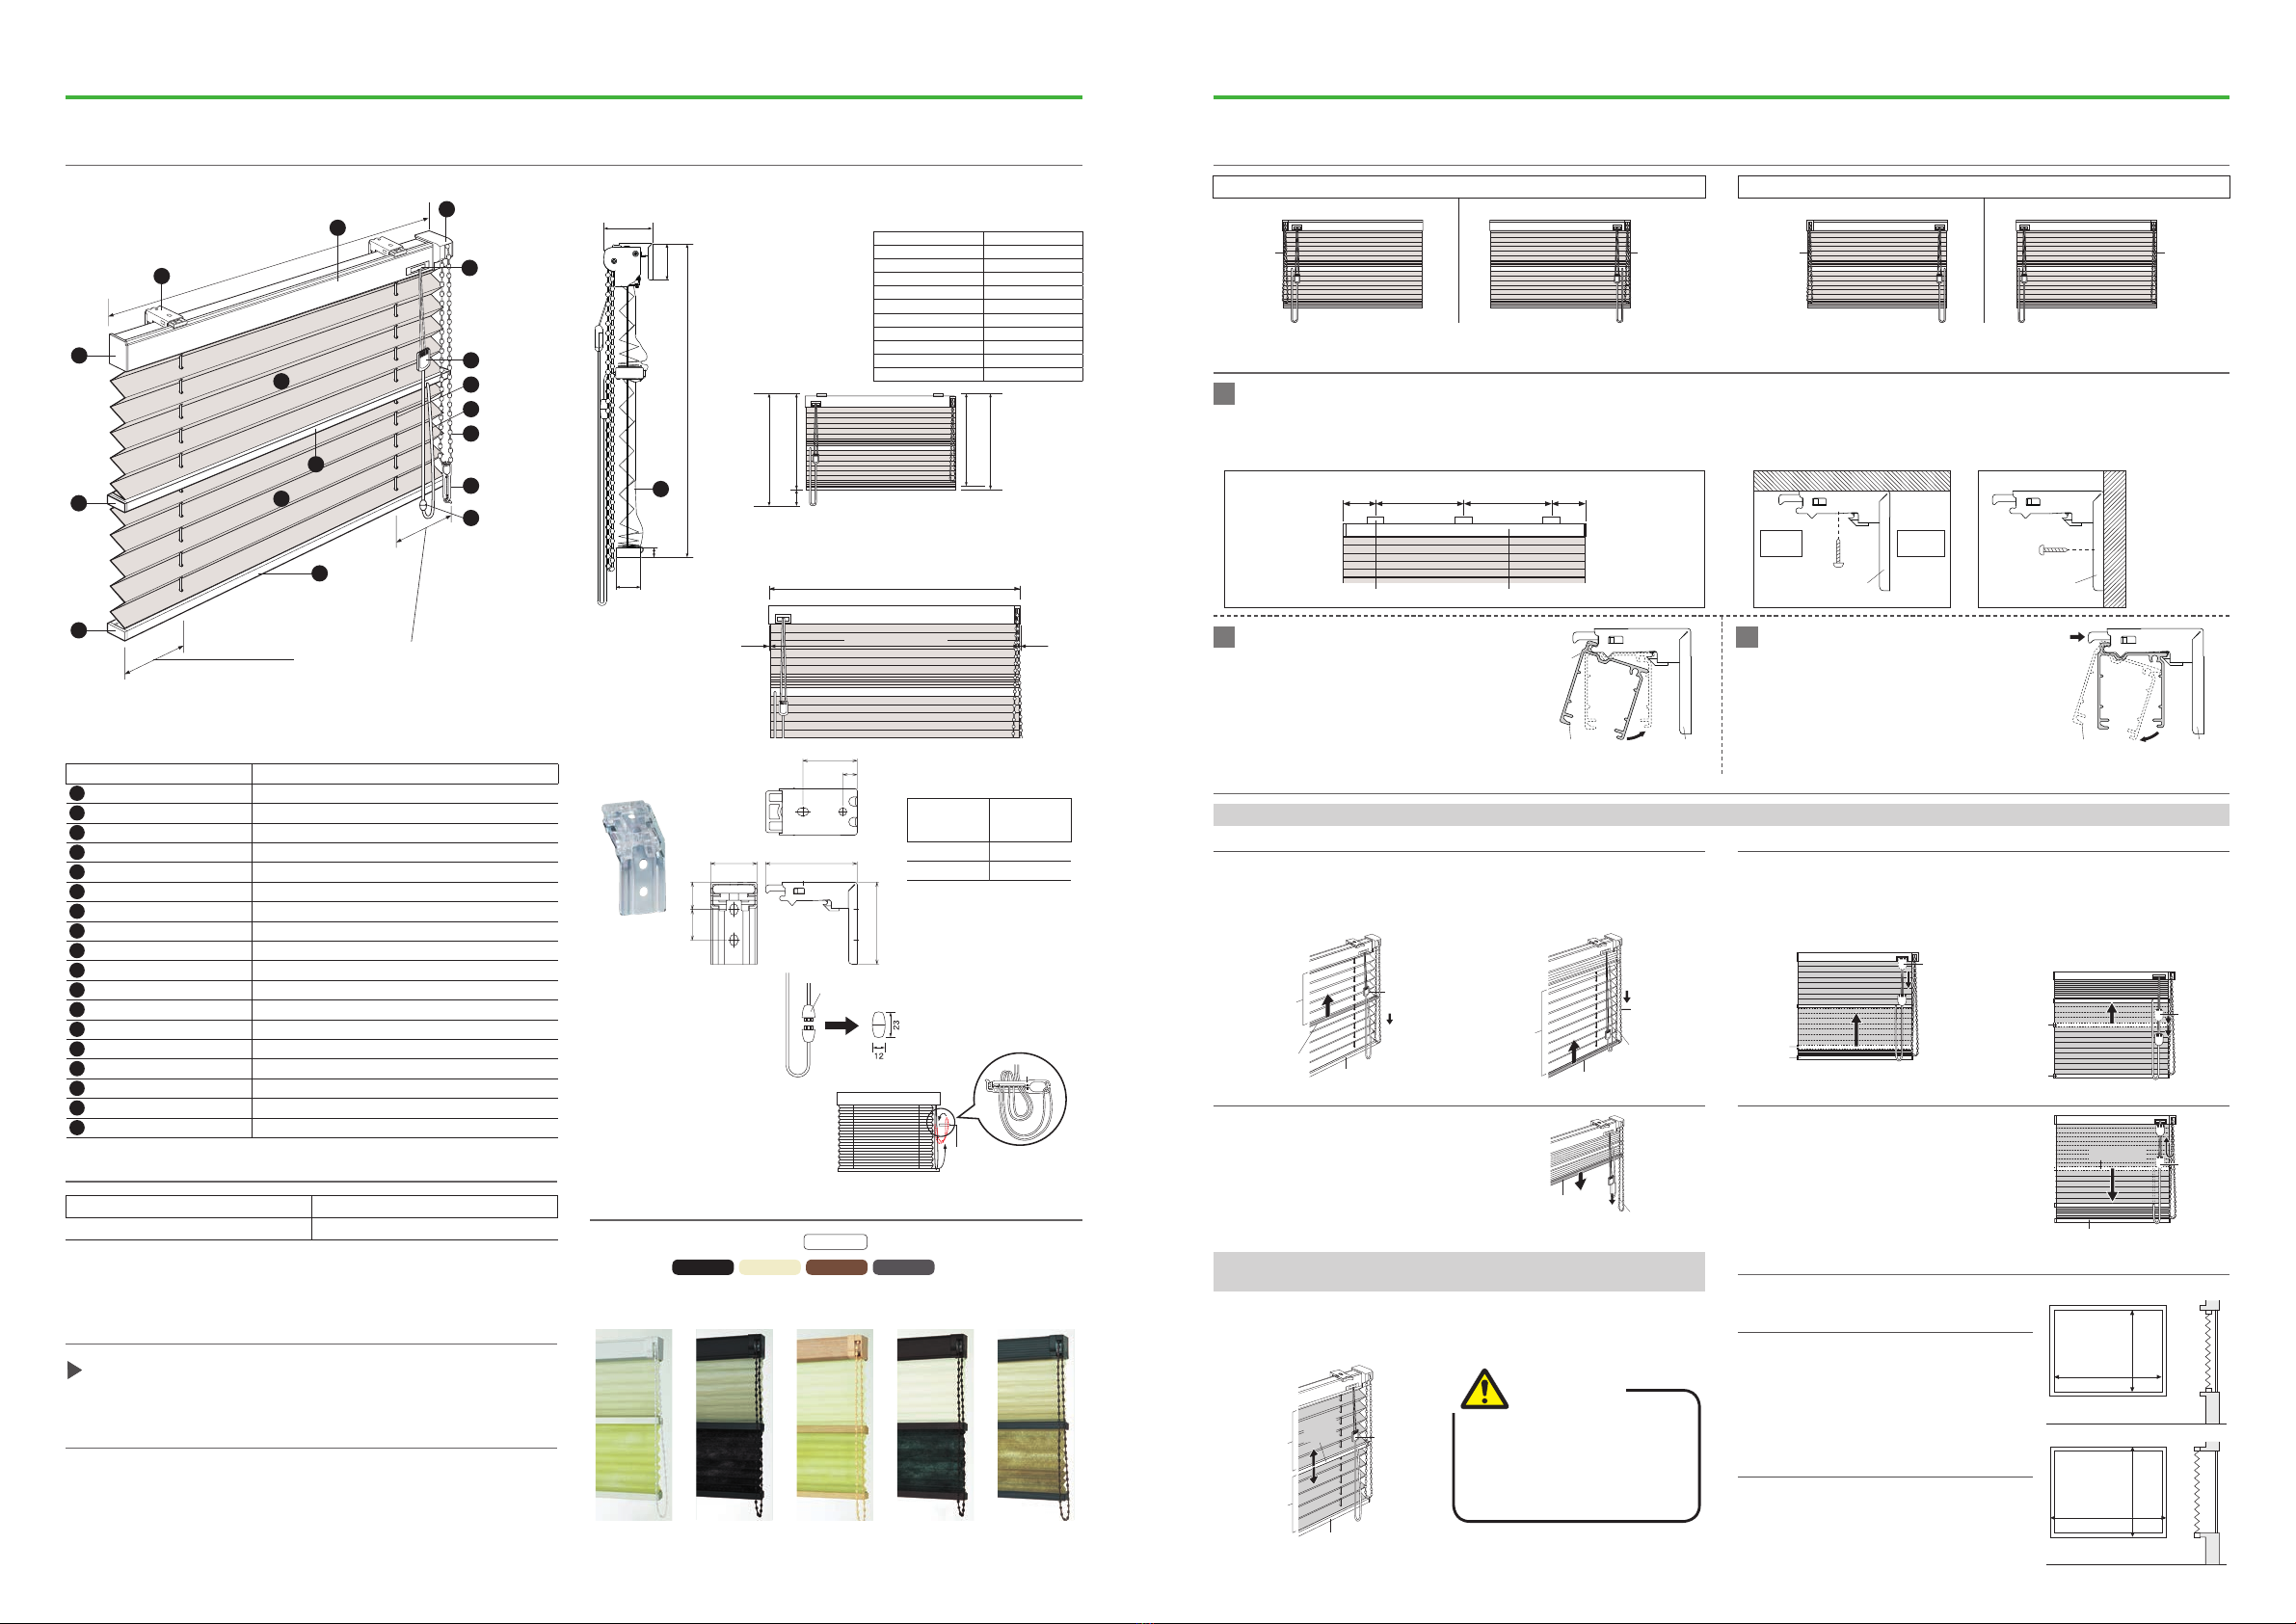
40–70mm 40–70mm
Equal
interval
Equal
interval
Bracket Head Rail
Ball Chain
Ball Chain
Ball Chain
Ball Chain
59
44
30
12
Product height (H)
Operation Cord Length: Product height (H)+150 mm
Ball Chain Length:
Pelmet width (W)
Standard Type: Upper Screen is sheer fabric (see-through)and lower
Screen is thicker one.
Reversed Type: Upper Screen is thicker fabric and lower Screen is
sheer one(see-through).
Specifications・Structure
■Structure Drawing ■Side View ■
Operation Cord Length・Ball Chain Length
Product width −4 mm (2 mm gap on both sides)
■Product Width And Screen Width
1
2
3
13
14
12
4
5
6
7
11
8
17
18
9
15
10
16
Product width (W)495 mm or less: 105
Product width (W)500mm or over: 150
25 50
8
1517
44
■Bracket
Component Materials
1Head Cap plastic molded
2Bracket stainless steel press forming, plastic molded
3Head Rail aluminum alloy
4Cord Outlet stainless steel press forming, plastic molded
5Operation Pulley plastic molded
6Cord Joint plastic molded
7Lift Cord synthetic fiber
8Operation Cord synthetic fiber
9Ball Chain plastic molded, synthetic fiber
10 Bottom Rail Cap plastic molded
11 Bottom Rail aluminum alloy
12 Upper Screen Materials differ depending on types.
13 Middle Rail aluminum alloy
14 Lower Screen Materials differ depending on types.
15 Pitch Keeping Cord synthetic fiber
16 Middle Rail Cap plastic molded
17 Safety Join plastic molded
18 Safety Tassel plastic molded
①Install the Bracket in a position 40-70 mm inward from each end of the
Head Rail. If three or more Brackets are required, install them at regular
intervals as equally as possible.
①Keep the Screen raised thoroughly
with the Screen stacked-up. Hang
the front groove of the Head Rail on
the temporal hook of each Bracket.
②Push the Head Rail in until it clicks
into place.
1
*Drum left, Cord right operation and Drum right, Cord left operation are based
on which side the Chain is positioned.
One side
Left side operation Right side operation
Both sides
Drum left, Cord left operation Drum right, Cord left operation
Installation Method
Bracket installation
2Installation of body 3Removing the main unit
①
Keep the Screen raised thoroughly
with the Screen stacked-up (while)
pressing the Bracket release button
pull the Head Rail toward you.
②
Remove the main unit from the
temporal hook.
Control Position
Lifting the Middle RailWhen lifting the Screen (the Bottom Rail)
②Pull down the Ball Chain in
front until the lower Screen.
(The Bottom Rail)Reaches the
position you want and release
your hand.
When you want to stop the
Middle Rail halfway unlock rst by
pulling down the Cord Joint or the
Operation Cord slightly and lock at
the position you want by pulling it
down again and release your hand.
①
Pull down the Cord Joint or
the Operation Cord until the
upper Screen (the Middle Rail)is
stacked to the top.
Pull down the Ball Chain in front
approx. 2 cm and release your hand.
The Bottom Rail will drop at a constant
speed.
When the Middle Rail is in the
lowest position pull down the Cord
Joint or the Operation Cord until
the Middle Rail is in the position
you want and release your hand.
Unlock the Stopper by pulling down the
Cord Joint or the Operation Cord slightly
and the Middle Rail will go down. When
you want to stop the Middle Rail halfway
lock the Stopper again by pulling down
the Cord Joint or the Operation Cord
and the Middle Rail will stop.
When lowering the Screen (the Bottom Rail)
Operation Method
Lifting and lowering the whole blind (Along with the Bottom Rail up)
Lowering the Middle Rail
②Fit the Bracket with accompanying screws.
Ceiling attachment Wall attachment
Product Height (H)
Ball Chain Length
– 800 mm 650 mm
810 –1,000 mm 750 mm
1,010 –1,200 mm 900 mm
1,210 –1,400 mm 1,100 mm
1,410 –1,600 mm 1,300 mm
1,610 –1,800 mm 1,400 mm
1,810 –2,200 mm 1,600 mm
2,210 –2,600 mm 1,800 mm
2,610 –2,800 mm 2,000 mm
2,810 –3,000 mm 2,200 mm
150 mm
Product height (H)
Product height (H)
Ball Chain length
Operation Cord length
Screen width (W−4)
2 mm 2 mm
Product width (W)
Screen width (W−4)
2 mm 2 mm
Safety Joint
This part comes apart
when the weight of a child
is applied to the Cord.
Color : Clear
Safety Joint
Stack-up Guide
P. 17–
Product width 1,000 mm ×Product height 1,000 mm 2.3 kg
Product width 2,000 mm ×Product height 2,000 mm 5.1 kg
*Product weight may differ from Screen to Screen.
Product Weight Guide
Product
Width (W)
Required
Pieces
–1,200 mm 2
1,205 mm– 3
■The Number of
Brackets
Safety
Tassel
Safety Tassel
Safety Tassel
This is a device for bundling the Cord
or the Chain.
This device will reduce the risk of an
accident by bundling it to keep out of
children's reach.
Color: White
*Bundle the Chain and
the Cord.
*Allowable size and height limitation differ from Screen to Screen.
*For ordering, round down the nearest 5 mm in width and 10 mm in height.
Allowable Size
Product Width (W)Product Height (H)
380–2,000 mm 300–3,000 mm
How to Take Measurements
When installing outside the window frame
(Outside mount)
When installing inside the window frame
(Ceiling mount)
Subtract approx. 10 mm from
both the actual inner width and
height of the window.
Specify the actual outside
sizes, both width and height, for
finished dimensions.
Height
Width
Height
Width
Switching the upper and lower Screens
(by operating the Middle Rail)
*Twin styles are easy to change the upper and lower Screen ratio by
moving the Middle Rail.
*The Stopper has a function to alternate a lock and a release.
Bracket
Interior
side
Exterior
side
Bracket
Bracket
Interior
side
Exterior
side
Head Rail
Bracket
Bracket
With the release
button pressed
With the
Head Rail
hung on the
temporal
hook.
Push all
the way in.
②
Head Rail
Bracket
With the release
button pressed
With the
Head Rail
hung on the
temporal
hook.
①
Push all
the way in.
②
pull toward
you
Upper
Screen
Middle Rail
Bottom Rail
Cord
Joint
Lower
Screen
Bottom Rail
The Chain
in front
The Chain
in back
Bottom Rail
The Chain
in back
Middle Rail
Cord Joint
(Lift Cord)
Bottom Rail
Middle Rail
Bottom Rail
Cord Joint
(Lift Cord)
Middle Rail
Bottom Rail
Cord Joint
(Lift Cord)
*Specify the size, round down the nearest 5 mm in width and 10 mm in height.
Upper Screen
Lower Screen
Middle
Rail
Bottom Rail
Cord Joint
(Lift Cord)
SHIORI 25 Twin Chain & Cord Type
White
Recommended
color
Optional
color
Optional
color
Optional
color
Optional
color
Black Light Wood Dark Wood Charcoal Wood
Part Color
The standard part color is .
)is also available.Optional color (
White
Light Wood Dark Wood
Charcoal Wood
Black
Before releasing your grip on the
Operation Cord make sure that the
Screen is securely stopped (The Stopper
is locked). If the Stopper is not securely
locked, the Screen may free-fall and
cause an injury or malfunction.
Caution
05 06


