TOSO Shiori 25 Cord Single User manual

P−08091202
No.P−08091202
Instruction Manual
Thank you for purchasing TOSO products. To ensure safe use of this product,
please read the following thoroughly and keep this manual stored.
Shiori 25
Cord Single/Drum Single
Pleated Blind
INDEX
Caution .................................................................................................................2
Product View and Part Names ...........................................................................4
Installation and Detaching..................................................................................5
Operation Methods .............................................................................................7
Maintenance Sticker...........................................................................................9
Replacement screens .........................................................................................9
Troubleshooting.................................................................................................10
Cleaning ............................................................................................................11
Guide for Distributors and Installation Contractors
This manual contains information for a user to safely operate this product.
Please provide this manual to a customer.

Japan Blind Industry
Association
P. 2 P. 3
CAUTION
∗This manual contains cautions and instructions for safe use of the product.
Please read it carefully before using to ensure appropriate use.
This document illustrates the dangers of using this product without taking necessary
precautions. Please refer to the symbols below for different types of safety points.
This document illustrates safety points to be followed using the symbols below.
Illustrates that if this product is misused, there are dangers of serious
injuries or possible fatal accidents.
Illustrates that if this product is misused, there are dangers of
casualties or possible physical damage of the product.
Illustrates specific actions which are prohibited.
Illustrates specific guidelines which must be followed.
Screws provided are for xylem only. Do not use on materials other than xylem.
Check the foundation base and strength of the material before installing this product. If
not installed properly to the foundation base, there are dangers of it falling.
Install this product as instructed with the necessary quantity of brackets. Otherwise the
product may fall.
Warning
Caution
This product is intended for indoor use. Please do not use it for outdoor purposes.
Locations subject to high temperatures and high humidity, or areas where
water may leak, should be avoided.
Make sure to install this product horizontally.
Precautions upon installing the product (Please read before installation.)
Warning
Caution
Safety During Use (Please read thoroughly)
Warning
Please keep the cord or the chain where children cannot
reach.
Please avoid actions which may result in the cord or the
chain entangling the body or becoming hooked onto
something. This may cause an accident.
When not in use, please take the cord and put away the
handling cord by wrapping it around the safety hook.
Please do not hang from or pull on
this product. This may damage the
product or cause it to fall down.
Please do not operate the product with
sudden or forceful motion. This may
damage the product or cause it to fall
down.
Caution
When there is strong wind, please either
close the window or have the screen
completely opened up.
Please do not dismantle the
mechanical assembly or lubricate
the moving parts
of this product.
Physical damage
or malfunction of
the product will
occur.
Please do not use this product
around open flames.
Please remember to always use the
operation cord when operating this product.
Please do not attempt to move the screen
or Bottom Rail directly.
Please do not place any fragile objects or
objects that may interfere with operation
near the screen.

P. 4 P. 5
Product View and Part Names
<Cord Type> <Drum Type>
Product width (W)
Product width (W)
Head Rail Cap
Bracket
Head Rail
Cord Outlet
Cord Joint
Lift Cord
Operation Cord
Bottom Rail Cap
Bottom Rail
Screen
Pitch Keeper Cord
Operation Pulley
Drum Operation Cord
Safety Joint
Maintenance
Sticker
Product Weight (Product Width 2,000 mm x Product Height 2,000 mm)
Components Parts
−1200
1210−2000
2010−
Components
Name
Bracket
(Cord Type)
2
3
4
2
3
4
Bracket
(Drum Type)
Fixing Screw
(round head Ø3.5 x 20)
2
3
4
Product Width
(mm)
Safety Tassel
* Drum Type only
1
Cord Type
2.5 kg
Drum Type
3.2 kg
∗ Product weight varies slightly
depending on the screen.
Screws provided are for xylem only. Do not use on materials other than xylem.
Installation and Detaching
Caution
<Front Attachment>
<Ceiling Attachment>
25
(45) 10
(19)
(m/m)
44 (55)
44 (55)
22 (30)
(m/m)
Attaching surface
Attaching surface
25
(45)
∗ For Drum Type
4−7 cm4−7 cm Even intervalEven interval
Bracket Head Rail
Bracket Position
Install the Bracket in a position 40-70mm from
the edges of the Head Rail.
If there are three or more brackets, be sure to
install them at intervals that are as equally
spaced as possible.
Bracket installation
Follow the above illustrations for "Installation Method" and use the included Fixing Screws to
install the brackets.
∗There is one Fixing Screw for each bracket. The above illustration is a dimensional drawing for
the center of the elongated holes on the brackets. The brackets also have round holes, please
use them according to installation conditions.
Product height (H)
Product height (H)
Product Name
Installation Method
Bracket
Bracket
Indoor side
Window side
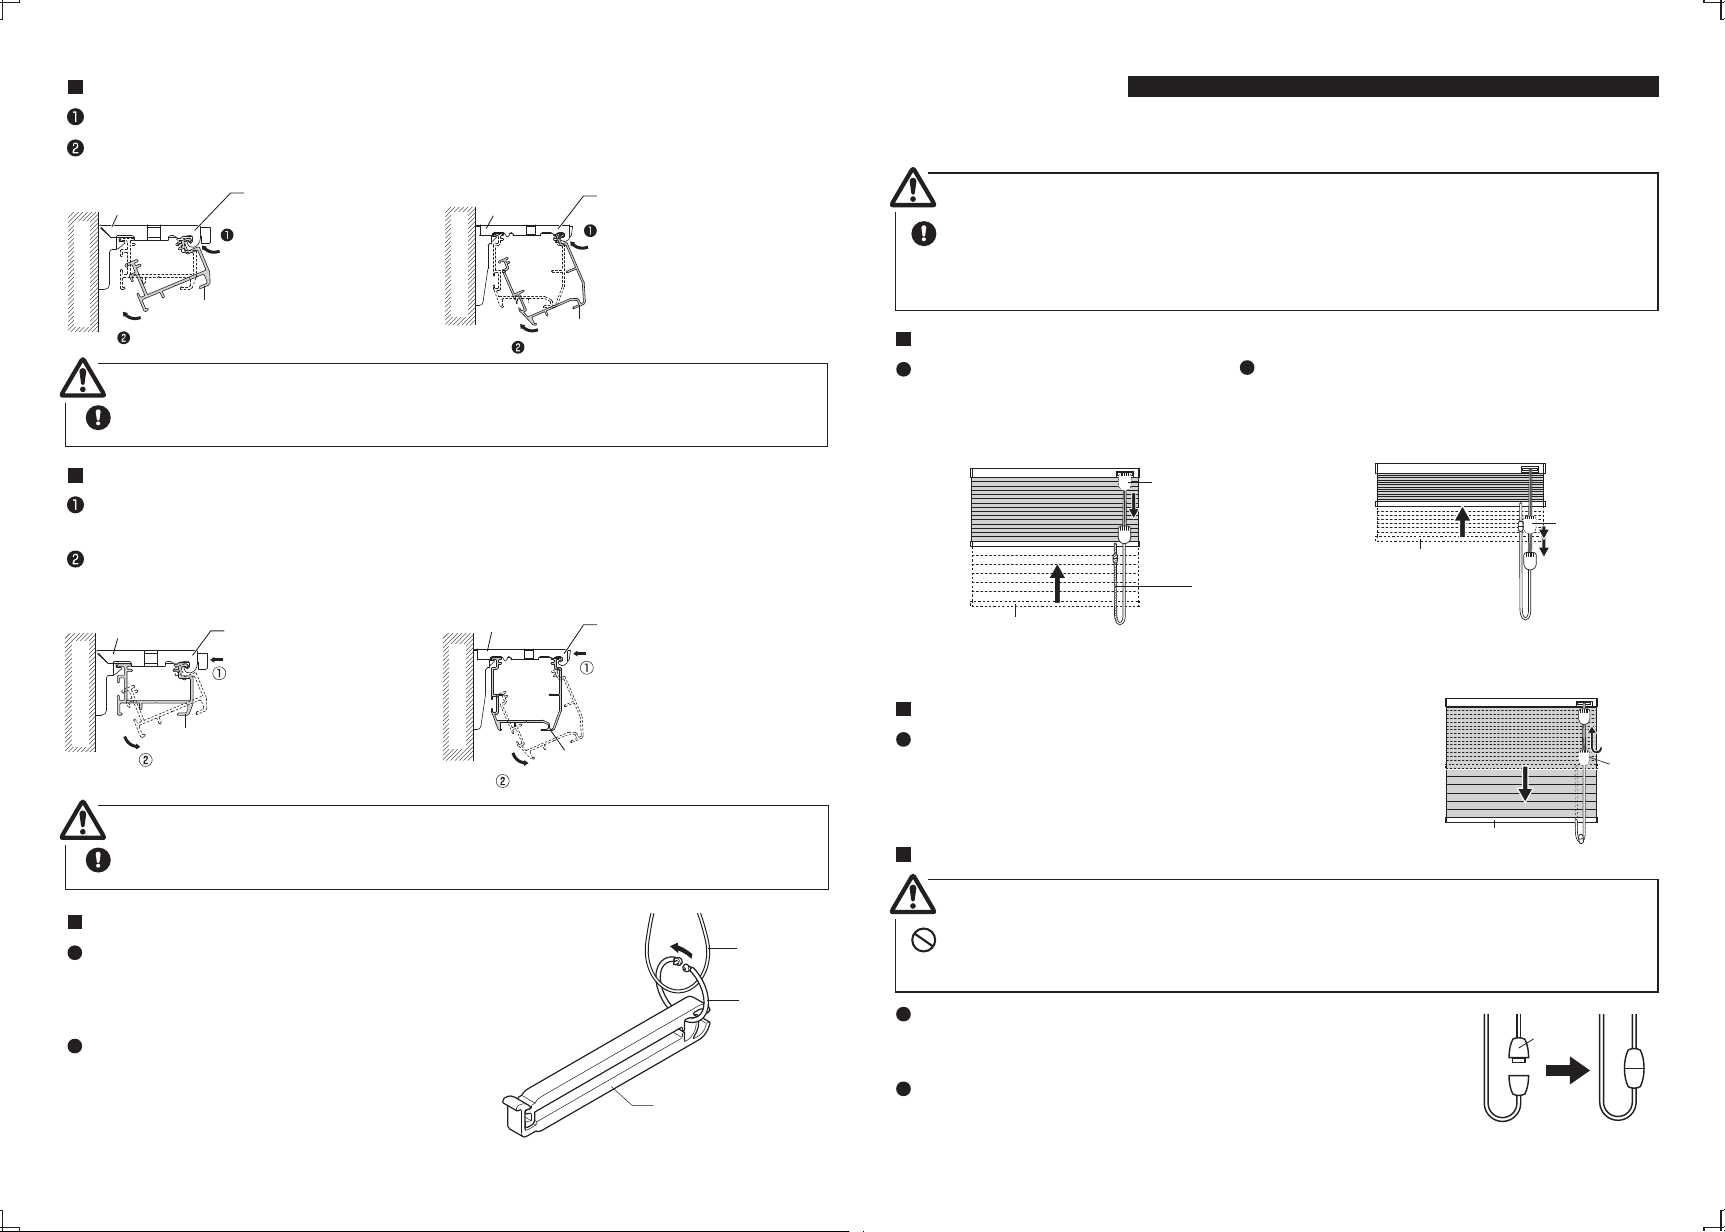
When removing the product from the brackets, be sure to support it with your hand.
Caution
Warning
Bracket
Head Rail
Hold in the
release button
Pull forward
Bracket
Head Rail
Hold in the
release button
Pull forward
Temporary stopper hook Temporary stopper hook
Bottom Rail
Operation Cord
Ring
Safety Tassel
P. 6 P. 7
<Cord Type> <Drum Type>
Bracket
Head Rail
Latch onto the
temporary
stopper hook
Push in and up
Latch onto the
temporary
stopper hook
Push in and up
Bracket
Head Rail
Temporary stopper hook Temporary stopper hook
Installing the main unit
With the screen in the stacked position, latch the temporary stopper hook onto the front groove of the Head Rail.
Push the Head Rail in until it clicks into place.
Attaching surface
Attaching surface
Attaching surface
Attaching surface
After installing the main unit, make sure the main unit is secured to the brackets.
Caution
Uninstalling the main unit
With the screen in the stacked position, grasp the main unit and hold the Bracket release
button while pulling forward.
Remove the main unit from the temporary stopper hook.
<Cord Type> <Drum Type>
About the Safety Tassel
This Safety Tassel is a part for preventing
unexpected accidents such as the Operation
Cord becoming wrapped around the neck or
body of a child.
Attach the Safety Tassel to the Operation Cord
using the included ring and tie the Operation
Cord in a place where children cannot reach.
Cord Joint
(Operation Cord)
Cord Joint
(Operation Cord)
Cord Joint
(Operation Cord)
Bottom Rail
Bottom Rail
Pull up the Screen
When the Bottom Rail is in the
lowest position, pull the Cord Joint
or the Operation Cord downwards
until the screen is in the position you
want and release your hand.
When the Bottom Rail is partially raised, pull the Cord
Joint or Operation Cord downwards slightly, temporarily
release your hand and then again pull the Cord Joint or
Operation Cord until the screen is in the position you
want and release your hand.
Pull down the Screen
When the Cord Joint or Operation Cord is pulled downwards
slightly, the stopper will be released and the screen will lower. If
you want to stop the screen partway, again pull the Cord Joint or
Operation Cord downwards and the stopper will engage, stopping
the screen.
About the Safety Joint
The Safety Joint is a part designed so that the Operation Cord will
come apart in order to prevent danger in case of the Operation Cord
becoming wrapped around a child's neck or body.
If stress is placed on the Safety Joint or if the Operation Cord is
operated by holding close to the Safety Joint, the Safety Joint will
come apart. If it comes apart, do not attempt to use the Operation
Cord. Re-assemble the Safety Joint before use.
Operation Methods
∗
The changing movement for the Bottom Rail is composed of alternating stop and release movement.
<Cord Type>
Before releasing your hand from the Operation Cord, make sure that the screen is
securely stopped (be sure that the changing movement is set to stop). If the changing
movement is not set to stop, the screen may forcefully fall and cause injury or damage.
Caution
Please do not allow children to play with the operation cord. Otherwise it may become
wrapped around the neck or body and cause an unexpected accident.
Safety
Joint
Operation Cord
(rear portion)
∗When raising and lowering the Bottom Rail, do not pull on the rear portion of Operation Cord.
Damage to the product will occur.

Maintenance Sticker
Bottom Rail
Replacement screens
Drum Operation Cord
front portion
rear portion
P. 8 P. 9
Your purchased product has an affixed maintenance sticker showing information related to the
product. Please refer to this maintenance sticker when inquiring about the product or for
repairs.
Shows the product specifications.
Shows the shipping date.
Product name
Installation height
Slat code Product
width
Product
height
Operation
position
<Drum Type>
Pull up the screen
Pull the front of the Drum
Operation Cord 1downwards
until the screen is in the position
you want and release your hand.
Pull down the screen
Pull the rear Drum Operation Cord
2downwards until the screen is
in the position you want and
release your hand.
“SHIORI Replacement Screens” are also
sold so that the material can be replaced
with the mechanisms left as-is. Perfect for
redecorating or for replacing broken
screens.
There is a maintenance sticker on surface
of the Bottom Rail in the Bottom right
corner of the product.
Please refer to this maintenance sticker
when inquiring about the product or for
repairs.
Maintenance
sticker
(Bottom right corner of
the product)
Bottom Rail
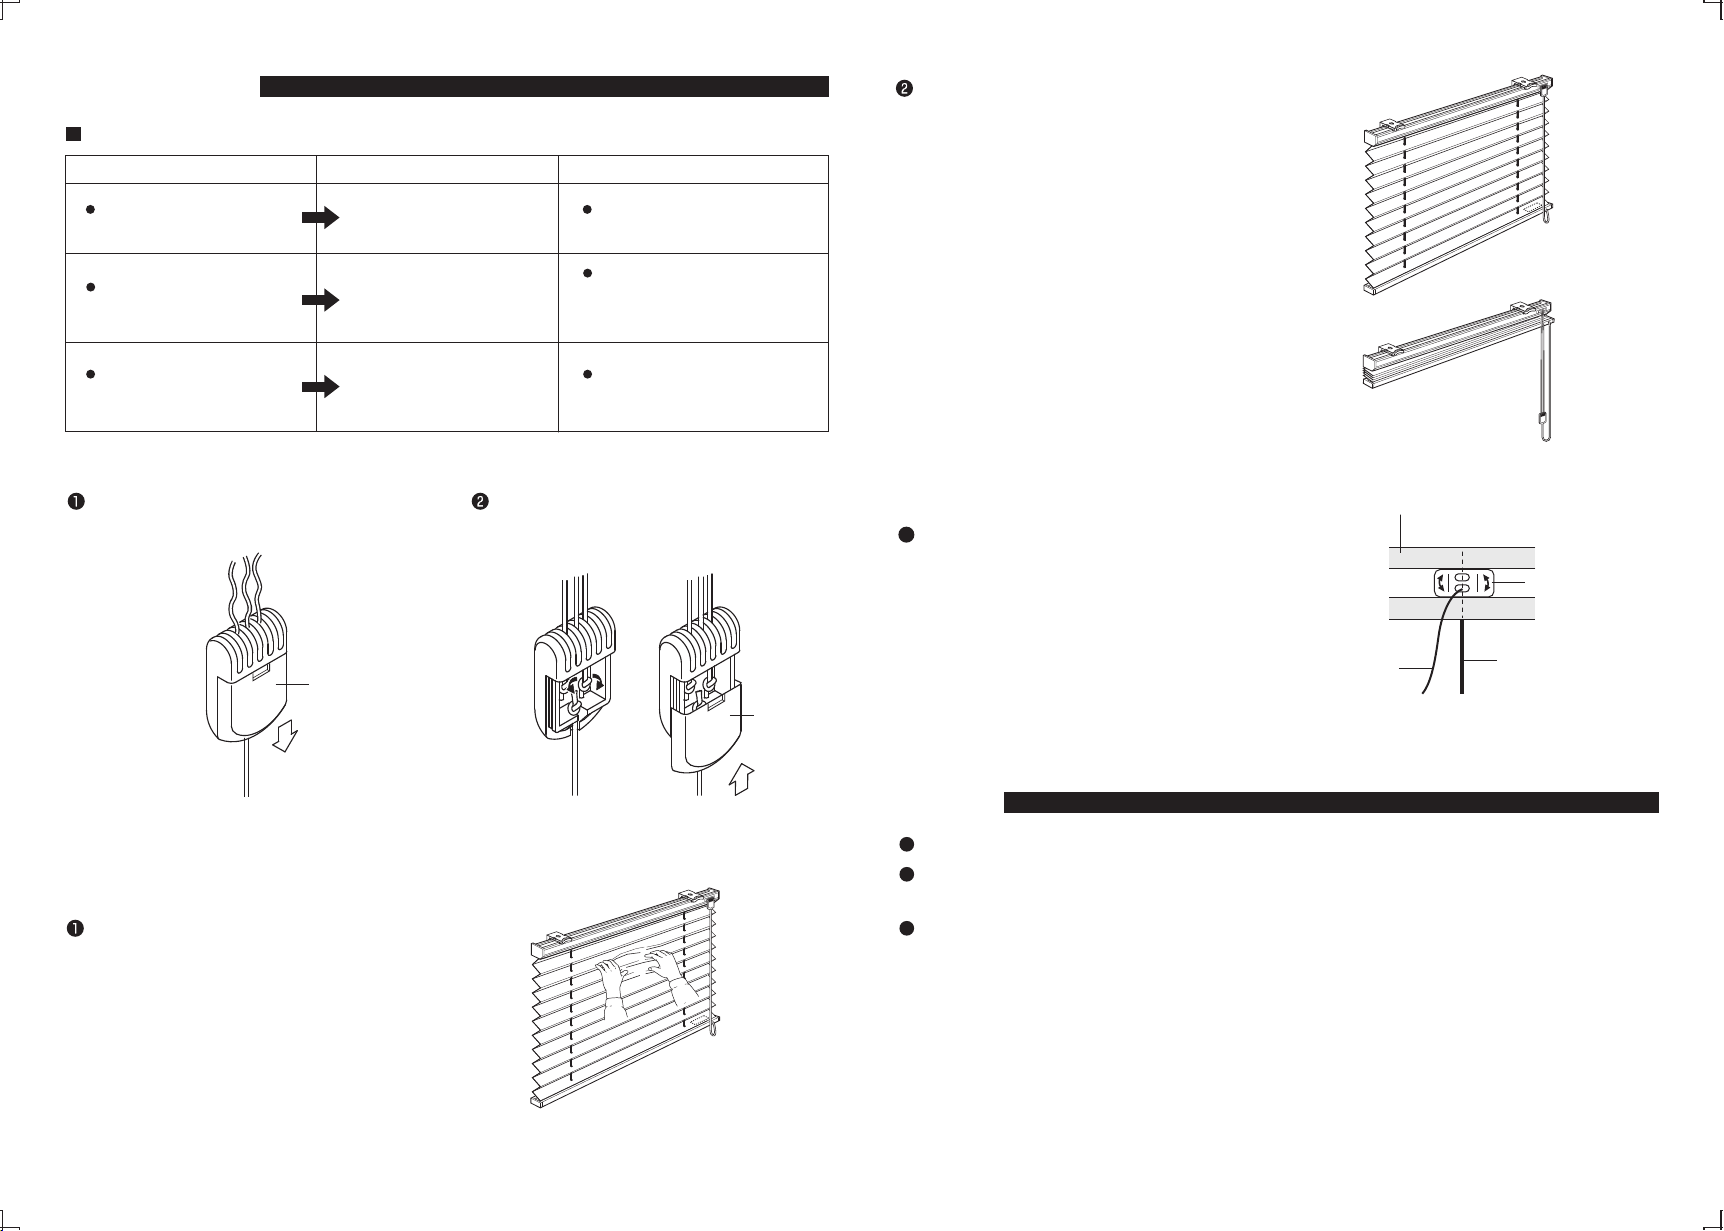
Cleaning
Cover
Cover
`<Fixing screen folds that have become disorganized>
Rear
Pitch-Keeper Cord Lift Cord
P. 10 P. 11
Troubleshooting
Example
Condition Cause Solution
The Lift Cord may be
twisted.
The screen won’t lower.
(Cord type)
Untwist using the following
procedure.
The pleat folds may be
disorganized.
The screen won't stack
neatly.
See "Fixing screen folds that
have become disorganized"
on P.10 and P.11.
The pitch-keeper cord
Bush securing position
may be off.
The screen raises
diagonally.
See "Fixing screens that
raise diagonally" on P.11.
<Removing twists from the Lift Cord>
Remove each twist from the Lift Cord and
slide in the cover from the bottom.
Slide a screwdriver under the cover to
remove it.
If the screen is disorganized, adjust the pleats
and raise into the stacked position.
Leave the screen in the stacked position
for a while, and operate again once the
pleat folds are corrected.
∗The length of time required for correction
varies depending on the screen type and
condition. If the screen disorganization is
not corrected on the first attempt, leave the
screen in the stacked position described in
2above for as long as possible.
The pitch-keeper cord Bush secured on
the back of the Head Rail should be
aligned directly above the Lift Cord.
`<Fixing screens that raise diagonally>
Pitch-Keeper cord
Bush
Head Rail
For regular care, dust with a feather duster or a hand mop.
Refrain from wiping with water or the screen coming into contact with water as it may cause the
colors to change.
The screen has a special resin finish that may leave wrinkles or deformations if bent or folded. It
may be impossible to return the screen to its original shape.
This manual suits for next models
1
Table of contents
Other TOSO Window Blind manuals

TOSO
TOSO Mytec 01 User manual

TOSO
TOSO SHIORI 25 User manual

TOSO
TOSO DUAL 100 User manual

TOSO
TOSO Mytec 01 Loop Double Type User manual

TOSO
TOSO Mytec 01 Loop Double Type User manual

TOSO
TOSO Shiori 25 Cord Twin User manual

TOSO
TOSO Design Blind 50 Drum Type User manual

TOSO
TOSO Shiori 25 Drum Twin User manual


