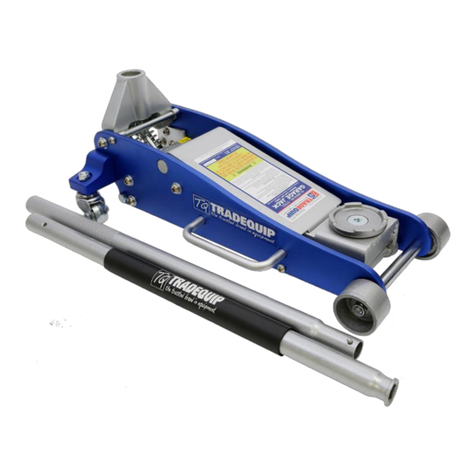
TradeQuip 2828 User manual

Mar-18 Product Code: 2828
OWNER’S MANUAL
PRODUCT CODE: 2828
GARAGE JACK ALUMINIUM
Working Load
Limit (kg)
Min.Height
(mm)
Max. Height
(mm)
Net Weight
(kg)
Gross
Weight (kg)
Package Size
(cm)
2700
95
480
25.5
27
730 x 332 x 175

Product Code: 2828
Page 2
WARNING INFORMATION
IMPORTANT: READ ALL INSTRUCTIONS BEFORE USE
WARNING
The instructions and warnings contained in this manual should be read and understood before
using or operating this garage jack. Do not allow anyone to use or operate this jack until they
have read this manual and have developed a thorough understanding of how this jack works.
Failure to observe any of the instructions contained in the manual could result in severe
personal injury to the user or bystanders, or cause damage to the equipment and property.
Keep this manual in a convenient and safe place for future reference.
Whilst every effort has been made to ensure accuracy of information contained in this manual,
the TradeQuip policy of continuous improvement determines the right to make modifications
without prior warning.
Read, study and understand all warnings and operating instructions prior to use.
Do not overload this jack beyond the rated capacity.
This jack is designed for use only on hard level surfaces capable of sustaining the
load.
This is a lifting device only. The load must be supported immediately by jack stands.
Do not get under or allow anyone under the vehicle until it has been supported by
jack stands.
Lift only on areas of the vehicle as specified by the vehicle manufacturer.
Centre load on saddle prior to lifting.
Some vehicles require an adaptor to properly engage the frame for lifting. Use the
vehicle manufacturer’s instruction on proper lifting.
No alterations to the jack shall be made.
Only attachments, restraints or space adapters supplied by the manufacturer shall
be used.
Failure to heed these warnings may result in personal injury and / or property
damage.
Activate the hazard warning flasher, turn off ignition, set the parking brake, move
automatic shift selector to park position. In case of manual transmission move gear
selector into reverse position. In addition, the wheel diagonally opposite from the
wheel being lifted shall be chocked in both directions.
Follow tyre changing procedure or tyre chain mounting procedure specified by the
vehicle manufacturer’s owner’s manual.
No alterations shall be made to this hydraulic trolley jack.

Product Code: 2828
Page 3
CONTENT
WARNING INFORMATION ............................................................................................................2
CONTENT ......................................................................................................................................3
SAFETY INSTRUCTIONS .................................................................................................................4
ASSEMBLY, OPERATION & PREVENTATIVE MAINTENANCE..........................................................5
TROUBLESHOOTING .....................................................................................................................8
PARTS LIST ....................................................................................................................................9
PARTS LIST DIAGRAM .................................................................................................................10
PARTS LIST ..................................................................................................................................11
WARRANTY.................................................................................................................................13

Product Code: 2828
Page 4
SAFETY INSTRUCTIONS
WARNING
FAILURE TO READ THESE WARNINGS MAY RESULT IN PROPERTY DAMAGE & PERSONAL INJURY
Support load by approved jack stands
after lifting
Do not exceed rated capacity
Centre load on the jack
Only use attachments and/or adapters
supplied with or sold specifically for the
jack
Only lift areas of the vehicle designated by
the vehicle manufacturer.
Use as lifting device only
Use only on hard, level surface
Do not modify jack
SAFETY OPERATING INSTRUCTIONS
This Jack should be used for lifting and lowering only. The raised vehicle should
be supported on approved vehicle stands. No person should get any part of the
body under a vehicle that is supported by this jack.
Position the jack to only lift on the areas of the vehicle specified by the vehicle
manufacturer.
Use support stands - after lifting the vehicle always support the load with
appropriately rated vehicle support stands before working onthe vehicle.
Do not overload this jack beyond its rated capacity. Overloading this jack beyond
its rated capacity can cause damage to or failure of the jack.
Use only on hard level surfaces capable of sustaining the load. Use on other than
hard level surfaces can result in jack instability and possible loss of load.
Centre load on jack saddle before lifting vehicle.
Off centre loads and loads lifted when the jack is not level can cause loss of load or
damage to the jack.
Keep hands & feet clear of the jack hinge mechanism & ground contact area
when lowering the load.
Failure to comply with all these warnings may result in loss of load, damage to the
jack, void of warranty and/or failure resulting in personal injury or property damage.
THIS JACK IS A LIFTING DEVICE ONLY & IS DESIGNED FOR LIFTING PART OF THE TOTAL
VEHICLE. DO NOT MOVE OR DOLLY THE VEHICLE WHILST THE VEHICLE IS ON THE JACK.

Product Code: 2828
Page 5
ASSEMBLY, OPERATION & PREVENTATIVE MAINTENANCE
1. FEATURES
The TradeQuip 2,700kg Super Lightweight Low Profile High Lift Garage Jack is designed for
the professional automotive service technician and automotive enthusiasts needing fast
acting performance. The long reach, ultra-light weight aluminium and steel combination
offers maxi- mum versatility. The double pump design rapidly raises the jack to the
maximum height with fewer strokes. Wiper seals protect the hydraulic system from
contaminants.
2. BEFORE USE
Prior to each use conduct a visual inspection checking for abnormal conditions, such as
cracked welds, leaks, and damaged, loose, or missing parts.
Consult the vehicle owner’s manual to determine the location of lift points.
Be sure to set the vehicle in park with the park brake on and wheels securely
chocked.
Be sure that the vehicle and the jack are on a hard, level surface.
3. OPERATION
3.1. Raising Vehicle
Only attachments and/or adapters supplied by the manufacturer shall be used. Lift only
on area of the vehicle as specified by the vehicle manufacturer.
Make sure the jack and vehicle are on a hard level surface.
Follow the vehicle manufacturer's recommended guidelines for lifting.
Engage the emergency brake and chock each wheel in both directions to
prevent inadvertent vehicle movement.
Close release valve by turning end of handle clockwise until firm resistance is felt. DO
NOT OVER TIGHTEN
Refer to the vehicle manufacturer owner's manual to locate approved lifting
points on the vehicle. Centre jack saddle under lift point.
Verify lift point, then pump handle to contact lift point. To lift, pump handle
until load reaches desired height.
Transfer the load immediately to appropriately rated jack stands
NEVER
use hydraulic jack as a standalone device!
ALWAYS
transfer the lifted load
IMMEDIATELY
to a pair of appropriately rated jack stands. Use one pair of jack
stands per vehicle. Rated capacity is per pair only! Do not exceed rated capacity

Product Code: 2828
Page 6
3.2. Lowering Vehicle
Be sure all tools and personnel are clear before lowering load.
Raise load high enough to clear the jack stands. (refer 'Raising the vehicle')
Remove jack stands carefully (always used in pairs)
Slowly turn the handle counter-clockwise, but no more than 1/2 full turn. If the load
fails to lower :
Slowly lower the vehicle to the ground
Maintain control of the rate of speed at which the load lowers at all times!
The more you turn the handle counter-clockwise, the faster the load will come
down.
After removing jack from under the vehicle, fully lower the saddle to reduce ram
exposure to rust and contamination
4. INSPECTION
Prior to each use conduct a visual inspection checking for abnormal conditions, such
as cracked welds, leaks, and damaged, loose, or missing parts.
The Jack shall be maintained in accordance with the maintenance instructions. No
alterations or modifications shall be made to this Jack.
Inspections shall be performed in accordance with this owner's manual.
The jack must be inspected immediately if it is believed to have been subjected to
abnormal load or shock.
Owners and /or operators should be aware that repair of this product may require
specialised equipment and knowledge (refer to maintenance section)
5. MAINTENANCE
Monthly maintenance is recommended. Lubrication is critical to jacks as they support
heavy loads. Any restriction due to dirt, rust, etc, can cause either slow movement or
cause extremely rapid jerks damaging the internal components. The following steps are
designed to keep the jack well maintained and operational.
Important: Dirt is the greatest single cause of failure in hydraulic units. Keep the jack
clean and well lubricated to prevent foreign matter from entering the system. If the jack
has been exposed to rain, snow, sand, or grit it must be cleaned before it is stored or
used.
Important: Use only good grade hydraulic jack oil. Avoid mixing different types of fluid
and NEVER use brake fluid, turbine oil, transmission fluid, motor oil or glycerine.
Improper fluid can cause premature failure of the jack and the potential for sudden and
immediate loss of load. We recommend PENRITE HYDRAULIC JACK OIL or equivalent
Adding oil
1. With saddle fully lowered set jack in its upright, level position. Remove oil filler plug.
2. Proper oil level will vary from just covering the inner cylinder to 6mm above the
inner cylinder as seen from the oil filler plug hole. Reinstall the oil filler plug.
Product Code: 2828
Page 7
NOTICE: If the oil level is too low, the jack will not raise to its advertised maximum
height. DO NOT overfill the reservoir. An overfilled reservoir can cause a wide
variety of performance problems and create an oily mess on the workshop floor!
See the troubleshooting guide below.
Changing oil
For best performance and longest life, replace the complete fluid supply at least
once per year.
1. With saddle fully lowered, remove the oil filler plug.
2. Lay the jack on its side and drain the fluid into a suitable container.
Note. Dispose of hydraulic fluid in accordance with local regulations.
3. Fill with oil until 6mm below the oil filler hole. Reinstall oil filler plug.
Lubrication
A periodic coating of light lubricating oil to pivot points, axles and hinges will help to
prevent rust and assure that wheels, casters and pump assemblies move freely.
Cleaning
Periodically check the pump piston and ram for signs of rust or corrosion. Clean as
needed and wipe with an oily cloth. Note: Never use sandpaper or abrasive material
on these surfaces.
6. STORAGE
When not in use, store the jack with saddle fully lowered out of the elements. Do not let
the jack be exposed to water.
Check the ram every three months for any sign of rust or corrosion. Clean as needed and
wipe with an oily cloth. When not in use always leave the saddle and ram all the way
down.
Always store your jack in the fully lowered position. This will help protect critical areas
from corrosion. Do not use brake or transmission fluids or regular motor oil as they can
damage the seals.
7. SERVICE & REPAIR
Any jack found damaged in any way, or found to be worn or operates abnormally should
be removed from service until repaired by an authorised service agent. Owners and / or
operators should be aware that repair of this product may require specialised equipment
and knowledge. Only authorised parts, labels, decals shall be used on this equipment.
Annual inspection of the jack is recommended and can be made by an authorised repair
facility to ensure that your equipment is in optimum condition and that the equipment
has the correct decals and safety labels specified by the manufacturer.

Product Code: 2828
Page 8
TROUBLESHOOTING
PROBLEM
POSSIBLE CAUSE
ACTION
Jack will not lift to full height
Low oil level
Check oil level
Jack will lift, but not maintain
pressure
Release valve not tightly
closed
Hydraulic unit malfunction
Ensure release valve is
tightly closed.
Discontinue use and
contact service agent
Jack will not lower after
unloading
Reservoir overfilled
Linkages binding
Drain fluid to proper
level
Clean and lubricate
moving parts
Poor lift performance
Fluid level low
Air trapped in system
Ensure proper fluid
level
With ram fully
retracted, remove oil
biller plug to let
pressurised air escape.
Reinstall oil filler plug

Product Code: 2828
Page 9
PARTS LIST
Item
No:
Description
Qty
Item
No:
Description
Qty
1
Bushing, Rear Wheel
2
36
Long Connecting Rod
2
2
Bolt, Rear Wheel
2
37
Pin Roll
2
3
Universal Wheel Rack
2
38
Screw
2
4
Rear Wheel Seat
2
39
Snap Ring
2
5
Lock Nut
2
40
Long Connecting Rod Bushing
2
6
Lock Nut
2
41
Connecting Rod, Saddle
1
7
Rear Wheel
2
42
Saddle Base
1
8
Flat Washer
4
43
Saddle
1
9
Spring Washer
14
44
Bolt
1
10
Screw
10
45
Rubber Pad
1
11
Spring Washer
8
46
Left Side Plate, Arm
1
12
Bolt
8
47
Lifting Arm Shaft
1
13
Spring Washer
4
48
Right Side Plate, Arm
1
14
Bolt
4
49
Reinforcement Block B
1
15
Lock Nut
2
50
Reinforcement Block A
1
16
Screw
8
51
Retainer Ring
2
17
Handle
2
52
Short Connecting Rod
2
18
Bushing, Front Wheel
2
53
Short Connecting Rod Bushing
2
19
Front Wheel
2
54
Pump Unit
1
20
Flat Washer
2
55
Roller Shaft, Handle
1
21
Lock Nut
2
56
Idler Wheel
1
22
Left/Right Side Plate
2
57
Pin
1
23
Pin Roll
2
58
Handle Socket
1
24
Limit Rod Bushing
2
59
Lock Nut
1
25
Limit Rod
1
60
Washer
1
26
Cover Plate
1
61
Universal Joint Sleeve
1
27
Arm Limit Lever
1
62
Bolt
1
28
Screw
4
63
Lower Handle
1
29
Front Wheel Shaft
1
64
Handle Cases
1
30
Cover Parts
1
65
Locating Spring Pin
2
31
Washer
2
66
Handle Rubber Pad
2
32
Screw
2
67
Bolt
2
33
Screw
16
68
Middle Handle
1
34
Arm Connecting Shaft
1
69
Front Handle
1
35
Arm Spacer
2

Product Code: 2828
Page 10
PARTS LIST DIAGRAM

Product Code: 2828
Page 11
PARTS LIST
Item
No:
Description
Qty
Item
No:
Description
Qty
54-1
Pin
1
54-25
Compress Spring Plate
1
54-2
Connect Head
1
54-26
Steel Retain Ring
1
54-3
Bolt
2
54-27
Copper Washer
1
54-4
Top Nut
1
54-28
Pump Body
1
54-5
O-Ring
1
54-29
O-Ring
2
54-6
Seal Ring
1
54-30
Nylon Gasket
2
54-7
Spring
2
54-31
Pump Core
1
54-8
Reservoir
1
54-32
Compress Spring
1
54-9
Oil Plug
1
54-33
Dust Cap
1
54-10
Cylinder
1
54-34
Compress Spring Plate
1
54-11
Piston Rod
1
54-35
Steel Retain Ring
1
54-12
Bowl Washer
1
54-36
Steel Ball
2
54-13
O-Ring
1
54-37
O-Ring
1
54-14
Seal Ring
1
54-38
Release Valve Rod
1
54-15
Copper Washer
1
54-39
Steel Ball
1
54-16
Spring Filter
2
54-40
Ball Valve Seat
1
54-17
Pump Base
1
54-41
Spring
1
54-18
Steel Ball
4
54-42
Pressure Valve Bolt
2
54-19
Copper Washer
1
54-43
Washer
2
54-20
Pump Body
1
54-44
Safety Valve Screw
2
54-21
O-Ring
2
54-45
Ball Valve Seat
1
54-22
Pump Cylinder
1
54-46
Spring
1
54-23
Pressure Spring
1
54-47
O-Ring
1
54-24
Dust Cap
1
54-48
Screw
1

Product Code: 2828
Page 12

Product Code: 2828
Page 13
WARRANTY
TradeQuip products have been carefully tested and inspected before shipment and are
guaranteed to be free from defective materials and workmanship for a period of 12 months
from the date of purchase except where tools are hired out when the guarantee period is
ninety days from the date of purchase.
Should the machine develop any fault, please return the complete tool to your nearest
authorised warranty repair agent or contact TQB Brands Pty Ltd Warranty team –
If upon inspection it is found that the fault occurring is due to defective materials or
workmanship, repairs will be carried out free of charge. This guarantee does not apply to
normal wear and tear, nor does it cover any damage caused by misuse, careless or unsafe
handling, alterations, accident, or repairs attempted or made by any personnel other than the
authorised TQB Brands Pty Ltd repair agent.
This guarantee applies in lieu of any other guarantee expressed or implied and variations of its
terms are not authorised.
Your TQB Brands Pty Ltd guarantee is not effective unless you can produce upon request a
dated receipt or invoice to verify your proof of purchase within the 12 month period.
Table of contents
Other TradeQuip Jack manuals

TradeQuip
TradeQuip 2829 User manual

TradeQuip
TradeQuip 2806T User manual

TradeQuip
TradeQuip 2026T User manual

TradeQuip
TradeQuip 2826T User manual

TradeQuip
TradeQuip 1128T User manual

TradeQuip
TradeQuip TQBJ12TA User manual

TradeQuip
TradeQuip 2051T User manual

TradeQuip
TradeQuip 2701T User manual

TradeQuip
TradeQuip 2015 User manual

TradeQuip
TradeQuip 1054T User manual