Trevi XF 500 User manual

ALTOPARLANTE AMPLIFICATO CON KARAOKE
Manuale d'uso e collegamento
POWERED SPEAKER WITH KARAOKE
Connection and Operation Manual
HAUT-PARLEUR AMPLIFIE AVEC KARAOKE
Mode d'emploi et branchement
BEWEGLICHER LAUTSPRECHER MIT KARAOKE
Gebrauchs- und Anschlusshandbuch
ALTAVOZ AMPLIFICADO CON KARAOKE
Manual para el uso y la conexión
LED
DISPLAY
USB/ SD
PLAYER
XF 500
Guida d’uso
User guide
LINE IN
25 W
MAX
BT
BLUETOOTH
Per informazioni integrative ed aggiornamenti su questo prodotto visita www.trevi.it
For additional information and updates of this product see www.trevi.it

2
XF 500
NOTE D'USO
Questo apparecchio è uno strumento elettronico di alta precisione, evitate quindi di utilizzarlo nei seguenti casi:
• Vicinoafortifontidicalorecomecaloriferiestufe.
• Inluoghimoltoumidicomestanzedabagno,piscine,ecc.
• Inluoghimoltopolverosi.
• Inluoghisoggettiafortivibrazioni.
■Posizionate l'apparecchio in modo che ai suoi lati ci sia sempre abbastanza spazio per la libera circolazione di aria (almeno 5 cm).
■Non ostruite le feritoie di ventilazione.
■Non premete l'interruttore o altri tasti con forza.
■Se dei liquidi penetrano all'interno dell'apparecchio scollegate immediatamente la spina dalla presa e portate l'apparecchio al più vicino centro
assistenza autorizzato TREVI.
■Controllate sempre prima di accendere l'apparecchio che i cavi di alimentazione e di collegamento siano installati correttamente.
CURA E MANUTENZIONE
Per la pulizia si consiglia l’ uso di un panno morbido, leggermente inumidito. Evitate solventi o sostanze abrasive.
IMPORTANTE
Questo dispositivo e' progettato per uso domestico non professionale. La buona costruzione di questo apparecchio ne garantisce per lungo tempo il
perfettofunzionamento.Setuttaviadovessepresentarsiqualcheinconveniente,saràopportunoconsultareilpiùvicinoCentroAssistenzaautorizzatoTREVI.
TREVI persegue una politica di continua ricerca e sviluppo. Pertanto i prodotti possono presentare caratteristiche diverse da quelle descritte.
ITALIANO
DESCRIZIONE CONNETTORI/COMANDI Comandi e prese sul dispositivo
1. Regolazione Volume
2. Regolazione del Volume Microfono
3. Ingresso USB
4. Slot per lettore di schede SD/MMC
5. Regolazione TREBLE (toni alti)
6. Regolazione BASS (toni bassi)
7. Regolazione ECHO del microfono
8. Ingresso LINE IN
9. Ingresso MIC
10. Spia led (rosso: alimentazione rete collegata/caricamento batteria)
11. Presa di alimentazione (15V/2A)
12. Interruttore ON/OFF, accensione/spegnimento
13. Tasto MODE, selezione ingressi
14. Display digitale
15. Tasto PLAY/PAUSA/RIPETIZIONE BRANO/RIPETIZIONE TUTTO
16. Tasto NEXT, selezione traccia/Radio successiva, ricerca avanzamento
veloce
17. Ricevitore telecomando
18.TastoPREV,selezione traccia/Radioprecedente,ricerca indietro veloce
19. Microfono
19
1
2
3
4
7
6
5
8
9
10
11
12

3
XF 500ITALIANO
DESCRIZIONE TELECOMANDO
CARATTERISTICHE E ACCESSORI
Oltre alle sue normali funzioni questo apparecchio può essere collegato anche all'uscita audio dei seguenti dispositivi: Telefoni, PC, DVD, TV, MP3,
tastieredigitaliperamplicarneilsuono(utilizzarel'ingressoLINEIN).
Nella confezione sono presenti:
• Unità
• Telecomando
• Microfonoconcavo
• AlimentatoreAC/DC
• Manualeistruzioni
ALIMENTAZIONE
Questa unità funziona con batteria ricaricabile al piombo 12V 2.6A e alimentazione DC 15V 2A, tramite alimentatore in dotazione.
Quando la batteria è in fase di esaurimento o l'apparecchio non si accende inserire lo spinotto dell'alimentatore in dotazione nella presa del dispositivo
(11) e la spina in una presa di corrente per effettuare la ricarica.
Non collegare l'apparecchio ad alimentatori con tensione e corrente diversa da quella indicata.
Quando la batteria interna è carica, sul display digitale (14) sarà presente l'icona .
Quando la batteria interna si sta scaricando, sul display digitale(14) sarà presente l'icona ,primassaepoilampeggiante.
ISTRUZIONI RICARICA BATTERIA
Portare l'interruttore ON/OFF (12) su OFF per effettuare una ricarica veloce. La spia Led (10) diventerà di colore rosso.
Al termine della ricarica la spia Led (10) diventerà di colore blu.
FUNZIONI DI BASE
ACCENSIONE/SPEGNIMENTO
Premere l'interruttore ON/OFF(12) per accendere/spegnere l'apparecchio.
In caso di funzionamento anomalo dell'apparecchio con alimentatore collegato, scollegare l'alimentatore ed attendere alcuni minuti prima di ricollegarlo.
20
21
22
23
24
25
26
27
28
29
Descrizione Comandi
20.TastoREPEAT(RIPETIZIONE,premereunavoltaperripetereilbrano,premereduevolteperripeteretutto)
21. Tasto SOUND (equalizzazioni pre impostate, premere più volte per selezionare il tipo di equaliz-
zazione preferita. Questa funzione è attiva solamente per le modalità USB, SD/MMC e Bluetooth)
22. Tastiera numerica (per selezionare direttamente il numero del brano da riprodurre)
23. Tasto PLAY/PAUSA
24. Regolazione Volume -
25. Tasto NEXT, selezione traccia/Radio successiva, ricerca avanzamento veloce
26. Regolazione Volume +
27. Tasto LAST, selezione traccia/Radio precedente, ricerca indietro veloce
28. Tasto MODE, selezione ingressi
29. Tasto MUTE
30. Tasto Stand-by
31.TastoINT/ALL(inmodalitàUSB/SD,premereunasolavoltaperattivarelafunzioneIntro,ognile
verrà riprodotto per 10 secondi, una volta terminato la riproduzione inizierà dal 1 brano. Premere
unasecondavoltaperriprodurrecompletamenteille)
Installazione batterie:
Rimuovere il coperchio nella parte posteriore del Telecomando, inserire 2 batterie formato “AAA”
facendo attenzione alla polarità indicata e richiudere il coperchio.
30
31

4
XF 500
STAND-BY
E' possibile portare l'apparecchio in modalità Stand-by utilizzando il tasto (30) del telecomando. Premerlo nuovamente per riaccendere l'apparecchio
NOTA:
- La funzione Stand-by è attivabile solamente se l'interruttore ON/OFF (12) è in posizione ON.
- Vi ricordiamo lasciando l'apparecchio in funzione Stand-by la batteria si scarica più velocemente che utilizzando l'interruttore ON/OFF (12).
IMPOSTAZIONE DELLA MODALITA' "FUNZIONE"
Per cambiare la modalità di funzionamento, premere piu' volte il tasto MODE(28) sul telecomando. Per poter selezionare l'ingresso USB o SD la memoria
deve essere collegata alle rispettive prese/ingressi (USB(3), SD/MMC(4)).
REGOLAZIONE DEL VOLUME
1. Ruotare la manopola del volume VOL(1) sull'unità per aumentare o diminuire il volume generale di riproduzione o premere i tasti (24) e (26) sul
telecomando per diminuire o aumentare il volume.
2. Ruotare la manopola MIC VOL(2) per regolare il volume del segnale sull'ingresso MIC.
NOTA: Se con il tasto del telecomando (24) si porta il livello del volume a 0, l'audio totale si annulla. Ricordarsi che una regolazione del volume
tramite telecomando comporta una diminuzione della potenza audio totale in uscita.
REGOLAZIONE TONI ALTI E BASSI
Ruotare la manopola TREBLE(5) per regolare i toni alti.
Ruotare la manopola BASS(6) per regolare i toni bassi.
EFFETTO ECHO
Ruotare la manopola ECHO(7) per aumentare o diminuire l'effetto eco sull'ingresso MIC.
Nota: l'effetto eco agisce unicamente sull'ingresso microfonico.
FUNZIONE RADIO FM
RICERCA AUTOMATICA
1. Accendere l'apparecchio e premere più volte il tasto MODE(13) sull'unità, o il tasto MODE(28) sul telecomando e selezionare la funzione RADIO
(comparirà sul display l'idicazione della frequenza).
2.
Premere a lungo il tasto PLAY/PAUSE(23) sul telecomando per attivare la funzione "AUTOSCAN", memorizzazione automatica delle emittenti (la
radio inizia una ricerca automatica delle stazioni radio stereo e le salva automaticamente in memoria). Il numero delle stazioni memorizzate dipende
dal segnale radio nella vostra zona. Durante la ricerca premere il tasto PLAY/PAUSE(23) sul telecomando per arrestare la memorizzazione.
3. Utilizzare i tasti NEXT(25) e LAST(27) sul telecomando per l'ascolto delle varie emittenti radio salvate in memoria.
4. Utilizzando la tastiera numerica(22) sul telecomando potete digitare direttamente il numero della memoria per richiamare velocemente l'emittente
radio.
RICERCA MANUALE
1. Premere a lungo i tasti
NEXT(25) e LAST(27) sul telecomando
pereffettuare unascansione manuale dellefrequenze radio;la ricercasi fermera’nelmomento
in cui verra’ ricevuta una emittente radio.
2. Utilizzando la tastiera numerica(22) sul telecomando potete digitare direttamente la frequenza dell'emittente radio preferita (senza inserire punti o
virgole).
NOTE:
-
La ricezione in FM dipende molto dal luogo dove è posto l’apparecchio.
- La vicinanza di apparecchi TV, lampade al neon o altri elettrodomestici può provocare disturbi nella ricezione di programmi radio, in
questo caso allontanate l'apparecchio.
INGRESSO USB, SD/MMC
1. Inserire una memoria USB nell'ingresso USB(3) oppure una memoria SD/MMC nella slot(4). La riproduzione viene avviata automaticamente, se
cosìnonfossepremereiltastoMODE(13)sull'unità,oiltastoMODE(28)sultelecomandopiùvoltenoaquandosuldisplay(14)noncompare
la scritta "USB" o "CARD".
2. Per mettere in pausa la riproduzione, premere il tasto PLAY/ PAUSA(23) sul telecomando, sul display comparirà la scritta "PAUS".
3. Per riprendere la riproduzione, premere di nuovo il tasto PLAY/ PAUSA(23) sul telecomando.
4. Premendo il tasto NEXT(25) sul telecomando durante l’ascolto si passa alla traccia successiva, mentre con il tasto LAST(27) si passa ai brani
precedenti.
5. Premere e tenere premuto il tasto NEXT(25) o LAST(27) sul telecomando durante l'ascolto per ricercare velocemente un particolare passaggio
musicale. Rilasciare il tasto per tornare alla normale riproduzione.
Utilizzando la tastiera numerica(22) sul telecomando potete digitare direttamente il numero della canzone da riprodurre.
6. Utilizzare il tasto SOUND (21) sul telecomando per scegliere il tipo di equalizzazione desiderato.
ITALIANO

5
XF 500
NOTE
- Il lettore potrebbe non supportare alcuni dispositivi USB, questo è dovuto all'incompatibilità di alcuni processori.
- Per evitare interferenze dannose, collegare sempre le periferiche USB direttamente all'unità, non utilizzare cavi di prolunga.
- Dal computer formattare le memorie USB, SD/MMC in FAT32.
- L'apparecchioinizieràlariproduzionedeileinbasealnumero/lettera,seilesono:01,02,l'apparecchiocominceràlariproduzionedalle01.
- Siconsigliadicopiaresullememoriesolamenteilemusicalidariprodurreedieliminareileelecartellenonrilevanti,ilsistemaleggeràpiù
velocementeenonsivericherannoerroridurantelalettura.
FUNZIONAMENTO BLUETOOTH
1. Accendere l'apparecchio e premere più volte il tasto MODE(13) sull'unità, o il tasto MODE(28) sul telecomando e selezionare la funzione bluetooth,
sul display(14) comparirà la scritta "BLUE" e un Led rosso comincerà a lampeggiare.
2. L'apparecchio adotta la funzione di ritorno automatico ai dispositivi accoppiati, ovvero, all'attivazione della funzione Bluetooth l'apparecchio cerca
prima i dispositivi Bluetooth accoppiati in precedenza, se questi non vengono trovati entro i primi 5 secondi, esso si porta automaticamente in
modalità accoppiamento con altri dispositivi esterni.
3. Attivare la funzionalità Bluetooth sul dispositivo esterno da accoppiare.
4. Avviare la ricerca dei dispositivi sul dispositivo esterno. Al termine selezionare il dispositivo "XF 500".
5. Inserire la password "0000" se richiesto.
6. Avviare la riproduzione dal dispositivo esterno. Utilizzare i tasti PLAY/PAUSA(23) sul telecomando per avviare la riproduzione e i tasti NEXT(25) o
LAST(27) sul telecomando per la selezione dei brani.
7. Utilizzare il tasto SOUND (21) sul telecomando per scegliere il tipo di equalizzazione desiderato.
LINE-IN
1. Accendere l'apparecchio e premere più volte il tasto MODE(13) sull'unità, o il tasto MODE(28) sul telecomando e selezionare la modalità "LINE".
2. Collegare una qualsiasi unità provvista di uscita audio tramite un apposito cavo Jack da 3,5mm (non incluso) all'ingresso LINE IN(8).
3. Regolare il dispositivo esterno dai propri comandi.
UTILIZZO DEL MICROFONO
1. Collegare il microfono in dotazione nella presa MIC(9).
2. Accendere il microfono agendo sull'interruttore presente sul manico del microfono stesso portandolo in posizione ON.
3. Regolare il volume di ingresso(2) del microfono e l'effetto eco(7) come desiderato tramite gli appositi comandi.
CARATTERISTICHE TECNICHE
GENERALI
Alimentazione: .....................................DC 15V, 2A - batteria interna al piombo 12V 2.6A ricaricabile
Potenza massima in uscita: .................................................................................................... 25W
Dimensioni unità: ................................................................................ 380x245x210mm
Peso: .................................................................................................... 4 Kg
INFORMATIVA SULLA RIMOZIONE E LO SMALTIMENTO DELLE BATTERIE
Attenzione: Questa operazione è riservata esclusivamente al personale tecnico specializzato!
PROCEDURA PER LA RIMOZIONE DELLA BATTERIA DALL’ALTOPARLANTE AMPLIFICATO
Operare esclusivamente in assenza di collegamento dell’apparecchio alla rete elettrica!
1. Rimuovere le viti che serrano la struttura dell'apparecchio e smontarlo.
2. Individuare la batteria;
3. Rimuovere le viti che serrano i sostegni della batteria, rimuovere i sostegni, scollegare la batteria e rimuoverla.
Qualunquesiailtipodibatteriaesaurita,essanondeveesseregettatatrairiutidomestici,nelfuocoonell’acqua.Ognitipodibatteriaesauritadeve
essere riciclata oppure smaltita presso gli appositi centri raccolta dedicati.
ITALIANO

6
XF 500
ENGLISH
NOTES ON USE
This is a precision electronic appliance; avoid using it in the following cases:
- Near strong heat sources, such as central heating plants or stoves.
- In very humid places such as bathrooms, swimming pools, etc.
- In very dusty places.
- In places subject to strong vibrations.
- Position the appliance in such a way that there is always enough room for free air circulation (at least 5 cm).
- Do not block the air inlets.
- If any liquid enters the appliance, unplug it immediately from the socket and take it to the nearest TREVI authorised service centre.
- Before switching on the appliance, always check that the power cable and the connection cable are properly installed.
CARE AND MAINTENANCE
Use a slightly damp soft cloth for cleaning. Do not use solvents and abrasive substances.
IMPORTANT
This device is designed for home use (not professional use). This appliance has been carefully built to ensure long-lasting perfect performance.
However, should any inconvenience occur, please contact your local authorised TREVI Service Centre.
TREVI follows a policy of ongoing research and development. Therefore products may have different features from those described.
LOCATION OF CONTROL
Controls and sockets on the device
1. Main voice volume knob
2. Microphone volume knob
3. USB port
4. SD/MMC card slot
5. Treble
6. Bass
7. Reverberation for microphone
8. Line in
9. Microphone input port
10. LED indicator (red: AC/DC connected/battery charging)
11. DC15V/2A Input
12. Power button
13. Mode key (M/MODE)
14. Digital display screen
15. Play/pause
16. Next
17. Remote receiver
18. PREV
19. Microphone
19
1
2
3
4
7
6
5
8
9
10
11
12

7
XF 500ENGLISH
REMOTE CONTROL INSTRUCTION
FEATURES AND ACCESSORIES
In addition to its normal functions the device can also be connected to the audio output to the following devices: Mobile, PC, DVD, TV, MP3, digital
keyboards to amplify the sound (use the LINE IN).
In the package are:
• Unit
• Remotecontrol
• Microphonewithcable
• AC/DCadapter
• InstructionManual
POWER
This unit works with rechargeable lead acid 12V 2.6A and 15V DC 2A power adapter supplied.
When the battery and 'being phased out or the device does not turn On, insert the AC/DC adapter plug into the socket of the device (11) and the plug
into a wall socket to recharge.
Do not connect other AC/DC adaptor with voltage and current different, use only AC/DC adaptor supplied.
When the internal battery is charged, the digital display(14) will be present icon .
When the internal battery is low, the digital display(14) will be present icon ,rstturnedon,thenashing.
BATTERY CHARGE INSTRUCTIONS
Put the ON/OFF switch (12) to OFF to make a fast charge. The LED indicator (10) will turn red.
After charging the LED indicator (10) will turn blue.
BASIC FUNCTIONS
POWER ON/OFF
Press the POWER switch(12) to turn on/off the unit.
In case of malfunction of the device to disconnect the power supply and wait a few minutes before reconnecting.
MODE SETTING FUNCTION
To change the operation mode, press more 'times the MODE button (28) on the remote control. In order to select the input USB or SD memory must
be connected to the respective sockets/inputs (USB (3), SD/MMC (4)).
Remote control functions
20. Repeat key (Press it to single repeat or all repeat)
21. Sound mode key (Several EQ modes circulated, this key only works in USB/SD/MMC mode)
22. 0~9 Number key
23. Play/pause button
24. Volume- button
25. Next button
26. Volume+ button
27. Last button
28. Mode key (To change mode)
29. Mute Key (Press once to mute the device, repress to activate sound)
30. Stand-by button
31. INT/ALL button ( In USB/SD mode, press one time, it will be Intro function, means overview each
lefor10seconds,oncenish,itwillstarttoplayfromthe1stle.Whenyoupressagain,itwill
playthelecompletely)
Installing the Batteries
RemovethebatterycoverfromtheRemoteControlandput 2xAAAsizebatteriesinsidethecompartment.
The diagram inside the Battery Compartment shows the correct way to install the batteries.
20
21
22
23
24
25
26
27
28
29
30
31

8
XF 500
ENGLISH
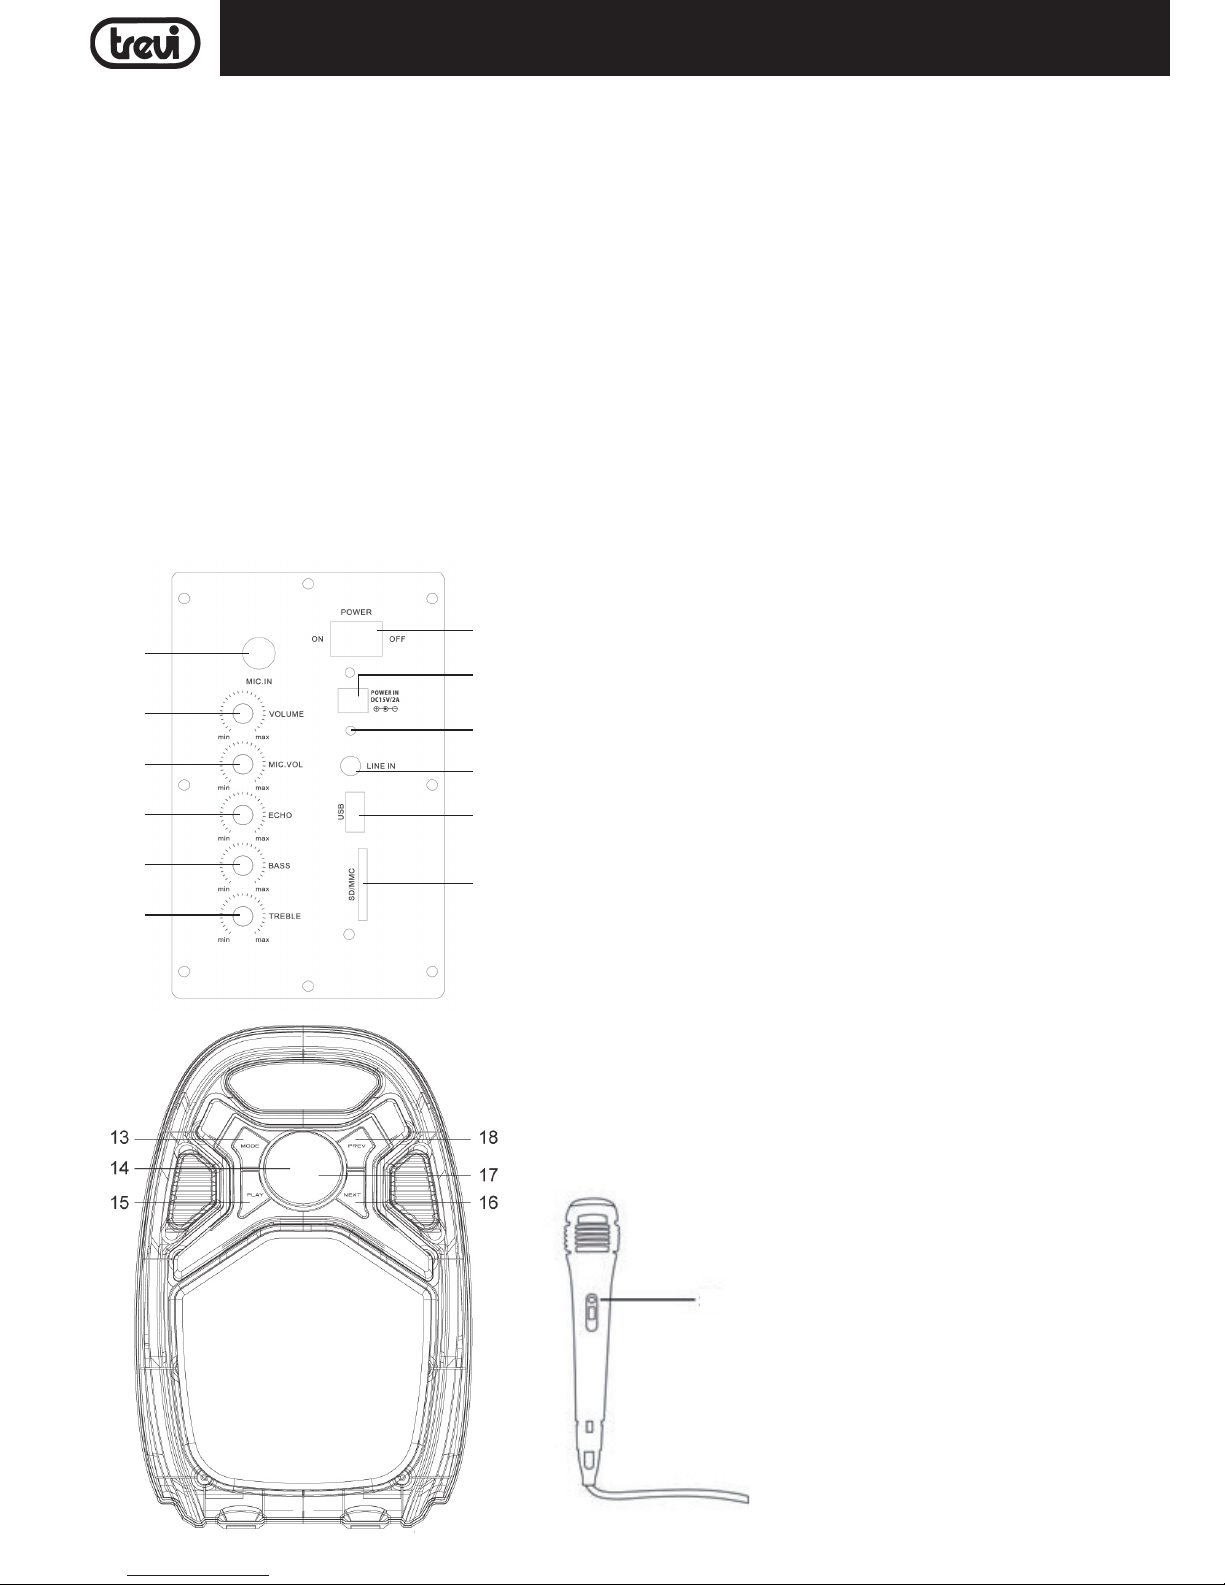
ADJUSTING THE VOLUME
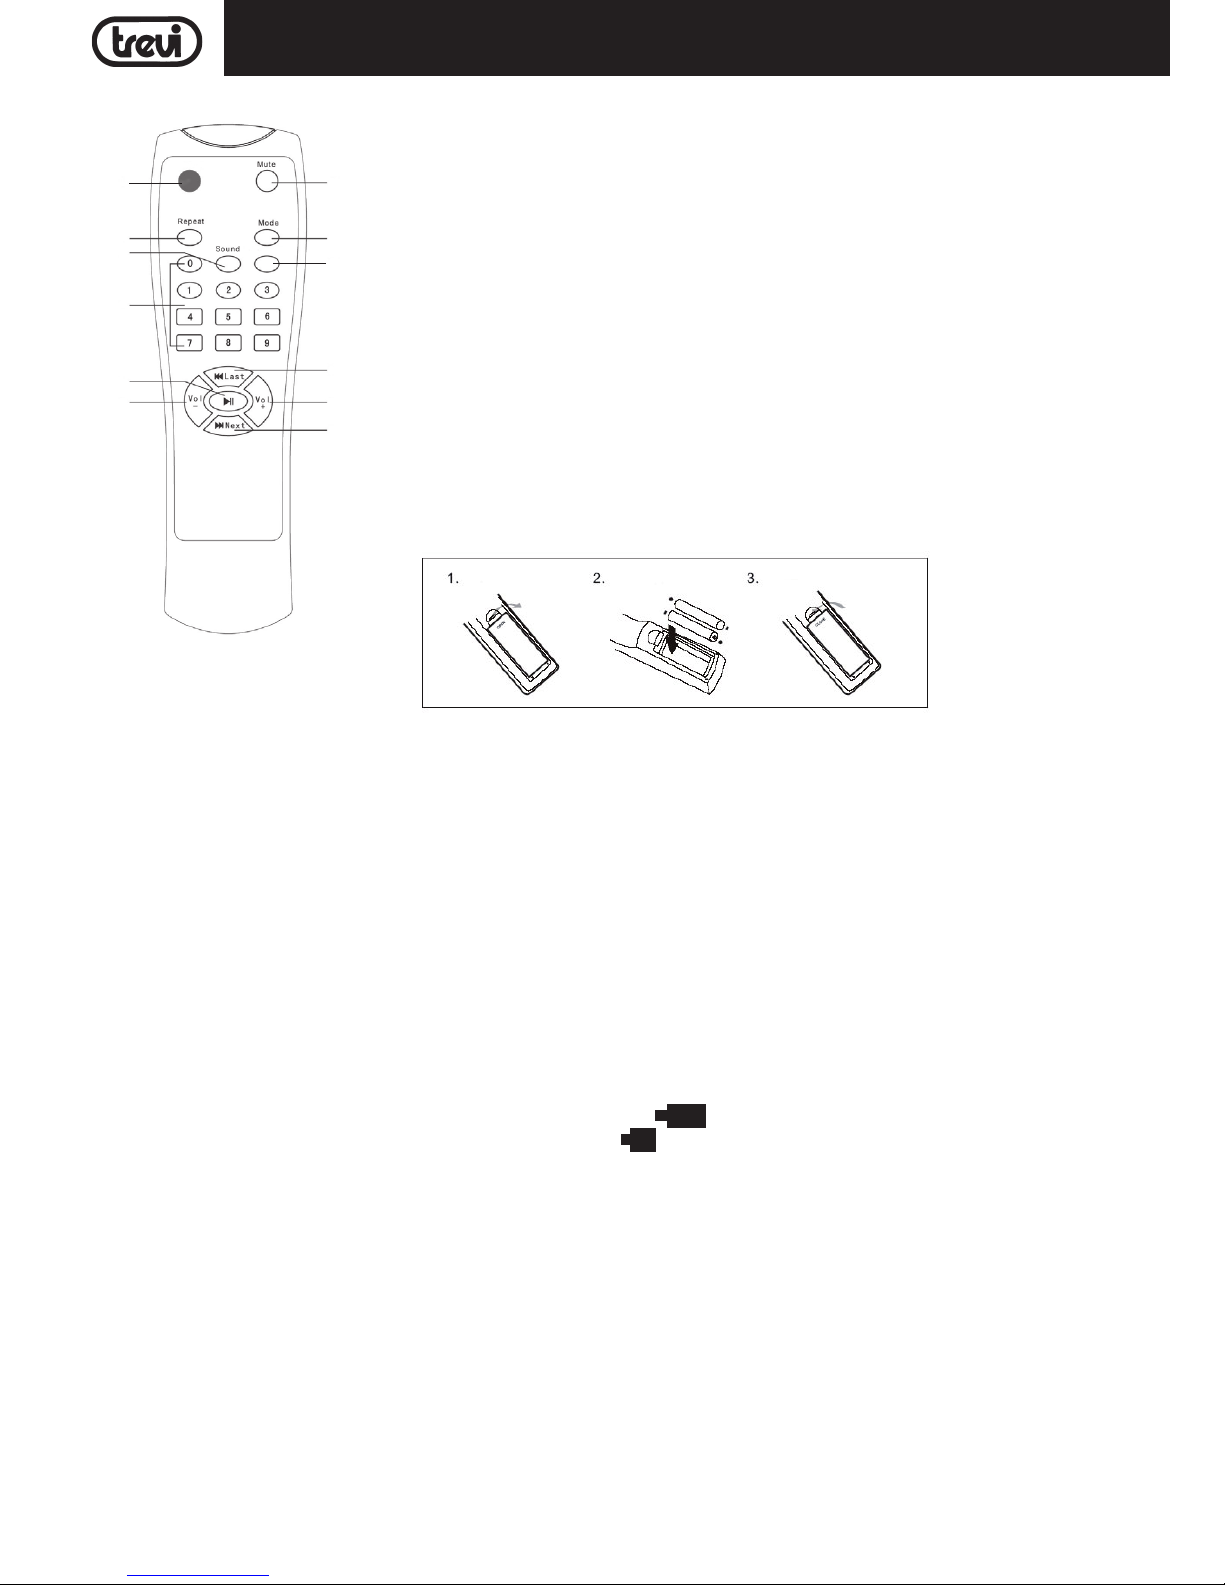
1. Turn the volume VOL(1) unit to increase or decrease the overall volume of playback or press (24) and (26) on the remote control to decrease or
increase the volume.
2. Turn the MIC VOL(2) to adjust the volume of the signal at the MIC.
Note: If the remote control button (24) moves the volume level to 0, the audio power output will be lower.
SETTING TONE TREBLE AND BASS
Turn the knob TREEBLE (5) to adjust the treble.
Turn the knob BASS (6) to adjust the bass.
ECHO EFFECT
Turn the knob ECHO (7) to increase or decrease the echo effect on the inputs MIC.
Note: The echo only works on microphone inputs.
RADIO FUNCTION
AUTOMATIC SEARCH
1. Turn on the unit and repeatedly press the MODE button(13) on the unit, or the MODE button(28) on the remote control and select the function
RADIO (will appear on the display idicazione frequency).
2. Press and hold the PLAY/PAUSE button(23) on the remote control to activate the automatic storing AUTOSCAN broadcasters (radio starts au-
tomatically search for radio stations stereo and automatically saves in memory). Saves up to 50 radio stations. During the search, press PLAY/
PAUSE (23) on the remote control to stop recording.
3. Use the NEXT(25) and LAST(27) on the remote control for listening to various radio stations saved in memory.
4. Using the numeric keypad(22) on the remote control, you can enter the number of the memory to quickly recall the radio station.
MANUAL SEARCH
1. Long press the NEXT(25) and LAST(27) on the remote control to perform a manual scan of radio frequencies; the search will stop 'when will'
received a stereo radio station.
2. Using the numeric keypad(22) on the remote control you can directly enter the frequency of the favorite radio.
Notes:
- The FM reception depends on the place where you place the unit.
- The proximity of TV sets, uorescent lamps, or other appliances may cause interference in the reception of radio programs, in this case,
move this unit.
INPUT USB, SD/MMC
1. Insert a USB memory into the USB port(3) or an SD/MMC in the slot(4). Playback will start automatically, if not press the MODE button(13) on
the unit, or the MODE button(28) on the remote repeatedly until the display(14) show the "USB" or "CARD ".
2. To pause playback, press the PLAY/PAUSE(23) on the remote control, the display will show "PAUS".
3. To resume playback, press the PLAY/PAUSE button(23) on the remote control.
4. Press the NEXT button(25) on the remote control during playback to go to the next track, while the LAST button(27) to the previous tracks.
5. Press and hold the NEXT button(25) or LAST(27) on the remote control while listening to quickly search a particular musical passage. Release
the button to resume normal playback.
Using the numeric keypad(22) on the remote control, you can enter the number of the song to be played.
Notes:
- The player may not support some USB devices, this is due to the incompatibility of some processors.
- To avoid harmful interference, always connect USB devices directly to the unit, do not use extension cords.
- From the computer to format the USB memory SD/MMC in FAT32.
- Theunitwillstartplaybackofthelebasedonthenumber/letter,iflesare:01,02,itwillstartplayingfromthele01.
- Itisrecommendedtocopythememoriesonlymusiclestoplaybackanddeletelesandfoldersthatarenotrelevant,thesystemwillreadmore
quickly and there will be no errors when reading.
BLUETOOTH OPERATION
1. Turn on the unit and repeatedly press the MODE button(13) on the unit, or the MODE button(28) on the remote control and select the Bluetooth
function, the display(14) will show "BLUE".
2. The device adopts the function of automatic return to the paired devices, activation of the Bluetooth device tries before the paired Bluetooth devices
earlier,iftheyarenotfoundwithintherst5seconds,itwillautomaticallymodecouplingwithotherexternaldevices.
3. Activate the Bluetooth feature on the external device to be coupled.
4. Initiate a search for devices on the external device. After select the "XF 500".
5. Enter the password "0000" if required.
6. Press the PLAY/PAUSE(23) on the remote control to start playback and NEXT buttons(25) or LAST(27) on the remote control to select tracks.

9
XF 500
AUX-IN
1. Turn on the unit and repeatedly press the MODE button(13) on the unit, or the MODE button(28) on the remote control and select the "LINE".
2. Connect any unit equipped with audio output via a dedicated 3.5mm jack cable (not included) to the LINE IN(8).
3. Adjust the external device from their commands.
2. Connect any unit equipped with audio output through a cable 3.5mm jack (not included) to the AUX IN(11).
3. Use the external device from their commands.
USING THE MICROPHONE
1. Connect the supplied microphone into the jack MIC(9).
2. Turn on the microphone using the switch on the handle of the microphone to the ON position.
3. Adjust the volume(2) of the microphone input and the echo effect(7) as desired using the appropriate commands.
SPECIFICATIONS
Power Supply: ....................................DC 15V, 2A - internal lead acid rechargeable battery 12V, 2.6A
Maximum output power: .................................................................................................... 25W
Unit size: ................................................................................ 380x245x210mm
Weight: .....................................................................................................4 kg
INFORMATION NOTE ON THE REMOVAL AND DISPOSAL OF BATTERIES
Warning: Only high-qualied personnel should perform this operation!
BATTERY REMOVAL
The appliance should not be plugged to the mains socket when performing this operation!
1. Removethescrewsthatsecuretherearpanelspeakerampliedandremovethepanel;
2. Locate the battery;
3. Remove the screws that secure the supports of the battery, remove the supports, disconnect the battery and remove it.
Usedbatteriesshouldnotbedisposedofwithhouseholdwasteorthrownintoreorwater.Usedbatteriesshouldberecycledordisposedofin
separate waste collection centres.
ENGLISH

10
XF 500
NOTES D’EMPLOI
Cet appareil est un instrument électronique de haute précision ; évitez donc de l’utiliser dans les cas suivants :
- Près de grosses sources de chaleur comme des radiateurs et des poêles.
- Dans des endroits très humides comme les salles de bains, les piscines, etc.
- Dans des endroits très poussiéreux.
- Dans des endroits exposés à de fortes vibrations.
- Placez l’appareil de sorte qu’il y ait toujours assez d’espace sur ses côtés pour laisser circuler librement l’air (au moins 5 cm).
- Ne bouchez pas les fentes d’aération.
- Si des liquides pénètrent à l’intérieur de l’appareil, débranchez-le immédiatement et portez-le au centre d’assistance agréé TREVI le plus proche.
- Contrôlez toujours, avant d’allumer l’appareil, que les câbles d’alimentation et les câbles de branchement sont correctement installés.
MANIEMENT ET ENTRETIEN
Pour le nettoyage, il est conseillé d’utiliser un chiffon doux légèrement humide. Évitez l’emploi de solvants ou de substances abrasives.
IMPORTANT
Cet appareil est conçu pour un usage domestique (usage non professionnel). La bonne fabrication de cet appareil garantit un fonctionnement parfait
pour une longue période. Si toutefois quelques inconvénients devaient se présenter, adressez-vous au Centre d’Assistance agréé TREVI le plus proche.
TREVI observe une politique de recherche et de développement continus. C’est pourquoi ses produits peuvent présenter des caractéristiques différentes
par rapport à celles qui sont décrites.
DESCRIPTION DES CONNECTEURS ET DES COMMANDES
FRANCAIS
Commandes et prises
1. Réglage du volume
2. Contrôle du volume Microphone
3. Entrée USB
4. L'emplacement lecteur de carte SD/MMC
5. Réglage TREBLE (aiguës)
6. Réglage BASS (basse)
7. Ajustez microphone ECHO
8. Entrée LINE IN
9. Entrée MIC
10. Indicateur LED (rouge: AC/DC alimentation/chargement de la
batterie)
11. Prise d'alimentation (15V / 2A)
12. ON/OFF, Commande Allumage
13. Bouton MODE, la sélection d'entrée
14.Afchagenumérique
15. PLAY/PAUSE/TRACK REPEAT/REPEAT ALL
16.NEXT,sélectiondelapiste/Radiorechercheultérieureavancerapide
17. Récepteur de télécommande
18.TouchePREV,sélectiondelapiste/Radioprécédenterembobinage
de recherche
19. Microphone
19
1
2
3
4
7
6
5
8
9
10
11
12

11
XF 500FRANCAIS
DESCRIPTION COMMANDES DE LA TÉLÉCOMMANDE
CARACTÉRISTIQUES ET ACCESSOIRES
En plus de ses fonctions normales, le dispositif peut également être relié à la sortie audio aux appareils suivants: Mobile, PC, DVD, TV, MP3, claviers
numériquespouramplierleson(enutilisantLINEIN).
Dans le paquet sont:
• Unité
• Télécommande
• Microphoneaveccâble
• AC/DC,alimentateurfourni.
• Moded'emploi
ALIMENTATION
Cet appareil fonctionne avec une batterie au plomb rechargeable 12V 2.6A et 15V, 2A alimentateur fourni.
Lorsquelabatterieet«progressivementsuppriméeoul'appareilneseallumepasinsérerlachedel'adaptateurfournidanslaprisedel'appareil(11)
etlachedansuneprisemuralepourrecharger.
Ne branchez pas la machine à l'alimentation de tension et de courant autre que celle indiquée.
Lorsquelabatterieinterneestchargée,l'afchagenumérique(14)seraprésenticône
Lorsquelabatterieinterneestfaible,l'afchagenumérique(14)seraprésenticône , tout d'abord mis en marche, puis clignotent.
CHARGE DE LA BATTERIE INSTRUCTIONS
Placez l'interrupteur ON/OFF (12) sur OFF pour faire une charge rapide. Indicateur LED (10) s'allume en rouge.
Après la charge, Indicateur LED (10) s'allume bleue.
OPÉRATIONS DE BASE
ALLUMAGE
Appuyez sur l'interrupteur POWER(12) pour allumer/désactiver l'unité.
En cas de dysfonctionnement de l'appareil pour couper l'alimentation électrique et attendez quelques minutes avant de le rebrancher.
Description commandes
20.Touche REPEAT (REPEAT,appuyezunefoispourrépéterlapiste,appuyezdeuxfoispourrépétertout)
21. Touche SOUND (EQ PRE SET, appuyez plusieurs fois pour sélectionner le type de la péréquation
favori. Cette fonction ne est active que pour le mode USB/SD/MMC)
22. Pavé numérique (pour sélectionner directement le numéro de piste à lire)
23. PLAY/PAUSE
24. Réglage du volume -
25. NEXT, sélection de la piste/Radio recherche ultérieure avance rapide
26. Réglage du volume +
27. DERNIER bouton, sélection de la piste/Radio précédente rembobinage de recherche
28. bouton MODE, la sélection d'entrée
29. touche MUTE
30. bouton Stand-by
31.boutonINT/ALL(enmodeUSB/SD,appuyezunefois,ilserafonctionIntro,signieaperçude
chaquechierpendant10secondes,unefoisni,ilvacommenceràjoueràpartirdu1erchier.
Lorsquevousappuyezànouveau,ilvajouercomplètementlechier)
Installation des batteries :
Ôter le couvercle au dos de la télécommande, introduire 2 batteries en format « AAA » ayant soin de
respecter la polarité indiquée, et remettre le couvercle.
20
21
22
23
24
25
26
27
28
29
30
31

12
XF 500
FRANCAIS
MISE EN MODE FONCTION '
Pourchangerlemodedefonctionnement,appuyezplusieursfoisle«boutondeMODE(28)surlatélécommande.Andesélectionnerl'entréeUSBou
carte mémoire SD doit être branché sur les prises/entrées respectives (USB(3), SD/MMC (4)).
AJUSTEMENT DU VOLUME
1. Tourner le volume VOL(1) unité pour augmenter ou diminuer le volume global de la lecture ou appuyez sur (24) et (26) sur la télécommande pour
augmenter ou diminuer le volume.
2. Tournez le MIC VOL(2) pour régler le volume du signal à la MIC.
Remarques: Si le bouton de la télécommande (24) se déplace le niveau de volume à 0, la puissance de sortie audio sera inférieure.
REGLAGE TONALITE' AIGUS ET DES GRAVES
Tournez le bouton TREBLE(5) pour régler les aigus.
Tournez le bouton BASS(6) pour régler les basses.
ECHO EFFET
Tournez le bouton ECHO(7) pour augmenter ou diminuer l'effet d'écho à la MIC.
Remarque: l'écho ne agit que sur micro.
FONCTION RADIO FM
RECHERCHE AUTOMATIQUE
1. Allumez l'appareil et appuyez plusieurs fois sur le bouton MODE(13) sur l'appareil, ou sur le bouton MODE(28) sur la télécommande et sélectionner
lafonctionRADIO(apparaîtsurl'afchagedelafréquenceidicazione).
2. Appuyez et maintenez le bouton PLAY/PAUSE(23) sur la télécommande pour activer la mémorisation automatique diffuseurs auto SCAN (radio
démarre automatiquement rechercher les stations de radio stéréo et enregistre automatiquement en mémoire). Enregistre jusqu'à 50 stations de
radio. Pendant la recherche, appuyez sur PLAY/PAUSE(23) sur la télécommande pour arrêter l'enregistrement.
3. Utilisez le NEXT(25) et LAST(27) sur la télécommande pour écouter différentes stations de radio enregistrées dans la mémoire.
4. À l'aide du pavé numérique(22) sur la télécommande, vous pouvez entrer le numéro de la mémoire de rappeler rapidement la station de radio.
RECHERCHE MANUELLE
1. Appuyez longuement sur la NEXT(25) et LAST(27) sur la télécommande pour effectuer une analyse manuelle des fréquences radio; la recherche
se arrête 'quand sera «reçu une chaîne stéréo de la station de radio.
2. À l'aide du pavé numérique(22) sur la télécommande, vous pouvez entrer directement la fréquence de la radio préférée.
Remarques:
- La réception FM dépend de l'endroit où vous placez l'appareil.
- Laproximitédetéléviseurs,lampesuorescentes,oud'autresappareilspeutprovoquerdesinterférencesdanslaréceptiondeprogrammesde
radio, dans ce cas, déplacer cet appareil.
ENTRÉE USB, SD/MMC
1. Insérez une mémoire USB dans le port USB(3) ou une carte SD/MMC dans la fente (4). La lecture commence automatiquement, sinon appuyez
sur le bouton MODE(13) sur l'appareil, ou sur le bouton MODE(28) sur la télécommande jusqu'à ce que l'écran (14) ne montre pas le «USB» ou
«CARTE ».
2. Pourinterromprelalecture,appuyezsurlatouchePLAY/PAUSE(23)surlatélécommande,l'écranafche"PAUS".
3. Pour reprendre la lecture, appuyez sur le bouton PLAY/PAUSE(23) sur la télécommande.
4. Appuyez sur le bouton NEXT(25) de la télécommande pendant la lecture pour passer à la piste suivante, tandis que le bouton LAST(27) aux pistes
précédentes.
5. Appuyez et maintenez enfoncé le bouton NEXT(25) ou LAST(27) sur la télécommande tout en écoutant de rechercher rapidement un passage
musical particulier. Relâchez le bouton pour reprendre la lecture normale.
Utilisation du pavé numérique(22) sur la télécommande, vous pouvez saisir le numéro de la chanson à jouer.
Remarques:
- Le joueur peut ne pas supporter certains périphériques USB, cela est dû à l'incompatibilité de certains processeurs.
- Pour éviter les interférences nuisibles, toujours connecter des périphériques USB directement à l'appareil, ne pas utiliser de rallonges.
- De l'ordinateur pour formater la mémoire USB/SD/MMC en FAT32.
- L'appareildémarrelalectureduchierbasésurlenombre/lettre,sileschierssont:01,02,ilvacommenceràjoueràpartirduchier01.
- Ilestrecommandédecopierlessouvenirsseulsleschiersmusicauxpourlireetsupprimerdeschiersetdesdossiersquinesontpaspertinentes,
le système en savoir plus rapidement et il n'y aura pas d'erreurs lors de la lecture.

13
XF 500
BLUETOOTH FONCTIONNEMENT
1. Allumez l'appareil et appuyez plusieurs fois sur le bouton MODE(13) sur l'appareil, ou sur le bouton MODE(28) sur la télécommande et sélectionner
lafonctionBluetooth,l'afchage(14)afche"BLEU".
2. Le dispositif adopte la fonction de retour automatique aux périphériques jumelés, ce est à dire, l'activation des essais d'appareils Bluetooth avant
les appareils bluetooth plus tôt, se ils ne se trouvent pas dans les 5 premières secondes, il sera automatiquement couplage de mode avec d'autres
dispositifs externes.
3. Activez la fonction Bluetooth sur l'appareil externe pour être couplé.
4. Lancez une recherche des périphériques sur le périphérique externe. Après sélectionner "XF 500" .
5. Entrez le mot de passe "0000" si nécessaire.
6. Appuyez sur la touche PLAY/PAUSE(23) sur la télécommande pour démarrer la lecture et NEXT(25) ou LAST(27) sur la télécommande pour
sélectionner les pistes.
LINE-IN
1. Allumez l'appareil et appuyez plusieurs fois sur le bouton MODE (13) sur l'appareil, ou sur le bouton MODE (28) sur la télécommande et sélectionnez
le "LINE".
2. Branchez une unité équipé d'une sortie audio via un câble jack 3,5 mm (non fourni) à la prise LINE IN (8).
3. Utilisez le périphérique externe de leurs commandes.
UTILISATION DU MICROPHONE
1. Connectez le microphone fourni dans la prise MIC(9).
2. Allumez le microphone en utilisant l'interrupteur sur la poignée du microphone sur la position ON.
3. Réglez le volume de l'entrée microphone(2) et l'effet d'écho(7) que désiré en utilisant les commandes appropriées.
CARACTÉRISTIQUES
Alimentation: DC 15V, 2A - internal lead acid rechargeable battery 12V, 2.6A
Puissance de sortie maximale: .................................................................................................... 25W
Encombrement: ................................................................................ 380x245x210mm
Poids: .....................................................................................................4 kg
NOTE D'INFORMATION SUR LE RETRAIT ET ÉLIMINATION DES BATTERIES
Attention: Seul le personnel de haute qualié doit effectuer cette opération!
RETRAIT DE LA BATERIE
L'appareil ne doit pas être branché à la prise de courant lors de l'exécution de cette opération!
1. Retirerlesvisquixentlehaut-parleurampliépanneauarrièreetretirezlepanneau;
2. Repérez la pile;
3. Retirerlesvisquixentlessupportsdelabatterie,retirerlessupports,débrancherlabatterieetretirez-le.
Les piles usagées ne doivent pas être jetés avec les déchets ménagers ou jetés dans le feu ou l'eau. Les batteries usagées doivent être recyclés ou
éliminés dans les centres de collecte de déchets séparés.
FRANCAIS

14
XF 500
DEUTSCH
GEBRAUCHSHINWEISE
Dieses Gerät ist ein elektronisches Instrument höchster Präzision. Die Inbetriebnahme des Geräts sollte daher in den folgenden Fällen vermieden werden:
• InderNähevonWärmequellenwieHeizkörpernundÖfen.
• InsehrfeuchtenRäumenwieBadezimmern,Schwimmbädernusw.
• InsehrstaubigenRäumen.
• AnOrten,diestarkenSchwingungenausgesetztsind.
- Das Gerät sollte so aufgestellt werden, dass an den Seiten jeweils genügend Raum verbleibt, um eine freie Luftzirkulation zu ermöglichen (min-
destens 5 cm).
- Die Ventilationsöffnungen dürfen nicht abgedeckt werden.
- Sollten Flüssigkeiten ins Innere des Geräts eindringen, den Stecker von der Steckdose unmittelbar abziehen und sich an die nächstgelegene
autorisierte TREVI-Kundendienststelle wenden.
- Vor dem Einschalten des Geräts ist sicherzustellen, dass Netzkabel und Anschlusskabel korrekt installiert sind.
PFLEGE UND WARTUNG
Für die Reinigung wird die Verwendung eines leicht angefeuchteten, weichen Tuchs empfohlen. Der Einsatz von Lösungsmitteln oder scheuernden
Substanzen sollte vermieden werden.
WICHTIG
DiesesGerätistfürdenHeimgebrauch(nichtprofessionellenGebrauch).DerfachgemäßeBaudiesesGerätsgewährleistetlangfristigeineneinwandfreien
Betrieb. Sollten dennoch Betriebsstörungen auftreten, wenden Sie sich bitte an nächstgelegene autorisierte TREVI-Kundendienststelle.
Die Firma TREVI verfolgt eine Politik ständiger Forschung und Weiterentwicklung. Die Produkte können daher andere als die beschriebenen Eigen-
schaften aufweisen.
BESCHREIBUNG DER ANSCHLÜSSE/BEDIENELEMENTE
Kontrollen und Steckdosen am Gerät
1. Einstellen der Lautstärke
2. Lautstärkeregler Mikrofon
3. USB-Eingang
4. Slot Kartenleser SD/MMC
5. Einstellen TREBLE (Höhen)
6. Einstellung BASS (Bass)
7. Stellen Sie ECHO Mikrofon
8. Geben Sie LINE IN
9. Geben MIC
10. LED-Statusanzeige (rot: Power / Akku geladen wird)
11. Netzbuchse (15V / 2A)
12. EIN/AUS Schalter, Ein/Aus-
13. MODE-Taste, Eingangswahl
14 Digitalanzeige
15. PLAY/PAUSE/TRACK REPEAT/REPEAT ALL
16.NEXT-Taste,Titelwahl/RadioanschließendeSucheSchnellvorlauf
17. Fernbedienungsempfänger
18.Taste PREV, Titelwahl/RadiobisherigenForschungzurückspulen
19. Mikrofon
19
1
2
3
4
7
6
5
8
9
10
11
12

15
XF 500DEUTSCH
FERNBEDIENUNG
Funktionen und Zubehör
Zusätzlich zu den normalen Funktionen kann das Gerät auch an den Audioausgang angeschlossen werden, um folgende Geräte: Mobile, PC, DVD, TV,
MP3, digitale Tastaturen, um den Klang (mit dem LINE IN) zu verstärken.
In dem Paket sind:
• Einheit
• Fernbedienung
• MikrofonmitKabel
• AC/DC
• Bedienungsanleitung
LEISTUNG
DiesesGerätarbeitetmitwiederauadbarenBlei-Säure-12V2.6Aund15VDCversorgt2ANetzteil.
Wenn die Batterie und "Heraus oder schrittweise das Gerät schaltet sich nicht ein setzen Sie den Adapter-Stecker in die Buchse des Gerätes(11) und
denSteckerineineSteckdosezumAuadengeliefert.
Die Maschine nicht zum Netzteil mit Spannung und Strom andere als die angegebenen zu verbinden.
Wenn der interne Akku geladen ist, wird der Digitalanzeige 14) vorhanden sein Symbol
Wenn die interne Batterie fast leer ist, wird der Digitalanzeige(14) blinkt das Symbol , ersten Mal eingeschaltet, dann blinken.
HINWEISE BATTERIELADE
Setzen Sie den ein/aus-Schalter (12) auf OFF, eine Schnellladung zu machen. Das LED-Statusanzeige (10) wird rot dargestellt.
Nach Laden schaltet die Led (10) blau.
GRUNDFUNKTIONEN
EIN AUS
Drücken Sie den Netzschalter(12) zum Ein-/Ausschalten des Geräts.
Im Falle einer Fehlfunktion des Gerätes, um die Stromversorgung zu trennen und einige Minuten warten, bevor Sie wieder.
Fernfunktionen
20. Taste REPEAT (REPEAT einmal drücken, um den Titel, drücken Sie zweimal wiederholen, alle
wiederholen)
21. SOUND-Taste (EQ vor einzustellen, drücken Sie mehrmals, um die Art der Ausgleichs Favorit
auswählen. Diese Funktion ist nur für den Modus USB/SD/MMC aktiv)
22. Zehnertastatur (direkt die Titelnummer auszuwählen, die abgespielt werden)
23. PLAY/PAUSE
24. Einstellen der Lautstärke -
25. NEXT-Taste, Titelwahl/Radio anschließende Suche Schnellvorlauf
26. Einstellen der Lautstärke +
27. Taste LAST, Titelwahl/Radio bisherigen Forschung zurückspulen
28. MODE-Taste, Eingangswahl
29. MUTE-Taste
30. Stand-by Taste
31. INT/ALL Taste (in USB/SD modus die Taste einmal, wird es Intro-Funktion sein, bedeutet Überblick
jede Datei für 10 Sekunden, nachdem Ende, wird es beginnen, um aus der 1. Datei wiederzugeben.
Wenn Sie erneut drücken, wird die Datei vollständig zu spielen)
Einsetzen der Batterien:
DenDeckel im hinterenBereich der Fernbedienungentfernen,die beiden AAA-Batterienunter Beachtung
der richtigen Polarität einlegen und den Deckel wieder schließen.
20
21
22
23
24
25
26
27
28
29
30
31

16
XF 500
DEUTSCH
MODUS EINSTELLUNG FUNKTION
Um den Betriebsmodus zu ändern, drücken mehr 'mal die MODE-Taste(28) auf der Fernbedienung. Um den Eingang USB oder SD-Speicher wählen
müssen den jeweiligen Steckdosen/Eingänge angeschlossen werden (USB (3), SD/MMC(4)
LAUTSTÄRKE
1. Drehen Sie die Lautstärke VOL(1) Einheit zu erhöhen oder verringern die Gesamtlautstärke der Wiedergabe, oder drücken Sie (24) und (26) auf
der Fernbedienung zu verringern oder erhöhen Sie die Lautstärke.
2. Drehen Sie den MIC VOL(2), um die Lautstärke des Signals an der MIC einstellen.
ACHTUNG: Wenn die Taste der Fernbedienung (24) bewegt sich die Lautstärke auf 0, wird die Audio-Ausgangsleistung geringer sein.
EINSTELLUNG TONE HöHEN UND BäSSE
Drehen Sie den Knopf TREBLE(5), um die Höhen einzustellen.
Drehen Sie den Regler BASS(6), um die Bässe einzustellen.
ECHO EFFECT
Drehen Sie den Knopf ECHO(7) zu erhöhen oder verringern die Echo-Effekt an der MIC.
ACHTUNG: das Echo wirkt nur auf Mikrofon.
FUNKTION RADIO FM
AUTOMATISCHE SUCHE
1. Schalten Sie das Gerät ein und drücken Sie mehrmals die MODE-Taste(13) auf dem Gerät oder der MODE-Taste(28) auf der Fernbedienung, und
wählen Sie die Funktion RADIO (wird auf dem Display idicazione Frequenz angezeigt).
2. Halten Sie die Taste PLAY/PAUSE(23) auf der Fernbedienung, um die automatische Speicherung von AUTOSCAN Sender aktivieren (Radio startet
automatisch die Suche nach Radiosender stereo und speichert automatisch im Senderspeicher). Spart bis zu 50 Radiosender. Während des
Suchlaufs, drücken Sie PLAY/PAUSE(23) auf der Fernbedienung, um die Aufnahme zu stoppen.
3. Verwenden Sie die WEITER(25) und LAST(27) auf der Fernbedienung zum Abspielen von verschiedenen Radiostationen im Speicher abgelegt.
4. Verwenden Sie das numerischeTastenfeld(22)auf der Fernbedienungdrücken,können Sie die Nummer des Speicher eingeben, um den Radiosender
schnell wieder aufrufen.
MANUELLE SUCHE
1. Drücken Sie lange die NEXT(25) und LAST(27) auf der Fernbedienung, um einen manuellen Scan von Funkfrequenzen durchzuführen; Die Suche
wird angehalten ", wenn wird" erhielt eine Radiostation Stereo.
2. Verwenden Sie das numerische Tastenfeld(22) auf der Fernbedienung können Sie direkt die Frequenz des Radio Favorit.
ACHTUNG:
- Der UKW-Empfang ist abhängig von der Stelle, wo das Gerät montiert wird.
- DieNähevonFernsehgeräten,LeuchtstofampenoderanderenGerätenkanneszuStörungenbeiderAufnahmevonRadioprogrammenverur-
sachen, in diesem Fall, müssen Sie das Gerät.
INPUT USB, SD/MMC
1. Setzen Sie eine USB-Speicher in den USB-Anschluss(3) oder eine SD/MMC in den Schlitz(4). Die Wiedergabe startet automatisch, wenn nicht
die MODE-Taste(13) auf dem Gerät oder der MODE-Taste(28) auf der Fernbedienung mehrmals drücken, bis die Anzeige(14) nicht die "USB" oder
"CARD zeigen ".
2. Um die Wiedergabe anzuhalten, drücken Sie die PLAY/PAUSE(23) auf der Fernbedienung drücken, erscheint auf dem Display "PAUS".
3. Um die Wiedergabe fortzusetzen, drücken Sie die Taste PLAY/PAUSE(23) auf der Fernbedienung.
4. Drücken Sie die Taste NEXT(25) auf der Fernbedienung während der Wiedergabe, um zum nächsten Titel zu springen, während die letzte Taste
(27), um den vorherigen Titel.
5. Halten Sie die Taste NEXT(25) oder LAST(27) auf der Fernbedienung, während Sie schnell nach einem bestimmten Musikpassage. Lassen Sie
die Taste, um die normale Wiedergabe fortzusetzen.
Mit dem Zahlenblock(22) auf der Fernbedienung, können Sie geben die Nummer des Songs zu spielen.
ACHTUNG:
- Der Spieler kann keine Unterstützung für USB-Geräte, ist dies aufgrund der Inkompatibilität einiger Prozessoren.
- Zur Vermeidung funktechnischer Störungen, immer USB-Geräte direkt an das Gerät, verwenden Sie keine Verlängerungskabel.
- Vom Computer auf den USB-Speicher SD/MMC in FAT32 zu formatieren.
- DasGerätstartetdieWiedergabederDateiaufBasisderAnzahl/Buchstabenbeginnen,wennsichdieDateien:01,02,wirdesanfangenzuspielen
aus der Datei 01.
- Es wird empfohlen, die Erinnerungen nur Musikdateien kopieren, um Dateien und Ordner, die nicht relevant sind, wiedergeben und löschen, wird
das System weiter lesen schnell und es keine Fehler beim Lesen sein.

17
XF 500
BLUETOOTH-BETRIEB
1. Schalten Sie das Gerät ein und drücken Sie mehrmals die MODE-Taste(13) auf dem Gerät oder der MODE-Taste(28) auf der Fernbedienung, und
wählen Sie die Bluetooth-Funktion auf dem Display(14) wird "BLUE" zu zeigen.
2. Das Gerät übernimmt die Funktion automatische Rückkehr in den gekoppelten Geräten, dh die Aktivierung der Bluetooth-Gerät versucht, bevor die
gekoppelten Bluetooth Geräte früher, wenn sie nicht innerhalb der ersten 5 Sekunden gefunden, wird es automatisch Modenkopplung mit anderen
externen Geräten.
3. Aktivieren Sie die Bluetooth-Funktion auf dem externen Gerät gekoppelt werden.
4. Initiieren Sie eine Suche nach Geräten auf dem externen Gerät. Nach wählen Sie die "XF 500".
5. Das Passwort "0000" eingeben, falls erforderlich.
6. Drücken Sie die PLAY/PAUSE(23) auf der Fernbedienung, um die Wiedergabe und NEXT(25) oder LAST(27) auf der Fernbedienung, um Titel
auszuwählen starten.
LINE-IN
1. Schalten Sie das Gerät ein und drücken Sie mehrmals die MODE-Taste(13) auf dem Gerät oder der MODE-Taste(28) auf der Fernbedienung, und
wählen Sie die "LINE".
2. Schließen Sie Geräte mit Audio-Ausgang ausgestattet, über eine eigene 3,5mm Klinkenkabel (nicht mitgeliefert) an die LINE IN(8).
3. Stellen Sie das externe Gerät aus ihre Befehle.
MIT DEM MIKROFON
1. Schließen Sie das mitgelieferte Mikrofon an die MIC-Buchse(9).
2. Schalten Sie das Mikrofon mit dem Schalter am Griff des Mikrofons in die Stellung ein.
3. Stellen Sie die Eingangslautstärke(2) des Mikrofons und den Echoeffekt(7) wie gewünscht mit den entsprechenden Befehlen.
TECHNISCHE DATEN
Stromversorgung: DC 15V, 2A - internen Blei-Säure-Akku 12V 2.6A
Verbrauch: .............................................................................................25W Max
Geräteabmessungen: ......................................................... Abmessungen: 380x245x210mm
Gewicht: .....................................................................................................4 kg
Informationen Hinweis auf die Entfernung und Entsorgung von Batterien
Achtung: Nur qualitativ qualiziertes Personal darf diese Operation durchzuführen!
BATTERIE AUSBAUEN
Das Gerät darf nicht an die Netzsteckdose angeschlossen werden um diesen Vorgang auszuführen!
1. Entfernen Sie die Schrauben, die die Rückwand-Lautsprecher verstärkt zu sichern und entfernen Sie die Abdeckung;
2. Suchen Sie die Batterie;
3. Entfernen Sie die Schrauben, mit denen die Träger der Batterie zu sichern, entfernen Sie die Stützen, die Batterie abklemmen und ausbauen.
Verbrauchte Batterien gehören nicht in den Hausmüll entsorgt werden oder in Feuer oder Wasser geworfen. Gebrauchte Batterien müssen recycelt
oder in separaten Sammelstellen entsorgt werden.
DEUTSCH

18
XF 500
ESPANOL
NOTAS PARA EL USO
Este aparato es un instrumento electrónico de alta precisión; por lo tanto debe evitar utilizarlo en los siguientes casos:
• Cercadefuertesfuentesdecalorcomocaloríferosyestufas.
• Enlugaresmuyhúmedoscomocuartosdebaño,piscinas,etc.
• Enlugaresmuypolvorientos.
• Enlugaressujetosafuertesvibraciones.
■Posicione el aparato de manera que el espacio circundante sea amplio para la libre circulación del aire (por
lo menos 5 cm).
■No obstruya las ranuras de ventilación.
■ Sipenetranlíquidosdentrodelaparato,desconecteinmediatamenteelenchufedelatomadecorrientey
lleve el aparato al centro de asistencia autorizado TREVI más cercano.
■Siempre compruebe que los cables de alimentación y de conexión estén instalados correctamente antes de encender el aparato.
CUIDADO Y MANTENIMIENTO
Para efectuar la limpieza se aconseja utilizar un paño suave, ligeramente humedecido. Evite solventes o
sustancias abrasivas.
IMPORTANTE
Estedispositivoestádiseñadoparausodoméstico(usonoprofesional).Labuenaconstruccióndelaparato
garantizasu perfecto funcionamiento durante mucho tiempo. Sise presentase algúninconveniente, será
oportuno consultar al Centro de Asistencia autorizado TREVI más cercano.
TREVIcultivaunapolíticadeinvestigaciónydesarrollocontinuos.Porconsiguiente,losproductospuedenpresentarcaracterísticasdistintasalasdescritas.
DESCRIPCIÓN DE LOS CONECTORES/MANDOS
Controles y conectores
1. Ajuste Volumen
2. Control de volumen del micrófono
3. Entrada USB
4. Ranura de lector de tarjetas SD/MMC
5. TREBLE Ajuste (agudos)
6. Ajuste de graves (bass)
7. Ajuste el micrófono ECHO
8. Entrada LINE IN
9. Entrada MIC
10.LEDindicadordeestado(rojo:Potenciadecarga/batería)
11. Toma de corriente (15V/2A)
12. el interruptor ON/OFF, encendido/apagado
13. Botón MODE, selección de entrada
14. pantalla digital
15. PLAY/PAUSA/TRACK REPEAT/REPEAT ALL
16. NEXT, la selección de pista/Radio posterior búsqueda de
avance rápido
17. Receptor del control remoto
18. Botón PREV, selección de pista/Radio anterior rebobinado
investigación
19. Micrófono
19
1
2
3
4
7
6
5
8
9
10
11
12

19
XF 500
ELLEHNIKA
ESPANOL
DESCRIPCIÓN DEL MANDO A DISTANCIA
CARACTERÍSTICAS Y ACCESORIOS
Además de sus funciones normales, el dispositivo también se puede conectar a la salida de audio de los siguientes dispositivos: móviles, PC,
DVD,TV,MP3,tecladosdigitalesqueamplicanelsonido(mediantelatomaLINEIN).
En el paquete son:
• Unidad
• Controlremoto
• Micrófonoconcable
• AC/DC
• Manualdeinstrucciones
ALIMENTACION
Esta unidad trabaja con plomo recargable 12V 2.6A y adaptador de corriente 2A 15V DC suministrado.
Cuandolabateríay'estáeliminandooeldispositivonoseenciendeinsertarelenchufeadaptadorsuministradoenelenchufedeldispositivo(11)y
el enchufe en una toma de corriente para recargar.
No conecte la máquina a la fuente de alimentación con voltaje y corriente distinta a la indicada.
Cuandolabateríainternaestácargada,elindicadordigital(14)estarápresenteicono
Cuandolabateríainternaesbaja,elindicadordigital(14)estarápresenteicono , encienda, luego parpadea.
INSTRUCCIONES DE CARGA DE LA BATERÍA
Poner el interruptor de ON/OFF (12) a OFF para hacer una carga rápida. El indicador Led (10) dará vuelta a roja.
Después de cargar el indicador Led (10) se vuelve azul.
FUNCIONES BÁSICAS
POWER ON/OFF
Pulse el interruptor principal ON/OFF(12) para encender/apagar el dispositivo.
En caso de mal funcionamiento del dispositivo para desconectar la fuente de alimentación y espere unos minutos antes de volver a conectar.
Descripción Controles
20. Botón Repeat (repetición, pulse una vez para repetir la pista, pulse dos veces para repetir todo)
21. Tecla SOUND (PRE EQ establecer, pulse repetidamente para seleccionar el tipo de ecualización
favorita. Esta función sólo está activada para el modo USB / SD / MMC)
22.Tecladonumérico(paraseleccionardirectamenteelnúmerodepistaquedeseareproducir)
23. PLAY / PAUSA
24. Ajuste del volumen -
25.NEXT,laseleccióndepista/Radioposteriorbúsquedadeavancerápido
26. Ajuste del volumen +
27. Botón LAST, selección de pista / Radio anterior rebobinado investigación
28. Botón MODE, selección de entrada
29. Botón MUTE
30. Botón Stand-by
31.BotónINT/ALL(enelmodoUSB/SD,pulseunavez,serálafunciónIntro,signicapanoramacada
archivo durante 10 segundos, una vez acabado, comenzará a jugar desde el primero de archivos.
Al pulsar de nuevo, se reproducirá el archivo completo)
Instalación de las pilas:
Retire la tapa de la parte posterior del control remoto, inserte 2 x "AAA", ase-
gurándose de que la polaridad y cerrar la tapa.
20
21
22
23
24
25
26
27
28
29
30
31

20
XF 500
ESPANOL
SELECION DE LAS FUNCIÓN
Paracambiarelmododeoperación,pulsevariasveceselbotónMODE(28)enelcontrolremoto.ConelndeseleccionarlaentradaUSBomemoria
SD debe estar conectado a las tomas respectivas/ insumos (USB (3), SD/ MMC(4)
AJUSTE DEL VOLUMEN
1 Gire el volumen VOL (1) unidad para aumentar o disminuir el volumen global de la reproducción o la prensa (24) y (26) en el control remoto para
aumentar o disminuir el volumen.
2. GireelMICVOL(2)paraajustarelvolumendelaseñalenelMIC.
NOTAS: Si el botón de control remoto (24) se mueve el nivel de volumen a 0, la potencia de salida de audio será menor.
AJUSTE DE TONO AGUDOS Y BASS
Gire el mando TREBLE(5) para ajustar los agudos.
Gire el mando BASS(6) para ajustar los graves.
FUNCTION DE RADIO FM
BÚSQUEDA AUTOMÁTICA
1. Encienda la unidad y pulse repetidamente el botón MODE(13) en la unidad o el botón MODE(28) en el control remoto y seleccione la función de
radio (aparecerá en la frecuencia idicazione pantalla).
2. Mantenga pulsado el botón PLAY/PAUSE(23) en el control remoto para activar el almacenamiento de emisoras automática AutoScan (radio se
iniciaautomáticamentelabúsquedadeemisorasderadioestéreoyguardaautomáticamenteenlamemoria).Ahorrahastaun50emisorasde
radio.Durantelabúsqueda,pulsePLAY/PAUSE(23)enelmandoadistanciaparadetenerlagrabación.
3. UtiliceelNEXT(25)ylaúltima(27)enelcontrolremotoparaescuchardiversasemisorasguardadasenlamemoria.
4. Utilizandoeltecladonumérico(22)enelcontrolremoto,puedeintroducirelnúmerodelamemoriapararecordarrápidamentelaestaciónde
radio.
MANUAL DE BÚSQUEDA
1. MantengapulsadoelNEXT(25)ylaLAST(27)enelmandoadistanciapararealizarunanálisismanualdelasradiofrecuencias;labúsquedase
detendrá"cuandose"recibióunequipodemúsicaestaciónderadio.
2. Utilizando el teclado numérico (22) en el control remoto se puede introducir directamente la frecuencia de la radio favorita.
NOTAS:
- La recepción de FM depende del lugar donde se coloca la unidad.
- La proximidad de televisores, lámparas uorescentes u otros aparatos puede causar interferencias en la recepción de programas de radio,
en este caso, mueva esta unidad.
ENTRADA USB, SD/MMC
1. Inserte una memoria USB en el puerto USB(3) o una tarjeta SD/MMC en la ranura (4). La reproducción se iniciará automáticamente, si no se
pulse el botón MODE(13) en la unidad o el botón MODE (28) en el control remoto varias veces hasta que la pantalla(14) no muestra el "USB" o
"CARD ".
2. Para hacer una pausa en la reproducción, pulse PLAY/PAUSE(23) en el control remoto, la pantalla mostrará "PAUS".
3. Para reanudar la reproducción, pulse el botón PLAY/PAUSE(23) en el control remoto.
4. Pulse el botón NEXT(25) en el mando a distancia durante la reproducción para ir a la siguiente pista, mientras que el botón LAST(27) a las pistas
anteriores.
5. Mantenga pulsado el botón NEXT(25) o LAST(27) en el control remoto mientras se escucha buscar rápidamente un pasaje musical en particular.
Suelte el botón para reanudar la reproducción normal.
Medianteeltecladonumérico(22)enelcontrolremoto,puedeintroducirelnúmerodelacanciónquedeseareproducir.
NOTAS
- El jugador puede no ser compatible con algunos dispositivos USB, esto se debe a la incompatibilidad de algunos procesadores.
- Para evitar interferencias perjudiciales, siempre conecte los dispositivos USB directamente a la unidad, no utilice cables de extensión.
- Desde el ordenador para formatear la memoria USB/SD/MMC en FAT32.
- Launidadcomenzarálareproduccióndelarchivobasadoenelnúmero/letra,silosarchivosson:01,02,seiniciarálareproduccióndesdeel
archivo 01.
- Serecomiendacopiarlosrecuerdossóloarchivosdemúsicaparareproduciryborrararchivosycarpetasquenosonrelevantes,elsistemalee
más de forma rápida y no habrá errores durante la lectura.
Table of contents
Languages:
Other Trevi Speakers manuals

Trevi
Trevi XF 4000 DJ User manual

Trevi
Trevi XR 9A5 User manual

Trevi
Trevi XT 10A8 BT User manual

Trevi
Trevi XF 750 KB User manual

Trevi
Trevi AVX 570 S2 User manual

Trevi
Trevi XR 74 BT User manual

Trevi
Trevi XR 8A12 User manual

Trevi
Trevi XB 65 USB User manual

Trevi
Trevi AVX 530 BT User manual

Trevi
Trevi XR JUMP User manual

Trevi
Trevi SH 8420 BT User manual

Trevi
Trevi XR 73 BT User manual

Trevi
Trevi XR 190 BT User manual

Trevi
Trevi XR 8A18 User manual

Trevi
Trevi XR 85 BT User manual

Trevi
Trevi XR 82 BT User manual

Trevi
Trevi XR 8A15 User manual

Trevi
Trevi AVX 575 BT User manual

Trevi
Trevi SB 8320TV User manual

Trevi
Trevi AVX 590 BT User manual