TRIUMPH BOARD VC4 Parts list manual

TRIUMPH BOARD
Video Conferencing System VC4
Quick Installation Card
Package Contents
1. Main System
2. Camera
3. Microphone
4. Remote Control
5. Power Adapter
6. Power Cords (US, EU, UK)
7. VGA Cable
8. DVI to HDMI Converter
9. Mini Din 8 pin MIC Cable
10. 2x HDMI Cable
11. Camera Cable
12. RJ-45 Cable
13. Warranty Card
14. Quick Installation Card
15. Panel Label
16. AAA Batteries
Layer 1 Layer 2 Layer 3
Accessory Pack Camera, Microphone, Remote, Main System
Adapter, Cables and Batteries
4. 5. 6. 7. 8.
9. 10. 11. 12
13. 14. 15. 16.
1.
2.
3.
2
43
5
6 7 8 9 10 11 12 16
1
13 14 15
Rev.: By: yyyy/mm/dd Apprv’d
Part#:
01 IvyZ 圖面繪製 2015/03/17 Calvin
Description:Artwork, V2C1E
尺寸:310mm*45mm
材質:銅版紙上霧P
備註:單色印刷 K:55
AVerInformation Inc.
No.157, Da-An Rd., Tucheng Dist., New Taipei City 23673, Taiwan
310mm
45mm
InternetCameraMicPC/ LaptopPC/ LaptopAudioInSpeakerDisplay1Display2 (HDMI)Display2 (VGA)Power

Connection Diagram
Rev.: By: yyyy/mm/dd Apprv’d
Part #:
01 Ivy Z 圖面繪製 2015/04/17 Calvin
Description: Artwork, V2C1E
AVer Information Inc.
No. 157, Da-An Rd., Tucheng Dist., New Taipei City 23673, Taiwan
PANTONE Cool Gray 8C
PANTONE 白CAMRA / MIC / DVI / VGA / AUDIO / HDMI-1 / HDMI-2

Setup Wizard
Put back panel label on main system
Rev.: By: yyyy/mm/dd Apprv’d
Part #:
01
Ivy Z 圖面繪製 2015/03/17 Calvin
Description:
Artwork, V2C1E
尺寸:310mm*45mm
材質:銅版紙上霧P
備註:單色印刷 K:55
AVer Information Inc.
No. 157, Da-An Rd., Tucheng Dist., New Taipei City 23673, Taiwan
310mm
45mm
InternetCameraMicPC / LaptopPC / LaptopAudio InSpeakerDisplay 1Display 2 (HDMI)Display 2 (VGA)Power
For the first time using TRIUMPH BOARD Video Conferencing System VC4, the Installation Wizard will
guide you to setup your VC4 system step by step. After completing the wizard setup, user may start to use
your VC4 system.
1. Connect your VC4 system well and turn on the power. After
your VC4 system starting, user will see the Installation Wizard
screen shown up.
2. Language: Select the language of your VC4 system. Press
to expand the drop-down list. Then, use or button to
move the selection and press to make the selection.
3. After selecting, press to move to “Next” option and press
to go to the next step.
4. Follow the instructions and complete your settings.
5. Click “Finish” to complete the Installation Wizard setup and go
to home menu.
6. Please press on the remote to start making a call.

Network Quick Setup Guide
Default IP address: 192.168.0.1.
Please change your VC4’s IP address at the start.
There are three possible setup scenarios for most video conferencing users, if yours is:
1. Public IP Configuration (Outside of Firewall).
2. Private IP Configuration (Behind Firewall with Port Forwarding). Please refer to the following table “VC4 H.323 Related Port Usage
for Firewall Setup” for your firewall Port forwarding setup.
3. H.460 Gatekeeper with Firewall Traversal. Please refer to the following table “VC4 H.323 Related Port Usage for Firewall Setup “for
your firewall Port forwarding setup.
VC4 H.323 Related Port Usage for Firewall Setup
(Please set the following ports in port forwarding in your firewall before start installing your VC4)
InternetVC4
1. Using the remote press “Home”-> -> “Setting”.
Scenario 1 – Public IP Configuration (Outside of Firewall)
Your Video Conferencing System VC4 is connecting directly to the internet.
1
Port Function Type
1719 Gatekeeper UDP
1720 H.323 Call setup TCP
30000 ~ 30299 Control and media for audio, video, content, and data/FECC TCP and UDP
80 HTTP Interface (WebTool) TCP
23 Telnet TCP
5060 SIP TCP and UDP

InternetVC4 Firewall
2. Press -> “Network”.
3. Press “LAN Configuration”.
4. And In the drop-down list “IP Address Type”, choose “Static IP” or “PPPoE”.
- Static IP: Input the “IP address”, “Subnet Mask” and “Default Gateway”.
- PPPoE: Input the PPPoE login “User name” and “Password”.
5. Select “Apply” and press (Enter).
6. Press “Home” on the remote to return to the home menu.
7. Press the (Call) button on the remote and you are
ready to make your first call.
Scenario 2 –Private IP Configuration
(Behind Firewall with Port Forwarding)
Your Video Conferencing System VC4 is connecting to the internet through a firewall.
1. Using the remote press “Home”-> -> “Setting”.
2. Press -> -> “Network”.
2
4
4
3
3
1
2
5
5
Static IP setting
PPPoE setting

1. Using the remote press “Home”-> -> “Setting”.
2. Press -> “Network”.
Scenario 3 – H.460 Gatekeeper with Firewall Traversal
Your Video Conferencing System VC4 is connecting to the internet through a firewall and you have a Gatekeeper
outside the firewall.
InternetVC4 Firewall
Gatekeeper
1
2
3. Press “LAN Configuration”.
4. And In the drop-down list “IP Address Type”, choose “Static IP” or “DHCP”.
- Static IP: Input the “IP address”, “Subnet Mask” and “Default Gateway”.
- DHCP: Configure the system to automatically obtain an IP address
from the DHCP server.
5. Manually input the “IP address”, “Subnet Mask” and “Default Gateway”.
6. Select “Apply” and press (Enter).
7. Press (Back) on the remote to return to previous menu. (If you have
H.323 ALG enabled, skip to step 10).
8. In the same page, go to “Firewall” and press (Enter).
9. Select “ON” in the NAT check box and enter the IP address in the “NAT
Public (WAN) address” field.
10. Press the “Home” button on the remote to return the home menu.
11. Press the Call button on the remote and you are ready to make
your first call.
9
4
5
6
3
8

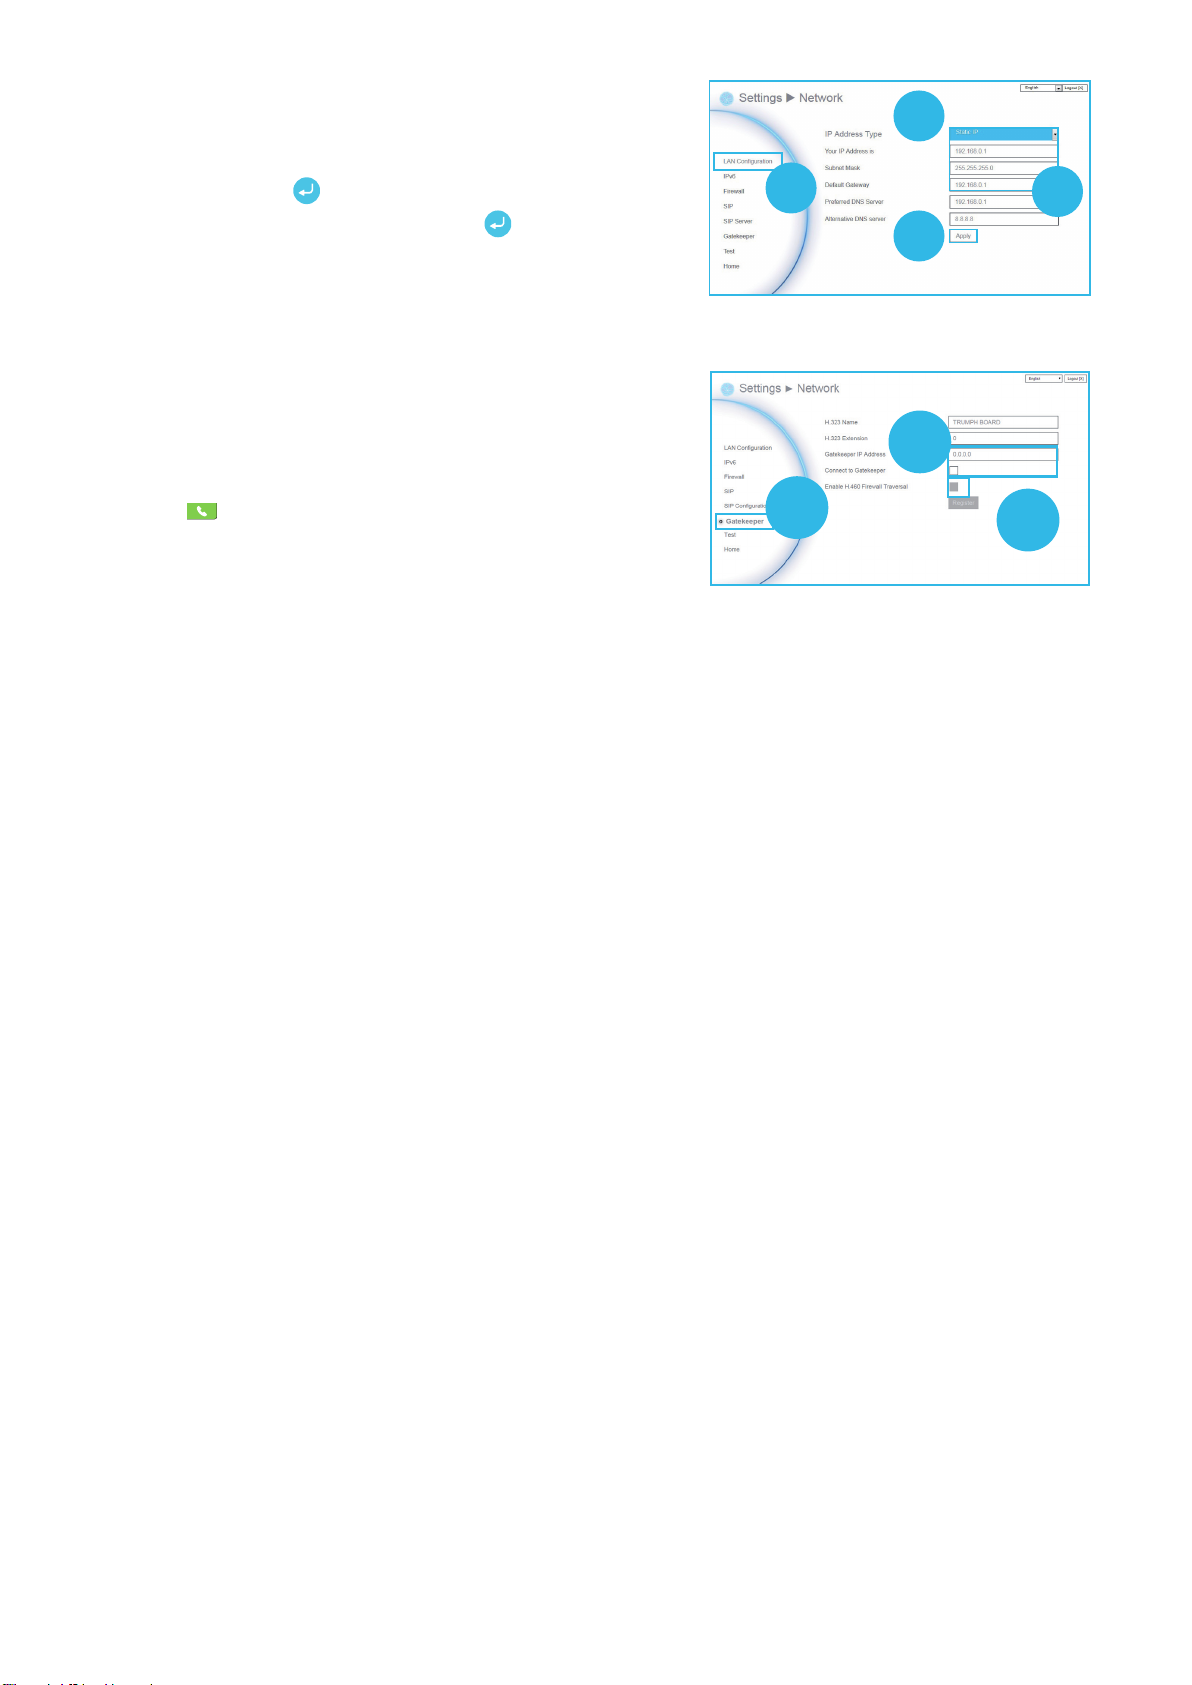
3. Press “LAN Configuration (IPv4)”.
4. And In the drop-down list “IP Address Type”, choose “Static IP”.
5. Manually input the “IP address”, “Subnet Mask” and “Default Gateway”.
6. Select “Apply” and press (Enter).
7. In the same page, go to “Gatekeeper” and press (Enter).
8. Enter the IP address of your Gatekeeper in the “Gatekeeper IP Address”
field and enable the “Connect to Gatekeeper” check box.
9. Enable the “Enable H.460 firewall Traversal” option.
10. Press the “Home” button on the remote to return the home menu.
11. Press the (Call) button on the remote and you are ready to make
your first call.
Troubleshooting
1. Make sure you have changed your default IP address. The default IP address is 192.168.0.1, in order not to conflict with
other devices in the same LAN, please change your IP address at the start.
2. Video conference call is established but no video or voice.
- If you are connecting to the TRIUMPH BOARD Video Conferencing System VC4 with a firewall, make sure that you have
set up the port forwarding correctly. If there is no H.323 ALG firewall, please configure the NAT and the WAN IP address for
the TRIUMPH BOARD Video Conferencing System VC4.
- We suggest having a fixed public IP address for the TRIUMPH BOARD Video Conferencing System VC4. With a dynamic
public IP address, it will change after a certain period which depends on your local ISP.
- There is a routing issue if you installed two TRIUMPH BOARD Video Conferencing System VC4 sharing one public IP
address.
3. Unable to connect to other Video Conferencing systems.
- Check to see if you are dialing the correct IP address.
- Ensure the power status of the device from the other site is on.
- Verify if the firewall blocks the inbound trac from the other site.
- Verify if the other site rejected your Video Conferencing call.
4. Unable to see the OSD.
- Check to see if your cable is connected correctly.
- Make sure your system and display are securely-connected and then reboot your system. (Your display should be
switched on before you reboot your system).
4
5
6
3
8
9
7

5. Cannot open WebTool by IE 9 and IE 10.
- Click (Tools) in IE.
- Select “F12 developer tools”.
- Change Document Mode to Internet Explorer 9 standards.
- Disable intranet sites in Compatibility View. Go to “Tools”
-> “Compatibility view settings”.
- Unclick the checkbox “Display intranet sites in
Compatibility View” and then click “Close”.
For more information, please visit and download the TRIUMPH BOARD Video Conferencing System VC4 user manual at our website www.triumphboard.com
Other manuals for VC4
1
Table of contents
Other TRIUMPH BOARD Conference System manuals