Tumaker Voladora NX + User manual

Warranty
Declaration of conformity
First steps
Included software
Voladora NX +

TABLE OF CONTENTS
Printer Specications.....................................................................................p.3
Main parts of the printer...............................................................................p.4
Elements included in the printer..................................................................p.5
Installation and set up...................................................................................p.6
Printer Calibration.........................................................................................p.7
Loading and change of lament...................................................................p.8
Nozzle change................................................................................................p.9
Simplify Printing Software.............................................................................p.9
Filament sensor...........................................................................................p.10
Door sensor..................................................................................................p.11
Security.................................................................................................p.12
Basic recommendations ............................................................................p.12
WARRANTY.............................................................................................p.13
DECLARATION OF CONFORMITY................................................................p.16
Voladora NX +

PRINTER SPECIFICATIONS
3
Printer Volume: 225x295x200
Printer Size: 45x41x41
Package Size: 50x50x61
Package Weight: 26 kg
Printer Weight: 24 kg
Materials: PLA, PETG, PP, Flex, Nylon
Feeder Type: Double EMAXX Bowden extruder
Print Core Replacement: Fast Change DART ANS
Build speed: Depends on parameters
Energy Smart Management
Power Rating: 500W
Noise Level: 44 dB (closed door, 40dB)
Layer Resolution: 20µm
Maximum Layer Height:
0,8 nozzle: 0.64mm
0,6 nozzle: 0,48mm
0,4 nozzle: 0,3mm
0,2 nozzle: 0,16mm
Heated Bed: 45º - 150º
Build Plate Leveling / Active Leveling ? No
Operating Ambient Temperature: 10º-35ºC
(optimum 20ºC)
Nonoperating Temperature 5º-45ºC
Nozzle Diameter: 0.2 - 0.4 - 0.6 - 0.8 - 1.2
Nozzle Temperature: 45ºC - 350ºC
Nozzle Heat Up Time: 20ºC: 200ºC - 1’15” /
250ºC - 1’50” / 300ºC - 2’35”
Conectivity: USB, Ethernet / Wi
Display: No
Control Devices: PC, tablet, Smartphone.
Control Mode: Web
Connected to the Internet
Simplify3D Professional Software
Limited 1 Year Warranty

HEAD OR HOTEND
It moves in the X and Y axes by melting the lament of
material and depositing it on the platform or heated bed.
It has a nozzle that heats up to the required temperature
according to the corresponding printing material.
A
EXTRUDER
Supplies printing material to the head by extruding the
lament.
B
PLATFORM OR HEATED BED
The printing happens on the surface of the platform; this one
moves along the Z axis. Depending on the printing material,
it must be heated to a dierent temperature.
The distance between the platform and the nozzle has to be
perfectly calibrated for optimum printing.
We’ll see how to perform the calibration process later on.
C
MAIN PARTS OF THE PRINTER
MAIN ELEMENTS OF
THE PRINTER
Straight Adjuster
Nozzle
Filament input
Drive
Bowden tube
1
2
3
4
5
6
7
Part Cooling Fan
Light Indicator
4
8Front fan
Hotend
Extruder

5
ELEMENTS INCLUDED IN THE PRINTER
Make sure that the following items have been delivered with the printer, otherwise please contact us.
POWER CORD USB
CABLE
SPATULA GLASS FIXING
LACQUER
NOZZLE
CHANGING TOOL
LIGHT INDICATIONS
ON
WIRING
To start with the installation and set up, connect the
power cable to the slot on the back of the printer and
plug it into the power socket. The usb slot will not be
used if the machine is connected wirelessly. Switch on
the printer by pressing the button.
The light indicator will stay on while the printer is on.
POWERSWITCH
USB ETHERNET

6
INSTALLATION AND SET UP
Once the Internet connection has been congured,
we will place the printing bed correctly in order to
calibrate our 3D printer.
Connect the printer to the network in two steps:
- Use a computer to connect to the Wi of your printer with
the password “tumakerLS”.
- Once connected, open a browser and type 192.168.12.1
WIFI
1. If you want to connect via WiFi, choose the WiFi network
to which you want to connect.
2. Enter the network password
3. Add IP and Gateway
4. Click on Change
2. Open the Settings tab - Connectivity
3. Connect via Ethernet or WiFi always selecting the
STATIC option
ETHERNET
1. If you opt for the Ethernet option, connect a
network cable.
2. Assign the IP and gateway and click Change

7
The calibration process is essential for
optimal printer operation and quality
prints. The distance between the
nozzle and the bed has to be perfectly
measured.
In order to obtain a correct calibration
we must follow the simple process
explained below.
Using a sheet of 80g/m² A4 paper,
the calibration wizard of the Repetier
Server software and the nuts under the
bed will make the operation easy.
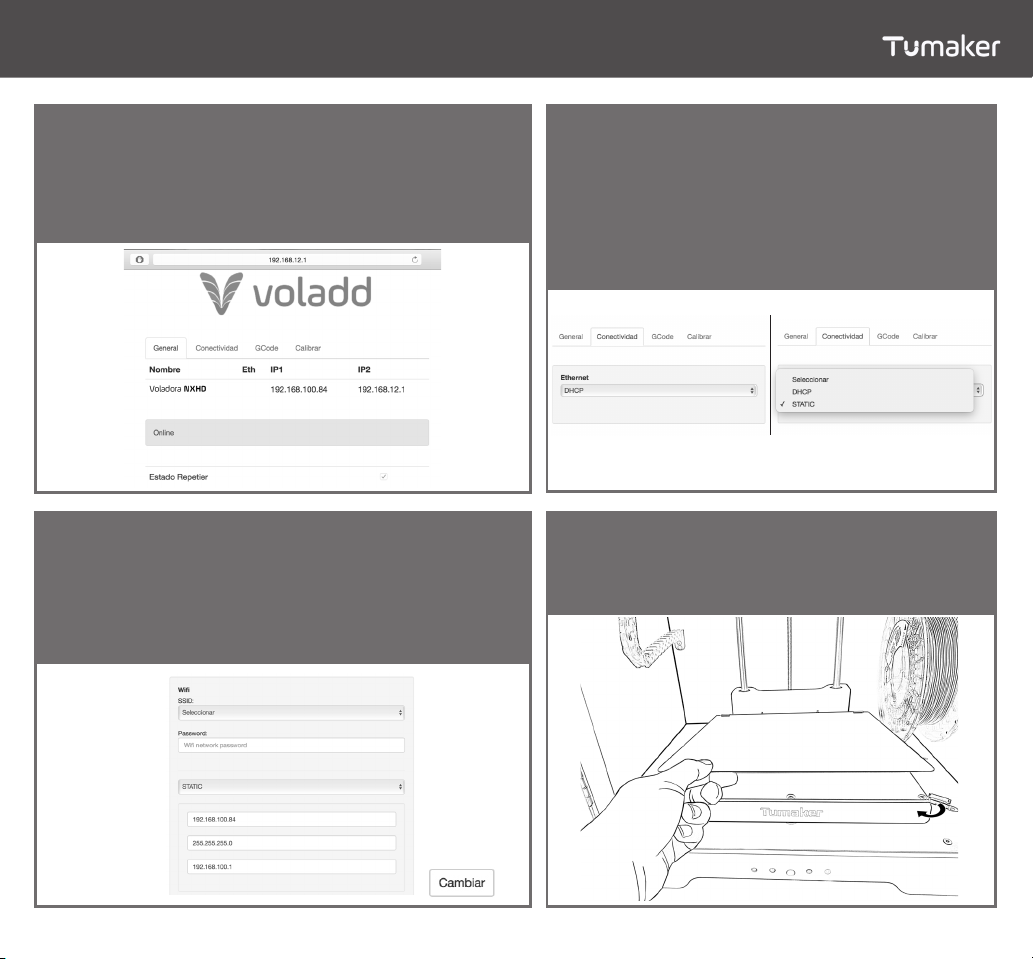
1. Enter an Internet browser and type
the IP we have previously assigned in
the machine adding “:3344” at the end.
We will enter Repetier Server
2. Click on the control tab
3. Display the “>_” menu
4. Select point by point
The rst point will be one of the
corners of the bed. When the head is
positioned, place the sheet between
the bed and the nozzle. In order for the
calibration to be correct, the foil must
be moved between the two elements
opposing a little resistance. If there
is no resistance, is that we have too
much distance between the bed and
the head, therefore we must adjust the
distance by loosening the nut under
that corner until it is optimal. On the
other hand, if the distance is too small,
we must tighten the nut to increase it.
This process will be carried out in all of
the three points. There is a fourth point
in the middle of the bed to check if the
calibration has been made correctly.
The calibration with four points will
allow us to improve the atness of the
surface of the bed, going from 0.2 mm
of the previous model to 0.1 mm.
This will allow larger parts to be printed
with a smaller layer height on the rst
layer and avoid clogging due to nozzle
occlusions in high areas.
PRINTER CALIBRATION
Voladora NX +
Voladora NX +

8
LOAD AND CHANGE OF FILAMENT SPOOL
Enter the control tab, choose the temperature in
the upper right corner depending on the material
and select the Remove Filament option.
Place the spool in the position of the image. The
lament should come from the bottom of the spool
up.
Place the spool in the bracket on one side and
approach it to the extruder as much as you can.
To load the lament, insert the lament through
the extruder inlet hole. Enter the control tab,
choose the temperature in the upper right corner
depending on the material and select the Filament
Loading option. Push the lament lightly until the
sprocket pulls it.
To load the lament or change the spool we have to follow the same steps, with the dierence that if we only have to
load the lament and there is no spool placed in the printer we will skip the rst step. This process will be done using
the Repetier Server controls.
Voladora NX +
Voladora NX +

9
NOZZLE CHANGE
If you have any questions about the use of the Voladora
do not hesitate to write us to the following email:
https://tumaker.com/en/site/support
SIMPLIFY3D PRINTING SOFTWARE
Tumaker’s 3D printing stations include the Simplify3D™
professional manufacturing suite, a software with all the
advanced and optimized characteristics to create the
most complex objects in the highest quality. It includes
a powerful simulator to make you more productive,
visualizing the result of the printing strategy you’re
working on before you start manufacturing. You will be
able to repair the imported designs in Simplify3D itself
and you will love the intelligent support option.
Spectacular functionality with which the software will
create the right support for the most complex parts.
If you have any questions about the use of the software,
please consult the following page:
www.simplify3d.com/support/
1. Enter the Control tab
2. In the drop-down menu select the option
Change Nozzle.
3. The platform will descend and give access to
the nozzle.
4. Extract the current nozzle.
5. Insert the nozzle into the tube until it stops.
6. Squeeze the trigger on the tting and nish
inserting the nozzle.
7. With the trigger squeezed, thread the tool until
two threads remain in sight.
8. Release the trigger and retighten until the tool
reaches the end of the thread.

10
FILAMENT SENSOR
The lament sensor detects if the 3D printer has enough lament to print. If it doesn’t, it will stop the printing process
and will make it possible to change it in order to continue the printing process. Please, make sure that your lament
detector is active (check the Activate Filament Detector table down below).
When there is no lament, a new tab will appear on Repetier Server. You will be able to cancel the print or to turn o
the detection and change the lament. If you decide to change the lament, please follow the steps indicated in the
Filament Changing Process table.
Once you have followed the steps, you can continue with the printing process. By turning o the sensor you will go back
to the main screen, where it is possible to keep interacting with the printer. By selecting the option “Cancel printing”,
the printing will stop.
A blue light will appear on the sensor if the lament has been put on. If the light doesn’t work, please replace the sensor.
Deactivated Activated
FILAMENT CHANGING PROCESS ACTIVATE FILAMENT DETECTOR
1. Go to the Temperature Control on Repetier Server
2. Press “Advanced Options”
3. Press “Activate Filament Detector”
1. The printer detects that there is no lament left
2. The printer will automatically remove the remaining
lament
3. The printer will no longer heat the nozzle
4. Please, remove the spool carefully
5. Select the following material in the menu display
and press “Next Button”
6. Wait until the temperature is stable
7. Introduce the lament on the extruder through the
lament sensor
8. Press “Next Button” and the engines of the extruder
will push the lament to the tip
9. Wait until the engines stop
10. Press “Continue Printing”
IMPORTANT NOTE

11
DOOR SENSOR
The door sensor is a new feature of the Voladora NX +. If the door is suddenly opened while the machine is printing, the
printer will pause the printing to avoid any alterations or damages that may occur. When the door is correctly closed,
the printing process will start again from where it was left.
The moment the door is opened you will received a notication on Repetier Server. In this window you will be able to
disable its use. The moment the door is closed, the notication tab will close too. Such as the lament sensor, the door
sensor can be turned on and o from Repetier Server. To turn it on, please follow these easy steps:
A red light will appear on the sensor if the door is closed. If it does not work, you have to verify if the magnet that detects
the opening is in its correct position. If the magnet is in its position and the light keeps o, the sensor must be replaced.
IMPORTANT NOTE
Deactivated Activated
ACTIVATE DOOR SENSOR
1. Go to the Temperature Control on Repetier Server
2. Press “Advanced Options”
3. Press “Activate Filament Detector”

SECURITY
The platform and nozzle of the head can be
heated up to 150ºC and 350ºC depending
on the printing material, therefore caution is
recommended.
Do not handle any mechanical parts
of the printer while it is in operation.
ATTENTION, HOT SURFACE RISK OF ENTRAPMENT
BASIC RECOMMENDATIONS
Place the printer on a rm
surface without vibration.
Place the printer in a draft-free
environment with an ambient
temperature between 15ºC -
25ºC.
Follow the printer installation
and power-up instructions.
Use materials recommended
by Tumaker to ensure proper
printer operation.
Make your prints by following
the recommendations and
parameters given by Tumaker.
Follow the maintenance
recommendations for optimal
printer operation and durability.
Cleaning the head
- Every 100h of printing.
Depending on the material it
would be advisable to do it more
regularly.
- Every time you change spools.
- Every time you change material.
General cleaning and greasing
of the printer every 6 months is
recomended
It is advisable to change the
nozzle periodically, every time
you change spools or material.
Write us and we will provide
them to you.
12

WARRANTY
Tumaker, S.L., (“Tumaker”) provides this Limited Warranty
to purchasers of the Tumaker product(s) included in the
sales package (“Product”). Tumaker warrants to you that,
during the warranty period, Tumaker or a service company
authorized by Tumaker will, within a commercially
reasonable time, remedy defects in materials, design
and workmanship by repair or, if Tumaker deems it
necessary in its sole discretion, replacement of the
Product in accordance with this Limited Warranty (except
as otherwise provided by law). This Limited Warranty shall
only be valid and enforceable in the country in which you
purchased the Product as long as Tumaker has intended
the Product for sale in that country. However, if you
purchased the Product in a member state of the European
Union, this Limited Warranty is valid and in force.
Some limitations may apply to the service covered by the
warranty due to the country-specic elements present in
the Products.
Tumaker’s obligation with respect to its products under
warranty is limited to replacement of parts or repair at
its discretion and at the premises of Tumaker or a dealer
authorized by Tumaker. In the case of requiring the
replacement of parts at the customer’s home, will be
made upon acceptance of travel budget and labor. The
congured and manipulated products and accessories
that had to be assembled will not be covered by this
warranty.
Warranty period
The warranty period shall commence at the time of the
original purchase of the Product by the rst end user.
Tumaker products are not consumer items. They are
oriented elements for professional and industrial use.
Tumaker oers a warranty period of 1 year valid only if it
has not been misused or if the maintenance and periodic
revisions required by the product for proper operation
have not been carried out correctly. This warranty will not
be valid in the cases specied in the “What is not covered
by the limited warranty?” section.
To the extent permitted by the law of your country, the
Warranty Period will not be extended or renewed or
otherwise aected by the subsequent resale, repair or
replacement of the Product authorized by Tumaker.
However, repaired part(s) or replacement products
supplied during the Warranty Period will be warranted
for the remainder of the original Warranty Period.
Optional “warranty extensions” are available to the buyer,
extending the warranty coverage.
How to obtain warranty service
If you wish to make a claim under this Limited Warranty,
please send your Product (or the aected part when it is
not the entire Product) to a service company authorized by
Tumaker. You can call a Tumaker customer service center
(charges may apply at domestic or preferential rates) for
more information on how to make a claim. Information
about Tumaker-authorized customer service centers and
service companies can be found in the Tumaker sales
package or on local Tumaker websites.
13

Any claim made under this Limited Warranty shall be
subjected to your notice of the alleged defect to Tumaker
or to a service company authorized by Tumaker within a
reasonable time of discovery and in any event not later
than the expiration date of the Warranty Period.
When making a claim under this Limited Warranty you
must provide (a) the Product (or aected part) and (b) the
original proof of purchase, clearly indicating the name
and address of the seller, the date and place of purchase,
the type of product, and the serial number.
What is not covered by the Limited Warranty?
1. User manuals or third party software, content, data
or links, conguration, included in or downloaded from
the Product or during installation, assembly or shipment,
as well as those incorporated at any other time in the
delivery chain or otherwise acquired in any way and in
any form by you.
Tumaker does not warrant that Tumaker’s software will
meet your needs, work in combination with any hardware
or software provided by an independent vendor, or resell,
repair, or replace the Product authorized by Tumaker.
2. Normal wear (including, but not limited to, wear of
moving parts). Defects caused by improper handling
(including, but not limited to, defects caused by sharp
elements, bending, compression or dropping, etc.).
Defects or damage caused by misuse of the Product,
including use contrary to instructions provided by
Tumaker (for the Product). Other acts beyond Tumaker’s
reasonable control.
3. Defects or alleged defects caused by the fact that the
Product was used with, or in connection with, any product,
equipment, software and/or service not manufactured or
supplied by Tumaker or was used in a manner other than
for its intended use.
4. The deterioration of the Product if it has been exposed
to inadequate environmental conditions, humidity or
extreme atmospheric or thermal conditions or to rapid
changes thereof, to corrosion, oxidation, spillage of food
or liquids or to the inuence of chemical products.
5. A dierent rmware than the one provided nor the use
of a dierent printing base than the one recommended.
6. Direct or indirect damage resulting from the use of
a third-party printing material (one that has not been
supplied by Tumaker) or from the use of a consumable in
an unsuitable condition (with adhering elements, grease
residues or other similar incidents).
7. It does not cover damage caused by improper transport:
use of packaging other than the original.
8. It does not cover the connection at a voltage other than
that set by the manufacturer.
9. It does not cover if Tumaker products have been
repaired or altered by personnel other than Tumaker or
personnel not authorized by Tumaker.
10. It does not cover if the documentation and information
requested by Tumaker is not submitted.
11. It does not cover if the elements which by their nature
require periodic maintenance have not been carried out.
12. It does not cover if the lack of functionality is a
consequence of the lack of knowledge on the part of the
buyers.
WARRANTY
14

Returns
You have 7 business days to return a Tumaker product.
This period applies from the day you receive the order
and the postmark or transport company’s stamp will be
used to check the return date.
• The product must be in its original packaging, in new
and complete condition (with all accessories, manuals,
cables, etc.) and accompanied by the invoice or delivery
note.
• The goods must be returned in perfect condition. Items
sent or returned incomplete, damaged or deteriorated
will not be accepted.
• Loss of the item or damage occurring during a
shipment shall be the responsibility of the customer. We
recommend that you return the items by registered mail
or courier service and with insurance for the value of the
product.
If all these requirements are met, the amount of the
returned item will be reimbursed or, always through the
same form of payment in which you paid the order and
excluding the shipping costs of the return and what was
paid for training, installation or other services.
If the device is damaged, the amount of the repair will be
deducted from the amount of the return. If a technical
analysis of the product is carried out within the framework
of the right of withdrawal, Tumaker will make every eort
to reimburse the customer as soon as possible.
Responsability
Tumaker shall not be liable to the Buyer for the failure or
inability of Tumaker products to function properly. Nor for
any loss, damage, injury or expense of any kind or nature
caused directly or indirectly by Tumaker’s products.
If for any reason it is necessary to ship the Product to
Tumaker’s facilities, it is recommended that the Product
be shipped under insurance to cover possible loss or
damage. In any case, any incident related to transport will
be the responsibility of the buyer.
Likewise, Tumaker is not responsible for its stations not
being able to print geometries not previously analyzed by
its technical service.
Annex A
The following list corresponds to some
elements that are not covered by
the limited warranty.
Consumable elements
• Filaments for 3D printing
• Printing platform
• Hotend Set:
- Fans
- Sensors
- Resistances
- Heating block
- Nozzles
- Straight adjustor
• Bowden Tube
WARRANTY
15

We,
Nosotros,
Declare under our sole responsibility that the product:
Declaramos bajo nuestra exclusiva responsabilidad la conformidad del producto:
Product:
Denominación:
Brand name:
Marca:
Model:
Modelo:
Serial number:
Número de serie:
DECLARATION OF CONFORMITY
Voladora NX +
16
Tumaker S.L.
Ihurrita bidea, 13 Pabellón 25 2º
20180 Oiartzun (Spain)
Fusion Deposition Modeling 3D printer
Tumaker
To which this declaration relates is in conformity with the requirements of
the following directives:
Al que se reere esta declaración, con las normas u otros documentos normativos:
- 2006/42/CE Directiva de máquinas.
- 73/23/CEE Directiva de Baja Tensión.
The presumption of Conformity with the essential requirements regarding
Council Directive 99/05/CE.
De acuerdo con las disposiciones de la Directiva 99/05/CE del Parlamento Europeo
y del Consejo de 9 de marzo de 1999, transpuesta a la legislación española
mediante el Real Decreto 1890/2000, de 20 de noviembre de 2000.
DECLARATION OF CONFORMITY
(according to EN 17050:2005)
Jon Bengoetxea Zurriarain
CEO Tumaker S.L

17
Voladora NX+

www.tumaker.com
Call us at 943 49 12 44
Tumaker S.L.
Ihurreta bidea, 13
Pabellón 25, 2º
20180 Oiartzun
Gipuzkoa
Table of contents
Other Tumaker 3D Printer manuals