Tumaker Voladora NXHD User manual

Warranty
Declaration of conformity
First steps
PELLETS 3D printer
Software included

INDEX
INDEX
Printer Specications.....................................................................................p.3
Main parts of the printer...............................................................................p.4
Elements included in the printer..................................................................p.5
Installation and set up...................................................................................p.6
Load of material.........................................................................................p.7
Printer calibration..........................................................................................p.8
Head cleaning..............................................................................................p.11
Simplify Printing Software...........................................................................p.11
Door sensor..................................................................................................p.12
Safety Measures..........................................................................................p.13
Basic recommendations ............................................................................p.13
WARRANTY.............................................................................................p.14
DECLARATION OF CONFORMITY................................................................p.17

PRINTER SPECIFICATIONS
3
Printer Volume: 270x190y200z
Printer Size: 45x41x41
Package Size: 50x50x61
Package Weight: 26 kg
Printer Weight: 24 kg
Materials: Pellet format materials
Printing Speed: Depends on parameters
Smart Energy Management
Power Rating: 500W
Noise Level: 44 dB
(closed door, 40dB)
Minimum Layer Height: 20µm
Maximum Layer Height: 60µm
Heated Bed: 45º - 100º
Build Plate Leveling: Manual
Operating Ambient Temperature: 10º-35ºC
(optimum: 20ºC)
Nonoperating Temperature: 5º - 45º
Nozzle Diameter: 0.8
Nozzle Temperature: 180ºC - 350ºC
Nozzle Heat Up Time:
20ºC: 200ºC - 1’15” / 250ºC - 1’50”
/ 300ºC - 2’35”
Conectivity: USB, Ethernet / Wi
Display: No
Control Devices: PC, Tablet, Smartphone.
Control Mode: Web
Connected to the Internet
Simplify3D Professional Software
Limited 1 Year Warranty

MAIN PARTS OF THE PRINTER
4
PELLET FEEDER
Once the material has been fed into the hopper, it melts inside
the pellet feeder. It passes through the head to the nozzle, and it
is extruded on the surface of the heated bed.
NOTE: The head moves on the X and Y axes. The nozzle must be
heated according to the
A
BPLATFORM OR HEATED BED
The printing happens on the surface of the platform as it moves
along the Z axis. It must be heated to a certain temperature
depending on the material used.
NOTE: It is absolutely essential that the distance between the
platform and the Nozzle is perfectly calibrated for optimum
printing. This will be achieved by carrying out the calibration
process.
Main parts
of the printer
Head Hopper
Nozzle Front Fan
1 4
2 5
3 6
Light Indicator Object Fan
1
A
B
2
6
4
3
5

5
ELEMENTS INCLUDED IN THE PRINTER
Make sure that the following items have been delivered with the printer, otherwise please contact us.
LIGHT INDICATIONS WIRING
To start with the installation and set up, connect the
power cable to the slot on the back of the printer and
plug it into the power socket. The usb slot will not be
used if the machine is connected wirelessly. Switch on
the printer by pressing the button.
The light indicator will stay on while the printer is on.
POWER CORD USB
CABLE
SPATULA GLASS FIXING
LACQUER
ON
POWERSWITCH
USB ETHERNET

6
INSTALLATION AND SET UP
Once the Internet connection has been congured, we will
place the printing bed correctly in order to calibrate our
3D printer.
Connect the printer to the network in two steps:
1. Use a computer to connect to the Wi of your printer with the
password “tumakerLS”.
2. Once connected, open a browser and type 192.168.12.1
WIFI
1. If you want to connect via WiFi, choose the WiFi network to
which you want to connect.
2. Enter the network password
3. Add IP and Gateway
4. Click on Change
3. Open the Settings tab - Connectivity
4. Connect via Ethernet or WiFi always selecting the STATIC
option
ETHERNET
1. If you opt for the Ethernet option, connect a network
cable.
2. Assign the IP and gateway and click Change

7
LOAD OF MATERIAL
First, manually insert the pellets into the hopper. The pellets will begin to fall through the hopper and
will melt inside the extruder.
The molten material will be expelled through the
nozzle and will begin to adhere to the printing base.
The 3D printing of pellets is an FDM process dierent to the 3D printing with lament spools.

8
The calibration of the Pellet 3D printer is essential to achieve quality prints and to ensure optimum performance. The
distance between the head nozzle and the bed has to be perfect.
1. Head Heating:
Heat up the head to the recommended fusion
temperature. If the melting temperature exceeds 260°,
keep the head warm for 5 minutes before starting.
Adhesion temperatures:
- PLA & similars: 45º
- ABS & similars: 80º
- Polycarbonate & similars: 120º
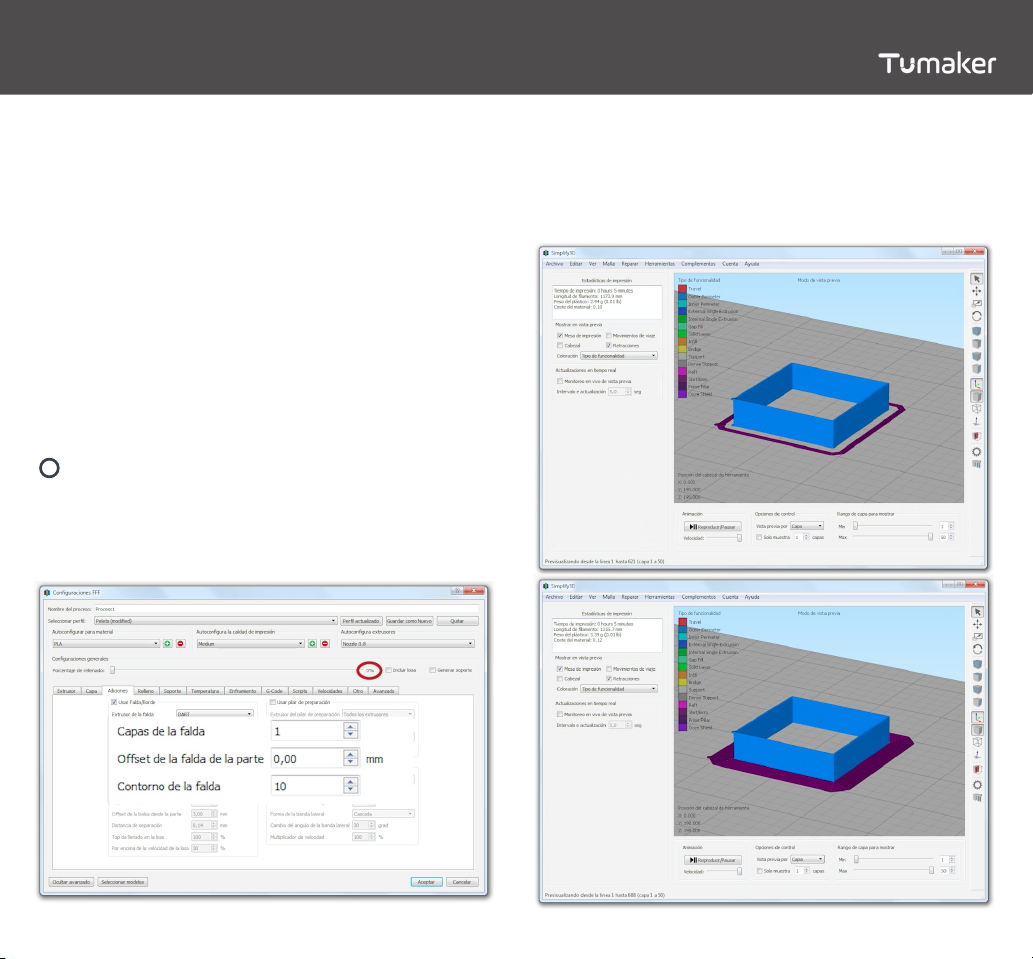
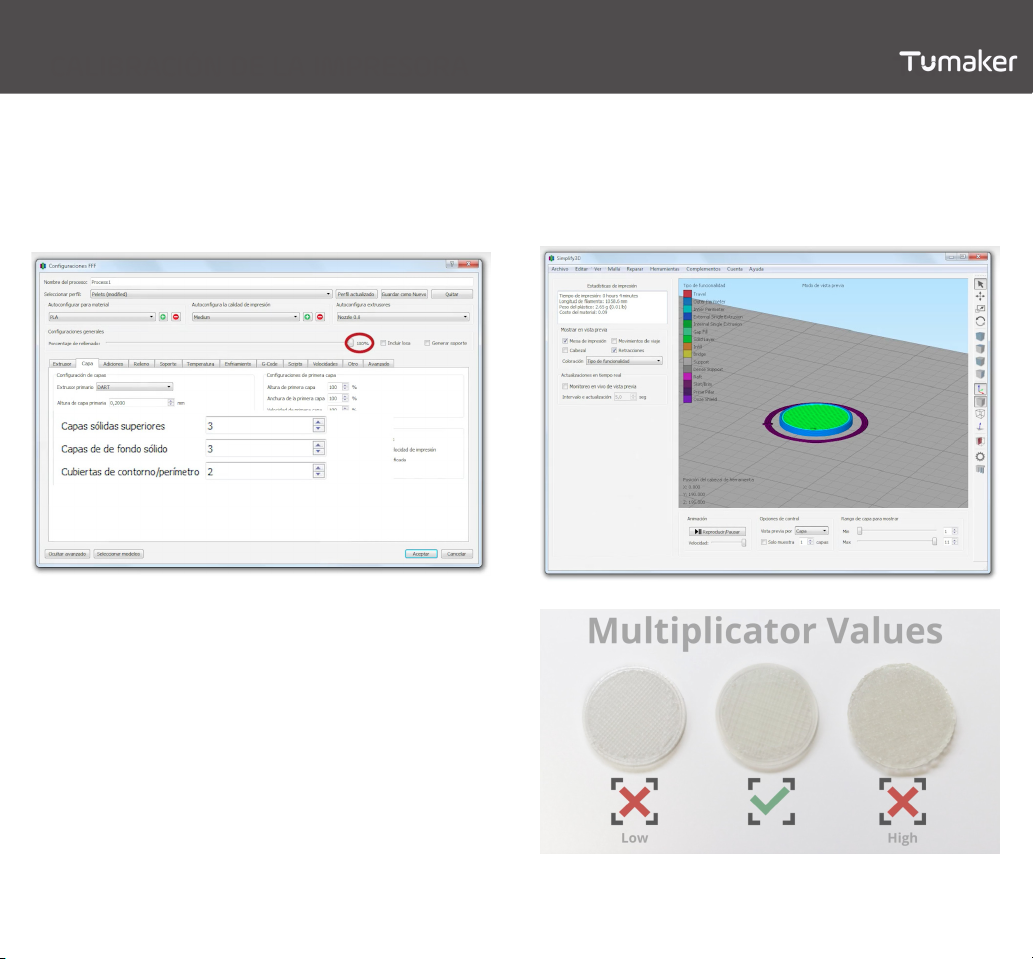
2. Extrusion multiplicator:
We will use this parameter to regulate the ow of the
head. For common materials, the possible values from
2 to 3.
Pellets with irregular shape and size will be more
dicult to calibrate. Besides, ow irregularities may
happen, and, in consequence, part’s appearance can
be negatively aected.
The fusion temperature may aect to a greater or
lesser extent on the material ow.
CALIBRACIÓN DE LA IMPRESORA
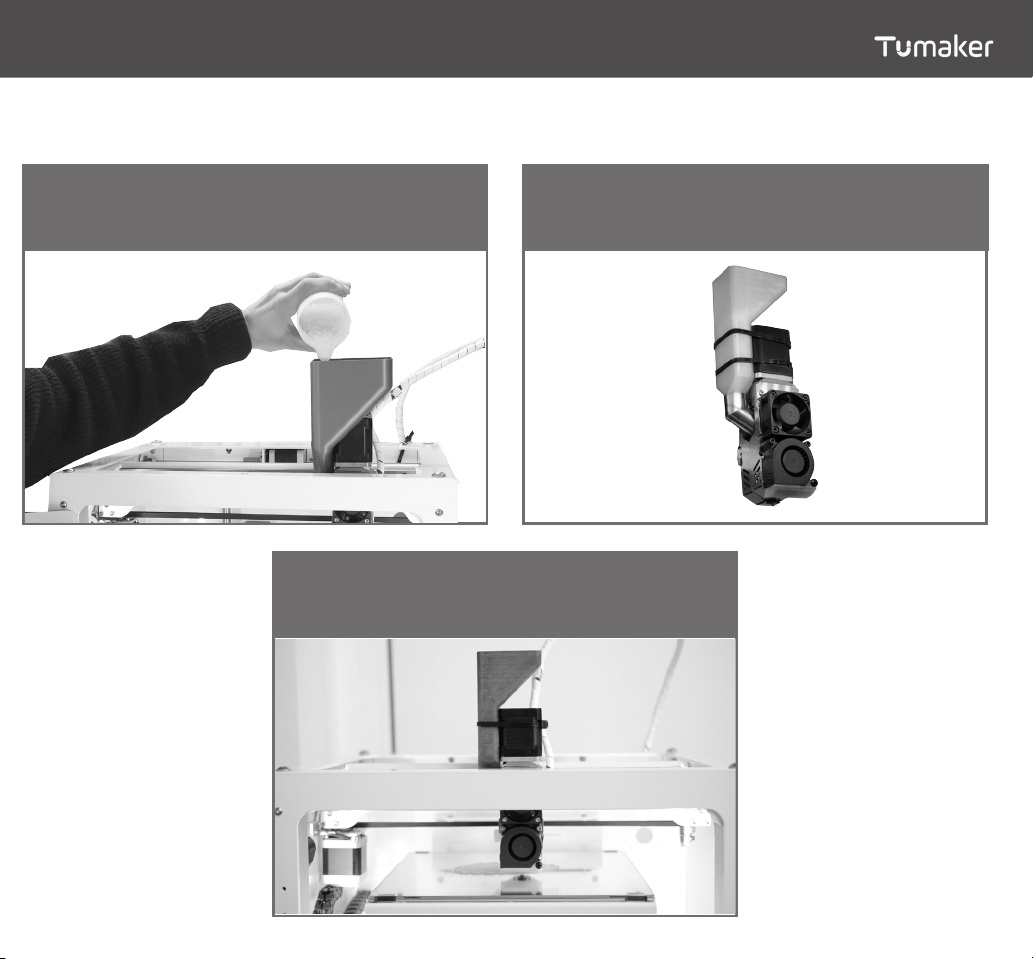
Use lacquer or other adherent system to get a better
adherence to the printing base
IMPORTANT NOTE
PRINTER CALIBRATION

PRINTER CALIBRATION
9
3. Multiplicator values:
3.1. Design a fully solid 40x40x10 cube and enter the
parameters shown in the following image.
3.2. Once created, measure one of the walls and change
the multiplier proportionally until the value corresponds
to the Ø of the nozzle.
• Use BRIM/FALDA while printing with ABS, PETG o
Polipropileno.
IMPORTANT NOTE

CALIBRACIÓN DE LA IMPRESORA
3.3. Print a 26 mm diameter, 2 mm high disc with
normal parameters and 100% ll.
Make sure that the amount of extruded material is
adequate.
• If the part is not completely closed, the extrusion level
will be low.
• If excess material is perceived on the surface, the
extrusion level will be high.
• The printer will be correctly calibrated when the
printed part is closed without any excess material on
the surface.
PRINTER CALIBRATION
10

11
SIMPLIFY 3D PROFESSIONAL SOFTWARE
Tumaker’s 3D printing stations include the Simplify3D™
professional manufacturing suite, a software with all the
advanced and optimized characteristics to create the
most complex objects in the highest quality. It includes
a powerful simulator to make you more productive,
visualizing the result of the printing strategy you are
working on before you start manufacturing.
You will be able to repair the imported designs in
Simplify3D itself and you will love the intelligent support
option; a spectacular functionality that allows the user to
create the right support for the most complex parts. If you
have any questions about the use of the software, please
consult the following page:
www.simplify3d.com/support/
HEAD CLEANING
>260º: Use ABS or materials with a similar melting
temperature range for materials over 260º. Start
extruding until there is no trace of the material
previously used. At this point, progressively lower the
temperature to 250°.
<260º: Use polypropylene for materials less than
260º. Start extruding until no trace of previously used
material remains. At this point, progressively lower the
temperature to 210 degrees.

12
DOOR SENSOR
The door sensor is a new feature of the Pellet 3D Printer If the door is suddenly opened while the machine is printing,
the printer will pause the printing to avoid any alterations or damages that may occur. When the door is correctly
closed, the printing process will start again from where it was left.
The moment the door is opened you will received a notication on Repetier Server. In this window you will be able to
disable its use. The moment the door is closed, the notication tab will close too. Such as the lament sensor, the door
sensor can be turned on and o from Repetier Server. To turn it on, please follow these easy steps:
A red light will appear on the sensor if the door is closed. If it does not work, you have to verify if the magnet that detects
the opening is in its correct position. If the magnet is in its position and the light keeps o, the sensor must be replaced.
IMPORTANT NOTE
Desactivado Activado
ACTIVATE DOOR SENSOR
1. Open Temperature Control on Repetier Server
2. Press “Advanced Options”
3. Press “Activate door sensor”

SAFETY MEASURES
The platform and nozzle of the head can be
heated up to 110ºC and 310ºC depending
on the printing material, therefore caution is
recommended.
Do not handle any mechanical parts
of the printer while it is in operation.
WARNING, HOT SURFACE RISK OF ENTRAPMENT
BASIC RECOMMENDATIONS
Place the printer on a rm
surface without vibration.
Place the printer in a draft-free
environment with an ambient
temperature between 15ºC -
25ºC.
Follow the printer installation
and power-up instructions.
Use materials recommended
by Tumaker to ensure proper
printer operation.
Make your prints by following
the recommendations and
parameters given by Tumaker.
Follow the maintenance
recommendations for optimal
printer operation and durability.
General cleaning and greasing
of the printer every 6 months is
recomended
It is advisable to change the
nozzle periodically.
13

WARRANTY
Tumaker, S.L., (“Tumaker”) provides this Limited Warranty
to purchasers of the Tumaker product(s) included in the
sales package (“Product”). Tumaker warrants to you that,
during the warranty period, Tumaker or a service company
authorized by Tumaker will, within a commercially
reasonable time, remedy defects in materials, design
and workmanship by repair or, if Tumaker deems it
necessary in its sole discretion, replacement of the
Product in accordance with this Limited Warranty (except
as otherwise provided by law).
This Limited Warranty shall only be valid and enforceable
in the country in which you purchased the Product as
long as Tumaker has intended the Product for sale in
that country. However, if you purchased the Product in
a member state of the European Union, this Limited
Warranty is valid and in force.
Some limitations may apply to the service covered by the
warranty due to the country-specic elements present in
the Products.
Tumaker’s obligation with respect to its products under
warranty is limited to replacement of parts or repair at
its discretion and at the premises of Tumaker or a dealer
authorized by Tumaker. In the case of requiring the
replacement of parts at the customer’s home, will be
made upon acceptance of travel budget and labor.
The congured and manipulated products and accessories
that had to be assembled will not be covered by this
warranty.
Warranty period
The warranty period shall commence at the time of the
original purchase of the Product by the rst end user.
Tumaker products are not consumer items. They are
oriented elements for professional and industrial use.
Tumaker oers a warranty period of 1 year valid only if it
has not been misused or if the maintenance and periodic
revisions required by the product for proper operation
have not been carried out correctly. This warranty will not
be valid in the cases specied in the “What is not covered
by the limited warranty?” section.
To the extent permitted by the law of your country, the
Warranty Period will not be extended or renewed or
otherwise aected by the subsequent resale, repair or
replacement of the Product authorized by Tumaker.
However, repaired part(s) or replacement products
supplied during the Warranty Period will be warranted
for the remainder of the original Warranty Period.
Optional “warranty extensions” are available to the buyer,
extending the warranty coverage.
How to obtain warranty service
If you wish to make a claim under this Limited Warranty,
please send your Product (or the aected part when it is
not the entire Product) to a service company authorized by
Tumaker. For more information on how to make a claim,
visit https://tumaker.com/en/site/contact. Information
about Tumaker-authorized customer service centers and
service companies can be found in the Tumaker sales
package or on local Tumaker websites.
14

Any claim made under this Limited Warranty shall be
subjected to your notice of the alleged defect to Tumaker
or to a service company authorized by Tumaker within a
reasonable time of discovery and in any event not later
than the expiration date of the Warranty Period.
When making a claim under this Limited Warranty you
must provide (a) the Product (or aected part) and (b) the
original proof of purchase, clearly indicating the name
and address of the seller, the date and place of purchase,
the type of product, and the serial number.
What is not covered by the Limited Warranty?
1. User manuals or third party software, content, data
or links, conguration, included in or downloaded from
the Product or during installation, assembly or shipment,
as well as those incorporated at any other time in the
delivery chain or otherwise acquired in any way and in
any form by you.
Tumaker does not warrant that Tumaker’s software will
meet your needs, work in combination with any hardware
or software provided by an independent vendor, or resell,
repair, or replace the Product authorized by Tumaker.
2. Normal wear (including, but not limited to, wear of
moving parts). Defects caused by improper handling
(including, but not limited to, defects caused by sharp
elements, bending, compression or dropping, etc.).
Defects or damage caused by misuse of the Product,
including use contrary to instructions provided by
Tumaker (for the Product). Other acts beyond Tumaker’s
reasonable control.
3. Defects or alleged defects caused by the fact that the
Product was used with, or in connection with, any product,
equipment, software and/or service not manufactured or
supplied by Tumaker or was used in a manner other than
for its intended use.
4. The deterioration of the Product if it has been exposed
to inadequate environmental conditions, humidity or
extreme atmospheric or thermal conditions or to rapid
changes thereof, to corrosion, oxidation, spillage of food
or liquids or to the inuence of chemical products.
5. A dierent rmware than the one provided nor the use
of a dierent printing base than the one recommended.
6. Direct or indirect damage resulting from the use of
a third-party printing material (one that has not been
supplied by Tumaker) or from the use of a consumable in
an unsuitable condition (with adhering elements, grease
residues or other similar incidents).
7. It does not cover damage caused by improper transport:
use of packaging other than the original.
8. It does not cover the connection at a voltage other than
that set by the manufacturer.
9. It does not cover if Tumaker products have been
repaired or altered by personnel other than Tumaker or
personnel not authorized by Tumaker.
10. It does not cover if the documentation and information
requested by Tumaker is not submitted.
11. It does not cover if the elements which by their nature
require periodic maintenance have not been carried out.
12. It does not cover if the lack of functionality is a
consequence of the lack of knowledge on the part of the
buyers.
WARRANTY
15

Returns
You have 7 business days to return a Tumaker product.
This period applies from the day you receive the order
and the postmark or transport company’s stamp will be
used to check the return date.
• The product must be in its original packaging, in new
and complete condition (with all accessories, manuals,
cables, etc.) and accompanied by the invoice or delivery
note.
• The goods must be returned in perfect condition. Items
sent or returned incomplete, damaged or deteriorated
will not be accepted.
• Loss of the item or damage occurring during a
shipment shall be the responsibility of the customer. We
recommend that you return the items by registered mail
or courier service and with insurance for the value of the
product.
If all these requirements are met, the amount of the
returned item will be reimbursed or, always through the
same form of payment in which you paid the order and
excluding the shipping costs of the return and what was
paid for training, installation or other services.
If the device is damaged, the amount of the repair will be
deducted from the amount of the return. If a technical
analysis of the product is carried out within the framework
of the right of withdrawal, Tumaker will make every eort
to reimburse the customer as soon as possible.
Responsibility
Tumaker shall not be liable to the Buyer for the failure or
inability of Tumaker products to function properly. Nor for
any loss, damage, injury or expense of any kind or nature
caused directly or indirectly by Tumaker’s products.
If for any reason it is necessary to ship the Product to
Tumaker’s facilities, it is recommended that the Product
be shipped under insurance to cover possible loss or
damage. In any case, any incident related to transport will
be the responsibility of the buyer.
Likewise, Tumaker is not responsible for its stations not
being able to print geometries not previously analyzed by
its technical service.
Annex A
The following list corresponds to some
elements that are not covered by
the limited warranty.
Consumable elements
• Pellets for 3D printing
• Printing platform
• Hotend Set:
- Fans
- Sensors
- Resistances
- Heating block
- Nozzles
- Straight adjustor
- Hopper
WARRANTY
16

We,
Nosotros,
Declare under our sole responsibility that the product:
Declaramos bajo nuestra exclusiva responsabilidad la conformidad del producto:
Product:
Denominación:
Brand name:
Marca:
Model:
Modelo:
Serial number:
Número de serie:
DECLARATION OF CONFORMITY
PELLET 3D Printer
17
Tumaker S.L.
Ihurrita bidea, 13 Pabellón 25 2º
20180 Oiartzun (Spain)
Fusion Deposition Modeling 3D printer
Tumaker
To which this declaration relates is in conformity with the requirements of
the following directives:
Al que se reere esta declaración, con las normas u otros documentos normativos:
- 2006/42/CE Directiva de máquinas.
- 73/23/CEE Directiva de Baja Tensión.
The presumption of Conformity with the essential requirements regarding
Council Directive 99/05/CE.
De acuerdo con las disposiciones de la Directiva 99/05/CE del Parlamento Europeo
y del Consejo de 9 de marzo de 1999, transpuesta a la legislación española
mediante el Real Decreto 1890/2000, de 20 de noviembre de 2000.
DECLARATION OF CONFORMITY
(according to EN 17050:2005)
Jon Bengoetxea Zurriarain
CEO Tumaker S.L

18

www.tumaker.com
943 49 12 44
Tumaker S.L.
Ihurreta bidea, 13
Hall 25, 2º
20180 Oiartzun
Gipuzkoa
Table of contents
Other Tumaker 3D Printer manuals