manuals.online logo
Brands
  1. Home
  2. •
  3. Brands
  4. •
  5. turck
  6. •
  7. Power Supply
  8. •
  9. turck PSM24-N.1 User manual

turck PSM24-N.1 User manual

PSM24-N.1
Documents supplémentaires
Sous www.turck.com, vous trouverez les documents suivants, qui contiennent des informa-
tions complémentaires à la présente notice:
■Fiche technique
■Remarques sur l’utilisation en zone2
■Manuel de l’excom: systèmed’E/S pour circuits électriques à sécurité non intrinsèque
■Déclarations de conformité (version actuelle)
■Homologations
Pour votre sécurité
Utilisation conforme
L’appareil est un équipement appartenant au mode de protection «sécurité renforcée» (IEC/
EN60079-7) et ne peut être utilisé qu’au sein du systèmeE/S excom avec les supports de
modules autorisésMT…-N (TÜV 21 ATEX 8643 X ou IECEx TUR 21.0012X) en zone2.
DANGER
Ces instructions ne contiennent pas d'informations relatives à l'utilisation en zone2.
Danger de mort en cas d'application non conforme!
En cas d'utilisation en zone2: respectez impérativement les informations sur l'utilisation
en zone2.
Le module d’alimentation est utilisé pour l’alimentation du système E/S excom et ne doit être
utilisé qu’avec l’étrier de verrouillage PSM24-LC.
Toute autre utilisation est considérée comme non conforme. La société Turck décline toute
responsabilité en cas de dommages causés par une utilisation non conforme.
Consignes de sécurité générales
■Seul un personnel qualifié est habilité à monter, installer, utiliser, configurer et entretenir
l’appareil.
■L’appareil répond aux exigences CEM pour les zones industrielles. Lorsqu’il est utilisé dans
des zones résidentielles, des mesures doivent être prises pour éviter les interférences radio.
■Ne raccordez des appareils entre eux que si leurs caractéristiques techniques le permettent.
■Vérifiez que l'appareil n'est pas endommagé avant le montage.
Description du produit
Aperçu de l’appareil
Voir fig.1: Vue de face, fig.2: Dimensions, fig.3: Etrier de verrouillage PSM24-LC (ID:
100038122)
Fonctions et modes de fonctionnement
Les modules d’alimentation 24VCC fournissent une tension CA à tous les modules excom
connectés.
Les blocs d’alimentation peuvent être alimentés de manière simple ou redondante.
En fonctionnement redondant, la charge est répartie entre les deux blocs d’alimentation.
Lorsqu’un appareil tombe en panne ou en cas de coupure de l’alimentation, l’appareil intact
prend en charge l’alimentation de l’ensemble du système. Différentes sources de tension
peuvent être utilisées pour l’alimentation.
Lorsque le module d’alimentation est utilisé en mode IoT, les données suivantes peuvent être
fournies:
■Module d’alimentation disponible
■Entretien recommandé (NE107)
■Courant de sortie trop élevé
■Tension d’entrée réelle
■Tension d’entrée insuffisante ou dépassée
■Tension d’entrée minimum
■Tension d’entrée maximum
■Compteur d’heures de service
■Durée de vie résiduelle attendue
Installation
 Retirez la vis moletée et, si nécessaire, le module d’alimentation précédemment monté du
support de module (voir fig. 4).
 Branchez l’appareil dans la position prévue à cet effet sur le support de module et emboîtez-
le jusqu’à enclenchement (voir fig. 5, étape 3).
 Placez l’étrier de verrouillage sur le cache du module de manière à ce que les deux
languettes latérales s’enclenchent (voir fig. 5, étape 4).
Raccordement
 Branchez l’alimentation externe sur le support de module via des bornes Ex-ec.
Mise en service
L’appareil est automatiquement opérationnel après raccordement des câbles et activation de la
tension d’alimentation.
FR Guide d'utilisation rapide EN Quick Start Guide
PSM24-N.1
Other documents
Besides this document, the following material can be found on the Internet at www.turck.com:
■Data sheet
■Notes on use in zone 2
■excom manual — I/O system for non-intrinsically safe circuits
■Declarations of conformity (current version)
■Approvals
For your safety
Intended use
The device is a piece of equipment from explosion protection category “increased safety” (IEC/
EN 60079-7) and may only be used as part of the excom I/O system with the approved module
carriers MT…-N (TÜV 21 ATEX 8643 X or IECEx TUR 21.0012X) in zone 2.
DANGER
These instructions do not provide any information on use in zone 2.
Danger to life due to misuse!
When used in zone 2: Observe the information on use in zone 2 without fail.
The power supply module is used for the power supply of the excom I/O system and must only
be used with the PSM24-LC locking clip.
Any other use is not in accordance with the intended use. Turck accepts no liability for any
resulting damage.
General safety instructions
■The device must only be fitted, installed, set, operated and maintained by trained and quali-
fied personnel.
■The device meets the EMC requirements for industrial areas. When used in residential areas,
take measures to prevent radio interference.
■Only combine devices for which the technical data is suitable for joint use.
■Check the device for damage before mounting.
Product description
Device overview
See fig. 1: front view, fig. 2: dimensions, fig. 3: PSM24-LC locking clip (ID: 100038122)
Functions and operating modes
The 24 VDC power supply modules supplies all plugged excom modules with AC voltage.
The power supply modules can be operated individually or redundantly.
In redundancy operation, the load is divided between both power supply modules. If one
device fails or the power supply is interrupted, the intact device takes over the power supply of
the entire system. Different power sources should be used for the supply.
When the power supply module is used in IoT mode, the following data can be provided:
■Power supply module available
■Maintenance recommended (NE107)
■Output current too high
■Actual input voltage
■Input voltage undershot or exceeded
■Minimum input voltage
■Maximum input voltage
■Operating hours counter
■Expected residual lifespan
Installing
 Remove the knurled screw and, if necessary, the previously mounted power supply module
from the module rack (see fig. 4).
 Insert the device into the designated position on the module rack so that it noticeably snaps
into place (see fig. 5, step 3).
 Fit the locking clip over the module cap so that the two tabs at the side snap into place (see
fig. 5, step 4).
Connection
 Connect the external power supply to the module rack with Ex ec terminals.
Commissioning
The device is operational automatically once the cables are connected and the power supply is
switched on.
DE Kurzbetriebsanleitung
PSM24-N.1
Weitere Unterlagen
Ergänzend zu diesem Dokument finden Sie im Internet unter www.turck.com folgende
Unterlagen:
■Datenblatt
■excom Handbuch – I/O-System für nicht eigensichere Stromkreise
■Hinweise zum Einsatz in Zone 2
■Konformitätserklärungen (aktuelle Version)
■Zulassungen
Zu Ihrer Sicherheit
Bestimmungsgemäße Verwendung
Das Gerät ist ein Betriebsmittel in der Zündschutzart„Erhöhte Sicherheit“ (IEC/EN 60079-7) und
darf nur innerhalb des I/O-Systems excom mit den zugelassenen Modulträgern MT…-N (TÜV
21 ATEX 8643 X bzw. IECEx TUR 21.0012X) in Zone 2 eingesetzt werden.
GEFAHR
Die vorliegende Anleitung enthält keine Informationen zum Einsatz in Zone 2.
Lebensgefahr durch Fehlanwendung!
Bei Einsatz in Zone 2: Hinweise zum Einsatz in Zone 2 unbedingt einhalten.
Das Netzteil dient zur Spannungsversorgung des excom-I/O-Systems und darf nur mit dem
Verriegelungsclip PSM24-LC verwendet werden.
Jede andere Verwendung gilt als nicht bestimmungsgemäß. Für daraus resultierende Schäden
übernimmt Turck keine Haftung.
Allgemeine Sicherheitshinweise
■Nur fachlich geschultes Personal darf das Gerät montieren, installieren, betreiben, einstellen
und instand halten.
■Das Gerät erfüllt die EMV-Anforderungen für den industriellen Bereich. Bei Einsatz in Wohn-
bereichen Maßnahmen treffen, um Funkstörungen zu vermeiden.
■Nur Geräte miteinander kombinieren, die durch ihre technischen Daten für den gemeinsa-
men Einsatz geeignet sind.
■Gerät vor der Montage auf Beschädigungen prüfen.
Produktbeschreibung
Geräteübersicht
Siehe Abb. 1: Geräteübersicht, Abb.2: Abmessungen, Abb. 3: Verriegelungsclip PSM24-LC (ID:
100038122)
Funktionen und Betriebsarten
Das 24-VDC-Netzteil versorgt alle gesteckten excom-Module mit AC-Spannung.
Die Netzteile lassen sich einzeln oder redundant betreiben. Im Redundanzbetrieb wird die Last
auf beide Netzteile aufgeteilt. Bei Ausfall eines Geräts oder bei Unterbrechung der Zuleitung
übernimmt das intakte Gerät die Versorgung des gesamten Systems. Zur Versorgung sollten
unterschiedliche Spannungsquellen genutzt werden.
Im IoT-Modus des Netzteils können folgende Daten zur Verfügung gestellt werden:
■Netzteil verfügbar
■Wartung empfohlen (NE107)
■Ausgangsstrom zu hoch
■aktuelle Eingangsspannung
■Eingangsspannung unterschritten oder überschritten
■kleinste Eingangsspannung
■höchste Eingangsspannung
■Betriebsstundenzähler
■erwartete Restlebenszeit
Montieren
 Rändelschraube und ggfs. zuvor montiertes Netzteil aus dem Modulträger entfernen (siehe
Abb. 4).
 Gerät in die dafür vorgesehene Position auf dem Modulträger stecken und deutlich spürbar
einrasten lassen (siehe Abb. 5, Schritt 3).
 Verriegelungsclip über die Modulkappe stecken, sodass die beiden seitlichen Rasternasen
einrasten (siehe Abb.5, Schritt 4).
Anschließen
 Externe Spannungsversorgung über Ex ec-Klemmen auf dem Modulträger anschließen.
In Betrieb nehmen
Nach Anschluss der Leitungen und Aufschalten der Versorgungsspannung geht das Gerät
automatisch in Betrieb.
© Hans Turck GmbH & Co. KG | 100032386 2023-06 V03.00Hans Turck GmbH & Co. KG | Witzlebenstraße 7, 45472 Mülheim an der Ruhr, Germany | Tel. +49 208 4952-0 | Fax +49 208 4952-264 | more@turck.com | www.turck.com
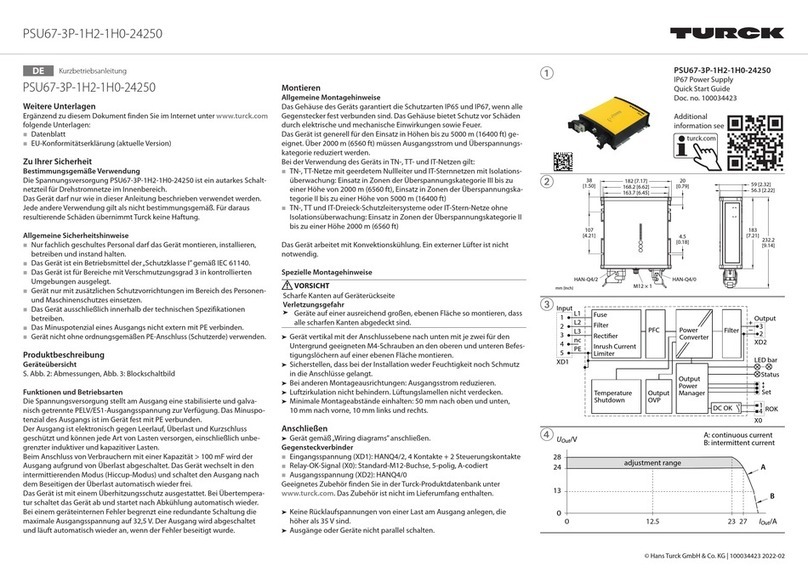
PSM24-N.1
①PSM24-N.1
Power Supply Module
Quick Start Guide
Doc. no. 100032386
Additional
information see
②
118
18
106
③
mm [Inch]
127.5
[5.02]
44 [1.73]
16 [0.63]
④
1.
2. ⑤3. 4.
⑥ ⑦
0
1
Z
Z (2:1)
0
1
Wiring diagram
24 VDC
+DC
–AC
turck.com
FR Guide d'utilisation rapide
Fonctionnement
Pour garantir un fonctionnement correct, l’étrier de verrouillage doit être fermement engagé
dans les deux ergots d’arrêt (voir fig. 6).
L’unité d’alimentation redondante peut être remplacée pendant le fonctionnement après avoir
vérifié que l’atmosphère ne présente pas de risque d’explosion.
LED
LED Indication Signication
PWR Verte Opérationnel
Vert clignote Durée de vie maximale atteinte, remplacez l'appareil
Eteinte Aucune tension
ERR Rouge Erreur
Eteinte Sans erreur
Mode de compatibilité pour PSM24-N
Le module d’alimentation PSM24-N.1 peut fonctionner avec un PSM24-N en parallèle.
 Réglez l’interrupteur sur le tableau du PSM24-N.1 sur «1» (voir fig.7).
 Montez l’appareil.
Mode IoT
En mode IoT, des données supplémentaires peuvent être fournies. Le module d’alimentation
PSM24-N.1 ne peut pas fonctionner en mode de compatibilité. L’évaluation n’est possible qu’en
utilisant la passerelle Ethernet GEN-N avec un micrologiciel ≥1.6.0.0.
 Réglez l’interrupteur sur le tableau sur «0» (voir fig.7).
 Montez l’appareil.
Mise hors service
 Déposez l’étrier de verrouillage.
 Retirez l’appareil du support de module.
Réparation
L’appareil ne peut pas être réparé par l’utilisateur. En cas de dysfonctionnement, l’appareil doit
être mis hors service. En cas de retour à Turck, veuillez respecter les conditions de reprise.
Mise au rebut
L’appareil doit être mis au rebut de manière appropriée et ne doit pas être placé avec les
ordures ménagères.
EN Quick Start Guide
Operation
To ensure correct operation, the locking clip must be securely engaged in both tabs (see fig. 6).
The redundant power supply unit can be changed during operation if a potentially explosive
atmosphere is not present.
LEDs
LED Indication Meaning
PWR Green Ready for operation
Green flashing Maximum lifespan reached, replace device
Off No voltage
ERR Red Error
Off Error-free
Compatibility mode for PSM24-N
The PSM24-N.1 power supply module can be operated with a PSM24-N in parallel.
 Set the switch on the board of the PSM24-N.1 to“1” (see fig. 7).
 Mount the device.
IoT mode
In IoT mode additional data can be provided. The PSM24-N.1 power supply module cannot be
operated in compatibility mode. Evaluation is only possible using the GEN-N Ethernet gateway
with a firmware ≥1.6.0.0.
 Set the switch on the board to“0” (see fig. 7).
 Mount the device.
Decommissioning
 Remove the locking clip.
 Remove the device from the module rack.
Repair
The device is not intended for repair by the user. The device must be decommissioned if it is
faulty. Observe our return acceptance conditions when returning the device to Turck.
Disposal
The device must be disposed of properly and must not be included in the domestic
waste.
Betreiben
Für den einwandfreien Betrieb muss der Verriegelungsclip in beide Rasternasen eingerastet
sein (siehe Abb. 6).
Wenn keine explosionsfähige Atmosphäre vorliegt, ist ein Wechsel des Netzteils bei redundan-
tem Einsatz im laufenden Betrieb möglich.
LEDs
LED Anzeige Bedeutung
PWR grün betriebsbereit
blinkt grün Endlebenszeit erreicht, Gerät austauschen
aus keine Spannung
ERR rot Fehler
aus fehlerfrei
Kompatibilitätsmodus zum PSM24-N
Das Netzteil PSM24-N.1 kann parallel mit einem PSM24-N betrieben werden.
 Schalter auf der Platine des PSM24-N.1 auf Position„1“ stellen (siehe Abb. 7).
 Gerät montieren.
IoT-Modus
Im IoT-Modus können zusätzliche Daten zur Verfügung gestellt werden. Das Netzteil PSM24-N.1
kann dabei nicht im Kompatibilitätsmodus betrieben werden. Die Auswertung ist nur über das
Ethernet-Gateway GEN-N mit einer Firmware ≥1.6.0.0 möglich.
 Schalter auf der Platine auf Position„0“ stellen (siehe Abb.7).
 Gerät montieren.
Außer Betrieb nehmen
 Verriegelungsclip entfernen.
 Gerät vom Modulträger entfernen.
Reparieren
Das Gerät ist nicht zur Reparatur durch den Benutzer vorgesehen. Sollte das Gerät defekt sein,
nehmen Sie es außer Betrieb. Bei Rücksendung an Turck beachten Sie unsere Rücknahmebe-
dingungen.
Entsorgen
Das Gerät muss fachgerecht entsorgt werden und gehört nicht in den normalen
Hausmüll.
DE Kurzbetriebsanleitung
Technical data
Type code PSM24-N.1
ID 100026211
Operating voltage range 19.2…32 VDC
Nominal voltage 24 VDC
Power consumption ≤ 66.5 W
Output power ≤ 60 W
Galvanic isolation Galvanically isolated input and output circuit
Connection mode Module, plugged on rack
Protection class IP20
Relative humidity ≤ 93 % at 40°C acc. to EN60068-2-78
EMC Acc. to EN 61326-1
Acc. to NAMUR NE21
Ambient temperature Tamb: -40…+70 °C
Hans Turck GmbH & Co. KG | Witzlebenstraße 7, 45472 Mülheim an der Ruhr, Germany | Tel. +49 208 4952-0 | Fax +49 208 4952-264 | more@turck.com | www.turck.com © Hans Turck GmbH & Co. KG | 100032386 2023-06 V03.00
PSM24-N.1
KO 빠른 시작 가이드
PSM24-N.1
󺯌󼹜󾘥󻣔󻺸
이 문서 외에도 다음과 같은 자료를 인터넷()에서 확인할 수 있습니다.
■데이터 시트
■2종 위험 지역에서 사용 시 참고 사항
■excom매뉴얼—비본질 안전 회로용I/O시스템
■적합성 선언(현재 버전)
■产品认证
󻹈󼑅󼔬󾘥󼋤󼖠󾘥󼖱󻪐
󻹈󼑅󾘥󻡅󼖝
이 장치는 폭발 방지 범주인“안전 개선”(IEC/EN60079-7)장치로서2종 위험 지역 내의 승인된
모듈 캐리어MT…-N(TÜV21ATEX8643X또는IECExTUR21.0012X)와 함께excomI/O시
스템의 부품으로만 사용할 수 있습니다.
󼒠󽍴
이 지침에는2종 위험 지역에서의 사용에 관한 정보가 포함되어 있지 않습니다.
󻬜󼖝󼖤󽋴󺨨󾘥󻹈󼑅󽋼󾘥󺩙󼑌󾘥󻹹󻠡󼔐󾘥󼒠󽍴󽋼󾘥󻾴󾘥󼔤󼁑󻁤󻂀
2종 위험 지역에서 사용하는 경우:2종 위험 지역에서의 사용에 관한 정보를 반드시 준수
하십시오.
파워 서플라이 모듈은excomI/O시스템의 전원 공급을 위해 사용되며 오직PSM24-LC잠금 클
립과 함께 사용해야 합니다.
기타 다른 방식으로 사용하는 것은 사용 목적을 따르지 않는 것입니다.터크는 그로 인한 손상에
대해 어떠한 책임도 지지 않습니다.
󼔘󻦴󾘥󼋤󼖠󾘥󼝜󼰄
■전문적인 훈련을 받은 숙련된 기술자만이 이 장치의 장착,설치,설정,작동 및 유지보수를 수
행해야 합니다.
■이 장치는 산업 분야의EMC요구 사항을 충족합니다.주거 지역에서 사용하는 경우 무선 간섭
을 방지하기 위한 조치를 취하십시오.
■기술 데이터가 공동 사용에 적합한 장치만 조합하십시오.
■설치 전에 장치가 손상되었는지 확인하십시오.
󼖸󽈤󾘥󻻀󻠡
󼕁󼯴󾘥󺦸󼐰
참조 그림1:정면도,그림2:치수,그림3:PSM24-LC잠금 클립(ID:100038122)을 참조하십시
오.
󺯌󻁁󾘥󻦫󾘥󼔭󻅵󾘥󻡄󻉸
24VDC파워 서플라이 모듈은 연결된 모든excom모듈에AC전압을 공급합니다.
파워 서플라이 모듈은 개별적으로 또는 이중으로 작동할 수 있습니다.
이중 작동 시,부하는 파워 서플라이 모듈 간에 분산됩니다.하나의 장치가 고장 나거나 파워 서플
라이가 중단되면,고장 나지 않은 장치가 전체 시스템에 전원을 공급합니다.파워 서플라이에 다
른 전력 소스를 사용해야 합니다.
파워 서플라이 모듈을IoT모드에서 사용하면 다음 데이터가 제공됩니다.
■파워 서플라이 모듈 사용 가능
■유지 보수가 권장됨(NE107)
■출력 전류가 너무 높음
■실제 입력 전압
■입력 전압 언더슈트 또는 초과됨
■최소 입력 전압
■최대 입력 전압
■작동 시간 카운터
■예상 잔여 수명
󻻀󼯴
 널링 나사를 제거하고,필요한 경우 이전에 설치한 파워 서플라이 모듈을 모듈 랙에서 분리하
십시오(그림4참조).
 장치를 모듈 랙의 지정된 위치에 삽입하여 확실하게 제자리에 밀어 넣으십시오(그림5,3단
계 참조).
 측면의 두 탭이 제자리에 끼워지도록 잠금 클립을 모듈 캡에 장착하십시오(그림5,4단계 참
조).
󼎌󺩌
 Exec터미널로 외부 파워 서플라이를 모듈 랙에 연결하십시오.
󼁸󼑐󼖠
케이블이 연결되고 파워 서플라이가 켜지면 장치가 자동으로 작동 가능해집니다.
PT Guia de início rápido
PSM24-N.1
Outros documentos
Além deste documento, o seguinte material pode ser encontrado na Internet em
www.turck.com:
■Ficha técnica
■Observações sobre o uso na Zona 2
■Manual do excom – sistema de E/S para circuitos não intrinsecamente seguros
■Declarações de Conformidade (versão atual)
■Homologações
Para sua segurança
Finalidade de uso
O dispositivo é um equipamento da categoria de proteção contra explosões“segurança
intrínseca”(IEC/EN 60079-7) e pode ser usado apenas como parte do sistema de E/S excom com
os portadores de módulos aprovados MT…-N (TÜV 21 ATEX 8643 X ou IECEx TUR 21.0012X) na
zona 2.
PERIGO
Essas instruções não contêm qualquer informação sobre o uso na zona 2.
Risco de morte devido ao mau uso!
Quando usado na zona 2: Observe as informações sobre o uso na zona 2 sem falhas.
O módulo da fonte de alimentação é usado para a alimentação elétrica do sistema de E/S
excom e só pode ser usado com o clipe de travamento PSM24-LC.
Qualquer outro uso está fora de concordância com o uso pretendido. A Turck se exime de
qualquer responsabilidade por danos resultantes.
Instruções gerais de segurança
■O dispositivo só deve ser montado, instalado, operado e mantido por pessoal qualificado e
treinado.
■O dispositivo atende aos requisitos de EMC para áreas industriais. Havendo uso em áreas
residenciais, tome medidas para evitar interferência de rádio.
■Somente combine dispositivos para os quais os dados técnicos sejam adequados para uso
conjunto.
■Verifique se há danos no dispositivo antes de montá-lo.
Descrição do produto
Visão geral do produto
Ver fig.1: Vista frontal, fig. 2: Dimensões, fig. 3: Clipe de travamento PSM24-LC (ID: 100038122)
Funções e modos de operação
Os módulos de fonte de alimentação de 24 VCC alimentam todos os módulos excom conecta-
dos com uma tensão CA.
Os módulos das fontes de alimentação podem ser operados individualmente ou no modo
redundante.
Na operação redundante, a carga é dividida entre os módulos de alimentação. Se um disposi-
tivo falhar ou a fonte de alimentação for interrompida, o dispositivo intacto assumirá o forne-
cimento de energia de todo o sistema. Diferentes fontes de alimentação devem ser usadas na
alimentação.
Quando o módulo da fonte de alimentação é usado no modo IoT, os seguintes dados podem
ser fornecidos:
■Módulo de alimentação disponível
■Manutenção recomendada (NE107)
■Corrente de saída muito alta
■Tensão de entrada real
■Tensão de insuficiente ou excedida
■Tensão mínima de entrada
■Tensão máxima de entrada
■Contador de horas de funcionamento
■Vida útil residual esperada
Instalação
 Remova o parafuso serrilhado e, se necessário, o módulo de fonte de alimentação montado
anteriormente do rack do módulo (consulte a fig. 4).
 Insira o dispositivo na posição designada no rack de módulo para que ele encaixe de forma
perceptível (consulte a fig. 5, etapa 3).
 Coloque o clipe de travamento sobre a tapa do módulo, de modo que as duas guias laterais
se encaixem em posição (consulte a fig. 5, etapa 4).
Conexão
 Conecte a fonte de alimentação externa ao rack do módulo com terminais Ex ec.
Comissionamento
O dispositivo fica automaticamente operacional assim que os cabos são conectados e a fonte
de alimentação, ligada.
ZH 快速入门指南
PSM24-N.1
其他文档
除了本文档之外,还可在www.turck.com网站上查看以下资料:
■数据表
■2级防爆区装置注意事项
■excom手册—非本安型电路用I/O系统
■合规声明(当前版本)
■인증
安全须知
预期用途
本装置是“增强安全”型(IEC/EN60079-7)防爆类别中的一种,只能作为excomI/O系统的一
部分,与核准的模块托架MT…-N(TÜV21ATEX8643X或IECExTUR21.0012X)一起用在危
险2区中。
危险
这些说明不包含有关在危险2区使用本装置的任何信息。
使用不当会危及生命!
在危险2区使用时:请严格遵守有关在危险2区使用本装置的注意事项。
该电源模块用于为excomI/O系统供电,只能与PSM24-LC锁箍一起使用。
任何其他用途都不属于预期用途。图尔克公司不会对非预期用途导致的任何损坏承担责任。
一般安全须知
■该装置只能由受过培训的合格人员进行组装、安装、设置、操作和维护。
■该装置符合工业领域的EMC要求。在住宅区使用时,请采取相应的措施以防止无线电干
扰。
■仅当技术数据支持装置联用时,才能组合使用装置。
■安装前检查本装置是否损坏。
产品描述
装置概览
见图1:正视图,图2:外形尺寸,图3:PSM24-LC锁箍(ID:100038122)
产品功能和工作模式
24VDC电源模块可为所有相连的excom模块提供交流电压。
该电源模块可以单独运行,也可在冗余模式下运行。
在冗余模式下运行时,负载在两个电源模块之间分配。如果一个模块出现故障或供电中断,则
完好的模块将为整个系统供电。应该使用不同的电源进行供电。
在IoT模式下使用电源模块时,可以提供以下数据:
■可用电源模块
■建议的维护(NE107)
■输出电流过高
■实际输入电压
■输入电压低于或高于限值
■最低输入电压
■最高输入电压
■工作小时计数器
■预期剩余寿命
安装
 从模块机架上卸下滚花螺钉,必要时可卸下先前安装的电源模块(见图4)。
 将装置插入模块机架上的指定位置,使其明显卡入到位
(见图5,步骤3)。
 将锁箍装到模块帽上方,使侧面的两个卡扣卡入到位(见图5,步骤4)。
连接
 将外部电源通过Exec端子连接至模块机架。
调试
连接线缆并接通电源后,装置将自动运行。
© Hans Turck GmbH & Co. KG | 100032386 2023-06 V03.00Hans Turck GmbH & Co. KG | Witzlebenstraße 7, 45472 Mülheim an der Ruhr, Germany | Tel. +49 208 4952-0 | Fax +49 208 4952-264 | more@turck.com | www.turck.com
PSM24-N.1
①PSM24-N.1
Power Supply Module
Quick Start Guide
Doc. no. 100032386
Additional
information see
②
118
18
106
③
mm [Inch]
127.5
[5.02]
44 [1.73]
16 [0.63]
④
1.
2. ⑤3. 4.
⑥ ⑦
0
1
Z
Z (2:1)
0
1
Wiring diagram
24 VDC
+DC
–AC
turck.com
󼔭󻅵
올바르게 작동하기 위해서는 잠금 클립이 두 탭에 단단히 체결되어야 합니다(그림6참조).
예비 파워 서플라이 유닛은 폭발 위험이 없는 환경에서 작동 중에 교체할 수 있습니다.


 󽇸󼁸 󼓴󻦔
PWR 녹색 작동 준비 완료
녹색 점멸 최대 수명 도달,장치 교체
꺼짐 전압 없음
ERR 적색 오류
꺼짐 오류 없음
󾙔󾙖󽏔󽏴󾘥󻡄󻉸
PSM24-N.1파워 서플라이 모듈은PSM24-N과 병렬로 작동할 수 있습니다.
 PSM24-N.1보드의 스위치를“1”로 설정하십시오(그림7참조).
 장치를 설치하십시오.
󻡄󻉸
IoT모드에서는 추가 데이터를 제공할 수 있습니다.PSM24-N.1파워 서플라이 모듈은 호환 모
드에서 작동할 수 없습니다.펌웨어1.6.0.0이상의GEN-N이더넷 게이트웨이를 사용해야 평가
가 가능합니다.
 보드의 스위치를“0”로 설정하십시오(그림7참조).
 장치를 설치하십시오.
󻻀󼯴󾘥󽌐󼩐
 잠금 클립을 분리하십시오.
 모듈 랙에서 장치를 분리하십시오.
󻾴󻝈
이 장치는 사용자가 수리할 수 없습니다.이 장치에 고장이 발생한 경우 설치 해체해야 합니다.장
치를 터크에 반품할 경우,반품 승인 조건을 준수하십시오.
󽅬󺯌
이 장치는 적절하게 폐기해야 하며 일반 가정 폐기물과 함께 배출해서는 안 됩니다.
KO 빠른 시작 가이드
PT Guia de início rápido
Operação
Para garantir o funcionamento correto, o clipe de travamento tem de estar bem engatado em
ambas as patilhas (consulte a fig. 6).
A unidade de fonte de alimentação redundante pode ser alterada durante o funcionamento se
não existir um ambiente potencialmente explosivo.
LEDs
LED Indicação Signicado
PWR Verde Pronto para operar
Verde
piscando Vida útil máxima atingida. Substitua o dispositivo
Desligado Sem tensão
ERR Vermelho Erro
Desligado Sem erros
Modo de compatibilidade para PSM24-N
O módulo de fonte de alimentação PSM24-N.1 pode ser operado em paralelo com um PSM24-N.
 Coloque o interruptor na placa do PSM24-N.1 em“1” (ver fig. 7).
 Monte o dispositivo.
Modo IoT
No modo IoT, dados adicionais podem ser fornecidos. O módulo de alimentação PSM24-N.1
não pode ser operado no modo de compatibilidade neste cenário. A avaliação só é possível por
meio do gateway Ethernet GEN-N com firmware ≥ 1.6.0.0.
 Coloque o interruptor na placa em“0” (ver fig. 7).
 Monte o dispositivo.
Descomissionamento
 Remova o clipe de travamento.
 Remova o dispositivo do rack do módulo.
Reparo
O dispositivo não se destina a reparos feito pelo usuário. O dispositivo deverá ser descomissio-
nado em caso de defeito. Observe nossas condições para aceitação de devolução ao devolver o
dispositivo à Turck.
Descarte
O dispositivo deve ser descartado corretamente e não em um lixo doméstico normal.
ZH 快速入门指南
运行
为确保正确操作,必须将锁箍牢固地卡入两个卡扣中(见图6)。
如果不处于有爆炸危险的环境中,则操作过程中可以更换冗余电源装置。
LED
LED 指示 含义
PWR 绿灯 准备就绪
绿灯闪烁 已达到最长使用寿命,请更换装置
熄灭 无电压
ERR 红灯 错误
熄灭 无错误
PSM24-N的兼容模式
PSM24-N.1电源模块可与PSM24-N并行运行。
 将PSM24-N.1板上的开关置于“1”位(见图7)。
 安装此装置。
IoT模式
在IoT模式下,还可以提供其他数据。PSM24-N.1电源模块无法在兼容模式下运行。只能使用
固件版本为1.6.0.0及更高版本的GEN-N型以太网网关进行评估。
 将板上的开关置于“0”位(见图7)。
 安装此装置。
停用
 拆下锁箍。
 从模块机架上拆下该装置。
维修
用户不得对该装置进行维修。如果出现故障,必须停用该装置。如果要将该装置送还给图尔克
公司维修,请遵从我们的返修验收条件。
废弃处理
必须妥善弃置该装置,不得混入普通的生活垃圾之中。
Hans Turck GmbH & Co. KG | Witzlebenstraße 7, 45472 Mülheim an der Ruhr, Germany | Tel. +49 208 4952-0 | Fax +49 208 4952-264 | more@turck.com | www.turck.com © Hans Turck GmbH & Co. KG | 100032386 2023-06 V03.00
PSM24-N.1
Technical data
Type code PSM24-N.1
ID 100026211
Operating voltage range 19.2…32 VDC
Nominal voltage 24 VDC
Power consumption ≤ 66.5 W
Output power ≤ 60 W
Galvanic isolation Galvanically isolated input and output circuit
Connection mode Module, plugged on rack
Protection class IP20
Relative humidity ≤ 93 % at 40°C acc. to EN60068-2-78
EMC Acc. to EN 61326-1
Acc. to NAMUR NE21
Ambient temperature Tamb: -40…+70 °C

Other turck Power Supply manuals

turck PSU67-3P-1S-2L-24250-F User manual

turck

turck PSU67-3P-1S-2L-24250-F User manual

turck PSD24EX User manual

turck

turck PSD24EX User manual

turck PSU67-3P-1S-2L-24250-IOL-F User manual

turck

turck PSU67-3P-1S-2L-24250-IOL-F User manual

turck IM82-24-10-3P User manual

turck

turck IM82-24-10-3P User manual

turck PSU67-3P-1H2-1H0-24250 User manual

turck

turck PSU67-3P-1H2-1H0-24250 User manual

turck PSU67-3P-1S-2L-24250-IOL-F User manual

turck

turck PSU67-3P-1S-2L-24250-IOL-F User manual

turck IM82-24-5,0-3P User manual

turck

turck IM82-24-5,0-3P User manual

turck PSU67-3P-1MP-2M5-24200-F User manual

turck

turck PSU67-3P-1MP-2M5-24200-F User manual

turck PSU67-1P-1M-2M5-24150-IOL-F User manual

turck

turck PSU67-1P-1M-2M5-24150-IOL-F User manual

turck PSU67-3P-1H2-1H0-24250-IOL User manual

turck

turck PSU67-3P-1H2-1H0-24250-IOL User manual

turck PSU67-3P-1H2-1H0-24250 User manual

turck

turck PSU67-3P-1H2-1H0-24250 User manual

turck PSU67-1P-1S-2L-24150-IOL-F User manual

turck

turck PSU67-1P-1S-2L-24150-IOL-F User manual

Popular Power Supply manuals by other brands

Pecron EB3000-48V user manual

Pecron

Pecron EB3000-48V user manual

Moxa Technologies DR-120 Series Hardware installation guide

Moxa Technologies

Moxa Technologies DR-120 Series Hardware installation guide

Pilz PSS Series operating manual

Pilz

Pilz PSS Series operating manual

AEMC AX501 user manual

AEMC

AEMC AX501 user manual

BCP PUOOO6BK How to install

BCP

BCP PUOOO6BK How to install

AP&T AP-AY1506 quick start guide

AP&T

AP&T AP-AY1506 quick start guide

EnerSys alpha Cordex CXRF 48-3.6kW Technical guide

EnerSys

EnerSys alpha Cordex CXRF 48-3.6kW Technical guide

BE QUIET! BQT E9-700W user manual

BE QUIET!

BE QUIET! BQT E9-700W user manual

Pulsar PSBSEP04124 manual

Pulsar

Pulsar PSBSEP04124 manual

GW Instek PSP-603 user manual

GW Instek

GW Instek PSP-603 user manual

Xantrex XTR 33-25 operating manual

Xantrex

Xantrex XTR 33-25 operating manual

Nemic-Lambda SWS50 Series instruction manual

Nemic-Lambda

Nemic-Lambda SWS50 Series instruction manual

Pulsar PSCV5012 quick start guide

Pulsar

Pulsar PSCV5012 quick start guide

Diamond Systems Jupiter-MM-5000 user manual

Diamond Systems

Diamond Systems Jupiter-MM-5000 user manual

KOHSEL ELEPHANT M40 installation guide

KOHSEL ELEPHANT

KOHSEL ELEPHANT M40 installation guide

Texas Instruments UCD3138 Technical reference manual

Texas Instruments

Texas Instruments UCD3138 Technical reference manual

TDK-Lambda 500A instruction manual

TDK-Lambda

TDK-Lambda 500A instruction manual

Rocket Fish RF-900WPS user guide

Rocket Fish

Rocket Fish RF-900WPS user guide

manuals.online logo
manuals.online logoBrands
  • About & Mission
  • Contact us
  • Privacy Policy
  • Terms and Conditions

Copyright 2025 Manuals.Online. All Rights Reserved.