UDI R/C TIMY U846 User manual

1 2
PRODUCT PARTS
USB Power Power Switch
Counter-clockwise
Blade B
Counter-clockwise
Blade B
Counter-clockwise
Blade B
Clockwise
Blade A
Clockwise
Blade A
Clockwise
Blade A
Blue Light
White Light
Red Light
Blue Light
White Light
Red Light
1. Quadcopter
headless flying quad
U846

3 4
2. Controller
Power Switch
Trim forward / back
Trim left / right
Trim Rotation
Right Stick
(move left /right
and forward / back)
Left Stick
(throttle & rotate)
Power Indicator
Flip and
H/M/L speed mode
Press left stick
down for 360° ip mode,
then move right
stick to perform a ip
Hold left stick down
for 3 seconds for
Headless mode
PRECAUTIONS
1. This product is only suitable for competent persons age 14+. This
machine is not a toy for children. It is a hobby ying drone, with
fast-spinning propellers. Use of this product naturally incurs risk of
injury, especially if it is misused. Purchaser accepts this risk by
purchasing or using this product.
2. To use this product, make sure you have a large open space, not too
close to people, buildings, or power lines. Please do not use this
helicopter in bad weather, such as in strong wind, rain or snow.
3. Before using this product, please read and follow all directions
carefully.
(1) When ying this machine, make sure you have a large open space.
The space must be at least 8m long, 8m wide, and 5m high.
(2) Make sure the controller and copter batteries are fully charged.
(3) Make sure the throttle is all the way down (all the way back) before
turning on the copter.
(4) Before you play, make sure you turn the controller on before you
turn on the copter.
(5) Make the battery is rmly installed and the all doors on the copter
are closed shut, otherwise the copter may not be stable.
(6) When the copter is not set up correctly, it may crash. The motors
may not be smooth, or make a noise, before the copter falls.
(1) Please do not attempt to open or disassemble the product yourself.
If there is a problem, please contact a local agent for repairs.
(2) The product contains many electronic parts, which must be kept dry.
Please avoid exposure to moisture.
(3) This product has metal and plastic surfaces, and electronic
components that should not be expose to heat. Please avoid long
exposure to heat or bright sunlight, which may harm the product’s
exterior.
(4) When the product is ying, avoid contacting the propellers with
ngers to avoid injury or damage.
(5) When you are using these products, please follow all local laws and
rules regarding remote control ying drones.
Quick button Quick button

5 6
FLIGHT PREPARATION
UA15 Controller
Your U846 quadcopter includes either a UA15 or UA14 controller.
The UA15 Controller uses 2 AAA batteries (not included).
Install 2 AAA Batteries in the UA15 Controller.
To assemble the Controller, install 2 1.5V AAA batteries (not included)
in the controller/ transmitter. Press the tab on the battery cover to
open and then close the cover over the battery compartment.
UA14 Controller
The UA14 Controller uses a Li-Po battery (included).
Install the Li-Po Battery in the UA14 Controller
To assemble the Controller, install the included Li-Po battery the
controller/ transmitter. Slide the battery cover down to open.
Attach the power connector on the battery to the matching
connector in the controller. Slide the battery cover back to close.
• This product is equipped with a Li-Po battery. Please take note of
appropriate safety precautions when not in use.
• Do not expose the charged battery to high temperatures, such as
ames or near electronic devices. This may cause damage or explosion.
• Make sure all batteries are connected in the proper orientation to avoid
damage or explosion.
• Do not use the battery to impact any hard surfaces. Avoid contact with
metal.
• If the battery becomes damaged, bulges, or appears to change shape,
please stop using the battery and discard it.
• When charging the battery, to avoid accident, put the power supply
on the ground. Avoid setting the charger on cloth or other ammable
materials because the charger will get hot.
• Do not immerse the battery in water. The battery should be kept in a
dry place.
• Do not break the battery or attempt to open the battery.
• Do not leave the battery charging without supervision.
2. Warnings
“AAA” batteries
Battery Cover
CHARGING LI-PO BATTERY
Connect the Li-Po battery in the quadcopter to USB before plugging
the USB to power or your computer. One end of the USB charger
goes into any free port on your computer or USB power bank. The
other end plugs into the charging connector on your copter. The
battery in the copter is not removable. While charging, the light will
be off. When charging is complete, the light will be on. The recharge
time should be around 40 minutes.
1. Charge the Battery

Push the LEFT STICK forward to make
the copter go up, or backward to go
down (“throttle”). The throttle will stay
where you leave it.
Push the LEFT STICK left or right
to rotate the direction the copter is
facing (“yaw”). Release the stick to
stop rotating.
7 8
1. The blue light are in the front of the quadcopter.
2. Before turning the quadcopter on, make sure the blades are installed
in the correct orientation (either clockwise or counter-clockwise as
shown),
3. During ying, if the quadcopter tilts or is not balanacd, use the trim
controls to make adjustment.
4. When the quadcopter battery is almost out of power, the control will
sound “di di di”. Please bring land and retrieve the quadcopter as
soon as possible
1. Up / Down (Throttle)
2. Rotate Direction
PRE-FLIGHT ADJUSTMENTS
PRE-FLIGHT TIPS
FLIGHT CONTROL
NOTE: The copter will not operate unless you follow these steps in the
order listed.
1. First make sure the quadcopter is OFF. Turn the controller / receiver
ON. This procedure must be followed precisely for the controller
and copter to “nd and bind” with each other.
2. The controller will beep once and the light will blink rapidly. Move
the LEFT STICK to the top and then to the bottom. The controller
will stop blinking to show the throttle is calibrated. Leave the stick
at the bottom.
3. Now turn quadcopter ON by ipping the switch underneath the
quadcopter to the ON position. After about 3 second the controller
will beep “di do di”. The lights on the copter will stop ashing. This
shows the quadcopter has become bound to the controller.
4. Put the copter on level ground. Move
the RIGHT STICK on the controller in
a circle. The controller will beep
“di do di” and the copter lights will
blink briey. This calibrates the copter
gyroscopes for level ying.
Push the RIGHT STICK left to move
left, or right to move right.
Release the stick to stop moving.
3. Move Left / Right
The Li-Po batteries may be recycled
Please discard old batteries in a proper recycling station.
Do not throw batteries in the regular trash. If you have questions,
please contact your local environmental agency to collect old batteries.

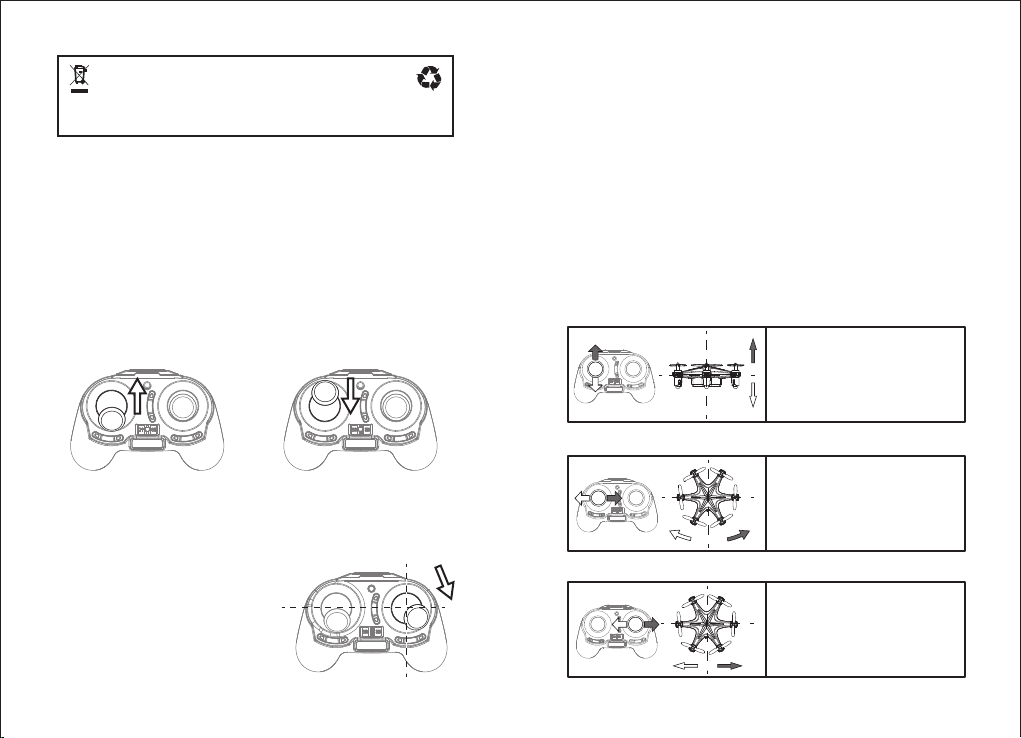
Push the RIGHT STICK forward to
move forward, or back to move
backwards. Release the stick to stop
moving.
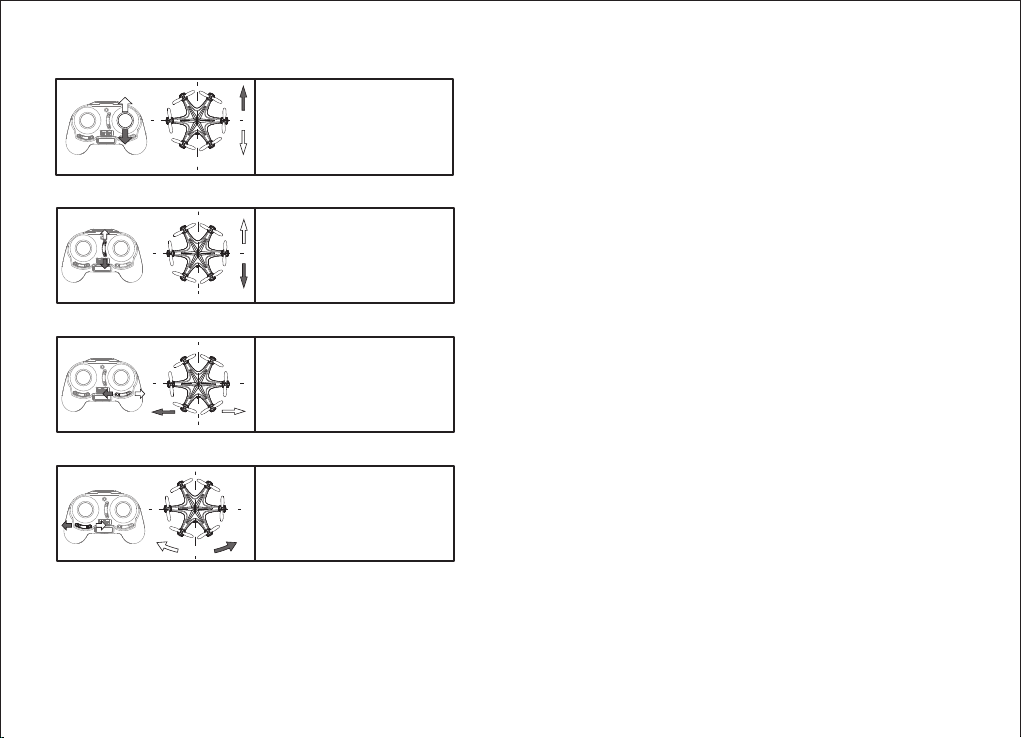
If the copter rotates when the stick is
centered, click this switch left or right
until the copter is stable.
If the copter drifts to the side when
the stick is centered, click this switch
left or right until the copter is stable.
If the copter drifts forward or back
when the stick is centered, click this
switch forward or backward until the
copter is stable.
9 10
Press the left stick down to switch between Flight Mode 1 (maximum
Gyro-stability), Mode 2 (medium stability), and Mode 3 (3D expert
control). The controller will beep once to indicate Flight Mode 1, twice
for Mode 2, and three times for Mode 3.
Mode 1 automatically uses the 6-Axis Gyro (3 gyroscopes and 3
accelerometers) to its full capabilities for stable, level ight. Use this
mode for beginners, or to hover for movies and snapshots.
Mode 2 is between Mode 1s and 3. The quadcopter accelerates more
quickly than Mode 1, but has more stability than Mode 3.
Mode 3 tilts the quadcopter more sharply (stronger pitch and roll), for
faster acceleration. Use this mode for racing and 3D maneuvers.
The quadcopter can easily ip in an entire 360° circle. The copter will
quickly stabilize and level out, but will lose some altitude, so rst make
sure the copter is ying high above the ground.
To ip in the direction you choose, rst press the right stick down. The
controller will start beeping and enter 360° Flip Mode. Push the right
stick in any direction to ip in the desired direction (forward, backward,
left, or right) and return to normal ight.
Press the right stick down for 3 seconds to enter or exit Headless Mode.
In Headless Mode, the quadcopter's direction of ight seen from your
viewpoint will follow the controls directly, no matter what direction the
quadcopter is facing. Face the ying quadcopter and move the right
joystick forward, and the copter will y away from you, or move the
right stick back and the copter will return to you. Move the right stick
left or right and the quadcopter will y left or right relative to you.
To enter Headless mode, hold the right stick for 3 seconds. The
controller will beep three times “di di di” and the quadcopter’s lights
will constantly ash to indicate Headless mode. Hold the right stick
down again for 3 second to return to normal steering mode. When
not in headless mode, the blue lights are in front. When in headless
mode, all lights blink.
If you are having problems steering the quadcopter, you can briey put
the quadcopter in headless mode and then back to normal mode to
easily reorient the quadcopter.
In normal mode, the blue lights are at the front.
FLIGHT MODES
360° FLIPS
HEADLESS MODE
4. Move Forward / Backwards
5. Adjust Rotation Trim (Yaw)
6. Adjust Left/Right Trim (Roll)
7. Adjust Forward/Backward Trim (Pitch)

U846-01
Top cover U846-02
Lower cover U846-03
Blades
U846-04
Rubber Feet U846-05
A motor U846-06
Li-Po battery
U846-07
Circuit board U846-08
B motor
U846-10
UA15 Controller U846-11
USB data cable
U846-09
UA14 Controller
11 12
In Headless mode, face the quadcopter and the Front will always be
away from you. It does not matter where the blue lights are – the front,
left, rear, and right will match your front, left, rear, and right.
When connecting a new or replacement motor, match the number of the
motor to the corresponding number written on the circuit board, 1 to 6.
For example, install motor #1 in the upper left of the quadcopter and
connect the wires from motor #1 to the connector labeled “M1” on the
circuit board.
Below are spare parts for your selection which you may obtain from your
local distributors.
Hold the left stick down for
3 seconds to enter Headless
mode.
Installing a Motor
SPARE PARTS
USB Power Power Switch
Blue lights
Front
Right
Left
Front
Rear
RightLeft
Front
Rear
RightLeft
Front
Rear
RightLeft
Blue lights
Blue lights Front
Rear
RightLeft
Blue lights
Blue lights
3 seconds
12
3
4
5
6
Motor #1 is in the upper left.
Motor #2 is in the upper right.
Motor #3 is on the right.
Motor #4 is on the lower right.
Motor #5 is on the lower left.
Motor #6 is on the left.
Table of contents
Other UDI R/C Drone manuals

UDI R/C
UDI R/C Swan U42 User manual

UDI R/C
UDI R/C U46S User manual

UDI R/C
UDI R/C U46W User manual

UDI R/C
UDI R/C SLRD40 User manual

UDI R/C
UDI R/C U818A WIFI User manual

UDI R/C
UDI R/C Swan U42 User manual

UDI R/C
UDI R/C VOYAGER U845Wifi User manual

UDI R/C
UDI R/C U39S User manual

UDI R/C
UDI R/C U61S User manual

UDI R/C
UDI R/C U95 User manual

UDI R/C
UDI R/C VOYAGER U845Wifi User manual

UDI R/C
UDI R/C U52G User manual

UDI R/C
UDI R/C VOYAGER U845Wifi User manual

UDI R/C
UDI R/C U46S User manual

UDI R/C
UDI R/C Discovery2 User manual

UDI R/C
UDI R/C VOYAGER U845Wifi User manual

UDI R/C
UDI R/C U64 User manual

UDI R/C
UDI R/C VOYAGER U845Wifi User manual

UDI R/C
UDI R/C U88S User manual

UDI R/C
UDI R/C U37 User manual