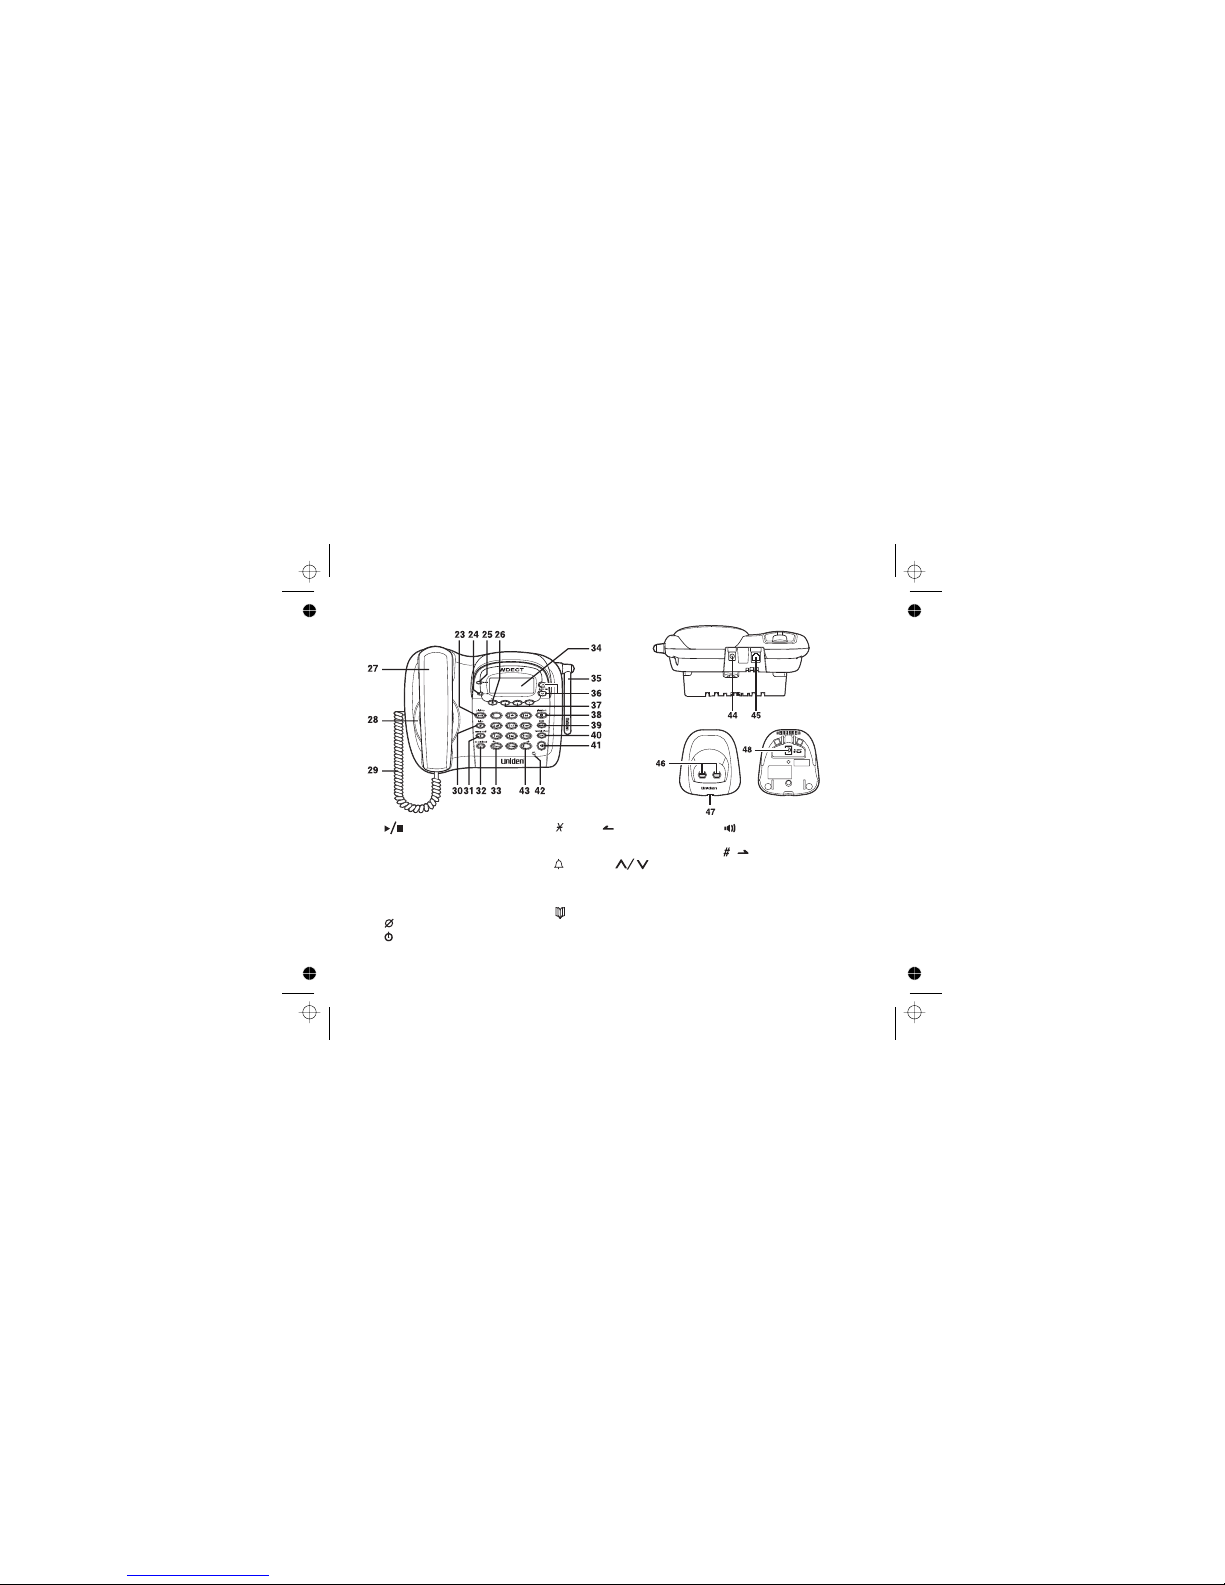
Uniden WDECT 2345+1 User manual

Corded Telephone and
Digital Answering System
with Wide Band Digital
Cordless Handset
OWNER'S MANUAL
WDECT 2345+1

WELCOME/ FEATURES 2
TERMINOLOGY 4
CONTROLS & FUNCTIONS 5
DISPLAY AND ICONS 7
SOFT KEY FUNCTION (BASE ONLY) 9
GETTING STARTED 10
BASICS 29
PHONEBOOK 40
CALLER ID 49
THE INTEGRATED ANSWERING DEVICE 55
MULTI- HANDSET FEATURES 70
ADDITIONAL INFORMATION 76
TROUBLESHOOTING 79
MEMORY LIST 83
INDEX 87
REMOTE OPERATION CARD 88
WARRANTY 90
Setting up the Phone 10
Expanding Your Phone 16
Register the Handset 17
Changing the Digital Security Code 18
Installing the Beltclip 18
Optional Headset Installation 18
Main Menu Options 19
Setting Menu Options 20
Using Your Phone 29
Call Waiting 32
Placing a Call on Hold 32
Redialing a Call 33
Adjusting the Ringer, Earpiece and
Speaker Volume 34
Muting the Ringer 35
Mute Microphone 36
Tone Dialing Switch- over 36
Traveling Out of Range 37
Clarity Booster (Handset only) 37
Privacy Mode 38
Conferencing 38
Find Handset 39
Setting up the Phonebook 40
Viewing the Phonebook 44
Making Calls Using the Phonebook 45
Speed Dialing 46
Editing or Erasing a Stored Name, Phone Number,
Distinctive Ring and Speed Dial 46
Copying Phonebook Locations 47
Caller ID and CIDCW
(Caller ID on Call Waiting) 49
The Integrated Telephone Answering Device 55
Turning the Answering System On/ Off 61
Setting Your Outgoing Message (Greeting) 61
New Message LED 62
Using Your Answering System 62
Remote Operation 66
Multi- Handset Features 70
Using DirectLink Mode 70
Intercom 72
Room/ Baby Monitor 75
Note on Power Sources 76
General Information 78
Troubleshooting 79
Liquid Damage 82
Contents
[1]

Congratulations on your purchase of the Uniden Digital Expandable Cordless Telephone
System! This is a "Corded/Cordless" Telephone unit. The corded handset (on base) can
make/ receive calls during power failure. When the base unit is connected to AC power
and a telephone line, it can support up to four cordless handsets. You can now place a
fully- featured cordless handset anywhere in your home or office where AC power is
available to connect the handset chargers. Extra handsets also allow you to establish a
4- way conference call among two handsets, the base speakerphone, and an
outside line.
Integrated Answering Device
Caller ID* at Handset and Base
Backward/Forward Compatibility
During Power Outage, Make and Receive Calls Using Corded Handset
Dual Keypad with LCD Screen at Base
Four Multi-Handset Expandability
Hands-Free Duplex Speakerphone at Handsets and Base
100 Programmable Memory Locations at Handsets and Base
Intercom/Call Transfer Between Handsets or Handset and Base
20 Distinctive Ring* Options (10 Tones/10 Melodies)
Mute/Hold
Do Not Disturb (DND)
Two-way Communication between Handsets** Anywhere without the Base
Room/Baby Monitoring
Battery Level Indicator
Clock Display
Note: Illustrations in this manual are used for explanation purposes. Some
illustrations in this manual may differ from the actual unit.
!
!
!
!
!
!
!
!
!
!
!
!
!
!
!
!
* Caller ID, Distinctive Ring features require subscription to the Caller Display service from your network
supplier. A fee normally applies for this.
** DirectLink mode: Optional additional cordless handset required for this feature.
Welcome
Features
[2]

This series features and AutoTalk allows you to answer a call by just
removing the handset from the cradle so you don't have to waste time pushing buttons. AutoStandby
allows you to hang up by simply returning the handset to the cradle.
To protect you against mis-billed calls that might result from your phone being activated by other
equipment, this series has digital security, which automatically selects one of about
130,000 digital security codes for the handset and base.
Built in sound quality which provides life-like conversations.
With mode, you can use two or more handsets as radio transceiver (walkie-talkies).
Be sure to visit our web site: www.uniden.com.au, www.uniden.co.nz
Your phone may be compatible with other Uniden Digital expandable systems
Look for the technology icon on our boxes!
AutoTalk AutoStandby
Random Code
IntegriSound
DirectLink
™™
™
™
.
[3]

Terminology
!
!
Standby Mode - talk/ flash
Talk Mode - talk/ flash
The handset maybe sitting on or off the cradle, but is NOT in use. or
has not been pressed. The corded base handset is on the base and
on the base has not been pressed. No dial tone is present.
The handset is off the cradle and or has been pressed, or pick
up the corded base handset and on the base is pressed, enabling a dial
tone.
[4]

Controls & Functions
1. Handset Antenna
2. Headset Jack Cover
3. Beltclip Hole
4. Hands-Free Speaker
5. Handset Battery Compartment
6. New Message LED
7. Handset Earpiece
8. LCD Display
9. (P.20 & 41)
10. (ring) Key (P.34 & 20)
a. ringer volume control
b. scroll keys for display screen
11. Key (P.36 & 41)
12. Key (P.30 & 33)
13. Key (P.30)
14. Key (P.20 & 67)
15. Key (P.51)
16. Key (P.29 & 32)
17. Key (P.31)
18. / Key
19. Key (P.40)
20 Key (P.32 & 72)
21. Handset Microphone
22. Handset Charging Contacts
menu /del Key
/vol / /
/tone
redial/pause
speaker
select /
call id
talk/flash
end
phonebook
. hold /transfer/int’com
/
(P.41)
67
[5]

23. (P. 62)
24.In use LED
25.New Message LED
26. (P. 51)
27. Corded Base Handset
28. Base Speaker
29. Curl Cord
30. (P. 64)
31. (P. 61)
32. /DND
LED (P. 35)
33. (P. 36 and 41)
34. LCD Display
35. Base Antenna
36.
(volume up/ down)
(P. 34 and 20)
37. (P. 9)
38. (P. 40)
39. (P.30 and 33)
40.
(P. 72 and 32)
41. (speaker) LED (P. 30)
42. mic (microphone)
43. (P. 41)
44. DC IN 9V Jack
45. TEL LINE Jack
46. Charging Contacts
47. Charge LED
48. DC IN 9V Jack
play/ stop
cid/ exit
delete
answer on/ off
do not disturb
tone
/
soft
phonebook
pause/redial
transfer/ int'com/ hold
/
//
volume
Keys
[6]

Display and Icons
Example of the standby mode display
!Handset
* appears if you have a new message.
appears if you turn your answering system off.
** appears when the message storage is full.
appears if you set your answering system to announce only.
Standby/Talk
Day of the week and time/battery icon
Handset ID and Banner
Number of new Caller ID calls received
Ringer off icon (when the ringer is off)
*Status of your answering machine Day of the week and time
**Number of message Number of new Caller ID calls
received
icons indicate the handset battery status.
This icon cycles depending on the battery status (full,
medium,low,and empty).
Standby off icon indicates that ringer is turned off.
• Base
Battery
Ringer
:OFF
ANSWER
NEW
OFF
FULL
Announce
ONLY
:OFF
SUN 12:00A
Handset #1
New: 5
[7]

B
R
Talk icon appears when you mute the handset or
the base.
Talk icon appears when the handset speaker
phone is used.
Talk icon appears when the Clarity Booster
feature is in use.
Talk icon appears when the Privacy Mode is
turned on.
Talk icon appears while recording a conversation.
Mute
Speaker
Booster
Privacy
Record
[8]

Soft Key Function (Base only)
"Soft" keys are keys that change function during the operation of the phone. There are three soft keys
on the base. Soft keys allow you to:
Access the main menu
Find a handset
Record Voice Memo
Complete information on the features controlled by the soft keys can be found under each feature.
!
!
!
The function of each soft key is determined by the icon that appears directly above it.
In standby mode
Base
Base (speaker phone) (Corded base handset)
SUN 12:00A
New CID: 5
FIND HS RECORD MENU
SP-Phone
FLASH RECORD MENU
0:00
Talk
FLASH MENU
0:00
[9]

Setting up the Phone
Do the following steps:
A. Choose the best location
B. Connect the base unit
C. Install the rechargeable battery pack into the handset
D. Connect the charger
E. Mount the base unit on a wall
Here are some important guidelines you should consider:
A. Choose the best location
Avoid noise sources such as a window
by a street with heavy traffic
Avoid microwave ovens
Avoid excessive
moisture, extremely
low temperatures,
dust, mechanical
vibration, or shock
Avoid personal computers
Avoid other cordless telephones
Avoid heat sources, such as
radiators, air ducts, and sunlight
Avoid television sets and
other electronic equipment
!
!
!
If your home has
specially wired
alarm equipment
connected to the
phone line, be
sure that
installing the
system does not
disable your
alarm equipment.
If you have
questions about
what will disable
alarm equipment,
contact your
telephone
company or a
qualified installer.
The earcap of
this telephone
may attract and
retain small
metallic objects
Choose a central location
GETTING STARTED
[10]

!
!
Use only the
Do not place the
power cord
where it creates
a trip hazard or
where it could
become chafed
and create a fire
or electrical
hazard.
supplied [AAD-
041S] AC
Adaptor. Do not
use any other AC
adaptor.
[11]
B. Connect the base unit
1) Connect the handset cord to the left side of the
phone and the corded base handset.
2)
3) Connect AC adaptor to the jack and
to a standard 240V AC wall outlet.
4) Set the base on a desk or tabletop.
Place the corded base handset on
the base.
5) Raise the antenna to a vertical
position.
If your telephone
outlet isn't modular,
contact your
telephone company
for assistance.
Connect the telephone line cord to the JackTEL LINE
Test Telephone Line Without Power
DC IN 9V
Pick up the base handset and listen for a dial tone.
If a dial tone is achieved after 2 seconds then base
handset can be used during a power failure.
If there is no dial tone your telephone may be on a long line
length in which case no dialling functions will be available
during power failure.

C. Install the rechargeable battery pack into the handset
1) Press down on the handset battery case cover
(use the finger indention for a better grip) and
slide the cover downward to remove.
2) Plug the battery pack connector (red & black
wires) into the jack inside the battery
compartment. (The connector notches fit into the
grooves of the jack only one way.) Match the
wire colors to the polarity label in the battery
compartment, connect the battery and listen for a
click to insure connection.
3) Make sure you have a good connection by
slightly pulling on the battery wires. If the
connection is secure, the battery jack will remain
in place.
4) Place the battery case cover back on the
handset and slide it upwards until it clicks into
place.
!Use only the
Uniden (BT- 446)
rechargeable
battery pack
supplied with
your cordless
telephone.
GETTING STARTED
[12]

D. Connect the charger
The handset is powered by a rechargeable battery pack. The battery recharges
automatically when the handset is placed in the charger.
1) Connect the AC adaptor to the
jack and to a standard 240V AC wall
outlet.
2) Set the charger on a desk or tabletop,
and place the handset in the charger
with the keypad facing forward.
3) Make sure that the LED
illuminates. If the LED does not
illuminate, check to see that the AC
adaptor is plugged in and the
handset makes good contact with the
base charging contacts.
4) Charge the handset battery pack for at least 15- 20 hours before using your new
cordless handset for the first time.
DC IN
9V
charge
!Use only the
supplied
[AAD-600s] AC
adaptor. Do not
use any other AC
adaptor.
[13]

E. Mount the Base Unit on a Wall
Standard wall plate mounting
DC IN 9V
TEL LINE
This phone can be mounted on any standard wall plate.
1) Detach the wall mount adaptor from the bottom
of the base.
2) Snap the wall mount adaptor into the notches on
the base bottom as shown.
3) Plug the AC adaptor into the jack.
Wrap the AC adaptor cord inside the molded
wiring channel as shown.
4) Plug the AC adaptor into a standard 240V AC
wall outlet.
5) Plug the telephone line cord into the
jack.
6) Plug the telephone line cord into the telephone
outlets.
7) Raise the antenna to a vertical position.
8) Align the mounting slots on the base with the
mounting posts on the wall. Then push in and
down until the phone is firmly seated.
9) Press and push up on the handset holder to lift
and remove it. Turn it over and rotate it 180°,
then slide it down into its slot and snap it back
into place so it holds the handset.
10) Connect the handset cord to the left side of the
phone and corded handset.
GETTING STARTED
[14]

Direct wall mounting
If you don't have a standard wall plate, you can mount your phone directly to the
wall. Before doing this, consider the following:
Avoid electrical cables, pipes, or other items behind the mounting location that
could cause a hazard when inserting screws into the wall.
Try to mount your phone within 1.5m of a working phone jack to avoid
excessive lengths.
Make sure the wall material is capable of supporting the weight of the base and
handset.
Use #10 screws (minimum length of 35 mm) with anchoring devices suitable for
the wall material where the base unit will be placed.
1) Insert two mounting screws into the wall
(with their appropriate anchors). 100mm
apart. Allow about 3mm between the wall
and screw heads for mounting the phone.
2) Refer to steps 1 through 10 on page 14 to
mount the telephone.
!
!
!
!
3mm
100mm
35 mm
[15]

Expanding Your Phone
Four Handset Expandability
Backward / Forward Compatibility
Your phone supports up to four handsets,
including any handsets supplied with your phone.
You can now place a fully- featured cordless
handset anywhere AC power is available to
connect the handset charger.
Handsets can be used in DirectLink Mode or on an intercom call without interfering
with incoming calls. It is possible to have a 4- way conference among the base,
two handsets, and one outside line.
All of the handsets ring when a call is received.
Your phone may be compatible with other Uniden Digital Expandable
Systems. Please visit our website at www.uniden.com.au, www.uniden.co.nz
If you purchase a WDECT2305 or WDECT2380 expansion handset, please
register the handset to the original/main base before use. The WDECT2305 and
WDECT2380 will not operate until it is registered.
GETTING STARTED
[16]

!Your phone may
be compatible
with other
Uniden Digital
Expandable
Systems.
Please visit our
website at
for model
number
confirmation.
www.uniden.com.au,
www.uniden.co.nz
Register the Handset
If you purchase an expansion handset (WDECT2305 model), you need to register
the handset before use. Only one handset can be registered at a time.
Handsets supplied with the phone are registered to the base by the factory. When
charged, pre-registered handsets display a handset ID number. Handsets that
have not been registered display When
you register an extra handset to the base, the handset ID will be assigned.
1) Before registering the extra handset, the battery pack MUST be charged for 15-
20 hours.
2) With the main base in standby mode, press the soft key on the base.
3) Press on the base to select HS Registering, and then
press the soft key.
4) On the handset, press and hold the key for two seconds.
To cancel registration, press the soft key on the base.
5) While the handset is registering, will appear in the LCD.
When is displayed, the handset has been registered to
the base. If appears, please try these steps again. the base
by following the same steps above.
The WDECT2380 expansion handset can be registered to the base by following
the same steps above.
Place handset on main base to register.
MENU
OK
#/
CANCEL
/volume up/down
Handset Registering
Registration Complete
Registration Failed
[17]

!
!
If you have more
than one
handset, de-
register all the
handsets you
have.
If you de-register
another handset,
perform
"Replacing the
Base Setting" for
the handset after
you de-register it
(see page 28).
Changing the Digital Security Code
Installing the Beltclip
Optional Headset Installation
The digital security code is an identification code used to connect the handset and
the base unit. Normally, setting the code is not necessary. In the rare situation that
you suspect another cordless telephone is using the same security code, you can
change the code. To change the digital security code:
1. De- register the Handset (see page 28).
2. Re- register each handset by following the steps on page 17.
Insert the beltclip into the holes on each side of the
handset. Press down until it clicks.
Pull either side of the beltclip to release the tabs from the
holes.
Your phone may be used with an optional headset. To use this
feature, insert the headset plug into the headset jack. Your
phone is ready for hands- free conversations. (Headset may be
purchased visiting the web site. See page 78.)
To attach the beltclip
To remove the beltclip
GETTING STARTED
[18]

!For Global
Setup, Answ.
Setup, and
System Reset-
Deregister
Handset, when
setting options
from the
handset, make
sure the line is
not in use and
the handsets are
within range of
the base.
Main Menu Options
Your phone has seven main menu options:
You can change and settings from the
base or from any handset.
and are only available
from a handset. is only available from the base.
The default settings set at the factory match the features that most people use. You may not
need to change them. However, there are a number of options you must set and entries you
must make in memory to take full advantage of all the phone features.
The table below lists the default settings.
DirectLink Mode, Room/ Baby Monitor,
Handset Setup, Base Setup, Answ. Setup, System Reset (Handset only), Handset
Registration(Base only) and Global Setup .
Room/ Baby Monitor, Answ. Setup , Global Setup
DirectLink Mode, Handset Setup System Reset-Replacing Base
Base Setup
Default Settings
Function Handset Base Function Handset Base
Ringer Tone Flicker Ring Time 9
Distinctive Ring On Recording Time one minute
Auto Talk On Message Alert Off
Anykey Answer On Name Tagging On
Banner Call Screen On
Insert Zero Answer Setup On
Contrast level 5 Day & Time SUN 12: 00 AM
Key Touch Tone On CIDCW Off
Record Greeting - - -
Select Greeting Dial Mode Tone
Security Code 80
Pre- record OGM
-(AUS)/On(NZ) Off(AUS)/On(NZ)
[19]
Table of contents
Other Uniden Telephone manuals

Uniden
Uniden DXAI5588-3 Series User manual

Uniden
Uniden WDECT 2300 User manual

Uniden
Uniden D3288-2 User manual

Uniden
Uniden FP1200 User manual

Uniden
Uniden EXS 2010 User manual

Uniden
Uniden 1035 Series User manual

Uniden
Uniden DXI860 User manual

Uniden
Uniden EXP2900 User manual

Uniden
Uniden DS810 User manual

Uniden
Uniden DCT748-4 User manual

Uniden
Uniden EXP 7900 Series User manual

Uniden
Uniden DECT 6015 User manual

Uniden
Uniden DECT3380-3R User manual

Uniden
Uniden XDECT SSE06 User manual

Uniden
Uniden XDECT SSE25 Series User manual

Uniden
Uniden Axis EP100 User manual

Uniden
Uniden UCIS-3050C User manual

Uniden
Uniden DECT1363 Series User manual

Uniden
Uniden DECT1035 User manual

Uniden
Uniden 420 User manual