V-tech 3-in-1 Ride with Me Motorbike Assembly Instructions

91-003840-001 UK
Parent’s Guide
3-in-1 Ride with Me Motorbike

2
2
2
INTRODUCTION
Thank you for purchasing the 3-in-1 Ride with Me Motorbike.
Hop on the motorbike that’s packed with fun and learning! Pretend
to visit places in the community while learning about colours with
songs and music. Walk, ride and balance with the 3-in-1 Ride with
Me Motorbike.
Community Buttons
Lock
Switch
Colour-
Changing
Light
Arrow
Buttons
Activity Selector
On/Off/Volume
Selector
Ignition Switch
Head Lights

3
3
3
INCLUDED IN THIS PACKAGE
• 3-in-1 Ride with Me Motorbike
• Interactive Dashboard
• Vehicle body • Two back wheels
• Back handle • Front wheel • Storage basket
• Label sheet
• Parent’s guide

4
4
4
WARNING:
All packing materials such as tape, plastic sheets, packaging locks,
removable tags, cable ties and packaging screws are not part of this
toy and should be discarded for your child’s safety.
NOTE: Please keep this Parent`s Guide as it contains important
information.
Unlock the Packaging Lock
Rotate the packaging lock anticlockwise 90
degrees.
Pull out the packaging lock and discard.
WARNING!
Not to be used by children over 36 months. Insufficient strength.
Protective equipment should be worn. 20kg Max. Regularly check for
signs of wear or tear on the snap in or locking devices. If damaged
do not use until repaired or replaced. Only to be used under the
direct supervision of a competent adult.
• This toy should be used in a safe area e.g indoors, in a private
garden, on level flat surfaces and away from any hazards such as
cars, stairs, water etc.
• Not for use on pavements or in traffic.
• Adult supervision is advised.
• Please help your child to sit properly on the seat and to use the
toy correctly.
• Since skill is required this toy should be used with caution to
avoid falls or collisions that could cause injury to the user or third
parties.

5
5
5
WARNING! Protective equipment should be worn. Not to
be used in traffic. 20kg Max. Please wear helmet, gloves,
knee pads and elbow pads.
GETTING STARTED
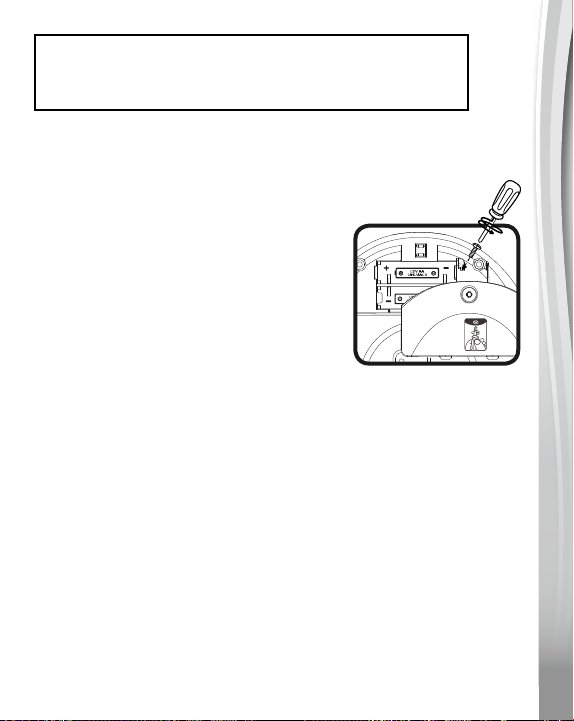
Battery Removal and Installation
1. Make sure the unit is turned Off.
2. Find the battery cover located on the
bottom of the interactive dashboard and
use a screwdriver to loosen the screw
and open the battery cover.
3. Remove old batteries by pulling up on
one end of each battery.
4. Install 2 new AA (LR6/AM-3) batteries
following the diagram inside the battery
box.
5. Replace the battery cover and tighten the screw to secure.
BATTERY NOTICE
• Use only batteries of the same or equivalent type as recommended.
• Do not mix different types of batteries: alkaline, standard (carbon-
zinc) or rechargeable, or new and used batteries.
• Do not use damaged batteries.
• Insert batteries with the correct polarity.
• Do not short-circuit the battery terminals.
• Remove exhausted batteries from the toy.
• Remove batteries during long periods of non-use.
• Do not dispose of batteries in fire.
• Do not charge non-rechargeable batteries.
• Remove rechargeable batteries from the toy before charging (if
removable).

6
6
6
• Rechargeable batteries are only to be charged under adult
supervision.
Disposal of batteries and product
The crossed-out wheelie bin symbols on products and
batteries, or on their respective packaging, indicates they
must not be disposed of in domestic waste as they contain
substances that can be damaging to the environment and
human health.
The chemical symbols Hg, Cd or Pb, where marked,
indicate that the battery contains more than the specified
value of mercury (Hg), cadmium (Cd) or lead (Pb) set out
in Battery Directive (2006/66/EC).
The solid bar indicates that the product was placed on the
market after 13th August, 2005.
Help protect the environment by disposing of your product
or batteries responsibly.
For more information, please visit:
www.recycle-more.co.uk
www.recyclenow.com

7
7
7
LABEL APPLICATION
Please securely stick the labels to the toy as indicated below:

8
8
8
1
746
911
10
2
3
58

9
9
9
Three Ways to Play and Ride
Use the back handle as a grip for little ones learning to walk.
Progress to a three-wheeled motorbike and then to a two-wheeler
when they are ready to balance.
ASSEMBLY INSTRUCTIONS
With the 3-in-1 Ride with Me Motorbike, safety comes first.
Adult assembly required. For your child’s safety, do not let them
play with this toy until it is fully assembled.
1. To assemble the front wheel, insert
the wheel into the slot on the bottom
of the vehicle body. You will hear the
pieces snap together when connected
properly.

10
10
10
2. Insert the Interactive Dashboard into
the slot on the top of the vehicle body.
You will hear the pieces snap together
when connected properly.
3. To assemble the back wheels in the
tricycle position, insert each of the
wheels into the slots on the bottom
of the vehicle body so the tricycle
labels are visible. You will hear the
pieces snap together when connected
properly.
4. To assemble the back wheels in the
motorbike position, insert each of the
wheels into the slots on the bottom
of the vehicle body so the motorbike
labels are visible. You will hear the
pieces snap together when connected
properly.
5. To use the motorbike as a push-along
walker with the wheels in tricycle
position, slide the Locking Switch to
the locked position so the front wheel
does not turn left or right, providing
a more stable walker. When using
the motorbike as a ride-on toy, slide
the Locking Switch to the unlocked
position.

11
11
11
6.
To remove the back wheels, slide
the wheel locks inwards to unlock the
wheels.
7. Insert the back handle into the two
slots on the back of vehicle body. You
will hear the pieces snap together
when connected properly.
8. Insert the storage basket into the
slot between the back handle as
illustrated.
Once you’ve completed the above steps, you are ready to play!
PRODUCT FEATURES
1. On/Off/Volume Selector
To turn the unit On, slide the On/Off/
Volume Selector to the Low volume
or
the High volume position. You will
hear a sound and a phrase. To turn
the unit Off, slide the On/Off/Volume
Selector to the Off position.

12
12
12
2. Activity Selector
Turn the Activity Selector to choose
a mode of play. The three modes of
play include Learning mode, Adventure
mode and Music mode.
3. Automatic Shut-Off
To preserve battery life, the
3-in-1 Ride with Me Motorbike
will
automatically shut off after several minutes without input. The unit
can be
turned on again by adjusting the Activity Selector or sliding
the
On/
Off/Volume Selector or turning the Ignition Switch.
NOTE
If the unit powers down or if the light fades out during play, please
install a new set of batteries.
ACTIVITIES
1. Community Buttons
Press the Community Buttons to
learn about colours and locations
around town in Learning mode. In
Adventure mode you will hear a variety
of phrases to encourage imaginative
play. In Music mode you will hear
songs. The lights will flash with the
sounds.

13
13
13
2. Ignition Switch
Turn the Ignition Switch to
hear realistic engine sounds and
imaginative phrases. The lights will
flash with the sounds.
3. Arrow Buttons
Press the Arrow Buttons to learn
about colours and hear interactive
phrases and melodies. The lights will
flash with the sounds.
MELODIES
1. Oh My Darling Clementine
2. Did You Ever See a Lassie?
3. Humpty Dumpty
4. London Bridge Is Falling Down
SONG LYRICS
Song 1
To market, to market,
To buy some fresh fruit.
Apples and oranges
Pears all taste good.

14
14
14
Song 2
Let’s go to the grocery store,
The grocery store, the grocery store.
Let’s go to the grocery store.
I need to buy some food.
Song 3
A-Tisket, a-tasket,
A letter in my basket.
I zoom around town, I deliver the post,
To all my friends and family.
Song 4
Look at me, I’m going to town,
Riding on my motorbike.
First stop is the post office,
Where I’ll post a letter.
Song 5
Jump on to the fire engine,
Don’t forget to grab the hose,
Spray the water on the fire,
Out it goes!
Song 6
Hurry, hurry, hurry, hurry!
Ding, ding, ding! Ding, ding, ding!
Someone needs our help,
Someone needs our help!
Off we go! Off We go!

15
15
15
Song 7
I’m zooming down the road,
On my motorbike.
Hi-ho, the derry-o, off to work I go!
Someone needs my help,
I’m rushing to the scene,
Hi-ho, the derry-o, I am here to help!
Song 8
Oh, I jumped into my police car,
I’m zooming down the road.
Have my siren on and my lights flashing,
I’m going to save the day.
Song 9
A-B-C-D-E-F-G,
H-I-J-K-L-M-N-O-P,
Q-R-S, T-U-V,
W-X-Y and Z.
Song 10
1-2-3-4-5,
6-7 and 8,
9-10, let’s count again.
I love to learn each day!
Song 11
Stop, stop, stop!
Go, go, go!
Rev my engine,
Zoom, zoom, zoom, zoom.
Off I go!

16
16
16
Song 12
Cruising around on my motorbike,
Driving through the town.
I shout hello, I wave good-bye,
To everyone I know!
CARE & MAINTENANCE
1. Keep the unit clean by wiping it with a slightly damp cloth.
2. Keep the unit out of direct sunlight and away from direct heat
sources.
3. Remove the batteries if the unit will not be in use for an extended
period of time.
4. Do not drop the unit on hard surfaces and do not expose the unit
to moisture or water.
TROUBLESHOOTING
If for some reason the unit stops working or malfunctions, please
follow these steps:
1. Please turn the unit Off.
2. Interrupt the power supply by removing the batteries.
3. Let the unit stand for a few minutes, then replace the batteries.
4. Turn the unit On. The unit should now be ready to use again.
5. If the unit still does not work, install a new set of batteries.
If the problem persists, please contact our Consumer Services
Department and a service representative will be happy to help you.

17
17
17
CONSUMER SERVICES
Creating and developing VTech®products is accompanied by a
responsibility that we at VTech®take very seriously. We make
every effort to ensure the accuracy of the information, which forms
the value of our products. However, errors sometimes can occur. It
is important for you to know that we stand behind our products
and encourage you to call our Consumer Services Department with
any problems and/or suggestions that you might have. A service
representative will be happy to help you.
UK Customers:
Phone: 0330 678 0149 (from UK) or +44 330 678 0149 (outside UK)
Website: www.vtech.co.uk/support
Australian Customers:
Phone: 1800 862 155
Website: support.vtech.com.au
NZ Customers:
Phone: 0800 400 785
Website: support.vtech.com.au
Product Warranty / Consumer
Guarantees
UK Customers:
Read our complete warranty policy online at vtech.co.uk/warranty.
Australian Customers:
VTECH ELECTRONICS (AUSTRALIA) PTY LIMITED –
CONSUMER GUARANTEES
Under the Australian Consumer Law, a number of consumer
guarantees apply to goods and services supplied by VTech
Electronics (Australia) Pty Limited. Please refer to vtech.com.au/
consumerguarantees for further information.

18
18
18

Visit our website for more
information about our products,
downloads, resources and more.
www.vtech.co.uk
www.vtech.com.au
TM & © 2020 VTech Holdings Limited.
All rights reserved.
Printed in China.
91-003840-001 UK
Table of contents