Valore VS-1000C Plus User manual

Version No.: V1.20160526
Easy Install Shower Panel
Installation and User Guide
VS-1000C Plus
ATTACH YOUR RECEIPT HERE
Serial Number Purchase Date
If you have questions relating to the use, warranty, return, claims and replacement,
please call: Phone: 877-551-0484 (Monday to Friday 8:30am-5:30pm PST)
Français p.18
Español p. 35

• (H) 30.74" x (W) 4.72" x (D) 2.6"
• Hand shower hose: 59.05"
• Weight: Net: 10 lbs /Gross: 12 lbs
This product is tested and certified to
meet U.S. and international standards
cUPC-certified
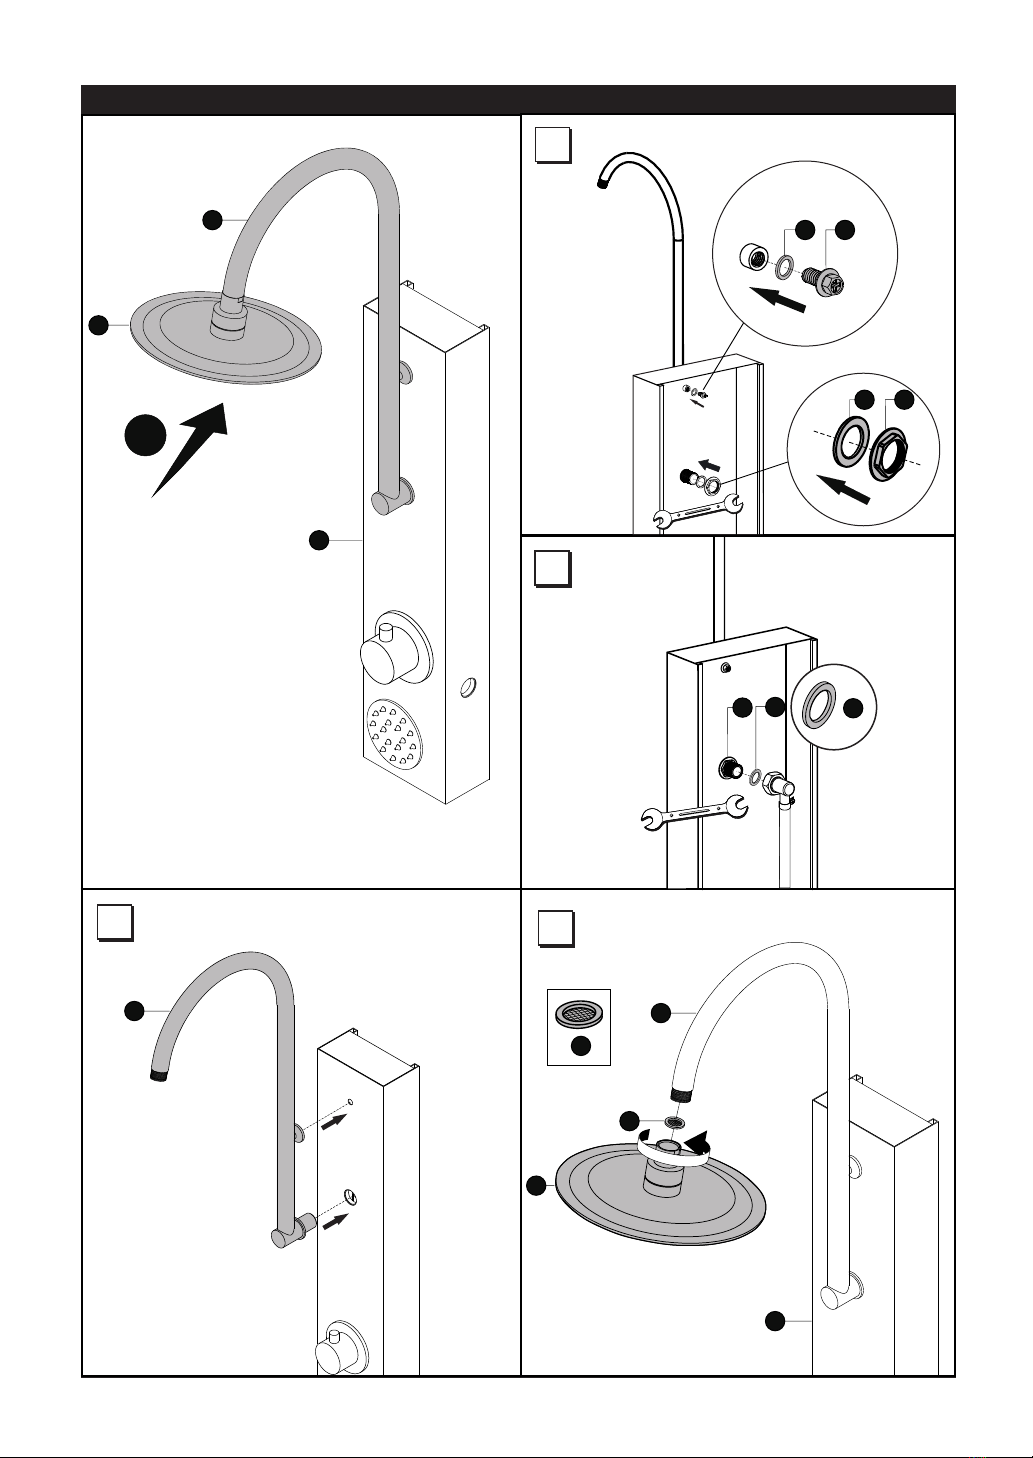
• Drill-less design and installs in under 15 minutes
• Easily installs in all shower stalls or tub bath
combinations
• All high quality metal components
• Large sleek slim profile rainfall head shower
• Polished chrome “goose neck” to hold the shower
head
• Full brass hand shower and cradle
• Stainless steel hand shower hose
• Stainless steel body with finger print resistant
coating
• 6 way rotary diverter that offers 3 single spray
modes or combination of any 2 features
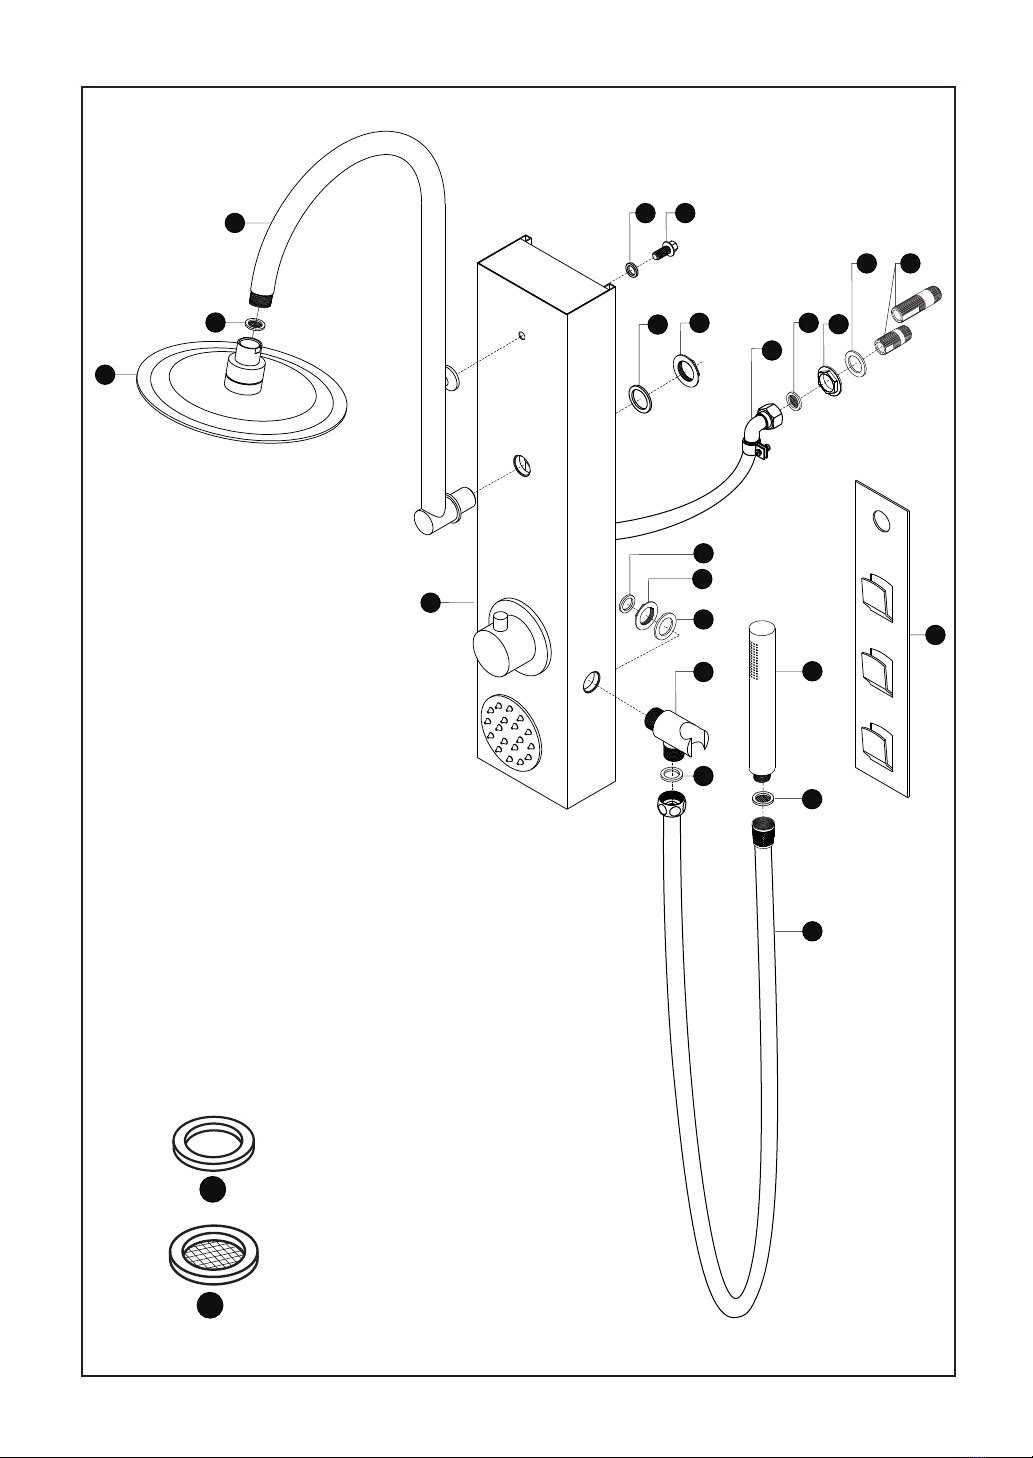
DIMENSIONS
DIMENSIONS CODE COMPLIANCE
FEATURES
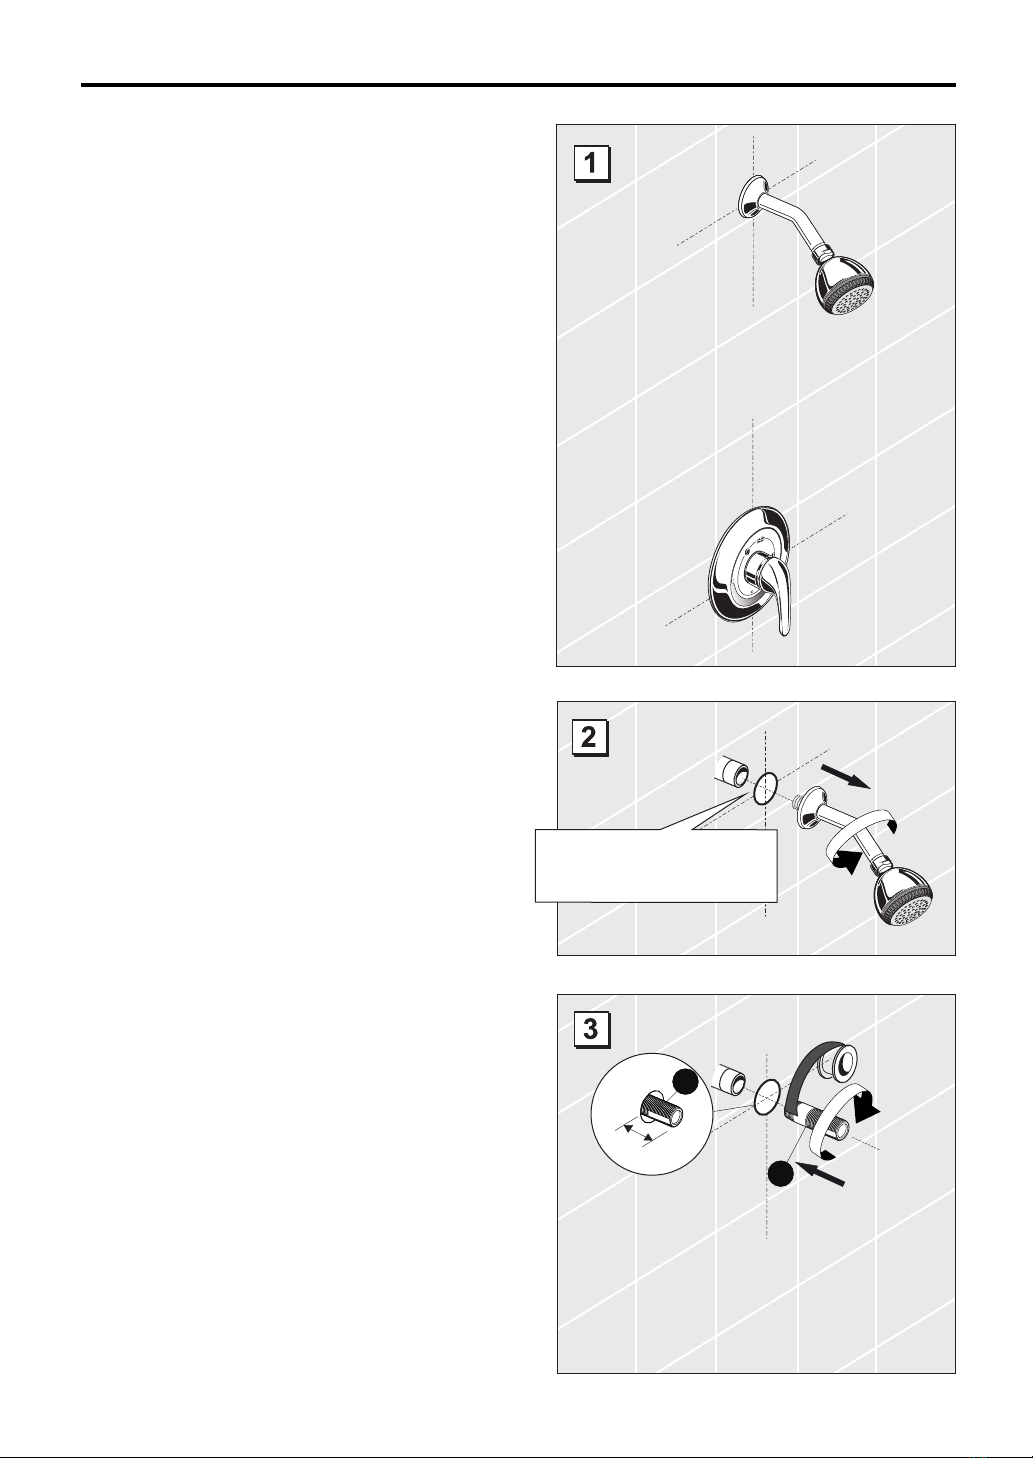
• Please read this Installation and User Guide before
installing and operating.
• Always take extra care when installing to prevent
injury. Please wear appropriate safety equipment.
• Do not allow children unsupervised use of the
shower panel.
• Do not use the shower panel if you are physically
impaired or under the influence of alcohol or any
substance which may prevent you from properly
operating the shower panel.
• Keep enough distance between yourself and the
shower panel.
• Do not allow sensitive parts of the body such as
eyes to come too close to the shower jets.
• Proper pressure balance needs to be maintained
between hot and cold water inputs to prevent
scalding or injury.
ATTENTION
- 2 -
5
128"
3
30 4"
1
22 2"
1
58"
3
44"
5
28"
1
22"
3
64"

• Before and during installation, please read and familiarize yourself with all installation instructions for this product.
• Please keep all components, parts and accessories of this product away from small children and minors. During installation,
all screws,tools and small parts should be supervised so that they do not fall into the hands of children.
• Use caution at all times when installing this product. Please ensure that you are physically able to perform all parts of the
installation and that you have the correct tools and equipment needed.
• Before beginning,remove all wrappers and packinging materials including staples and packing straps.
• Please check to ensure that all components and parts are complete.
• The Filter Gasket (# 3) must be installed to protect against incoming dirt by pipework. Incoming dirt can impair the function
and/or lead to damages on functional parts of the fixture. Manufacturer will not be held liable for resulting damages.
• The O Ring Gasket (# 9) must be installed to prevent water leakage. Manufacturer will not be responsible or liable from
any damage which results directly or indirectly from failure to installation of the O Ring Gasket.
IMPORTANT NOTE
RECOMMENDED TOOLS FOR INSTALLATION
-
PH +
2.5 mm
Wrenches
24 mm /30mm
Vice
Screwdriver Level Sealing Tape
Pliers
NO.
1
2
3
4
5
6
7
8
9
10
11
12
13
14
15
Description
Shower Panel Casing
Shower Head
Filter Gasket
Shower Arm
Screw
Rubber Washer( 5/8")
Nut
Rubber Washer( 1-1/2")
O Ring Gasket
Handshower Cradle Assembly
Handshower Hose
Full Brass Handshower
Positioning and Support Brackets
Elbow Connector
Brass extender joint (1-7/8"&2-3/4"x1/2")
Qty
1 Set
1 Pc
3 Pcs
1 Set
1 Pc
1 Pc
3 Pcs
3 Pcs
3 Pcs
1 Set
1 Set
1 Pc
1 Pc
1Set
2 Pcs
PARTS LIST
- 3 -
Pencil / Hexagon-wrench
Silicone

1
9
3
2
3
45
6
87
8
7
9
10
9
11
3
12
13
14
37
15
8
- 4 -

ASSEMBLY
c
- 5 -
A
b
d
a
1
2
45
6
7
8
799
4
3
2
3
1
4

B
ASSEMBLY
a
- 6 -
1
1
10
10
87
10
9
7
10
b
c

• Before Installation, insure there is sufficient
clearance to accommodate the shower panel.
A minimum of 23.5” is required between the
shower outlet and top of your existing valve.
Maximum clearance required 42”.
Ensure that the water line to the overhead
shower pipe is completely shut off prior to
performing any work.
• Remove the existing shower head and shower pipe.
• Connect the Brass Extender Joint (Part 15) provided
to the shower outlet. Use waterproof plumbing tape
on the pipe threading prior to securing the extender
to prevent leaks.
(Note: The Brass Extender Joint (Part 15) in two
sizes. Choose the appropriate size and ensure the
longer end of threading on the Extender (Part 15)
is facing outward.)
INSTALLATION INSTRUCTIONS
- 7 -
15
15
MAX 1-1/4"
MIN 23.5 INCH
½" diameter is needed to
accommodate the shower panel's
Brass Extender Joint (Part 15)

INSTALLATION INSTRUCTIONS
- 8 -
• Insert the Bracket (Part 13) onto the Brass
Extender Joint (Part 15)
4
13
5
15
• To ensure the bracket (and your shower panel)
will be in a completely straight and level position,
use a level tool against the side of the bracket
guide to make fine adjustments to the bracket
guide's position until fully level.
• Once fully level, this will be the final position of
the bracket guide.
• Take a pencil/marker and lightly mark the vertical
position of the Bracket (Part 13).
6
ab
a. Peel off the paper backing to the adhesive on the
back side of the Bracket (Part 13).
b. Place the adhesive side to the wall and apply
pressure to secure the Bracket(Part 13).
(Note: Clean all residues from the wall to insure
the cover will bond properly)
c. Place the Rubber Washer (Part 8) and nut over
the Brass Extender Joint (Part 15), and tighten
the nut (Part 7) to secure the bracket (Part 13)
to the extender joint (Part 15).
13
7
8
13 13
13
c15

INSTALLATION INSTRUCTIONS
Add a Filter Gasket (Part 3) into Elbow Connector
(Part 14) first. Then attach the Elbow Connector
(Part 14) to the Brass Extender Joint (Part 15),
turn clock wise to tighten.
- 9 -
7
• After all connections have been completed
inside the shower panel, it is ready to be
hung on the shower wall for installation.
• There are three height positions to select from.
• 10" of clearance between the overhead shower
and the top of the tallest user's head is
recommended.
• Place the shower panel on the desired bracket
position.
• Raise the shower panel and rest it against the
bracket until the support strut is resting snugly
in the desired bracket position.
• Once a snug and secure fit is achieved and all
the parts on the PVC Supply Line are secured
to the back of the shower panel, sealant may
be applied to seal the gap between the shower
panel body and the wall to prevent water from
entering behind the shower panel.
8
15

INSTALLATION INSTRUCTIONS
Recommended
10"
B
Installation position will vary,
depending on users height.
It is recommended to have
at approximately 10" of
clearance above the users
head, for the best experience
with this produce.
A
1
2
3
- 10 -

• Add a O Ring Gasket (Part 9) into Handshower
Hose (Part 11). Then attach the Handshower
Hose (Part 11) to the Handshower Cradle (Part 10),
turn clock wise to tighten.
ASSEMBLY & INSTALLATION INSTRUCTIONS
- 11 -
1
9
11
3
12
9
10
10
• Add a Filter Gasket (Part 3) into Handshower
Hose (Part 11). Then attach the Handshower
(Part 12) to the Handshower Hose(Part 11),
turn clock wise to tighten.

* For Safety, it is highly recommended that you familiarize yourself with all applicable local plumbing codes before
installing this product.
125psi
50~80psi
psi ,125psi45
93.2~107.6 F
<2.0gpm
Technical Data
Maximum operating pressure:
Recommended pressure:
Test pressure:
Recommended hot water temperature:
Flow rate @ 80 psi:
How to use Diverter
NOTE: Please turn on the Faucet first.
• Hand Shower Position
When the position knob is placed in”b”.
• Spray Position
When the position knob is placed in”c” .
When the position knob is placed in ”a”.
• Shower Head Position
c
When the position knob is placed in between each
dot mark, this will result in a sharing of water output
between 2 operating modes .This can be used if
combination of 2 modes is desired however the
water output will be reduced due to sharing of water
flowing through the system between those 2
operating modes.
Two modes simultaneously•
When the position knob is placed ”d”, the
handshower and the top hydro jets will work
simultaneously.
- 12 -
a
b
b
d

Diverter Valve Structure
Diverter valve
How to Remove the Diverter Valve
5
4
3
1
2
• Remove the handle to open the set screw access hole.
1
• Loosen the set screw (#1) from the valve stem and pull
the knob (#2) straight out.
2
(2.5 mm)
3
2
1
1
• Loosen and remove the gland nut (#4). • Remove the Diverter valve (#5) by pulling it straight out.
4
4
3
5
Diverter valve
4
- 13 -

2
5
Diverter valve
1
How to Install the Diverter Valve
• Place the Diverter valve (#5) into the valve body. Note
the one pillar on the bottom of the Diverter valve (#5)
must be aligned with the hole in the rear of the body.
• Tighten the gland nut (#4). Take precaution to avoid
scratching the trim plate. Do not force the nut too
tightly.
4
4
3
Adjust the knob with right position
Shower Head Mode
2
• Replace the knob (#2) on the valve stem.
• Before securing the knob, turn on the water to know
which way the handle is to be pointed.
5
4
(2.5 mm) 3
2
1
1
• Tighten the handle (#3) and finish the install.• Once the correct position of the knob has been
determined, place the knob on the valve stem and
tighten the set screw (#1). Do not overtighten.
2
- 14 -

• Loosen the nut securing the PVC Flexible hose to
the brass valve body.
• Disconnect the PVC hose from the valve body and
remove the Filter Gasket (#3).
• Using needle nose pliers, grip the edge of the check
valve and pull straight out..
2
3
Check Valve
1
• Place the new check valve into the valve body.
Observe the direction of the valve is correct.
2
4
Check Valve
2
2
3
2
• Ensure the check valve is flush with the top of the valve
body inlet.
5
Level
• Place the filter gasket (#3) back in place and secure the
PVC hose to the valve body to complete the install.
2
6
How to Replace the Check Valve
- 15 -
3

Problem Possible Causes Remedy
Limited water flow
- Check water pressure (If a pump has
been installed check to see if the
pump is working)
- Clean Filter Gasket between shower
and hose
Troubleshooting
Cleaning Recommendations
Cleaning Procedures
• Required cleaning your faucets and shower products,
regular cleaning will prevent scale buildup and water
spotting.
• Follow the label instructions. Do not allow any cleaner
to remain on the product for longer than necessary.
• When using spray cleaners, Please spray first to a
sponge or cloth, Don’t spray directly to the product.
• Please use clean water to rinse to remove residual
cleaners and dirt.
Important
• Soap and shampoo residue can also cause damage to
the product. Rinse with clean water after use.
• If the surface is already damaged, harsh cleaning
materials will cause further damage.
- Dirt or sedimentation on valve seat,
shut-off unit damaged - Clean or exchange shut-off unit
Shower drips continuously
Modern faucets and shower products utilize a combination
of materials to comply with the needs of the market with
regard to design and functionality.
To avoid damage, it is necessary to use some caution
when cleaning. Damage caused by improper treatment
is not covered under the warranty.
Cleaning Materials for Faucets and Showers
• To remove lime scale, use only products made
specifically for that purpose. Always follow the
manufacturer’s instructions when using.
• Do not use cleaners that contain hydrochloric,
formic, acetic, or phosphoric acids, as these will
cause considerable damage to finishes and to
plastic components.
• Never mix cleaning materials.
• Never use cleaners containing abrasives. Do not
use abrasive cleaning cloths, pads, or sponges.
- Supply pressure inadequate
- Filters Gasket are dirty
- 16 -

Valore (“Seller”) and the person or entity that acquires these
goods from Seller (“Purchaser”) hereby fully agrees to the
following terms and conditions of the sale: Shipping fees are
the responsibility of the Purchaser whether freight prepaid
or freight collect. Seller assumes no responsibility for the
goods sold to the Purchaser once the goods have left the
Seller’s premises, including but not limited to, late delivery
by the moving carrier, or for events caused by any difficulty
carrier incurs in attempting to fit the goods into the
Purchaser’s place of business or residence due to size of
the goods or otherwise Purchaser assumes all responsibility
for delivery, payment of freight, access, measurement,
installation, hook-up, wiring, moving and storage of the
goods. The transportation of all goods is subject to the terms
and conditions which the moving carrier imposes on
Purchaser including, but not limited to, additional charges
imposed per flight of stairs, and/or additional charges
resulting from the carrier’s inability to safely and/or
adequately use the building elevator to lift the goods to an
upper level. Any claim for damages incurred during the
shipment by the carrier of the goods are insured and
handled directly with the carrier. Any damages due to
manufacture defects will be handled directly with Valore,
subject to the limited warranty.
All sales are final, and unless authorized in writing by the
Seller, Purchaser may not return the goods, under any
circumstance. If Purchaser refuses to accept the goods,
under any circumstance, the Purchaser is liable for the
return and cost of freight both ways, and if seller does take
the goods, there may be a restocking fee that of 20% of the
purchase price of the goods in addition to the freight.
Purchaser must notify Seller of non-conforming goods
within seven (7) days of delivery, after which time all goods
are deemed accepted. If an order has been placed and
production started, cancellation cost of your order will be
20% or the purchase price.
The limited warranty does not cover damage due to
such things as accident, misuse, abuse, mishandling,
neglect, acts of God, fires, earthquakes, floods, high
winds, government, war, riot or labor issues defined
as strikes, lockouts, delay of carrier, unauthorized
repair, or any other beyond the control of the Seller
whether similar or dissimilar to the foregoing. Seller is
not responsible for any damages caused by the
Purchaser misusing, mishandling or abusing the
intended the use of the goods. Limited warranty
applies only inside the Continental U.S. or Canada
(Alaska, Puerto Rico Hawaii, Yukon, Northwest
Territories, and Nunavut not included). The limited
warranty is not transferrable between the US and
Canada.
The limited warranty is only valid with the provision of
proof-of-purchase from an authorized retailer of Valore
branded products.
Seller is not responsible for labor expenses that are
incurred due to service or installation charges.
Seller is not responsible for incidental or consequential
damages and there are no warranties, expressed or
implied, which extend beyond the limited warranty
described above. The implied warranties of
merchantability and of fitness for a particular purpose
are hereby expressly disclaimed. Some states do not
allow the exclusion of incidental or consequential
damages, or a waiver of the implied warranties of
fitness and/or merchantability, so the above limitations
may not apply to you. This warranty gives you specific
legal rights and you may have other rights, which vary
from state to state.
LIMITED WARRANTY
guaranteed from manufacture defectsTen (10) years
Lifetime limited parts warranty on the diverter valve.
Recycling: Most of the materials used to manufacture this
shower fixture are recyclable. Please dispose of those
materials properly in accordance to your local state laws.
Improper disposing of this shower fixture can be harmful to
the environment.
LENGTH OF WARRANTY
If you have questions relating to the use, warranty,
return, claims and replacement, please call:
Phone: 877-551-0484
(Monday to Friday 8:30am-5:30pm PST)
Email us at [email protected] (24 hour)
For more information, you can visit us at:
www.valoreusa.com
- 17 -
Table of contents
Other Valore Bathroom Fixture manuals
Popular Bathroom Fixture manuals by other brands

Victorian Plumbing
Victorian Plumbing N82DQ-PKA installation instructions

Tres
Tres Shower Technology manual

Richelieu
Richelieu 87O2S10418 Series Installation

WOLSELEY
WOLSELEY nabis D06958 installation guide

Geberit
Geberit AQUACLEAN TUMA CLASSIC quick guide

Signature Hardware
Signature Hardware PROVINCETOWN 948569 manual