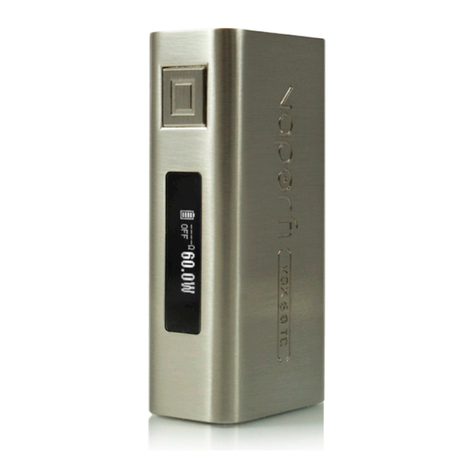
Vaporfi VOX 80 TC User manual


VOX® 80 TC MANUAL
ENGLISH

3
USING DEVICE:
To turn on the VOX 80w TC mod, press the power button five times, you will do the
same to turn off the device as well. Before using the device, make sure you are in the
correct mode depending on the atomizer you are using. To adjust modes, press the
power button three times to enter the designated menu. Once there, use the – button
the navigate the menu and the + button to make any necessary changes. Once you’ve
checked your settings, you are now ready to vape. Hold the power button while
inhaling from the drip tip, releasing the power button once the desired vapor
production is achieved. Use the + and – buttons to determine the best wattage or
temperature, depending on your atomizer, that works for your vaping style.
TEMPERATURE CONTROL:
If you are planning to use an atomizer in one of three temperature modes, press the
power button 3 times to enter the designated menu. Once in the menu, press the –
button, you will notice that the modes will begin to flash. Now, press the + button to
scroll through the different modes. Press the power button to confirm. Once you have
found the correct mode for your atomizer, you are now ready to vape in temperature
control mode. Using the + and – buttons you can adjust your temperature (ranges
www.vaporfi.com
Note: When the power button is held for longer than 10 seconds, the device will no
longer fire and the screen will display, “Over 10s Protection.”
from 100-315 degrees Celsius to 200-600 degrees Fahrenheit) to find the best
temperature for your e-liquid.

If you are planning to use an atomizer in one of three temperature modes, press the
power button 3 times to enter the designated menu. Once in the menu, press the –
button, you will notice that the modes will begin to flash. Now, press the + button to
scroll through the different modes. Press the power button to confirm. Once you have
found the correct mode for your atomizer, you are now ready to vape in temperature
control mode. Using the + and – buttons you can adjust your temperature (ranges
4
www.vaporfi.com
Note: When using new atomizers in temperature control mode, it is important to
start at lower temperatures to avoid burning your atomizer.
from 100-315 degrees Celsius to 200-600 degrees Fahrenheit) to find the best
temperature for your e-liquid.
SWITCHING FROM CELSIUS
TO FAHRENHEIT:
Switching from Celsius to Fahrenheit or vice versa is fairly easy. Hold the + button to
increase the temperature, until you’ve reached the maximum temperature (315
degrees Celsius or 600 degrees Fahrenheit). Once you reach the maximum
temperature, press the + button once more to complete the switch.
CHANGING WATTAGE IN
TEMPERATURE CONTROL:
Wattage can be adjusted in Temperature Control Mode. Press the power button three
times to enter the menu. By pressing the – button twice, you will notice the wattage
will begin to blink. Then, press the + button to increase this number to the desired
wattage. Now, press the power button to confirm.

5
www.vaporfi.com
TCR (M1, M2, M3):
TCR SETUP:
The VOX 80w TC mod offers the TCR function, which enables users to customize their
temperature control atomizers (Ni, Ti, SS). To enter TCR mode, press the power
button three times, once you have entered the mode menu, press the + button until
you see the TCR mode. While the mode is still flashing you can press the – button to
scroll through the set memories (M1, M2, M3), once entered only the memory setting
will flash. Now press the + button to choose a memory and follow that by pressing the
power button to confirm.
With the device turned off, hold the power button and + button for five seconds.
Once you have entered the TCR menu, press the + or - button to choose a memory.
You will then press the power button to enter your parameter setting. Press the + or -
button to set the parameter for your atomizer. Then hold the fire button to confirm.
BYPASS MODE:
Bypass Mode is a direct output mode of voltage. This mode can only be used with
atomizer resistances under the range of 0.15-3.5 ohms; otherwise the device will not
work properly. Press the power button three times to enter the menu. Press the + until
you enter bypass mode and press the power button to confirm.

6
www.vaporfi.com
EXTRA FEATURES:
1. NEW COIL/SAME COIL PROMPT
When replacing your atomizer, especially from a nickel atomizer to a temperature
controlled atomizer (Ni, Ti, SS 316), you will be required to reset the resistance of that
atomizer. This helps the device recognize that the new atomizer is to be used at room
temperature, which ensures that you will not experience a burnt hit, if properly primed.
When prompted press the + button to indicate that the replacement atomizer is new. If
you are using the same atomizer and are prompted, press the – button indicating that
the atomizer is the same.
2. LOCK/UNLOCK IN TEMPERATURE MODE
When using an atomizer in temperature control, to ensure that your atomizer is read at
the correct base resistance, you have the ability to lock your resistance. Press the power
button three times to enter the menu. Then press the – button to enter the second row
of your display, you will notice the resistance display is now blinking. Now, press the +
button to lock the resistance.
Note: It is important to unlock your atomizer’s resistance before replacing the
atomizer. This will ensure that the new atomizer is installed at room temperature.

7
www.vaporfi.com
3. SCREEN PROTECTION TIME
While the device is on, hold the power and + buttons to enter the led menu. Press the +
button again, to enter the screen protection menu. Once in the menu, press the – button
to choose the protection time. Press the power button to confirm.
4. KEY LOCK
While the device is on, hold the + and – buttons to enter key lock mode. While in this
mode, you will be unable to change the wattage/temperature, but will still be able to fire.
5. STEALTH MODE
While the device is on, hold the power and – buttons to enter stealth mode. While in
stealth mode, you will be able to fire your device without the screen lighting up. This
helps save battery life. The Real time clock will still display and you can still see the
screen when changing your wattage/temperature You can still see the screen when
changing your wattage/temperature.
6. CLOCK DISPLAY
While the device is on, press the power button three times to enter the designated
menu. Press the + button until you reach the clock display. Now, using the – button,
you can set the hour, minute, year, month, and day depending on the clock display that
you choose. Once your preferred settings are in press the power button to confirm.

8
www.vaporfi.com
PROTECTIONS AND ALERTS:
1. LOW BATTERY
You will receive the “Low Battery” message when your battery meter begins to blink. If
you continue to press the power button, the message will then change to “Battery Low
Lock.” The device will not work until the battery is charged.
2. NO ATOMIZER FOUND
You will receive the “No Atomizer Found” message if the device is unable to read there
is an atomizer attached or if the atomizer has shorted. Please ensure atomizer is
attached properly. Also make sure the atomizer is not damaged in any way before use.
3. TEMPERATURE PROTECTION
In temperature control mode, if the temperature of the atomizer is higher than the set
temperature of the device, the “Temperature Protection” message will be displayed.

9
www.vaporfi.com
Note: While the device is charging, you can still enjoy your favorite e-liquid. Keep in
mind, while it is possible to continue use during charging, it drastically slows down
the process.
BATTERY LIFE:
There is a battery meter at the bottom of your screen, that will display the device’s
current battery strength. As you use the device, this meter will continue to decrease
until the device can no longer fire and the “Low Battery” message is displayed on the
screen. Once this message is displayed, use the USB cord included with the device and
proceed to charge.

ESPAÑOL
VOX® 80 TC MANUAL

12
www.vaporfi.com
USO DEL DISPOSITIVO:
Para encender el mod VOX 80w TC, presione el botón de encendido cinco veces. Para
apagar el dispositivo deberá hacer exactamente lo mismo. Antes de utilizar el
dispositivo, asegúrese de estar en el modo correcto en función del atomizador que
esté utilizando. Para ajustar los modos, presione el botón de encendido tres veces
para entrar en el menú designado. Una vez allí, utilice el botón "-" para navegar por el
menú y el botón "+" para realizar los cambios necesarios. Una vez que haya elegido su
configuración, ya está listo para vaporear. Mantenga pulsado el botón de encendido
mientras aspira por la boquilla y suéltelo cuando logre la producción de vapor
deseada. Utilice los botones "+" y "-" para determinar la potencia y temperatura que
mejor funcionen para su estilo de vaporeo en función de su atomizador.
CONTROL DE TEMPERATURA:
Si está planeando usar un atomizador en uno de los tres modos de temperatura,
presione el botón de encendido 3 veces para entrar en el menú designado. Una vez en
el menú, presione el botón "-" y notará que los modos comienzan a parpadear. Ahora,
presione el botón "+" para desplazarse por los diferentes modos. Presione el boton
Nota: Cuando pulse el botón de encendido durante más de 10 segundos, el
dispositivo dejará de producir vapor y se mostrará en la pantalla "Over 10s
Protection" ("Protección de más de 10 segundos").
den encendido para confirmar. Cuando encuentre el modo correcto para su
atomizador, ya está listo para vaporear en el modo de control de temperatura. Con los
botones "+" y "-" puede ajustar la temperatura (varía entre 100 y 315 grados Celsius o
entre 200 y 600 grados Fahrenheit) para encontrar la que mejor se adapte a su
e-líquido.
Con el dispositivo encendido, presione el botón de encendido tres veces para acceder al
menú designado. Presione el botón "+" hasta llegar a la visualización del reloj. Ahora,
con el botón "-" puede ajustar la hora, minuto, año, mes y día dependiendo de la
visualización del reloj que haya elegido. Una vez que los ajustes que prefiera, pulse el
botón de encendido para confirmar.

13
www.vaporfi.com
Si está planeando usar un atomizador en uno de los tres modos de temperatura,
presione el botón de encendido 3 veces para entrar en el menú designado. Una vez en
el menú, presione el botón "-" y notará que los modos comienzan a parpadear. Ahora,
presione el botón "+" para desplazarse por los diferentes modos. Presione el boton
den encendido para confirmar. Cuando encuentre el modo correcto para su
atomizador, ya está listo para vaporear en el modo de control de temperatura. Con los
botones "+" y "-" puede ajustar la temperatura (varía entre 100 y 315 grados Celsius o
entre 200 y 600 grados Fahrenheit) para encontrar la que mejor se adapte a su
e-líquido.
Nota: Cuando se utilizan nuevos atomizadores en el modo de control de
temperatura, es importante comenzar a bajas temperaturas para evitar que el
atomizador se queme.
CAMBIAR DE CELSIUS A FAHRENHEIT:
Cambiar de Celsius a Fahrenheit o viceversa es muy sencillo. Mantenga presionado el
botón "+" para aumentar la temperatura hasta alcanzar el máximo (315 grados Celsius
o 600 grados Fahrenheit).Una vez que llegue a la temperatura máxima, pulse una vez
más el botón "+" para efectuar el cambio.
CAMBIO DE POTENCIA EN EL
CONTROL DE TEMPERATURA:
En el modo de control de temperatura se puede ajustar la potencia en vatios. Pulse el
botón de encendido tres veces para entrar en el menú. Presione el botón "-" dos
veces y notará que la potencia comienza a parpadear. Luego, presione el botón "+"
para aumentar este número hasta alcanzar la potencia deseada. Ahora, pulse el botón
de encendido para confirmar. Con el dispositivo encendido, presione el botón de encendido tres veces para acceder al
menú designado. Presione el botón "+" hasta llegar a la visualización del reloj. Ahora,
con el botón "-" puede ajustar la hora, minuto, año, mes y día dependiendo de la
visualización del reloj que haya elegido. Una vez que los ajustes que prefiera, pulse el
botón de encendido para confirmar.

14
www.vaporfi.com
TCR (M1, M2, M3):
El mod VOX 80w TC ofrece la función TCR, la cual permite a los usuarios personalizar
sus atomizadores de control de temperatura (Ni, Ti, SS).Para entrar en el modo TCR,
presione el botón de encendido tres veces. Una vez dentro del menú de modo,
presione el botón "+" hasta ver el modo TCR. Mientras el modo sigue parpadeando,
puede presionar el botón "-" para desplazarse por las memorias de ajuste (M1, M2,
M3). Una vez dentro, solo parpadeará el ajuste de memoria. Ahora presione el botón
"+" para elegir una memoria y luego pulse el botón de encendido para confirmar.
CONFIGURACIÓN DE TCR:
Con el dispositivo apagado, mantenga pulsado el botón de encendido y el botón "+"
durante cinco segundos. Una vez que haya ingresado al menú TCR, presione el botón
"+" o "-" para elegir una memoria. A continuación, pulse el botón de encendido para
introducir su ajuste de parámetros. Pulse el botón "+" o "-" a fin de ajustar el
parámetro para su atomizador. A continuación, mantenga pulsado el botón de fuego
para confirmar.
MODO DE DERIVACIÓN:
El modo de derivación es un modo de salida directa de voltaje. Este modo solo se
puede utilizar con resistencias de atomizador por debajo del rango de 0,15 - 3,5 ohm.
De lo contrario, el dispositivo no funcionará correctamente. Pulse el botón de
encendido tres veces para entrar en el menú. Pulse el botón "+" hasta entrar en el
modo de derivación y pulse el botón de encendido para confirmar.
Con el dispositivo encendido, presione el botón de encendido tres veces para acceder al
menú designado. Presione el botón "+" hasta llegar a la visualización del reloj. Ahora,
con el botón "-" puede ajustar la hora, minuto, año, mes y día dependiendo de la
visualización del reloj que haya elegido. Una vez que los ajustes que prefiera, pulse el
botón de encendido para confirmar.

15
www.vaporfi.com
El modo de derivación es un modo de salida directa de voltaje. Este modo solo se
puede utilizar con resistencias de atomizador por debajo del rango de 0,15 - 3,5 ohm.
De lo contrario, el dispositivo no funcionará correctamente. Pulse el botón de
encendido tres veces para entrar en el menú. Pulse el botón "+" hasta entrar en el
modo de derivación y pulse el botón de encendido para confirmar.
CARACTERÍSTICAS ADICIONALES:
1. PREGUNTA "NUEVA BOBINA / MISMA BOBINA":
Cuando reemplace su atomizador, sobre todo si reemplaza uno de níquel por uno de
temperatura controlada (Ni, Ti, SS 316), deberá restablecer la resistencia de ese
atomizador. Esto ayuda al dispositivo a reconocer que el nuevo atomizador debe
utilizarse a temperatura ambiente, lo cual le garantiza que no sentirá sabor a quemado si
está bien cebado. Cuando aparezca la pregunta, presione el botón "+" para indicar que
el atomizador de reemplazo es nuevo. Si está utilizando el mismo atomizador y aparece
la pregunta, presione el botón "-" para indicar que el atomizador es el mismo.
2. BLOQUEO/DESBLOQUEO EN MODO DE TEMPERATURA:
Cuando utilice un atomizador en control de temperatura, puede bloquear su resistencia
para asegurarse de que sea leído según la resistencia base correcta. Pulse el botón de
encendido tres veces para entrar en el menú. Luego, presione el botón "-" para entrar en
la segunda fila de su pantalla. Notará que la pantalla de resistencia está parpadeando.
Ahora, presione el botón "+" para bloquear la resistencia.
Con el dispositivo encendido, presione el botón de encendido tres veces para acceder al
menú designado. Presione el botón "+" hasta llegar a la visualización del reloj. Ahora,
con el botón "-" puede ajustar la hora, minuto, año, mes y día dependiendo de la
visualización del reloj que haya elegido. Una vez que los ajustes que prefiera, pulse el
botón de encendido para confirmar.

3. TIEMPO DE PROTECCIÓN DE PANTALLA
Con el dispositivo encendido, mantenga presionados los botones de encendido y "+"
para entrar en el menú del LED. Pulse de nuevo el botón "+" para acceder al menú de
protección de pantalla. Una vez en el menú, presione el botón "-" para elegir el tiempo
de protección. Pulse el botón de encendido para confirmar.
4. BLOQUEO DE TECLAS:
Con el dispositivo encendido, mantenga pulsados los botones "+" y "-" para entrar en el
modo de bloqueo de teclas. Mientras esté en este modo, no podrá cambiar la
potencia/temperatura, pero podrá seguir vaporeando.
5. MODO SIGILOSO:
Con el dispositivo encendido, mantenga pulsados los botones "+" y "-" para entrar en el
modo de bloqueo de teclas. Mientras esté en este modo, no podrá cambiar la
potencia/temperatura, pero podrá seguir vaporeando. El reloj en tiempo real seguirá
apareciendo y aún podrá ver la pantalla cuando cambie su potencia / temperatura
6. VISUALIZACIÓN DEL RELOJ:
Con el dispositivo encendido, presione el botón de encendido tres veces para acceder al
Nota: Es importante desbloquear la resistencia de su atomizador antes de
reemplazarlo. Esto asegurará que el nuevo atomizador se instale a temperatura
ambiente.
16
www.vaporfi.com
menú designado. Presione el botón "+" hasta llegar a la visualización del reloj. Ahora,
con el botón "-" puede ajustar la hora, minuto, año, mes y día dependiendo de la
visualización del reloj que haya elegido. Una vez que los ajustes que prefiera, pulse el
botón de encendido para confirmar.

16
www.vaporfi.com
Con el dispositivo encendido, presione el botón de encendido tres veces para acceder al
PROTECCIONES Y ALERTAS:
1. BATERÍA BAJA
Recibirá el mensaje "Low Battery" ("Batería baja") cuando el medidor de batería
comience a parpadear. Si continúa presionando el botón de encendido, el mensaje
cambiará a "Battery Low Lock" ("Bloqueo de batería baja").El dispositivo no funcionará
hasta que cargue la batería.
2. NO SE ENCONTRÓ ATOMIZADOR:
Recibirá el mensaje "No Atomizer Found" ("No se encontró atomizador") si el
dispositivo no puede detectar que hay un atomizador conectado o si se produjo un
cortocircuito en el atomizador. Asegúrese de que el atomizador esté conectado
correctamente. Asegúrese también de que el atomizador no esté dañado de ninguna
manera antes de usarlo.
3. PROTECCIÓN DE TEMPERATURA:
En el modo de control de temperatura, si la temperatura del atomizador es superior a la
temperatura establecida para el dispositivo, se visualizará el mensaje "Temperature
Protection" ("Protección de temperatura").
menú designado. Presione el botón "+" hasta llegar a la visualización del reloj. Ahora,
con el botón "-" puede ajustar la hora, minuto, año, mes y día dependiendo de la
visualización del reloj que haya elegido. Una vez que los ajustes que prefiera, pulse el
botón de encendido para confirmar.

17
www.vaporfi.com
Con el dispositivo encendido, presione el botón de encendido tres veces para acceder al
NIVEL DE CARGA DE LA BATERÍA:
Hay un medidor de batería en la parte inferior de la pantalla que indica el nivel de carga
actual de la batería del dispositivo. A medida que utiliza el dispositivo, este medidor va
disminuyendo hasta que ya no se pueda producir vapor y aparezca el mensaje "Low
Battery" ("Batería baja") en la pantalla. Cuando se muestre este mensaje, utilice el cable
USB que trajo el dispositivo y proceda a cargarlo.
menú designado. Presione el botón "+" hasta llegar a la visualización del reloj. Ahora,
con el botón "-" puede ajustar la hora, minuto, año, mes y día dependiendo de la
visualización del reloj que haya elegido. Una vez que los ajustes que prefiera, pulse el
botón de encendido para confirmar.
Nota: Mientras el dispositivo se está cargando, usted puede seguir disfrutando de
su e-líquido favorito. Tenga en cuenta que si bien es posible utilizar el dispositivo
durante la carga, tardará mucho más en cargarse.

Con el dispositivo encendido, presione el botón de encendido tres veces para acceder al
menú designado. Presione el botón "+" hasta llegar a la visualización del reloj. Ahora,
con el botón "-" puede ajustar la hora, minuto, año, mes y día dependiendo de la
visualización del reloj que haya elegido. Una vez que los ajustes que prefiera, pulse el
botón de encendido para confirmar.
Table of contents
Languages:
Other Vaporfi Vaporizer manuals

Vaporfi
Vaporfi VEX 150 TC User manual

Vaporfi
Vaporfi ATOM Operating and maintenance instructions

Vaporfi
Vaporfi VOX 60 TC User manual

Vaporfi
Vaporfi VOLT User manual

Vaporfi
Vaporfi PRO II User manual

Vaporfi
Vaporfi VEX 75 TC User manual

Vaporfi
Vaporfi V-GRIP 220 User manual

Vaporfi
Vaporfi PULSE User manual

Vaporfi
Vaporfi VOLT 2 User manual

Vaporfi
Vaporfi Rebel User manual