Variquest Perfecta 3600STP User manual

Perfecta® 2400STP & Perfecta® 3600STP
Poster Design System
Quick Start & Introduction

Page
2 VariQuest® Perfecta® STP Series
Quick Start
Perfecta STP Series Quick Start
Introduction
Your VariQuest® Perfecta® STP Series Poster Design Systems are multifunction
printers designed for printing, scanning and copying large, high-quality images.
This introductory document includes legal notices and safety instructions, describes
the use of the front panel and lists error messages that you may encounter. For
further information, contact your authorized VariQuest® Dealer.
This introductory document works for both the Perfecta® 2400STP and the
Perfecta® 3600STP. Information provided is identical for both machines unless
otherwise noted.
Legal Notices
© Copyright 2019, Varitronics, LLC.
This manual is copyrighted with all rights reserved. No portion of this manual may be
copied or reproduced by any means without the prior consent of Varitronics, LLC.
While every precaution has been taken in preparation of this document, Varitronics
assumes no liability to any party for any loss or damage caused by errors or
omissions or by statements resulting from negligence, accident or any other cause.
Varitronics further assumes no liability for incidental or consequential damages
arising from the use of this document. Varitronics disclaims all warranties of
merchantability or fitness for a particular purpose.
Varitronics reserves the right to make changes without further notice to any product
or system herein to improve reliability, function or design.
This software and documentation are based in part on software and documentation
under license from Hewlett-Packard Company. Copyright (c) 2016 Hewlett-Packard
Development Company, L.P.
Reproduction of this material, in part or whole, is strictly prohibited without the
written permission of Varitronics, LLC. For more information contact: Varitronics® at
7200 93rd Ave N, Suite 120, Brooklyn Park, MN 55445 USA.
Front Panel
The front panel gives you complete control of your printer. Dynamic information in
central area displays current activity. Dashboard (swipe down from top) displays
Home screen icons. Fixed icons on left and right (normally not all displayed at
once). Power is illuminated when the printer is on.
Fixed Icons
Home Screen Icons
Dynamic Icons
Icon Description Icon Description
Return to home screen. Return to previous screen.
View current screen help. Wireless network active (blue).
Icon Description Icon Description
Change printer settings. View printhead information.
Eject scanned original. View network status and configure
network (wireless or wired).
View ink supply information. View WiFi direct information.
View and configure ePrint.
Icon Description Icon Description
Roll paper options. Single-sheet paper options.
Multi-sheet tray options. White check indicates active
paper source.

VariQuest® Perfecta® STP Series
Quick Start Page
3
Install Ink
CAUTION!CAUTION!
Do not remove an ink cartridge while printing. Make sure you insert the ink cartridge
into the slot with the same colored letter as the cartridge you are installing.
To replace an ink cartridge:
1. With printer ON, open ink cartridge cover and wait until carriage stops moving.
2. Pull out the ink cartridge.
3. Insert the new ink cartridge and close ink cartridge cover.
Install Paper
Load Spindle
1. Open roll cover and remove spindle. Do not insert your fingers into spindle
supports during the removal
process
2. Remove blue paper stop from end of spindle and slide on new roll. Orient paper
as shown.
3. Replace blue paper stop on open end of spindle and push toward roll.
Load Paper Roll in Printer
1. On dashboard, press , then touch Load Roll. Open roll cover and insert
spindle with blue hub on left (from front). Ensure paper edge is straight.
2. Insert edge of paper into printer and roll until you feel resistance. Do not push
your fingers inside paper path. When printer detects paper, it beeps and
feeds in paper automatically.
3. On front panel, select paper category and type. Touch More paper types to see
more types. Close roll cover and touch OK.
Use the Multi-Sheet Tray
If a roll or single sheet is already loaded, you will have to touch Unload Roll and
wait until it is automatically unloaded. If no roll is loaded or the roll has run out of
paper, the multi-sheet tray is active by default.
1. On front panel, touch , then Use multi-sheet tray and adjust the input and
output tray extensions, depending on the length of the paper: the first extension
is for A4 and the second extension for A3 paper.
[3]
[2]
[1]
[1]
[2]
[3]
[1]
[2]
[3]
[1]

Page
4 VariQuest® Perfecta® STP Series
Quick Start
2. Load sheets of paper into the tray with printed side facing outward. Ensure that
the sheets are all the same size.
3. Adjust tray to fit width of paper.
Connect DC2300 to Perfecta® STP Series Printer
Before printing from the Design Center to the Perfecta® STP Series printer, you
must first set up the Design Center software and the Perfecta STP Series printer.
Note: For further instructions on connection methods, please visit the User's Guide
at resources.variquest.com
Select a Connection Method
Follow the tree chart to help identify what connection method is best for you.
Still not sure which connection is best for you or looking for more information on
each connection method? Review the chart to the right for more details.
Wi-Fi Direct - Method 1
Note: Easy to install - instructions on page 5
Wi-Fi Direct is a connection that allows for device-to-device communication,
linking devices together without a network.
Uses
• No IT required
• No additional cords required
• Printer and Design Center are off the network
Do not use if…
• You would like to access the internet and or use Google Drive
• Print from multiple locations across the school
Network Connection - Method 3
Note: Medium difficulty to install - instructions on page 5
Uses
• Access to school network and internet access with Google Drive
• Additional cords may be required
Do not use if…
• If you do not want IT involvement
• If you do not want the printer to be discovered by others on the network
involvement
Wi-Fi Direct between Perfecta and DC with DC Ethernet to
wall for network connection - Method 2
Note: Medium difficulty to install - Access the User's Guide, located at
resources.variquest.com Requires additional ethernet cord (not included)
Uses
• Access to school network and internet access with Google Drive
• Printer is off the network and not discoverable without a password
Do not use if…
• If you do not want IT involvement
Direct Wired Connection - Method 4
Note: Most difficult to install - Access the User's Guide, located at
resources.variquest.com Requires additional ethernet cord (not included)
Uses
• Printer and Design Center are off the network
• You are having difficulty keeping a strong connection between the Perfecta STP
Series Printer and Design Center
Do not use if…
• If you do not want IT
[3]
[2]

VariQuest® Perfecta® STP Series
Quick Start Page
5
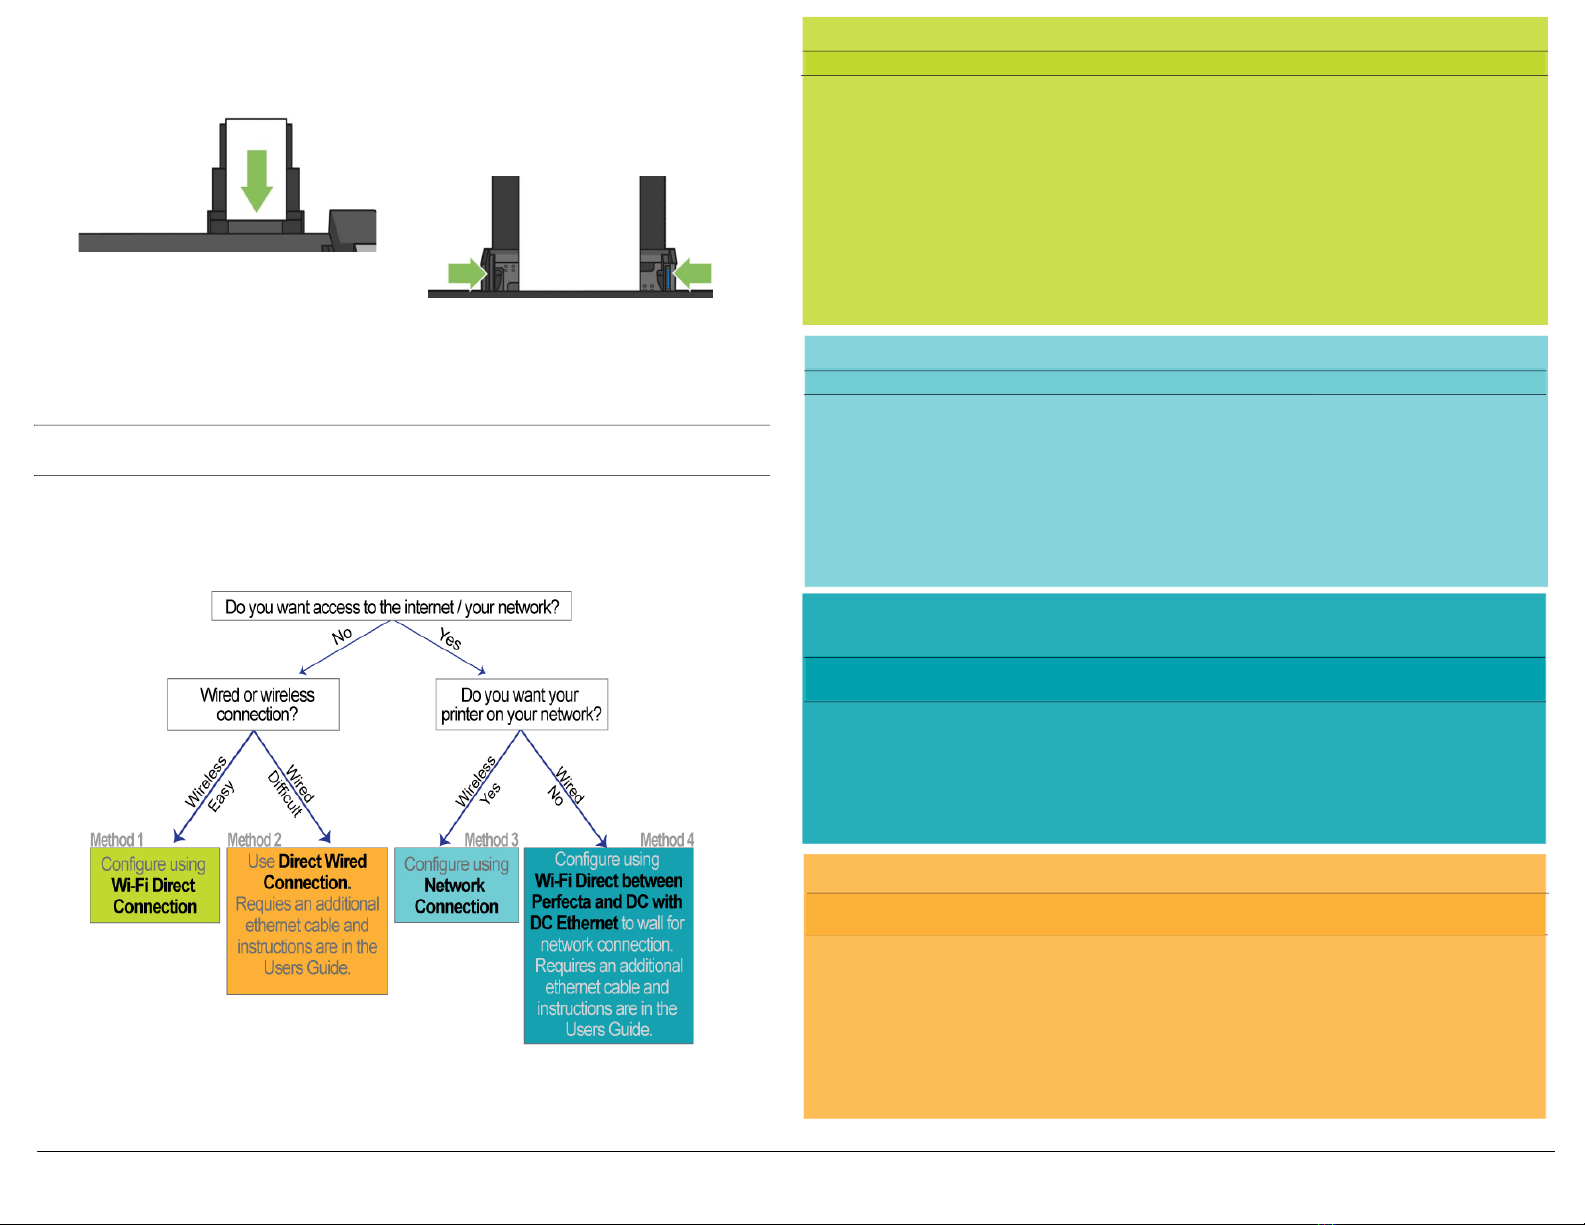
Configure DC2300 & Perfecta STP Series via Wi-Fi Direct
Note: This is a direct wireless connection and does not use any external networks.
1. Start the DC2300. The Design Center Software launches automatically.
2. In the Welcome screen, touch OK, then on the Main Menu, touch Exit and
Close Variquest Software without following any of the setup options.
3. On the DC2300 desktop, double-click Perfecta STP Series Installer icon and
follow the setup instructions to install the printer driver.
4. When prompted to connect via Wi-Fi Direct, select Yes.
5. On the Perfecta STP Series printer:
Verify Wi-Fi Direct connection
:
Note: For initial setup: 1) Select Connect Later on the Select Connection Method,
menu. 2) On Printer Update Options, select Do Not Check, then uncheck
Automatically Send Anonymous Data. If this is not the initial setup, configuration is
unnecessary and this screen will not display.
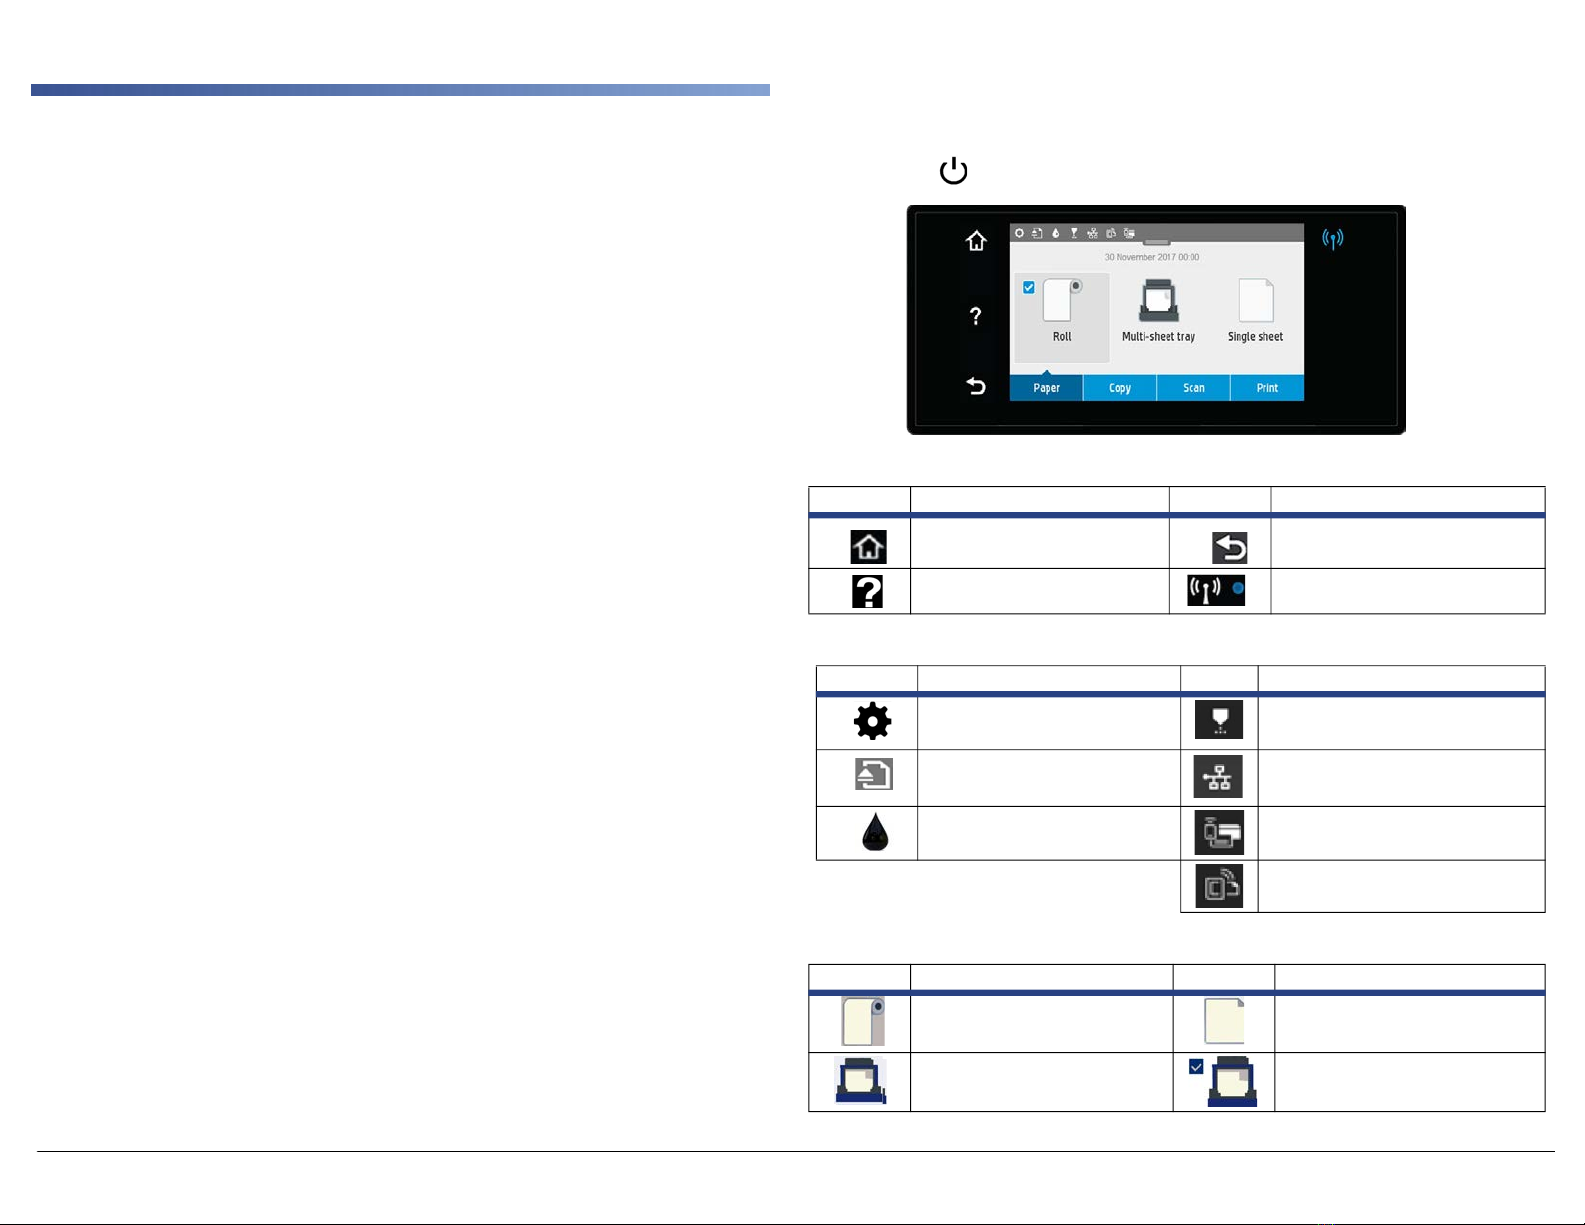
a. Touch at top left.
b. On the Info menu, verify the printer is connected by scrolling up or down to
find the correct printer (e.g., Direct-xx HP DesignJet). If Wi-Fi Direct is
connected, the Wi-Fi Direct network name and password will display.
c. If the Wi-Fi Direct network name and password is not displayed, continue to
Turn on Wi-Fi Direct. Otherwise, go to Step 6.
Turn on Wi-Fi Direct:
a. Touch , then again.
b. In the Setup menu, select Wi-Fi Direct.
c. In the Wi-Fi Direct Settings menu, toggle Wi-Fi- Direct to ON.
d. In Connection Method, choose Manual, then touch to exit.
6. Connect DC2300 to the Perfecta STP Series printer Wi-Fi Direct Connection
(i.e., DIRECT-xx HP DesignJet) using the Windows Wireless Network utility.
7. Run the VariQuest Software to complete the setup process. You can now print
from the Design Center software to the Perfecta STP Series printer.
Configuring DC2300 & Perfecta STP Series via a Network
Both the DC2300 and Perfecta® STP Series printer must be connected to the
network before starting this process.
1. Swipe down on the dashboard, touch , then scroll down and touch Network
setup > Wireless settings.
2. Select Wireless Setup Wizard. The printer will search for wireless routers.
3. Choose a Network Name, then enter the Password. Touch Apply when done.
4. In the Connection Successful menu, touch Apply.
5. Start the DC2300. The Design Center Software launches automatically.
6. In the Welcome screen, touch OK, then on the Main Menu, touch Exit and
Close Variquest Software without following any of the setup options.
7. On the DC2300 desktop, double-click Perfecta STP Series Installer icon and
follow the setup instructions to install the printer driver.
8. If printer IP address cannot be located, enter the IP address manually
(press at top of Perfecta STP Series panel. IP address is 2nd from top).
9. Run the VariQuest Software to complete the setup process. You can now print
from the Design Center software to the Perfecta STP Series printer.
Mobile Printing from an iOS Device
You can print directly from your smartphone or tablet in just a few simple steps
wherever you are using your mobile iOS device. Method 1 is for printing from a
mobile device when both your printer and device are connected to the internet.
Method 2 is for printing without connecting to a wireless network.
Note: Mobile printing is also supported for Android depending on the version of your
device. To print from Android™ devices, download the HP Print Service Plugin app
from Google Play.

Page
6 VariQuest® Perfecta® STP Series
Quick Start
Print via Wireless Internet using iOS Device
1. Connect the Perfecta STP Series printer and your device to the local internet.
Make sure your mobile device has WiFi enabled.
Note: The mobile device and printer Wi-Fi must be connected to the same
internet.
2. On your mobile device, choose the document you want, then touch Print.
3. Select your Printer (e.g., DIRECT-xx HP DesignJet).
4. Select paper size and other options (e.g., paper size, color, black & white).
Note: The print will automatically size itself to how it was designed. To print on
the size of the loaded paper, you must select it.
5. When done, touch Print. The document will be sent to the Perfecta® STP
Series printer.
Print without Wireless Network using iOS Device
To connect the printer to your phone without using a wireless network, you must use
the Direct Printing option.
1. On the printer, select at top of screen. The Info menu will indicate the printer
is not connected.
2. Select Setup and choose Wi-Fi Direct.
3. In Wi-Fi Direct Settings menu, make sure Wi-Fi Direct is ON. The Connection
Method will indicate Manual and the printer will change to automatic.
4. When the Wi-Fi Direct Settings change to Automatic, touch to display the
Info menu with a list of available printers. Note the password for
later.
I
5. Choose A Network list, select the printer (e.g., DIRECT-xx-HP-DesignJet) and
when prompted, enter the password from the Info screen.

VariQuest® Perfecta® STP Series
Quick Start Page
7
6. On your mobile device, select a document, then touch Print and select your
Printer (e.g., DIRECT-xx HP DesignJet).
7. Select the paper size and other options you want (e.g., paper size, color, black &
white).
Note: The print will automatically size itself to how it was designed. To print on
the size of the loaded paper, you must select it.
8. When done, touch Print. The document will be sent to the Perfecta STP Series
Printer.
Setup Scan to Print
Note: Steps 1-4 are a one-time setup. Once done, scan-to-print will resize to the
loaded paper size.
1. Select Copy then touch an option for your copy (e.g., Lines, Image or Mixed).
2. At the bottom of the screen, touch , then scroll down and touch Resize.
3. Select Fit To and choose the Loaded Paper.
4. Scroll to Save Current Settings, then at the prompt, select Save, then OK.

Page
8 VariQuest® Perfecta® STP Series
Quick Start
Scan to Print
Scan-to-print is performed from the Copy tab. The printer first scans the original into
memory, then prints the scanned image. Do not feed the scanner while printing.
Only one action can be done at a time. Scanner will not accept paper when printing.
Note: Vertical/horizontal positioning depends on how you scan the document.
Placing document vertically prints a larger poster. Placing horizontally prints a
smaller poster.
1. On the front panel, touch Copy tab., then choose option for your document.
2. Select the number of copies (1 to 99) and the paper output source (roll, multi-
sheet tray, single sheet).
3. Select the copy quality option: Best, Normal, Draft.
4. Touch Copy. At the prompt, load the original document if you haven’t already.
Note: For the Perfecta 2400STP, align the edge of the document with the green line
shown by the two orange arrows. [1]. For the Perfecta 3600STP, center the
document on the orange arrow. [2]
5. Push the sheet into the insertion slot until you feel it contact the rollers. The
scanner will automatically grab the sheet and move it into position for scanning.
6. If the sheet loads incorrectly, you can pull it out manually and retry. To unlock
scanner and retrieve jammed document, push the two buttons (see green
arrows.)
7. When scan is complete, touch Eject.
Print/Scan to USB
You can print a file from a USB thumb drive connected to the Perfecta® STP Series
printer or save a scanned image from the Perfecta® STP Series printer to a USB
flash drive.
Print from a USB
1. Insert the USB flash drive into the USB port on the printer.
2. On the Dashboard, select Print.
3. Touch Print from USB and select the document you want (only JPEG, TIFF and
HP-GL/2 are valid file types).
4. Select the number of copies and touch Print.
Save Scanned Image to a USB
1. Insert a USB flash drive into the USB port
2. On the Home menu, select Scan.
3. Select USB.
4. Select your settings and click Start Scan to start the scanning process.
5. Insert document into scanner with the middle of the document aligned with the
arrow.
Technical Support
For technical assistance, please contact your authorized VariQuest dealer or the
VariQuest Technical Support team:
•Email: [email protected]
•Phone: 1-800-328-0585
Additional information can be found in the User's Guide located at
resources.variquest.com.
[1] [2]
2900879 Rev A 05/19 ©2019 Varitronics, LLC. All Rights Reserved.
Other manuals for Perfecta 3600STP
2
This manual suits for next models
2
Table of contents
Other Variquest Printer manuals

Variquest
Variquest Perfecta 3600STP User manual

Variquest
Variquest Awards Maker 400 User manual

Variquest
Variquest Perfecta 2400PRO User manual

Variquest
Variquest Perfecta STP Series User manual

Variquest
Variquest Awards Maker 400 User manual

Variquest
Variquest Perfecta 2400STP User manual

Variquest
Variquest Awards Maker 400 User manual

Variquest
Variquest Motiva 400 User manual

Variquest
Variquest Perfecta 2400PRO User manual

Variquest
Variquest VisiMate User manual