Vax VSTM1500 User manual

Stick Steam Cleaner
Get Cleaning...
What’s your Vax’s model number?
What’s your serial number? (Located on the base of the machine)
Note these down in case you need them in future. Please keep instructions for further use.
– – – – –
User Guide
S2 Hard Floor Master User Guide v1.1.qxd:User guide 6/10/10 11:35 Page 1
Vax Careline Australia: 1300 361 505
New Zealand: 0800 800 900
VSTM1500
V S T M 1 5 00
vax.com.au

Machine Overview
Accessories
10
12
9
11
Unit
9Microfibre cleaning pad x 2
10 Carpet glider
11 Measuring jug
12 Hard water filter (hidden)
(Pre-assembled in unit)
13 Resting tray
8
3
2
1 Handle
2 Upper cord clip
3 Lower cord clip
4 Power cord
5 Clean water tank
6 Steam tank/power indicator
unit on
Green light = steamer ready
No light = tank heating
7 Floor head
8 Steam release trigger
6
5
4
1
7
12
S2 Hard Floor Master User Guide v1.1.qxd:User guide 6/10/10 11:36 Page 2
13
Vax Careline Australia: 1300 361 505
New Zealand: 0800 800 900
2

Machine Overview
Accessories
10
12
9
11
Unit
9Microfibre cleaning pad x 2
10 Carpet glider
11 Measuring jug
12 Hard water filter (hidden)
(Pre-assembled in unit)
13 Resting tray
8
3
2
1 Handle
2 Upper cord clip
3 Lower cord clip
4 Power cord
5 Clean water tank
6 Steam tank/power indicator
unit on
Green light = steamer ready
No light = tank heating
7 Floor head
8 Steam release trigger
6
5
4
1
7
12
S2 Hard Floor Master User Guide v1.1.qxd:User guide 6/10/10 11:36 Page 2
13
General Safety Information
S2 Hard Floor Master User Guide v1.1.qxd:User guide 6/10/10 11:36 Page 3
FOR HOUSEHOLD USE ONLY.
When using the steam mop, basic safety precautions should always be observed, including the following:
11 . Do not steam clean harmful or toxic material
(chlorine, bleach, ammonia, drain cleaner etc.).
12. Keep cleaning area well lit.
13. Store the steam mop in a cool, dry area.
14. Turn off the on/off switch before unplugging the
steam mop.
15.
W
Symbol IEC 60417-5597 (2002-10)
is used on the unit to indicate the following:
ARNING: Always switch off and unplug the
steam cleaner from the electrical outlet before
assembling, opening or emptying the water container, or
before connecting/disconnecting the attachments.
CAUTION: The steam cleaner is a very powerful
unit. Before plugging the cord into the electrical
outlet, make sure the switch is in the ‘off’ position. Hold the
steam cleaner firmly when starting and in use.
IMPORTANT: We recommend the use of a
This steam cleaner is intended for household use
only and NOT for commercial or industrial use.
PLEASE KEEP INSTRUCTIONS FOR FURTHER USE.
!
!
!
1 . Turn off the steam mop controls before
disconnecting or connecting from the mains supply.
2. Always unplug the steam mop before connecting
or disconnecting the vacuum hose and accessories.
3. Children should be supervised to ensure that they
do not play with the appliance.
4. This appliance is not intended for use by persons
(including children) with reduced physical, sensory
or mental capabilities, or lack of experience and
knowledge, unless they have been given supervision
or instruction concerning use of the appliance by a
person responsible for their safety.
5. Use only as described in this manual. Use only Vax
recommended attachments.
6. Do not use the steam mop if it has been
dropped, damaged, left outdoors or dropped into
water. Do not use the steam mop with a damaged
cord or plug. If the supply cord is damaged, it
7. Do not pull or carry by cord. Do not use the cord
as a handle, close a door on the cord or pull cord
around sharp edges or corners. Do not run the
steam mop over the cord. Keep the cord away
from heated surfaces.
8. Do not handle the plug or steam mop with wet
hands. Do not use outdoors or on wet surfaces.
9. Do not put any objects into openings. Do not use
with any openings blocked and do not restrict air-
flow. Keep all openings free of dust, lint, hair or
anything that might reduce airflow.
10. Keep hair, loose clothing, fingers and all parts of
the body away from openings and moving parts.
must be replaced by the manufacturer, its service
agent or similarly qualified persons in order
to avoid a hazard.
!WARNING: Danger of Scalding
Residual Current Device with a Residual Current
rating of 30mA or less.
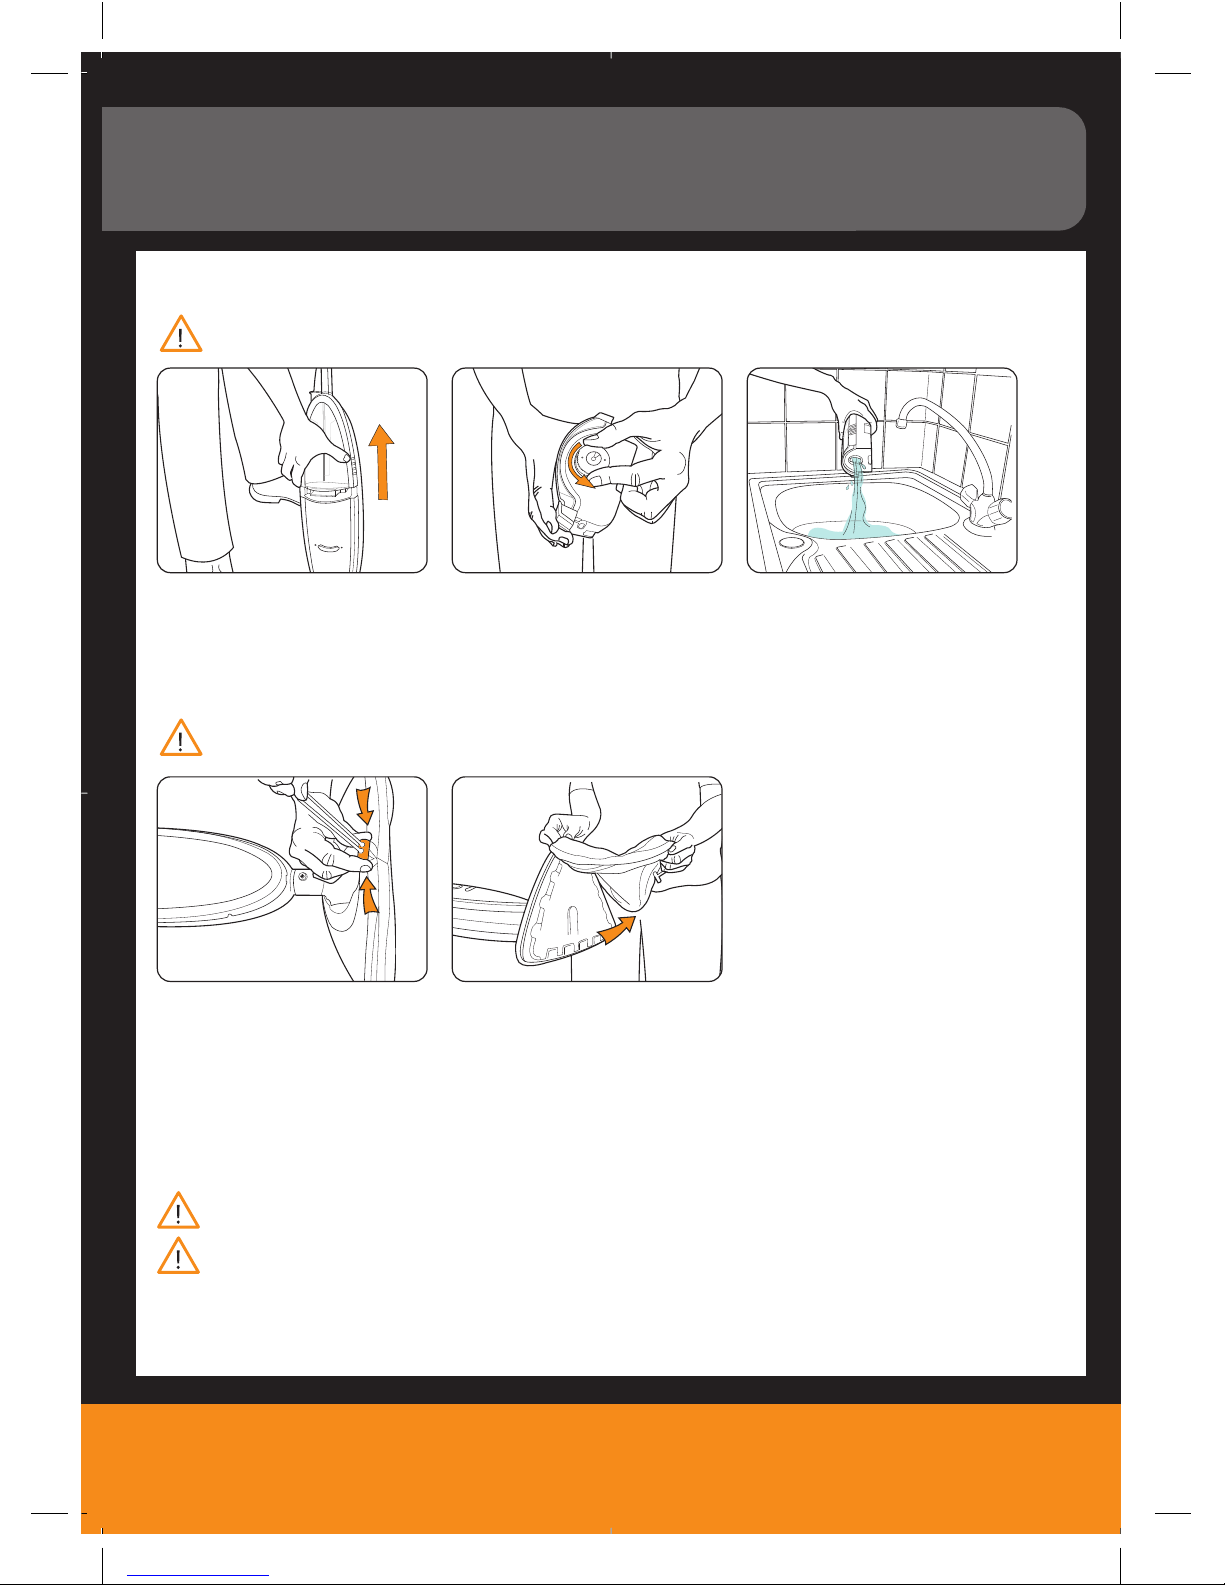
WARNING:
spot on any surface for an extended period of
time as this may damage the floor surface. Always
!Never leave the steam mop in one
return the mop back to the resting pad when not in
use or when not continuously moving across the floor.
IMPORTANT: This steam mop may not be suitable
!for all floating floorboards - please check with your
floorboard manufacterer first prior to use.
3
vax.com.au

-
--
Operation
Remove clean water tank. Insert handle into main body.
Line up the screw holes on
the handle and the main body.
Secure the handle in place
with one of the screws
provided.
Assembling your stick steam cleaner
Fit the body of the unit onto
the floor head, lining up the
screw hole.
Secure the floor head with
the remaining screw.
S2 Hard Floor Master User Guide v1.1.qxd:User guide 6/10/10 11:36 Page 4
Vax Careline Australia: 1300 361 505
New Zealand: 0800 800 900
4

---
Operation
Remove clean water tank. Insert handle into main body.
Line up the screw holes on
the handle and the main body.
Secure the handle in place
with one of the screws
provided.
Assembling your stick steam cleaner
Fit the body of the unit onto
the floor head, lining up the
screw hole.
Secure the floor head with
the remaining screw.
S2 Hard Floor Master User Guide v1.1.qxd:User guide 6/10/10 11:36 Page 4
Operation
Before you begin cleaning
WARNING: To reduce the risk of personal injury, unplug the steamer when assembling
the accessories.
Attaching the microfibre cleaning pad
Place the microfibre cleaning
pad over the floor head.
Tighten the drawstring so the
microfibre cleaning pad is
fitted securely.
WARNING: Never use the steam stick without the microfibre cleaning pad
correctly attached to the floor head.
IMPORTANT: Place the steamer on the resting tray whilst the steam is heating and when
the product is not moving continuously on the floor.
Remove the clean
water tank.
Twist the cap anti-
clockwise to remove.
Replace the clean water
tank, clicking into place
making sure the hard
water filter is in place.
WARNING: To reduce the risk of personal injury, unplug the steamer when assembling the unit.
S2 Hard Floor Master User Guide v1.1.qxd:User guide 6/10/10 11:36 Page 5
NOTE: In hard water areas, or to prevent calcium and mineral deposits from accumulating on the
heating element and mop head, you may use distilled or demineralized water in place of tap water.
Fill the tank with 500ml
(2 measuring jugs) of
water and replace the
water cap. Tighten by
twisting clockwise. Make
sure water levels do not
exceed the MAX fill line
on jug. DO NOT OVERFILL.
For best results, thoroughly sweep or vacuum floors prior to cleaning with the steam mop.
5
vax.com.au

-
--
Operation
S2 Hard Floor Master User Guide v1.1.qxd:User guide 6/10/10 11:36 Page 6
Vax Careline Australia: 1300 361 505
New Zealand: 0800 800 900
6
WARNING: Never leave the stick steamer in one spot on any surface for an extended
period of time as this may damage the floor surface. Place on the resting tray whilst the
steam is heating and when the product is not moving continuously on the floor.
WARNING: Your stick steamer should only be used on tiles, lino or sealed wood
flooring. Do not use on laminated flooring and if using the product on floating floor boards –
check with the manufacturer of this flooring before use if it is suitable.
WARNING: Never use the steam stick without the microfibre cleaning pad properly
attached to the floor head.
WARNING: To reduce the risk of personal injury, unplug the steamer when assembling
the accessories.
IMPORTANT: Check the water tank viewing window to ensure there is adequate water in
the water tank.
IMPORTANT: Do not put solutions or detergents into the water tank. This machine
operates with water & steam only.
Plug into mains and
wait for the green light
(on the main body) to
switch on. This takes
approx. 30 seconds.
To recline the unit
place foot on floor
head and tilt handle.
To produce steam
squeeze the trigger.
A hissing noise will be
heard as the steam
begins. Steam will wet
the microfibre cleaning
pad. If you want to
stop the steam, press
the trigger again.
Move the steam stick
slowly backwards and
forwards across the floor
paying particular attention
to high traffic areas.
Steam cleaning hard floors

---
Operation
S2 Hard Floor Master User Guide v1.1.qxd:User guide 6/10/10 11:36 Page 6
---
Operation
S2 Hard Floor Master User Guide v1.1.qxd:User guide 6/10/10 11:36 Page 6
7
vax.com.au
WARNING: Your Steam Mop is designed to clean carpets or rugs that will withstand high
heat. Be sure to check the Use and Care Instructions from the carpet manufacturer before
steam cleaning.
WARNING: The carpet glider accessory is for use on carpeting and rugs only. Use of
the carpet glider on other floor will cause streaking and possible scratching of the floor’s
surface.
IMPORTANT: Never use the Steam Mop without the microfiber cleaning pad properly
attached to the mop head.
IMPORTANT: Check the water tank viewing window to be sure there is adequate water in
the water tank.
CAUTION: Never use the carpet glider on surfaces that are prone to scratching.
CAUTION: The Steam Mop emits steam and creates moisture. If the Steam Mop operates
too long in one place, water marks can result.
IMPORTANT:
Pay attention to the water tank’s viewing window to monitor remaining
water/steam. As the water tank empties, a special water sensor will cause the unit to work
intermittently and eventually stop running in order to protect the pump inside the unit. A vibrating
sound may be heard, and the green indicator light will turn orange. The pump will turn OFF.
WARNING: Never leave the Steam Mop in one spot on any surface for an extended period
of time as this may damage the floor surface. Always return the mop back to the resting tray
when not in use or when not continuously moving across the floor.
Attach carpet glider
attachment to floor
head by pushing the
steam stick onto it.
To recline the unit
place foot on floor
head and tilt handle.
To produce steam
squeeze the trigger.
If you want to stop
the steam, press the
trigger again.
Move the steam stick
slowly backwards and
forwards across the floor
paying particular attention
to high traffic areas.
Refreshing carpets
For best results, thoroughly vacuum the carpets or rugs prior to steam cleaning.
1. Place the mop head (with microfiber cleaning pad in place) on top of the carpet glider.
2. Do not attempt to use the Steam Mop on carpet/rug surfaces without the carpet glider in place!

Empty the water tank
IMPORTANT: Allow the unit to fully cool down before performing any maintenance or
troubleshooting checks.
Remove the microfibre cleaning pad from the unit
IMPORTANT: Allow the unit to fully cool down before performing any maintenance or
troubleshooting checks.
Maintenance (Keep your Vax as good as new)
Empty any excess water
over the sink, replace water
cap and return to the unit.
Remove the clean water tank. Twist the cap anti-clockwise
to remove.
Undo drawstring. Remove microfibre cleaning pad.
S2 Hard Floor Master User Guide v1.1.qxd:User guide 6/10/10 11:36 Page 7
Vax Careline Australia: 1300 361 505
New Zealand: 0800 800 900
8
To ensure long life and continued cleaning ability, proper care of your microfibre cleaning pad is
required. Read and follow cleaning instructions.
1. Microfibre cleaning pads can be machine washed in warm water with a mild detergent after
each use or when dry.
CAUTION: Never use bleach or fabric softener.
IMPORTANT: Only use liquid detergent or soap.
2. Air dry pads for 24 hours.
NOTE: Cleaning pads may be machine tumble dried on low heat.
Cleaning the microfibre cleaning pad

---
Maintenance (Keep your Vax as good as new)
Replacing the hard water filter
IMPORTANT: The condition of the filter affects the performance of your machine.
Check and change filter regularly (depending on level of use).
Your machine is fitted with a hard water filter. If you live in an area of hard water the filter will
discolour/darken over time. Depending on water hardness and/or frequency of use the filter
should be changed every 6 months.
S2 Hard Floor Master User Guide v1.1.qxd:User guide 6/10/10 11:36 Page 8
9
vax.com.au
3. To avoid passing or picking up lint from the cleaning pads, wash the microfibre cleaning pads
separately or place them in a garment bag.
IMPORTANT: Wash microfibre cleaning pads regularly. As with any fabric, dirt particles can
cause the fibers to break down. Therefore regular cleaning will help preserve the cleaning
efficiency of the microfibre cleaning pads.
4. As the microfibre cleaning pad is used, sometimes a thread will loosen or pull out. This is normal.
Never pull loose threads as this can cause the weave to come undone. Simply trim any loose
threads with a pair of sharp scissors.
Care & Cleaning
1. Always unplug and allow the Steam Mop to cool completely before cleaning or moving.
2. Press the round black lock and pull it downwards to loosen the microfibre cleaning pad’s
drawstring.
CAUTION: Carefully remove the cleaning pad from the mop head, as mop pad and lower
assembly may be hot.
4. Any water remaining in the water tank should be emptied before storing the Steam Mop.
5. Wipe all exterior surfaces of Steam Mop with a damp or dry, soft cloth.
Storage
1. Never store the Steam Mop while it is still plugged in. Remove the plug from the electrical outlet.
2. Empty water from the water tank before storing.
3. Wrap cord for storage.
4. Store upright in a protected, dry area. Keep water fill cup and funnel handy for future use.

---
Other Information
Service & Help
Vax Careline:
If you have any queries about using your Vax, call the Vax Careline. Please make a note of the serial
number and model number of your product before calling. For the nearest Service Agent, please call
the Vax Customer Careline or visit
Technical Specification
Voltage: 220 – 240 v ~ 50Hz
Wattage: 1500W
Water tank capacity: 500ml
Cord length: 5.8m
Heating time: 30 seconds
Weight: 3.2kg
Subject to technical change without notice.
EEC Statement of Compliance
Manufacturer/EEC importer: Vax Limited, hereby on our own responsibility, declare that the
steam cleaner series is manufactured in compliance with the following Directives:
Safety: 2006/95/EC Low Voltage Directive
EMC: 2004/108/EC Electromagnetic Compatibility Directive
Waste electrical products should not be disposed of with household waste. Please recycle where
facilities exist. Check with your Local Authority or retailer for recycling advice.
S2 Hard Floor Master User Guide v1.1.qxd:User guide 6/10/10 11:36 Page 10
FAQs
WARNING: To reduce the risk of personal injury, unplug the steam stick before
performing maintenance or trouble shooting checks.
Is there an accessory missing?
•Check the Parts Overview page in the guide to
make sure the part is definitely included in your unit
•If the part is missing we’re here to help. Simply call
us on:
Why won’t the steam stick run?
•Unit may not be plugged into the electrical outlet
correctly, ensure the plug is pushed in securely
•The electrical outlet may not be working properly,
check the fuse or breaker, or consult an electrician
•The power cord may be damaged, if it is it must be
replaced by the manufacturer or similarly
qualified person
What do I do if an accessory/the unit has
become damaged or broken?
•Please call our Careline to purchase new spares
or order a replacement
Why is the steam stick not producing steam?
•There may be no water in the tank; please refer to
the operation section
•The water tank may not be fitted correctly; please
refer to the operation section
Why won’t the microfibre cleaning pad pick
up dirt?
•The cleaning pad may already be saturated with
dirt and needs washing, please refer to the
maintenance section
S2 Hard Floor Master User Guide v1.1.qxd:User guide 6/10/10 11:36 Page 9
Vax Careline Australia: 1300 361 505
New Zealand: 0800 800 900
10
Australia: 1300 361 505
New Zealand: 0800 800 900
Don’t take your machine
back to the shop, simply
contact us
vax.com.au
Australia: 1300 361 505
New Zealand: 0800 800 900
This does not affect your statutory rights.

---
Other Information
Service & Help
Vax Careline:
If you have any queries about using your Vax, call the Vax Careline. Please make a note of the serial
number and model number of your product before calling. For the nearest Service Agent, please call
the Vax Customer Careline or visit
Technical Specification
Voltage: 220 – 240 v ~ 50Hz
Wattage: 1500W
Water tank capacity: 500ml
Cord length: 8m
Heating time: 30 seconds
Weight: 3.2kg
Subject to technical change without notice.
EEC Statement of Compliance
Manufacturer/EEC importer: Vax Limited, hereby on our own responsibility, declare that the
steam cleaner series is manufactured in compliance with the following Directives:
Safety: 2006/95/EC Low Voltage Directive
EMC: 2004/108/EC Electromagnetic Compatibility Directive
Waste electrical products should not be disposed of with household waste. Please recycle where
facilities exist. Check with your Local Authority or retailer for recycling advice.
S2 Hard Floor Master User Guide v1.1.qxd:User guide 6/10/10 11:36 Page 10
11
vax.com.au
Australia: 1300 361 505
New Zealand: 0800 800 900
Monday– Friday 8.30am to 5.00 pm
vax.com.au

---
Distributed by Techtronic Industries Pty. Ltd.
Level 1, 660 Doncaster Rd, Doncaster, Australia 3108.
www.vax.com.au. Service Line: AU: 1300 361 505 / NZ: 0800 800 900
VSTM1500vax.com.au
Table of contents
Other Vax Steam Cleaner manuals

Vax
Vax Steam Clean Multi S85-CM Installation instructions

Vax
Vax V-082 User manual

Vax
Vax S85-SF-R User manual

Vax
Vax Mach2 VZL-6012 User manual

Vax
Vax DualPower MAX User manual

Vax
Vax VMSM1500 User manual

Vax
Vax Revolution 53000 (version 2) User manual

Vax
Vax V-085 Series User manual

Vax
Vax S2 Series User manual

Vax
Vax VS102 User manual

Vax
Vax Total Home Pro S7-A Plus User manual

Vax
Vax Hard Floor Ultimate User manual

Vax
Vax Home Pro User manual

Vax
Vax VX24 User manual

Vax
Vax Steam Grime Master User manual

Vax
Vax S84-W7-P Installation instructions

Vax
Vax S2 Series User manual

Vax
Vax Essentials VEU-101 User manual

Vax
Vax V-081 SERIES User manual

Vax
Vax V-084 User manual