Veridian Healthcare 09-333 User manual

INSTRUCTION MANUAL • ENGLISH & ESPAÑOL
Behind Ear/Temple
Sensor Thermometer
Model # 09-333
Please read this instruction manual
completely before operating this unit.
3-YEAR 2-YEAR
3-YEAR 2-YEAR
1-YEAR
1-YEAR

2 • ENGLISH
1 CR2032 Battery Instruction Manual
STOP!
PLEASE ENSURE YOU HAVE ALL OF THE
FOLLOWING COMPONENTS BEFORE USING YOUR
THERMOMETER.
QUICK START TIPS
1. Press and release the POWER button; unit will beep once when
ready.
2. Verify temple or behind the ear mode; press the MODE button to
change measurement site.
3. Hold unit rmly to measurement site until a long single beep is
heard, 4 seconds.
4. Results will be displayed on the screen.
IF YOU ARE MISSING ANY PARTS, INCLUDING INSERTS OR
INSTRUCTION MANUALS, DO NOT RETURN TO PLACE OF
PURCHASE. CONTACT CUSTOMER CARE AT 8663261313.
Thermometer

ENGLISH • 3
Introduction.......................................................................................................... 4
Getting Started .................................................................................................... 4
Normal Body Temperature and Fever............................................................. 5
How Sensor Thermometers Work.................................................................... 5
Thermometer Features....................................................................................... 6
Guidelines for Sensor Thermometers............................................................. 7
Taking Your Measurement ............................................................................ 8-9
Memory Recall ...................................................................................................10
Changing Modes - °F or °C Operation ..........................................................10
Ambient Temperature Display .......................................................................11
Medication Timer Tracker .........................................................................12-13
Battery Installation and Replacement .........................................................14
Care and Cleaning Instructions .....................................................................15
Troubleshooting and Display Symbols ........................................................16
Specications .....................................................................................................17
Warranty .............................................................................................................18
Instrucciones en Español...........................................................................19-36
INDEX
Manufactured by Medisim Ltd
Distributed by:
Veridian Healthcare
1175 Lakeside Drive
Gurnee, IL 60031
www.veridianhealthcare.com
Made in China
#93-1244 01/15
©2015 Veridian Healthcare, LLC
Protected by US patents
# 7,597,668B2 and other pending patents
Toll-Free Customer Care Help Line: 1-866-326-1313
Monday – Friday 8:30 a.m. – 4:30 p.m. CST

4 • ENGLISH
INTRODUCTION
GETTING STARTED
Thank you for purchasing a Behind the Ear/Temple Sensor Thermometer. Please
read these instructions carefully to ensure proper use and safe operation of your
device.
• This product is not intended to diagnose or treat any health problem or
disease and should not be used as a substitute for the consultation and
advice of a physician or other medical professional
• Thermometers should only be used under the supervision of an adult
• Before use, it is recommended that the patient avoid eating, drinking,
smoking or exercising for at least twenty minutes prior to taking a
measurement; never walk, run or talk during a measurement
PLEASE READ THIS INSTRUCTION MANUAL
COMPLETELY BEFORE OPERATING THIS UNIT.

ENGLISH • 5
NORMAL BODY TEMPERATURE & FEVER
Body temperature can vary from 97°F and 100.4°F and still be considered
normal. The medically accepted‘normal’body temperature is 98.6°F. Body
temperature is commonly lower in the morning than at any point during the
rest of an individual’s waking hours.
Temperature readings will vary based on the body location point of the reading.
Average‘normal’temperature ranges by measurement location site:
Forehead 97.0°F–100.0°F (36.1°C–37.8°C) Oral 97.0°F–100.0°F (36.1°C–37.8°C)
Rectal 97.3°F–100.4°F (36.3°C–38.0°C) Axillary 95.4°F–99.0°F (35.2°C–37.2°C)
A fever is dened as a body temperature that is elevated above the normal
for that person. It is important to determine what is normal for an individual
before determining if a fever is present. Tracking an individual’s temperature
on a consistent basis, at the same body site and at the same time everyday
when the person is well or healthy, will help determine an individual’s normal
temperature.
Patented R.A.T.E.™ technology utilizes a unique
sensor which rapidly samples the heat owing
from the blood vessels to the skin’s surface.
The measurements are then converted to a
comparable body temperature.
HOW SENSOR THERMOMETERS WORK–
RAPID ACCURATE TEMPERATURE ESTABLISHMENT (R.A.T.E.™)
Blood Vessels
Heat/Energy Flow
Skin

6 • ENGLISH
THERMOMETER FEATURES
DETAILS OF THE DIGITAL DISPLAY SCREEN AND
INTERPRETATION OF THE SYMBOLS ARE INCLUDED
THROUGHOUT THIS MANUAL.
Probe
Sensor
Automatic
Flash Light
Battery
Compartment
Digital
Display
TIMER
Button
POWER
Button
MODE
Button

ENGLISH • 7
GUIDELINES FOR SENSOR THERMOMETERS
This thermometer is designed to measure the temperature at the temple area
between the end of the eyebrow and the hairline. This model is also designed
for behind the ear measurements. Consult the‘TAKING YOUR MEASUREMENT’
section of this manual for detail instructions for each measurement site.
• Do not place the thermometer on scar tissue, skin disorder, open sores or
abrasions or patients in trauma
• Consult your physician when using drug therapies that may elevate skin
temperature in the forehead
• Do not use skin exposed to direct sunlight, replace heat, air conditioner
or fan air ow, or hot/cold compress therapies
• WAIT AT LEAST TWO MINUTES BETWEEN MEASUREMENTS TO
ALLOW THE UNIT SENSOR TO READJUST TO ROOM TEMPERATURE
• If the thermometer has been stored in an excessively cold or warm
environment, allow the thermometer to adjust to the ambient room
temperature before use. Performance and operation of this unit may
be compromised if operated outside of the specied temperature and
humidity operating ranges

8 • ENGLISH
TAKING YOUR MEASUREMENT
Please read the guidelines for sensor thermometers
section prior to attempting your reading to help ensure
accurate and reliable measurement results.
1. Press and release the POWER button to activate
the thermometer.
2. The unit will beep, and the thermometer will
perform a self-test, showing all of the symbols on
the display, Fig 1.
3. The last measurement taken will show on the display
for approximately 3 seconds, Fig 2.
4. When the last reading results and hourglass icon
disappear from the display screen and the unit
sounds one beep, the unit is ready for measurement.
5. Use the MODE button to toggle between the two
measurement sites–temple or behind the ear–as
indicated by the icon on the display, Fig 3.
Temple—
Behind the Ear—
Fig. 1
Fig. 3
Fig. 2
AUTOMATIC FLASHLIGHT FEATURE:
This thermometer features a small ashlight below the probe sensor. If the
room is dark, an LED light will illuminate, helping to guide caregivers to the
measurement sight.
The light feature will only illimunate when dark and will automatically shut
o after 10 seconds.

ENGLISH • 9
TAKING YOUR MEASUREMENT
Fig. 4
Fig. 6
Fig. 5
6. Temple measurements, gently place the probe in
the center of the temple area between the end of the
eyebrow and the hairline. Maintain rm contact with
the skin, hold the thermometer in place during the
reading and do not move the thermometer to ensure
reliable results, Fig 4.
Behind the ear measurements, place the
thermometer probe at the small pocket behind the ear
lobe, Fig 5. Press the probe in an upward motion and
hold rmly in place.
7. The measurement will start automatically once the
probe is in place and will take approximately 4 seconds.
8. The unit will sound one long beep when the
measurement is complete and the reading will appear
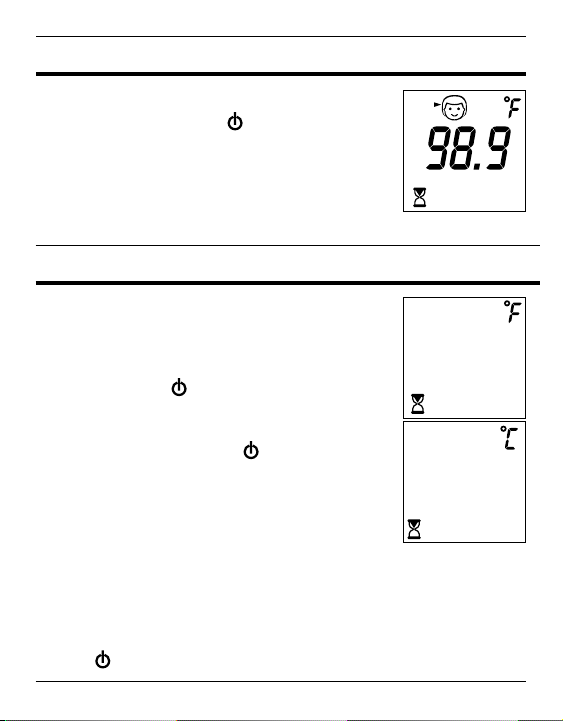
on the display, Fig 6.
Wait a minimum of one minute before attempting
a new measurement; if you attempt to take a new
measurement before 1 minute, the device will perform
a countdown from 9 to 0.
DO NOT TRY TO MEASURE DURING THE COUNTDOWN.
If you attempt to measure during the countdown , the
device will display the previous result, beep 8 times and
turn itself o automatically.
9. To turn the unit o, simply press the POWER button. The unit will
automatically shut-o after approximately one minute.
NOTE: This thermometer measures the heat ow rate from the user’s body.
If the heat ow for a given measurement location is within normal range,
the thermometer backlight will be green; if the heat ow rate is high, the
backlight will be red, indicating a fever MAY be present.

10 • ENGLISH
MEMORY RECALL
CHANGING MODES – °F OR °C OPERATION
This unit includes a recall of the last measurement taken.
When the unit is OFF, press the POWER button to turn
the unit on, and release. After the self-test, the unit will
briey show the last reading on the display.
This thermometer defaults to a Fahrenheit measurement
To change modes:
1. The thermometer must be OFF before changing
modes. Press the POWER button to turn the unit
OFF.
2. Press and hold the MODE button.While holding
MODE, press and release the POWER button.
3. The display will briey show the current mode, °F or
°C, and then switch to opposite mode in the upper
right of the display screen. The thermometer has now
switched measurement modes.
NOTE: After the mode has changed, the display will
self-test, show the last measurement in memory and then
prepare for a new measurement. If you do not desire to
take a measurement immediately after changing modes,
press the POWER button to turn the unit o.

ENGLISH • 11
AMBIENT TEMPERATURE DISPLAY
This thermometer displays the ambient room temperature
in either °F or °C as desired.
1. Press and hold the POWER button.
2. While holding the POWER button, press and hold
the MODE button.
3. The ambient room temperature will show on the
display with a house symbol, indicating the current
room temperature. The measurement will display
in whichever mode–°F or °C–the thermometer is
presently set to.
4. The ambient temperature will continue to remain
on the display until the unit is turned o. Press and
release the POWER button.
Take care to turn the unit o after an ambient
temperature reading in order to preserve battery life.

12 • ENGLISH
The Medication Time Tracker is designed to help track the time elapsed between
medication doses and to alert the caregiver when a subsequent dose is
scheduled.
• The timer can be used while the thermometer is in-use or OFF (not taking
a measurement). The timer will continue counting elapsed time even when
the thermometer is OFF
• The timer cannot be turned on or set during a temperature measurement
MEDICATION TIME TRACKER
SETTING & USING THE TIME CYCLE DURATION
The time cycle can be set for up to 8 hours, in 1-hour increments. A time cycle
must be set before using the timer feature.
1. The thermometer must be OFF before setting the time cycle. Press the
POWER button to turn the unit OFF.
2. Press and release the TIMER button; the word
TIMER will show on the display and the time will
ash.
3. Press the MODE button to scroll through the
hourly increments.
4. When the desired TIMER length is shown on the
display; press the TIMER button to conrm the
hourly increment.

ENGLISH • 13
MEDICATION TIME TRACKER
5. The timer will automatically begin.
The display will show the timer counting UP from 0 to 60 seconds, then
the display will show‘0:01’ indicating 1-minute. The timer will continue to
count UP until the time cycle is reached.
6. You may check the timer setting at any time. When the device is OFF (not
presently in a measurement) press and release the TIMER button; the
display will show the TIME CYCLE DURATION.
7. When the timer is up, the thermometer will beep for 30-seconds.
NOTE: The Medication Time Tracker will maintain the preferred user set time
cycle (1–8 hours) until reset or until the batteries are replaced.
To turn the timer function OFF at any time, press and hold the TIMER button
until the display fully clears and is blank.

14 • ENGLISH
This thermometer includes 1 CR2032 battery. The
low battery symbol will appear on the display
when the batteries need to be changed.
1. Carefully remove the battery cover from the
unit.
2. Using a narrow screwdriver or other pointed
device, carefully push the coin battery
forward, releasing the edge of the battery
from under the white plastic prongs, Fig 1.
3. The battery will pop-up, allowing for easy
removal, Fig 2.
4. Replace the battery, plus side up, Fig 3.
5. Carefully replace the battery cover.
6. Do not dispose of used batteries in the
trash. Consult your local recycling center
for the proper way to dispose of batteries
in your area. Keep used batteries away from
children, pets and excessive heat.
It is recommended that the battery be removed
if the thermometer will not be used for a long
period of time.
BATTERY INSTALLATION/REPLACEMENT
Fig. 1
Fig. 2
Fig. 3
Carefully slide the battery under the
single metal prong at an angle as
illustrated, then snap into place under
the double plastic prongs.

ENGLISH • 15
• Wipe the tip and probe with an alcohol swab or a cotton swab moistened
with 70% isopropyl alcohol before & after each use
• After cleaning, wait at least 2 minutes before taking a measurement for the
unit to readjust to room temperature
• Use only a soft dry cloth to clean the body of the thermometer (if
necessary). Never use an abrasive cleanser or submerge the thermometer
in water or other liquids
• Do not expose the thermometer to extreme temperatures, humidity, direct
sunlight or shock. Store at room temperature
CARE AND CLEANING INSTRUCTIONS

16 • ENGLISH
The thermometer has been designed to display feedback-warnings to ensure
proper usage and accurate temperature measurement. When an error appears,
the device will“beep”, and then the thermometer will turn o automatically.
In the event of a malfunction or incorrect temperature measurement, the
following warnings will be displayed:
WARNING!
A high or low body temperature requires seeking immediate medical attention.
TROUBLESHOOTING / DISPLAY SYMBOLS
ERR Message Possible / Cause Solution
The measured temperature is
below 95.9°F (35.2°C)
The measured temperature is
above 107.6°F (42°C)
The thermometer is too cold or
too hot to operate
Temperature did not register
because of poor contact, patient
movement or poor placement
Unit malfunctioned
Low battery - Battery icon
displays continuously
Drained battery - Battery icon is
the only icon the display and unit
turns o
1. Turn the unit OFF and then ON again
2. Wait 2 minutes, retake temperature
1. Turn the unit OFF and then ON again
2. Wait 2 minutes, retake temperature
1. Verify that the room temperature within
product range 60.8°F-104°F (16° C - 40° C)
2. Wait 2 minutes, retake temperature
Wait 2 minutes, turn unit ON and retake
temperature
Do not use the thermometer – contact
Customer Care
Battery is low; enough power remains for
approximately 10 measurements
Battery is completely expired and must be
replaced

ENGLISH • 17
PRODUCT SPECIFICATIONS
MEASUREMENT TIME: 4 seconds
MEASUREMENT SITE: Temple area of forehead; underarm
MEASUREMENT RANGE: 95.0°F – 107.6°F (35° – 42°C)
OPERATING TEMPERATURE: 60.8°F – 104.0°F (16°C – 40°C);
Humidity 15-95% (non condensing)
STORAGE TEMPERATURE: -4.0°F – 122.0°F (-20°C – 50°C);
Humidity 15-95% (non condensing)
MEASUREMENT SCALE: Fahrenheit and Celsius
MEMORY: Recall of last measurement taken
BATTERY: 1 CR2032 Li Lithium Coin Battery
BATTERY LIFE: Approximately 24 months;
minimum of 1000 measurements
AUTOMATIC SHUT-OFF: Approximately after 1 minute of non-use
ACCURACY: Complies with ASTM E 1112-00 standards
DISPLAY: Liquid crystal display
DIMENSIONS: 5.5”X 1.5” X 0.75”
WEIGHT: 1.1 ounces with batteries
Specications are subject to change without notice.

18 • ENGLISH
ONE-YEAR LIMITED WARRANTY
Congratulations on your purchase of a
Behind the Ear/Temple Sensor Thermometer
. Your
Behind
the Ear/Temple Sensor Thermometer
is covered by the following limited warranty commencing
upon the date of purchase, and subject to the following terms and conditions:
The Warrantor warrants that its
Behind the Ear/Temple Sensor Thermometer
will be free from
defects in materials and workmanship under normal consumer usage for a period of one year for
the original purchaser of the Temple Touch Premium Thermometer.
Periodic maintenance, repair and replacement of parts due to normal wear and tear are excluded
from coverage. Defects or damage that result from: (a) improper operation, storage, misuse
or abuse, accident or neglect, such as physical damage (cracks, scratches, etc.) to the surface
of the product resulting from misuse; (b) contact with liquid, water, rain, extreme humidity
or heavy perspiration, sand, dirt or the like, extreme heat, or food; (c) use of the Temple Touch
Premium Thermometer for commercial purposes or subjecting the
Behind the Ear/Temple Sensor
Thermometer
to abnormal usage or conditions; or (d) other acts which are not the fault of the
Warrantor, are excluded from coverage. This warranty does not cover batteries or other power
sources that may be provided with, or used with the
Behind the Ear/Temple Sensor Thermometer
.
If the
Behind the Ear/Temple Sensor Thermometer
fails to conform to this limited warranty, return
the
Behind the Ear/Temple Sensor Thermometer
postage prepaid to: Attn: Repair Department,
1175 Lakeside Drive, Gurnee, IL, 60031. When returning a product, please also include: (i) a
copy of your receipt, bill of sale or other comparable proof of purchase; (ii) a written description
of the problem; and (iii) your name, address and telephone number. Carefully package the
product to avoid any damage that may occur while in transit; shipping insurance with returned
receipt is recommended. At our option, Veridian Healthcare will repair or replace the unit found
to be defective in materials or workmanship under normal consumer usage. The purchaser will be
notied of any additional repairs required prior to completing the repair, and will be responsible for
parts charges, if any, and repair charges not covered by this limited warranty.
EXCEPT AS PROVIDED FOR IN THIS LIMITED WARRANTY, ALL EXPRESS AND IMPLIED WARRANTIES
AND CONDITIONS ARE DISCLAIMED, INCLUDING WITHOUT LIMITATION THE IMPLIED WARRANTIES
OF MERCHANTABILITY AND FITNESS FOR A PARTICULAR PURPOSE. THE REPAIR OR REPLACEMENT
AS PROVIDED UNDER THIS LIMITED WARRANTY IS THE EXCLUSIVE REMEDY OF THE CONSUMER,
AND IS PROVIDED IN LIEU OF ALL OTHER WARRANTIES, EXPRESS OR IMPLIED. IN NO EVENT SHALL
THE WARRANTOR BE LIABLE, WHETHER IN CONTRACT OR TORT INCLUDING NEGLIGENCE
FOR DAMAGES IN EXCESS OF THE PURCHASE PRICE OF THE PRODUCT, OR FOR ANY INDIRECT,
INCIDENTAL, SPECIAL OR CONSEQUENTIAL DAMAGES OF ANY KIND, OR FOR DAMAGES TO, OR
LOSS OF, OTHER PROPERTY OR EQUIPMENT OR PERSONAL INJURIES TO THE FULL EXTENT THESE
DAMAGES MAY BE DISCLAIMED BY LAW.
Some states and jurisdictions do not allow the limitation or exclusion of incidental or consequential
damages, or limitation on the length of an implied warranty, so the above limitations or exclusions
may not apply to you. This warranty gives you specic legal rights, and you may also have other
rights that vary from state to state or from one jurisdiction to another.

ONE-YEAR LIMITED WARRANTY
INSTRUCCIONES • ESPAÑOL
Termómetro Premium
Temple Touch
Modelo 09-332
Lea por favor este manual de la instrucción
totalmente antes de actuar esta unidad.
3-YEAR 2-YEAR
3-YEAR 2-YEAR
1-YEAR
1-YEAR

20 • ESPAÑOL
Una batería CR2032 Manual de instrucciones
¡ALTO!
ASEGÚRESE DE TENER TODOS LOS COMPONENTES
QUE SE INDICAN A CONTINUACIÓN ANTES DE
UTILIZAR SU TERMÓMETRO.
CONSEJOS DE INICIO RÁPIDO
1. Presione y suelte el botón de encendido (POWER). La unidad
emitirá un“bip” (señal audible) cuando esté lista.
2. Verique el modo para la sien o detrás del oído. Oprima el botón
de modo (MODE) para cambiar el lugar de la medición.
3. Sostenga rmemente la unidad en el sitio de la medición hasta
que escuche un solo “bip” largo durante 4 segundos.
4. Los resultados aparecerán en la pantalla.
SI LE FALTA ALGUNA PARTE, INCLUIDOS LOS FOLLETOS O
MANUALES DE INSTRUCCIONES, NO LO DEVUELVA AL LUGAR
DONDE LO COMPRÓ. COMUNÍQUESE CON EL SERVICIO DE
ATENCIÓN AL CLIENTE AL 8663261313.
Termómetro
Table of contents
Languages:
Other Veridian Healthcare Thermometer manuals

Veridian Healthcare
Veridian Healthcare 09-349 User manual

Veridian Healthcare
Veridian Healthcare 09-349 User manual

Veridian Healthcare
Veridian Healthcare 09-342 User manual

Veridian Healthcare
Veridian Healthcare 09-349 User manual

Veridian Healthcare
Veridian Healthcare 08-359 User manual

Veridian Healthcare
Veridian Healthcare JXB-311 User manual

Veridian Healthcare
Veridian Healthcare 08-370 User manual

Veridian Healthcare
Veridian Healthcare 09-340 Instruction Manual

Veridian Healthcare
Veridian Healthcare 09-348 User manual

Veridian Healthcare
Veridian Healthcare 09-340 User manual