VEVOR SC8 Series User manual

HAND HELD ENDOSCOPE WITH SCREEN
OPERATING MANUAL
We continue to be committed to provide you tools with competitive price.
"Save Half", "Half Price" or any other similar expressions used by us only
represents an estimate of savings you might benefit from buying certain tools
with us compared to the major top brands and doses not necessarily mean to
cover all categories of tools offered by us. You are kindly reminded to verify
carefully when you are placing an order with us if you are actually saving half
in comparison with the top major brands.

- 1 -
Have product questions? Need technical support? Please feel free to
contact us:
CustomerService@vevor.com
NEED HELP? CONTACT US!
This is the original instruction, please read all manual instructions
carefully before operating. VEVOR reserves clear interpretation of our
user manual. The appearance of the product shall be subject to the
product you received. Please forgive us that we won't inform you again if
there are any technology or software updates on our product.
Model: SC8 series NO.:SAS0049
HAND HELD ENDOSCOPE
WITH SCREEN
OPERATING MANUAL

- 2 -
NOTICE
1. Before use, please use 5V1A charger to fully charge the device
2. Please use a high-quality TF (micro SD) card
3. Only in the effective focal length can the photos be reflected most
clearly. Be sure to observe the target object within the effective focal
length.
DETAILS
1. Photo/video key
2. Lens switch key
3. Lens light adjustment
4. Power on/off
5. Back key
6. Forward key
7. Setting menu key
8. Handle
9. Lens
10. Wire connection
11. LCD display
12. TF (micro sd) card slot
13. Reset key
14. DC 5V charging
interface (type-c)

- 3 -
PRODUCT DESCRIPTION
1. It supports micro TF cards of up to 64GB, and only supports TF cards
of class 10 or higher FAT32 format (including TF cards when shipping).
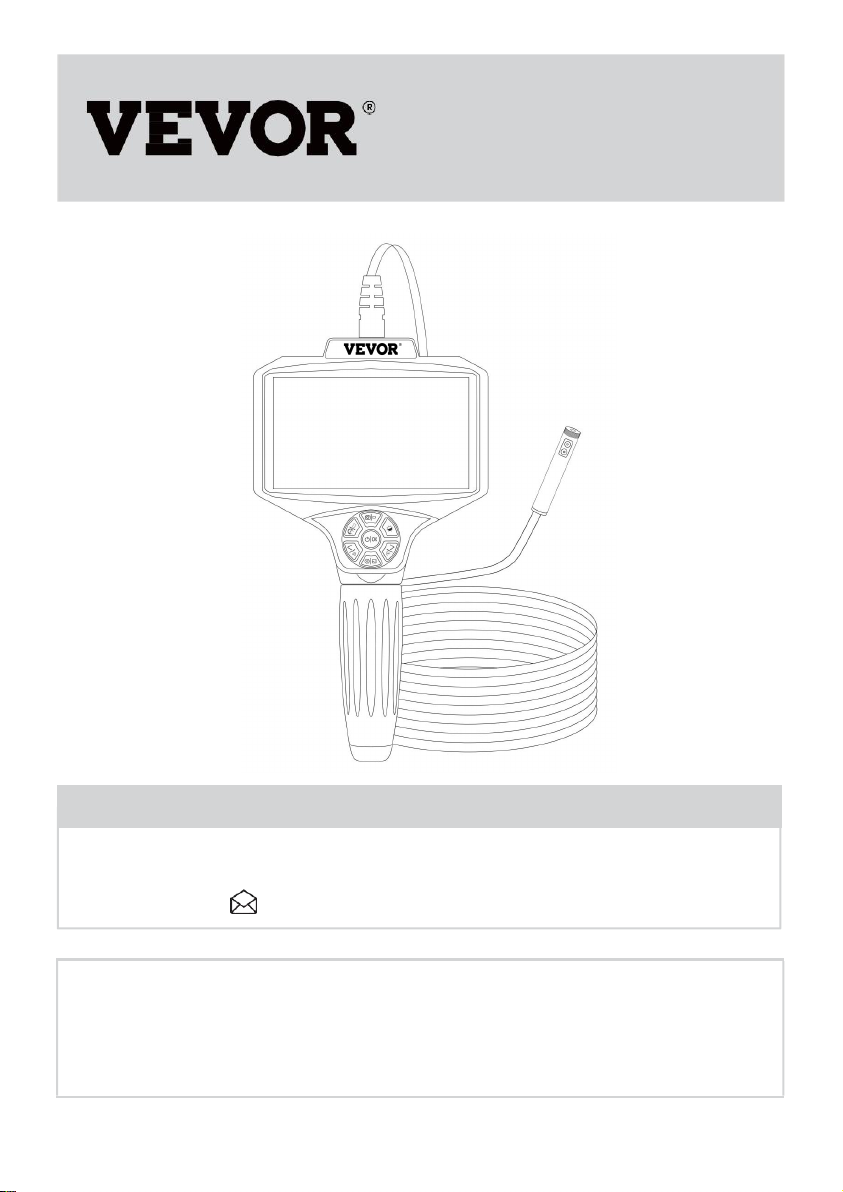
2. Charging interface; 5V 1A power supply.
3. Switch on/off key: long press for 2 seconds to start the machine, long
press for 2.5 seconds to turn off the machine, short press the freeze frame
screen to lock the screen, and short press to exit the freeze frame to enter
the real screen.
4. OK key: In the menu page, press briefly to confirm.
5. Photo/video key: short press to take a picture; Long press Record, and
then press again to stop recording.
6. Lens switch key: short press to switch to a single lens, A.B.C displays
single lens picture, long press to switch to double lens (vertical line 2 of
screen is split screen and double display), AB.AC lens picture.
7. Lens light adjustment key; Briefly press the adjusting camera lamp
(3.2.1.0) to turn on the machine at the third gear.
8. Back key/180-degree flip key: short press to shrink X8. X6, X4. X2, X1
in the real-time screen, long press the left screen to continue to flip 180
degrees.
9. Forward key/180-degree flip key: short press to enlarge X1.X2, X4.X6,
X8 on the real-time screen, long press the right key to continuously flip 180
degrees.
10. Menu key: press briefly to enter the menu page, (Date and time
adjustment: short press to enter the menu page, first press the Back or
Forward key, click the date/time, then press the OK key to confirm, short
press to return to the menu page, such as selecting language setting, date
label, screen saver, automatic shutdown, format, default setting, version,
etc., first press the Back or Forward key, if you click to confirm language
setting, press the Back or Forward key to select, press the OK key to
adjust, then press the Back key or Press the forward key to select, then
press the confirmation key to confirm, and press briefly to return to the
previous level, or exit the menu page.
11. Browse key: long press to enter photo preview and video playback,
(memory card must be inserted) long press to delete photos, videos, and
short press to exit.

- 4 -
12. Charging prompt: when charging, the red light at the switch/0K key is
on, and when fully charged, the red light is off.
13. The working temperature of this product is - 10℃-70 ℃.
14. The waterproof grade of this product is IP67
15. The light source of the detection line is LED lamp, which is 8 (front
end)+1 (left side)+1 (right side)
16. The screen can only be rotated 180 degrees. Do not rotate too hard to
avoid damaging the product.
17. Product content includes: Handheld Display x1, 5m Detection Line x1,
Hook x1, Magnetic Hook x1, Aluminum Ring x1, Data Line x1, Instruction
Manual x1
PROCEDURE
1. With reference to example 1, insert the TF card into the TF card slot as
shown in the figure, and gently press until the card locks (Note: you must
insert class 10 to take pictures and record videos)
2. Long press the power on key for 2 seconds, and the image appears
after the screen loads the power on screen. At this time, the lens light is on;
Short press the lens light adjustment key to adjust the lens
3. Short press to take a picture; Long press to record, short press again to
stop recording
4. For others not mentioned, please describe the operation in combination
PRODUCT PARAMETERS
Lens diameter: 8.0mm
Lens pixel: 1 million
Angle of view: 70 degrees
Focus: front lens 3-8 cm, B lens 2-6 cm, C lens 1.5-3 cm
Display screen: 5.0 inch color display screen
Battery capacity: 5000 mA

- 5 -
TROUBLESHOOTING
Tips: Charge before use
OTHER INSTRUCTIONS
1. For other matters not covered, please contact the supplier!
2. This product has many models and slightly different colors and
accessories, subject to the actual receipt!
3. This manual is subject to optimization without notice!
4. Keep away from the fire source and flammable and corrosive
environment.
5. Please keep this product out of the reach of children.
6. Please put this product in a cool, dry and ventilated place.
7. At the end of its service life, please follow the local environmental
protection policy!
Question
Resolution
Unable to start
1. Check whether the battery is charged
2. Check whether the power on key is normal
3. Check whether the charging is normal
Unable to read
card
1. Check whether the memory card format is correct
(only FAT32 file format is supported)
2. Remove the TF card and reinsert it
3. Reinsert the memory card after formatting it on the
computer
Device panic
Reset: reset by inserting the reset key
Image blur
1. Check whether the observation distance is within
the focus range
2. Clean the lens with a dust-free cloth
3. In case of water ingress into the lens, please place
it in a ventilated and dry place to dry
Other issues
Please consult the supplier

- 6 -
* There are any minor changes to the numbers included in the user
manual without prior notice.
Importer: WAITCHX
Address: 250 bis boulevard Saint-Germain 75007 Paris
Importer: FREE MOOD LTD
Address: 2 Holywell Lane, London, England, EC2A 3ET
Address:8th Floor, Building F, Fengzhimei Industrial Zone,
Jinfenghuang Avenue,Fenggang Town, Dongguan City, Guangdong
Province
Made In China
FCC INFORMATION
This device complies with Part 15 of the FCC Rules.
Operation is subject to the following two
conditions:(1)This device may not cause harmful
interference, and (2)this device must accept any
interference received, including interference that
may cause undesired operation.
This product is subject to the provision of European
Directive 2012/19/EC. The symbol showing a
wheelie bin crossed through indicates that the
product requires separate refuse collection in the
European Union. This applies to the product and all
accessories marked with this symbol. Products
marked as such may not be discarded with normal
domestic waste, but must be taken to a collection
point for recycling electrical and electronic devices.
REP
UK
EUREP UK LTD
UNIT 2264, 100 OCK STREET, ABINGDON
OXFORDSHIRE ENGLAND OX14 5DH
REP
EC
EUREP GmbH
Unterlettenweg 1a, 85051
Ingolstadt, Germany
This manual suits for next models
1
Table of contents
Other VEVOR Analytical Instrument manuals