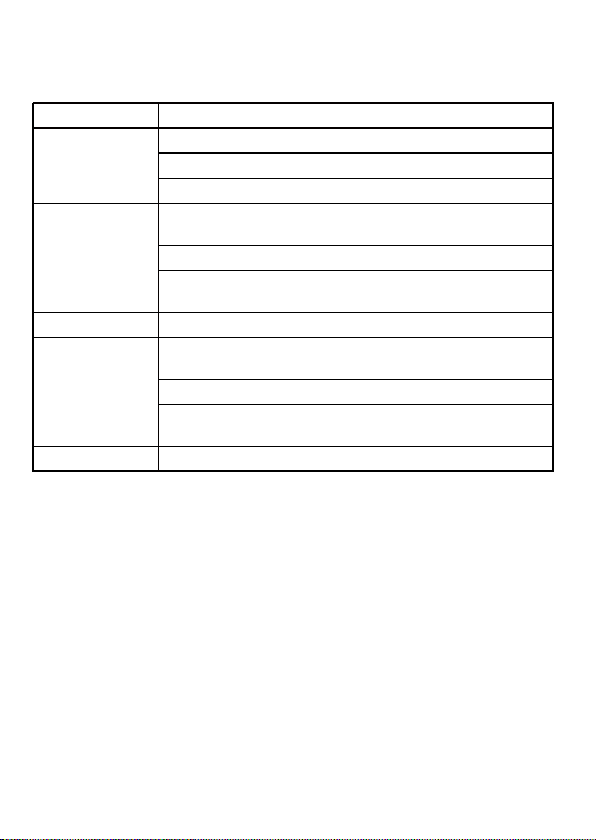
VEVOR ZX2-D User manual

Steering Endoscope
Technical Support and E-Warranty Certificate
www.vevor.com/support
Modell: ZX2-D
We continue to be committed to provide you tools with competitive price.
"Save Half", "Half Price" or any other similar expressions used by us only
represents an estimate of savings you might benefit from buying certain
tools with us compared to the major top brands and doses not necessarily
mean to cover all categories of tools offered by us. You are kindly reminded
to verify carefully when you are placing an order with us if you are actually
saving half in comparison with the top major brands.

Steering Endoscope
Instruction Manual
Have product questions? Need technical support? Please feel free
to contact us: CustomerService@vevor.com
NEED HELP? CONTACT US!
This is the original instruction, please read all manual instructions
carefully before operating. VEVOR reserves clear interpretation of
our user manual. The appearance of the product shall be subject to
the product you received. Please forgive us that we won't inform
you again if there is any technology or software updates on our
product.
1

The products are widely used in the fields of auto repair inspection, pipeline inspection,
fire protection and security, etc.
Warm reminder:
1. It cannot be used as a medical device
2.The camera of this product cannot be used in a high temperature environment.
There will be a buzzer alarm when the temperature is higher than 85 ℃.
Please remove the camera from the high temperature environment when giving an alarm.
(There are different colors, and the products are subject to the physical objects received)
PRODUCT INTRODUCTION
Camera
SnakeTube
Steering Wheel
Camera Key
Light Key
Display Screen
Handle Body
This product is a handheld high-definition detection endoscope, which can be displayed
on the screen in real time through the front camera image.
PRODUCT DESCRIPTION
2

DISPLAY OPERATION INSTRUCTIONS
Charger port
TF card slot
Removal and installation of display screen
Installation method: Move the latch on the back of the display to the right and connect
the handle to the display
Removal method: Move the latch on the back of the display to the right and take the
display out of the handle
Lock Catch
Display screen connection base
Handle connection base
Reset hole
3

ON/OFF
OK key
Press and hold for 2 seconds to turn on, and then press and
hold for 2.5 seconds to turn off
Under the setting menu, as the confirmation key, short press the
freeze frame screen to lock the screen, and then short
press to exit the freeze frame to enter the real-time screen
Short press to enter the main menu
Short press to exit the main menu
Short press to zoom out X8. X6. X4. X2. X1
Under the setting menu, select Up
Short press to enlarge X1. X2. X4. X6. X8
Under the setting menu, select Down
short press to enter photo preview, video playback,
and then long press to delete photos, videos, and delete
(delete current and all)
short press to exit
Press and hold the left button of the screen for 180-degree flip
Press and hold the right button of the screen for 180-degree flip
Short press to take a picture
Long press video
Photo key
Menu key
Video key
180-degree
flip key
180-degree
flip key
Preview key
Charging prompt: when charging, the charging indicator light will be red, and when fully
charged, the charging indicator light will be green
No TF card is inserted, can only observe normally, can not take photos/videos
(Delivered without TF card)
In the process of use, if the picture is stuck and the machine cannot be shut down, use
the card reader to align with the reset hole on the back of the display screen, press once,
and then retest
Warm reminder: Charge the display before use
OK
key
key
4
Key Operation Instructions

PRODUCT PARAMETERS
MATTERS NEEDING ATTENTION
1.Do not use brute force during installation and removal
2.The effective focal length of the camera is 3-8cm. Please view the image within this
range
3.This product cannot be used for medical and human body testing
4.Please keep this product out of the reach of children to avoid unnecessary damage
and property loss
5.Please keep the product clean and avoid exposure to sunlight and direct contact with
corrosive liquids
6.Pull out the coil after confirming that the steering wheel returns to the middle position.
It is strictly forbidden to turn the steering wheel violently
7.Do not twist or pull the bending body at the front of the coil
8.Please handle with care. Do not bend the snake tube excessively. The bending limit
of the snake tube is one circle
9.The camera temperature of this product cannot be higher than 85 ℃
Lens diameter: 6.4mm
Lens pixel: 1 Million
Lens light source: built-in bright LED
Snake tube length:
Display screen: 5 inches
Charging voltage: 5V 2A
Rotation angle: ≥ 180° in both directions
Endurance: about 4 hours
Effective focal length: 3-8CM
2.Light key: press briefly to adjust camera brightness
3.Steering wheel: turn left and right to adjust the camera direction
1M
5
DESCRIPTION OF KEYS AT THE HANDLE BODY
1.Photo key: short press to take photos/long press to record

6
TROUBLESHOOTING
Tips: Charge before use
Problem Solution
Unable to start
1. Check w hether the battery is charged
2. Check w hether the pow er on key is normal
3. Check w hether the charging is normal
Unable to read
card
1. Check w hether the memory card format is correct
(only FAT32 file format is supported)
2. Remove the TF card and re insert it
3. Re insert the memory card after formatting it on the
computer
Device panic Reset: reset by inserting the reset key
Image blur
1. Check w hether the observation distance is w ithin the
focus range
2. Clean the lens w ith dust-free cloth
3. In case of w ater ingress into the lens, please place it in
a ventilated and dry place to dry
Other issues Please consult the supplier

FCC statement:
This device complies with Part 15 of the FCC Rules.Operation is subject
to the following two conditions:
(1)This device may not cause harmful interference, and (2) this device
must accept any interference received,including interference that may
cause undesired operation.
Disposal information:
This product is subject to the provision of European Directive
2012/19/EU. The symbol showing a wheelie bin crossed through
indicates that the product requires separate refuse collection in the
European Union. This applies to the product and all accessories marked
with this symbol. Products marked as such may not be discarded with
normal domestic waste, but must be taken to a collection point for
recycling electrical and electronic devices.
Imported To AUS: Sihao Pty Ltd, 1 Rokeva Streeteastwood Nsw 2122 Australia
Imported To USA: Vevor Store Inc, 9448 Rinchmond Pl #e Rancho Cucamonga,
California, 91730 United States Of America
Address: Baoshanqu Shuangchenglu 803long 11hao 1602A-1609shi Shanghai
SHUNSHUN GmbH
Römeräcker 9 Z2021,
76351 Linkenheim-Hochstetten, Germany
EC REP
7

Drehbares Endoskop
Haben Sie Fragen zum Produkt? Benötigen Sie technische Unterstützung?
Bitte kontaktieren Sie uns: CustomerService@vevor.com
BRAUCHEN SIE HILFE? KONTAKTIEREN SIE UNS!
Dies ist die Original-Bedienungsanleitung, bitte lesen Sie alle Anweisungen
vor der Inbetriebnahme sorgfältig durch. VEVOR behält sich eine klare
Auslegung unserer Bedienungsanleitung vor. Das Aussehen des Produkts
entspricht dem Produkt, das Sie erhalten haben. Wir bitten um Ihr
Verständnis, dass wir Sie nicht mehr informieren werden, wenn es
irgendwelche Technologie- oder Software-Updates für unser Produkt gibt.
8

Freundliche Hinweise:
1. Es kann nicht als medizinisches Gerät verwendet werden.
2. Die Kamera dieses Produkts kann nicht in einer Umgebung mit hohen Temperaturen
verwendet werden. Wenn die Temperatur höher als 85 ℃ist, ertönt ein akustischer
Alarm. Bitte entfernen Sie die Kamera aus der Umgebung mit hohen Temperaturen,
wenn ein Alarm ausgelöst wird.
(Hinweis: Die Farbe und die Länge des Produkts sind abhängig von dem tatsächlich
erhaltenen Objekt.)
EINFÜHRUNG DES PRODUKTS:
Kamera
Schlangenrohr
Lenkrad
Foto-Taste
Licht Taste
Display-Bildschirm
Handgriff Gehäuse
BESCHREIBUNG DES PRODUKTS:
9
Dieses Produkt ist ein tragbares hochauflösendes Detektion-Endoskop, das über das
Bild der Frontkamera in Echtzeit auf dem Bildschirm angezeigt werden kann.
Die Produkte werden häufig in den Bereichen Autoreparaturinspektion, Rohrleitungsin-
spektion, Feuerschutz und Sicherheit usw. eingesetzt.

DISPLAY OPERATION INSTRUCTIONS
Anschluss für
Ladegerät
TF-Karten
-Schlitz
Demontage und Montage des Bildschirms
Installationsmethode: Schieben Sie den Riegel auf der Rückseite des Bildschirms
nach rechts und verbinden Sie den Griff mit dem Bildschirm.
Demontagemethode: Schieben Sie den Riegel auf der Rückseite des Bildschirms
nach rechts und nehmen Sie den Bildschirm vom Griff ab.
Verriegelung
Display-Anschluss Sockel
Griffanschluss Sockel
Reset-Taste
10

EIN/AUS
OK -Taste
Halten Sie die Taste 2 Sekunden lang gedrückt, um das Gerät
einzuschalten, und halten Sie sie dann 2,5 Sekunden lang
gedrückt, um es auszuschalten.
Im Einstellungsmenü drücken Sie als Bestätigungstaste kurz auf
den Standbildschirm, um den Bildschirm zu sperren, und drücken
Sie dann kurz, um den Standbildschirm zu verlassen und den
Echtzeitbildschirm aufzurufen.
Kurz drücken, um das Hauptmenü aufzurufen
Kurz drücken, um das Hauptmenü zu verlassen
Kurzes Drücken zum Herauszoomen X8. X6. X4. X2. X1
Im Einstellungsmenü wählen Sie „Auf“.
Kurzes Drücken zum Vergrößern X1. X2. X4. X6. X8
Im Einstellungsmenü wählen Sie „Ab“.
Kurzes Drücken zum Aufrufen der Fotovorschau und der
Videowiedergabe, langes Drücken zum Löschen von Fotos
und Videos (aktuelles und alle Fotos löschen)
Kurzes Drücken zum Verlassen
Halten Sie die rechte Taste des Bildschirms gedrückt, um ihn um
180 Grad zu drehen.
Halten Sie die rechte Taste des Bildschirms gedrückt, um ihn
um 180 Grad zu drehen.
Kurz drücken, um zu fotografieren.
Lang drücken, um Video aufzunehmen.
Foto-Taste
Menü
-Taste
Video
Taste
180-Grad
Kippschalter
180-Grad
Kippschalter
Preview
-Taste
Wenn das Bild während des Gebrauchs hängen bleibt und das Gerät nicht ausgeschaltet
werden kann, verwenden Sie das Kartenlesegerät, um das Reset-Loch auf der Rückseite
des Bildschirms auszurichten, einmal drücken und dann erneut testen.
Keine TF-Karte eingelegt, nur normale Beobachtung, kein Foto/Video
(ab Werk ohne TF-Karte)
Ladeanzeige: Während des Ladevorgangs leuchtet die Ladeanzeige rot, und wenn sie
vollständig geladen ist, leuchtet die Ladeanzeige grün.
Hinweis: Laden Sie das Display vor der Benutzung auf.
OK
Taste
Taste
11
Anweisungen zur Bedienung der Tasten:

PRODUCT PARAMETERS
ACHTUNG:
1.Gehen Sie bei der Montage und Demontage nicht gewaltsam damit um.
2.Die effektive Brennweite der Kamera beträgt 3-8cm, bitte betrachten Sie das Bild
innerhalb dieses Bereichs.
3.Dieses Produkt kann nicht für die medizinische Behandlung und die Ermittlung
des menschlichen Körpers verwendet werden.
4.Bitte bewahren Sie dieses Produkt außerhalb der Reichweite von Kindern auf,
um unnötige Schäden und Sachverluste zu vermeiden.
5. Bitte halten Sie das Produkt sauber, vermeiden Sie Sonneneinstrahlung und
direkten Kontakt mit korrosiven Flüssigkeiten.
6.Ziehen Sie die Spule heraus, nachdem Sie sich vergewissert haben, dass sich
das Lenkrad in der Mittelstellung befindet. Es ist verboten, das Lenkrad gewaltsam
zu drehen.
7.Die Biegung am vorderen Ende der Spule darf nicht verdreht oder gezogen werden.
8.Bitte behandeln Sie sie mit Vorsicht. Biegen Sie die Spule nicht zu stark.
Der Grenzwert für die Biegung der Spule ist ein Kreis.
9.Die Temperatur der Kamera dieses Produkts kann nicht höher als 85 ℃sein.
Durchmesser der Linse: 6,4 mm
Spulenlänge: 1M
Objektiv-Pixel: 1Million
Lichtquelle im Objektiv: eingebaute helle LED
Effektive Brennweite: 3-8CM
Drehwinkel: ≥ 180° in beide Richtungen Display: 5 Zoll (ca. 13 cm)
Betriebsdauer: ca. 4 Stunden Ladespannung: 5V 1A
12
BESCHREIBUNG DER TASTEN AUF DEM GRIFFGEHÄUSE
1. Foto-Taste: kurzes Drücken zum Fotografieren/langes Drücken zum Aufnehmen
2. Licht-Taste: kurzes Drücken, um die Helligkeit der Kamera einzustellen
3. Lenkrad: Drehen Sie es nach links und rechts, um die Richtung der Kamera
einzustellen.

13
FEHLERBEHEBUNG
Tipps: Vor Gebrauch aufladen
Probleme Lösungen
Kann nicht
eingeschaltet
werden
1. Prüfen Sie, ob der Akku geladen ist.
2. Prüfen Sie, ob die Ein-/Aus-Taste normal
ist.
3. Prüfen Sie, ob der Ladevorgang normal
verläuft.
Karte kann nicht
gelesen werden
1. Prüfen Sie, ob das Format der
Speicherkarte korrekt ist (nur das FAT32-
Dateiformat wird unterstützt)
2. Entnehmen Sie die TF-Karte und legen Sie
sie erneut ein.
3. Setzen Sie die Speicherkarte nach dem
Formatieren auf dem Computer erneut ein.
Geräte-Panik
Unschärfe im
Bild
1. Prüfen Sie, ob der Beobachtungsabstand
innerhalb des Schärfebereichs liegt.
2. Reinigen Sie das Objektiv mit einem
staubfreien Tuch.
3. Sollte Wasser in das Objektiv
eingedrungen sein, legen Sie es zum
Trocknen an einen belüfteten und trockenen
Ort.
Sonstige
Probleme
Re s et: Zurücks e tze n du rch Drücke n de r Re s e t-
Ta s te
Bi �e we nde n Si e s i ch a n d en Li e fe ra nte n

Hergestellt in China
FCC-Erklärung:
Dieses Gerät stimmt mit Teil 15 der FCC-Vorschriften überein. Der
Betrieb unterliegt den folgenden zwei Bedingungen:(1)Dieses Gerät darf
keine schädlichen Störungen verursachen, und (2) dieses Gerät muss
alle empfangenen Störungen akzeptieren, einschließlich Störungen, die
einen unerwünschten Betrieb verursachen können.
Informationen zur Entsorgung:
Dieses Produkt unterliegt den Bestimmungen der europäischen Richtlinie
2012/19/EU. Das Symbol einer durchgestrichenen Mülltonne bedeutet,
dass das Produkt in der Europäischen Union getrennt gesammelt
werden muss. Dies gilt für das Produkt und alle mit diesem Symbol
gekennzeichneten Zubehörteile. Produkte, die als solche gekennzeichnet
sind, dürfen nicht mit dem normalen Hausmüll entsorgt werden, sondern
müssen zu einer Sammelstelle für das Recycling von Elektro- und
Elektronikgeräten gebracht werden.
Importiert nach AUS: SIHAO PTY LTD,
1 ROKEVA STREETEASTWOOD NSW 2122 Australia
Importiert nach USA: VEVOR STORE INC,
9448RINCHMONDPL#E RANCHOCUCAMONGA, California,91730
United States of America
Address: Baoshanqu Shuangchenglu 803long 11hao 1602A-1609shi Shanghai
SHUNSHUN GmbH
Römeräcker 9 Z2021,
76351 Linkenheim-Hochstetten, Germany
EC REP
14

Technical Support and E-Warranty Certificate
www.vevor.com/support
Made In China
Table of contents
Languages:
Other VEVOR Analytical Instrument manuals