manuals.online logo
Brands
  1. Home
  2. •
  3. Brands
  4. •
  5. Vivo
  6. •
  7. Farm Equipment
  8. •
  9. Vivo BEE HV01 User manual

Vivo BEE HV01 User manual

Langstroth Beehive
Assembly Manual
Email: [email protected]
Live chat: www.vivo-us.com
Call: 1-800-3 1-5654
-Model: BEE HV01
Thank you for purchasing our VIVO
product
Scan the QR code with your mobile device or follow the link to
helpful videos related to this product.
Before you call for service, here are a few things you can do to help us
serve you better.
Read this owner’s manual:
It contains instructions to help you use and maintain your product
properly.
If you receive a damaged or defective product:
Immediately contact us. We are more than happy to replace any parts to
provide you with a fully functional product.
Need Help?
https://vivo-us.com/products/bee-hv01
1
F4 (20) Plastic
Foundation
S1 (2) Hive Boxes (assembled
by you)
F2 (20) Top Bar w/
Wedge Comb Guide
Package Contents
Tools Required:
B1 (4) Box Side Panels B2 (4) Box End Panels
B3 (60) 40mm
Copper Nails
F1 (40) End Panels F5 (20) Bottom Bar
F3 (120) 25mm Gray
Nails
S4 (1) Bottom Board (solid or screen)
S3 (1) Inner
Cover
S5 (1) Outer Cover/
Telescoping Cover
Hive Boxes
(Deep and Medium)
Hive Frames
(10 Deep and 10 Medium)
Stack Hive
●Drill or Screwdriver w/
Phillips Head
●Hammer
S2 (20) Frames w/ Foundation
(assembled by you)
S6 (1) Queen
Excluder
●Wood Glue
●Block
Hive Boxes
Assembling Instructions
Step 1: Use a hammer and a block to fit 2 side panels and 2 end panels (B1 & B2)
together to make a box. Be sure they fit together tightly and the handles are on the
upper outside of the box.
Matching boards should be
across from one another.
Make sure all 4 handles are facing
out and towards the top.
Step 2: Pre-drill nail holes in the center of each “leg” of the pre-cut joint. This will
prevent the nail from being misaligned when hammering the box together. Check
to make sure that the corners are at 90° angles as you assemble each corner.
Nails Per Box Corner
(40mm diameter)
FOR MEDIUM BOX,
6 Nails Per Box Corner
(24 total)
FOR DEEP BOX,
9 Nails Per Box Corner
(36 total)
After pre-drilling holes, start with a top corner and hammer in one nail (B3). As you
are hammering each nail, be sure to check if the box is still aligned every so often.
Adjusting the boxes as you move along will be much easier for assembling.
Note: Spare nails are included in assembly kit if needed.
2
Step 3: Repeat steps 1 and 2 for each additional box.
Hive Frames
Step 1: Grab an end panel (F1) and put a small dab of wood glue on the top inner
notch. Attach to one end of the wedged top bar (F2). Push down and hold so that it
adheres. Glue the other end panel in the same way and attach it to the opposite end
of the top bar. Wipe away any glue leaking with a paper towel.
Step 2: Insert plastic foundation (F4) into the groove of the top bar.
MEDIUM FRAME
6¼” depth & 19” top piece
DEEP FRAME
9⅛” depth & 19” top piece
Assembled Frame Dimensions
End Panel
End Panel
Top Bar
Place glue
here.
The wedge comb guide
faces down and the sides
face each other
Note: Our plastic
foundations are NOT
wax coated.
Side view of
bottom bar
with 2 long
nails nailed
down into side
panels
Aerial view of
bottom bar with
2 long nails
nailed down into
side panels
Aerial view of top
bar with 2 long
nails nailed down
into side panels Side view of
top bar with 2
long nails
nailed down
into side
panels
Hive Frames (cont.)
Step 4: Place two gray nails (F3) at one end of the top bar, spaced evenly, and
hammer into the end panels. Hammer another two gray nails on the opposite end of
the top frame bar in same manner.
Step 5: Place one gray nail (F3) on one end of the bottom bar and hammer into the
end panel. Hammer another nail on the opposite end of the bottom bar in the same
manner. This will ensure that the frame doesn’t pull apart once it is glued in by the
bees with propolis.
Bottom Bar
View from Bottom
Step 3: Put a small dab of wood glue on each
ends of the end panel. Attach the bottom bar
(F5) into the final notches of the frame. Push
down until the fit is snug.
3
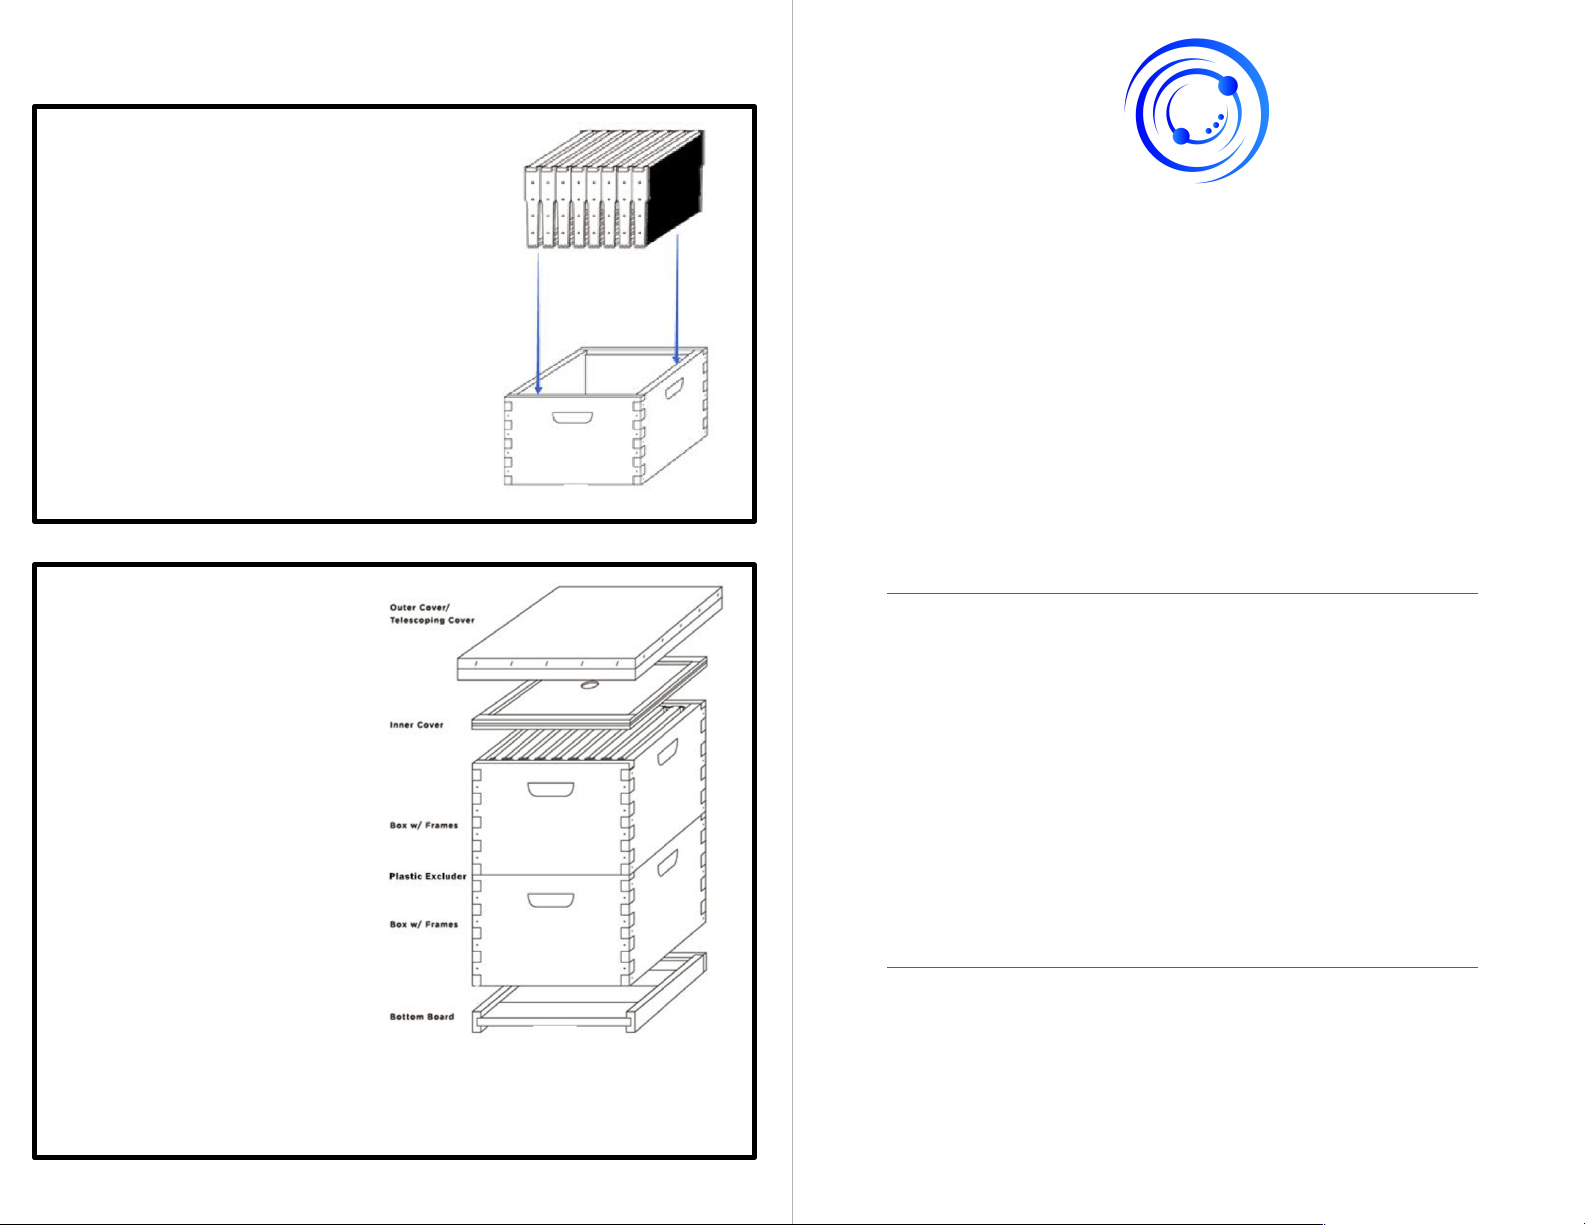
Step 2: Stack the hive parts in
this order:
1) Bottom Board (the side
with larger gap size should
be facing up to leave room
for an entrance reducer if
used)
2) Deep Box w/ Frames
Inside
3) Queen Excluder
4) Medium Box w/ the
Frames Inside
5) Inner Cover
6) Outer Cover/Telescoping
Cover
SUGGESTION: Coat the exterior wood with chemical-free Tung oil or prime and
paint the exterior surfaces. Leave the interior - except for the bottom board –
untreated. This will protect hive from weather and ensures longevity of use.
Stack Hive
Step 1: Now that you have assembled
the boxes and frames, place the frames
in the boxes. Push the frames together
in the middle.
Optional Step: Hammer the bottom
board to the bottom of the deep box
using spare nails left in the package to
secure hive when transporting or during
heavy winds.
If you do not understand these directions, or if you have any
doubts about the safety of the installation, please call a
qualified technician. Check carefully to make sure there are no
missing or defective parts. Improper installation may cause
damage or serious injury. Do not use this product for any
purpose that is not explicitly specified in this manual. We
cannot be liable for damage or injury caused by improper
mounting, incorrect assembly, or inappropriate use.
Email: help@vivo-us.com
Live chat: www.vivo-us.com
Call: 1-800-3 1-5654
For more VIVO products, check out our
website at
www.vivo-us.com.
If any parts are received damaged or defective, please contact
us. We are happy to replace parts to ensure you have a fully
functional product.
Safety Warning
Contact us at:
4

Other Vivo Farm Equipment manuals

Vivo BEE-V002C User manual

Vivo

Vivo BEE-V002C User manual

Vivo BEE-V002E User manual

Vivo

Vivo BEE-V002E User manual

Vivo BEE-V002C User manual

Vivo

Vivo BEE-V002C User manual

Vivo BEE-V004E User manual

Vivo

Vivo BEE-V004E User manual

Popular Farm Equipment manuals by other brands

Rata LGF04S user manual

Rata

Rata LGF04S user manual

KUHN GA 7301 Assembly & operators manual

KUHN

KUHN GA 7301 Assembly & operators manual

DALBO Dinco 2000 manual

DALBO

DALBO Dinco 2000 manual

Monosem CS 3000-16 manual

Monosem

Monosem CS 3000-16 manual

SIP STAR 430/12 T Instruction for work

SIP

SIP STAR 430/12 T Instruction for work

RHINO RHINO 2409 Assembly manual

RHINO

RHINO RHINO 2409 Assembly manual

GREAT PLAINS Ultra-Till I 3030 Series Operator's manual

GREAT PLAINS

GREAT PLAINS Ultra-Till I 3030 Series Operator's manual

Global Corn Crusher Instructions for use

Global

Global Corn Crusher Instructions for use

Civemasa GIC-TL Operator's manual

Civemasa

Civemasa GIC-TL Operator's manual

Knapik Planter Drag manual

Knapik

Knapik Planter Drag manual

GrainPro COLLAPSIBLE DRYER CASE II instruction manual

GrainPro

GrainPro COLLAPSIBLE DRYER CASE II instruction manual

Smithco Super Star 42-000-E Operator's manual

Smithco

Smithco Super Star 42-000-E Operator's manual

roost&root Backyard Chicken Coop 2 Assembly instructions

roost&root

roost&root Backyard Chicken Coop 2 Assembly instructions

Pottinger NOVACAT 261 Operator's manual

Pottinger

Pottinger NOVACAT 261 Operator's manual

KUHN HR4004D Operator's manual

KUHN

KUHN HR4004D Operator's manual

Massano ROTOSTONE RSG Use and maintenance book

Massano

Massano ROTOSTONE RSG Use and maintenance book

Schaffert Furrow V Closer Mounting instructions

Schaffert

Schaffert Furrow V Closer Mounting instructions

Frontier WR3008 Operator's manual

Frontier

Frontier WR3008 Operator's manual

manuals.online logo
manuals.online logoBrands
  • About & Mission
  • Contact us
  • Privacy Policy
  • Terms and Conditions

Copyright 2025 Manuals.Online. All Rights Reserved.