Wahl 1887 User manual

de
en
fr
it
es
pt
nl
da
sv
no
fi
tr
pl
cs
sk
hr
hu
sl
ro
bg
ru
uk
et
lv
lt
el
ar
OPERATING MANUAL HAIR CLIPPER
1887-1070 00 - 07-2021
TYPE 1887

1
A
B
F
+
www.downloads.wahlgmbh.com
C
E
P
Q
D
G
H
I
J
K
L
M
N
O

2 3
4 5
6

7

de
en
fr
it
es
pt
nl
da
sv
no
fi
tr
pl
cs
sk
hr
hu
sl
ro
bg
ru
uk
et
lv
lt
el
ar
OPERATING MANUAL HAIR CLIPPER
Originalbetriebsanleitung
Professionelle Netz-/Akku-Haarschneidemaschine Typ 1887 ........................................................................................................................................... 6
Translation of the original instructions
Professional cord/cordless hair clipper type 1887 ........................................................................................................................................................... 11
Mode d'emploi original
Tondeuse à cheveux professionnelle avec/sans fil, type 1887 ....................................................................................................................................... 16
Istruzioni per l’uso originali
Tagliacapelli professionale a rete/a batteria tipo 1887 .................................................................................................................................................. 21
Manual de uso
Máquina de corte profesional con alimentación de red y batería tipo 1887 ............................................................................................................... 26
Tradução do manual de instruções
Manual de instruções (tradução) Máquina de corte de cabelo profissional com bateria e ligação à rede elétrica tipo 1887 ............................. 31
Vertaling van de originele gebruiksaanwijzing
Professionele netstroom-/accutondeuse type 1887 ........................................................................................................................................................ 36
Original driftsvejledning
Professionel net-/akku-hårklipper Type 1887 ................................................................................................................................................................... 41
Bruksanvisning (översättning)
Professionell nät-/batteridriven hårklippningsmaski typ 1887 ...................................................................................................................................... 46
Oversettelse av bruksanvisning
Profesjonell nett-/batteridrevet hårklippemaskin type 1887 ......................................................................................................................................... 51
Alkuperäinen käyttöohje (käännös)
Ammattilaisen verkko-/akkukäyttöinen hiustenleikkuukone, tyyppi 1887 .................................................................................................................. 56
Kullanım Kılavuzu Çevirisi
Profesyonel Kablolu/Kablosuz saç kesme aleti Tip 1887 ................................................................................................................................................ 61
Instrukcja obsługi (tłumaczenie)
Profesjonalna maszynka do strzyżenia włosów z zasilaniem sieciowym/akumulatorowym typu 1887 .................................................................. 66
Originální návod kpoužití
Profesionální zastřihovač vlasů s napájením ze sítě/akumulátoru typ 1887 ................................................................................................................ 71
Preklad originálneho návodu na obsluhu
Profesionálny sieťový/akumulátorový strihač vlasov, typ 1887 ..................................................................................................................................... 76
Izvorne upute za uporabu
Profesionalni šišač za kosu na struju i baterije, tip 1887 ................................................................................................................................................. 81
Eredeti használati utasítás
Professzionális vezetékes / vezeték nélküli hajvágógép, 1887-es típus ....................................................................................................................... 86
Prevod originalnih navodil za uporabo
Profesionalni omrežni/akumulatorski strižnik za lase tip 1887 ...................................................................................................................................... 91
Manual de utilizare original
Mașină profesională de tuns părul tip 1887 cu alimentare de la priză/ acumulator .................................................................................................. 96
Оригинално ръководство за експлоатация
Професионална машинка за подстригване за работа със захранване от мрежата/с акумулатор тип 1887 ............................................... 101
Оригинальное руководство по эксплуатации
Профессиональная аккумуляторно-сетевая машинка для стрижки волос, тип 1887 ....................................................................................... 106
Оригінальна інструкція з експлуатації
Професійна машинка для підстригання волосся, що працює від мережі або акумулятора, тип 1887 ......................................................... 112
Algupärase kasutusjuhendi tõlge
Professionaalne võrgu-/akutoitel juukselõikusmasin, tüüp 1887 ............................................................................................................................... 117
Instrukcija (tulkojums)
Profesionāla tīkla/akumulatora matu griešanas ierīce, modelis1887 ........................................................................................................................ 122
Originali naudojimo instrukcija
Profesionali elektrinė / akumuliatorinė plaukų kirpimo mašinėlė tipas 1887 .......................................................................................................... 127
Πρωτότυπες οδηγίες λειτουργίας
Επαγγελματική κουρευτική μηχανή ρεύματος/μπαταρίας τύπος 1887 ...................................................................................................................... 132
1887....................................................................................................................................... 138

6
DEUTSCH
de
en
fr
it
es
pt
nl
da
sv
no
fi
tr
pl
cs
sk
hr
hu
sl
ro
bg
ru
uk
et
lv
lt
el
ar 1887-1070 00 - 07-2021 1887-1070 00 - 07-2021
Originalbetriebsanleitung
Professionelle Netz-/Akku-
Haarschneidemaschine Typ 1887
Allgemeine Benutzerhinweise
Informationen zum Gebrauch der Sicherheitshinweise und der
Betriebsanleitung
fDie Dokumentation dieses Gerätes besteht aus folgenden Teilen:
·Originalbetriebsanleitung
·Allgemeine Sicherheitshinweise
·Garantiebedingungen
fBevor Sie das Gerät zum ersten Mal in Betrieb nehmen, müssen Sie
die Sicherheitshinweise und diese Betriebsanleitung vollständig
gelesen und verstanden haben.
fDie Kontaktdaten unserer Servicecenter finden Sie in den
Garantiebedingungen.
fBetrachten Sie die Sicherheitshinweise und die Betriebsanleitung
als Teil des Produkts und bewahren Sie sie gut und erreichbar auf.
fSie können die Sicherheitshinweise und die Betriebsanleitung auch
als PDF-Datei von unseren Servicecentern anfordern. Auch die EG-
Konformitätserklärung kann in den weiteren Amtssprachen der EU
von unseren Servicecentern angefordert werden.
fFügen Sie die Sicherheitshinweise und die Betriebsanleitung bei
Weitergabe des Gerätes an Dritte bei.
fAlle Rechte vorbehalten. Diese Gebrauchsanweisung ist urheber-
rechtlich geschützt.
fWir arbeiten ständig an der Weiterentwicklung unserer Produkte
und behalten uns Änderungen des Lieferumfanges in Form, Aus-
stattung und Technik vor.
fDer Inhalt dieser Betriebsanleitung kann jederzeit und ohne Ankün-
digung geändert werden.
Symbol- und Hinweiserklärung
Die folgenden Symbole und Signalworte werden in dieser Betriebsanlei-
tung, auf dem Gerät oder auf der Verpackung verwendet.
Dabei bezeichnen die Signalwörter GEFAHR, WARNUNG oder
VORSICHT die Abstufung einer möglichen Verletzungsgefahr.
GEFAHR zeigt eine unmittelbar gefährliche Situation an, die, wenn
nicht vermieden, zum Tod oder ernster Verletzung führt.
WARNUNG zeigt eine potentiell gefährliche Situation an, die, wenn
nicht vermieden, zum Tod oder ernster Verletzung führen kann.
VORSICHT zeigt eine potentiell gefährliche Situation an, die, wenn
nicht vermieden, zu geringfügiger oder leichter Verletzung führen kann.
GEFAHR
Gefahr durch Stromschlag mit möglicher schwerer Körper-
verletzung oder Tod als Folge.
GEFAHR
Explosionsgefahr mit möglicher schwerer Körperverletzung
oder Tod als Folge.
GEFAHR
Gefahr durch die Verwendung entzündlicher Stoffe. Durch
Brandentstehung mögliche schwere Körperverletzung oder
Tod als Folge.
WARNUNG
Warnung vor einer möglichen Körperverletzung oder einem
gesundheitlichen Risiko.
VORSICHT
Warnt vor einer möglichen Verletzungsgefahr.
VORSICHT
Hinweis auf die Gefahr von Sachschäden.
Hinweis mit nützlichen Informationen und Tipps.
EAC-Konformitätszeichen für das Gebiet der Eurasischen
Wirtschaftsunion
CE-Konformitätszeichen
UKCA-Konformitätszeichen für den britischen Markt
WEEE Kennzeichnung zum Verbot der Entsorgung von elek-
trischen und elektronischen Geräten im Hausmüll
Sie werden zu einer Handlung aufgefordert.
Ergebnis einer Aktion / Handlung.
Führen Sie diese Handlungen in der beschriebenen Reihen-
folge durch.
Aufzählung
Produktbeschreibung
Bezeichnung der Teile (Abb. 1)
A Schneidsatz*
B Schnittlängenverstellung
C Ein-/Ausschalter mit integrierter Akkukapazitätsanzeige
D Gehäuse
E Gerätebuchse
F Ladeständer
G Ladeständerbuchse
H Geräteanschlussstecker
I Steckerschaltnetzteil
J Magnetischer Aufsteckkamm, 1,5mm Schnittlänge*
K Magnetischer Aufsteckkamm, 3mm Schnittlänge*
L Magnetischer Aufsteckkamm, 4,5mm Schnittlänge*
M Magnetischer Aufsteckkamm, 6mm Schnittlänge*
N Magnetischer Aufsteckkamm, 9mm Schnittlänge*
O Magnetischer Aufsteckkamm, 12mm Schnittlänge*
P Öl für den Schneidsatz
Q Reinigungsbürste
f
4
1.
2.
3.
·

7
DEUTSCH
de
en
fr
it
es
pt
nl
da
sv
no
fi
tr
pl
cs
sk
hr
hu
sl
ro
bg
ru
uk
et
lv
lt
el
ar
1887-1070 00 - 07-2021
* Aufsteckkämme und zusätzliche Schneidsätze sind optionales Zube-
hör und können je nach Modell abweichen.
Technische Daten
Handgerät
Typ Professionelle Netz- / Akku-
Haarschneidemaschine
Schneidsystem Schneidsatz-Schnellwechselsystem
mit ablesbarer Schnittlänge
Schneidsatzbreite 46 mm
Schnittlänge 0,5 - 2 mm
Antrieb bürstenloser DC-Motor, ca. 7200
1/min
Betriebsspannung 100 – 240 V AC / 50/60 Hz über
Steckerschaltnetzteil
Betriebsart Netz / Akku (Two Way), Lithium-Ionen
Betriebsdauer Akku bis zu 120 Minuten
Ladezeit Akku ca. 70 Minuten
Abmessungen (L x B x H) 149 x 47 x 48 mm
Gewicht ca. 210 g
Emissionsschalldruckpegel max. 63 dB(A) @ 25 cm
Vibration < 2,5 m/s2
Ladeständer
Abmessungen mit Zubehör
(L x B x H): 95 x 75 x 60 mm
Gewicht: 80 g
Steckerschaltnetzteil
Hersteller: Ten Pao Industrial Co., Ltd.
Room 10-11,6/F., Kwong Sang Hong
Centre, 151-153 Hoi Bun Road, Kwun
Tong, Kowloon, Hong Kong
Typ: Adapter 6000
Eurostecker
Eingangsspannung: 100-240 V
Eingangswechselstromfrequenz:50-60 Hz
Ausgangsspannung: 5,9 V
Ausgangsstrom: 1,5 A
Ausgangsleistung: 8,85 W
Durchschnittliche Effizienz im
Betrieb: 78,9%
Leistungsaufnahme bei Nulllast: 0,04 W
Hersteller: GOLD MARK (CHINA) HOLDINGS LTD
Unit 1706,17/F.,Vanta Industrial Centre,
21-33 Tai Lin Pai Road,Kwai Chung, N.T.,
Hong Kong
Typ: Adapter 6000A (VI)
Eurostecker / UK-Stecker
Eingangsspannung: 100-240 V
Eingangswechselstromfrequenz:50-60 Hz
Ausgangsspannung: 5,9 V
Ausgangsstrom: 1,5 A
Ausgangsleistung : 8,85 W
Durchschnittliche Effizienz im
Betrieb: 79,7%
Leistungsaufnahme bei Nulllast: 0,04 W
Betriebsbedingungen
Umgebung: 0°C – +40°C
Das Gerät ist schutzisoliert und funkentstört. Es erfüllt die Anforderun-
gen der EU-Richtlinie Elektromagnetische Verträglichkeit 2014/30/EU
und die Maschinenrichtlinie 2006/42/EG.
Betrieb
Vorbereitung
Bewahren Sie das Verpackungsmaterial für eine spätere
sichere Lagerung oder Transport auf.
fKontrollieren Sie die Vollständigkeit des Lieferumfangs.
fPrüfen Sie alle Teile auf eventuelle Transportschäden.
fBei Transportschäden wenden Sie sich an Ihren Händler.
Sicherheit
Vorsicht! Schäden durch falsche
Spannungsversorgung.
fBetreiben Sie das Gerät ausschließlich mit der auf dem
Typenschild des Gerätes bzw. am Steckerschaltnetzteil
angegebenen Betriebsspannung.
fBetreiben Sie das Gerät ausschließlich mit dem mitgelie-
ferten Steckerschaltnetzteil.
Akku laden
1. Schalten Sie mit dem Ein-/Ausschalter das Gerät aus (Abb.2a).
2. Stecken Sie den Geräteanschlussstecker des Steckerschaltnetzteiles
in die Ladeständerbuchse (Abb.4b - 1).
·Das Gerät kann zum Laden auch direkt mit dem Stecker-
schaltnetzteil verbunden werden (Abb. 4a - 1).
·Durch ein intelligentes Lademanagement wird ein Über-
laden des Akkus verhindert.
·Die ideale Umgebungstemperatur für das Laden liegt
zwischen 15 °C und 35 °C.
·Setzen Sie das Gerät nicht längere Zeit Temperaturen
über 50 °C aus.
3. Stecken Sie das Steckerschaltnetzteil in die Netzsteckdose (Abb.
4b - 2).
4. Stellen Sie das Gerät in den Ladeständer (Abb. 4b - 3).
Der Ladevorgang beginnt.
oder
1. Schalten Sie mit dem Ein-/Ausschalter das Gerät aus (Abb.2a).
2. Verbinden Sie das Gerät direkt mit dem Geräteanschlussstecker des
Steckerschaltnetzteils (Abb.4a - 1).
3. Stecken Sie das Steckerschaltnetzteil in die Netzsteckdose (Abb.
4a - 2).
Der Ladevorgang beginnt.
·Während des Ladevorgangs blinkt die Akkukapazitäts-
anzeige (C) langsam grün. Bei voll geladenem Akku
leuchtet die Akkukapazitätsanzeige konstant grün.

8
DEUTSCH
de
en
fr
it
es
pt
nl
da
sv
no
fi
tr
pl
cs
sk
hr
hu
sl
ro
bg
ru
uk
et
lv
lt
el
ar 1887-1070 00 - 07-2021 1887-1070 00 - 07-2021
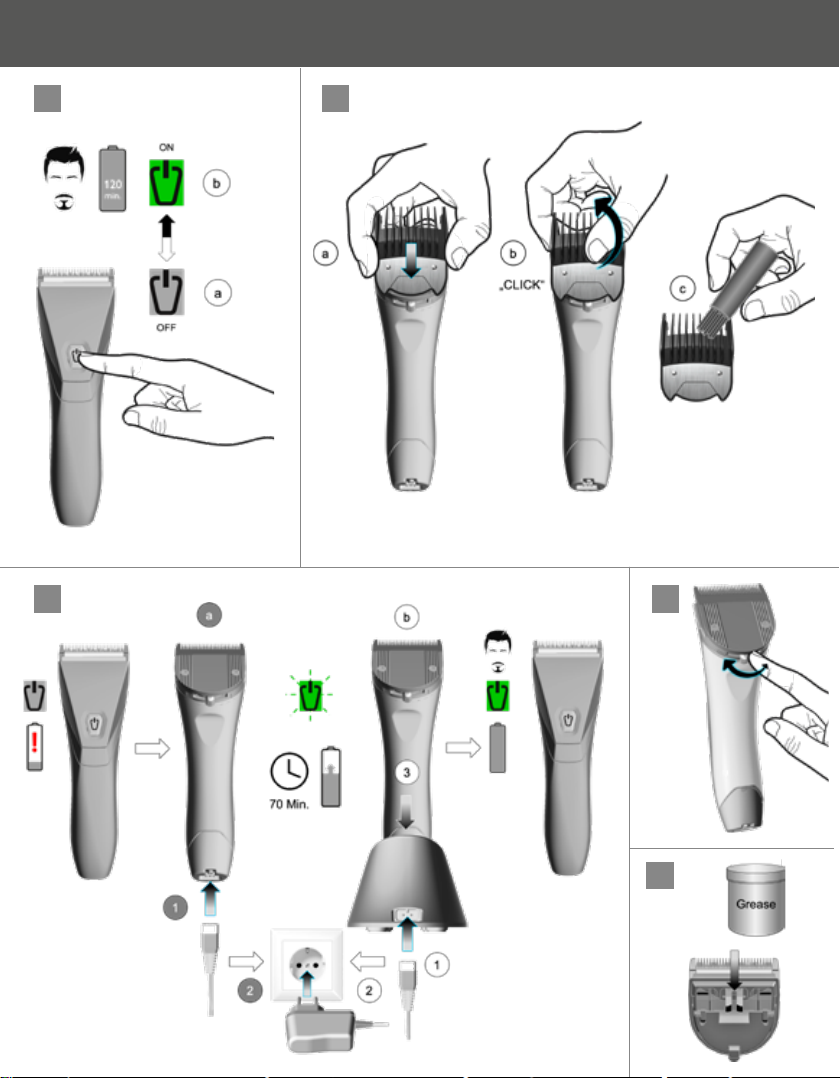
·Nach Entnahme des Gerätes aus dem Ladeständer
erlischt nach ca. 20 Sekunden die Anzeige
(Stromsparmodus).
Akku Betrieb
1. Schalten Sie mit dem Ein-/Ausschalter das Gerät ein (Abb.2b).
·Der Ladezustand des Akkus wird durch die Akkukapazi-
tätsanzeige (C) angezeigt:
– leuchtet konstant grün = 100 % – 20 %
– blinkt schnell grün = 20 % – 5 %
– leuchtet konstant rot = 5 % – 0 %
·Bei entladenem Akku schaltet sich das Gerät automa-
tisch ab.
2. Schalten Sie mit dem Ein-/Ausschalter das Gerät nach Gebrauch
aus (Abb.2a).
·Nach dem Ausschalten des Gerätes erlischt nach ca.
20Sekunden die Anzeige (Stromsparmodus).
Netzbetrieb
Vorsicht! Schäden durch Benutzung der Haarschneide-
maschine mit permanent eingestecktem Steckerschalt-
netzteil (Netzbetrieb).
Die Benutzung der Haarschneidemaschine mit permanent
eingestecktem Steckerschaltnetzteil (Netzbetrieb) ist nicht
vorgesehen. Das Anschlusskabel des Steckerschaltnetzteiles
ist nicht für die mechanische Belastung im Dauerbetrieb
ausgelegt.
fDer Netzbetrieb wird nur kurzfristig, im Falle eines
leeren Akkus, empfohlen.
1. Stecken Sie den Geräteanschlussstecker des Steckerschaltnetzteiles
in die Gerätebuchse (Abb.4a - 1).
2. Stecken Sie das Steckerschaltnetzteil in die Netzsteckdose (Abb.
4a - 2).
3. Schalten Sie mit dem Ein-/Ausschalter das Gerät ein (Abb.2b).
4. Schalten Sie mit dem Ein-/Ausschalter das Gerät nach Gebrauch
wieder aus (Abb.2a).
Instandhaltung
Warnung! Verletzungen und Sachschäden durch
unsachgemäße Handhabung.
fSchalten Sie das Gerät vor Beginn aller Reinigungs-
und Wartungsarbeiten aus und trennen es von der
Stromversorgung.
Reinigung und Pflege
Gefahr! Stromschlag durch eintretende Flüssigkeit.
fDas Gerät nicht in Wasser tauchen!
fLassen Sie keine Flüssigkeiten in das Geräteinnere
gelangen.
Vorsicht! Schäden durch aggressive Chemikalien.
Aggressive Chemikalien können das Gerät und Zubehör
schädigen.
fVerwenden Sie keine Lösungs- oder Scheuermittel.
fVerwenden Sie ausschließlich das vom Hersteller emp-
fohlene Reinigungsmittel und Schneidsatzöl.
·Bei unzureichender Pflege des Schneidsatzes kann sich
die Laufzeit erheblich reduzieren.
·Zubehör und Ersatzteile können Sie über Ihren Händler
oder unsere Servicecenter beziehen.
1. Schalten Sie mit dem Ein-/Ausschalter das Gerät aus (Abb.2a).
2. Entfernen Sie den Schneidsatz gemäß Kapitel„Austausch des
Schneidsatzes“ vom Gehäuse.
3. Nehmen Sie den Schneidsatz ab (Abb.7 - 1 + 2).
4. Entfernen Sie mit der Reinigungsbürste die Haarreste aus der
Gehäuseöffnung (Abb.7 - 3) und vom Schneidsatz (Abb.7 - 4).
5. Drücken Sie den Reinigungshebel leicht nach unten (Abb.7 - 5), so
dass Sie die Haarreste zwischen Scherkamm und Schermesser mit
der Reinigungsbürste entfernen können (EASYCLEANING).
6. Ölen Sie den Schneidsatz mit dem Schneidsatzöl (Abb.7 - 6) jeweils
seitlich und oben.
7. Setzen Sie den Schneidsatz mit dem Haken an der Aufnahme am
Gehäuse an (Abb.7 - 7a), klappen Sie ihn hoch und drücken Sie ihn
ans Gehäuse, bis er einrastet (Abb.7 - 7b).
8. Schalten Sie mit dem Ein-/Ausschalter das Gerät für ca. 2 Sek. ein
(Abb.7 - 8a), damit sich das Öl verteilt.
9. Wischen Sie ggf. mit einem Tuch überschüssiges Öl ab (Abb.7 - 8b).
·Für eine gute und lang anhaltende Schneidleistung
ist es wichtig den Schneidsatz täglich und nach jeder
Nutzung zu ölen.
·Wenn nach längerer Gebrauchsdauer trotz regelmäßi-
gem Reinigen und Ölen die Schneidleistung nachlässt,
sollte der Schneidsatz gewechselt werden.
10. Befindet sich kein Fett mehr am Mitnehmer, fetten Sie diesen mit
unserem Spezialfett 1590-7340 (Abb.6), um den Verschleiß zu
reduzieren.
Bedienung
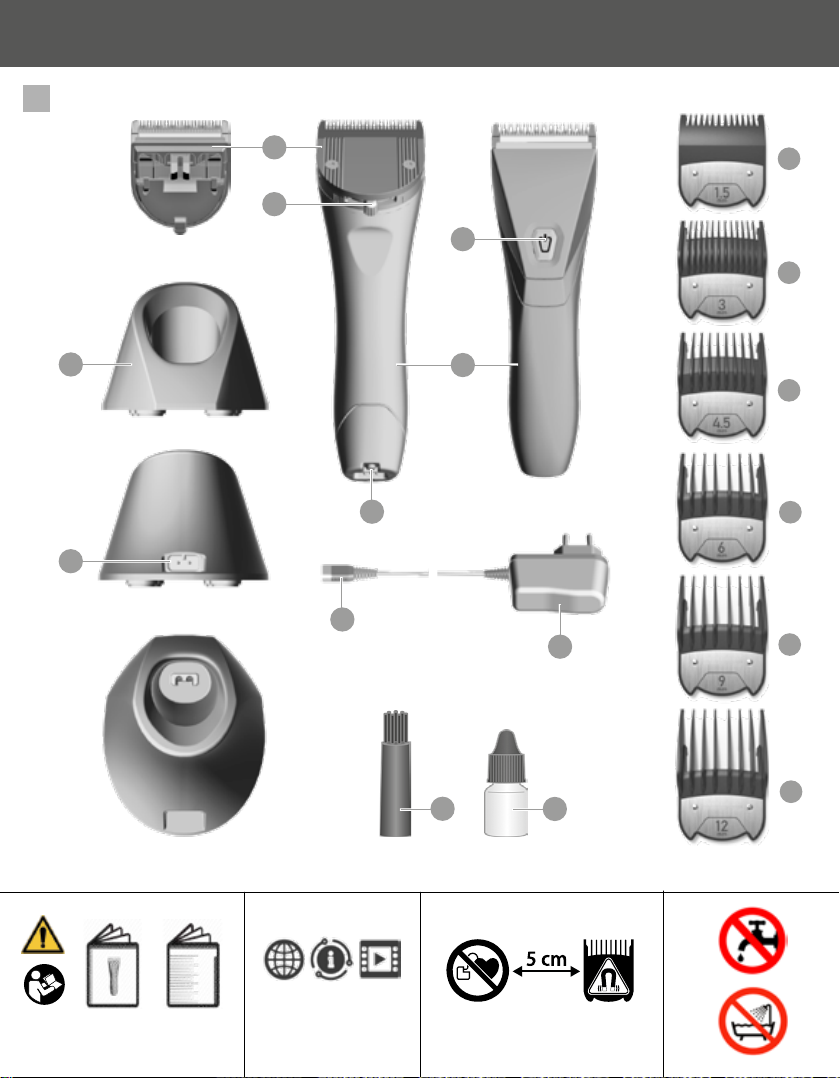
Einstellung der Schnittlänge am Schneidsatz
Die integrierte Schnittlängenverstellung kann von 0,5 mm bis 2mm
(Abb.5) eingestellt werden.
1. Schalten Sie mit dem Ein-/Ausschalter das Gerät aus (Abb.2a).
2. Schieben Sie die Schnittlängenverstellung stufenweise nach rechts
oder links bis in die gewünschte Position.
Die Schnittlänge lässt sich in 5 Positionen von 0,5 mm bis 2mm
einstellen (Abb.5).
Schneiden mit Aufsteckkamm
Das Gerät kann auch mit einem magnetischen Aufsteckkamm betrieben
werden.
1. Schalten Sie mit dem Ein-/Ausschalter das Gerät aus (Abb.2a).
2. Halten Sie den Aufsteckkamm so nah an den Schneidsatz, dass
dieser magnetisch angezogen wird (Abb.3a) und schieben Sie ihn
ggf. in die korrekte Postion. Ein „Click“ bestätigt das Einrasten.

9
DEUTSCH
de
en
fr
it
es
pt
nl
da
sv
no
fi
tr
pl
cs
sk
hr
hu
sl
ro
bg
ru
uk
et
lv
lt
el
ar
1887-1070 00 - 07-2021
3. Schalten Sie mit dem Ein-/Ausschalter das Gerät ein (Abb.2b).
4. Führen Sie das Gerät parallel zur Haut langsam und vorsichtig
gegen die Haarwuchsrichtung.
5. Schütteln oder pusten Sie zwischendurch die Haare vom Gerät und
Aufsteckkamm.
fWenn sich der Aufsteckkamm mit Haaren zusetzt, sollten Sie diesen
entfernen (Abb.3b) und reinigen (Abb.3c).
6. Entfernen Sie den Aufsteckkamm nach dem Schneiden durch Abhe-
ben nach oben (Abb.3b).
7. Reinigen Sie den Aufsteckkamm nach der Benutzung (Abb.3c).
Austausch des Schneidsatzes
Vorsicht! Verletzungen an Händen bzw. Fingern durch
scharfkantigen Schneidsatz.
1. Schalten Sie mit dem Ein-/Ausschalter das Gerät aus (Abb.2a).
2. Nehmen Sie den Aufsteckkamm ab (Abb.3b).
3. Drücken Sie den Schneidsatz vorne am Schermesser vorsichtig mit
den Daumen in Pfeilrichtung (Abb.7 - 1) nach hinten. Ggf. ein Tuch
o. ä. benutzen.
4. Nehmen Sie den Schneidsatz ab (Abb.7 - 2) und tauschen Sie ihn
aus.
5. Setzen Sie den neuen Schneidsatz mit dem Haken an der Aufnahme
am Gehäuse an (Abb.7 - 7a), klappen Sie ihn hoch und drücken Sie
ihn ans Gehäuse, bis er hörbar einrastet (Abb.7 - 7b).
Problembehebung
Schneidsatz schneidet schlecht oder rupft
Ursache: Schneidsatz ist verschmutzt oder verschlissen.
fReinigen und ölen Sie den Schneidsatz (Abb. 7). Sollte dies das
Problem nicht beseitigen tauschen Sie den Schneidsatz aus (Abb.7).
Hautverletzung
Ursache: Zu starker Druck auf die Haut.
fReduzieren Sie den Druck beim hautnahen Schneiden.
Ursache: Beschädigter Schneidsatz.
fKontrollieren Sie, ob beim Gebrauch Zahnspitzen beschädigt
wurden und tauschen Sie gegebenenfalls den Schneidsatz aus.
Akkulaufzeit ist zu kurz
Ursache: Ein verschmutzter und nicht geölter Schneidsatz reduziert die
verfügbare Akkulaufzeit erheblich!
fReinigen und ölen Sie den Schneidsatz gewissenhaft (Abb.7). Sollte
die Akkulaufzeit dennoch viel zu kurz sein, so ist vermutlich der
Akku nahe an seinem Lebensende.
Ursache: Kapazitätsanzeige ungenau
fEntladen Sie das Gerät vollständig und laden Sie es danach in
einem ununterbrochenen Ladevorgang wieder vollständig auf.
Akkukapazitätsanzeige blinkt nicht beim Laden
Ursache: Gerät ist nicht richtig im Ladeständer positioniert.
fStellen Sie sicher, dass das Gerät richtig im Ladeständer positioniert
ist.
Ursache: Gerätebuchse ist verschmutzt.
fReinigen Sie die Gerätebuchse vorsichtig mit einer Bürste o. ä.!
Ursache: Ladeständerbuchse ist verschmutzt.
fReinigen Sie die Ladeständerbuchse vorsichtig mit einer Bürste
o. ä.!
Ursache: Fehlende Stromversorgung.
fStellen Sie sicher, dass der Geräteanschlussstecker korrekt am Gerät
bzw. an der Ladeständerbuchse angeschlossen ist.
fStellen Sie sicher, dass das Steckerschaltnetzteil korrekt mit der
Steckdose verbunden ist.
fÜberprüfen Sie das Stromkabel und die Stecker auf eventuelle
Beschädigungen.
Akkukapazitätsanzeige blinkt rot
Ursache: Motorblockade
fReinigen und ölen Sie den Schneidsatz (Abb. 7).
fReinigen Sie die Gehäuseöffnung (Abb. 7).
Vorsicht! Schäden und Verletzungsgefahr durch
unerlaubte Reparaturen, Änderungen oder falsches
Zubehör.
Wenn Sie das Problem mit den o.g. Hinweisen nicht beheben
können, wenden Sie sich an unsere Servicecenter.
fVersuchen Sie keinesfalls das Gerät selbst zu reparieren!
fVerändern Sie das Gerät nicht.
fVerwenden Sie nur Original-Zubehör.
Entsorgung
Vorsicht! Umweltschäden bei falscher Entsorgung.
fAkkus vor der Entsorgung entladen!
fDie ordnungsgemäße Entsorgung dient dem Umwelt-
schutz und verhindert mögliche schädliche Auswirkun-
gen auf Mensch und Umwelt.
Beachten Sie im Falle der Entsorgung des Geräts die jeweiligen gesetz-
lichen Vorschriften.
Information zur Entsorgung von elektrischen und elektronischen
Geräten in der Europäischen Union:
Innerhalb der Europäischen Union wird für elektrisch betrie-
bene Geräte die Entsorgung durch nationale Regelungen vor-
gegeben, die auf der EU-Richtlinie 2012/19/EU über Elektro-
nik-Altgeräte (WEEE) basieren. Danach darf das Gerät nicht
mehr mit dem kommunalen Müll oder Hausmüll entsorgt werden.
Das Gerät wird bei den kommunalen Sammelstellen bzw. Wertstoffhö-
fen kostenlos entgegengenommen.
Die Produktverpackung besteht aus recyclingfähigen Materialien.
Entsorgen Sie diese umweltgerecht und führen Sie die Verpackung der
Wiederverwertung zu.

10 1887-1070 00 - 07-2021
MOSER Mix & Match System
Schneidsatz-Expertise Made in Germany
BLENDING BLADE
SCHNEIDSATZ
Für sanfte und natürliche
Übergänge 0,5 – 2 mm
FADING BLADE
SCHNEIDSATZ
Für hautnahe, präzise Fades
0,5 – 2 mm
MAGIC BLADE
SCHNEIDSATZ
Hochpräziser Universal-
Schneidsatz, 0,7 – 3 mm
DIAMOND BLADE
SCHNEIDSATZ
Universaler Schneidsatz:
abwaschbar, desinfizierbar,
langlebig, für hohe Ansprüche
0,7 – 3 mm
TEXTURIZING BLADE
SCHNEIDSATZ
Für kreative Texturier – und
Schnitttechniken.
3 Intensitätsstufen.

11
ENGLISH
de
en
fr
it
es
pt
nl
da
sv
no
fi
tr
pl
cs
sk
hr
hu
sl
ro
bg
ru
uk
et
lv
lt
el
ar
1887-1070 00 - 07-2021 1887-1070 00 - 07-2021
Translation of the original instructions
Professional cord/cordless hair clipper type 1887
General user information
Information about using the safety instructions and the
original instructions
fThe documentation for this appliance comprises the following
parts:
·Translation of the operating manual
·General safety instructions
·Warranty terms
fBefore using the appliance for the first time, you must read and
understand the safety instructions and the original instructions.
fYou will find the contact data for our service centre in the
guarantee conditions.
fConsider the safety instructions and the original instructions as part
of the product and store them in a safe and accessible place.
fYou can also request the safety instructions and the original
instructions in PDF format from our service centres. The EC
declaration of conformity can also be requested in the other official
EU languages from our service centres.
fInclude the safety instructions and the original instructions if
passing the appliance to a third party.
fAll rights reserved. This operating manual is protected by copyright.
fWe are constantly working on the further development of our
products and reserve the right to make changes to the scope of
delivery in terms of form, equipment and technology.
fThe contents of this operating manual may be changed at any time
and without notice.
Explanation of symbols and notes
The following symbols and signal words are used in this original
instructions, on the appliance or on the packaging.
The signal words DANGER, WARNING or CAUTION describe the
grading of a possible risk of injury.
DANGER indicates an imminently hazardous situation which, if not
avoided, will result in death or serious injury.
WARNING indicates a potentially hazardous situation which, if not
avoided, can result in death or serious injury.
CAUTION indicates a potentially hazardous situation which, if not
avoided, can lead to minor or moderate injury.
DANGER
Danger of electric shock which may result in serious physical
injury or death.
DANGER
Danger of explosion which may result in serious physical
injury or death.
DANGER
Danger due to the use of flammable materials. Danger of
fire development which may result in serious physical injury
or death.
WARNING
Warning of a possible physical injury or a health risk.
CAUTION
Warning of a possible risk of injury.
CAUTION
Information about danger of material damage.
Note with useful information and tips.
EAC conformity mark for the Eurasian Economic Union
CE conformity mark
UKCA conformity mark for the British market
WEEE mark prohibiting the disposal of electric and electronic
appliances with domestic waste
Action to be taken by owner.
Result of an action.
Carry out these actions in the sequence described.
List
Product description
Description of parts (Fig. 1)
A Blade set
B Cutting length adjustment
C On/off switch with integrated battery charge status indicator
D Housing
E Appliance socket
F Charging stand
G Charging stand socket
H Appliance plug
I switch mode power supply
J Magnetic attachment comb, cutting length 1.5mm*
K Magnetic cattachment comb, cutting length 3mm*
L Magnetic attachment comb, cutting length 4.5mm*
M Magnetic attachment comb, cutting length 6mm*
N Magnetic attachment comb, cutting length 9mm*
O Magnetic attachment comb, cutting length 12mm*
P Oil for blade set
Q Cleaning brush
* Comb attachments and additional blade sets are optional
accessories and can vary from model to model.
f
4
1.
2.
3.
·

12
ENGLISH
de
en
fr
it
es
pt
nl
da
sv
no
fi
tr
pl
cs
sk
hr
hu
sl
ro
bg
ru
uk
et
lv
lt
el
ar 1887-1070 00 - 07-2021
Technical data
Hand-held appliance
Type Professional cord/cordless
hair clipper
Blade system Blade set quick-change system
with read-off cutting length
Blade set width 46 mm
Cutting length 0.5 - 2 mm
Drive Brushless DC motor,
approx. 7200 rpm
Operating voltage 100 – 240 V AC / 50/60 Hz via switch
mode power supply
Operation mode Mains / battery (two-way), lithium-ion
Battery operating time up to 120 minutes
Battery charging time approx. 70 minutes
Dimensions (L x W x H) 149 x 47 x 48 mm
Weight approx. 210 g
Emission sound pressure level max. 63 dB(A) @ 25cm
Vibration < 2.5 m/s2
Charging stand
Dimensions with accessories
(L x W x H): 95 x 75 x 60 mm
Weight: 80 g
Switch mode power supply
Manufacturer: Ten Pao Industrial Co., Ltd.
Room 10-11,6/F., Kwong Sang Hong
Centre, 151-153 Hoi Bun Road, Kwun
Tong, Kowloon, Hong Kong
Type: Adapter 6000
Euro plug
Input voltage: 100-240 V
Input AC frequency: 50-60 Hz
Output voltage: 5.9 V
Output current: 1.5 A
Output power: 8.85 W
Average active efficiency: 78.9%
No-load
power consumption: 0.04 W
Manufacturer: GOLD MARK (CHINA) HOLDINGS LTD
Unit 1706,17/F.,Vanta Industrial Centre,
21-33 Tai Lin Pai Road,Kwai Chung,
N.T., Hong Kong
Type: Adapter 6000A (VI)
Euro plug / UK plug
Input voltage: 100-240 V
Input AC frequency: 50-60 Hz
Output voltage: 5.9 V
Output current: 1.5 A
Output power: 8.85 W
Average active efficiency: 79.7%
No-load power consumption: 0.04 W
Operating conditions
Ambient temperature: 0°C – +40°C
The appliance is safety insulated and radio screened. It meets the
requirements of EU Electromagnetic Compatibility Directive 2014/30/EU
and Machinery Directive 2006/42/EC.
Operation
Preparation
Keep the packaging material for safe storage or transport
later.
fCheck that the contents are complete.
fCheck all the parts for possible transport damage.
fIn case of transport damage, contact your dealer.
Safety
Caution! Damage due to incorrect power supply.
fOnly operate the appliance with the voltage stated on
the nameplate or on the switch mode power supply.
fOnly operate the appliance with the switch mode power
supply provided.
Charging the battery
1. Switch the appliance off using the on/off switch (Fig.2a).
2. Connect the appliance plug on the switch mode power supply to
the charging stand socket (Fig.4b-1).
·The appliance can also be connected directly to the
switch mode power supply for charging (Fig. 4a-1).
·Battery overcharging is prevented thanks to intelligent
charge management.
·The ideal ambient temperature for charging is between
15°C and 35°C.
·Do not expose the appliance to temperatures over 50°C
for longer periods.
3. Connect the switch mode power supplyto the mains socket (Fig.4b-2).
4. Place the appliance in the charging stand (Fig.4b-3).
Charging begins.
or
1. Switch the appliance off using the on/off switch (Fig.2a).
2. Connect the appliance directly to the appliance plug on the switch
mode power supply (Fig.4a-1).
3. Connect the switch mode power supply to the mains socket
(Fig.4b-2).
Charging begins.
·During charging the battery charge status indicator (C)
blinks green slowly. With a fully charged battery, the
battery charge status indicator is constantly green.
·After the appliance has been removed from the charging
stand, the display goes out after approx. 20 seconds
(power saving mode).

13
ENGLISH
de
en
fr
it
es
pt
nl
da
sv
no
fi
tr
pl
cs
sk
hr
hu
sl
ro
bg
ru
uk
et
lv
lt
el
ar
1887-1070 00 - 07-2021 1887-1070 00 - 07-2021
Battery operation
1. Switch the appliance on using the on/off switch (Fig.2b).
·The charge status of the battery is displayed by the
battery charge status indicator (C):
– constant green illumination = 100 % – 20 %
– rapid green blinking = 20 % – 5 %
– constant red illumination = 5 % – 0 %
·When the battery has fully run down, the appliance
switches itself off automatically.
2. Switch the appliance off after use using the on/off switch (Fig.2a).
·After the appliance has been switched off, the display
goes out after approx. 20 seconds (power saving mode).
Mains operation
Caution! Damage due to use of the hair clipper with
switch mode power supply permanently plugged in
(mains operation).
The hair clipper is not designed to be used with the plug-in
transformer permanently plugged in (mains operation). The
plug-in transformer connecting cable is not designed for
mechanical stress in continuous operation.
fMains operation is only recommended for short periods
of use, in the event of an empty battery.
1. Connect the appliance plug on the plug-in transformer to the
appliance socket (Fig.4a-1).
2. Connect the plug-in transformer to the mains socket (Fig.4b-2).
3. Switch the appliance on using the on/off switch (Fig.2b).
4. Switch the appliance off again after use using the on/off switch
(Fig.2a).
Maintenance
Warning! Injuries and material damage due to
incorrect handling.
fSwitch off the appliance before cleaning it or performing
any maintenance and disconnect it from the mains.
Cleaning and care
Danger! Electric shock due to penetration of liquid.
fDo not immerse the appliance in water!
fDo not allow any liquid to get inside the appliance.
Caution! Damage through aggressive chemicals.
Aggressive chemicals could damage the appliance and
accessories.
fNever use solvents or scouring agents.
fOnly use cleaning agents and blade set oil
recommended by the manufacturer.
·In case of insufficient maintenance of the blade set, the
operating time can be reduced considerably.
·Accessories and spare parts can be purchased from your
dealer or our service centres.
1. Switch the appliance off using the on/off switch (Fig.2a).
2. Remove the blade set from the housing in accordance with the
section “Changing the blade set”.
3. Take the blade set off (Fig.7-1 + 2).
4. Use the cleaning brush to remove any cut hairs from the housing
opening (Fig.7-3) and from the blade set (Fig.7-4).
5. Press the cleaning lever down slightly (Fig.7-5) so that you can
remove any cut hairs that accumulate between the bottom blade
and the top blade using the cleaning brush (EASYCLEANING).
6. Oil the blade set with the blade set oil (Fig.7-6) at the side and
top.
7. Hook the blade set into the housing (Fig.7-7a), swing it up and
press it onto the housing until it clicks into position (Fig.7-7b).
8. Use the on/off switch to switch the appliance on for approx. 2 sec
(Fig.7-8a) so that the oil is distributed.
9. If necessary, wipe any excess oil off using a cloth (Fig.7-8b).
·For a good and long-lasting cutting performance, it is
important to oil the blade set daily and after every use.
·If the cutting performance deteriorates after long use
despite regular cleaning and oiling, the blade set should
be replaced.
10. If there is no more grease on the driver, grease it with our special
grease 1590-7340 (Fig.6) to reduce wear.
Operation
Setting the cutting length at the blade set
The integrated cutting length adjustment can be adjusted from 0.5 mm
to 2mm (Fig.5).
1. Switch the appliance off using the on/off switch (Fig.2a).
2. Slide the cutting length adjustment gradually to the right or left to
reach the required position.
The cutting length can be adjusted in 5 positions from 0.5 mm
to 2mm (Fig.5).
Cutting with the comb attachment
The appliance can also be operated using a magnetic comb attachment.
1. Switch the appliance off using the on/off switch (Fig.2a).
2. Hold the comb attachment so close to the blade that it is attracted
magnetically (Fig.3a) and slide it into the correct position if
necessary. You will hear it “click” into place.
3. Switch the appliance on using the on/off switch (Fig.2b).
4. Slowly and carefully move the appliance parallel to the skin against
the direction of hair growth.
5. Shake or blow the hair off the appliance and the comb attachment
in between.
fIf the comb attachment becomes clogged with hair, you should
remove it (Fig.3b) and clean it (Fig.3c).
6. Remove the comb attachment after cutting by lifting it upwards
(Fig.3b).
7. Clean the comb attachment after use (Fig.3c).

1887-1070 00 - 07-2021
14
ENGLISH
de
en
fr
it
es
pt
nl
da
sv
no
fi
tr
pl
cs
sk
hr
hu
sl
ro
bg
ru
uk
et
lv
lt
el
ar 1887-1070 00 - 07-2021
Changing the blade set
Caution! Injuries to hands or fingers due to sharp-
edged blade set.
1. Switch the appliance off using the on/off switch (Fig.2a).
2. Take the comb attachment off (Fig.3b).
3. Carefully push the blade set at the front on the top blade
backwards with your thumbs in the direction of the arrow
(Fig.7-1). Use a cloth or similar if necessary.
4. Take the blade set off (Fig.7-2) and replace it.
5. Hook the new blade set into the housing (Fig.7-7a), swing it up
and press it onto the housing until it you hear it click into position
(Fig.7-7b).
Problem solving
Blade set is cutting badly or pulling hair out
Cause: Blade set is dirty or worn out.
fClean and oil the blade set (Fig. 7). If this does not resolve the
problem, replace the blade set (Fig.7).
Skin injury
Cause: Too much pressure on the skin.
fReduce pressure when cutting close to skin.
Cause: Damaged blade set.
fCheck whether the blade edges were damaged during use and
replace the blade set if necessary.
Battery operating time is too short
Cause: A blade set that is dirty and has not been oiled can reduce the
available battery operating time substantially!
fCarefully clean and oil the blade set (Fig.7). If the blade set is clean
and oiled and the battery operating time is still far too short, it is
likely that the battery are nearing the end of their life.
Cause: Charge status indicator is imprecise.
fFully discharge the appliance before fully recharging it in one
uninterrupted charging process.
Battery charge status indicator does not blink during charging
Cause: Appliance has not been correctly placed on the charging stand.
fEnsure that the appliance has been correctly placed on the
charging stand.
Cause: Appliance socket is dirty.
fClean the appliance socket carefully using a brush or similar!
Cause: Charging stand socket is dirty.
fClean the charging stand socket carefully using a brush or similar!
Cause: No power supply.
fEnsure that the appliance plug is connected properly to the
appliance or to the charging stand.
fEnsure that the switch mode power supply is connected correctly
to the socket.
fCheck the mains cable and the plugs for any damage.
Battery charge status indicator is blinking red
Cause: Motor blockade
fClean and oil the blade set (Fig. 7).
fClean the housing opening (Fig. 7).
Caution! Damage and risk of injury due to
unauthorised repairs, modifications or wrong
accessories.
In the event that this information does not help you resolve
your problem, please contact our service centre.
fNever try to repair the appliance yourself!
fDo not modify the appliance.
fAlways only use original accessories.
Disposal
Caution! Environmental damage in the event of
incorrect disposal.
fDischarge batteries before disposal!
fCorrect disposal will ensure environmental protection
and prevent any potentially harmful impact on people
and the environment.
Adhere to the relevant legal requirements when disposing of the
appliance.
Information on the disposal of electric and electronic appliances
in the European Union:
Within the European Community, national regulations are
specified for the disposal of electrical appliances, based on
EU Waste Electrical and Electronic Equipment Directive
2012/19/EC (WEEE). In accordance with this, the appliance
can no longer be disposed of with the local or domestic
waste.
The appliance will be accepted free of charge by local collection points
or recycling centres.
The packaging for this product is made from recyclable materials.
Dispose of this in an environmentally friendly manner by recycling it.

15
1887-1070 00 - 07-2021 1887-1070 00 - 07-20211887-1070 00 - 07-2021
MOSER Mix & Match System
Blade set expertise Made in Germany
BLENDING BLADE
BLADE SET
For smooth and natural transi-
tions 0.5-2 mm
FADING BLADE
BLADE SET
For precise on-scalp fades
0.5-2 mm
MAGIC BLADE
BLADE SET
High precision universal blade,
0.7-3 mm
DIAMOND BLADE
BLADE SET
universal blade set: washable,
disinfectable, durable, for high
performance 0.7-3 mm
TEXTURIZING BLADE
BLADE SET
For creative texturizing and slicing
techniques. 3 levels of intensity

16
FRANÇAIS
de
en
fr
it
es
pt
nl
da
sv
no
fi
tr
pl
cs
sk
hr
hu
sl
ro
bg
ru
uk
et
lv
lt
el
ar 1887-1070 00 - 07-2021
Mode d'emploi original
Tondeuse à cheveux professionnelle avec/sans fil,
type 1887
Instructions générales pour l'utilisateur
Informations sur l'utilisation des consignes de sécurité et du
mode d'emploi
fLa documentation de cet appareil se compose des parties suivantes:
·Mode d'emploi original
·Instructions générales de sécurité
·Conditions de garantie
fAvant d'utiliser l'appareil pour la première fois, vous devez avoir lu et
compris l'intégralité des consignes de sécurité et du présent mode
d'emploi.
fLes coordonnées de nos centres de service se trouvent dans les condi-
tions de garantie.
fConsidérez les instructions de sécurité et le mode d'emploi comme
faisant partie du produit et conservez-les dans un endroit sûr et
accessible.
fVous pouvez également demander les instructions de sécurité et le
mode d'emploi sous forme de fichier PDF à nos centres de service
après-vente. La déclaration de conformité CE peut également être
demandée à nos centres de service dans les autres langues officielles
de l'UE.
fIncluez les instructions de sécurité et le mode d'emploi lorsque vous
remettez l'appareil à des tiers.
fTous droits réservés. Ce mode d'emploi est protégé par des droits
d'auteur.
fNous travaillons en permanence au perfectionnement de nos produits
et nous nous réservons le droit de modifier l'étendue de la livraison en
termes de forme, d'équipement et de technologie.
fLe contenu de ce manuel est susceptible d'être modifié sans préavis.
Explication des symboles et des indications
Les symboles et mentions d’avertissement suivants sont utilisés dans ce
mode d'emploi, sur l'appareil ou sur l'emballage.
Les mots de signalisation DANGER, AVERTISSEMENT ou ATTENTION
indiquent la gradation d'un risque possible de blessure.
DANGER indique une situation dangereuse imminente qui, si elle n'est pas
évitée, entraînera la mort ou des blessures graves.
AVERTISSEMENT indique une situation potentiellement dangereuse qui,
si elle n'est pas évitée, peut entraîner la mort ou des blessures graves.
ATTENTION indique une situation potentiellement dangereuse qui, si elle
n'est pas évitée, peut entraîner des blessures mineures ou modérées.
DANGER
Risque de choc électrique pouvant entraîner des blessures
graves ou mortelles.
DANGER
Risque d'explosion pouvant entraîner des blessures graves ou
la mort.
DANGER
Danger dû à l'utilisation de substances inflammables. Risque
d’incendie pouvant entrainer des blessures graves ou la mort.
AVERTISSEMENT
Risque de blessures éventuelles ou risque pour la santé
ATTENTION
Avertit d'un risque possible de blessure.
ATTENTION
Indication de risque de dommages matériels.
Indication contenant des informations et des conseils utiles.
Marque de conformité EAC pour le territoire de l'Union écono-
mique eurasienne
Marque de conformité CE
Marque de conformité UKCA pour le marché britannique
Marquage DEEE pour interdire l'élimination des équipements
électriques et électroniques dans les déchets ménagers
Vous êtes invité à effectuer une action.
Résultat d'une action / agissement.
Exécutez ces actions dans l'ordre décrit.
Enumération
Description du produit
Désignation des pièces (Fig. 1)
A Tête de coupe*
B Réglage de la longueur de coupe
C Touche marche/arrêt avec affichage de l’état de charge de la batterie
intégré
D Boîtier
E Prise de l'appareil
F Socle chargeur
G Prise du socle chargeur
H Fiche de connexion de l'appareil
I Adaptateur secteur
J Sabot magnétique, longueur de coupe de 1,5mm*
K Sabot magnétique, longueur de coupe de 3mm*
L Sabot magnétique, longueur de coupe de 4,5mm*
M Sabot magnétique, longueur de coupe de 6mm*
N Sabot magnétique, longueur de coupe de 9mm*
O Sabot magnétique, longueur de coupe de 12mm*
P Huile pour la tête de coupe
Q Brosse de nettoyage
* Les sabots et les têtes de coupe supplémentaires sont des accessoires
en optionnels et peuvent varier selon le modèle.
f
4
1.
2.
3.
·

17
FRANÇAIS
de
en
fr
it
es
pt
nl
da
sv
no
fi
tr
pl
cs
sk
hr
hu
sl
ro
bg
ru
uk
et
lv
lt
el
ar
1887-1070 00 - 07-2021 1887-1070 00 - 07-2021
Caractéristiques techniques
Appareil portatif
Type Tondeuses à cheveux
professionnelle à secteur / batterie
Système de coupe Système de changement rapide
de tête de coupe avec longueur de
coupe lisible
Largeur de la tête de coupe 46 mm
Longueur de coupe 0,5 - 2 mm
Entraînement moteur CC sans balais,
environ 7200 1/min
Tension de service 100 - 240 V CA / 50/60 Hz
via l’adaptateur secteur
Mode de fonctionnement Secteur / Batterie (deux voies),
Lithium-Ion
Durée de fonctionnement sur batterie jusqu'à 120 minutes
Temps de charge de la batterie : env. 70 minutes
Dimensions (L x l x H) 149 x 47 x 48 mm
Poids env. 210 g
Niveau de pression acoustique
des émissions max. 63 dB(A) @ 25 cm
Vibration < 2,5 m/s2
Socle chargeur
Dimensions avec accessoires
(L x l x H) : 95 x 75 x 60 mm
Poids : 80 g
Adaptateur secteur
Fabricant : Ten Pao Industrial Co., Ltd.
Room 10-11,6/F., Kwong Sang Hong
Centre, 151-153 Hoi Bun Road,
Kwun Tong, Kowloon, Hong Kong
Type : Adapter 6000
Prise Euro
Tension d'entrée : 100-240 V
Fréquence d'entrée CA : 50-60 Hz
Tension de sortie : 5,9 V
Courant de sortie : 1,5 A
Puissance de sortie : 8,85 W
Efficacité moyenne pendant
Fonctionnement : 78,9%
Puissance absorbée à vide : 0,04 W
Fabricant : GOLD MARK (CHINA) HOLDINGS LTD
Unit 1706,17/F.,Vanta Industrial
Centre, 21-33 Tai Lin Pai Road,Kwai
Chung, N.T., Hong Kong
Type : Adapter 6000A (VI)
Fiche Euro / Prise UK
Tension d'entrée : 100-240 V
Fréquence d'entrée CA : 50-60 Hz
Tension de sortie : 5,9 V
Courant de sortie : 1,5 A
Puissance de sortie : 8,85 W
Efficacité moyenne en fonctionnement : 79,7%
Puissance absorbée à vide : 0,04 W
Conditions de fonctionnement
Environnement : 0°C - +40°C
L'appareil est isolé et antiparasité. Il répond aux exigences de la directive
européenne sur la compatibilité électromagnétique 2014/30/UE et de la
directive machines 2006/42/CE.
Opération
Préparation
Conservez le matériel d'emballage pour un stockage ou un
transport ultérieur en toute sécurité.
fVérifiez l'exhaustivité de l'étendue de la livraison.
fVérifiez que toutes les pièces n'aient pas été endommagées pendant
le transport.
fEn cas de dommages liés au transport, contactez votre revendeur.
Sécurité
Attention ! Dommages dus à une tension électrique
incorrecte.
fN’utilisez l'appareil qu'avec la tension de service indiquée
sur la plaque signalétique de l'appareil ou sur l’adaptateur
secteur.
fNe faites fonctionner l'appareil qu'avec l’adaptateur
secteur.
Charger la batterie
1. Éteignez l'appareil à l'aide de l'interrupteur marche/arrêt (Fig. 2a).
2. Insérez la fiche de connexion de l'appareil de Lu bloc d'alimentation
à découpage dans la douille du socle chargeur Insérez la fiche de
connexion de l’appareil dans l’adaptateur secteur (Fig. 4b - 1).
·L'appareil peut également être raccordé directement à
l’adaptateur secteur (Fig. 4a - 1).
·La gestion intelligente de la charge empêche la batterie
d'être surchargée.
·La température ambiante idéale pour la charge se situe
entre 15 °C et 35 °C.
·N'exposez pas l'appareil à des températures supérieures à
50 °C pendant une période prolongée.
3. Branchez l’adaptateur secteur à la prise secteur (Fig. 4b - 2).
4. Placez l'appareil dans le socle chargeur (Fig. 4b - 3).
Le processus de chargement commence.
ou
1. Éteignez l'appareil à l'aide de l'interrupteur marche/arrêt (Fig. 2a).
2. Branchez l'appareil directement sur la fiche de connexion de l'appareil
de l’adaptateur secteur (Fig. 4a - 1).
3. Branchez l’adaptateur secteur à découpage dans la prise secteur (Fig.
4a - 2).
Le processus de chargement commence.
·Pendant la charge, l’affichage de l’état de charge de la bat-
terie (C) clignote lentement en vert. Lorsque la batterie
est entièrement chargée, l’affichage de l’état de charge de
la batterie s'allume en permanence en vert.

18
FRANÇAIS
de
en
fr
it
es
pt
nl
da
sv
no
fi
tr
pl
cs
sk
hr
hu
sl
ro
bg
ru
uk
et
lv
lt
el
ar 1887-1070 00 - 07-2021
·Après avoir retiré l'appareil du socle chargeur, l'écran
s'éteint après environ 20 secondes (mode économie
d'énergie).
Fonctionnement avec batterie
1. Utilisez l'interrupteur marche/arrêt pour mettre l'appareil en marche
(Fig. 2b).
·Le niveau de charge de la batterie est indiqué par l’affi-
chage de l’état de charge de la batterie (C) :
– s'allume en permanence en vert = 100 % - 20 %
– clignote rapidement en en vert = 20 % - 5 %
– s'allume en permanence en rouge = 5 % - 0 %
·Lorsque la batterie est déchargée, l'appareil s'éteint
automatiquement.
2. Utilisez l'interrupteur marche/arrêt pour éteindre l'appareil après
l’utilisation (Fig. 2a).
·L’affichage s'éteint après environ 20 secondes (mode éco-
nomie d'énergie) après avoir éteint l'appareil.
Fonctionnement sur secteur
Attention ! Dommages causés par l'utilisation de la ton-
deuse avec l’adaptateur secteur branché en permanence
(fonctionnement sur secteur).
La tondeuse à cheveux n'est pas destinée à être utilisée avec un
adaptateur secteur branché en permanence (fonctionnement
sur secteur). Le câble de raccordement de l’adaptateur secteur
n'est pas conçu pour subir des contraintes mécaniques en fonc-
tionnement continu.
fLe fonctionnement sur secteur n'est recommandé que pour
une courte durée, en cas de batterie vide.
1. Insérez la fiche de connexion de l’adaptateur secteur dans la prise de
l'appareil (Fig. 4a - 1).
2. Branchez l’adaptateur secteur dans la prise secteur (Fig. 4a - 2).
3. Utilisez l'interrupteur marche/arrêt pour mettre l'appareil en marche
(Fig. 2b).
4. Utilisez l'interrupteur marche/arrêt pour éteindre l'appareil après
l’utilisation (Fig. 2a).
Maintenance
Attention ! Blessures et dommages matériels dus à une
mauvaise manipulation.
fÉteignez l'appareil et débranchez-le de l'alimentation élec-
trique avant de commencer toute opération de nettoyage
ou d'entretien.
Nettoyage et entretien
Danger ! Choc électrique dû à la pénétration de liquide.
fNe pas immerger l'appareil dans l'eau !
fNe laissez aucun liquide pénétrer à l'intérieur de l'appareil.
Attention ! Dommages causés par des produits
chimiques agressifs.
Les produits chimiques agressifs peuvent endommager l'appa-
reil et les accessoires.
fN'utilisez pas de solvants ou de nettoyants abrasifs.
fUtilisez uniquement le produit de nettoyage et l'huile pour
tête de coupe recommandés par le fabricant.
·Un entretien inadéquat de la tête de coupe peut réduire
considérablement la durée de fonctionnement.
·Les accessoires et les pièces de rechange peuvent être
obtenus auprès de votre revendeur ou de nos centres de
service après-vente.
1. Éteignez l'appareil à l'aide de l'interrupteur marche/arrêt (Fig. 2a).
2. Retirez la tête de coupe du boîtier conformément au chapitre «Rem-
placement du tête de coupe».
3. Retirez la tête de coupe (Fig. 7 - 1 + 2).
4. Utilisez la brosse de nettoyage pour éliminer les résidus de cheveux de
l'ouverture du boîtier (Fig. 7 - 3) et de la tête de coupe (Fig. 7 - 4).
5. Appuyez légèrement sur le levier de nettoyage (Fig. 7 - 5) afin de
pouvoir éliminer les résidus de cheveux entre le peigne et la lame de
coupe avec la brosse de nettoyage (EASY CLEANING).
6. Lubrifiez la tête de coupe avec l'huile pour tête de coupe (Fig. 7 - 6) sur
le côté et sur le dessus.
7. Placez la tête de coupe avec le crochet dans le logement du boîtier
(Fig. 7 - 7a), poussez-le vers le haut et appuyez-le contre le boîtier
jusqu'à ce qu'il s'encliquette (Fig. 7 - 7b).
8. Allumez l'appareil à l'aide de l'interrupteur marche/arrêt pendant envi-
ron 2 secondes (Fig. 7 - 8a) afin que l'huile se répartisse.
9. Si nécessaire, essuyez l'excédent d'huile avec un chiffon (Fig. 7 - 8b).
·Pour une capacité de coupe performante et durable, il est
important de lubrifiez la tête de coupe quotidiennement et
après chaque utilisation.
·Si le rendement de coupe diminue après une longue durée
d'utilisation malgré un nettoyage et un lubrification régu-
liers, il convient de remplacer la tête de coupe..
10. S'il ne reste plus de graisse sur le driver, graissez-le avec notre graisse
spéciale 1590-7340 (Fig. 6) pour réduire l'usure.
Opération
Réglage de la longueur de coupe sur la tête de coupe
Le réglage intégré de la longueur de coupe peut être réglé de 0,5 mm à 2
mm (Fig. 5).
1. Éteignez l'appareil à l'aide de l'interrupteur marche/arrêt (Fig. 2a).
2. Faites glisser le réglage de la longueur de coupe progressivement vers
la droite ou la gauche jusqu'à atteindre la position souhaitée.
La longueur de coupe peut être réglée sur 5 positions de 0,5 mm
à 2 mm (Fig. 5).
Coupe avec sabot
L'appareil peut également être utilisé avec un sabot magnétique.
1. Éteignez l'appareil à l'aide de l'interrupteur marche/arrêt (Fig. 2a).
2. Tenez le sabot suffisamment près du plateau de coupe pour qu'il soit
attiré magnétiquement (Fig. 3a) et poussez-le dans la bonne position si
nécessaire. Un «clic» confirme l'encliquètement.

19
FRANÇAIS
de
en
fr
it
es
pt
nl
da
sv
no
fi
tr
pl
cs
sk
hr
hu
sl
ro
bg
ru
uk
et
lv
lt
el
ar
1887-1070 00 - 07-2021 1887-1070 00 - 07-2021
3. Utilisez l'interrupteur marche/arrêt pour mettre l'appareil en marche
(Fig. 2b).
4. Guidez lentement et soigneusement l'appareil parallèlement à la peau,
dans le sens contraire de la pousse du cheveu.
5. Secouez ou soufflez les cheveux de l'appareil et du sabot de temps à
autre.
fSi le sabot est obstrué par des cheveux, vous devez le retirer (Fig. 3b) et
le nettoyer (Fig. 3c).
6. Retirez le sabot après la coupe en le soulevant vers le haut (Fig. 3b).
7. Nettoyez le sabot après l’utilisation (Fig. 3c).
Remplacement de la tête de coupe
Attention Blessures aux mains ou aux doigts dues à une
tête de coupe à arêtes vives.
1. Éteignez l'appareil à l'aide de l'interrupteur marche/arrêt (Fig. 2a).
2. Retirez le sabot (Fig. 3b).
3. Poussez délicatement la tête de coupe située à l'avant de la lame de
la tondeuse à cheveux vers l'arrière avec vos pouces dans le sens de la
flèche (Fig. 7 - 1). Si nécessaire, utilisez un chiffon ou autre.
4. Retirez la tête de coupe (Fig. 7 - 2) et remplacez-la.
5. Placez la nouvelle tête de coupe avec le crochet sur le support du boî-
tier (Fig. 7 - 7a), rabattez-la vers le haut et appuyez-la contre le boîtier
jusqu'à ce qu'elle s'encliquette de manière audible (Fig. 7 - 7b).
Dépannage
La tête de coupe coupe mal
Cause : La tête de coupe est sale ou usée.
fNettoyez et huilez la tête de coupe (Fig. 7). Si cela ne résout pas le
problème, remplacez la tête de coupe (Fig. 7).
Lésion cutanée
Cause : Trop de pression sur la peau.
fRéduisez la pression lorsque vous coupez près de la peau.
Cause : Tête de coupe endommagée.
fVérifiez si des pointes de dents ont été endommagées pendant
l'utilisation et remplacez la tête de coupe si nécessaire.
La durée de vie de la batterie est trop courte
Cause : Une tête de coupe sale et non huilée réduit considérablement l'auto-
nomie de la batterie disponible !
fNettoyez et huilez soigneusement la tête de coupe (Fig. 7). Si l'auto-
nomie est encore beaucoup trop courte, la batterie est probablement
proche de la fin de vie utile.
Cause : L'affichage de la capacité est inexact
fDéchargez complètement l'appareil, puis rechargez-le complètement
dans un processus de charge ininterrompu.
L’affichage de l’état de charge de la batterie ne clignote pas pendant
la charge
Cause : L'appareil n'est pas positionné correctement dans le socle chargeur.
fAssurez-vous que l'appareil est positionné correctement dans le socle
chargeur.
Cause : La prise de l’appareil est sale.
fNettoyez soigneusement la prise de l'appareil avec une brosse ou autre !
Cause : La prise du socle chargeur est sale.
fNettoyez soigneusement la prise du socle chargeur avec une brosse ou
un outil similaire !
Cause : Manque d'alimentation électrique.
fAssurez-vous que la fiche du connecteur de l'appareil soit correctement
connectée à l'appareil ou à la prise du socle chargeur.
fAssurez-vous que l’adaptateur secteur soit correctement raccordé à
la prise.
fVérifiez que le câble d'alimentation et les fiches ne sont pas
endommagés.
L’affichage de l’état de charge de la batterie clignote en rouge
Cause : Blocage du moteur
fNettoyez et huilez la tête de coupe (Fig. 7).
fNettoyez l'ouverture du boîtier (Fig. 7).
Attention Dommages et risques de blessures dus à des
réparations non autorisées, des modifications ou des
accessoires incorrects.
Si vous ne pouvez pas résoudre le problème avec les instructions
ci-dessus, veuillez contacter notre centre de service.
fN'essayez pas de réparer l'appareil vous-même !
fNe modifiez pas l'appareil.
fN'utilisez que des accessoires d'origine.
Élimination
Attention ! Dommages environnementaux causés par une
élimination incorrecte.
fDéchargez les piles avant de les jeter !
fUne élimination appropriée permet de protéger l'environ-
nement et de prévenir d'éventuels effets nocifs sur l'homme
et l'environnement.
En cas d'élimination de l'appareil, respectez les dispositions légales en
vigueur.
Informations sur l'élimination des équipements électriques et élec-
troniques dans l'Union européenne :
Au sein de l'Union européenne, l'élimination des équipements à
fonctionnement électrique est régie par des réglementations
nationales basées sur la directive européenne 2012/19/UE rela-
tive aux déchets d'équipements électriques et électroniques
(DEEE). Après cela, l'appareil ne doit pas être jeté avec les déchets
municipaux ou ménagers.
L'appareil est accepté gratuitement dans les points de collecte municipaux
ou les centres de recyclage.
L'emballage du produit est fabriqué en matériaux recyclables. Éliminez-le de
manière respectueuse de l’environnement et recyclez l'emballage.

20 1887-1070 00 - 07-2021
Système de remplacement
de tête de coupe de MOSER
Expertise en jeu de lames, fabriqué en Allemagne
BLENDING BLADE
TÊTE DE COUPE
Pour des transitions douces et
naturelles 0,5-2 mm
FADING BLADE
TÊTE DE COUPE
Pour des dégradés précis sur le cuir
chevelu 0,5-2 mm
MAGIC BLADE
TÊTE DE COUPE
Lame universelle de
haute précision, 0,7-3 mm
DIAMOND BLADE
TÊTE DE COUPE
jeu de lames universel :
lavable, désinfectable, durable,
pour de hautes performances
0,7-3 mm
TEXTURIZING BLADE
TÊTE DE COUPE
Pour des techniques créatives de
texturation et de coupe. 3 niveaux
d’intensité
Table of contents
Languages:
Other Wahl Hair Clipper manuals

Wahl
Wahl 1170 User manual

Wahl
Wahl Moser Ermila 1565 Q User manual

Wahl
Wahl OMBI PACK 1481-0465 User manual

Wahl
Wahl 1250 User manual

Wahl
Wahl Bravura 1870 Li+ User manual

Wahl
Wahl Academy Chromstyle WM8871-833 User manual

Wahl
Wahl 1872 User manual

Wahl
Wahl 79111-516 User manual

Wahl
Wahl 1871 Li User manual

Wahl
Wahl X-Block User manual