Walter Junior Silver User manual

Mounting instructionsPlease read the Operation Manual completely and retain for future reference AUTOMATIC SLATTED POOL COVERS MANUFACTURERSafety cover compliant with standard NFP 90-308 to be installed and used according this mounting user manual
ABOVE GROUND REEL SYSTEM
JUNIOR SILVERCompliant with standard NFP 90-308

SpecificationsPlease follow the instructions :- The owner or end user is responsible for the use and the security of his pool- The owner or end user must be cautious and aware of the risks- Never leave a child without supervision- Please follow the instructions of this operation manual- Please make sure that the cover is closed and locked after each use.- The pool should never have a lateral deviation higher than 70 mm- Please make sure that the quick fastening system on the width sides of the cover is properly fastened (in oder toprevent kids from slipping underneath)- Please make sure that the cover fits the standard NFP 90-308- Please maintain the key while opening and closing the cover, and more Importantly, remove this key after the coveris closed.2

The box must contain :Anodised aluminium axle + integrated motorShaft + rings, opposite to the motor - BElectrical box + drilling template - CQuick fastening system (qty depending on the width of the pool) - DPair of stands - ERolling straps to be fixed on the axle (qty depending of the width of the pool) - F50 cm slat strips (6 slats/strip) (qty depending of the length of the pool) - GKit of screws1 mounting intructions manualUpon receipt of the slatted automatic cover: WALTER Piscine can not be held responsible for losses or damages caused during the transport. It is clearly stated that the goods travel at recipient's risk.In case of missing or defective parts, it is essential to: - Record any reservations on the delivery note.- Address a registered letter with acknowledgement receipt to the transport manager within 2 days after the delivery and please noteprecisely the problems identified.- Send a copy of this letter to WALTER Piscine, for informationThe quality control of the original parcel must be done in presence of the delivery manThe containt of the box should be checked upon delivery. CHECK-LIST
3

A
B
D
E
F
C
G
G
C
G
The box must contain:
A - Anodised aluminium axle + integrated motor
B - Shaft + rings, opposite to the motor
C - Electrical box + drilling template
D - Quick fastening system (qty depending on the width of the pool)
E - Pair of stands
F - Rolling straps to be fixed on the axle (qty depending of the width of the pool)
G - 50 cm slat strips (6 slats/strip) (qty depending of the length of the pool)
Kit of screws
1 mounting intructions manual
Note: Pictures are not contractual. For information
Assembled cover
Strip of 6 slats
Junior Silver mechanism
Electrical box
Box content4

Distance electrical box against the pool.
Please follow standard NF C15-100
section 702
Cable section R02V recommended (from motor to
electrical box). Semi rigid copper FR-N05VV-R
2 x 10 mm²
15m<L<30m
2 x 6 mm²
0m<L<15m
Motor cable section
Distance electral box - motor
Electrical box 220V 24V
Differential
30mA
220V
24V ongoing
To cover motor
Common bridge
Commun (Noir)
Opening (blue)
Closing (white)
Motor cable
-
Black
+
Red
Push button
switch to adjust
the stroke end
Phase
(brown)
Neutral
(blue)
Terre
(Vert)
Stroke end
(brown)
Push button
switch (brown)
Push button
(black)
Commun (Noir)
Wago
+
-
T
P
N
5

165
74,50
4x
10
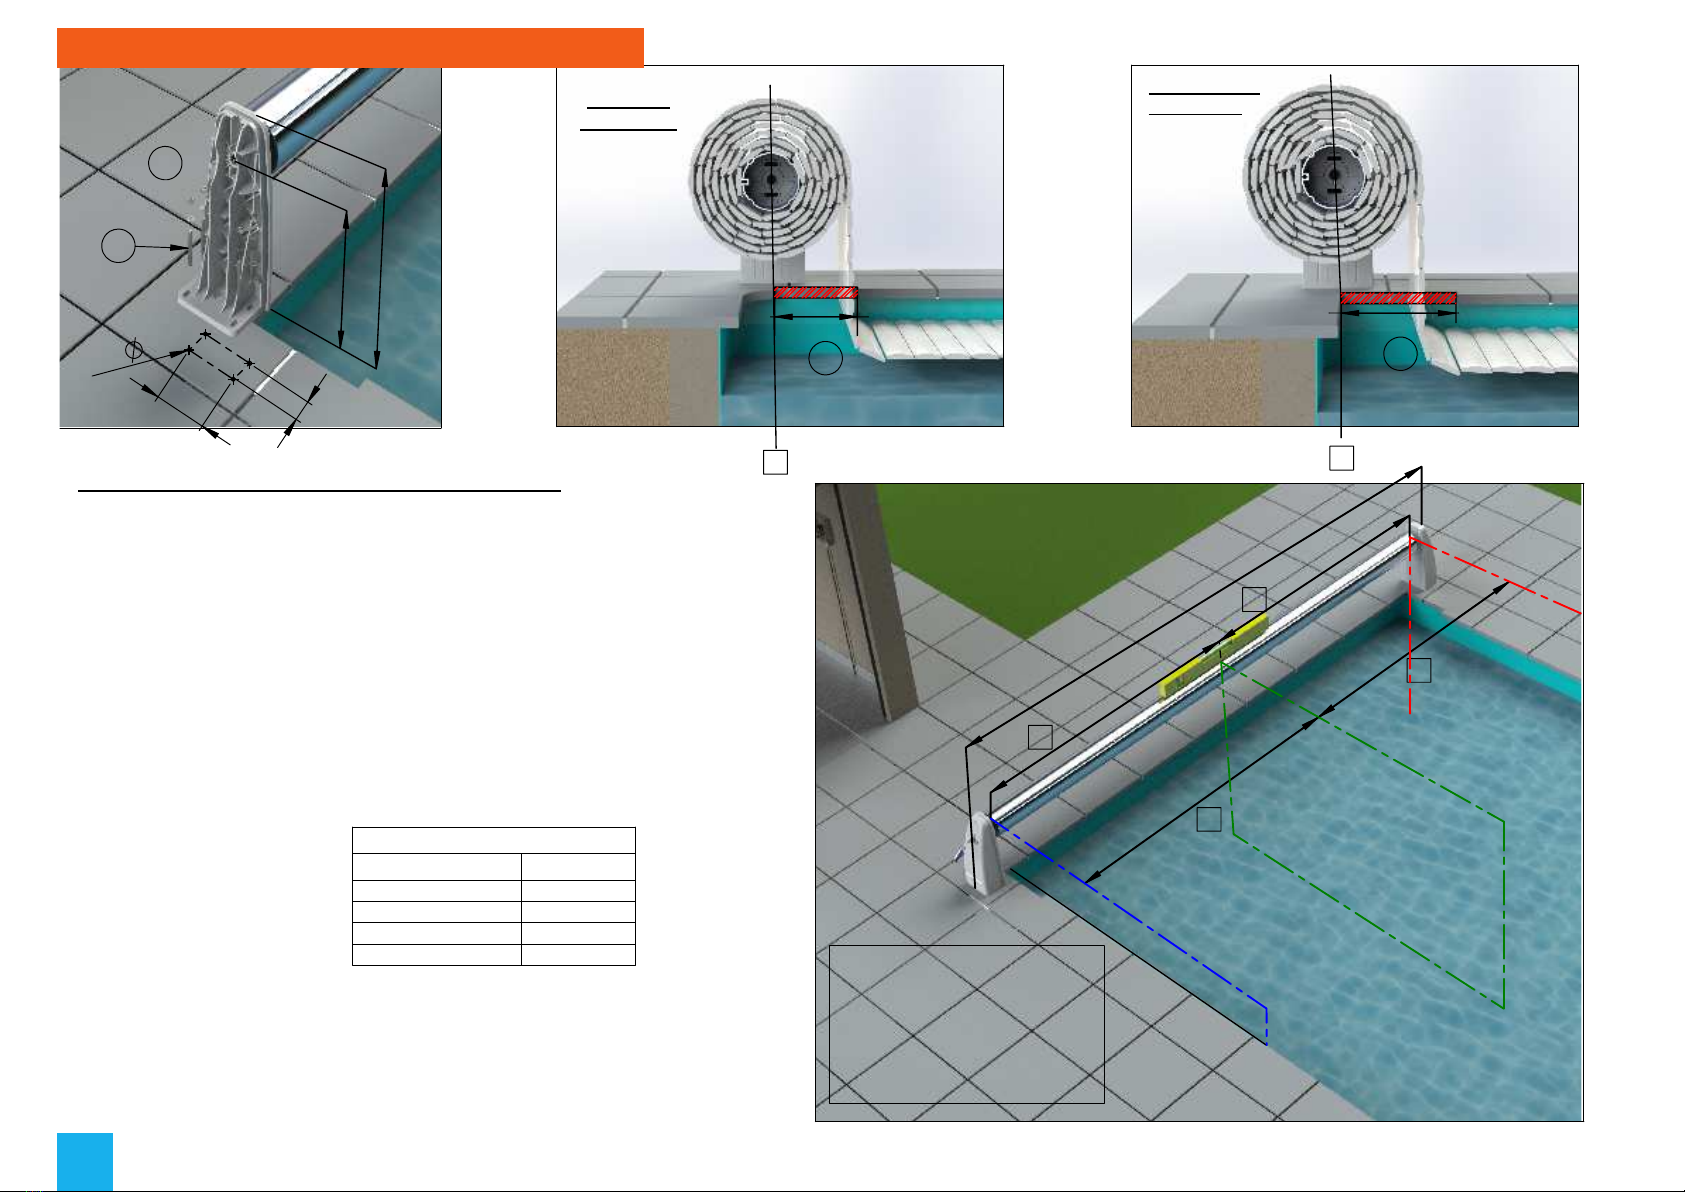
Preparation of coping stones in order to place the cover :
1) Position the stands assembled with the axle on the coping stones axis
according the below indications:
A) Respect the parallelism between the axle of unrolling slats and one of
the pool's length, as well as the axle leveling.
B) Please center the the cover on the pool's width, with stands close to the
aluminium profile. (otherwise, please plan to tighten the ring to prevent any
lateral play)
C) Axle at the base:
- of the coping stone if straight angled pool and coping
- of the en of the radius if rounded pool and coping
2
)
Fix the brackets with M10 knock-in studs through the coping
stones.
3
)
Cutting of the coping stones in line with the axis over a length Dm
according to the table opposite:
4
)
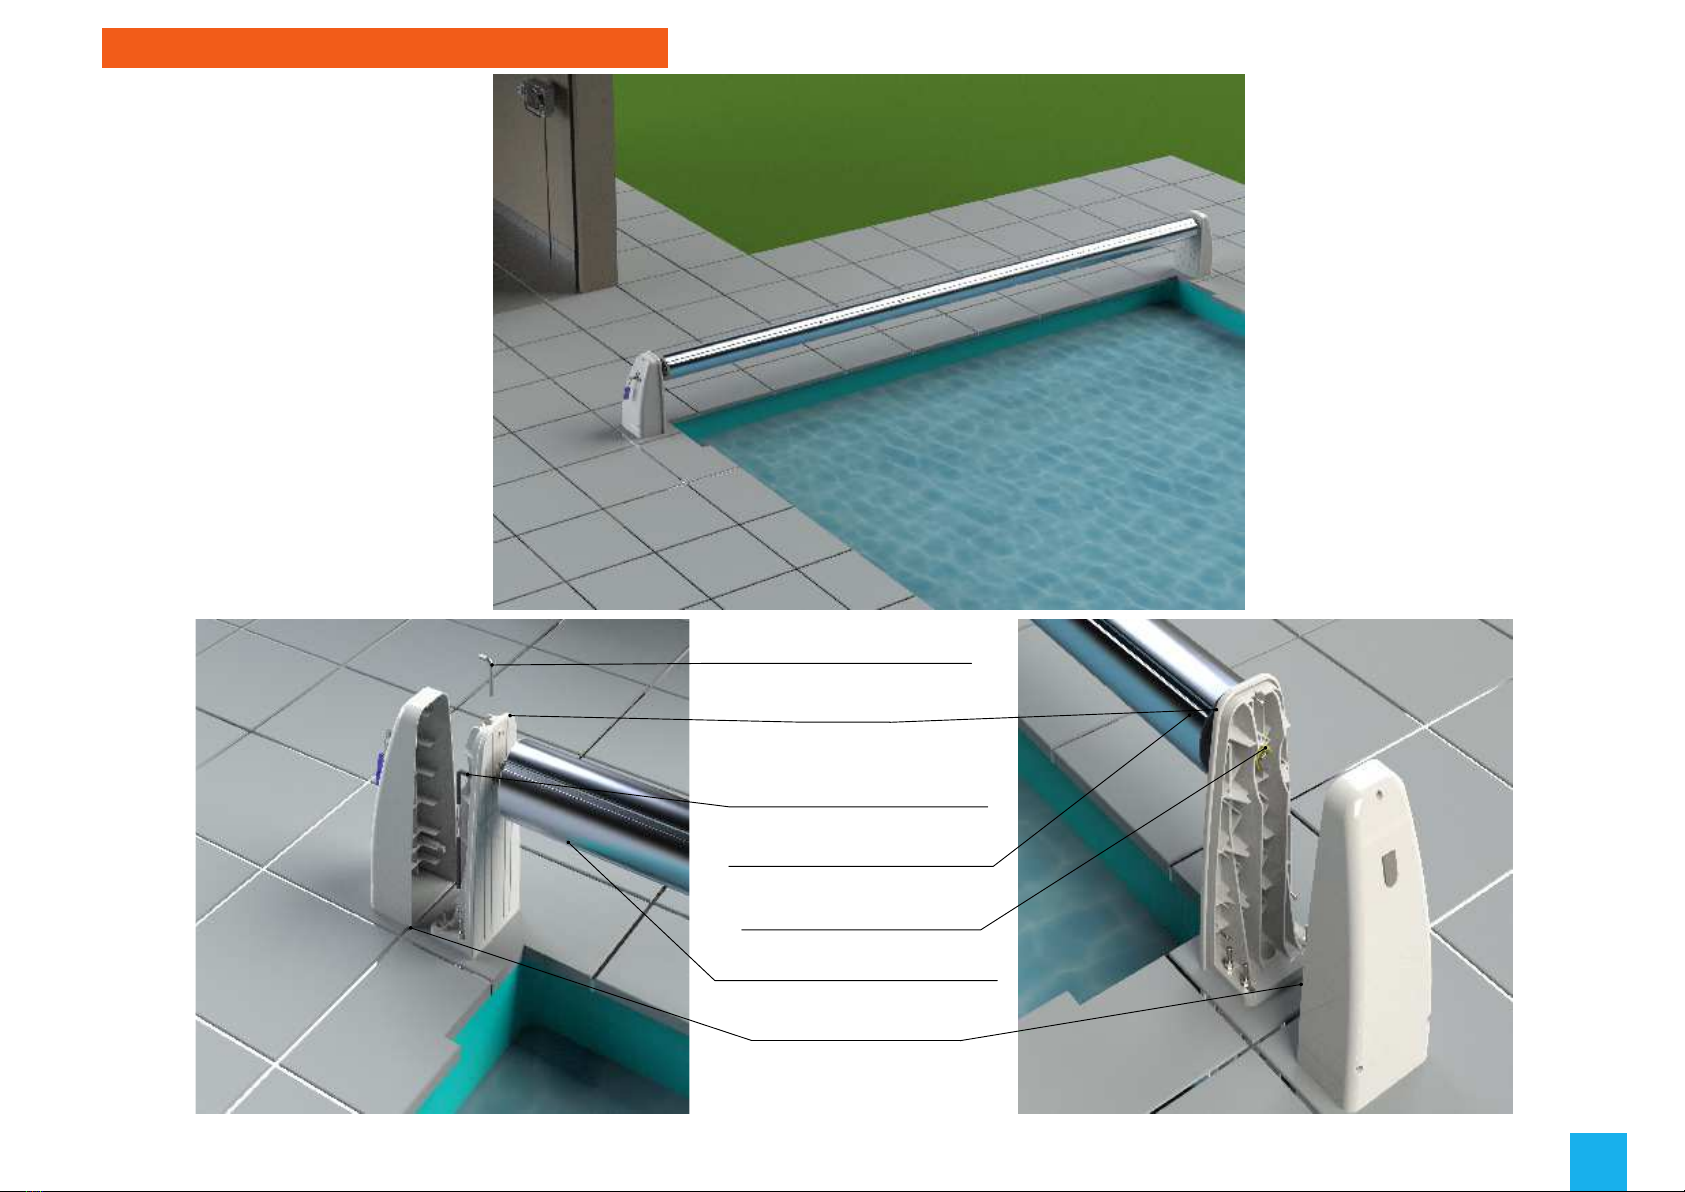
After mounting the cover, make sure that there is no friction when
opening and closing it (rear curbstone, side curbstone, skimmer, etc.).
Option: Surface a flat surface for the supports. Minimum dimension:
235 x 155 mm
2
1
390mm
499mm
If coping stone right angled
If rounded coping stone
Dm
3
Dm
3
CC
Width/2 Width/2
0° 0°
A
A
B
B
Pool lefthand side
Plan middle of pool cover
Pool righthand side
Width X
Width X = pool width + 440 mm
Axle: about 5 cm longer than the pool width
Coping stones
Pool length
Dm
6 m
260 mm
8 m
290 mm
10 m
320 mm
12 m
340 mm
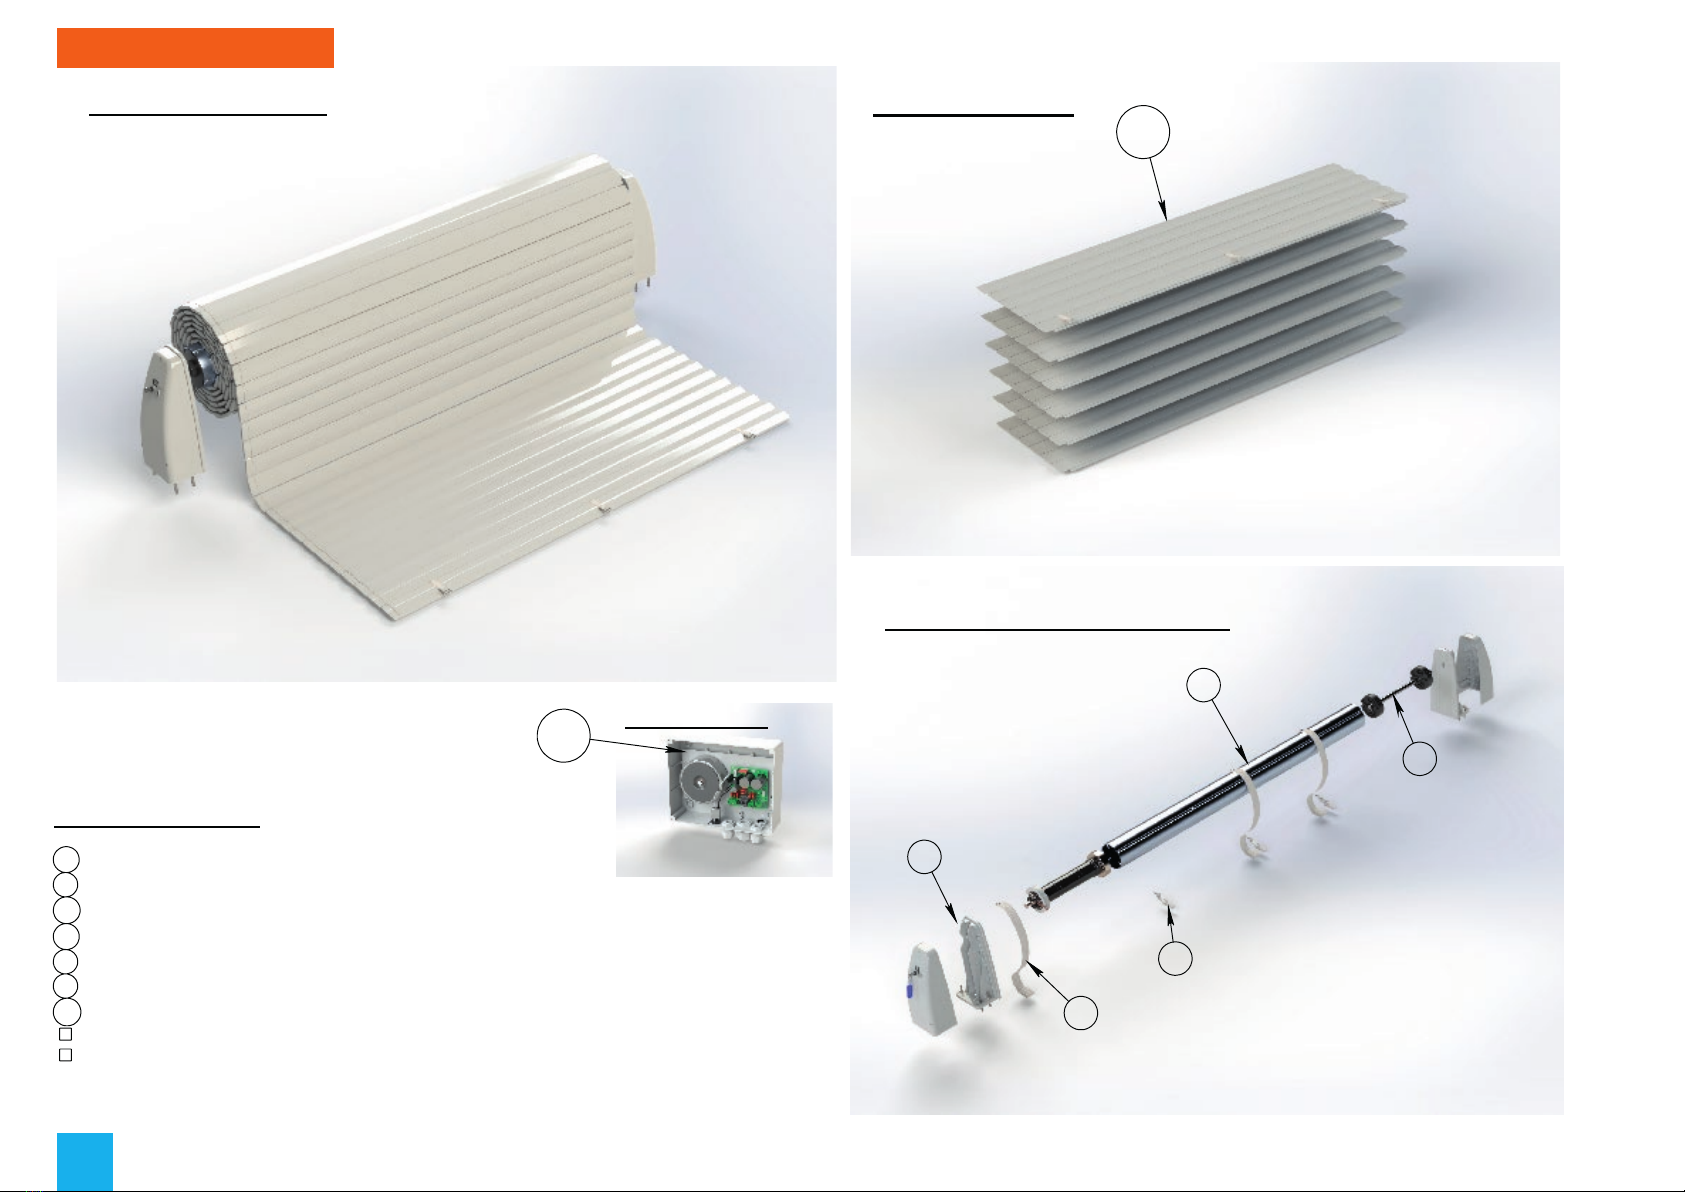
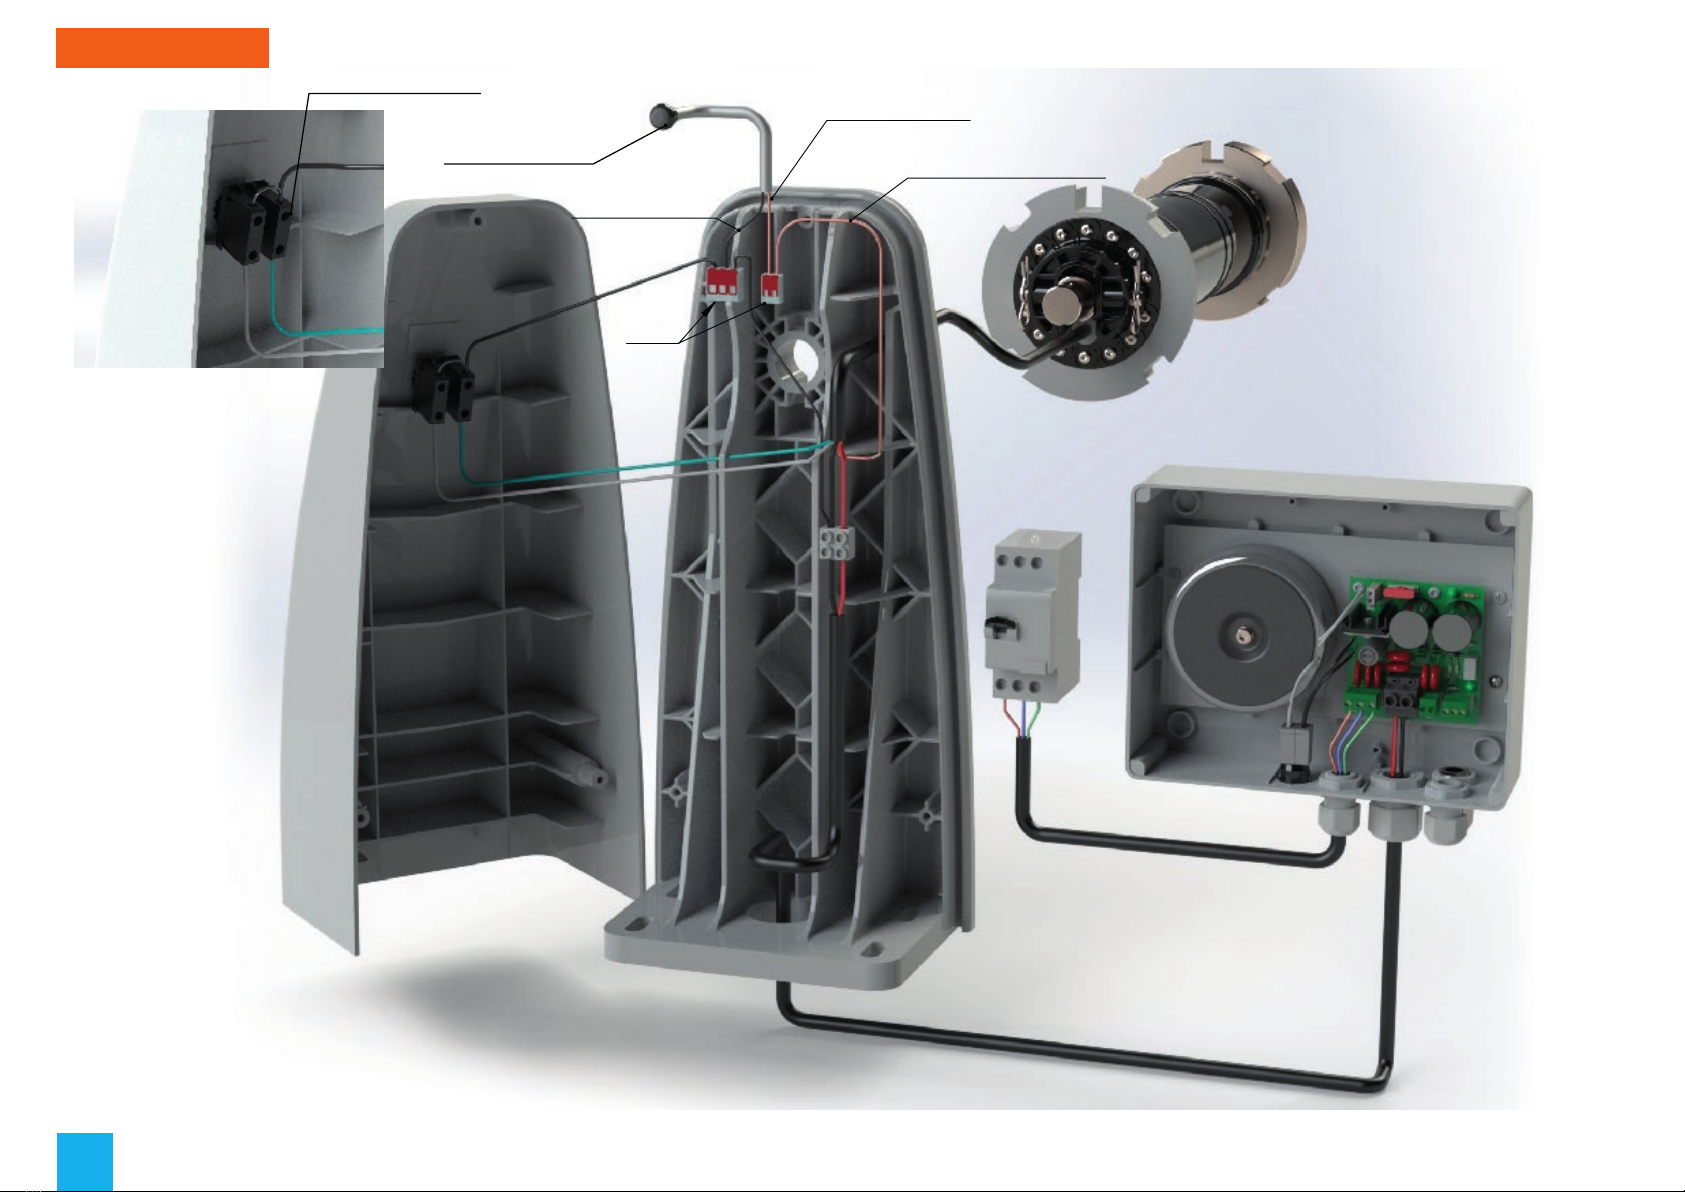
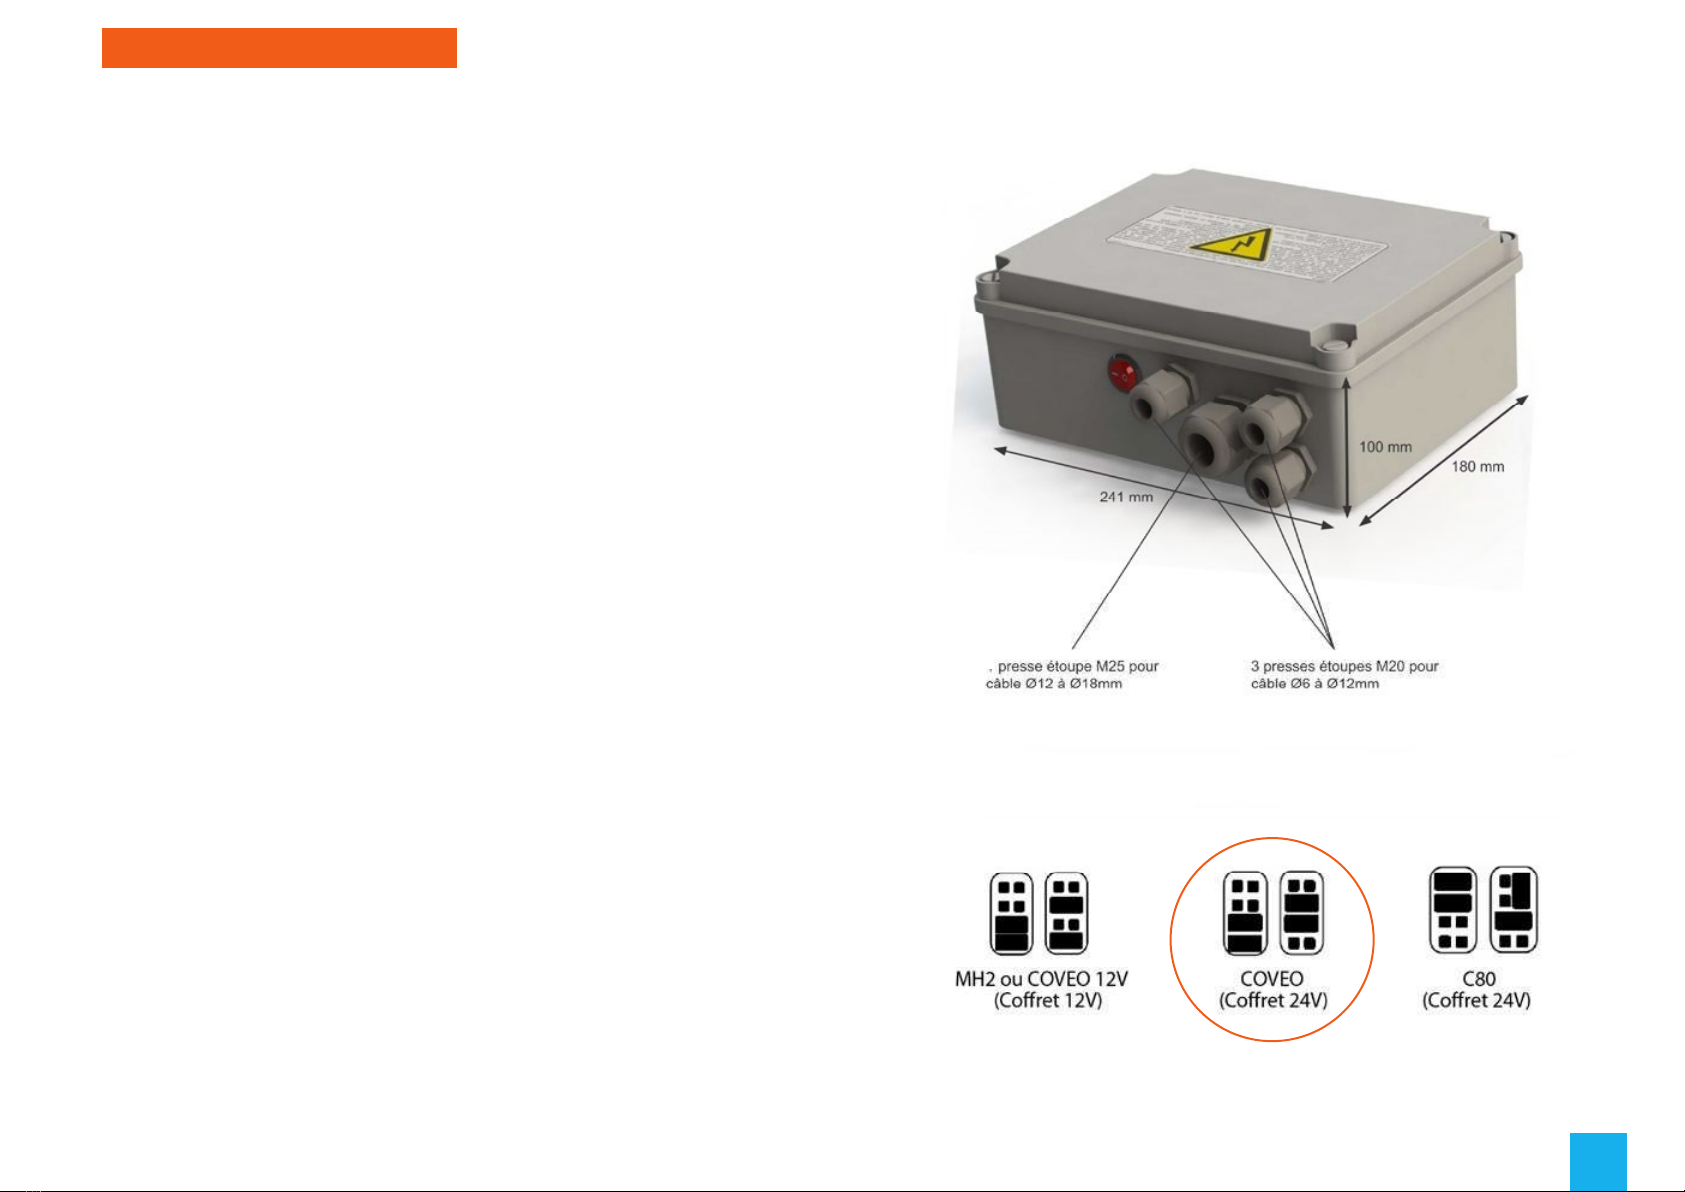
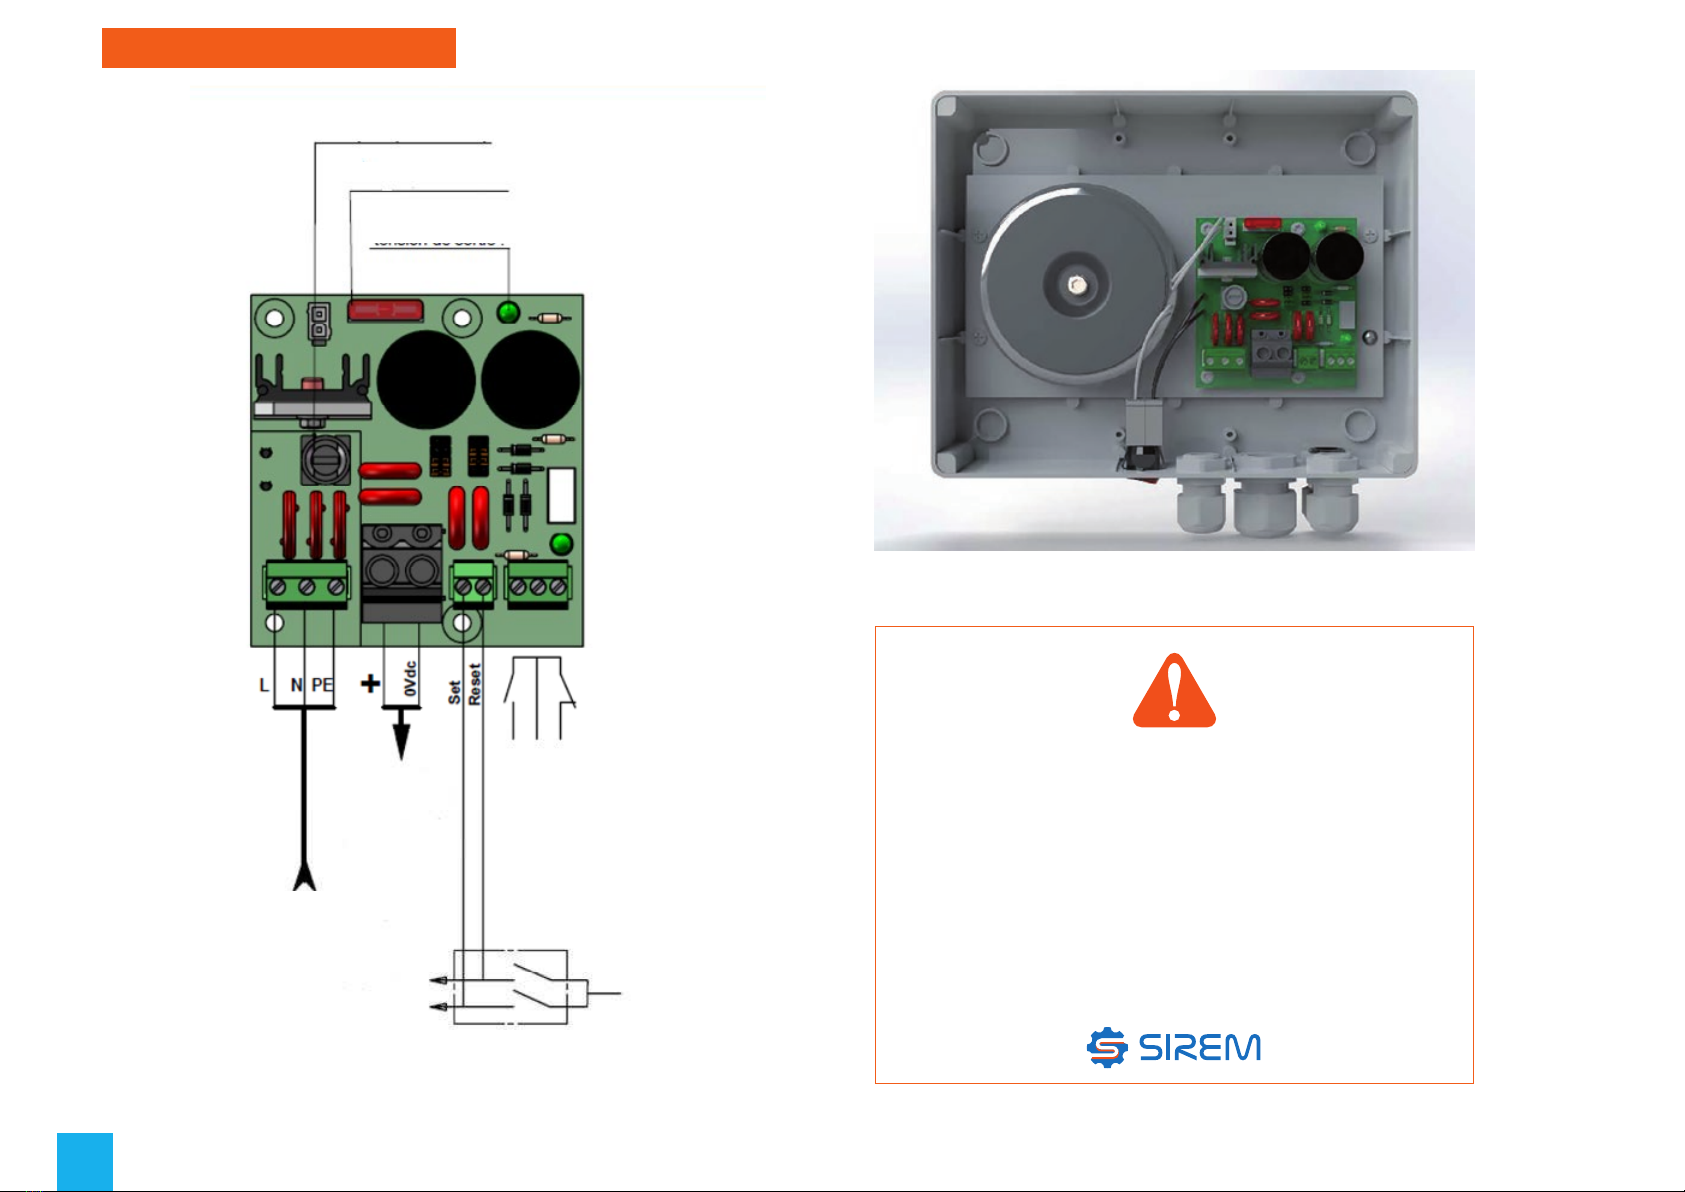
Installation of the power reel system6

Motor shaft pin
Stands
Power cable and
stroke end
Alumimium axle + bearing
Bearing shaft pin
Aluminium axle with tubular motor
support hood
Assembly of the axle with the stands7

Key switch
(O) : Opening (blue)(F) : Closing (white)(C) : Common (black)Differential )
30mA
(not enclosed
SIREM COVEO motor above ground
Electrical box for above ground motor
220V
24V Continu
Wiring electrical box with above ground motor for Junior Silver
C
Push button (stroke end setting)
O
F
-
+
-
+
Push button (brown)
Push button (black)
Stroke end (brown)
Wago
Cable 2x6²
Reel wiring8

Electrical supply unitTechnical features:Power 230 VAC - 50/60 HzElectrical box 24VOn/Off buttonPresence of voltage output by LEDOvercharge fuse protectionFunction temperatureStorage temperatureRelative air humidity until 95%9
- Power supply- Dry contact for electrolizercontrol- Overcharge protectionHull:IP55Shock resistance IK06Easy connectionMounting brackets includedCompliant with electrical normsElectrical security EN60335Compliant with CEM norms:- Immunity according CN55014,EN61000-4-6, EN61000-4-2,EN61000- 4-8, EN61000-4-11, tightenedthresholds for EN61000-4-4 and4-5 to 4kV-Emissions according EN 55014-1and EN 61000-6-3PLUGS CONFIGURATION

Electronic card detailsOvervoltage protection will only be fully efficient if the grounding connection has a resistance <20ohm. If the grounding from the main building is far from the installation site, this can not be the case. It is then essential to install a proper differential to the pool which is compliant with Standard NF C15-100.The electro box must be installed by a qualified technician.The electro box must also be connected to switch differential 30mA compliant with NF EN/IEC 60947-3.Above ground electrical box10 Primary fuseCartridge 230VSecondary fuse type ATO 10ALed presence output voltageDry contact to drive the electrolyser. represented contact state is "set" state.The state is stored when the electrical box is not connected.These contacts should not directly drive a pump. switching off capacityPower supplyAbove ground motorisationAbove ground motorisation control-0 Vdc or+ 24 VdvRemote control interface box0 Vdc for COVEO and MH2+ 24 Vdc for C80230 vac 10% - 50/60 Hz

2
1
3
Above ground electrical box
Slats cover
JUNIOR SILVER
Rep:
Ref.Article Description
quantity
1
MASFDC
Motorized Junior Silver
1
2
TABLILAME
PVC slats cover
1
3
CHS
Above ground electrical box
1
11

18
17
14
9
8
10
6
4
2
3
57
13
1
11
12
16
15
11
?
12
13
14
15
16
17
18
No.
ARTICLE Ref.Article
Description
Weight (Kg)
QTY
1
AAA167
aluminium anodized axle Ø167mm
4.414 Kg
1
2
AP
bearing shaft Ø30
2.769 Kg
1
3
BND157
black ring Ø157 for axle 453 Gr
2
4
GOUIN-D8-55
stainless steel pinA4 Ø8 Lg55
21 Gr
1
5
BSDIAM30
stainless steel retaining ring Ø30
81Gr
2
6
SMA
Stand
2.613 Kg
2
7
GOUAG-D4
Clip pin Ø4
13 Gr
1
8
CAP
Stands hoods
1.156 Kg
2
9
VINTBZ-M5.5X50
stainless steel screw TB Z - M5.5x50
7 Gr
6
10
GOIN-M10
Ground fixing kit:
-Stainless steel stud M10x100
-Stainless steel washer-M10
-
Stainless steels nut-M10
65 Gr
8
11
VINTBZ-M5.5X32
Stainless steel screw TB Z - M5.5x32
5 Gr
8
12
VINTBZ-M5.5X19
Stainless steel screw TB Z - M5.5x19
4 Gr
4
14
COMCLE
Above ground keyswitch
52 Gr
1
15
GOUINL-D10
Stainless steel pin L Ø10
62 Gr
1
16
MHSCOV
Above ground motor SIREM COVEO
5.926 Kg
1
17
CLE-2
Key
7 Gr
2
18
PORTECLE
Key ring
0.036 Gr
1
12

1
5
7
6
17
Bouchon version
à coller
1
7
6
17
5
4
3
2
2
3
12
10
15 14
13
16
11
8
9
9
8
11
16
13
14
15
10
12
4
Bouchons réglables
en option
Fin to stick
Adjustable fins option
Note : Pictures are not contractual. For information
V01-2020 PVC slats cover 83 mm
1
2
1
2
Rep:
Ref.Article
Description
Weight
Quantity
1
LO83
PVC slats 83mm
337gr M/L
as per
pool
length
2
BOUDSOU
Righthand slats cap
13gr
3
AIL30
Fin 30mm
9gr
4
BOUGSOU
Lefthand slats cap
13gr
5
LO83
PVC slat high cut 83mm
337gr M/L
1
6
LO83
PVC slat low cut 83mm
337gr M/L
1
7
LO83
PVC slat male part cut 83mm
337gr M/L
1
8
SANG
Straps to fix the slats on the axle 47gr
9
VIQUSAN
Screw to fix the strap on the axle 15gr
10
LANAS
Fastening system Part A
8gr
11
LANAS
Fastening system Part B
24gr
12
CHENYLM6
PVC toggle M6
1gr
13
RONIN-M6
Stainless steel washer M6 1gr
14
RONCA-M6
Rubber washer- M6 1gr
15
VINHM-M6x40 Stainless steel screwA4 HM - M6x40 5gr
16
CAPECRM10
Nut cap CHC M6
1gr
17
SKIPVC
Guiding bracket to lift the end slat 15gr
Rép:
Réf Article
Description
Weigth
1
BOUDCOL
Plastic caps to stick
13 Gr
2
BUTESCBF
Removable mecanical
pin for adjustable fins 47 Gr
Rep:
Réf Article
Description Weight
1
AIL
Flange 30mm
9 Gr
2
BOUGSOU
Slats endcap
13 Gr
13
as per
pool
length

1/
Please take out a slat
strip out of the box, check
the compliance with width
of the pool
2/
Check the
recommended
distance of 20 mm
on each side
between the pool
wall and the slat
strip.
Top
≈
20 mm on each side
standard fin 30 mm
Installation of the end slat lifting
bracket for above ground cover
End slat lifting bracket:
Please slide the PVC
bracket
for a clipping in
the female part giving
the inclination of the end
slat at 45°
Sats cover installation14

1/ Please take out a slat
strip out of the box, check
the compliance with width
of the pool
Installation of the end slat lifting
bracket for above ground cover
2/
check the
recommended
distance of 20 mm
on each side
between the pool
wall and the slat
strip.
≈20 mm on each side
unlock for setting
locked end
if unmet distance
underneath
possible setting of +/- 20 mm
on each side of the slats on
the adjustabel fins
End slat lifting bracket:
Please slide the PVC
bracket
for a clipping in
the female part giving
the inclination of the end
slat at 45°
15

Page 11 sur 16 –Version 01/2013
ASSEMBLAGE DE LA COUVERTURE
Reproduire un mouvement d’oscillation jusqu’à l’encliquetage total des lames.
Répartir de manière égale le jeu latéral de la couverture sur le bassin.
Toute découpe de bouchon supprime sa garantie d’étanchéité et de rigidité.
LIAISON DE LA COUVERTURE A L’AXE
1
2
3
AVAILABLE COLORS:
WhiteSandBlueLight GreyDark Grey
O
F
Adjustable patented capsFixed finsStrengthened slat Independant alveolus>Cover assembly must be done when the pool is filled with water>Make up and down movements until the slats are locked together>You have to spread the lateral play on the pool cover>A cutting slat would automatically void the tightness and stifness warranty.Cover assembly16 Compliant with NF P 90-308possible setting of +/- 20 mm on each side of the slatsJunction between the cover and the axle

Coping stone
Stainless stell screw
A4 M8x40
bracket to support the quick
festening system (optional)
Brass peg M8
Stainless steel screw
TF Z A4 M6x12
Washer
Nut M6
Cap
Concrete toggle M6
Sealing washer
Washer
Stainless steel screw M6x40
Cap
OU
40mm
100mm
0.5m
maxi
0.5m
maxi
2m
maxi
2m
maxi
2m
maxi
0.5m
maxi
2m
maxi
0.5m
maxi
Without stairs
0.5m
maxi
2m
maxi
2m
maxi
0.5m
maxi
0.5m
maxi
2m
maxi
2m
maxi
0.5m
maxi
0.5m
maxi
2m
maxi
2m
maxi
0.5m
maxi
0.5m
maxi
2m
maxi
2m
maxi
0.5m
maxi
0.5m
maxi
2m
maxi
2m
maxi
0.5m
maxi
0.5m
maxi
2m
maxi
2m
maxi
0.5m
maxi
Roman stairs
Trapeze stairs
Rectangular stairs
Installation of the quick fastening system17

Important advices- Please make sure that the slats do not rub onto the skimmer straps- We do not recommend you nor the use of the salt elektroliser, neither another electro physical device, due to the oxydation risks for submerged metals.- We highly advise you to install an independant ground connection.- The polycarbonate slats must stay in contact with the water surface to avoid a definitive deformation.- The first strip equipped with quick fastening system must be fitted to the axis (fixing screw on the axis) spread equally the lateral play from the cover- Never cut the endcaps, otherwise the rigidity and tightness would not be guaranteed anymore.- When the cover is not in use for an extended period of time, the electrical breaker panel must be turned off. - Fastening system are fitted with stainless hex head cap screws, as well as sealing gaskets in order to lock the straps, please click both parts together.Walter remains at user's disposal for any further advice or information.Cover installationWhen installing this cover, the presence of 2 people is required, and one of them should be entitled to install it in compliance with Norm NF C15-100Cover components>toolbox, hammer drill, grinder, an electric screwdriver, an electrical measurement device. >We advise you to wear handgloves for the manipulation of sharp components, as well as protection goggles and safety shoes.Pool useOnly one adult is allowed to operate the cover. When opening and closing the pool, he must ensure that no bather is left in the pool , and remove all floating objects such (buoys, inflatable mattresses, boats or balloons) from the pool.While closing the pool, the access must be locked with the fastening system.For safety reasons, when closing/opening the pool, please remove the key from the keybox.Before opening the pool, do not forget to unlock the fastening system.to prevent the automatic cover from being stuck, the switch should not be left in intermediate position.Before use, the water level must be checked. it should not be too high, as this would prevent the cover from working properly.Please never empty your pool without your installater. If you own polycarbonates slats, these should always be immersed to avoid a final distortion. By sunny weather and especially when the sun shines on the slats (when the pool cover is closed) and if water temperature is higher than 30° It is also required to leave the cover rolled all night, to prevent slats damages.18

Maintenance tipsThe pool user is responsible for keeping his cover in good conditions.He must clean his cover twice a year with a high pressure water cleaner and use a food descaling product and no solvent or abrasive product.In order to keep a right water balance, without risks for the cover, following regulations are recommended :PH betwen 7.2 and 7.6Chlor between 0.7 and 1.5Brom between 1.5 and 2.5Overdosage of products, prolonged or repeated, may irremediably damage the PVC slats.Lack of treatment can lead to algae development and promote the process of decomposition and show dark spots on the PVC slats. For exended periods of pool closure it is highly recommended to check that the electrolyser is up and running.As this type of device works continuously, the build up of chlorin can damage the PVC slats. Considering this, it is essential to open the pool cover in order to ventilate the pool.While opening the cover, please always keep an eye open as the pool is not protected anymore and represents a danger.In case of chlorin overdosage, please open the cover and plug the filtration system. And always monitor the pool access. Depending on the geographical location and the weather conditions, your cover will survive the winter if you follow these procedures: >Clean your cover with a high pressure cleaner.>Put specific products in the water>Install a safety net above the cover if vegetation is nearby in order to avoid decay on the PVC slats (as the warranty does not cover failures or malfunctions caused by accumulation of leaves and debris)>Disconnect the power supply from the electro box.>Please vaccum and filtrate one hour a day throughout skimmers and install a antifreeze thermostat which aims at trigggering the filtration as soon as the temperature is lower than 0 °. ServicingIn case of failure or repair stopping the pool closure and safety.>Please take all necessary measures (the pool is not safe anymore) in order to forbid the access to the pool, especially to children.>You must check the straps once a year>You must control regularly the filtration system, so that it vacuums normally, and not air, as PVC slats can be damaged.>Please check that the slats are in good conditions, and that nothing is rolled inside the cover which can cause slats deformation.>Please make sure the spare parts are identical to the original ones and compliant with the technical specifications.19
Wintering

NB : For a maximum technical safety cover, the gap between the inner pool and the cover edge must be maximum 70 mm. Please contact a qualified technician in order to get such a result.in order to to get the correct cover adjustement to the pool, it is essential to supply to the manufacturer a pool plan with the width and length measured every meter WarrantyThe warranty is granted when normal installation, use and wintering are in line with our conditions. WALTER Pscine warrants all defective parts replacement during the warranty period as of the service enter date.Automatic cover installation and repair must be performed by a qualified technician.Warranty period>4 years for the electrical equipment SIREM (motor, electrobox)>3 years for the PVC slats regarding the buyoancy, tightness, disintegration, and articulation. Mechanism is also warranty, except for the corrosion.>6 Months for the solar batteries 12V (solar rolling cover)This warranty does not cover>Polycarbonate slats deformation due to lack of contact with the water surface.>Acts of God such as hail, storm, lightning.>if the product has been modified other than as authorised by Walter without our prior consent.>Workmanship costs for the assembly and disassembly.>Costs for damages as well as financial penalties.Information before purchaseSafety cover for pool aimed at preventing the access to children under 5 years old.Cover model : Junior SilverDimensions cover : width minimum 2.20 mWater level : minimum 100 mm / maximum 120 mmWintering water level : minimum 100 mmUsage period : all seasons, except for cover stuck in iceBeware of hail (please check with your insurance)Estimated handling time : Opening : 3 minutes / closure : 3 minutesNumber of people for handling : 1 personBox unloading : 4 peopleBroduction sheet included : by the wholesaler, installer, or customer20
Table of contents
Other Walter Lighting Equipment manuals
Popular Lighting Equipment manuals by other brands

LumX
LumX LM 32245 instruction manual

V-TAC
V-TAC VT-5167 Installation instruction

IOTAVX
IOTAVX ILB-CP-HE-SD instruction manual

Equinox Systems
Equinox Systems CARINA user manual

Clas Ohlson
Clas Ohlson SP-G125WTDW03-02B instruction manual

Commercial Electric
Commercial Electric MAGIC-L21-12 Use and care guide