23
Technische Änderungen vorbehalten | Technische wijzigingen voorbehouden | We reserve the right to make technical changes | Sous réserve de modications techniques Technische Änderungen vorbehalten | Technische wijzigingen voorbehouden | We reserve the right to make technical changes | Sous réserve de modications techniques
3
4
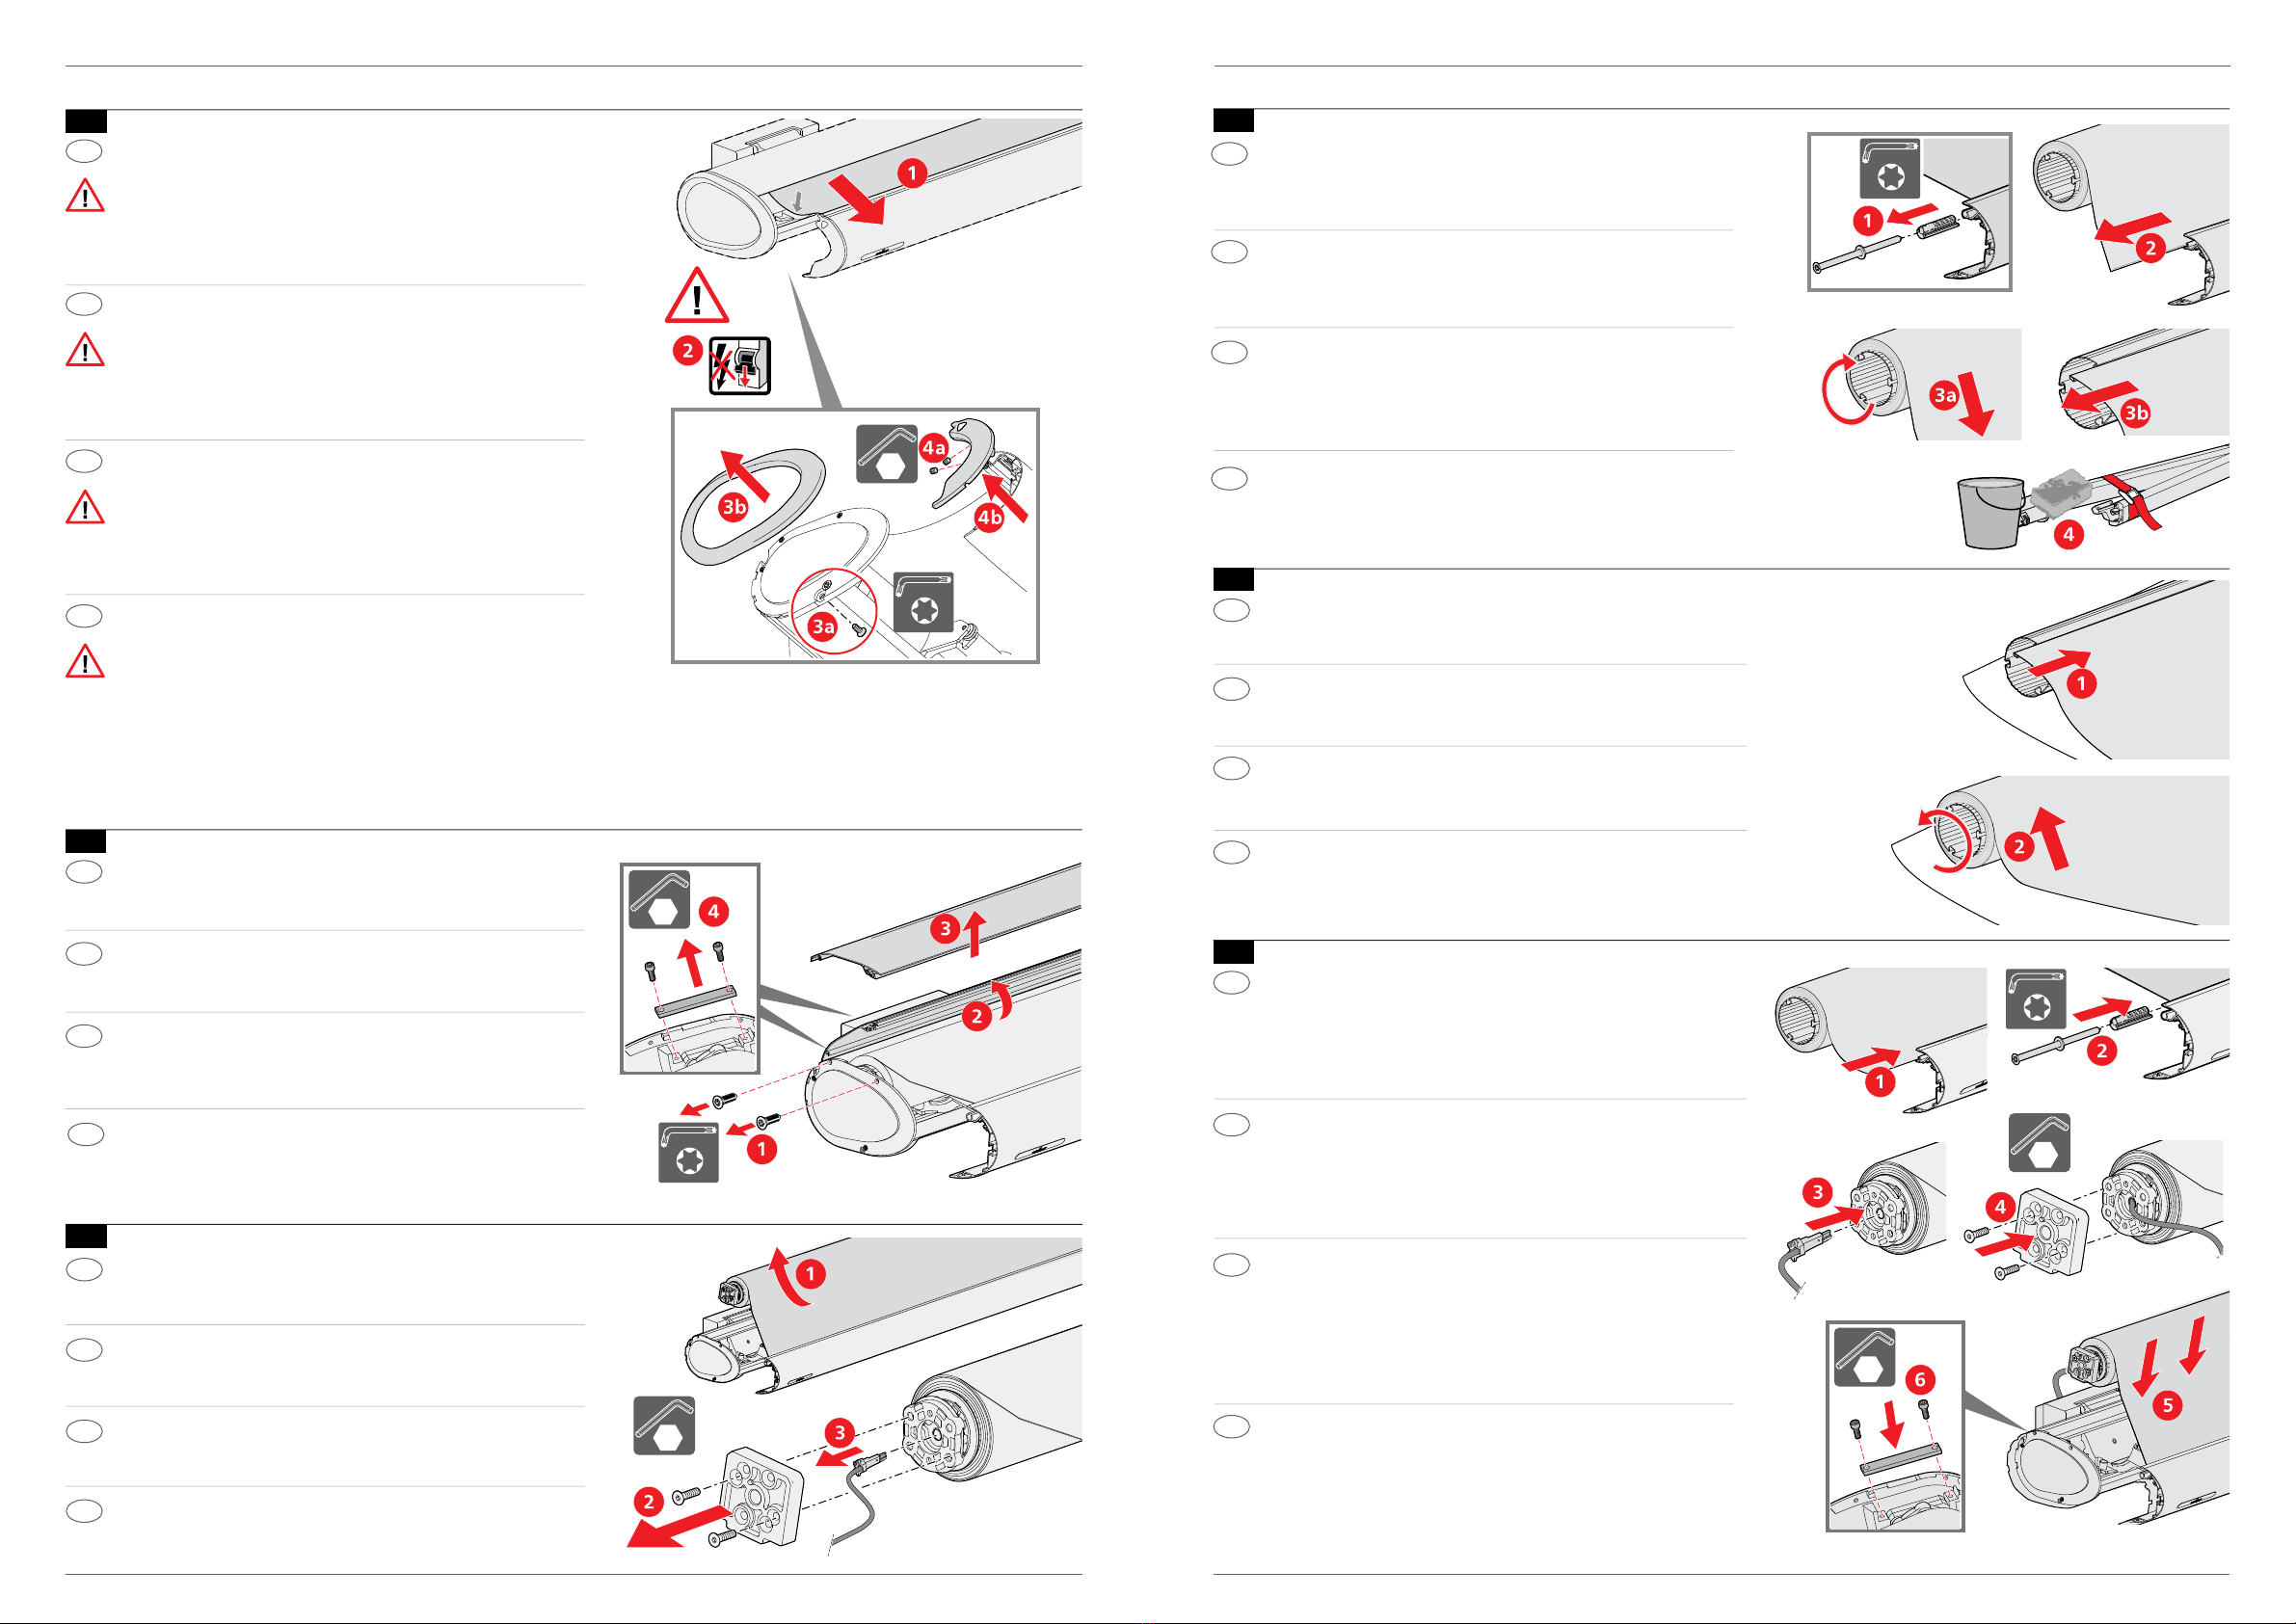
• Markise weiter ausfahren, bis Tuch spannungslos
• Elektrische Stromzufuhr unterbrechen
Vorsicht! Personenschäden durch unkontrollierte Bewegung der Marki-
se! Trennen Sie die Stromzufuhr, um Quetschgefahren durch unkontrol-
lierte Bewegungen der Anlage abzuwenden!
• Kopfplatten-Ringe demontieren
• Ausfallprofil-Endkappen demontieren
• Zonnescherm verder uitschuiven, tot het doek spanningloos is
• Elektrische voedingsspanning onderbreken
Voorzichtig! Persoonlijk letsel door ongecontroleerde beweging van het
zonnescherm! Maak de voedingsspanning los, om beknellingsgevaar
door ongecontroleerde bewegingen van de aanleg te voorkomen!
• Kopplaatring demonteren
• Eindkappen uitvalprofiel demonteren
• Open the awning until the fabric is free from tension
• Disconnect the power supply
Caution! Personal injury due to uncontrolled movement of the awning!
Disconnect the power supply to prevent crushing hazards due to uncon-
trolled movement of the construction!
• Dismount the headplate rings
• Dismount the end caps of the projection profile
• Continuer de déployer le store jusqu‘à ce que la toile ne soit plus tendue
• Couper l‘alimentation électrique
Prudence! Risque de blessures corporelles en cas de mouvement incon-
trôlé du store! Couper l‘alimentation électrique an d‘éviter des risques
d‘écrasement en cas de mouvements incontrôlés de l‘installation!
• Démonter les anneaux de la tôle de recouvrement
• Démonter les embouts des profilés de défection
• Tuchspannschrauben in Kedergasse lösen/entfernen
• Tuch mit Tuchwelle seitlich von Ausfallprofil abziehen
• Tuch von Tuchwelle abwickeln und abziehen
• Gelenkarme reinigen
• Doekspanschroeven in piping losmaken/verwijderen
• Doek met doekas aan de zijkant van het uitvalprofiel aftrekken
• Doek van de doekas afwikkelen en verwijderen
• Knikarm reinigen
• Loosen/remove the fabric tensioning screws in the beading channel
• Remove the fabric together with the fabric roller bearing sideways from the
projection profile
• Unwind the fabric from the fabric roller bearing and remove
• Clean the folding arms
• Desserrer/ retirer les vis servant à tendre la toile dans la rainure
• Retirer la toile du profilé de défection en la tirant latéralement avec son axe
d‘enroulement
• Dérouler la toile de l‘axe d‘enroulement et la retirer
• Nettoyer les bras articulés
D
NL
GB
F
D
NL
GB
F
6
7
• Neues Tuch auf Tuchwelle aufziehen (saubere Unterlage oder
das alte Tuch zum Schutz gegen Verschmutzung verwenden)
• Tuch aufwickeln und mittig zum Kasten ausrichten
• Nieuw doek op de doekas trekken (goede onderlaag of het
oude doek ter bescherming tegen vervuiling gebruiken)
• Doek opwikkelen en op het midden van de kast uitrichten
• Wind the new fabric onto the fabric roller bearing (use a
clean base or use the old fabric as a protection against dirt)
• Wind the fabric and align concentrically to the housing
• Fixer une nouvelle toile sur l‘axe d‘enroulement (utiliser un support
propre ou se servir de l‘ancienne toile comme protection contre les salissures)
• Enrouler la toile et l‘ajuster bien au centre par rapport au boîtier
D
NL
GB
F
D
NL
GB
F
8
• Tuch mit Tuchwelle seitlich auf Ausfallprofil aufziehen
• Tuchdübel in Ausfallprofil einsetzen (nicht fixieren)
• Steckbares Motorkabel einsetzen
• Motorlager/Getriebe montieren
• Tuchwelle einsetzen
• Adaptersicherung montieren
• Doek met doekas aan de zijkant op het uitvalprofiel trekken
• Doekplug in uitvalprofiel plaatsen (niet fixeren)
• Opsteekbare motorkabel inzetten
• Motorlager/aandrijving monteren
• Doekas plaatsen
• Adapterborging monteren
• Wind the fabric together with the fabric roller bearing
sideways onto the projection profile
• Insert the fabric dowel into the projection profile (do not fix)
• Insert the insertable motor cable
• Mount the motor bearing/gear drive
• Insert the fabric roller bearing
• Mount the adapter locking device
• Placer la toile sur le profilé de défection en la tirant
latéralement avec son axe d‘enroulement
• Insérer une cheville de toile dans le profilé de défection (sans la fixer)
• Insérer un câble moteur enfichable
• Monter le palier moteur/ engrenage
• insérer l‘axe d‘enroulement
• Monter le dispositif de sécurisation des adaptateurs
D
NL
GB
F
• Verschraubung Dach lösen (4 Blechschrauben)
• Dach herausheben
• Adaptersicherungen an Kopfplatten lösen (2 x M6)
• Schroefkoppeling dak losmaken (4 plaatschroeven)
• Dak uittillen
• Adapterborgingen op kopplaten losmaken (2 x M6)
• Loosen the roof bolting (4 self-tapping screws)
• Lift off the roof
• Release the adapter locking device on the
headplate (2 x M6)
• Desserrer la fixation par vis du toit (4vis à tôle)
• Sortir le toit en le soulevant
• Défaire les dispositifs de sécurité des adaptateurs des tôles de recouv-
rement (2 x M6)
5
• Tuchwelle auf der Antriebsseite anheben.
• Motorlager entfernen
• Steckbares Motorkabel aus dem Motorkopf ziehen
• Doekas aan de aandrijfzijde optillen.
• Motorlager verwijderen
• Opsteekbare motorkabel uit de motorkop trekken
• Lift the fabric roller bearing on the drive side.
• Remove the motor bearing
• Draw the insertable motor cable from the motor head
• Soulever l‘axe d‘enroulement côté entraînement.
• Retirer le palier moteur
• Débrancher le câble moteur enfichable de la tête du moteur
D
NL
GB
F
Semina Life | 120051-0000w | v1.1 | 2019-12-20 | Austauschanleitung | Vervangingshandleiding | Replacement instructions | Notice de remplacement Semina Life | 120051-0000w | v1.1 | 2019-12-20 | Austauschanleitung | Vervangingshandleiding | Replacement instructions | Notice de remplacement


