manuals.online logo
Brands
  1. Home
  2. •
  3. Brands
  4. •
  5. Westin
  6. •
  7. Automobile Accessories
  8. •
  9. Westin Sportsman 40-0125 User manual

Westin Sportsman 40-0125 User manual

STEP 1.
STEP 2.
Remove the contents from box and check for damage. Verify all parts are present. Read instructions completely
before beginning.
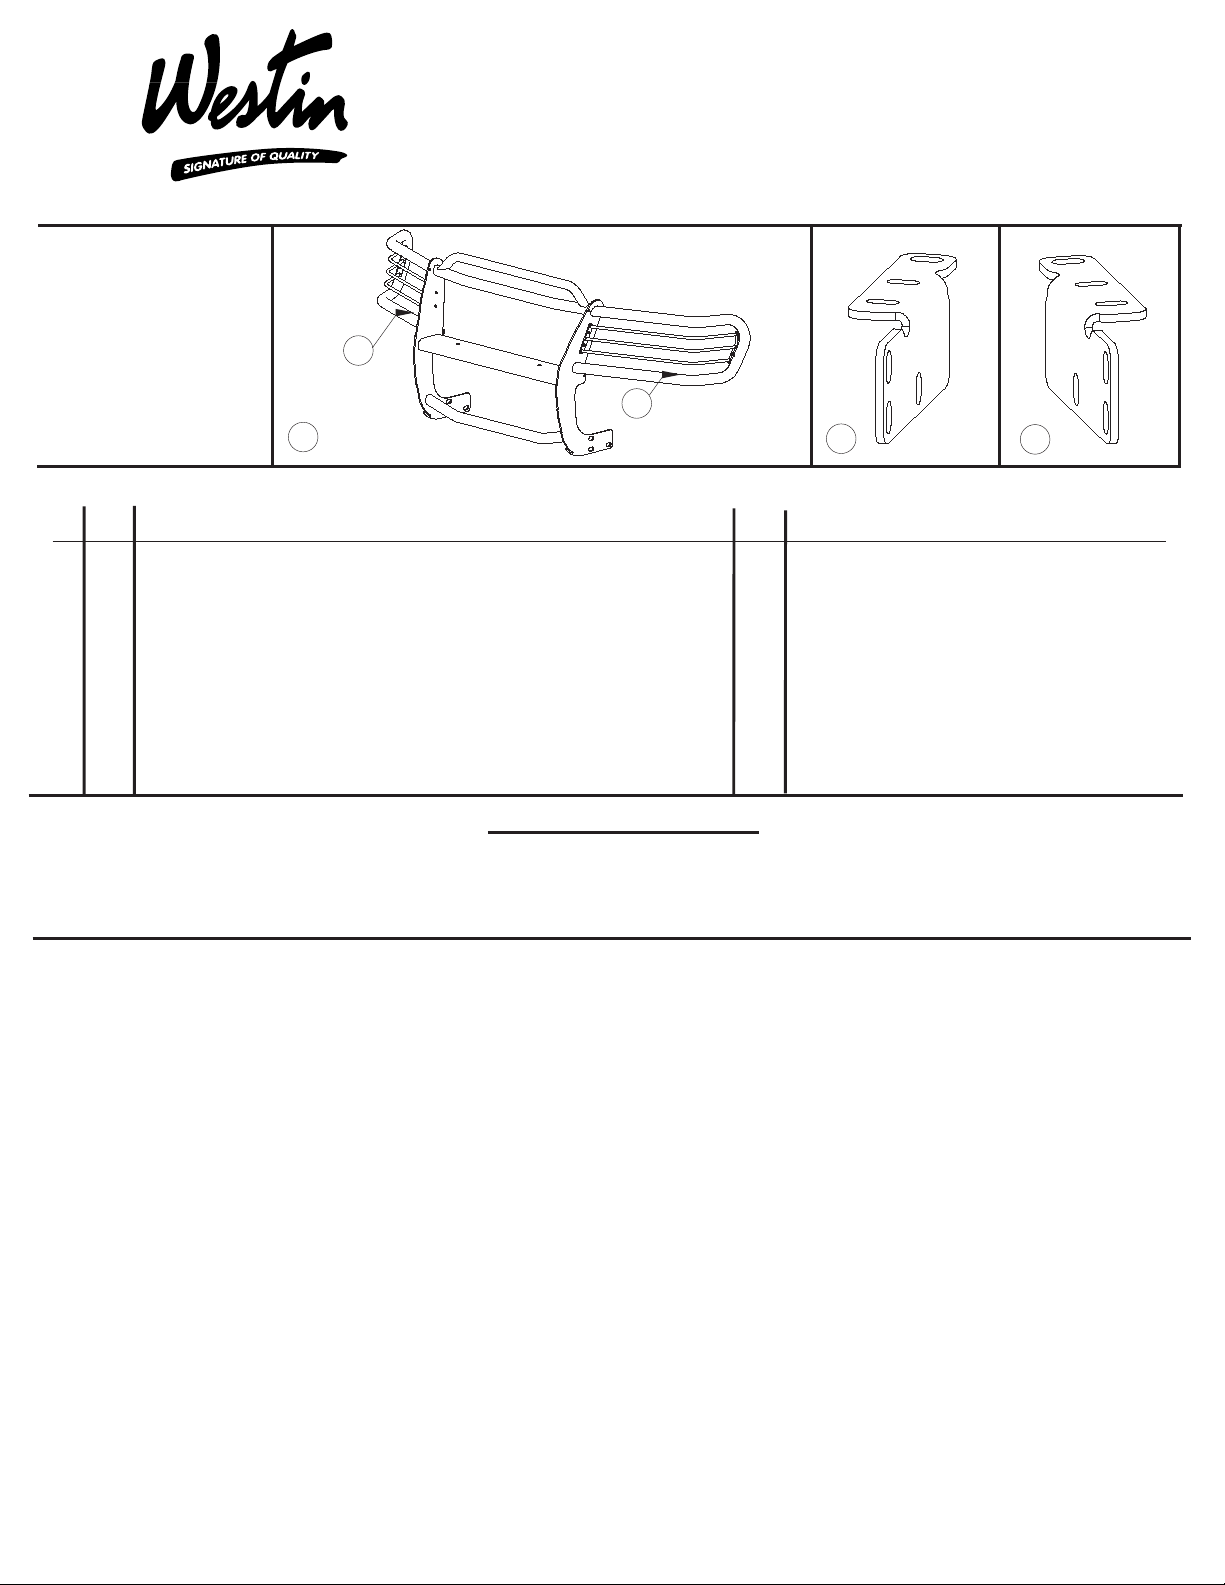
Attach light guard assemblies as shown.
Center and level Sportsman on vehicle and tighten all fasteners. Recommended torque values are 43 Ft. Lbs. for 1/2”
stainless fasteners.
SEE FIGURE 1.
STEP 3.
STEP 4.
STEP 5.
STEP 6.
STEP 7.
STEP 8.
STEP 9.
STEP10.
To install mount brackets, removal of bumper/grille is necessary. Remove seven Phillips screws from grille, (four above
grille, and three on lower front of grille) (Figure 2A). Remove (2) 10mm bolts from bumper, located at front/inside of
fender, using nut driver (Figure 2B). Cut out (6) plastic rivets from inside of front fender, three on each side (replace-
ments provided). From beneath vehicle, remove three pin retainers from bottom/center of bumper with flat screw-
driver and disconnect fog lamp connector, (if equipped)(Figure 2C). Pull bumper/grille straight out from vehicle.
Install mount brackets to frame using 1/2" and 3/8" hardware as shown in Figure 2. Finger tighten so brackets move
freely. Repeat for opposite side.
Measure distance from inside to inside of Sportsman uprights near slots. Center mount brackets on vehicle so that this
distance is the outside to outside measurement of the mounting brackets.
Make sure brackets are properly aligned and tighten fasteners. Recommended torque values are 64 Ft.Lbs. for 1/2”
fasteners and 26 ft. lbs. for 3/8" fasteners.
Replace bumper/grille in opposite order of removal. (Step 3). Use the replacement, plastic “push-type” retainers
provided.
Place cardboard under front side of vehicle. Lay Sportsman on cardboard with front side down. Slide Sportsman
back so that the rearmost slots align with the rearmost slots on the brackets. Attach Sportsman to brackets at rearmost
slots using 1/2” stainless steel black zinc fasteners provided.
Carefully rotate Sportsman up toward vehicle until remaining slots are aligned. Insert remaining 1/2" fasteners. Do not
tighten at this time.
INSTALLATION INSTRUCTIONS
APPLICATION: 1999-04 JEEP GRAND CHEROKEE/LAREDO 2/4
WHEEL DRIVE
1999-03 JEEP GRAND CHEROKEE LIMITED
SPORTSMAN
ASSEMBLY
40-0125
AUTOMOTIVE PRODUCTS, INC.
PARTS KIT CONTENTS
ITEM QTY DESCRIPTION ITEM QTY DESCRIPTION
TOOLS REQUIRED
3/4” SOCKET 3/4” WRENCH 9/16” SOCKET 9/16” WRENCH 7/16” WRENCH
5/32” HEX WRENCH 19MM SOCKET 10MM NUT DRIVER RATCHET TAPE MEASURE
TORQUE WRENCH UTILITY KNIFE PHILLIPS SCREWDRIVERFLAT TIP SCREWDRIVER
SPORTSMAN ASSEMBLY
LIGHT GUARD ASSEMBLY
MOUNT BRACKET, PASSENGER (4) AND DRIVER (5)
1/2-13 X 1.25” HEX HEAD BOLT, BLACK ZINC
1/2” FLAT WASHER, BLACK ZINC
1/2” LOCK WASHER, BLACK ZINC
1/2-13 HEX NUT, BLACK ZINC
1/2-13 X 1.25” HEX HEAD BOLT
, PASSENGER (2) AND DRIVER (3)
1/2” SAE SMALL O.D. FLAT WASHER
1/2” USS LARGE O.D. FLAT WASHER
1/2” WILLIAMS WASHER (THICKEST WASHER)
1/2” LOCK WASHER
1/2-13 HEX NUT
3/8-16 X 1.25” HEX HEAD BOLT
3/8” FLAT WASHER
3/8” LOCK WASHER
3/8-16 HEX NUT
PLASTIC PUSH PIN
2
2
2
2
4
8
4
4
8
12
13
14
15
16
17
18
19
20
1
2,3
4,5
6
7
8
9
10
11
1
2
2
6
12
6
6
2
2
1
2
45
3
75-0226 Revision D 3/14/07
WO:
14
11
7
79
17
18
12
10
6
8
16
13
5
17
15
19
Finish protection - Westin products have a high quality finish that must be cared for like any
other exposed finish on the vehicle. Protect the finish with a non-abrasive automotive wax (pure
carnauba, for example) on a regular basis. The use of cleaner wax or any compound which
contains an abrasive is detrimental, as the compounds scratch the finish and open it to
corrosion.
Westin Automotive Products, Inc.
5200 N. Irwindale Ave. Suite 220
Irwindale, Ca. 91706
Thank You for choosing Westin products
For aditional installation assistance please call
Customer service (800) 793-7846 or (507) 375-3559
10mm BOLT
PLASTIC PUSH PIN FOG LAMP
CONNECTOR
PLASTIC RIVET
PHILLIPS SCREW
BUMPER/GRILLE ASSY
FORWARDFORWARD
SPORTSMAN ASSY
FIGURE 3
DRIVER SIDE SHOWN
FIGURE 3
DRIVER SIDE SHOWN
FIGURE 2AFIGURE 2A
FIGURE 2BFIGURE 2B
FIGURE 2CFIGURE 2C
2
2
4
4
5
1
2
13
13
1
2
5
ITEM QTY. DESCRIPTION
1 8 1/4-20 X 1.00” BUTTON HEAD BOLT
2 8 1/4” FLAT WASHER
3 4 1/4” INTERNAL TOOTH LOCK WASHER
4 4 1/4-20 NYLON NUT
5 8 RUBBER WASHER
NOTE: ALL FASTENERS MAY NOT BE USED.
FIGURE 1

This manual suits for next models

2

Other Westin Automobile Accessories manuals

Westin SPORTSMAN 40-1665 User manual

Westin

Westin SPORTSMAN 40-1665 User manual

Westin SG6 User manual

Westin

Westin SG6 User manual

Westin E Series User manual

Westin

Westin E Series User manual

Westin 46-23995 User manual

Westin

Westin 46-23995 User manual

Westin 27-1855 User manual

Westin

Westin 27-1855 User manual

Westin 33-2060 User manual

Westin

Westin 33-2060 User manual

Westin 22-1775 User manual

Westin

Westin 22-1775 User manual

Westin 25-3490 User manual

Westin

Westin 25-3490 User manual

Westin 22-1395 User manual

Westin

Westin 22-1395 User manual

Westin 22-1815 User manual

Westin

Westin 22-1815 User manual

Westin SPORTSMAN 43-0140 User manual

Westin

Westin SPORTSMAN 43-0140 User manual

Westin 40-2405 User manual

Westin

Westin 40-2405 User manual

Westin 46-22235 User manual

Westin

Westin 46-22235 User manual

Westin 27-1585 User manual

Westin

Westin 27-1585 User manual

Westin PROMOD FRONT BUMPER User manual

Westin

Westin PROMOD FRONT BUMPER User manual

Westin 40-2055 User manual

Westin

Westin 40-2055 User manual

Westin 29-24085 User manual

Westin

Westin 29-24085 User manual

Westin 57-6025 User manual

Westin

Westin 57-6025 User manual

Westin 25-2550 User manual

Westin

Westin 25-2550 User manual

Westin 25-2130 User manual

Westin

Westin 25-2130 User manual

Westin 28-0160 User manual

Westin

Westin 28-0160 User manual

Westin 58-41025 User manual

Westin

Westin 58-41025 User manual

Westin 23-3130 User manual

Westin

Westin 23-3130 User manual

Westin 21-2310 User manual

Westin

Westin 21-2310 User manual

Popular Automobile Accessories manuals by other brands

Magneti Marelli AC161 Installation instruction

Magneti Marelli

Magneti Marelli AC161 Installation instruction

FDI uEZ GUI Start here

FDI

FDI uEZ GUI Start here

JCROffroad JT Install instructions

JCROffroad

JCROffroad JT Install instructions

Rostra VOXXElectronics 250-1930 owner's guide

Rostra

Rostra VOXXElectronics 250-1930 owner's guide

TOP VEHICLE TECH GR3FORD5 installation manual

TOP VEHICLE TECH

TOP VEHICLE TECH GR3FORD5 installation manual

Safe Fleet PRIME DESIGN AR-2000-BLK manual

Safe Fleet

Safe Fleet PRIME DESIGN AR-2000-BLK manual

Skoda Fabia Combi 5J Fitting instructions

Skoda

Skoda Fabia Combi 5J Fitting instructions

Camcar 40077 Al Mounting instructions

Camcar

Camcar 40077 Al Mounting instructions

Camcar 40089 AL Mounting instructions

Camcar

Camcar 40089 AL Mounting instructions

Impac Tradesman 2000 installation manual

Impac

Impac Tradesman 2000 installation manual

DVB OFFROAD BRSB-01 installation manual

DVB

DVB OFFROAD BRSB-01 installation manual

Safari Snorkel SS385HF installation guide

Safari Snorkel

Safari Snorkel SS385HF installation guide

ULTIMATE SPEED 279746 Assembly and Safety Advice

ULTIMATE SPEED

ULTIMATE SPEED 279746 Assembly and Safety Advice

SSV Works DF-F65 manual

SSV Works

SSV Works DF-F65 manual

ULTIMATE SPEED CARBON Assembly and Safety Advice

ULTIMATE SPEED

ULTIMATE SPEED CARBON Assembly and Safety Advice

Witter F174 Fitting instructions

Witter

Witter F174 Fitting instructions

WeatherTech No-Drill installation instructions

WeatherTech

WeatherTech No-Drill installation instructions

TAUBENREUTHER 1-336050 Installation instruction

TAUBENREUTHER

TAUBENREUTHER 1-336050 Installation instruction

manuals.online logo
manuals.online logoBrands
  • About & Mission
  • Contact us
  • Privacy Policy
  • Terms and Conditions

Copyright 2025 Manuals.Online. All Rights Reserved.